1
VIDOS-NVR
User Guide
Copyright
This user guide is the intellectual property of VCS and is protected by copyright.
All rights reserved. No part of this document may be reproduced or transmitted
for any purpose, by whatever means, electronic or mechanical, without the
express written permission of VCS.
Release: April 2004 (Software Version 3.0)
© Copyright 2004 VCS Video Communication Systems AG
Note
This user guide has been compiled with great care and the information it contains
has been thoroughly verified. The text was complete and correct at the time of
printing. Due to further product development, the contents of the manual may
change without prior notice. VCS accepts no liability for damages resulting
directly or indirectly from errors, omissions or discrepancies between the user
guide and the product described.
Trademarks
All hardware and software product names used in this document are likely to be
registered trade marks and must be treated accordingly.
Contents
0
Chapter 1 Contents
Chapter 1 Introduction
About this user guide . . . . . . . . . . . . . . . . . . . . . . . . . . . . . . . . . . .
Conventions . . . . . . . . . . . . . . . . . . . . . . . . . . . . . . . . . . . . . . . . . .
VIDOS-NVR . . . . . . . . . . . . . . . . . . . . . . . . . . . . . . . . . . . . . . . . . .
Overview of functions . . . . . . . . . . . . . . . . . . . . . . . . . . . . . . . . . .
Supported components . . . . . . . . . . . . . . . . . . . . . . . . . . . . . . . . .
System requirements . . . . . . . . . . . . . . . . . . . . . . . . . . . . . . . . . . .
5
5
6
7
7
8
Chapter 2 Installing VIDOS-NVR
Installation . . . . . . . . . . . . . . . . . . . . . . . . . . . . . . . . . . . . . . . . . . . 9
Conversion to the Temporarily Unlimited License Version . . . . . 10
Upgrades . . . . . . . . . . . . . . . . . . . . . . . . . . . . . . . . . . . . . . . . . . . 11
Updates . . . . . . . . . . . . . . . . . . . . . . . . . . . . . . . . . . . . . . . . . . . . 12
De-installation . . . . . . . . . . . . . . . . . . . . . . . . . . . . . . . . . . . . . . . 12
Chapter 3 Starting and Stopping VIDOS-NVR
Automatic start . . . . . . . . . . . . . . . . . . . . . . . . . . . . . . . . . . . . . . . 13
Stopping the program . . . . . . . . . . . . . . . . . . . . . . . . . . . . . . . . . 13
Starting the program manually. . . . . . . . . . . . . . . . . . . . . . . . . . . 13
Chapter 4 Operation using a Web Browser
Basics . . . . . . . . . . . . . . . . . . . . . . . . . . . . . . . . . . . . . . . . . . . . .
Establishing the connection . . . . . . . . . . . . . . . . . . . . . . . . . . . . .
Navigation . . . . . . . . . . . . . . . . . . . . . . . . . . . . . . . . . . . . . . . . . .
Password protection and license information . . . . . . . . . . . . . . .
Recording task administration . . . . . . . . . . . . . . . . . . . . . . . . . . .
Recording task configuration . . . . . . . . . . . . . . . . . . . . . . . . . . . .
Scheduling the recording . . . . . . . . . . . . . . . . . . . . . . . . . . . . . . .
Status query. . . . . . . . . . . . . . . . . . . . . . . . . . . . . . . . . . . . . . . . .
Selecting a recording for replay . . . . . . . . . . . . . . . . . . . . . . . . . .
Controlling replay . . . . . . . . . . . . . . . . . . . . . . . . . . . . . . . . . . . . .
Storing segments and single images . . . . . . . . . . . . . . . . . . . . . .
VIDOS-NVR
15
15
16
17
19
20
24
25
27
30
32
3
Chapter 5 Appendix
Troubleshooting. . . . . . . . . . . . . . . . . . . . . . . . . . . . . . . . . . . . . .
Error messages . . . . . . . . . . . . . . . . . . . . . . . . . . . . . . . . . . . . . .
Technical support . . . . . . . . . . . . . . . . . . . . . . . . . . . . . . . . . . . .
Internet . . . . . . . . . . . . . . . . . . . . . . . . . . . . . . . . . . . . . . . . . . . .
4
35
36
37
37
VIDOS-NVR
Introduction
1
About this user guide
This user guide is intended for persons responsible for the installation and
operation of the VIDOS-NVR. It describes the installation of the software and how
to operate the VIDOS-NVR using a Web browser.
Conventions
Symbols and notation
The following symbols and notation are used to draw attention to specific
situations.
Warning!
This symbol indicates safety instructions that must be followed to avoid loss
of data.
Note
This symbol indicates special features as well as tips and instructions for
working with the software.
VIDOS-NVR
5
Chapter 1
VIDOS-NVR
The VIDOS-NVR is a software for digitally recording and replaying video
sequences. NVR stands for Network Video Recorder, because the VIDOS-NVR
enables any standard PC (commercial server) with sufficient storage capacity to
function as a digital network recorder. External storage or RAID systems are also
supported.
The VIDOS-NVR offers completely new technology for network-based storage of
digital video data. In addition, integrated ANR technology (Automatic Network
Replenishment) ensures complete restoration of digital data in the event of
network failure.
The VIDOS-NVR records video, audio and metadata. It is also possible to access
each camera connected to the system independently of the computer or the
camera location.
A VIDOS-NVR application is very flexible and scalable. Any device with a direct
interface to the network can be integrated. This makes it possible to register
further video sources whenever required, and integration of additional memory is
a simple matter.
The ANR technology integrated in the VIDOS-NVR protects the system against
data loss due to network failure. Network failure is registered immediately. After
restoration of the network connection, gaps in the recording are filled in
automatically. In this process, the ANR technology inserts the missing parts from
the local hard drive recording of each device seamlessly into the gap in the
network recording.
The VIDOS-NVR is generally operated using VIDOS all-purpose video
management software from VCS, but independent direct access using a Web
browser is also supported.
6
VIDOS-NVR
Chapter 1
Overview of functions
The main functions of the VIDOS-NVR are:
] Device-independent digital recording of video, audio and metadata
] Faster, more convenient search function to access desired video sequences
] Availability of the recorded video images on the entire network worldwide
] Simple integration of an unrestricted number of cameras and storage media
] Immediate integration in VIDOS
] Direct access from any location via a Web browser
] User-friendly graphical operating interface
] Gap-free storage, even when the network fails, due to ANR technology
Supported components
The VIDOS-NVR supports data recordings from all VCS hardware products.
VIDOS from VCS is supported for replay purposes.
VIDOS-NVR
7
Chapter 1
System requirements
Installation requirements
Your system must meet the following requirements in order to install the VIDOSNVR:
] Computer with a Pentium III Xeon or Pentium IV CPU, 1.8 GHz or faster
and 256+ MB RAM
] Windows 2000 or XP operating system and network access via a
100/1000 MBit network interface card
] VGA graphics card
] Storage media: IDE or better;
SCSI-II, SCSI Ultra or Fiber Channel are optional
] At least 20 MB free memory for installation
Requirements for Web browser operation
The system must meet the following requirements for operation of the VIDOSNVR using a Web browser:
] Graphic card ATI Radeon 8500, 9500, 9800,
or Matrox Parhelia,
or NVIDIA GeForce 3 or 4,
or an equally good model
] Installation of DirectX 9.0 software
] Installation of the most recent version of MPEG ActiveX from VCS
] Microsoft Internet Explorer 6.0 or later version
] A sound card is recommended
8
VIDOS-NVR
Installing VIDOS-NVR
2
Installation
The installation program for the VIDOS-NVR can be found on the CD-ROM. The
program will usually start automatically after the CD is placed in the drive.
If the CD does not start automatically, open Windows Explorer and start file
vidos-nvr_setup.exe on the CD manually by double-clicking.
Note
Before inserting the CD, close all applications and open programs.
Warning!
For security reasons, the VIDOS-NVR should not be installed on the same
computer as VIDOS. When selecting the target directory for storing
recordings, ensure there is sufficient storage space. As soon as the
available storage space is full, older recordings will be automatically
overwritten with new ones.
– Place the CD-ROM in the drive. The installation program will start.
– Follow the instructions in the installation program.
– If you want to use a separate drive for storing recordings, such as an external
RAID system, make sure you specify the path to the target directory properly
during installation. Otherwise, the suggested default directory can simply be
confirmed by clicking OK.
– After installation is complete, remove the CD from the drive and restart the
computer.
The VIDOS-NVR is installed as a temporary demo version but provides the
complete range of functions from the start.
Warning!
Replace the demo version with a temporarily unlimited license version in
due time in order to use the VIDOS-NVR without interruptions (see
following section).
VIDOS-NVR
9
Chapter 2
Settings and video sequences stored during the term of the demo version are still
available after the conversion to the license version.
Conversion to the Temporarily Unlimited License Version
Activation of the VIDOS-NVR for temporarily unlimited use is done with the help
of two activations keys that you receive from your software distributor.
Warning!
The VIDOS-NVR license is bound to your computer. Therefore it is
essential that the demo version is installed on the same computer the
license version is to be running on.
– Start the browser and enter the IP address of the computer on which the
VIDOS-NVR is installed (e.g. http://10.0.29.250). The NVR-Replay page is
opened.
– Click the link NVR-Config in the navigation bar. Under License settings the
remaining evaluation period of the demo version is shown in License type.
– Note down the Installation-Code.
– Give the code to your software distributor and confirm what number of
channels you want your VIDOS-NVR license version to support.
10
VIDOS-NVR
Chapter 2
You will receive two activation keys from your software distributor that are
generated based on the installation code and activate the VIDOS-NVR license
version for the respective computer.
– Open the NVR-Config page in the Web browser.
– Enter the first key as Activation Code (typing or with copy&paste).
– Click Set to save the activation key. The message Activation Code
successfully entered! is displayed.
– If the message Activation Code is incorrect! is displayed enter the key again
and click Set.
– Repeat the procedure to save the second activation key. In the License type
field the entry changes to Full-Version. The VIDOS-NVR license version is
now active.
Note
Access to the NVR-Config page is still possible when the evaluation
period of the demo version has expired.
Upgrades
You can increase the number of licensed channels for your VIDOS-NVR at any
time.
– Order the desired upgrade from your software distributor giving him the
Installation-Code of your VIDOS-NVR (see above).
You will receive an activation key from your software distributor that is generated
based on the installation code.
– Open the NVR-Config page in the Web browser.
– Enter the key as Activation Code (typing or with copy&paste).
– Click Set to save the activation key. In the Licensed inputs field the new
number of licensed inputs will be displayed. The VIDOS-NVR is now
upgraded.
VIDOS-NVR
11
Chapter 2
Updates
Note
Before installing a VIDOS-NVR update, recorded data should be backed
up.
Before beginning the update, make a back-up of directory ...\vidos-nvr-data
including all data and subdirectories.
– Install the new version.
De-installation
If you no longer wish to use the VIDOS-NVR on a computer, the program can be
removed at any time.
– Terminate any active recordings using the VIDOS-NVR and close the Web
browser and VIDOS if it is running.
– Open the Windows installation console
(Start – Settings – Control Panel – Add/Remove Programs).
– Select VIDOS-NVR from the list, then click the Change/Remove button.
Follow the instructions on the screen.
12
VIDOS-NVR
Starting and Stopping VIDOS-NVR
3
Automatic start
After installation, the VIDOS-NVR will start automatically. You can check whether
it started successfully.
– Open the Windows services management console
(Start – Settings – Control Panel – Administrative Tools – Services).
– Look for VIDOS-NVR in the list of services.
– Check in the Status column to see whether the service started.
Stopping the program
You can stop the VIDOS-NVR at any time.
– Open the Windows services management console
(Start – Settings – Control Panel – Administrative Tools – Services).
– Select VIDOS-NVR.
– Right-click with mouse and select Stop from the context menu. The VIDOSNVR will be terminated.
Starting the program manually
– Open the Windows services management console
(Start – Settings – Control Panel – Administrative Tools – Services).
– Select VIDOS-NVR.
– Right-click with the mouse and select Start from the context menu. The
VIDOS-NVR will start.
VIDOS-NVR
13
14
VIDOS-NVR
Chapter 4
Operation using a Web Browser
4
Basics
The VIDOS-NVR is designed to be operated with VIDOS all-purpose video
management software from VCS. VIDOS provides access to the complete range
of functions in the VIDOS-NVR. However, limited operation is also possible using
a Web browser. You can create and configure recording tasks and view stored
recordings.
The VIDOS-NVR can be accessed from any location worldwide. All that is
needed is a computer with VIDOS or a Web browser installed and network
access.
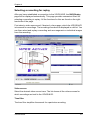
Establishing the connection
To access the VIDOS-NVR using a Web browser, all you need is the IP address
of the computer on which the VIDOS-NVR is installed.
– Start the Web browser.
– For the address, enter the IP address of the computer on which the VIDOSNVR is installed (for example http://10.0.29.250). The replay page will open.
VIDOS-NVR
15
Chapter 4
Password protection in the VIDOS-NVR
If the VIDOS-NVR is password-protected against unauthorized access, a dialog
box requesting the password will appear first.
– Enter the user name and associated password in the corresponding text fields.
– Click OK. If the password is correct, the VIDOS-NVR replay page will open.
Navigation
Configuration and operation of the VIDOS-NVR takes place in four HTML pages.
Use the links in the upper part of the window to access these pages.
– Click on one of the links to navigate to the corresponding page.
16
VIDOS-NVR
Chapter 4
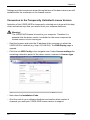
Password protection and license information
On the NVR-Config page you can assign passwords and get information on the
license status.
Protect the VIDOS-NVR with a password in order to prevent unauthorized
access.
The VIDOS-NVR uses two authorization levels:
] Service
Access to all VIDOS-NVR functions
] User
Access to the status page and for replaying stored recordings
Note
Always assign both authorization levels. If only the subordinate authorization level is assigned, then higher-level functions can also be used with
this authorization level. If only the User authorization level is used, the User
password enables access to all functions.
– Select the desired authorization level in the Login user name: list field in the
Password settings section.
– Enter the desired password in the Password: field.
VIDOS-NVR
17
Chapter 4
– Enter the new password again in the Password confirm: field to rule out the
risk of typing errors.
– Then click Set to save the changes.
Note
If no password has been assigned to the selected authorization level, then
the message No password set! is displayed.
In the section License settings information on the license status is displayed.
Here the license version can be changed inserting activation keys (see page 10).
License type
This field shows whether a demo version or a full version is used. In case of a
demo version the remaining evaluation period is displayed.
Licensed inputs
In this field the number of licensed channels is displayed.
Currently used inputs
In this field the number of active channels is displayed.
Installation-Code
In this field the installation code is displayed, which is necessary for generating
the activation keys.
Activation Code
Here you insert the activation keys for changing the license status, e.g. to switch
from the demo to the full version.
Note
Here the conversion to the temporarily unlimited license version is activated
(see page 10). Replace the demo version in due time in order to use the
VIDOS-NVR without interruptions.
18
VIDOS-NVR
Chapter 4
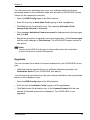
Recording task administration
The VIDOS-NVR offers extensive options for planning and managing recording
tasks. The NVR-Setup page provides an overview of all programmed recording
tasks. You can create new recording tasks here and existing tasks can be edited
or deleted.
– Click New. The Add Recording window will open, and a new task can be
created.
or
– Select an existing task and click Edit. The Edit Recording Setup window will
open, and the selected task can be edited.
or
– Select an existing task and click Remove to delete the task.
Note
A new recording task becomes active immediately. If the current time falls
within the scheduled active time range, the VIDOS-NVR will start recording
immediately.
VIDOS-NVR
19
Chapter 4
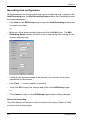
Recording task configuration
All key parameters for the recording task can be configured resp. changed in the
Add Recording resp. the Edit Recording Setup window. Both windows provide
the same parameters.
– Click New on the NVR-Setup page to open the Add Recording window and
to create a new task.
or
– Mark one of the listed recording tasks and click the Edit button. The Edit
Recording Setup window will open and you can change the settings for the
chosen recording task.
– Configure the desired settings in the window. An overview of the setup
parameters is listed below.
– Click Time…, in order to define a schedule.
– Then click OK to apply the settings and return to the NVR-Setup page.
or
– Click Cancel to return to the NVR-Setup page without making changes.
Source for recording
This field displays all the active video sources in the system. Select a video
source for the recording here.
20
VIDOS-NVR
Chapter 4
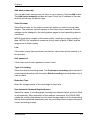
Add device manually
You can add video sources not yet active in your system. Click the Add button.
The Add device manually window will open. Enter the IP address in the new
window and choose the device type.
Video Encoder
Select the encoder for the video source from which you wish to record video
images. The selection options depend on the video source selected. Encoder
settings can be changed in the configuration pages for the transmitting device
concerned.
MPEG-2 produces images of first-class quality, resulting in a large quantity of
data. MPEG-4 by comparison produces a very small quantity of data, and the
images are of lesser quality.
Line
If the video source has more than one channel, select here which channel is to
be recorded.
Unit password
If the video source has a password, enter it here.
Type of recording
Select the desired recording mode. The Continuous recording option stands for
uninterrupted recording, with the option Event recording recording starts only in
case of alarm.
Retention Time
Enter the storage period of the recordings in days here.
Use Automatic Network Replenishment
Select this option, if recording gaps resulting from network failure are to be filled
in automatically. After restoration of the network connection, the VIDOS-NVR
copies the missing sequences from the local storage medium of the transmitting
device and inserts them seamlessly into the recording without compromising the
current recording process.
VIDOS-NVR
21
Chapter 4
Note
Until now, Automatic Network Replenishment has only been supported by
VCS devices. This option is only possible if the selected video source has
a local storage medium and local recording is enabled.
Warning!
Automatic Network Replenishment can only function properly if the system
time of the video source is synchronized with that of the computer on which
the VIDOS-NVR is installed. To accomplish this, the computer with the
VIDOS-NVR must be set up as the time server for the video source. Use
the IP address of the VIDOS-NVR as the time server IP address.
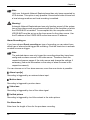
Alarm Recording on
If you have chosen Event recording as type of recording you can select here,
which type of alarm should trigger the recording. Click the check box to activate
an alarm source as trigger.
Note
The selected alarms can only trigger the recording when they have been
configured as alarm sources in the video server. Therefore check the
respective browser pages of the video server and change the settings if
necessary (find more information on the setup of alarm sources in the
respective manual).
You can choose out of four alarm sources, more than one choice is possible:
] Alarm input[s]
Recording is triggered by an external alarm input.
] Motion alarm
Recording is triggered by motion alarm.
] Video loss
Recording is triggered by loss of the video signal.
] Unified picture
Recording is triggered by too little contrast in the video picture.
Pre-Alarm time
Enter here the length of time for the pre-alarm recording.
22
VIDOS-NVR
Chapter 4
Post-Alarm time
Enter here the length of time for the alarm recording.
Recording scheduler
Here you can define a schedule for each recording task by clicking the button
Time... (see following section).
VIDOS-NVR
23
Chapter 4
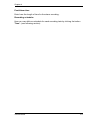
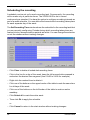
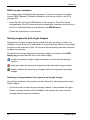
Scheduling the recording
A schedule can be set up for each recording task. Consequently, the recording
will be made only at particular times. The VIDOS-NVR is set to record
continuously as standard. You have the option to configure recording intervals as
part of a week schedule. You can define the times at which recording takes place
for each separate day of the week.
The Set Recording Time window shows the schedule for the recording task that
you are currently configuring. Periods during which recording takes place are
marked in blue, whereas inactive periods are white. You can change the selection
or exit the window without making changes.
– Click Clear to delete all scheduled recording times.
– Click in the line for a day of the week, keep the left mouse button pressed in
and select the desired time segment (from 18:00 to 24:00 for example).
– Right-click the marked time to delete it.
– Click one of the buttons on the upper border of the table to mark the same time
for all days of the week.
– Click one of the buttons on the left border of the table to mark an entire
weekday.
– Click Select all to mark the entire week.
– Then click Ok to apply the schedule.
or
– Click Cancel to return to the start window without making changes.
24
VIDOS-NVR
Chapter 4
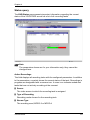
Status query
The NVR-Status page presents important information regarding the current
status of the VIDOS-NVR as well as a list of all recording tasks.
Note
The parameters shown are for your information only; they cannot be
changed here.
Active Recordings
This field displays all recording tasks with the configured parameters. In addition
to the parameters, a symbol shows the current status of the task. Recordings in
progress are designated with a camera icon. A cross icon indicates scheduled
tasks that are not actively recording at the moment.
] Source
The video source to which the recording task is assigned
] Type of Recording
Recording mode chosen for the recording task
] Stream Type
The encoding used, MPEG-2 or MPEG-4
VIDOS-NVR
25
Chapter 4
] Data Rate
The data transfer rate of the current recording
] ANR-Technology
On is displayed if Automatic Network Replenishment is enabled, if not Off will
appear.
System Load
The system load on the computer with the VIDOS-NVR installed should not
exceed 80 to 90%. At higher system loads, we recommend using a second
VIDOS-NVR.
Average Retention Time
The average recording capacity of the entire storage space in days, hours and
minutes based on the bandwidth used by the active recordings
Remaining HDD Capacity
The free hard drive capacity is shown in gigabytes and as a progress bar. The
green portion of the progress bar represents the available storage; the red portion
represents the hard disk storage already used.
Warning!
When the free storage space amounts to less than 256 MB, older
recordings will be overwritten with new ones without prior warning.
Total HDD Size
The size of the hard drive
Current Data Rate
The data transfer rate shown here is a composite of the data transfer rates of the
individual recording tasks. It directly influences the remaining recording time.
Active MPEG-2 Recordings
The number of active MPEG-2 recordings
Active MPEG-4 Recordings
The number of active MPEG-4 recordings
26
VIDOS-NVR
Chapter 4
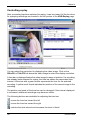
Selecting a recording for replay
After you have established a connection to the VIDOS-NVR, the NVR-Replay
page will be displayed automatically. This page provides convenient filters for
selecting a recording to replay. All the functions for this are found on the righthand side of the page.
First select a video source and, if desired, a time range, which the VIDOS-NVR
is to search for recordings. The recordings found will be displayed in a hit list. You
can then select and replay a recording and save segments or individual images
from this recording.
Video source
Select the desired video source here. The list shows all the video sources for
which recordings are held in the VIDOS-NVR.
Time filter
The time filter simplifies the search for a particular recording.
VIDOS-NVR
27
Chapter 4
] None
No time filter will be used in the search.
] Today
The search will be restricted to recordings that were made on the same day.
] Yesterday
The search will be restricted to recordings that were made the day before.
] Last seven days
The search will be restricted to recordings made during the previous seven
days.
] Last 30 days
The search will be restricted to recordings made during the last 30 days.
] User defined
This option allows you to define a time range for the recording search.
From date
When using a user defined time filter, the starting date can be set here. The date
format entered must always be DD.MM.YYYY.
From time
When using a user defined time filter, the starting time can be set here. The time
must be entered in 24 hour format (for example "18:45" for 6:45 PM).
To date
When using a user defined time filter, the end date can be set here. The date
format entered must always be DD.MM.YYYY.
To time
When using a user defined time filter, the end time can be set here. The time must
be entered in 24 hour format (for example "18:45" for 6:45 PM).
Search
This button starts the search.
28
VIDOS-NVR
Chapter 4
Note
A video source must always be selected first; otherwise, a corresponding
error message will be displayed.
– Select a video source and use a time filter (if desired) in order to restrict and
accelerate the search.
– Click Search to start the search. A hit list of all the recordings found will be
displayed below the filter area.
If no recording meeting the specified criteria is found, a corresponding
message will be displayed. Change the specified criteria and start the search
again.
– Click on a recording to select it. The replay will begin immediately in the left
portion of the window.
Note
If no video image is displayed during replay, it may be necessary to install
a current MPEG decoder (see page 32).
VIDOS-NVR
29
Chapter 4
Controlling replay
After a recording has been selected for replay, it can be viewed. All the functions
for replaying recordings are located in the left portion of the NVR-Replay page.
You can select the resolution for displaying the video image. Click on the
528x432 or 704x576 link above the video image to select the display resolution.
A time bar is displayed below the video image for easy orientation. If a recording
has already been selected for replay, the time bar shows the associated time
interval. A blue bar with a green border represents the time for the selected
recording. A yellow scroll thumb indicates the position of the current image in the
recording.
The position and scale of the time bar can be changed. If the interval displayed
is increased, additional recordings may become visible.
The following buttons are available for adjusting the time bar:
moves the time bar toward the left
moves the time bar toward the right
reduces the time interval and increases the level of detail
30
VIDOS-NVR
Chapter 4
increases the time interval and reduces the level of detail
Buttons for controlling the replay are displayed below the time bar. The buttons
have the following functions:
jump to the beginning of the recording,
jump to the previous recording in the list
fast rewind
stop
play
pause
fast forward
jump to the end of the recording,
jump to the subsequent recording
Note
When fast forward or fast rewind are used, the VIDOS-NVR jumps from one
I-frame (“intra-frame”) to the next. This can result in a somewhat jerky
display. The size of the jumps depends on the GOP ("group of pictures")
structure and the GOP length of the video source (find more information in
the manual of the respective video server).
The replay rate is controlled using the scroll bar to the left of the buttons for replay
control. 100% means normal speed. Lower values reduce the replay rate and
higher values increase it.
– Change the time bar as desired.
– Select the yellow scroll thumb using the mouse and, keeping the mouse button
pressed in, drag it to the time position where the replay is to start.
– Use the buttons and links described to control the replay of a selected
recording.
Note
When the VIDOS-NVR is operated via VIDOS, even more options for replay
control are available.
VIDOS-NVR
31
Chapter 4
MPEG decoder installation
If no video image is displayed during replay, it may be necessary to install a
current MPEG decoder. Suitable software for this can be found on the VCS
program CD.
– Insert the CD into the CD-ROM drive of the computer. The CD will start
automatically. If the CD does not start automatically, open the root directory of
the CD in Windows Explorer and double-click MPEGAx.exe.
– Follow the instructions on the screen.
Storing segments and single images
Segments and single images can be stored from any recording, in order, for
example, to pass them on to third parties or to process them further. Any storage
location can be selected for this. Of course entire recordings can also be saved
for back-up purposes.
The buttons for saving segments and single images are found on the NVRReplay page below the time bar for the video image.
creates a snapshot (single image) and saves it to the selected storage
location
starts and stops the saving of segments to the selected storage location
opens a window for selecting a storage location for segments and single
images
Selecting a storage location for segments and single images
Any storage medium in the system can be selected for saving sequences and
single images.
– Click the button for selecting the storage location. A new window will open.
– Select a storage location and click Save. The window will close, and the
storage location has been selected.
32
VIDOS-NVR
Chapter 4
Saving segments from recordings
Segments from recordings can be saved during replay. The segments are saved
in MPEG format.
Note
The MPEG viewer from VCS is needed to replay the saved segments. The
current version of the MPEG viewer can be downloaded via the Get MPEGviewer software? link on the NVR-Replay page and installed if necessary
(see page 34).
– Select a recording and start replay.
– Click the button for saving segments. The button will flash slowly, and the
current sequence being played will be saved.
– Click once again on the button for saving segments to stop saving.
Saving single images from recordings
Single images can be created from recordings during replay. The snapshots are
created and stored immediately in JPEG format. Subsequently they will be shown
in a separate field on the lower right of the NVR-Replay page. The field displays
all the single images that were saved during access to the VIDOS-NVR.
– Select a recording and start replay.
– Click the button for saving single images. A snapshot will be created from the
recording currently being played, and it will be stored immediately in the
selected location. Subsequently the snapshot image will be shown on the
NVR-Replay page.
– If you wish to create and save additional snapshots, click the button for saving
single images again. The new snapshot will be displayed next to those saved
previously.
VIDOS-NVR
33
MPEG-viewer installation
The MPEG viewer serves for the viewing of saved segments without using
VIDOS or a VIDOS-NVR. If e.g. dedicated segments are passed on to third
parties as evidence these can be displayed on any PC with the help of the MPEG
viewer. The current version of the VCS MPEG viewer can be downloaded via the
link Get MPEG-viewer software? on the NVR-Replay page.
– Click the link Get MPEG-viewer software? and save the file
MPEGViewer.exe to your hard drive.
– You can start the MPEG viewer by double-clicking the file
MPEGViewer.exe.
34
VIDOS-NVR
5
Appendix
Troubleshooting
If a problem cannot be resolved, please contact your software distributor or VCS
Customer Service ([email protected]).
The following table is intended to help identify causes of malfunctions and, where
possible, to suggest solutions.
Problem
Possible Causes
Solution
Connection
unsuccessful
Installation or configuration
of the VIDOS-NVR is faulty
Check the configuration and re-run
the installation if necessary
Wrong IP address
Check the IP address
Faulty data transmission
within the LAN
Check data transmission with the
ping command.
No recording tasks
can be programmed
No video source is available Check the system for available
on the system
video sources (use VIDOS from
VCS). If necessary, turn on the
video sources and check the
connection.
No recording
available for replay
Filter definition
Redefine the filter
No video image
when replaying
recordings
The most current version of
MPEG ActiveX from VCS is
not installed
Install the software from the CDROM
DirectX 9.0 is not installed
Install the software from the CDROM
VIDOS-NVR
35
Chapter 5
Error messages
The following error messages are displayed in certain situations when accessing
the VIDOS-NVR via the Web browser.
Note
In many cases it is enough to refresh the page in the browser, and the error
message will no longer be displayed. Use the F5 key to refresh the page.
Error Message
Meaning
Solution
Select a video source in the Video
No video source was
Input required.
Please select a video selected when searching for source: field.
recordings.
source first.
Input Error! Incorrect An incorrect date format was Enter the date using the format
used when setting the time DD.MM.YYYY.
Date format was
filter for the recording
entered.
search.
Error! Could not
export the files.
The video sequence could
not be backed up.
Check whether a video sequence is
selected and whether replay has
been started. The corresponding
button must flash slowly during
backup.
Delete Error! Could
not delete the
selected files.
The recording task could not The VIDOS-NVR may be busy with
be deleted.
other tasks, delaying display of the
deletion. Try again later if
necessary.
Not successfully
registered on NVR
Server.
Registration on the NVR
server is not possible.
Check the status of the VIDOS-NVR
in the Windows services console
and start the VIDOS-NVR if
necessary.
The connection between
Replay Error!
ActiveX and the VIDOSConnection to this
replay session failed. NVR was not established
correctly.
Check the status of the VIDOS-NVR
in the Windows services console
and start the VIDOS-NVR if
necessary.
The connection between
ActiveX and the VIDOSNVR was not established
correctly.
Check the status of the VIDOS-NVR
in the Windows services console
and start the VIDOS-NVR if
necessary.
SQL error! Request There was an error in the
for recordings failed. search for recorded video
sequences.
Update the page in the Web browser
and repeat the search.
SQL error! Request
for sources failed.
Update the page in the Web browser
and repeat the search.
Could not replay the
selected recording!
Connection to this
recording on NVR
server failed!
36
There was an error in the
search for recorded video
sequences.
VIDOS-NVR
Chapter 5
Technical support
In you have questions regarding the use of the VIDOS-NVR, which are not
answered in this user guide, please contact your software distributor or:
VCS Video Communication Systems AG
Forchheimer Strasse 4
90425 Nuremberg, Germany
Phone: +49 (0)911 9 34 56-0
Fax: +49 (0)911 9 34 56-66
[email protected]
Internet
Comprehensive information regarding the VIDOS-NVR and other products from
VCS is available on VCS AG's website:
http://www.vcs.com
VIDOS-NVR
37
38
VIDOS-NVR
VIDOS-NVR
39
VCS Video Communication Systems AG
Forchheimer Strasse 4
90425 Nuremberg, Germany
Phone: +49 911 93456-0
Fax: +49 911 93456-66
E-mail: [email protected]
http://www.vcs.com
ID No.: 3610/0404/0/2