1
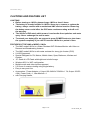
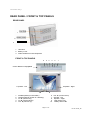
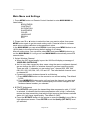
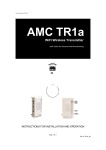
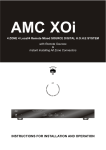
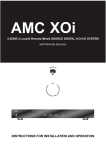
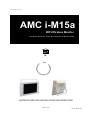
User manual-amc i-M15a_G
AMC i-M15a
WiFi Wireless Monitor
with Water Resistant, Video On Demand and Broadcasting
AMC
TM
HOME
IA
Entertainment
Center
INSTRUCTIONS FOR INSTALLATION AND OPERATION
Page 1 of 12
PN: 21-i-M15a_IM
User manual-amc i-M15a_G
Page 2 of 12
PN: 21-i-M15a_IM
User manual-amc i-M15a_G
CAUTIONS AND FEATURE LIST
CAUTIONS
z Before turning on i-M15a, please charge i-M15a at least 2 hours
z The battery is already installed in i-M15a. Never try to remove or replace the
battery, always contact with an authorized AMC service location. Removing
the battery cover could affect the IP65 water resistance rating and will void
the warranty.
z The i-M15a is IP65 rated, which means it can handle direct splashes and water
spray. Never submerge the unit in water.
z To extend your battery life, we suggest to press POWER button to shut down
the system completely if you will not use the i-M15a for a period of time.
FEATURES OF THE AMCTM MODEL i-M15a
• The AMC model i-M15a is a Water Resistant WiFi Wireless Monitor with Video on
Demand and Broadcasting features.
• The AMC model i-M15a is with water resistant for strong jet of water (IP65)
• UL1563 Approved.
• Special Designed for RV, Marine, Mobile Home, Spas, Bathroom, Kitchen and
Outdoor.
• 15” Grade A LCD Panel with bright and colorful image.
• Wireless 802.11a WiFi configuration.
• Multiple audio and video inputs supported.
• 2.5 hours of nonstop viewing using single battery.
• Easy to carry and use.
• Accessories : Power Adaptor x 1(Input 100~240VAC 50/60Hz 1.7A, Output 15VDC
4.0A), Power Cord x 1, User Manual x 1
• with Carrying Handle,
Page 3 of 12
PN: 21-i-M15a_IM
User manual-amc i-M15a_G
•
The i-M15a is easy to position. The handle is also the stand. The stand designed to
click into place at angles 0 degrees, 22.5 degrees, 45 degrees and 180 degrees.
You can change it to fit your needs.
•
Power Savings feature : When power adaptor is not plugged into i-M15a and iM15a is on standby (OFF) mode, the i-M15a will shut down automatically 5 minutes
after the power adaptor is removed.
Page 4 of 12
PN: 21-i-M15a_IM
User manual-amc i-M15a_G
REAR PANEL / FRONT & TOP PANELS
REAR PANEL
1
2
Power Receptacle
3
1. Heat Sink
2. Battery Cover
3. Water sealed DC Power Receptacle
FRONT & TOP PANELS
6
5
4
3
2
1
Control Buttons on top panel
8 Speaker - Right
7 Speaker - Left
10
1.
2.
3.
4.
5.
9
POWER (Battery Power Button)
ON/OFF (Monitor Power On / Standby)
CH ▲ (Channel Up)
CH ▼ (Channel Down)
VOL ▲ (Volume Up)
6. VOL ▼ (Volume Down)
7. Speaker - Left
8. Speaker – Right
9. Main Power LED
10. Battery Status LED
Page 5 of 12
PN: 21-i-M15a_IM
User manual-amc i-M15a_G
REAR PANEL
1. Heat Sink
The heat sink is water sealed and
inside the heat ventilation holes on
plastic rear cover. So, it will be very
effectively venting the heat out from
inside of the monitor and with
complete water sealing feature.
This is a special designed water
sealed DC Power Receptacle for
connecting 15VDC/4A power from
Monitor Power Adaptor to the i-M15a
Monitor for charging the battery of iM15a.
Please pay careful attenuation to the
plug connector. There is an
indentation on the receptacle
matching the key on the power cord
plug to ensure the alignments
between receptacle and power cord
plug are correct.
2. Battery Cover
The battery of the Monitor is water
sealed securely fixed inside the
Battery Cover.
3. Water Sealed DC Power
Receptacle
Power Cord Plug
Tighten the screw on power cord
plug until snug. Do not overtighten or
use pliers !
Water sealed DC Power Receptacle
FRONT & TOP PANELS
1. POWER Button (Battery Power
Button)
This is a Battery Power Button. It is a
toggle switch and will only work
when power adaptor is not plugged
into i-M15a.
When power adaptor is not plugged
into i-M15a, you can press the
POWER button for 5 seconds to turn
the battery power off.
Power Savings feature : When power
adaptor is not plugged into i-M15a
and i-M15a is on standby (OFF)
Page 6 of 12
PN: 21-i-M15a_IM
User manual-amc i-M15a_G
mode, the i-M15a will shut down
automatically 5 minutes after the
power adaptor is removed. This
power saving feature will save the
power of battery.
6. VOL ▼ (Volume Down)
By pressing the VOL ▼ button the
Volume from L & R Speakers of iM15a will decrease (Down).
2. ON/OFF Button (Monitor Power
On / Standby)
This is a toggle switch. It will work
when power adaptor is plugged into
i-M15a or Battery power is turned
ON when power adaptor is not
plugged into i-M15a.
When i-M15a is “Standby (OFF)”,
you can press the button to turn iM15a to ON. When i-M15a is “OFF” ,
you can press the button to turn iM15a to “Standby (OFF)”
3. CH ▲ (Channel Up)
By pressing the CH ▲ button the iM15a will send control signal through
802.11a to give command to
equipment received the control
signal with “Channel Up” command
specified.
7. Speaker - Left
Left Speaker of i-M15a.
8. Speaker – Right
Right Speaker of i-M15a.
9. Main Power LED
The LED will turn “Green” when main
power of i-M15a is “ON”.
The LED will turn “Orange” during iM15a is at “Standby”
The LED will be “Off” when battery of
the i-M15a is turned “Off”
The LED will never be “Off” when
power adaptor plugged into i-M15a.
10.
Battery Status LED
Green : Full Charged
4. CH ▼ (Channel Down)
By pressing the CH ▼ button the iM15a will send control signal through
802.11a to give command to
equipment received the control
signal with “Channel Down”
command specified.
5. VOL ▲ (Volume Up)
By pressing the VOL ▲ button the
Volume from L & R Speakers of iM15a will increase (Up).
Orange : Battery is Charging
Blinking Orange : Battery is low and
i-T15a will be turned off automatically.
No light : Once Battery Full Charged
the LED will turn off when i-M15a is
turned on or the power adaptor is
removed.
Page 7 of 12
PN: 21-i-M15a_IM
User manual-amc i-M15a_G
Main Menu and Settings
1. Press MENU button on Remote Control Handset to enter MAIN MANU as
listed below,
BRIGHTNESS
CONTRAST
SATURATION
SHARPNESS
COLOR
LANGUAGE
RECALL
EXIT
2. Please use ▼ or ▲ button to select the item you want to adjust, then press
MENU button again to get into each setting value. Press ► button to increase
each value or press ◄ button to decrease each value.
In the MAIN MANU you can select RECALL and then press MENU button to set
i-M15a back to the original factory default setting of all values.
After all setting done, you can either select EXIT and press MENU button to go
out the MAIN MANU or it will go out from MAIN MANU automatically around 20
seconds later.
3. Select Wireless Channel
a. When the WiFi signal quality is poor the i-M15a will display a message of
“WIRELESS OVERLOAD”
b. As it is very often caused by other users using the same or adjacent channel,
we can change the 802.11a wireless channel to get best receiving quality.
There are total 11 channels you can select from : channel 036, 040, 044,
048, 052, 056, 060, 064, 149, 153 and 157. The initial default channel is set
on channel 36.
c. Procedure to select wireless channel is as following,
i) Press WIRELESS button on the remote to see current setting. The default
is 036.
ii) Press WIRELESS button again until you have the channel you want and
press ENTER button. The on screen display will confirm changed to the
wireless channel number you selected.
4. BITRATE Adjustment
a. The BITRATE setting sets the transmitting data compression ratio. If “LOW”
is selected, it indicates that the data compression ratio is high. It effectively
reduce the data transmitting load which might improve the wireless overload
status, bit it will lower signal quality. The default is “MID”.
b. Press the BITRATE button on the remote to enter the Quality Low or Mid or
High adjustment screen. Press ENTER to set the Quality (BIT RATE) level
you selected.
Page 8 of 12
PN: 21-i-M15a_IM
User manual-amc i-M15a_G
5. Select language of OSD (On Screen Display)
a. Press DISPLAY button on the remote and select the language.
b. Press ENTER to set the language.
Page 9 of 12
PN: 21-i-M15a_IM
User manual-amc i-M15a_G
SPECIFICATIONS
Panel .................... 15.4”, 16:10 wide screen,
Brightness ............
520 cd/m2 (typ.)
Contrast Ratio ......
600 : 1 (typ.)
Resolution ............
1280 x 800 (Pixel)
A grande panel
Wireless ............... IEEE 802.11a 5 GHz
Embedded Battery ................
Lithium Polymer safe battery,
Over 2.5 hours continuous viewing
Video Decoder ..... MPEG2 video chip, DVD Quality
Video Scaler ........
3D video image chip
Monitor Housing ..
Flameproof plastic, water-resistant (IP-65 rating)
Audio Outputs .....
3W x 2 Stereo, 8 ohm Speakers, Freq Resp. 400~20kHz
PHYSICAL
Dimensions (W x H x D) .........................................................
480x265x65 mm
Net weight (including battery) ...............................................................
4.5 Kgs
Shipping weight (4 pieces)....................................................................
Kgs
Power consumption.....................................................................................30 W
Input Power – Max Charging power to Monitor …............
60W (15 VDC / 4A)
Input Power – Input power to Power Adaptor ...100 ~ 240VAC, 50/60Hz, 1.7A
Max Power output from Power Adaptor ...........................
60W (15 VDC / 4A)
Weltronics Corp. reserved the right to improve its products at any time.
Specifications are subject to change without notice.
Page 10 of 12
PN: 21-i-M15a_IM
User manual-amc i-M15a_G
Page 11 of 12
PN: 21-i-M15a_IM
User manual-amc i-M15a_G
WELTRONICS CORP.
LONDON/L.A.
AMC Web: http://www.amchome.com
PN: 21-i-M15a_IM
Page 12 of 12
PN: 21-i-M15a_IM