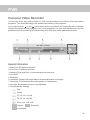
1
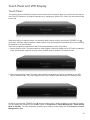
User’s Guide
Twin HD Tuner Digital Terrestrial Recorder
DHR8202U / DHR8203U / DHR8205U
V.1.0
Introduction
Thank you for purchasing a Digital Stream twin HD tuner digital recorder product. Following the
instructions in this manual will enable you to obtain optimum performance from your new product.
Equipped with the latest technology and design, the product is ideal for digital terrestrial broadcast
reception and recording. The simple installation and operation, user-friendly OSD, digital audio
output with Dolby Digital plus, and advanced video clarity made for TV and VCR are all designed
to enrich the viewer experience.
As a digital set-top box, it can receive free-to-air broadcasts. In addition to delivering more
services with its new highly sensitive tuner, the product boasts the EPG(Electronic Program
Guide) for detailed programme information on all services, and settings to enable subtitles and
teletext for an enriched user experience.
As a twin HD tuner PVR(Personal Video Recorder), you can use the PIP(Picture In Picture)
feature to watch two different programmes on one screen and you can record two different
services while watching another simultaneously. Furthermore, you can even playback a existing
recorded media while recording two different services simultaneously.
As a PVR, the product fully utilises the incorporated hard disk drive using the new preloaded
software functions. This allows various play modes/settings, diverse formats of recording, and
recording playback, all through the time shift recording function.
The preloaded software can be easily updated through USB memory. With the latest updates,
viewers are always sure to enjoy endless hours of extraordinary digital broadcasts and an
abundance of data.
If you have any difficulties concerning the operation of your PVR, please refer to the relevant
sections of this manual. This manual will provide you with useful information on using the product.
Please retain this manual for future reference.
Copyright (Copyright 2010 Digital STREAM Technology Inc.)
The manual shall not be copied, used or translated in part or what so ever without Digital STREAM
Technology’s prior consent writing of ownership of copyright and copyright law.
Important care and safety advice
The product has been manufactured to meet the international safety standards, but must be
handled with care for safely.
It is important that you read the safety instruction carefully.
1
If you have any problems about the installation, operation or safety of the product,
contact Digital STREAM Technology, as shown in the next page.
The lightening flash with arrowhead symbol, within an equilateral triangle, is
intended to alert the user to the presence of un-insulated “dangerous voltage”
within the product’s enclosure that may be of sufficient magnitude to constitute a
risk of electric shock.
The exclamation point within an equilateral triangle is intended to alert the user
to the presence of important operating and servicing instructions in the literature
accompanying the appliance.
Electrical Warning
- Main Supply: 100-250V AC 50/60Hz
- The product contains high voltage which is sufficient to cause dangerous electric shock.
- The socket-outlet shall be installed near the equipment and shall be easily accessible.
- Never remove the product’s cover.
- There are no user-serviceable parts inside the product.
- Switch off the power supply switch on the real panel before connecting or disconnecting
any equipment from the product.
- Never push objects of any kind into the ventilation holes, slots or any other openings.
Positioning the Product
- The product and the leads should be placed properly so that they are not likely to be walked on
or pinched by items placed upon or against them.
- Do not expose your product to direct sunlight, extreme temperature
(above 40℃ or below -5℃), high moisture levels, or dust.
- The apparatus shall not be exposed to dripping or splashing and that no objects filled with
liquids, such as vases, shall be placed on the product.
- The ventilation should not be impeded by covering the ventilation openings with items, such as
table-cloths, curtains, etc.
- Do not place the product on an unstable surface such as on a bed, sofa, rug or similar surface
as this may block the air ventilation and would cause it to overheat.
- Never place the product over a radiator or in an unventilated cabinet. No naked flame sources,
such as candles, should be placed upon the product.
- Do not block the ventilation holes of the product. Allow at least 10cm on all sides of the product
(including top but excluding the base) for ventilation.
2
Cleaning the Product
- Always unplug the product before cleaning.
- Wipe with lint-free cloth or any cloth that has been slightly dampened with clean water.
Never use detergents or liquid cleaners.
Unplug when not in use
When not in use for an extended period, unplug the product. Do not overload the wall outlets and
extensions adapters as this can cause a risk of fire or electric shock.
Use only authorized servicing if any of the following occurs
- Any leads or plug is damaged.
- Liquid has spilled onto, or objects have fallen into the product.
- The product has been dropped or the casing has been damaged.
- The product does not operate normally.
- The warranty will not be guaranteed if the warranty void tape is removed.
When needing service, carefully unplug the product from
the electrical outlet
- Contact the retailer/supplier who sold you the product.
- Call the helpline center on the last page of this manual.
Instruction about the ‘WEEE’ Symbol
This product should not be disposed with other household wasters at the end of its working life. Please separate this from other types of wastes and recycle it responsibly to promote the sustainable reuse of material resources. This will prevent possible harm to the environment or human health from uncontrolled waste disposal.
Domestic users: Please contact either the retailer where you purchased this product or their local
government office for details of where and how they can take this item for environmentally safe
recycling.
Business users: Contact your supplier and check the terms and conditions of the purchase
contract. This product should not be mixed with other commercial wastes for disposal.
3
RoHS(Directive 2002/95/EC) Compliant
This environment-friendly product does not contain the EU RoHS restricted substances (Pb, Hg, Cd, Cr6+, PBB
and PBDE).
Warning
Hard Disk Drive
- Do not move the product or turn the power off when the product is accessing the hard disk drive.
The company shall not be liable for any corruption of data on the hard disk drive caused by the
carelessness or the misuse of users.
- The company shall not be liable for problems caused by changing hard disk drive by user.
Notice
Manufactured under license from Dolby Laboratories.
Dolby and the double-D symbol are registered Trademarks of Laboratories.
End User License
This product contains propriety software and hardware that are licensed to the user as a single
product that cannot be separated.
It is intended as a domestic product for the purposes of receiving digital television services; any
other use is done so at the user’s risk.
In relation to the software the end user is prohibited from copying, transferring to a 3rd party,
modifying or otherwise attempting to derive the source code of any part or whole of the
propriety software in the product. This software is not sold, but licensed for use in the European
Union to the owner of the hardware. New software maybe transmitted to the box by the
manufacturer in which case the license transfers to the new software.
This product also contains Linux software which is licensed under the terms of the GNU General
Public License as published by the Free Software Foundation; version 3 or later. Copies of the
Linux source code contained within this unit can be obtained by mail order. To order a copy
please contact customer support. There may be a charge for this service.
4
Table of Contents
Getting Started
Package contents
Front Panel Overview
Rear Panel Overview
Remote Control Overview
Conditional Access
Inserting a CI Module(with Smartcard)
7
7
8
8
9
10
10
Setup
Connecting the Aerial
Connecting the TV
Using HDMI Lead
Using SCART Lead
Using RCA Lead
Connecting the TV and VCR
Using SCART Lead
Using RF Lead
Connecting the Audio System
Powering On
Touch Panel and VFD Display
Touch Panel
VFD Display
17
18
18
18
19
20
20
21
21
21
21
22
22
PVR
Personal Video Recorder
Time Shifted Recording
Instant Replay
Quick Skip
Direct Jump
Repeat Mode
Repeat A-B
Instant Recording
Recording Two Programmes
Stop Recording(s)
Pause
Slow
Fast Forward and Fast Rewind
Bookmarks
11
11
11
11
12
12
13
13
13
14
14
15
15
16
Installation Wizard
Basic Operation
Using Stand-by
Service List
Information Banner
Detailed Programme Information
Switching Service
Volume Control
Audio Language Selection
Subtitle Control
Interactive Services
Function Plus
PIP (Picture-in-Picture) Screen
23
23
24
24
24
24
25
25
25
25
26
27
27
27
28
5
Main Menu
29
Media
Information on the Media screen
JPEG Viewer
MP3 Player
31
31
33
33
Guide
Detailed information on Programme Guide
Using the record function in the Programme Guide
Searching Programmes
34
35
35
36
Schedule
Adding Manual Reservations
37
38
Preferences
AV Setup
Language
Time
Parental Control
Playback Settings
Power Management
39
39
40
40
41
42
43
Installation
Scan Services
Full Rescan
Update Scan
Manual Scan
Edit Services
Edit Service List
Edit Favourite List
Appendix
Specifications
Trouble Shooting
Warranty Certificate
6
44
44
44
45
45
46
46
47
Others
Diagnostics
System Messages
System Information
Signal Information
Disk
Peripheral Devices
Maintenance
49
49
49
50
50
51
52
54
55
55
56
57
Getting Started
Package contents
When you open the packaging, make sure you have the following :
Remote Control
Digital Stream Twin HD Tuner Digital Terrestrial Recorder
Batteries(AAA 1.5V Battery x 2)
User’s Guide
User’s Guide
SCART-lead
Quick Start Guide
Quick Start Guide
Retune Guide
Retune Guide
HDMI-lead
Note: If anything is missing from the list above, do not attempt to install this product.
Please contact the careline center on the warranty certificate at the last page of this
manual.
Warning: The company shall not be liable for problems caused by changing
hard disk driver by user.
7
Front Panel Overview
1
2
3
4
5
6
7
8
1. Standby Button: Sets the product to On or Standby.
2. Menu up/down Buttons: Works as arrow buttons, moving up and down.
Menu left/right Buttons: Works as arrow buttons, moving left and right.
OK Button: Can be used to select or to confirm menu options.
3. Menu Button: Can be used to access the menu.
4. FUNC+ Button: Allows access to various Menu items or key features easily.
The FUNC+ button can replace all of the colour buttons on the remote control.
5. Front Display: Displays Service Name, Time, Date and etc.
6. Blue LED: Indicates power status of the product.
7. USB: Used to connect USB memory device such as memory stick or HDD.
8. CI Module Slot: Used to connect CI Module.
Rear Panel Overview
1
2
3
4
5
6
7
8
1. RF IN: Used to connect your aerial.
2. RF OUT: Used to connect RF (ANT) input jack to your TV or VCR.
3. TV SCART: Used to connect to your TV SCART input.
VCR SCART: Used to connect to your VCR or DVD input.
4. Audio L/R: Used to connect audio signal to your TV or VCR.
5. SPDIF: The connector outputs digital audio signal.
6. CVBS: Used to connect composite video signal to your TV or VCR.
7. HDMI: Used to connect HDMI to your TV.
8. ETHERNET: Used for Ethernet port connection(for future use).
USB: Used to connect USB memory device such as memory stick or HDD.
9. FAN: Ventilation hole for FAN.
10. Power Switch: Power switch for your product.
8
9
10
Remote Control Overview
When you open the packaging, make sure you have the following :
Press to set the product
to On or Standby.
Source selection between
TV mode and Settop box mode
Press to toggle between TV
and Radio services.
Press to view the media menu.
Numerical number buttons
are used to directly tune
to a particular service.
Subtitle button
Mutes or unmutes the product.
Press to adjust HDMI
video output format.
Wide screen
Audio language selection
Press to enter Schedule Menu.
Press to enter or leave MHEG Text menu.
Colour buttons
for various functions.
Press to view OSD Menu.
Press to exit to the live screen.
Press to view
the service/progamme information.
Press to increase and
to decrease volume.
Press to Pause media.
Press to Play media.
Press to Rewind media.
Press to Fast Forward media.
Press to Slowly play media.
Press for Book Marking function.
Press for Repeat function.
A-B repeat
Press to view the Guide Menu.
Arrow and Ok buttons are used to
select and adjust settings.
Press to return to the previous
service or menu.
PR+ and PRPress to use Function Plus.
Press to Stop media.
Press to Record media.
Next
Previous
Press to swap PIP screen.
Press to channel up the PIP.
Press to enable/disable PIP.
Press to channel down PIP.
9
Conditional Access
The product delivers free to air TV and radio services. However, some are subscription basis so that they can
only be enjoyed via a Conditional Access component. The Conditional Access component is a CI module with a
removable Smartcard.
Inserting a CI Module(with Smartcard)
A CI Module looks like a PCMCIA for laptops. There are various kinds of CI Modules, suitable for various
encryption systems. In addition to the CI Module, Smartcards are needed to decode the programme.
1. Insert the Smartcard into the CI Module.
2. Open the flap and insert the CI Module into the slot.
3. Now you may enjoy encrypted services.
10
Setup
This chapter describes various methods on how to connect your product to the TV to gain the
optimum signal quality. The product provides various interfaces connecting to your TV, VCR, and
other devices. Select the most appropriate interface depending on your equipment.
If you have any problems during setting up your product, please contact your local product
distributor.
Connecting the Aerial
Connect your aerial to the RF IN. Use the RF lead to connect the TV and your product to watch digital or
analogue services.
RF LEAD
ANTENNA
ANTENNA
RF LEAD
Connecting the TV
There are various methods to connect your product to your TV. Follow one of the most appropriate method
described as below
Using HDMI Lead
Using the HDMI lead connection is recommended for Digital TVs. In case your TV has HDMI input interface,
connect your product to the TV using an HDMI lead.
HDMI LEAD
HDMI
11
Note:
The audio may not work properly if the receiver does not support compressed
audio through the HDMI interface. In this case change the settings in the Menu >
Preferences > AV Setup > Dolby Digital.
WARNING:
When using HDMI-DVI converter lead for your connection to a monitor, you
may not be able to view any pictures if your DVI monitor does not support
HDCP.
Using SCART Lead
TV connection using the SCART lead is as below.
SCART LEAD
SCART
Using RCA Lead
TV connections using the RCA lead is as below.
VIDEO
RCA LEAD
12
L
R
Connecting the TV and VCR
This section describes the methods when connecting both your TV and VCR to your product. Follow one of the
most appropriate methods described as below.
Using SCART Lead
TV and VCR connections using the SCART leads are as below.
SCART LEAD
TV SCART
VCR SCART
SCART LEAD
Using RF Lead
1. On the RF OUT of the product and the aerial input of the VCR, use the RF lead connector for connection.
2. On the aerial output of the VCR and the aerial input of the TV, use the RF lead connector for connection.
ANTENNA
RF LEAD
RF LEAD
ANTENNA IN
ANTENNA OUT
VCR
ANTENNA IN
TV
13
Connecting the Audio System
When connecting the Audio System, choose the most appropriate procedure for your product as below.
- Using the RCA lead, connect the product and the audio system.
- Using the S/PDIF lead, connect the product and the audio receiver that functions as a digital audio decoder.
AUDIO LEAD
AUDIO
R
L
SPDIF LEAD
SPDIF
Powering On
1. Plug-in the power of the product to a wall outlet.
2. Switch ON the power switch located on the rear panel of the product.
3. Switch the power of the product by pressing the STANDBY button on the remote control or the STANDBY
button at the front of the product.
1
14
2
3
Touch Panel and VFD Display
Touch Panel
This product can be controlled by using the touch buttons on the front panel. When your product is active and you
touch the LED indicators, the product responds as by changing the whole LEDs’ colour into yellow and turning
back to red.
When the product is in stand-by mode, you can switch back to active mode by touching the STANDBY icon
on the front. And then when the product is back to active mode, the backlight of the buttons will turn on indicating
full operation on the touch buttons.
There are two stand-by modes(Normal and Power-saving stand-by) used in this product.
1. Normal stand-by mode: The normal stand-by mode supports current time display on the VFD while on stand-by
mode. And the power supply for the main core is enabled when the product is in stand-by mode.
2. Power saving stand-by mode: The power saving stand-by mode does not support time display on the VFD
while on stand-by mode. The power supply for main core is disabled when the product is in stand-by mode.
Please be aware that the STANDBY icon
and the remote control is always operable on both stand-by modes.
You can change the settings for the stand-by modes on Preferences > Power Management > Power Saving
Mode in Standby. For more information on setting your stand-by mode, please refer to Preferences > Power
Management chapter.
15
VFD Display
1
2
3
4
5
6
7
8
9
10
11
12
17
1. Displays when the current service is HD content.
2. Displays that the current channel contains Dolby audio.
3. Displays whether the soruce is from the external VCR SCART input.
4. Displays whether the user is watching TV Service.
5. Displays whether the user is watching RADIO service.
6. Displays that the product is under reservation mode.
7. Displays that the product is under recording mode.
8. Displays that the product is under time shifting mode.
9. Displays on playback mode.
10. Displays on pause mode.
11. Displays on rewind.
12. Displays on fast foward.
13. Displays on slow playback mode.
14. Displays whether the USB port is connected to a memory device.
15. Flickers when the product receives any IR signal.
16. Displays whether the product is connected to the network.
17. Displays text information.
18. Displays the current display resolution.
16
13
14
15
16
18
Installation Wizard
Installation Wizard will guide you through the initial installation process to automatically search digital
services. When using the product for the first time, the Installation Wizard will be started automatically.
Step 1. Select your TV screen type and press the OK button.
Step 2. Move your cursor to the Start and press the OK button. After all of the services are searched,
move your cursor to the Save and press the OK button.
After the installation wizard, you can now explore and enjoy the services available on your Digital TV service.
Please read the User’s Guide to find out more about the features offered by your Digital TV Recorder.
Note:
- Installation Wizard will also run after the product has been returned to the default
settings.
- This process can take few mintues.
Warning:
If you exit the Installation Wizard without fully completing the service searching
procedure, you may not have all of the services available. In this case, you can use
the Menu > Installation > Scan Services > Full Rescan Menu to search for all of
the services.
17
Basic Operation
Read the descriptions below for the functions such as switching services, volume control, and basic
features for watching programmes on your product.
Using Stand-by
When you are not using your product, you should set it to Stand-by mode. Please press the STAND-BY button on
the front panel or the On/Standby button on the remote control to switch to Standby mode.
If you plan to leave your product unattended for a long period, turn off the power switch at the rear panel and
unplug the power cord from the wall outlet.
Note:
The product supports two stand-by as Normal mode and Power saving mode.
To know about these features, please refer to Menu > Preferences > Power
Management chapter.
Service List
All of the searched Services on the product can be listed by the Service List. The list comprises TV, Radio and
others such as Favourite groups. Each service is allocated with a service number and is listed in this numerical
order.
You can display the Service List and switch to another by following the method below : .
1. While watching a programme, press the OK button to view the Service List. And then select a service you
want to watch using the ▲/▼ button and press the OK button.
2. Enter a service number directly using the NUMERIC (0~9) buttons to change to the service you want and then
press the OK button.
3. Press the ◀/▶ button while the Service List is displayed to switch to the Radio or the Favourite group list.
Note:
- While viewing the Service List, you can page up/down by pressing the P+/Pbutton on the remote control.
18
- Whenever you press the TV/RADIO button while the Service List is displayed, the
Service will switch between TV and Radio service lists.
- The Favourite lists will only appear if you have created them first.
The functions for the Colour Buttons on the remote control while navigating the Service List is as below :
- RED: Home. Pressing the RED button while navigating the Service List will move your cursor to the current
service you’re watching.
- GREEN: HD/SD. Pressing the GREEN button while navigating the Service List will sort the TV Service List
by HD or SD services.
- YELLOW: Edit List. Pressing the YELLOW button while navigating the Service List will let you move to Edit
Service List/Edit Favourite List menu directly.
- BLUE: Sort by Number/Name. Press the BLUE button while navigating the Service List will sort the Service
List by Name or Number.
- WHITE: FUNC+. Press the FUNC+ button while navigating the Service List to directly access the Home, HD/
SD, Edit List, and Sort menu. By pressing the WHITE button again, the dialogue access menu will disappear.
Information Banner
The Information Banner shows up whenever you press the Info
button on the remote control while watching a
programme or the service is switched to another service, The Information Banner can be exited by pressing the
EXIT button on the remote control.
1
A B
2
C
D
3
E
F
4
5
G H I J
6
General Information
1. Service number and name
2. Programme name
3. Recording service information
4. Current date and time
5. Programme broadcasting time and progress bar indicate programme playing time and progress.
6. Icons
A. Indicates TV
B. Indicates RADIO
C. Indicates HD or SD. Displayed only when the programme is HD.
D. Indicates Video Source Resolution.
E. Indicates Digital Teletext. Displayed only when the service supports MHEG.
F. Indicates Audio Description. Displayed only when the programme contains Audio Description
19
G. Indicates Dolby Digital or Dolby Digital Plus.
H. Indicates Subtitle. Displays only when the programme contains Subtitile.
I. Indicates Pay TV Services.
J. Indicates Locked Service. Displays only when the current Service is Locked.
Note:
- While the Information Banner is displayed, you can move to the next or previous
programme information by pressing the ◀/▶ buttons on the remote control.
- If no programme information is available, the Information Banner will be displayed
blank.
Detail Information Banner
When you press the Info button while the information banner is displayed, you can see more detailed information
about the current programme.
Note:
- Press the Info button again or press EXIT button to hide the information display.
Switching Service
You can switch services using one of the following methods :
1. Press the P+/P- button on the remote control.
2. Enter the service number using the NUMERICAL(0~9) buttons and press the OK button on the remote control
to select the service directly.
3. By pressing the OK button you can view the service List. Move cursor to the service you want to watch by
using the ▲/▼ button and press the OK button to select the service.
Note:
You can also switch services using the Programme Guide or the Favourite Service
List.
20
Volume Control
1. Press the
button to adjust the audio volume.
2. Press the Mute button to switch the audio ON/OFF.
Note:
- The mute function will be initialized whenever after the user changes the volume.
- But the mute function will remain still whether the service is changed or not.
Audio Language Selection
If the current programme supports multiple audio languages, you can select the desired audio language as below :
1. Press the AUDIO button to view the Audio Language selection dialogue menu.
2. Select the desired audio language using the ▲/▼ button and press the OK button
Note:
If the current programme does not support multiple audio languages, you will only
see the current language on the Audio Language selection dialogue menu.
Subtitle Control
If the current programme supports subtitle information, you can turn the subtitle ON/OFF by pressing the SUB
button on the remote control.
1. Press the SUB button to view the Subtitle selection pop-up menu.
2. Select Off or a subtitle language using the ▲/▼ button and press the OK button.
Note:
You can select the default subtitle language by changing Menu > Preferences >
Language > Subtitle Language.
Interactive Services
If the current programme supports interactive teletext features, you can access them by pressing the TEXT
button.
1. Press the TEXT button to access digital teletext.
2. Press the TEXT button again to return to normal viewing.
Note:
If the current programme does not support interative teletext features, nothing will
appear even though the TEXT button is pressed..
21
Function Plus
The Function Plus is a very unique software feature of the product. While watching a programme, press the
FUNC+ on the front panel or the WHITE button on the remote control and then you can see a list of functions
which you can access them directly. The FUNC+ button can alter the four colour buttons as well as almost all of
the special buttons on the remote control. This makes it possible to use all of your products functions just by the
touch buttons on the front panel.
1. Press the FUNC+ button on the remote control or the FUNC+ button on the front panel.
2. Select a menu on the pop-up dialogue window using the ▲/▼ button and press OK button to proceed.
PIP (Picture-in-Picture) Screen
You can watch two services simultaneously on one screen by pressing the PIP button while watching TV. When
using the PIP, the audio from the main screen will be outputted. To exit the PIP mode, press the PIP button
again.
Note:
- The teletext (MHEG) is only available for the main screen.
- The PIP screen is also available while recording a programme or playing back
a recording. Some services may not be available for PIP if you record two
servies simultaneously.
- Only one scrambled (Pay TV) servies can be used with the PIP function.
- The PIP screen only supports SD services. The product does not support PIP for
HD services.
TIP:
Moving the PIP Screen
The position of the PIP screen can be moved by pressing the ◀/▶/▲/▼ button
when the PIP screen is displayed.
Switching Services in the PIP Screen
In PIP mode, press the PIP +/- button to change the services on the PIP screen.
Swapping the PIP Screen
You cannot use the SWAP function in the following cases:
1. When the main screen is a Radio service, the PIP does not support Radio services.
2. When the main screen is an HD service, the PIP does not support HD services.
3. When the main screen is a DATA service, the PIP does not support DATA services.
22
PVR
Personal Video Recorder
You can enjoy various play functions similar to a VCR using the playback control buttons while playing back a
programme. Time Shifted Recording is also available when watching a live programme.
If you press the pause
or play
button while watching a programme, the Progress Bar will be displayed.
Progress Bar displays the time information of the current programme, how much time-shifted/recorded, the time
gap between the live broadcasting point and watching point, various play modes status and bookmarks.
1
3
5
4
6
7
2
8
9
General Information
1. Start Time: Programme start time.
2. End Time: Programme end time.
3. Watching Time and Point: Current watching time and point.
4. Live Point
5. Bookmark
6. Yellow Bar: Repeat A-B period when a recorded programme is playing.
7. Green Bar: Time Shifted or Recorded portion of a programme.
8. Gray Bar: Broadcasted portion of a programme.
9. Play Mode/Play Settings
-
Play
-
Pause
- FF: x2, x4, x16, x64
- FR: x2, x4, x16, x64
- Slow: x1/2, x1/4, x1/8
-
: Repeat
-
: A-B Repeat
: Repeat All
23
Time Shifted Recording
By default, this product provides 1 hour Time Shifted Recording by pressing the
button while watching a live
TV/RADIO service. You can change the Time Shifted Recording setting from the Menu > Preferences >
Playback Settings.
Note:
The product does not support Time Shifted Recording and recording the same
service simultaneously. When the Record button is pressed during a Time Shifted
Recording operation, the Time Shifted Recording will stop and will start recording.
Be aware that the recording from the Time Shifted Recording will be erased.
Instant Replay
Press the
button to jump back and play from that position. By default, the amount of jump back is 15
seconds. You can increase this value to 30 seconds or 60 seconds. For more information refer to Menu >
Preferences > Playback Settings > Instant Replay.
Quick Skip
Press the
button to jump ahead and play from that position. By default, the amount of jump ahead is 30
seconds. You can increase this value to 60 seconds or 120 seconds.
Note:
You can use the Quick Skip operation only when there is a certain amount of
time difference left between the current watching point and the live point. If the
time difference is less than 30 seconds, the programme will be played at the live
broadcasting point once you have pressed the
button.
Direct Jump
You can jump to the specific position you want to start playback by the Direct Jump function. This Function is
provided additionally in the FUNC+. If you select Direct Jump in the FUNC+ menu and enter the specific time in
the dialogue menu, the playback will start from the postion you entered.
24
Repeat Mode
You can repeat play back of a recorded programme(s) repeatedly by pressing the REPEAT button. Select as
many recorded programmes from the Media List and press the OK (or PLAY) button to start playback of the
selected recorded programmes. Press the REPEAT key while playing back the recorded programmes. To stop
the repeat mode, press the REPEAT button again.
Repeat A-B
You can select a specific portion within a recorded programme and playback the portion repeatedly. Press the
A-B button to set the starting position. Select the end position using the ◀/▶ button and press the A-B button
again. Then the programme plays back the selected portion repeatedly. To stop the A-B mode, press the A-B
button while repeating the selected portion.
Instant Recording
Like a VCR, you can record real time programme using the built-in hard disk drive. Press the RECORD button
on the remote control to record the current programme instantly
Tip:
Adjusting the Recording End Time
Press the RECORD button while recording to adjust the recording end time. You
can adjust the recording end time by using the ▲/▼ button or the P+/P- button.
Then press the OK button to change the recording end time.
Recording Two Programmes
The product supports recording up to two programmes at once. If you change services while recording a
programme and press the Record button, recording starts on that service also. Time Shift operation and all
various play modes playback are possible for both recording services.
25
Tip:
While recording two programmes, you may watch another programme in the PIP
screen but there are some restrictions. Press the OK button to display the Service
List and press the ◀/▶ button to select the PIP Service List available.
Note:
The product has two aerial tuners. Once a recording operation is started, the
system assigns one tuner to that recording operation and you can move to other
services using the second tuner. If the second recording operation can share the
first tuner which is assigned to the first recording operation, some other operat
ion such as viewing other services using the second tuner is possible. However,
if the second recording operation have to use the second tuner, there are some
restrictions on the services you can move to.
While recording two services simultaneously, if you are going to watch a service
which requires a change in the tuner settings, you will be prompted to stop one
recording.
Stop Recording(s)
If you press the STOP
button while recording one or two programmes, you will be prompted to select a
recording you wish to stop.
Note:
- If a reserved recording is about to start while recording two other programmes
already, you will be prompted to stop one of the currently recording programmes.
- Ensure that there is enough free space before recording. If the free space on
the hard disk drive is insufficient, recording will stop. Recording one hour of HD
programme may requires up to 4 GB (up to 2 GB for SD programme) of hard disk
space. The space for recording 1 hour of programme may differ depending on
the programme.
- You can also record radio programmes.
26
Pause
If you press the PAUSE
button on the remote control, the current programme will be paused. If you press the
PAUSE button once again, the programme will resume from the point where it was paused.
Note:
Using the pause function results time delay between the live point and current
watching point. The time difference is equal to the period the programme was
paused. Operation like slow motion and fast rewind results the time delay. Press
the STOP
button to remove the time difference and catch up to the live point.
The product can be only paused for a limited period, where the paused screen will
be released when the time difference between the live broadcasting point reaches
the maximum Time Shift Duration setting.
Slow
If you press the SLOW button on the remote control, the screen enters into slow playback mode. You can adjust
the slow playback speed to 1/2, 1/4, 1/8 by pressing the SLOW
button repeatedly. Press the PLAY
button to return to normal speed playback.
Fast Forward and Rewind
Press the
the
or
or
button on the remote control to fast forward or rewind the programme. Each time you press
button, the speed will be changed.
: x2, x4, x16, x64
: x2, x4, x16, x64
During Fast Forward/Rewind, the playback mode recovers to normal playback mode immediately whenever the
PLAY
button is pressed.
Pressing the PAUSE
button during Fast Forward/Rewind, the operation stops immediately and will be paused.
27
Note:
- Fast Forward operation will be effective only when there is a time difference
between the current watching point and the live point caused by
any previous operations such as Pause, Slow or Rewind. You can fast
forward only up to the live point. While fast forwarding, if the
watching point reaches the live point, the programme will automatically be
played at normal speed.
- Rewind operation will be effective only when there is Green bar left of the
current watching point. You can only rewind back to the start point of the
progress bar. While rewinding, if you reach the start point of the progress bar the
programme will be automatically played at normal speed from the start point.
Bookmarks
You can use the bookmark functions for your media library and can playback from a bookmarked position directly.
By pressing the Bookmark
button on the remote control, you can set bookmarks as below.
1. While watching a recorded programme, press the Bookmark
the bookmark.
2. Press the YELLOW button to add the bookmark.
3. Then you can see the added bookmark on the list.
button on the spot you wish to set
The functions for the Colour Buttons on the remote control while navigating the Service List is as below :
- RED: Delete. Pressing the RED button while navigating the Bookmark List will remove the selected bookmarks.
- GREEN: Select. Pressing the GREEN button while navigating the Bookmark List will select the bookmark.
- YELLOW: ADD. Pressing the YELLOW button while navigating the Bookmark List will add a bookmark.
- BLUE: No function.
- WHITE: FUNC+. Press the FUNC+ button while navigating the Service List to directly access the colour button
functions. By pressing the WHITE button again, the pop-up dialogue window menu will disappear.
28
Main Menu
The Main Menu lets you choose and change a wide range of your Digital PVR product.
Menu map
Media
Recorded programme, Mp3, Jpeg
Guide
Programme Guide
Schedule
Recording programme List
Preferences
TV SCART
TV Type
Display Format
AV Setup
Video Format
Dolby Digital
Audio Description
Lip Sync Adjustment
29
Language
Time
Parental Control
Audio
Subtitle
Time Zone Setting
Time Zone
Guidance Protection
Change PIN
Instant Replay
Playback Settings
Quick Skip
Slide Show Time
Time Shift Duration
Time Shift Auto-Start
Power Management
Power Saving Mode in Standby
Automatic Standby
Installation
Full Rescan
Scan Services
Update Scan
Manual Scan
Edit Services
Edit Service List
Edit Favourite List
Others
System Messages
Diagnostics
System Information
Signal Information
Disk Information
Disk
Format Disk
Repair Disk
Peripheral Devices
Maintenance
30
Network
Common Interfce
Software Update
Restore Default
Media
Press the MEDIA button to display the list of the storage media and their contents.
Note:
- The media screen can be also displayed by selecting the MEDIA menu from the
main MENU.
- Recorded programmes are always stored into the built-in HDD. External USB
storages are only for photos and music files.
Information on the Media screen
Press the Media button to display the list of media devices and their contents. On the Media screen, select a
media and press the OK button on the remote to play the media. You can also use the P+/P- buttons on the
remote control to move the page up/down.
The Media screen is displayed as follows.
Note:
Picture and music files(JPEG or MP3 files) cannot be Locked/Unlocked.
31
General Information
1.
button: Change Path.
2. Icons
-
Icons differ by the type of the media. Picture, Music, Recorded Programmes.
-
The currently played media.
-
The icon is displayed when the media is currently in recording.
-
The icon is displayed when the media is Locked.
-
The icon is displayed when the media is high definition programme.
3. Buttons
A. RED: Home. Press the RED button to move to the root directory.
B. GREEN: Select/Unselect. Press the GREEN button to Select/Unselect media.
C. YELLOW: Media Type. Press the YELLOW button to select the type of media
(MP3, JPEG, Recorded TV programme, Recorded Radio Programme).
D. BLUE: Sort. Press the BLUE button to sort the list by title name, recorded time or size. You can switch to
different sorting order by repeatly pressing BLUE button.
E. WHITE: FUNC+. Press the FUNC+ button to use all of the colour button functions just by navigating the
pop-up menu.
F.
: Press to change to media path.
G.
: Press to view the programme information of the selected media.
Note:
- The media being recorded will be added to the list of the built-in HDD after its 30
seconds of recording
- Press
button to see the detailed information about the media you have
selected if provided.
- When two other reservations with auto tracking conflict, the reservation with the
earlier start time starts recording first. If the reservations have the same start time,
the one with the lower channel number has the higher priority.
- When a media is being recorded, a red icon appears on the left side of the media
indicating that it is on recording mode.
32
Selecting / Unselecting Media
1. Select a recorded media and press the GREEN button. You can select multiple
media.
2. To unselect the selected media, press the GREEN button again.
Deleting Recorded Media
1. Select a media you want to delete from the list and press the FUNC+ button.
2. Select option “Delete All Selected Files” to delete.
Note:
- You can select multiple media to be deleted.
- If one or more media of the selected media is locked, you will be asked for the
PIN. The default PIN is 0000.
MP3 Player
The product supports music players for MP3 files on the external USB or Hard Disk Drive memory device.
1. Connect the external USB or Hard Disk Drive memory device and go to the Media screen.
2. Press the YELLOW button to sort the media type, and then select MP3. Press the OK button to proceed.
3. Select the MP3 music file from the Media screen menu by pressing the OK button on the remote control.
Note:
- MP3 music files cannot be locked.
- Be sure to move to the folder using the ◀/▶ button to the external USB device
or the Hard Disk Drive when selecting the MP3 file.
- When multiple files are selected, only the selected files will be played.
- Press the || button to pause the music.
- Press Next/Previous
button to move to the next/previous music file.
JPEG Viewer
The product supports viewers for JPEG picture files on the external USB or Hard Disk Drive memory device.
1. Connect the external USB or Hard Disk Drive memory device and go to the Media screen.
2. Press the YELLOW button to sort the media type, and then select JPEG. Press the OK button to proceed.
3. Select the JPEG picture file from the Media screen menu by pressing the OK button on the remote control.
Note:
- JPEG picture files cannot be locked.
- Be sure to move to the folder using the ◀/▶ button to the external USB device
or the Hard Disk Drive when selecting the JPEG file.
- When multiple pictures are selected, it will go into slide show mode.
- Press the || button to pause the slide show.
- Press ◀/▶, Next/Previous
button to move to the next/previous picture slide.
33
Guide
The programme guide displays a full list of available services and programmes based on the date and
time. You can also easily schedule your recordings using the information given by the Programme
Guide.
You can view the programme guide information for all available services by pressing the GUIDE button.
Press the EXIT or GUIDE button to hide the Programme Guide Information screen.
General Information
1.
HD linkage. Displayed when a SD programme is linked to a HD programme.
2. Services and Programme information
3.
indicates that detailed information is available.
4. Icons
-
Displayed on reserved programme.
-
Displayed on guidance programme.
-
Displayed on recommended programme.
-
Displayed on split programme.
-
Displayed on series programme.
5. Buttons
RED: Now. Press the RED button to move the cursor to the current viewing programme
GREEN: Prev Day. Press the GREEN button to view the programme guide of the previous day.
YELLOW: Next Day. Press the YELLOW button to view the programme guide of the next day.
BLUE: Schedule. Press the BLUE button to move to the Schedule Menu.
WHITE: FUNC+. Press the FUNC+ button to use all of the colour button functions just by navigating the pop-up menu.
34
-
: Page Up/Down.
: Move the cursor by 2 hours.
: Press to view the programme information.
: Press to reserve the selected programme.
: Press to search a programme.
Detail Information on Programme Guide
Press the
button in the selected programme to view the Detail Information (if available) of the selected
programme.
Using the record function in the Programme Guide
The easiest way to automatically schedule/reserve a recording using the Programme Guide is as follows.
1. Select the programme and press the OK or the RECORD
button to start reservation. The reservation icon
will be added on the programme.
2. Select the reserved/scheduled programme and press the OK button to cancel reservation.
3. If you press the OK button, a pop-up dialogue window will appear. Select an option you want and press the
OK button.
If you select a series programme, a pop-up dialogue window will appear. Select an option you want and press
the OK button.
Note:
- Auto Tracking can monitor the changes of the reserved programme and to
keep the reservation. Even when on situations where broadcasting time of the
reserved programme is changed, Auto Tracking allows you to record the reserved
programme.
35
Searching Programmes
You can search the programme you want by entering the name or the genre of the programme.
1. To start search, enter the search keyword by select and pressing the TEXT buttons in the Programme Guide
screen.
2. After entering the search keyword, press the OK button to start searching process.
3. After the searching process is over, select the appropriate programme you want and press OK button to watch
or reserve it.
The functions for the Colour Buttons on the remote control while navigating the Programme Search is as follows.
- RED: Delete. Pressing the RED button while navigating the Programme Search will delete a character
which you wrote in the search keyword input field.
- GREEN: Switch. Pressing the GREEN button will toggle the cursor from left to right and vice versa.
- YELLOW: Genre. Pressing the YELLOW button will toggle methods between Keyword and Genre.
- BLUE: Sort. Press the BLUE button while navigating the Programme Search to sort the searched programme
by the title name or the broadcasting start time.
- WHITE: FUNC+. Press the FUNC+ button to use all of the colour button functions just by navigating the pop-up
dialogue window.
36
Schedule
Press the SCHEDULE button to display the list of reserved recordings and instant recordings.
General Information
1. Services and Programme information
2.
indicates that detailed information is available.
3. Icons
-
Displayed on recommended programme.
-
Displayed on series programme.
-
Displayed on event based programme.
4. Buttons
- RED: Cancel. Press the RED button to cancel a schedule.
- GREEN: Select/Unselect. Press the Green button to manually add/delete a schedule.
- YELLOW: Add. Press the YELLOW button to manually edit an existing reservation.
- BLUE: Sort. Press the BLUE button to sort the list by the title’s alphabetical order.
- WHITE: FUNC+. Press the FUNC+ button to use all of the colour button functions just by navigating the
pop-up dialogue window.
Page Up/Down : Press to move from pages Up/Down.
Category. Press to move from tabs.
Press to view the information of the selected service.
TIP
All: List of All scheduled items including Single, Split and Series programmes.
Single: List of Single items including Split programmes.
Group: List of representive items of Series programmes.
37
- In the Schedule screen, you can delete multiple reservations at once by checking
the ones you want to delete. Move up/down by pressing P+/P- page buttons and
select a specific reservation by pressing the OK button. Check mark
will be
displayed on that reservation.
- When a service is being recorded, the Record
icon will appear on the right
side of the schedule list.
- When two other reservations with auto tracking conflict, the reservation with the
earlier start time starts recording first. If the reservations have the same start time,
the one with the lower service number has the higher priority .
- The Schedule screen also can be displayed by selecting the Schedule Menu
from the main Menu or pressing the BLUE button on the remote control when on
the Guide Menu.
- When Cancelling reservations, please ensure that only the reservations that you
wish to cancel are selected. Unselect any reservations by pressing the GREEN
button.
Adding Manual Reservations
You can add reservations manually by following the below method.
1. Press the Yellow button to add manual reservation. Then the pop up dialogue window menu will appear.
2. Select a service you wish to reserve.
3. Set the Start Time/End Time.
4. The Title Name can be changed by editing the Title Name field.
5. Select Apply and press the OK button to confirm the manual reservation.
TIP: Editing Reservations
You can edit reservations by selecting the reservations you want and pressing the
OK button. By using the manual reservation pop-up dialogue window menu, you
can edit your reservation settings.
38
Preferences
The Preferences menu lets you change the settings of your Digital PVR product.
AV Setup
The audio or video output control configurations can be set using the AV Setup menu.
1. Press the Menu button.
2. Select Preferences using ◀/▶/▲/▼ button and press the OK button.
3. Select AV Setup using the ▲/▼ button and press the OK button.
TV SCART
Selection: RGB, CVBS
TV Type
Selection: 4:3, 16:9
Display Format
Selection : Auto, Manual
The default value for this is set to Auto.
Dolby Digital
Selection: Enable, Disable
If your TV does not support Dolby Digital, please note to set this value as Disable. If the settings for this is
Enable and your TV does not support Dolby Digital, you may not hear anything for your TV.
Video Format
Selection: Auto, 576p, 720p, 1080i, 1080p
By setting the value “Auto”, the product will set its value to your TVs maximum resolution or format
If the settings for the Video Format reaches over your TVs maximum format, it will automatically be set to your
TVs maximum resolution.
The default setting of the Video Format is set to Auto.
Audio Description
Selection: On, Off
39
Lip Sync Adjustment
Selection: Range of 0 to 250ms
Also by using the P+/P- key, the sync value can be adjusted by 10ms.
The Lip Sync Adjustment can only be adjusted through the range of 0 to 250ms and only be affected on the
SPDIF audio output.
Language
The language settings for audio and subtitle can be configured using this menu.
1. Press the MENU button.
2. Select Preferences using the ◀/▶/▲/▼ button and press the OK button.
3. Select Language using the▲/▼button and press the OK button.
Audio
Selection: English, Welsh, Gaelic
This function is only valid if the source supports multi-language service.
Subtitle
Selection: Off, English, Welsh, Gaelic
This function is only valid if the source supports subtitle service
Time
The current time can be configured using this menu.
40
1. Press the Menu button.
2. Select Preferences using ◀/▶/▲/▼ button and press the OK button.
3. Select Time using the ▲/▼ button and press the OK button.
Time Zone Setting
Selection: Manual, Auto
When Auto is selected, the time is detected from the Digital Transmitter where you receive the digital services. In
this case it is not possible to enter the time manually.
Time Zone
Selection: Range through GMT-12 – GMT+13
Time Zone setting is only available when you set the Time Setting as manual.
Parental Control
Settings for parental control can be configured by using this menu.
1. Press the Menu button.
2. Select Preferences using ◀/▶/▲/▼ button and press the OK button.
3. Select Parental Control using the ▲/▼ button and press the OK button.
Guidance Protection
Selection: Enable, Disable
Watershed hours is defined between 21:00 through 05:30. If a recorded programme with a guidance protection is
attempted to be played outside of watershed hours, you will be asked for the PIN number.
You will be asked for the PIN number to change this setting.
The default PIN is 0000.
The default value for the guidance protection is Enable.
41
Change PIN
You will be asked for the PIN number to change this setting.
The default PIN is 0000.
Enter the new PIN number. You will also need to enter the new PIN number again for confirmation.
Playback Settings
You can set miscellaneous settings related to PVR and Slide Show.
1. Press the Menu button.
2. Select Preferences using ◀/▶/▲/▼ button and press the OK button.
3. Select Playback Settings using the ▲/▼ button and press the OK button.
Instant Replay
Selection: 15 Sec, 30 Sec, 60 Sec
This is the setting value for the instant replay function used in the Time Shifted Recording and the recorded title
playback.
Quick Skip
Selection: 30 Sec, 60 Sec, 120 Sec
This is the setting value for the quick skip function used in the Time Shifted Recording and the recorded title
playback.
If the time difference between the live point and the current view time is less than the setting value for the Quick
Skip, you will be set to the live point.
Slide-show Time
Selection: 3 Sec, 5 Sec, 10 Sec
This is the setting value for the slide show function used in the JPEG viewer.
42
Time Shift Duration
Selection: 30 Min, 1 Hour, 2 Hour
Time Shift Auto-Start
Selection: Enable, Disable
You can set whether the Time Shifted operation starts automatically or manually. When the Time Shift Auto-Start
is set to Enable, it will start automatically whenever you switch to another service. If it is set to Disable, you have
to press the Pause button whenever you want to start the Time Shifted Recording.
Power Management
You can change the settings for the Power Management functions for the product. You can adjust the settings
whether the product switches to the power saving mode on standby. And also adjust the settings for the
automatic standby for the idle mode can be changed.
1. Press the Menu button.
2. Select Preferences using ◀/▶/▲/▼ button and press the OK button.
3. Select Power Management using the ▲/▼ button and press the OK button.
Power Saving Mode in Standby
Selection: Enable, Disable
The product has two standby modes. For more information, please refer to “Touch Panel and VFD Display”.
Automatic Standby
Selection: Enable, Disable
You can select whether the product switches to standby mode automatically when there is no interactions with
the user for 4 hours.
43
Installation
The Installation menu lets you change the service settings of your Digital PVR product.
Scan Services
The product provides you two types of scanning: Automatic (Full and Update) Scan and Manual Scan.
Full Rescan
1. Press the Menu button.
2. Select Installation using ▲/▼ button and press the OK button.
1. Before starting the process, you will be asked for confirmation.
2. When the Start button is highlighted, press the OK button to start scanning.
3. After the scan operation is finished, it will automatically highlight the Save button. Press OK button to save the
searched services.
Note:
By pressing the Stop button, the operation will stop and save only the currently
found services.
Warning : The Full Rescan will erase the previous service list.
44
Update Scan
1. When the Start button is highlighted, press the OK button to start update scanning.
2. After the scan operation is finished, it will automatically highlight the Save button. Press the OK button to
update the searched services.
Note:
Update scan will not erase the previously searched services, but only update the
previous service list.
Manual Scan
1. Move the cursor to Channel to manually scan services by RF channel numbers and press the OK button.
You can also manually scan services by selecting a particular frequency and press the OK button.
2. To start scanning, move the cursor to the Scan button and press the OK button to start scanning.
3. The scanned services can be saved by moving the cursor to the Save button and then press the OK button.
45
Edit Services
You can edit service list and favourite list by using this menu.
1. Press the MENU button.
2. Select INSTALLATION using the ▲/▼ button and press the OK button.
3. Select Edit Service List using the ▲/▼ button and press the OK button
Edit Service List
1. Select Edit Service List using the ▲/▼ button and press the OK button.
2. Insert the PIN number.
3. Select a service using the ▲/▼ button or the GREEN button and press the OK button.
You can select more than one service. Press the OK button or the GREEN button again to unselect the
selected service.
4. Press the YELLOW button to select all services. Press the YELLOW button again to unselect all selected
services.
General Information
The functions for the Colour Buttons on the remote control while navigating the EDIT SERVICE LIST is as below.
46
- RED: Remove. Pressing the RED button while navigating the EDIT SERVICE LIST will remove the selected
services.
- GREEN: Select/Unselect. Pressing the GREEN button while navigating the EDIT SERVICE LIST will
Select/Unselect a service.
- YELLOW: Select All /Unselect All. Pressing the YELLOW button while navigating the EDIT SERVICE LIST
will Select All/Unselect All services.
- BLUE: Lock/Unlock. Pressing the BLUE button while navigating the EDIT SERVICE LIST will Lock/Unlock
the selected services.
- WHITE: FUNC+. Press the FUNC+ button to use all of the colour button functions just by navigating the pop-up
dialogue window.
Note:
- Press the ◀/▶ button to move to the TV or radio service list directly.
- The default PIN is 0000.
TIP:
Locking/Unlocking a service
- When Locking/Unlocking multiple services at once, be sure to notice that when
some of the selected services are Locked and some of them are not, you
will be forced to Lock the ones which were Locked before again. If you wish to
Unlock them please redo the Locking/Unlocking procedures again.
TIP:
Deleting a service
1. Select the services you wish to delete. You can either select services using the
▲/▼ button or the GREEN button and press the OK button or select all of the
services by pressing the YELLOW button.
2. Once you have selected the services you wish to Delete, press the RED button.
Edit Favourite List
47
A favourite list enables you to select a subset of services you consider as your favourite.
1. Select Edit Favourite List using the ▲/▼ button and press the OK button. Now you can see the EDIT
Favourite List window.
2. From the right side of the list, select a service using the ▲/▼ button and press the OK button or the GREEN
button. The selected services can be unselected by pressing the OK button or the GREEN button again.
3. Now the selected services can be moved to your favourite list by pressing the RED button.
General Information
The functions for the Colour Buttons on the remote control while navigating the Edit Favourite List is as below.
- RED: Add/Remove. Pressing the RED button while navigating the Edit Favourite List will add or remove the
selected service to or from the list.
- GREEN: Select/Unselect. Pressing the GREEN button while navigating the Edit Favourite List will select or
unselect the service.
- YELOW: Select All/Unselect All. Pressing the YELLOW button while navigating the Edit Favourite List will
select all or unselect all the service.
- BLUE: Group. Pressing the BLUE button while navigating the Edit Favourite List will display the favourite list
or the switch to TV/RADIO/ALL SERVICES.
- WHITE: FUNC+. Press the FUNC+ button to use all of the colour button functions just by navigating the pop-up
dialogue window.
TIP:
The Edit Favourite List window is divided into two areas: the right area is for the
whole service list and the left area is your favourite list. You can move to and from
each area by pressing the ◀/▶ button.
Selecting other favourite groups.
The default favourite group is Favourite 1. To select another favourite group, press
the ◀ key to move to the left area and press the BLUE button. You can select
other favourite groups from the list.
When renaming favourite group name using the FUNC+ key.
You can rename the favourite group by using the FUNC+. Press the FUNC+ button
while editing the favourite group and select the RENAME from the pop-up dialogue
window menu. You can insert new names for the group.
48
Others
Diagnostics
The Diagnostics settings for the product can be set following the below methods.
1. Press the Menu button.
2. Select Others using ◀/▶/▲/▼ button and press the OK button.
3. Select Diagnostics using the ▲/▼ button and press the OK button.
System Messages
The System Messages for the product can be viewed following the below methods.
1. Press the Menu button.
2. Select Others using ◀/▶/▲/▼ button and press the OK button.
3. Select System Messages using the ▲/▼ button and press the OK button.
4. You can move to other pages by pressing the ◀/▶ button.
49
System Information
The system information enables the user to view the information as below.
- Hardware and middleware version
- Firmware version
- Network configuration
Signal Information
The signal information enables the user to view the information as below.
- Current tuned channel information
- Modulation information
- Service provider information
- Signal strength and quality information
50
Disk
Your product supports basic operation for your disk such as viewing disk information or formatting your disk.
1. Press the Menu button.
2. Select Others using ◀/▶/▲/▼ button and press the OK button.
3. Select Diagnostics using the ▲/▼ button and press the OK button.
Disk Information
You can view the information of the Hard Disk Drive using this menu.
Format Disk
You can format your internal Hard Disk Drive using this menu. When using this menu, you will be asked for
the PIN number. The default PIN is 0000. Also you will be asked again for confirmation after entering the PIN
number.
51
Note:
Please be aware that this process will take a few minutes.
DO NOT TURN THE POWER OFF DURING FORMATTING PROCESS!
The service list and configured settings for your product will not be erased using
this function.
WARNING : ALL OF THE RECORDED MEDIA WILL BE DELETED AFTER THIS
PROCESS!
Repair Disk
You can repair your external memory device using this menu for consistency. When using this menu, you will be
asked for the PIN number. The default PIN is 0000. Also you will be asked again for confirmation after entering
the PIN number.
Peripheral Devices
The settings for the peripheral devices on your Digital PVR product, refer to the methods below.
1. Press the Menu button.
2. Select Others using ◀/▶/▲/▼ button and press the OK button.
3. Select Peripheral Devices using the ▲/▼ button and press the OK button.
52
Network
The network settings for your product supports DHCP connection to the network or can be set by manually.
Using DHCP for your network configuration
1. Move your cursor to DHCP.
2. Then move your cursor to APPLY and press the OK button.
Using manual settings for your network configuration
1. Move your cursor to Manual and press the ▼ button.
2. Type in the IP address for your set and press the ▼ button.
3. Type in the Subnet mask value for your set and press the ▼ button.
4. Type in the Router address for your set and press the ▼ button.
5. Type in the DNS address for your set and press the ▼ button.
6. Then move your cursor to APPLY and press the OK button.
Common Interface
You can view your CI module information using this menu.
The information on the Common Interface of the product can be viewed following the below methods.
1. Press the Menu button.
2. Select Others using ◀/▶/▲/▼ button and press the OK button.
3. Select Common Interface using the ▲/▼ button and press the OK button.
4. You can move to other pa ges by pressing the ◀/▶ button.
53
Maintenance
For the maintenance of your product, this menu provides functions such as software update and restore default.
1. Press the Menu button.
2. Select Others using ◀/▶/▲/▼ button and press the OK button.
3. Select Maintenace using the ▲/▼ button and press the OK button.
Software Update
When updating your firmware, you will be asked for the PIN. Your default PIN is 0000.
It is recommended to update the software of the product regularly. For the latest firmware, please visit our
website written on the last page of this manual.
1. Download the latest firmware from the customer support website.
2. Copy the update files into your USB memory.
3. Select the Software Update menu and press the OK button.
4. Enter 4-digit PIN code. The default PIN is 0000.
5. Insert the USB memory into one of the USB slots and wait untill the USB is detected.
6. Select the YES and press the OK button to start the software update.
7. The system will be turned off after completing the update.
WARNING:
1. DO NOT TURN OFF THE MAINS POWER WHILE UPDATING.
2. Please contact customer support if the update failed.
Note:
Over-Air Download is the main method of up-grading your product after 30 June, 2010.
Restore Default
You can restore your product to the default settings by using Restore Default. When restoring to the default
settings, you will be asked for the PIN. The default PIN is 0000.
Warning: Please note that once you perform Restore Default, all data such as Service List and user configured
data will be cleared. However, information and files on the HDD will not be cleared.
54
Appendix
Specifications
Tuner
Tuner
Twin HD Digital Terrestrial Tuner
UHF Channel Range
21(474MHz) ~ 69(858MHz)
Bandwidth
8 MHz
Signal Level
-75 to -20dBm
Demodulation
DVB-T/DVB-T2
Audio/Video
Audio Decoding
MPEG1/Layer2,3, MPEG2, AAC, HE-AAC, Dolby Digital Plus
Video Decoding
MPEG2, MPEG4, H.264/AVC, VC-1
HDMI Resolution
576p, 720p, 1080i, 1080p
SCART Output
576i, CVBS/RGB
Video Format
4:3, 16:9, Letter Box
Input/Output Devices
USB
3xUSB 2.0 Host (5V, 500mA max)
RJ-45
Ethernet 10/100Mbps
Common Interface
DVB-CI, EN50221
Power Supply
Input Voltage
100-250V~, 50/60Hz
Power Consumption
On-mode Max 40W, Standby below 0.5W
Others
Gross weight
4.34 Kg
Boxed Size
406 x 357 x 125 mm
Operating Temperature
0℃ ~ 40℃
55
Trouble Shooting
1. The product can not power ON or nothing is displayed on the front panel.
- Make sure that the main power lead is plugged into a suitable power outlet.
- Make sure that the power switch on the rear panel is switched on.
- Try connecting the power lead to a different power outlet.
2. Cannot view anything on the TV set
- Make sure the power is ON and the product is in active mode.
- Make sure the AV lead(HDMI or SCART) is connected to the TV.
- Make sure that the brightness level of the TV is in visual state
- Make sure that the current service is on air. Contact your broadcaster to make sure that the service is on air.
- Make sure that the TV is correct external input mode.
3. The output image has poor picture/sound quality
- Make sure your antenna is installed in an obstacle-free place.
- Adjust your antenna to a correct direction for better quality.
4. Can’t hear anything from the product.
- Make sure your AV lead is connected correctly.
- Make sure the volume of the TV and your product is not zero(or mute).
5. The remote control does not work.
- Make sure that you use the remote control pointing the top end towards the product.
- Make sure the batteries in the remote control are operable.
6. The default PIN is 0000.
7. Service search does not work properly.
- Check whether the antenna is connected correctly.
8. Cannot view any scrambled or paid services.
- Make sure that you have the appropriate CI-Module. If so, then reinsert the CI-Module.
- Ensure that the CI-Module is not damaged.
- Contact your network operator for more information.
9. Recording progammes does not work properly.
- The internal hard disk drive is full. Free space by deleting unnecessary recorded programmes.
- If the recording is overlapped with other reservation or recording, wait until the reservation or recording
is finished.
10. The Time Shifted Recording does not work properly.
- In some situations the Time Shifted Recording may not be available during the recording. In this case
wait until the recording is finished and try the Time Shifted Recording again.
- If the external hard disk drive is full, the Time Shifted Recording will not work. In this case free space
by deleting unnecessary recordings.
11. There is picture but no sound on my PVR.
- Make sure the volume on the PVR and TV is up. Check that the PVR and the TV are not set to Mute. Make
sure that the HDMI or SCART lead from the TV set is connected to the HDMI or TV SCART port on the back
of the PVR.
56
Warranty Certificate
IMPORTANT! Please keep this with your purchase receipt, which will be required if service is
needed on this product during the warranty period.
KEEP THIS FOR YOUR FUTURE REFERENCE
Model No.:
Serial No.:
Date of Purchase:
WARRANTY CONDITIONS:
The warranty of this product is valid for 12 months from the date of original purchase. Any defect that arises due
to faulty materials or workmanship will be repaired free of charge during this period by the dealer from whom you
purchased the unit. The warranty is subject to the following provisions.
The warranty does not cover accidental damage, misuse, cabinet parts, knobs or consumable items such as
batteries, drive belts or bulbs.
The product must be correctly installed and operated in accordance with the instructions contained in the manual.
It must be used solely for domestic purposes. For further information regarding your warranty please see the
section at the rear of your user manual.
The warranty will be rendered invalid if the product is resold or has been damaged by inexpert repair.
Digital STREAM Technology Inc. disclaims any liability for incidental or consequential damages.
The warranty is in addition to and does not diminish your statutory or legal rights.
In the event of a breakdown please refer to your instruction manual and check all plugs, fuses and electricity
supply. In the event of there being no breakdown you will be charged for the repair.
Contact Detail:
MIT LONDON LTD
UNIT 1 KINGSTON BUSINESS CENTRE, FULLERS WAY SOUTH, CHESSINGTON
Surrey KT9 1DQ U.K
Help Desk Tel. No. : 0208 391 9806 (Mon to Fri : 09:00 to 17:00)
Fax : 0208 397 4497
www.mitlondon.com (A/S Registration, Q&A)
Tech.info. : [email protected]
57
MEMO
MEMO