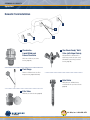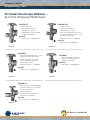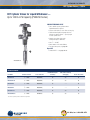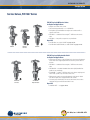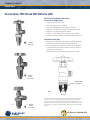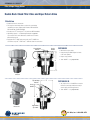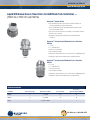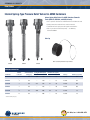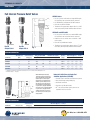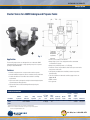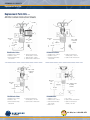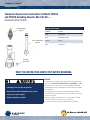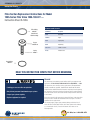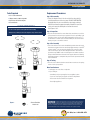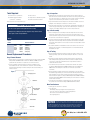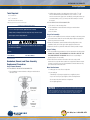
1
All Safe, Inc.
Sherwood Master Distributor
Toll Free: 866-958-3473
Email: [email protected]
Web: www.allsafe.net
SHERWOOD VALVE
LPG PRODUCTS
Catalog
All Safe, Inc. 1-866-958-3473
SHERWOOD LPG PRODUCTS
Table of Contents
Table of Contents
Sherwood LPG Products
Sherwood History ............................................................... 2–3
Warranty ................................................................................. 4
Applications ...................................................................... 5–10
Valves ............................................................................. 11–34
Float Gauges ................................................................... 35–38
Replacement Parts Kits .................................................. 39–42
Instruction Sheets........................................................... 43–81
Notes .................................................................................... 82
All Safe, Inc. 1-866-958-3473
A History of Quality and Innovation
For nearly a century, Sherwood has
been a premier producer of gas control
products. We have earned a reputation
as a manufacturer that consistently meets
the highest industry standards.
Originally located in Buffalo, New York, Sherwood was acquired by the
Aluminum & Brass Company of Lockport, New York in 1923. Over the next
60 years, we earned a reputation for products that not only kept pace with
customer requirements, but also anticipated their changing needs.
In 1985, Sherwood was acquired by the Harsco Corporation, a merger
which greatly enhanced Sherwood’s financial position and increased the
opportunities for technological development. In 1996, Sherwood merged with
the Taylor-Wharton Gas Equipment division of Harsco. Today Sherwood Valve
is part of Taylor Wharton, LLC.
Our focus has expanded beyond LPG products to meet the needs of the
Energy marketplace. By building on our traditional LPG product lines,
Sherwood is focused on being a leading provider for both traditional and
emerging fuel technologies.
All Sherwood products are designed to meet the highest standards, and only
quality materials are used. Careful assembly and detailed inspection of every
part ensure top performance. Sherwood is fully certified to the stringent
requirements of ISO 9001, which enables us to compete confidently in the
global marketplace.
Sherwood is a totally integrated brass valve manufacturer. We manufacture
our own rod and raw forgings at our foundry. These forgings are then
machined into the bodies that we use in our valves. Because we
manufacture our own brass rod, we can control the alloy components more
closely, resulting in a more durable forging. The end result is a high-quality,
long-lasting valve that meets or exceeds industry standards.
Expertise
Sherwood’s diverse product lines of compressed gas, propane, refrigerant
gas, specialty gas, scuba diving and life support equipment have enabled us
to develop varied and diverse technical expertise. Careful assembly, detailed
inspection and 100% leak test of every valve ensures top performance.
2
SHERWOOD LPG PRODUCTS
Sherwood History
Quality Products for Diverse Markets
Sherwood serves a variety of Energy
markets: domestic LPG cylinders, ASME
tanks and engine fuel. Our start-to-finish
capabilities include:
Design and Engineering
Sherwood’s diverse engineering group has many years of experience
in the Energy industry. Product development is ongoing, and many of
our engineers hold patents related to gas control regulation. Our on-site
testing facility is furnished with state-of-the-art equipment that simulates
actual environmental conditions for testing, product development and
problem solving.
Production enhancements and quality improvements have been
undertaken by employee involvement in the industry associations, and the
implementation of Material Requirements Planning (MRP) and Capacity
Requirements Planning (CRP).
A Focus on Quality
Quality is a primary focus at Sherwood, from material selection to
finished product.
Our Quality Assurance Department is staffed by professionals who are highly
experienced in LPG containment and usage. Sherwood continues to meet the
ongoing requirements of our ISO 9001 certification.
All Safe, Inc. 1-866-958-3473
of the Compressed Gas Association (CGA), the National Fire Protection
Association (NFPA), the Canadian Gas Association, American Society of
Mechanical Engineers (ASME), or Underwriters Laboratories, Inc. Energy
industry dealers should use this catalog to select the correct Sherwood
Energy products for residential, recreational, commercial and industrial
applications. These quality products must only be used with liquefied
petroleum gas (LPG) and must be used in strict compliance with appropriate
industry and government regulations.
Guidelines
To promote the correct handling and use of any Energy-related or LPG
equipment, Sherwood has published a series of instruction sheets and repair
instructions. These materials provide guidelines for the proper selection and
repair of Sherwood products and are available from your local Sherwood
distributor. Instruction sheets are provided with all replacement part kits.
NFPA Pamphlets #54 and #58 provide specific safety guidelines. The National
Propane Gas Association (NPGA) is also an excellent source for proper safety
procedures.
The NPGA Certified Employee Training Program (CETP), along with supporting
publications and programs, should be used for proper handling and use of
LPG equipment.
Sherwood will be pleased to help you with any questions or problems
concerning the selection, installation or maintenance of our equipment.
Contact the Sherwood Energy Customer Service Department or your local
Sherwood distributor.
All Sherwood products are manufactured to the highest industry standards.
The products represented in this catalog meet or exceed the requirements
3
SHERWOOD LPG PRODUCTS
Warranty
Exclusive Three-Year Limited Warranty
Limited Warranty
5IF(BT$IFDL™ Way
We warrant material manufactured and sold by Sherwood to be free from
manufacturing defects for a period of three years from date of shipment.
Under this warranty, we will repair or replace defective material at our
factory. However, no material should be returned without first obtaining
written consent. This warranty covers manufacturing defects only. Items
misused, altered, or neglected are not covered. We will not be liable for any
loss, cost of repair, or damages of any kind connected with the use, sale,
or repair of any of our products. This warranty is applicable when products
are installed and used in accordance with all acceptable standards as
established by NFPA and ANSI. Except for the limited warranty as stated
above, Sherwood makes no claim as to the ability of a particular product
used in conjunction with products of other manufacturers.
Sherwood is a member of the NPGA Gas Check Program, established to
promote customer safety and satisfaction. The Gas Check Way is a system of
inspection and maintenance procedures for servicing LPG installations while
promoting optimum safety and efficiency. For information on the Gas Check
Program, contact the National Propane Gas Association, 1150 17th St. NW,
Suite 310, Washington, DC 20036.
.PEFM$IBOHFT
Sherwood’s engineering personnel are constantly researching new frontiers
in gas control equipment. Sherwood reserves the right to change model
designs to incorporate new engineering advances, but we shall not be
required to modify equipment already sold or in service.
Safety
The Sherwood equipment shown in this catalog is offered for DOT and
ASME containers as well as other applications in the LPG system. All of the
equipment shown meets the safety requirements of the Compressed Gas
Association, ASME, the Canadian Gas Association, the National Fire Protection
Association, or Underwriters Laboratories Inc., depending on the type of
equipment.
Customer Safety
Since LPG dealers are the primary customer contact, the dealer has an
obligation to warn customers of potential hazards of LPG and ensure that
they are made aware of the available safety instructions for the use and
handling of LPG.
Dealers must warn customers that LPG is flammable and explosive. Instruct
customers to leave the area immediately if they should hear, see, or smell
gas escaping from a cylinder. All customers should be informed that LPG
cylinders should be used and stored outside at all times.
*NQPSUBOU
Sherwood LPG products must be used in strict compliance with all Sherwood
instructions, the requirements and provisions of the National Fire Protection
Association Pamphlets #54 and #58, DOT and ANSI standards, and all
applicable federal, state, provincial, and local laws, regulations, codes, and
standards. All LPG systems and components must be regularly maintained
and inspected by personnel trained in accepted LPG industry procedures.
Distributors
Wherever you are, there’s a Sherwood distributor near you! Our distributors
are strategically located throughout North America and carry a complete
inventory of Sherwood LPG products to ensure optimum availability and
fast turnaround time on every order. For high-quality valves, regulators,
accessories, and the best customer service in the industry, rely on
Sherwood’s world-renowned distributor network!
t0OMZUSBJOFEQFSTPOOFMTIPVMEXPSLPOHBTTZTUFNT
For more information about our three-year limited warranty, contact your
Sherwood distributor today.
t*OTQFDUHBTTZTUFNTSFHVMBSMZ
t-FBLJOHHBTDBODBVTFmSFTPSFYQMPTJPOT
t3FQMBDFFRVJQNFOUBTSFRVJSFE
All Safe, Inc. 1-866-958-3473
SHERWOOD LPG PRODUCTS
"QQMJDBUJPOT
Table of Contents
Applications
Domestic Tank Installation...................................................... 6
DOT Fork Lift Truck ................................................................. 7
DOT Cylinder Valves ................................................................ 8
Recreational Vehicle ............................................................... 9
Engine Fuel ........................................................................... 10
All Safe, Inc. 1-866-958-3473
SHERWOOD LPG PRODUCTS
Applications
Domestic Tank Installation
E
H
D
G
E
CF
D
B
AC
A
al
Checkmate™
Liquid Withdrawal
Excess Flow Valve
D
PVE2033CLDBT or PVE2033CLT or
Multi-Purpose Valve (no vapor return)
PVE2034CLT (not shown) (see Valves
Section, page 18)
PVE5136 or PVE5137 (see Valves
Section, page 27)
tion,
0,
B
“Gas Check Ready” Multi
Valve (with Vapor Return)
Float Gauge
FG2281 or FG3981 Series (see Float
Gauges Section, pages 36 and 38)
at gauge
2281 and
3981 Series
e Float Gauges
ction, pages 1 &
of this manual)
E
s,
s
C
Filler Valve
Relief Valve
UVE433A Series, UVE443A Series,
or UVE453A Series (see Valves Section,
page 28)
es
1,
PVE623C (see Valves Section, page 24)
All Safe, Inc. 1-866-958-3473
SHERWOOD LPG PRODUCTS
Applications
DOT Fork Lift Truck
A
BB
CC
DD
EE
FF
A
G
G
Service Valve
D
PVE1427 Series or PVE1449 Series (see
Valves Section, page 20)
PVE1449
Float Gauge
FG1284 Series or FG2284 Series
(see Float Gauges Section, page 38)
oat gauge
G1284 Series or
G2284 Series (see
PVE1449
B
Safety Relief Valve
E
Filler Valve
PVE1855SD or PVE1855SD-30
(see Valves Section, page 22)
PVE435A (see Valves Section, page 29)
F
Connector
PA1428M (see Valves Section, page 21)
C
Liquid Level Gauge
PVE12A (see Valves Section, page 33)
G
Connector
PA1428F (see Valves Section, page 21)
All Safe, Inc. 1-866-958-3473
SHERWOOD LPG PRODUCTS
Applications
DOT Cylinder Valves
Full Internal
Relief Valve
Four-Hole Design
ual)
Filler Valve
PVE1855SD
PVE445AT
Used on multiport 420-lb. DOT
containers (see Valves Section,
page 30)
(see Valves Section, page 22)
420-lb. Vertical
Container
Float Gauge
Fixed Liquid
Level Gauge
5AT
ion, back
his manual)
ntainer
- 1" NPT
FG3981-001NR
1" NPT mounting (see Float
Gauges Section, page 36)
es Section,
manual)
One-Hole Design
PVE3250ALG7T-11.0
t Use where a separate
pressure relief device is
provided (such as on a
multiport 420-lb. cylinder)
t Comes with 11" dip tube
(see Valves Section,
page 17)
PVE2035A Series
t Up to 420-lb. LPG capacity
t Combines a service line valve, a back check filler valve, with secondary back check, a relief valve,
and a fixed maximum liquid level gauge (must specify liquid level tube length when ordering)
t Lightweight and compact
t Ideal for on-site filling of DOT cylinders up to 420 lb. capacity without interrupting service
t Combines several DOT container components in one tank opening
t Filler connection: 13⁄4" ACME thread
t Inlet: 1"–111⁄2 NGT
t Outlet: POL (CGA510)
t Pressure relief setting: 375 psig (see Valves Section, page 18)
PVE3250CLM-375
Liquid Withdrawal
Valve (see Valves
Section, page 17),
works with 100-lb.
cylinders (A)
100 LB.
100 LB.
200 LB.
A
PVE3250
Series Valves
(see Valves Section,
page 17), work with
100-lb. cylinders
(A and B)
PVE2030BC
Multi-Purpose Valve
with double backcheck valve (page 18),
works with 100- and
200-lb. cylinders
(A and C)
B
C
All Safe, Inc. 1-866-958-3473
SHERWOOD LPG PRODUCTS
Applications
Recreational Vehicle
Float
Float
Gauge
Gauge
A
B
B
C
C
Service Valve
D
ASMEE Tank
Regulator
Regulator
A
B
C
Filler Valve
Liquid Level Gauge
Relief Valve
PVE1855SD Series
(see Valves Section, page 22)
PVE12 Series
(see Valves Section, page 33)
UVE436AR
(see Valves Section, page 30)
All Safe, Inc. 1-866-958-3473
SHERWOOD LPG PRODUCTS
Applications
Engine Fuel Applications
CC
A
A
B
B
EE
DD
A
FF
UVE436AR Series
(see Valves Section, page 30)
G
G
C
Relief Valve
B
Double Back-Check
Filler valve PVE18555SD-90
(see Valves Section, page 23)
H
H
Shutoff Valve
For remote liquid level gauge
PVE10DRF or PVE10ARF
(see Valves Section, page 33)
D
Liquid Service Valve
PVE1447 Series
(see Valves Section, page 19)
E
ASME Tank
F
Vent and Rain Cap
G
Bulk Head
Filler valve PV1855BRCN
(see Valves Section, page 24)
H
Liquid Level Gauge
(With dial) PVE12A (see Valves
Section, page 33)
All Safe, Inc. 1-866-958-3473
SHERWOOD LPG PRODUCTS
Valves
Table of Contents
Valves
Overview ........................................................................ 12–13
Design Features ............................................................. 14–15
DOT Cylinder Valves – 100 lb. ........................................ 16–17
Multi-Purpose Valves ........................................................... 18
Service Valves ............................................................... 19–21
Filler Valves and Vapor Return Valves ............................ 22–25
Liquid Withdrawal Valves ............................................... 26–27
Relief Valves .................................................................. 28–30
Cluster Valve .................................................................. 31–32
Dual Check T-Connector Valve ............................................. 33
Fixed Liquid Level Gauges ................................................... 33
Filling and Unloading Valves,
Adapters, and Accessories .................................................. 34
All Safe, Inc. 1-866-958-3473
SHERWOOD LPG PRODUCTS
Overview
Overview
General
Safety Guidelines for Cylinder Valves
We engineer and manufacture Sherwood LPG valves to the highest industry
standards. Our valves are tested and listed by Underwriters Laboratories Inc.
and ASME. Our line of valves includes:
Cylinder valves serve many purposes, including vapor withdrawal and
shutoff, liquid withdrawal and shutoff, filling cylinders, releasing pressure,
and liquid level indication. Because of the hazards involved in possible
malfunction of this type of valve, all cylinder valves must be inspected on
a regular basis, particularly before filling cylinders, to ensure that no gas
escapes. Cylinders must not be overfilled.
t Cylinder and Service Valves
t Multi-Purpose Valves
t Filler Valves
t Liquid Withdrawal Valves
t Pressure Relief Valves
We make Sherwood valves for a full range of commercial, industrial, and
domestic applications, including installations in engine fuel, fork lift trucks,
and recreational vehicles as well as domestic tanks.
Pressure Relief Valve Service Life
All pressure relief valves, whether designed as an individual unit or as an
integral part of another valve, contain similar design features and have
similar functions. They all utilize the same basic operation principles,
and the same maintenance guidelines apply.
The life of a Sherwood pressure relief valve is affected by many variables,
including climate, air pollution, gas purity, and other factors. Therefore,
our valves must be routinely inspected according to industry standards.
Sherwood recommends that our valves be replaced after 10 years of use.
Customers using LPG cylinders are not always aware of the hazards of LPG.
Since LPG dealers are the primary customer contact, the dealer has an
obligation to warn customers of these potential hazards and ensure that
they receive proper safety instructions regarding the use and storage
of cylinders (see the Customer Safety Section found with the Sherwood
warranty, page 4).
Manufacturing Date
The manufacturing date is stamped on the wrench flats of most Sherwood
valves. Pressure relief valves have this date stamped in the body of the valve.
The manufacturing date of all Sherwood valves is coded in one of six ways
(see Table 1 on page 13).
This section of our catalog does not cover all aspects of inspection and
maintenance of pressure relief valves. For more detailed information on
these subjects, please refer to the following:
1. CGA Pamphlet S-1.1, Pressure Relief Device Standards Cylinders, Section 9.1
2. NPGA Certified Employee Training Program (CETP) and other guidlines
3. NFPA Pamphlet #58, Storage and Handling of Liquefied Petroleum Gases
4. NFPA Pamphlet #59, LP Gases at Utility Gas Plants
t-FBLJOHHBTDBODBVTFmSFTPSFYQMPTJPOT
t0OMZUSBJOFEQFSTPOOFMTIPVMEXPSLPOHBTTZTUFNT
t*OTQFDUHBTTZTUFNTSFHVMBSMZ
t3FQMBDFFRVJQNFOUBTSFRVJSFE
All Safe, Inc. 1-866-958-3473
SHERWOOD LPG PRODUCTS
Overview
TABLE 1 - SHERWOOD VALVE DATE CODE
How Most Valves Are Coded
Abbreviations
&YBNQMF
Month and year
(used up to 1976)
Month (alphabetic),
Year (single-digit numeric)
A - January
B - February
C - March
D - April
E - May
F - June
G - July
H - August
I - September
J - October
K - November
L- December
D5 could mean:
April 1955
April 1965
April 1975
Quarter and year
(used 1976–1982)
Quarter (alphabetic),
Year (double-digit numeric)
A - 1st quarter
D - 2nd quarter
G - 3rd quarter
J - 4th quarter
G80 means:
3rd quarter 1980
Month and year
(used 1982–1988)
Month (alphabetic),
Year (single-digit numeric)
F84 means:
June 1984
8FFLBOEZFBS
(used 1988–present)
Week (double-digit numeric),
Year (double-digit numeric)
01 - 1st week of calendar year
02 - 2nd week of calendar year
01-89 means:
First week of 1989;
10-03 means:
Tenth week of 2003
Relief Valves:
Month and year
Month (alphabetic or numeric),
Year (double-digit numeric)
3-88 or C-88 both mean:
March 1988
Model 3349 OPD Valves
Year and day
Year (alphabetic),
Day (numeric)
C212 means:
212th day of 1999
or July 31, 1999
All Safe, Inc. 1-866-958-3473
SHERWOOD LPG PRODUCTS
Design Features
Cylinder Valve Features
Valves and options available
Sherwood manufactures an extensive line of cylinder and
service valves for various LPG applications, including fork lift
trucks, recreational vehicles, and engine fuel installations as
well as domestic and commercial tanks up to and including
1000-gallon water capacity tanks. Available options include
liquid level gauges, liquid withdrawal tubes, pressure relief
devices, hydrostatic relief devices, various outlet connections,
and various bonnet assemblies (see Figs. 1 and 2).
Aluminum handwheel —
meets UL® temperature
requirements
Exclusive Teflon® coated
brass stem — provides
lubricity to reduce friction
in moving parts
Back seating seal — protects
against leaks while the valve is
in operation (3250 Series bonnet
assembly only)
Resilient seat — provides
positive shutoff for
leak-free closure
O-ring seal — formulated
forLPG applications; UL®
approved for -40º F
Rugged forged
brass body
Pressure relief valve —
releases excessive pressure
that may build up
Outlet Connections — Fig. 1
⁄8" SAE (Society of Automobile
Engineers) flare (CGA182) —
engine fuel applications
3
CGA 555 (male) —
cylinder valve liquid withdrawal
⁄8" SAE flare angled 30º —
engine fuel applications
3
PA1428M
adapter
11⁄4"
Acme
thread
POL (CGA510) —
cylinder valve vapor withdrawal
1
⁄2" or 3⁄4" FNPT —
liquid withdrawal applications
⁄8" NPT
3
PV1427 Series —
fork lift truck applications
All Safe, Inc. 1-866-958-3473
SHERWOOD LPG PRODUCTS
Design Features
Cylinder Valve Features
Bonnet Assembly Combinations — Fig. 2
3250-8LH
3329-13LH
Bonnet assembly with back seating seal
Used in compact valves
Excessive downstream
pressure is vented back
into tank
3429-100
3250D-8LH
Dual bonnet for ASME multi-valve
applications
Engine fuel applications (internal
hydrostatic relief valve allows trapped line
pressure to vent back into supply tank with
valve in closed position)
All Safe, Inc. 1-866-958-3473
SHERWOOD LPG PRODUCTS
DOT Cylinder Valves — 100 lb.
DOT Cylinder Valves for Vapor Withdrawal —
Up to 100 lb. LPG Capacity (PVE3250 Series)
PVE3250C-375
PVE3250CLG-375
t Integral relief device
t Integral relief device
t Start-to-discharge pressure:
PVE3250C-375 — 375 psig
t Start-to-discharge pressure:
PVE3250CLG-375 — 375 psig
t The PVE3250C-375 valve is designed
for cylinders with 240 psig
t Same as the PVE3250 Series but includes a
fixed maximum liquid level gauge — specify
the liquid level tube length
Repair Kit
t Replacement Parts Kit — see page 40
t 3250-8LH-KIT — see pages 72–73
Repair Kit
t 3250-8LH-KIT — see pages 72–73
PVE3250C-375
PVE3250CLG-375
PVE3250ALG7
PVE3250AD7
t Fixed maximum liquid level gauge — specify
liquid level tube length when ordering
t Use where a separate pressure relief
device is provided (for example, on a
multiport 420-lb. cylinder)
t Use where a separate pressure relief
device is provided (for example, on a
multiport 420-lb. cylinder)
Repair Kit
t Replacement Parts Kit — see page 40
t 3250-8LH-KIT — see pages 72–73
Repair Kit
t 3250-8LH-KIT — see pages 72–73
7
PVE3250ALG7
PVE3250AD7
PVE3250BC-312
t Replacement valve for small ASME engine
fuel tanks with 20 sq. ft. or less in surface
area that are now obsolete
t Flow rate 705 CFM air
t Bonnet assembly and handwheel are
PVE3329 Series configuration
Repair Kit
t 3329-13LH-KIT — see pages 76–77
PVE3250BC-312
All Safe, Inc. 1-866-958-3473
SHERWOOD LPG PRODUCTS
DOT Cylinder Valves — 100 lb.
DOT Cylinder Valves for Liquid Withdrawal —
Up to 100 lb. LPG Capacity (PVE3250 Series)
LIQUID WITHDRAWAL VALVE
t Use in 100-lb. capacity cylinders where
liquid withdrawal is required
t Pressure relief device is set to relieve at 375 psig
t Fixed maximum liquid level gauge with 11.6"
dip tube for 100-lb. cylinder — specify length
for other cylinder sizes
t Integral excess flow check valve:
Closing flow liquid: 1 GPM LPG
t Inlet: 3⁄4" – 14 NGT
t Outlet: 0.903–14 LH; male CGA555
t For replacement parts, see page 40.
Repair Kit
t 3250-8LH-KIT — see pages 72–73
PVE3250CLM-375
ORDERING INFORMATION
Part Number
Container Connection
Service Connection
Fixed Maximum Liquid
Level Gauge
Valves Start-to-Discharge
Setting (psig)
Pressure Excess Flow
⁄4" – 14 NGT
POL(CGA510)
No
375
No
⁄4" – 14 NGT
POL(CGA510)
Yes
375
No
⁄4" – 14 NGT
POL(CGA510)
Yes
—*
No
⁄4" – 14 NGT
POL(CGA510)
No
—*
No
⁄4" – 14 NGT
POL(CGA510)
No
312
No
⁄4" – 14 NGT
Male CGA555
Yes
375
Yes
PVE3250C-375
3
PVE3250CLG-375
3
PVE3250ALG7*
3
PVE3250AD-7*
3
PVE3250BC-312
3
PVE3250ALM-375
3
* Use where separate pressure relief device is provided.
All Safe, Inc. 1-866-958-3473
SHERWOOD LPG PRODUCTS
Multi-Purpose Valves
Multi-Purpose Valves for Bulk Tank Installations
PVE2033CLT
Approx.
top of tank
DT Length
PVE2033CLT
t Incorporates a vapor service outlet (POL,
CGA510), a vapor equalizing connection,
and a fixed maximum liquid level gauge
(specify liquid level tube length when
ordering; see Replacement Parts Section,
page 41); a separate filler valve must
be used
t Designed for easy installation with a
standard wrenching hex that prevents
deformation of the valve body
t Compact design allows the use of small
hoods and direct connection of the
regulator
t Sturdy, simple and economical installation
t Side boss is tapped 1⁄8" FNPT and plugged
t 2033-100-KIT — see pages 60–61
PVE2035AT Series, up to 420 lb.
LPG Capacity
PVE2035AT
PVE2030BC with Double Back-Check
Valve, up to 200 lb. LPG Capacity
Approx.
top of tank
DT Length
PVE2030BC
t Multi-purpose valve with double back check
filler valve
t Ideal for on-site filling of DOT cylinders up
to 200 lb. LPG capacity without interrupting
service
t All functions are combined in one valve,
permitting its use on cylinders with a 3⁄4"
pipe thread opening
t Includes a service valve, pressure relief
valve, back check filler valve with secondary
backcheck, and a fixed maximum liquid
level gauge (specify liquid level tube length
when ordering; see Replacement Parts
Section, page 46)
t Filler connection: 13⁄4" ACME thread
t Inlet: 3⁄4"–14 NGT
t Outlet: POL (CGA510)
t Pressure relief setting: 375 psig
t 3329-13LH-KIT — see pages 76–77
t 2030-100-KIT — see pages 58–59
t Combines a service line valve, a back
check filler valve with secondary back check,
a relief valve, and a fixed maximum liquid
level gauge (specify liquid level tube length
when ordering; see Replacement Parts
Section, page 41).
t Lightweight and compact
t Ideal for on-site filling of DOT cylinders up to
420 lb. capacity without interrupting service
t Combines several DOT container components
in one tank opening
t Filler connection: 13⁄4" ACME thread
t Inlet: 1"–111⁄2 NGT
t Outlet: POL (CGA510)
t Pressure relief setting: 375 psig
t PVE2035AT-250 — for ASME 100-gallon
propane tanks; pressure relief setting
is 250 psig
t 2035-100-KIT — see pages 62–63
t 3250-8LH-KIT — see pages 72–73
PVE2033CLDBT
PVE2033CLDBT
t Same as the PVE2033CLT, but
incorporates a Dual Bonnet®‚
one-piece bonnet and stem assembly
for easy repair while the valve is fully
open, so gas service is not interrupted
t For replacement parts section,
see page 41
t 2033-100-KIT — see pages 60–61
t 6775-60-KIT — see pages 80–81
PVE2034CLT
PVE2034CLT
t Same as the PVE2033CLT, but does not
include a vapor return valve or a 1⁄4"
tapped side boss
t Incorporates a fixed maximum liquid level
gauge (specify liquid level tube length
when ordering; see Replacement Parts
Section, page 41)
t Inlet: 3⁄4"–14 NGT
t Outlet: POL (CGA510)
t 3329-13LH-KIT — see pages 78–79
All Safe, Inc. 1-866-958-3473
SHERWOOD LPG PRODUCTS
Service Valves
Service Valves, PVE1447 Series
PVE1447 Series ASME Service Valves
for Engine Fuel Applications
t Integral excess flow check at inlet
t Flow rated at approximately 1.7 or 2.3 GPM LPG
t For liquid or vapor withdrawal from engine fuel containers with a
separate relief valve
t PVE1447B — standard full size straight 3⁄8" SAE flare outlet service
valve
t PVE1447C — low profile; compact for easy installation
Repair Kit
t For PVE1447C, see 3329-13LH-KIT on pages 76–77
t For PVE1447B and PVE1447D, see 3250-8LH-KIT on pages 72–73
PVE447B
PVE1447C
Low Profile
PVE1447D
PVE1447 Series with Hydrostatic Relief
for Engine Fuel Applications
PVE1447CAH
Low Profile
PVE1447DMF
Angled SAE Outlet
t Incorporates all features of the PVE1447 Series, plus internal hydrostatic
relief, which vents trapped liquid with excessive line pressure back to
the tank
t PVE1447D — standard full size straight 3⁄8" SAE flare outlet service
valve
t PVE1447CAH — Canadian Standards Association (CSA) Certified low
profile for easy installation
t PV1447DMF — angled 3⁄8" SAE flare outlet; uses shorter couplings and
lower hoods; permits easy connection of flare nuts
t Eliminates the need for an external hydrostatic relief valve for liquid
lines where liquid can be trapped between two shutoffs
t To ensure proper functioning of the excess flow feature, these valves
should be fully open and backseated when in use
Repair Kit
t 3250D-8LH-KIT — see pages 74–75
All Safe, Inc. 1-866-958-3473
SHERWOOD LPG PRODUCTS
Service Valves
Service Valves, PVE1427 and PVE1449 Series (DOT)
PVE1427 Series Dot Cylinder Service Valves
for Fork Lift Truck Applications
t Integral excess flow check at inlet
t Flow rated at approximately 1.7 GPM LPG
t For vapor or liquid withdrawal from fork lift truck containers
t PVE1427B — standard full size straight 3⁄8" NPT outlet service valve
t PVE1427C — smaller body and bonnet assembly
t PVE1449 — smaller body and bonnet assembly, smaller diameter
handwheel, and lower profile than the PVE1427B and PVE1427C valves
Internal Excess Flow Valve
PVE1427B
3250-8LH-KIT
t Designed for both ASME engine fuel applications (PVE1447 Series) and
DOT fork lift truck applications (PVE1427 and PVE1449 Series)
t Because Sherwood’s excess flow device is internal to the valve body, it
is unaffected by internal variations in cylinder construction, which can
contribute to premature shutoff
t Designed with a low-pressure differential shutoff rated at 1.7 GPM
PVE1427C
PVE1427CV
3329-13LH-KIT
Excessive flow
valve closed
Fig. 1
No Flow
PVE1449
PVE1449V
PVE1449
PVE1449V
3329-13LH-KIT
NOTE: Sherwood’s internal excess flow valve has been field tested in both the US and Canada
on 3⁄8-cubic inch (5.2-liter) and 400-cubic inch (6.5-liter) displacement engines. Analysis of
engine fuel requirements has confirmed that a 550 CID engine would consume less than 1.08
GPM under full load with a 50% safety factor. Restricting flow under 2 GPM minimizes the loss
of LPG in the event of a major break, while maintaining adequate flow for the LPG fueled engine
application.
All Safe, Inc. 1-866-958-3473
SHERWOOD LPG PRODUCTS
Service Valves
Exces
down
press
vente
into ta
Service Valves with Hydrostatic Relief
t Recognize a pressure increase in the downstream line of approximately
25 to 50 psig differential
t LPG flows back into the tank and not to the atmosphere (see Fig. 2)
A*
(Approximately)ox.)
t Eliminate the need for external hydrostatic relief valve between shutoff
valves that could vent to the atmosphere; connections are eliminated,
reducing the number of potential leak points
Excessive
downstream
pressure is
vented back
into tank
Top of
Top of
Tank
tank
B*
(Approximately)
Fig. 2
Lift Truck Connectors — PA1428M and PA1428F
t For installation on LPG engine fuel lift truck systems
t Both connectors automatically close when disconnected
ORDERING INFORMATION
Part Number
Container
Connection
Service
Connection
A
B
⁄8" SAE
31⁄8"
15⁄16"
1.7
No
3250-8LH-KIT
1901S
J12-F10-85AP
⁄8" SAE
23⁄8"
15⁄16"
1.7
No
3329-13LH-65-KIT
3329-7
3740-13
⁄8" SAE
31⁄8"
15⁄16"
1.7
Yes
3250D-8LH-KIT
1901S
J12-F10-85AP
⁄8" SAE
27⁄16"
15⁄16"
1.7
Yes
3250D-8LH-KIT
1901S
J12-F10-85AP
⁄8" NPT
31⁄8"
15⁄16"
1.7
No
3250-8LH-KIT
1901S
3740-13
⁄8" NPT
215⁄16"
15⁄16"
1.7
No
3329-13LH-65-KIT
3329-7
3740-13
⁄8" NPT
21⁄2"
15⁄16"
1.7
No
3329-13LH-65-KIT
1449-7
3740-13
⁄8" NPT
21⁄2"
15⁄16"
1.7
No
3329-13LH-65-KIT
1449-7
3740-13
⁄8" SAE
21⁄8"
11⁄8"
2.5
Yes
3250D-8LH-KIT
1901S
J12-F10-85AP
⁄8" SAE
21⁄8"
11⁄8"
2.5
Yes
3250D-8LH-KIT
1901S
J12-F10-85AP
3
⁄4" – 14 NGT
3
⁄4" – 14 NGT
3
⁄4" – 14 NGT
3
⁄4" – 14 NGT
3
⁄4" – 14 NGT
3
⁄4" – 14 NGT
3
⁄4" – 14 NGT
3
⁄4" – 14 NGT
3
⁄4" – 14 NGT
3
3
PVE1447C
3
PVE1447D
3
PVE1447CAH
3
PVE1427B
3
PVE1427CV
3
PVE1449
3
PVE1449V
3
PVE1447DMF
3
PVE1447CAHX
3
Component Parts
Excess
Flow (GPM)
⁄4" – 14 NGT
PVE1447B
*Dimensions
(See Fig. 2)
Hydrostatic
Relief
Bonnet Assembly Kit
Handwheel
Handwheel Screw
All Safe, Inc. 1-866-958-3473
SHERWOOD LPG PRODUCTS
Filler & Vapor Return Valves
Double Back Check Filler Valve and Vapor Return Valve
Filler Valves
t Double back check construction
t The large hex lower body allows a socket to be used during
installation (except on angled outlet fill valves PVE1855SD-30,
PVE1855SD-90, and PV1855BRCN)
t All valves are UL® Listed (per UL® 125) and meet NFPA standards
t High filling capacity — see Ordering Information on page 25
for connection sizes, valve dimensions, and fill rates at various
differential pressures
t Equipped with 3⁄4" MNPT outlet connection and 13⁄4" ACME inlet
connection or special 3⁄4" FNPT and 1⁄2" SAE male flare inlet connection
Cap and Strap
1850-10
PVE1855SD
O-ring
G216B
t Machined one-piece body
t Used primarily for ASME engine fuel tanks
or lift truck cylinders
t Keeper strap provided
AA
t 1855-100-KIT — see pages 54–55
C
C
App
top
PVE1855SD
10
Cap and Strap
1850-10
g
O-ring
G216B
6B
B
B
PVE1855SD-30
t 30° angle on the 13⁄4" ACME filler connection
facilitates connecting and disconnecting in
certain engine fuel tank applications
t 1855-100-KIT — see pages 54–55
C
C
A
PVE1855SD-30
Approximate
rox.
of tank
oftoptank
All Safe, Inc. 1-866-958-3473
SHERWOOD LPG PRODUCTS
Filler & Vapor Return Valves
PVE1855SPD
t Designed for use on tanks that have a
remote ACME fill valve
CC
A
A
t Has 3⁄4" FNPT connection
t 1855-100-KIT — see pages 54–55
Appro
top of
PVE1855SPD
PVE1855SVFD
t Designed for use on tanks that have a
remote ACME fill valve
t Standard 1⁄2" SAE flare connection
C
A
A
t Helps solve plumbing problems and reduces
the number of potential leak points
t 1855-100-KIT — see pages 54–55
PVE1855SVFD
Approx.
Approximate
op oftoptank
of tank
PVE1855SD-90
BB
t Designed for use on tanks that have a
remote ACME fill valve
t Standard 1⁄2" SAE flare connection
t Helps solve plumbing problems and reduces
the number of potential leak points
AA
t 1855-100-KIT — see pages 54–55
C
C
Approximate
Approx.
topof
of tank
tank
top
PVE1855SD-90
All Safe, Inc. 1-866-958-3473
SHERWOOD LPG PRODUCTS
Filler & Vapor Return Valves
Back Check Filler Valves and Vapor Return Valve
Cap and Strap
1850-10
A
O-ring
G216B
PV1855BRCN
t Designed for engine fuel application
t Bulkhead mounted (rear quarter panel well)
t Single back check
t Remote filling
t One-piece body
t Inlet: 13⁄4" ACME
t Outlet: 1⁄2" SAE flare
Rear quarter
panel mounting
surface
PV1855BRCN
PVE623C
t Designed for bulk tank applications
t One-piece body
t Low profile
t Increased fill rate
t Improved fill spray pattern
t Self-lubricated Delrin® poppet guide
t Seal replacement without poppet removal
t Low differential shutoff with poppet piston
t 623C-100-KIT
PVE623C
All Safe, Inc. 1-866-958-3473
SHERWOOD LPG PRODUCTS
Filler & Vapor Return Valves
PVE1876 Vapor Return Valve
t Has upper positive back check valve and
lower excess flow valve
t Attachment of the vapor hose coupling with
its projecting nozzle opens the back check
valve to permit flow in both directions
t 1876-100-KIT — see pages 58–59
A
C
Approximate top
of tank
PVE1876
ORDERING INFORMATION
*Dimensions (Inches)
Part Number
Container Connection
Filler Connection
A
B
C Hex
10 psig
25 psig
50 psig
75 psig
⁄4" NPT
13⁄4" ACME
27⁄64"
—
13⁄4"
19
30
43
60
⁄4" NPT
13⁄4" ACME
219⁄32"
11⁄4"
13⁄4"
19
30
43
60
⁄4" FNPT
13⁄4"
—
13⁄4"
19
30
43
60
⁄2" SAE Flare
2
—
13⁄4"
19
30
43
60
⁄2" SAE Flare
2
119⁄64"
13⁄4"
19
30
43
60
⁄2" SAE flare
13⁄4" ACME
15⁄8"
—
—
19
30
43
60
11⁄4" NPT
13⁄4" ACME
2
—
17⁄8"
70
92
144
158
⁄4" NPT
13⁄4" ACME
145⁄64"
—
11⁄4"
PVE1855SD
3
PVE1855SD-30
3
PVE1855SPD
3
PVE1855SVFD
3
PVE1855SD-90
3
PV1855BRCN
PVE623C
PVE1876
Fill Rate at Various Differential Pressures (GPM Propane)
⁄4" NPT
3
⁄4" NPT
1
⁄4" NPT
1
1
3
At 100 psig inlet pressure, LPG flow is 3100 CFH (vertical), 2970 CFH (horizontal)
Note: For replacement components, please refer to the following chart.
FOR VALVE
See Instruction Sheet:
Use Replacement Part Kit:
PVE1855 Series
R-1855
1855-100-KIT
PVE623C
R-623C
623C-100-KIT
PVE1876
R-1876
1876-100-KIT
All Safe, Inc. 1-866-958-3473
SHERWOOD LPG PRODUCTS
Liquid Withdrawal Valves
Liquid Withdrawal Valves for ASME Bulk Tank Installation —
(PVE2341 Series)
PVE2341 Series Transfer Valve for Liquid Withdrawal
t Withdraw liquid LPG from a stationary tank during an emergency
or when relocation of the tank is necessary
t Incorporate an O-ring seal on the lower stem assembly,
a back seat feature, and swivel seat construction for durability;
the side outlet boss is tapped 1⁄4" FNPT and plugged
PVE2341
t Available with integral excess flow valves — see Ordering
Information below
Outlet
51⁄4"
open
t All tanks using a PVE2341 Series transfer valve must be pre-fitted
with a Sherwood PV5133S or PV5135S Checkmate™ liquid excess
flow valve
43⁄8"
closed
t The PVE2341 valve when used with the newer style adapter
PA5138 and Checkmate™ valves PVE5136 or PVE5137 is
designed for permanent installation
Pipe plug
t The PVE valve when used with the older style adapter PA5133
and Checkmate™ valves PVE5133S or PV5135S is not
recommended for permanent installation
t For replacement parts, refer to page 41
Approx. top of tank
t 2341-100-KIT — see pages 66–67
t 2341-110-KIT — see pages 68–69
Inlet
Checkmate™
Tank
Fig. 1
PA5138 Adapter
Optional excess flow
valve kit 2341-110-KIT
PVE5136 or 5137
Checkmate™ Activated
Liquid Withdrawal Valve
ORDERING INFORMATION
Part Number
Inlet Connection (NGT)
Outlet Connection (FNPT)
Flow at 10 psig
Differential (GPM)
Excess Flow Valve
Excess Flow — Approx.
Closing Flow (GPM)/LPG
⁄4"
46
No
—
⁄2 "
31
No
—
⁄4"
—
Yes
19.5
⁄4"
3
⁄4"
1
⁄4"
3
⁄4"
1
⁄2 "
—
Yes
19.5
⁄4"
—
—
—
19.5
PVE2341
3
PVE2341A
3
PVE2341X
3
PVE2341AX
3
PVE2341BX
3
All Safe, Inc. 1-866-958-3473
SHERWOOD LPG PRODUCTS
Liquid Withdrawal Valves
Liquid Withdrawal Excess Flow Valves for ASME Bulk Tank Installation —
(PVE5136 or PVE5137 and PA5138)
Checkmate™ Adapter PA5138
t Use with PVE2341 Series transfer valves and PA5138 adapter to
evacuate liquid LPG from stationary bulk tanks
t Can be installed directly into any liquid withdrawal outlet location
(top, end, or bottom of tank)
t Uses an excess flow valve with a soft rubber seat to minimize leakage
when the cap is removed
t Designed for permanent installation when used with PVE5136
or PVE5137
138
PA5138
Checkmate™ Activated Liquid Withdrawal Excess Flow Valve
PVE5136
t 3⁄4" inlet
t 15⁄8" 12UN-2A outlet
t Meets UL® 125 Standard
t Use with PA5138 adapter
VE5136
t Approximate closing flow of the excess flow valve is 22 GPM liquid LPG
t Designed for permanent installation when used with PVE5138
PVE5136
Checkmate™ Activated Liquid Withdrawal Excess Flow Valve
PVE5137
t 11⁄4" inlet
t 15⁄8" 12UN-2A outlet
t Leak-free connection
t Use with PA5138 adapter
t Approximate closing flow of the excess flow valve is 30 GPM liquid LPG
t Designed for permanent installation when used with PA5138
PVE5137
ORDERING INFORMATION
Inlet Connection (NGT)
Outlet Connection (FNPT)
Excess Flow Valve
Excess Flow —
Approx. Closing Flow (GPM)/LPG
⁄4"
15⁄8" 12UN-2A
Yes
22
PVE5137
11⁄4"
15⁄8" 12UN-2A
Yes
30
PA5138
—
11⁄5" 12UN–3⁄4" Adapter
—
—
Part Number
PVE5136
3
All Safe, Inc. 1-866-958-3473
SHERWOOD LPG PRODUCTS
Relief Valves
Internal Spring-Type Pressure Relief Valves for ASME Containers
Internal Spring Relief Valves For ASME Containers/Domestic
Tanks (UVE433A, UVE443A, and UV453A Series)
t Use as pressure relief devices on ASME containers and domestic tanks
t Sturdy construction; made with non-corrosive materials
t Furnished with rain cap for protection against contamination
t Rain cap can also be ordered seperately — see Ordering
Information below
Rain Cap
NOTE: See Ordering Information for part numbers.
UVE433A
UVE443A
UVE453A
ORDERING INFORMATION
Part Number
Container
Connection
Start-to-Discharge
Setting (psig)
⁄4"
250
Cu. Ft. / Min. Flow Capacity
UL
®
Tank Surface Area (Sq. Ft.)
ASME
UL
ASME
Rain Cap
Relief Area (Sq. Inches)
1930
1709
79
68
433-45A
0.37
UVE433AM
3
UVE433AC*
3
⁄4"
250
—
1709
—
68
433-45A
0.37
UVE443AM
1"
250
2755
2436
122
105
443-45A
0.66
UVE443AC*
1"
250
—
2436
—
105
443-45A
0.66
UVE453AM
11⁄4"
250
4640
4406
230
216
453-45A
1.23
UVE453AC*
11⁄4"
250
—
4406
—
216
453-45A
1.23
* California setting 275 psig.
All Safe, Inc. 1-866-958-3473
SHERWOOD LPG PRODUCTS
Relief Valves
Full Internal Pressure Relief Valves for DOT Fork Lift Cylinders
Full Internal Pressure Relief Valves for
DOT Fork Lift Cylinders (PV435A and
PV435L)
PV435L
t Use on fork lift trucks and other power units
with removable DOT cylinders with
up to 100 lb. LPG capacity
t Classified by Underwriters Laboratories®
in accordance with the Compressed Gas
Association Pamphlet S-1.1, Pressure Relief
Device Standard for Cylinders
Sumptype
coupling
NOTE: NFPA Pamphlet #58 states, “All containers
used in industrial trucks (including fork lift
truck cylinders) service shall have the container
pressure relief valve replaced by a new or
unused valve within 12 years of the date of
manufacture of the container and each
10 years thereafter.”
Fig. 1
UVE453A
UVE453A
Rain Cap for Pipeaway Adapters
Pipeaway Adapters
tThe PV435L is intended as a
replacement relief valve on
cylinders which previously
incorporated a relief valve
with an external spring
tDo not use the PV435A for this type
of installation since the proper
function of the relief valve could be
restricted (see Fig. 1 for sump-type
coupling)
435-45
For use on
universal cylinder
435-90 also available
435-45C
ORDERING INFORMATION
Part Number
Container Connection
Start-to-Discharge
Setting (psig)
⁄4"
375
⁄4"
375
PVE435A
3
PV435L
3
Flow Capacity SCFM Air
UL
®
Tank Surface Area (Sq. Ft.)
ASME
UL
ASME
Pipeaway Adapter
517
—
17
—
435-90/435-45
517
—
17
—
435-90/435-45
All Safe, Inc. 1-866-958-3473
SHERWOOD LPG PRODUCTS
Relief Valves
Full Internal Pressure Relief Valves
UVE445A Series
t Use as a pressure relief device on larger ASME engine
fuel containers and recreational vehicle containers
D
B
t Use PVE445AT on multiport 420-lb. DOT containers
t Protective cap UEP16 included
t Threaded to accept pipeaway adapter 445-21 (1" NPT,
male outlet), which provides minimum flow restriction
Top of tank
A
UVE436AR and UVE436AM
t Use as pressure relief devices on smaller ASME engine
fuel containers and recreational vehicle containers
C
t Enable the use of a smaller, more economical 3⁄4" NPT
tank coupling
t Protective cap 436AR-20 included
UVE436AR
UVE445AM
Pipeaway
Adapter 436-21
Pipeaway
Adapter 445-21
t Threaded to accept pipeaway adapter 436-21 (5⁄8" SAE
flare outlet), which provides minimum flow restriction
Fig. 1
ORDERING INFORMATION
Tank Connection
(NPT)
Start-to-Discharge
Setting (psig)
UVE445AM
1"
250
PVE445AT*
1"
UVE436AR
3
UVE436AM
3
PVE436AE**
3
Part Number
Flow Capacity SCFM Air
Tank Surface Area (Sq. Ft.)
ASME
UL
ASME
Pipeaway
Adapter
987
950
35
33
375
1625
—
64
⁄4"
312
720
679
⁄4"
250
603
⁄4"
362
783
UL
®
Dimensions (Approx.) — See Fig. 1
A
B
C
D Hex
445-21
5 ⁄16"
1 ⁄32"
3 ⁄32"
13⁄8"
—
445-21
59⁄16"
13⁄32"
315⁄32"
13⁄8"
23
22
436-21
411⁄32"
11⁄16"
35⁄16"
11⁄16"
543
—
—
436-21
4 ⁄32"
1 ⁄16"
3 ⁄16"
11⁄16"
—
—
—
436-21
411⁄32"
11⁄16"
35⁄16"
11⁄16"
9
11
3
1
15
5
* PVE445AT is classified by Underwriters Laboratories Inc.® in accordance with CGA Pamphlet S-1.1.
** Australian setting — 362 psig.
3865
B
D
A
Top of
tank
NOTE: NFPA Pamphlet #58 states,
“Hydrostatic relief valves designed to
relieve the hydrostatic pressure which
might develop in sections of liquid
piping between closed shutoff valves
shall have pressure settings not less
than 400 psig or more than 500 psig
unless installed in systems designed
to operate above 350 psig. Hydrostatic
relief valves for use in systems designed
to operate above 350 psig shall have
settings not less than 110 percent or
more than 125 percent of the system
design pressure."
Hydrostatic Relief Valve for Engine Fuel
and Other Applications (PVE3865)
t Primarily used in manifolds and carburetion systems
t Start-to-discharge setting is 400 psig
t Small and economical
t Protective cap UAS 10 included
t UL® 132 states that flow capacity tests are not
required for this class of valve
C
PVE3865
Fig. 2
ORDERING INFORMATION
Part Number
PVE3865
Dimensions (Approx.) — See Fig. 2
NPT Connection
Start-to-Discharge
Setting (psig)
A
B
⁄4"
400
1 ⁄16"
1 ⁄16"
1
9
5
C
⁄4"
1
D Hex
⁄8"
5
All Safe, Inc. 1-866-958-3473
SHERWOOD LPG PRODUCTS
Cluster Valves
Cluster Valves for ASME Underground Propane Tanks
2.78"
6.79"
5.25"
⁄4" baffle pipe
length to suit
tank (furnished
by customer)
3
Fig. 1
30"
Dip tube
length
Application
t Service valve contains a Dual Bonnet®
These multi-purpose valves are designed for use on domestic ASME
underground tanks that require a single opening except for a separate
opening for liquid withdrawal.
t Gauge flange “junior” size configuration will accommodate
a combination of gauges
t Gauge boss provided (contains a 1⁄4" NPT plug)
t Protective closures are provided for filler valve, vapor return valve,
and pressure relief valve
Features
t 30" dip tube provided but not installed (customer may trim to
desired length)
t Combine components into a compact and convenient system
t Contain individual components that are standard, off-the-shelf items
t The full complement of domestic tank float gauge sizes is on
pages 36–38
t Include a double back-check filler valve suitable for all filling
requirements
t ASME certified
t Vapor return valve is designed to satisfy the demand required by the
system during the filling operation
t UL® approved
t Replaceable valves enable retrofitting without replacing the
complete unit
ORDERING INFORMATION
Part Number
2098AT
2098XT
2098PT
Container
Connection
Service
Connection
Filling
Connection
Connection
Size
21⁄2" FNPT
POL (CGA 510)
0.855–14 NGO LH
13⁄4" ACME
13⁄4" ACME
UL® Listed
Closing
Flow
Gauge
Flange
Opening
3100 CFH
@ 100 psig
Fits “Junior”
Size
Baffle Pipe
Connection
Dip Tube
Length
Pressure
Relief
Valve
Setting
⁄4" FNPT
30"*
250 psig
3
UL Listed
Relief
Valve
Capacity
ASME Listed
1740
SCFM/air
300 sq. ft.
Underground
* Dip tube not installed; may be cut by customer to desired length.
NOTE: For use in containers with surface area up to 300 sq. ft. underground.
Include 5136 liquid withdrawl valve.
All Safe, Inc. 1-866-958-3473
SHERWOOD LPG PRODUCTS
Cluster Valves
Cluster Valve (2098AT)
FG1281 Series
PVE12
2098A COMPONENTS
PVE431
PVE623C
PVE3329BDB
PVE1876
2098P* COMPONENTS
Part Number
Description
Part Number
Description
FG1281
Float Gauge
FG1281
Float Gauge
PVE431
Relief Valve
PVE431
Relief Valve
PVE623C
Filler Valve
PVE623C
Filler Valve
PVE12A
Outage Gauge
PVE12A
Outage Gauge
PVE3329BDB
Service Valve
PVE3329BDB
Service Valve
PVE1876
Vapor Return Valve
PVE1876
Vapor Return Valve
* Include 5136 Liquid Withdrawal Valve.
All Safe, Inc. 1-866-958-3473
SHERWOOD LPG PRODUCTS
T-Connector and Fixed Maximum Liquid Level Gauges
Dual Check T-Connector and Fixed Maximum Liquid Level Gauges
Dual Check T-Connector PV3866
PV3866
Fixed Maximum Liquid Level Gauges
t Use bulkhead-mounted units on
two-tank installations
t These gauges indicate maximum filling
level as specified in NFPA Pamphlet #58
t Complies with UL® and NFPA Pamphlet
#58 specifications
t All gauges have 1⁄4" NPT inlet threads
t Check valves stop the flow of LPG
between two tanks, helping to prevent
overfills
t Should the two tank pressures become
unequal, this connector will draw LPG
from the tank with the higher pressure
until both pressures equalize; LPG will
then be drawn from both tanks
PVE12B-XX
t Supplied with dip tube assembled to valve
t Furnished with a standard 12" length of
tube, unless otherwise specified
t #54 drill size orifice
PVE12B
PVE12BD
t Integral hydrostatic relief valve has
start-to-discharge setting of 400 psig
PVE12BD-XX
t Identical to the PVE12B, but supplied with
a “stop filling” dial (part number 11)
t Furnished with a standard 12" length of
tube, unless otherwise specified
t Plastic dust cover UAS 10 on hydrostatic
relief valve keeps out contaminants (check
regularly to make sure cover is installed)
PVE12A
t Fitting has only three connections,
minimizing leak points
t Use where a liquid level tube is welded in
the vessel, or where the gauge opening
on the container is at the maximum
allowable filling level
t All three connections are 3⁄8" SAE flare
for easy installation
t Lock washers and a large nut for bulkhead
installation reduce the cost of fittings
t #54 drill size orifice
PVE12AD
PVE12A
PVE12AD
t Identical to PVE12A, but supplied with a
“stop filling” dial (part number 11)
PVE10DRF
2.50
t Manually operated shutoff valve; mounts
directly on the tank
t Use with a remote liquid level gauge
t Can be manually shut off should repairs in
the line become necessary
t 1⁄4" SAE flare outlet connection
t 1⁄4" NPT tank connection
PV3866
PVE10DRF
PVE10ARF
Tank
1
Tank
2
PV3866
Fig. 1
t Does not contain a #54 drill size orifice;
install only where a #54 size orifice is
built into the tank coupling
PVE10ARF
t Identical to the PVE10DRF, but contains a
#54 drill size orifice
t Use where no orifice is provided in the
tank coupling
All Safe, Inc. 1-866-958-3473
SHERWOOD LPG PRODUCTS
Filling and Unloading Valves, Adapters, and Accessories
Filling and Unloading Valves, Adapters and Accessories
440 Series
Quick-Acting Valve — LV440 and LV440L Series
t Connects to end of hose used to fill cylinders
t Quickly turns on or shuts off the flow of liquid to the cylinder
t Available with or without a locking device (locking handle on
LV440L Series only)
t Replaceable bonnet and stem assembly; refer to Sherwood
Instruction Sheets R-440 (pages 44–45) and R-440L
(pages 46–47)
LV440 without locking handle
LV440L with locking handle
Flow
ORDERING INFORMATION
Part Number with Lock
Part Number without Lock
Inlet (FNPT)
LV440L
LV440
1
LV440AL
LV440A
3
LV440BL
LV440B
1
LV440CL
LV440C
1
Outlet (FNPT)
Bonnet & Stem Assembly
with Lock
Bonnet & Stem Assembly
without Lock
⁄4"
440-50L-KIT
440-50-KIT
⁄8"
440-50L-KIT
440-50-KIT
⁄4"
440-50L-KIT
440-50-KIT
⁄2 "
440-50L-KIT
440-50-KIT
⁄4"
1
⁄8"
3
⁄2 "
1
⁄2 "
1
Hose End Adapters for Filler Hoses (PA901 Series)
Unloading Adapter
Unloading Adapter PV903A
PA901B — Filler Hose Adapter with
Check Valve
t Use when liquid has to be removed from the
tank during an emergency or when relocation
is necessary
t Can be attached to the filler hose end valve
nozzle or can be carried separately to be
used as a temporary check valve for the
container filler valve in case of a leak
PA901B
t Smaller projection provides easier connection
t Permits close control of the liquid flow
t For proper use of the PV903A unloading
adapters, see pages 52–53
t Short height allows the protective hood to be
closed when the adapter is left on the filler
valve
t Inlet: 13⁄4" ACME (female)
t Outlet: 1⁄2" FNPT
PA901BTM — Filler Hose Adapter
PV903A
t Same as the 901B, but with a durable
plastic hand grip for quick coupling and
uncoupling of the hose with a gloved hand
t Inlet: 13⁄4" ACME (male)
PA901BTM
t Outlet: 13⁄4" ACME (female)
PA901H — LPG Motor Fuel Fill Adapter
t Connects a male POL (CGA510) to a
male 13⁄4" ACME filler valve
t Adapts a standard POL fitting connection to
fill an engine fuel tank
t Inlet: POL (CGA510) (female)
PA901H
t Outlet: 13⁄4" ACME (female)
t5IF17"VOMPBEJOHBEBQUFSTNVTUPOMZCFVTFEXJUI
Sherwood PVE623C or PV1855SD filler valves
t6TFXJUIBOZPUIFSWBMWFNBZDBVTFEBNBHFUPUIFWBMWF
and a proper seal may not be maintained
t"OJNQSPQFSTFBMNBZDBVTFHBTMFBLBHF
t-FBLJOHHBTDBODBVTFmSFTPSFYQMPTJPOT
All Safe, Inc. 1-866-958-3473
SHERWOOD LPG PRODUCTS
Float Gauges
Table of Contents
Float Gauges
LPG Float Gauges for ASME Domestic Tanks
and DOT Cylinders ................................................................ 36
LPG Float Gauges for ASME Domestic Tanks. ................. 37–38
LPG Float Gauges for Lift Truck Cylinders ............................. 38
All Safe, Inc. 1-866-958-3473
SHERWOOD LPG PRODUCTS
Float Gauges
LPG Float Gauges for ASME Domestic Tanks and DOT Cylinders
Float Gauges for Above-Ground Horizontal Tanks
t 1" NPT mounting
t For various-size tanks
t Refer to Ordering Information for correct size gauge
Features
t Solid brass mounting head
t Ultra-low friction, smooth-acting, non-jamming gear design
t Hermetically sealed, easily readable dial
t Teflon® coated, free-floating shaft
t Solid float; no metal shell to corrode or leak
FG3981 Series
ORDERING INFORMATION FOR ABOVE-GROUND TANKS
Container Capacity
(Gallons of Water)
Nominal Cylinder
Diameter
Gauge
Head Style
Replacement Dial &
2 Screws Kit Part Number
FG3981-002NR
120
24"
Threaded 1" NPT
1284-20-002-KIT
FG3981-002R
150
FG3981-003NR
200
Gauge Part Number
Brass Head
30"
250
FG3981-003R
325
FG3981-004NR
500
FG3981-001R
37"
Threaded 1" NPT
1284-20-002-KIT
41"
Threaded 1" NPT
30"
No
Yes
1284-20-002-KIT
Brass Head
420# Vertical
No
Yes
FG3981-005R
FG3981-001NR
1284-20-002-KIT
Brass Head
1000
No
Yes
Brass Head
FG3981-004R
FG3981-005NR
Threaded 1" NPT
Remote Ready
No
Yes
Threaded 1" NPT
1284-20-003-KIT
No
Brass Head
(% of Total Volume)
Yes
All Safe, Inc. 1-866-958-3473
SHERWOOD LPG PRODUCTS
Float Gauges
LPG Float Gauges for ASME Domestic Tanks
Float Gauges for Underground Horizontal Tanks
t Brass junior head mounting
t Refer to Ordering Information for correct size gauge
Features
t Solid brass mounting head
t Ultra-low friction, smooth-acting, non-jamming gear design
t Hermetically sealed, easily readable dial
t Teflon® coated, free-floating shaft
t Solid float; no metal shell to corrode or leak
FG1281 Series
ORDERING INFORMATION FOR UNDERGROUND TANKS
Gauge Part Number
FG1281-001W
Container Capacity
(Gallons of Water)
Nominal
Cylinder Diameter
Gauge
Riser Style
Replacement Dial &
2 Screws Kit Part Number
Remote Ready
120
24"
8 ⁄2"
1284-20-005-KIT
—
30"
81⁄2"
1284-20-005-KIT
No
37"
8 ⁄2"
1
150
FG1281-002NR
200
250
FG1281-002R
325
FG1281-003NR
500
Yes
1
1284-20-005-KIT
FG1281-003R
FG1281-004NR
No
Yes
1000
41"
81⁄2"
1284-20-005-KIT
FG1281-004R
No
Yes
FG1281-005NR
120
FG1281-005R
150
FG1281-006NR
200
24"
151⁄2"
1284-20-005-KIT
No
Yes
30"
151⁄2"
1284-20-005-KIT
No
250
No
FG1281-006R
325
Yes
FG1281-007NR
500
37"
151⁄2"
1284-20-005-KIT
FG1281-007R
FG1281-008NR
FG1281-008R
No
Yes
1000
41"
151⁄2"
1284-20-005-KIT
No
Yes
All Safe, Inc. 1-866-958-3473
SHERWOOD LPG PRODUCTS
Float Gauges
LPG Float Gauges for ASME Domestic Tanks and DOT Cylinders
Float Gauges for AboveGround Horizontal Tanks
t 1" NPT mounting
t For various-size tanks
t Refer to Ordering Information
for correct size gauge
Features
t Solid brass mounting head
t Ultra-low friction, smooth-acting,
non-jamming gear design
t Hermetically sealed, easily
readable dial
t Teflon® coated,
free-floating shaft
t Solid float; no metal shell
to corrode or leak
ORDERING INFORMATION FOR ABOVE-GROUND TANKS
Float Gauges for DOT Cylinders
Gauge Part
Number
FG2281 Series
Container
Capacity
(Gallons
of Water)
Nominal
Cylinder
Diameter
Gauge Head Style
Replacement
Dial 1 & 2 Screws
Kit Part Number
Remote
Ready
FG2281-001R
120
150
24"
Threaded 11⁄4" NPT Brass Head
1284-20-002-KIT
Yes
FG2281-002R
200
250
325
30"
Threaded 11⁄4" NPT Brass Head
1284-20-002-KIT
Yes
FG2281-003R
500
37"
Threaded 11⁄4" NPT Brass Head
1284-20-002-KIT
Yes
FG2281-004R
1000
41"
Threaded 1 ⁄4" NPT Brass Head
1284-20-002-KIT
Yes
1
LPG Float Gauges for Lift Truck Cylinders
Float Gauges for AboveGround Horizontal Tanks
Lift Truck Cylinder Gauges Junior Head
Mounting (brass head)
t 1" NPT mounting
t For various-size tanks
t Refer to Ordering Information
for correct size gauge
FG1284-001
Features
t Solid brass mounting head
t Ultra-low friction, smooth-acting,
non-jamming gear design
t Hermetically sealed, easily
readable dial
t Teflon® coated, free-floating shaft
t Solid float; no metal shell to
corrode or leak
ORDERING INFORMATION FOR LIFT TRUCK CYLINDERS, JUNIOR HEAD
FG1284-002
Gauge
Part Number
Propane Capacity
and Mounting
Style
Nominal
Cylinder
Diameter
Gauge Head Style
Replacement
Dial 1 & 2 Screws
Kit Part Number
FG1284-001U
33 ⁄2# Universal
12"
Junior Brass Head
1284-20-001-KIT (fraction of total volume)
FG1284-002R
33 ⁄2# Horizontial
12"
Junior Brass Head
1284-20-002-KIT (% of total volume)
1
1
ORDERING INFORMATION FOR LIFT TRUCK CYLINDERS, 11⁄4" NPT
Lift Truck Cylinder
Gauge 11⁄4" NPT Mounting
FG2284-001
Gauge Part
Number
Propane Capacity
and Mounting
Style
Nominal
Cylinder
Diameter
Gauge Head Style
FG2284-001U
33 ⁄2# Universal
12"
Threaded 11⁄4" NPT Brass Head
1
Replacement
Dial 1 & 2 Screws
Kit Part Number
1284-20-001-KIT
(fraction of total volume)
All Safe, Inc. 1-866-958-3473
SHERWOOD LPG PRODUCTS
Replacement Parts Kits
Table of Contents
Replacement Parts Kits
Replacement Parts Kits .................................................. 40–42
All Safe, Inc. 1-866-958-3473
SHERWOOD LPG PRODUCTS
Replacement Parts Kits
Replacement Parts Kits —
All Kits Contain Instruction Sheets
1
1
2
2
15⁄16" ACME
3
3
5
Approx. top of
tank
0.885" – 14 NGO
L. H.
⁄4"
14 NGT
3
Approx. top of
tank
0.885" – 14 NGO
L. H. Outlet: POL
(CGA510)
⁄4"
14 NGT inlet
3
DT Length
DT Length
6
5
4
4
PV3329 Series Valves
PV3349 Series Valves
1 - Handwheel Screw – 3740-13
2 - Handwheel – 3329-7
3 - Bonnet and Stem Assembly –
3329-13LH-KIT
4 - Liquid Level Stem and Seat
Assembly (Flush) – 1931S-24
5 - Module Assembly – 3349-20
6 - Liquid Level Tube – DI1929-23-XX
1 - Handwheel Screw – 3740-13
2 - Handwheel – 3329-7
3 - Bonnet and Stem Assembly –
3329-13LH-KIT
4 - Liquid Level Stem and Seat
Assembly (Flush) – 1931S-24
5 - Liquid Level Tube – DI1929-23-XX
4
1
2
1
5
3
0.885" – 14 NGO
L. H. Outlet: POL
(CGA510)
3
2
Approx. top of
tank
Approx. top of
tank
3
⁄4"
14 NGT inlet
⁄4"
14 NGT inlet
3
0.885" – 14 NGO L. H. Outlet:
POL (CGA510)
(not shown)
DT Length
DT Length
5
4
6
7
PV3250 Series Valves
1 - Handwheel Screw – 3740-13
2 - Handwheel – 1901
3 - Bonnet and Stem Assembly –
3250-8LH-KIT
PV2030BC Valve
4 - Liquid Level Stem and Seat
Assembly (Flush) – 1931-24A
5 - Liquid Level Tube – DI1929-23-XX
1 - Handwheel – 3329-7
2 - Handwheel Screw – 3740-13
3 - Bonnet and Stem Assembly –
3329-13LH-KIT
4 - Gasket – 697-2
5 - Cap – 1850-3
6 - Liquid Level Tube – DI1929U23-XX
7 - Liquid Level Stem and Seat
Assembly – 1931-24A
All Safe, Inc. 1-866-958-3473
SHERWOOD LPG PRODUCTS
Replacement Parts Kits
Replacement Parts Kits
All Kits Contain Instruction Sheets
1
1
2
4
3
5
6
PV903A and PV903B Series Valves
PV902A and PV902B Series Valves
2
1 - Screw – 3740-13
2 - Handwheel – 1901
3 - Stem
4 - Bonnet Nut
5 - Lower Stem Assembly
6 - Push Rod
7 - Valve Stem with Seat Disc –1931-24A
XX - Replacement Parts Kit for 903A and B Series
Valves – 903-100-KIT (includes parts 5, 6,
and 7)
XX - Replacement Parts Kit for 903A and B Series
Valves 903-200-KIT (includes 903-100-KIT
and parts 3 and 4)
1 - Screw – 3740-13
2 - Handwheel – 1901
3 - Stem
4 - Bonnet Nut
5 - Lower Stem Assembly
6 - Push Rod
7 - Valve Stem with Seat Disc – 1931-24A
XX - Replacement Parts Kit for 902 Series Valves
(902-100-KIT not shown) (includes parts
5, 6, and 7)
XX - Replacement Parts Kit for 902 Series
Valves (902-200-KIT not shown) (includes
902-100-KIT and parts 3 and 4)
3
4
5
7
6
7
Filler
connection
3
1 ⁄4" ACME
thread
1
2
PV2035A Series Valves
1
4
6
2
3
5
4
2341 Outlet ⁄4" FNPT
2341A Outlet 1⁄2" FNPT
3
5
6
7
8
9
10
3
Approx. top
of tank
1" – 111⁄2
NGT inlet
7
1 - Cap – 1850-10
2 - Gasket – 697-2
3 - Bonnet and Stem Assembly
3250-8LH-KIT
4 - Handwheel – 1901S
5 - Screw – 3740-13
6 - Rain Cap – UT12X
7 - Liquid Level Stem Assembly – 1931-24A
8 - Liquid Level Tube – DI1929UM23XX
DT Length
8
0.885" – 14 NGO
L.H. Outlet: POL
(CGA510)
(not shown)
Vapor return
11⁄4" ACME
7
11
4
2
1
⁄4" – 14 NGT inlet
3
6
12
PV2035A Series Valves
1 - Handwheel Screw – 3740-13
2 - Handwheel – 1901
3 - Upper Stem
4 - Bonnet
5 - O-Ring
6 - Lower Stem
7 - Gasket
8 - Back Seat Washer
9 - Seat
10- Washer Seat
11- Screw Seat
12- Excess Flow Check Assembly
2341-110-KIT
XX- Pipe Plug (not shown) – 2426B
XX- Replacement Parts Kit for 2341
Series Valve, lower stem section
(not shown) – 2341-100-KIT
(includes parts 5, 6, 7, 8, 9, 10,
and 11)
XX- Replacement Parts Kit for 2341
Series Valve (not shown) – 2341200-KIT (includes 2341-100-Kit and
parts 3 and 4)
8
Approx.
top of
tank
3
⁄4" 14 NGT
inlet
3
DT Length
5
Outlet:
POL (CGA510)
0.885" – 14 NGO
L.H. (CGA510)
PV2033CL and PV2034CL Valves
1 - Handwheel Screw – 3740-13
2 - Handwheel – 3329-7
3 - Bonnet and Stem Assembly
3329-13LH-KIT
3 - Dual Bonnet and Stem Assembly –
3427-100 (alternate)
4 - Liquid Level Stem and Seat Assembly
– 1931-24A
5 - Liquid Level Tube – 2033-15-XX
6 - Washer (2033CL only) – 797-2
7 - Cap (2033CL only) – 1875-3A
8 - Replacement Parts Kit
(2033CL only) – 2033-100-KIT
All Safe, Inc. 1-866-958-3473
SHERWOOD LPG PRODUCTS
Replacement Parts Kits
Replacement Parts Kits —
All Kits Contain Instruction Sheets
Dual Bonnet® Kit #6775-60
This kit is a partial bonnet replacement assembly for existing Sherwood
multi-purpose valves (PV2033CLDB Series). This replacement can be made
while the valve is fully opened so gas service is never interrupted. To ensure
correct replacement, please refer to Instruction Sheet R-6775-6.
Kit # 3429-100-KIT contains:
t Handwheel
t Bonnet Stem Assembly —
6775-60
Stem Back Seated
t Instruction Sheet — R-6775-60
NOTE: Will not convert existing Sherwood multi-purpose valves with standard bonnets
to the dual bonnet configuration.
Not included
Dual Bonnet® Kit #3429-100
This kit is a complete bonnet replacement assembly for existing Sherwood
multi-purpose valves (PV2033CLDB Series and PV2033CL Series). The tank
must be fully evacuated in accordance with Instruction Sheet R-3429 before
the bonnet assembly can be replaced.
Kit #3429-100-KIT contains:
t Dual Bonnet Conversion Assembly — 3429-100
t Instruction Sheet — R-3429
NOTE: Will convert existing Sherwood multi-purpose valves with standard bonnets
to the dual bonnet configuration.
All Safe, Inc. 1-866-958-3473
SHERWOOD LPG PRODUCTS
Instruction Sheets
Table of Contents
Instruction Sheets
Bonnet Assembly Replacement Kit for Sherwood
Model 440 Quick-Acting Valve — 440-50-KIT .................................... 44–45
Bonnet Assembly Replacement Kit for Sherwood
Model 440 Quick-Acting Valve
(with Locking Handle) — 440-50L-KIT ............................................... 46–47
Filler-Section Replacement Kit for Sherwood
Model 623B Filler Valve — 623B-100-KIT .......................................... 48–49
Component Replacement Instructions for Model 902A
and 902B Unloading Adapters — 902-100-KIT .................................. 50–51
Component Replacement Instructions for Model PV903A
and PV903B Unloading Adapters — 903-100-KIT .............................. 52–53
Filler-Section Replacement Instructions for Model 1855 Series
Filler Valve —1855-100-KIT ............................................................... 54–55
Vapor-Return Replacement Instructions for Model 1876
Vapor-Return Valve — 1876-100-KIT ................................................. 56–57
Filler-Section Replacement Instructions for Model 2030BC
Multi-Purpose Cylinder Valves — 2030-100-KIT ................................ 58–59
Vapor-Return Section Replacement Instructions for
Model 2033CL Multi-Purpose Cylinder Valves — 2033-100-KIT ........ 60–61
Filler Section Replacement Instructions for Model 2035CA
Multi-Purpose Cylinder Valves — 2035-100-KIT ................................ 62–63
Operating Instructions for Sherwood 2344
Series Transfer Valve .......................................................................... 64–65
Component Replacement Instructions for Sherwood
2341 Series Liquid-Withdrawal Valves — 2341-100-KIT ................... 66–67
Optional Excess-Flow Valve Replacement Instructions
for 2341 Series Liquid-Withdrawal Valves — 2341-110-KIT.............. 68–69
Bonnet Assembly Replacement Instructions for LPG Cylinder
Valves — 3250-8ALH-KIT ................................................................... 70–71
Bonnet Assembly Replacement Instructions for LPG
Cylinder Valves — 3250-8LH-KIT ....................................................... 72–73
Bonnet Assembly Replacement Instructions for LPG
Cylinder Valves — 3250D-8LH-KIT ..................................................... 74–75
Bonnet Assembly Replacement Instructions for LPG
Cylinder Valves — 3329-13LH-KIT ..................................................... 76–77
Dual Bonnet Assembly Conversion Instructions for LPG Cylinder
Valves — 3429-100-KIT ..................................................................... 78–79
Handwheel, Bonnet, and Stem Assembly Replacement
Instructions for LPG Cylinder Valves — 6775-60-KIT ......................... 80–81
All Safe, Inc. 1-866-958-3473
SHERWOOD LPG PRODUCTS
Instruction Sheets
Bonnet Assembly Replacement Kit
for Sherwood Model 440 Quick-Acting Valve 440-50-KIT —
Instruction Sheet R-440
Kit # 440-50-KIT Contains:
Bonnet Assembly
#440–50
Part Number
Description
440-50
Bonnet Assembly with Gasket
R-440
Instruction Sheet
Gasket
#440-11
READ THIS INSTRUCTION COMPLETELY BEFORE BEGINNING.
General
This instruction is intended for people familiar with LP gas equipment and
applications. IF YOU ARE NOT FAMILIAR WITH THIS EQUIPMENT — STOP.
tLeaking gas can cause fires or explosions
tOnly trained personnel should work on gas systems
tInspect gas systems regularly
tReplace equipment as required
This instruction covers the bonnet assembly replacement of Sherwood Model
440, 440A, 440B, and 440C Quick-Acting On/Off Valves. The letter “L” at the
end of the model number indicates a locking handle. For valves with a locking
handle, use Kit #440-50L-KIT. For valves without a locking handle, use Kit
#440-50-KIT. If preferred, a non-locking assembly can be replaced with a
locking assembly at this time. The bonnet assembly is the same for all valve
sizes. Read this instruction completely before beginning.
Do not attempt to repair the bonnet assembly. It must be completely replaced.
Make sure one of the model numbers listed above is stamped into
the valve body.
All Safe, Inc. 1-866-958-3473
SHERWOOD LPG PRODUCTS
Instruction Sheets
Step 2: Inspection
Tools Required
R A 11⁄4" box wrench and
11⁄4" crowfoot adapter
R Fine wire brush
R Commercial leak-test solution*
R Torque wrench, 0–100
foot-pounds
* Must be approved for use on brass and with LP gas.
NOTE: Torque wrench and crowfoot adapter or socket should have the same drive size.
SAFETY INSTRUCTIONS
t6TFBOBDDVSBUFUPSRVFXSFODIUPUJHIUFOUIFCPOOFUBTTFNCMZ
t"MXBZTEFTUSPZBEBNBHFEPSXPSOWBMWFBOEQBSUTTPUIFZDBOOPUCFSFVTFE
1. Inspect the internal valve shoulder where the metal gasket seats. If the
seat is nicked, scratched, or distorted, replace the entire valve. Destroy
the old valve so it cannot be reused.
2. Inspect the threaded connection. Replace the entire valve if the internal
threads are damaged or worn. Destroy the old valve so it cannot be
reused.
3. If necessary, use a fine wire brush to clean the fine female threads of
the valve body. Blow out all debris.
4. Below the valve-to-bonnet mating seat is the smaller diameter poppet
seat. If this seat is nicked, scratched, or distorted, replace the entire
valve. Destroy the old valve so it cannot be reused.
Step 3: Re-Assembly
Bonnet Assembly Replacement Procedures
1. Install a new #440-11 gasket into the valve.
Step 1: Disassembly
2. Screw the new bonnet assembly into the valve until it bottoms out.
Tighten between 50 to 60 foot-pounds of torque. Thread sealant is not
necessary since the bonnet gasket provides a positive seal. Do not
overtighten the bonnet assembly.
1.Remove all traces of LP gas from the system using the procedures specified
in NFPA Pamphlet #58 and NPGA Installation and Service Guide Book
#4003. Remove the valve from the installation and clean it with clean
compressed air so dirt does not enter the valve interior.
2. Mount the valve in a vise, holding on flats. Do not overtighten.
Overtightening the vise can distort the valve body and the internal sealing
seat. Should this occur, the entire valve must be replaced. Destroy the old
valve so it cannot be reused.
3. Use the 11⁄4" box wrench to remove (turn counterclockwise) the bonnet
assembly from the valve (see Fig. 1). NOTE: An open-ended crescent
wrench may not be able to remove the bonnet nut because the torque
requirements are too high.
4. Destroy the entire bonnet assembly and handle so they cannot be reused.
5. Remove the metal gasket where the bonnet and valve mate. Destroy the
gasket so it cannot be reused.
Step 4: Testing
1. Pressurize the system with LP gas at 50 to 150 psig. Using a mild
ammonia-free soap-and-water solution, check for leaks where the
bonnet screws into the valve body and where the valve stem enters the
bonnet. As a precaution, check the piping connections as well.
2. If any leaks are found, evacuate the system according to NFPA Pamphlet
#58 and NPGA Installation and Service Guide Book #4003. Remove and
destroy the entire valve so it cannot be reused. Install a new valve.
3. If no leaks are found, the valve may now be placed in service.
Warn Your Customer
t Leaking gas can cause fires or explosions
Bonnet Assembly
#440–50
Gasket
#440-11
t If you smell gas:
- Immediately call your gas supplier from a neighbor’s phone
- If you can’t reach your gas supplier, call the Fire Department
- Do not touch electrical switches or telephones
- Do not light appliances
All Sherwood products must be used in strict compliance with the requirements
and provisions of National Fire Protection Association Pamphlets #54 and #58,
DOT, ANSI, and all applicable federal, state, provincial, and local standards, codes, regulations, and
laws. It is the responsibility of the sellers, installation and maintenance personnel, and end users to
remain knowledgeable of and in compliance with all standards, codes, regulations, and laws.
NOTICE: All Safe, Inc. 1-866-958-3473
SHERWOOD LPG PRODUCTS
Instruction Sheets
Bonnet Assembly Replacement Kit for Sherwood Model 440
Quick-Acting Valve (with Locking Handle) 440-50L-KIT —
Instruction Sheet R-440L
Kit #440-50L-KIT Contains:
Bonnet Assembly
#440-50L
Part Number
Description
440-50L
Bonnet Assembly with Gasket
R-440L
Instruction Sheet
Gasket
#440-11
READ THIS INSTRUCTION COMPLETELY BEFORE BEGINNING.
General
This instruction is intended for people familiar with LP gas equipment and
applications. IF YOU ARE NOT FAMILIAR WITH THIS EQUIPMENT — STOP.
tLeaking gas can cause fires or explosions
tOnly trained personnel should work on gas systems
tInspect gas systems regularly
tReplace equipment as required
This instruction covers the bonnet assembly replacement of Sherwood Model
440, 440A, 440B, and 440C Quick-Acting On/Off Valves using Kit #440-50LKIT. The letter “L” at the end of the model number indicates a locking handle.
The bonnet assembly is the same for all valve sizes. Read this instruction
completely before beginning.
Do not attempt to repair the bonnet assembly. It must be completely
replaced.
Make sure one of the model numbers listed above is stamped into the
valve body.
All Safe, Inc. 1-866-958-3473
SHERWOOD LPG PRODUCTS
Instruction Sheets
Step 2: Inspection
Tools Required
R A 11⁄4" box wrench and 11⁄4"
crowfoot adapter
R Small, fine wire brush
R Commercial leak-test solution*
R Torque wrench, 0–100 footpounds
* Must be approved for use on brass and with LP gas.
NOTE: Torque wrench and crowfoot adapter or socket should have the same drive size.
1. Inspect the internal valve shoulder where the metal gasket seats. If the
seat is nicked, scratched, or distorted, replace the entire valve. Destroy
the old valve so it cannot be reused.
2. Inspect the threaded connection. Replace the entire valve if the internal
threads are damaged or worn. Destroy the old valve so it cannot be
reused.
3. If necessary, use a fine wire brush to clean the fine female threads of
the valve body.
SAFETY INSTRUCTIONS
t6TFBOBDDVSBUFUPSRVFXSFODIUPUJHIUFOUIFCPOOFUBTTFNCMZ
t"MXBZTEFTUSPZBEBNBHFEPSXPSOWBMWFBOEQBSUTTPUIFZDBOOPUCFSFVTFE
4. Below the valve-to-bonnet mating seat is the smaller diameter poppet
seat. If this seat is nicked, scratched, or distorted, replace the entire
valve. Destroy the old valve so it cannot be reused.
Step 3: Re-Assembly
1. Install a new #440-11 gasket into the valve.
2. Screw the new bonnet assembly into the valve until it bottoms out.
Tighten between 50 to 60 foot-pounds of torque. Thread sealant is not
necessary since the bonnet gasket provides a positive seal. Do not
overtighten the bonnet assembly.
Replacement Procedures
Step 1: Disassembly
1. Remove all traces of LP gas from the system using the procedures
specified in NFPA Pamphlet #58 and NPGA Installation and Service
Guide Book #4003. Remove the valve from the installation and clean
it with clean compressed air so dirt does not enter the valve interior.
2. Mount the valve in a vise. Do not overtighten. Overtightening the vise
can distort the valve body and the internal sealing seat. Should this
occur, the entire valve must be replaced. Destroy the old valve so it
cannot be reused.
3. Use the 11⁄4" box wrench to remove (turn counter-clockwise) the bonnet
assembly from the valve (see Fig. 1). NOTE: An open-ended crescent
wrench may not be able to remove the bonnet nut because
the torque requirements are too high.
4. Destroy the entire bonnet assembly and handle so they cannot be
reused.
5. Remove the metal gasket where the bonnet and valve mate.
Destroy the gasket so it cannot be reused.
Step 4: Testing
1. Pressurize the system with LP gas at 50 to 150 psig. Using a mild
ammonia-free soap-and-water solution, check for leaks where the
bonnet screws into the valve body and where the valve stem enters
the bonnet. As a precaution, check the piping connections as well.
2. If any leaks are found, evacuate the system according to NFPA Pamphlet
#58 and NPGA Installation and Service Guide Book #4003. Remove and
destroy the entire valve so it cannot be reused. Install a new valve.
3. If no leaks are found, the valve may now be placed in service.
Warn Your Customer
t Leaking gas can cause fires or explosions
t If you smell gas:
- Immediately call your gas supplier from a neighbor’s phone
- If you can’t reach your gas supplier, call the Fire Department
- Do not touch electrical switches or telephones
- Do not light appliances
Bonnet Assembly
#440-50L
All Sherwood products must be used in strict compliance with the requirements
and provisions of National Fire Protection Association Pamphlets #54 and #58,
DOT, ANSI, and all applicable federal, state, provincial, and local standards, codes, regulations, and
laws. It is the responsibility of the sellers, installation and maintenance personnel, and end users to
remain knowledgeable of and in compliance with all standards, codes, regulations, and laws.
NOTICE: Gasket
#440-11
Figure
Figure
1 1
All Safe, Inc. 1-866-958-3473
SHERWOOD LPG PRODUCTS
Instruction Sheets
Filler-Section Replacement Kit For Sherwood Model 623B
Filler Valve 623B-100-KIT —
Instruction Sheet R-623B
Kit #623B-100-KIT Contains:
Filler 0-Ring
FILLER
O-RING
(G216B)
(G216B)
Retainer
RETAINER
(623B-2)
(623B-2)
Seal Retainer
SEAL
RETAINER
(623B-3)
(623B-3)
Tool Retainer
TOOL RETAINER
(TL623B)
(TL623B)
Seal
SEAL
(623B-11)
(623B-11)
Body
BODY
(623-1)
(623-1)
Part Number
Description
623B-11
Seal
G216B
Filler O-Ring
623B-2
Retainer
623B-3
Seal Retainer
TL623B
Tool Retainer
R-623B
Instruction Sheet
READ THIS INSTRUCTION COMPLETELY BEFORE BEGINNING.
General
This instruction is intended for people familiar with LP gas equipment and
applications. IF YOU ARE NOT FAMILIAR WITH THIS EQUIPMENT — STOP.
tLeaking gas can cause fires or explosions
This instruction covers the filler-section replacement of Sherwood Model
623B Filler Valve using Sherwood Kit #623B-100-KIT.
tOnly trained personnel should work on gas systems
Read this instruction completely before beginning. The valve cap and valve
body may be reused if they are in good condition.
tInspect gas systems regularly
tReplace equipment as required
The 623B valve includes dual internal check valves (known in the industry
as a “double back-check”). Parts for the bottom check valve are not field
replaceable.
Make sure model number 623B is stamped into the valve body.
All Safe, Inc. 1-866-958-3473
SHERWOOD LPG PRODUCTS
Instruction Sheets
Step 2: Inspection
Tools Required
1. Inspect the threads on the retainer and in the body. If any are damaged
or worn, replace the retainer or replace the complete valve if damage is
evident in the body.
❏ Tool Retainer #TL623B
❏ Torque wrench 0–50 foot-pounds
❏ Commercial leak-test solution*
Step 3: Re-Assembly
* Must be approved for use on brass and with LP gas.
1. Place the seal into the white seal retainer.
NOTE: Always destroy a damaged or worn valve so it cannot be reused.
Filler 0-Ring
FILLER
O-RING
(G216B)
(G216B)
2. Place the seal retainer assembly into the top of the valve body
so that the black seal is facing down and the white seal retainer
is facing up. Note: The seal retainer assembly must rest flat on top
of the poppet assembly.
3. Hand-tighten the threaded brass retainer into the top of the valve body
until it stops.
4. Use a torque wrench with a 7⁄8" socket and Tool #TL623B, tighten to 20
(±5) foot-pounds.
Retainer
RETAINER
(623B-2)
(623B-2)
5. Install a new G216B O-ring into the groove in the valve body.
Seal Retainer (623B-3)
SEAL RETAINER
(623B-3)
Seal (623B-11)
SEAL
(623B-11)
Step 4: Testing
Tool Retainer
(TL623B)
Body
(623-1)
BODY
(623-1)
1. Pressurize the system with LP gas at 50 to 150 psig (30 to 90° F).
Using a commercial leak-test solution, check for leaks. As a precaution,
check the valve-to-tank connection as well.
2. Keep your body away from the valve inlet. Carefully place two or three
drops of commercial leak-test solution around the poppet seal and
inspect for leaks. When complete, use a clean cloth or paper towel to
remove the excess liquid. Do not use a soap-and-water solution for
this test. It could corrode the internal parts.
3. If any leaks are found, evacuate the tank according to NFPA
Pamphlet #58 and NPGA Installation and Service Guide Book #4003.
Remove and destroy the entire valve so it cannot be reused. Install a
new valve.
4. If no leaks are found, the valve may now be placed in ervice.
Make sure the valve cap is in place and tightened.
Warn Your Customer
Filler-Section Replacement Procedures
Step 1: Disassembly
1. Remove all traces of LP gas from the cylinder using the procedures
specified in National Fire Protection Association Pamphlet #58
and National Propane Gas Association Installation and Service Guide
Book #4403.
t Leaking gas can cause fires or explosions
t If you smell gas:
– Immediately call your gas supplier from a neighbor’s phone
– If you can’t reach your gas supplier, call the Fire Department
– Do not touch electrical switches or telephones
– Do not light appliances
2. Clean the valve with clean compressed air so dirt does not enter
the valve interior.
3. Remove the valve cap. Remove the O-ring inside the ACME connector.
Destroy the O-ring so it cannot be reused.
4. Using Tool #TL623B (7⁄8" hex), remove the retainer from the valve by
turning it counter-clockwise with a 7⁄8" wrench. NOTE: The retainer is
completely inside the body.
All Sherwood products must be used in strict compliance with the requirements
and provisions of National Fire Protection Association Pamphlets #54 and #58,
DOT, ANSI, and all applicable federal, state, provincial, and local standards, codes, regulations, and
laws. It is the responsibility of the sellers, installation and maintenance personnel, and end users to
remain knowledgeable of and in compliance with all standards, codes, regulations, and laws.
NOTICE: 5. Remove the seal retainer.
All Safe, Inc. 1-866-958-3473
SHERWOOD LPG PRODUCTS
Instruction Sheets
Component Replacement Instructions for Model 902A
and 902B Unloading Adapters 902-100-KIT —
Instruction Sheet R-902
Bonnet
Assembly
#902-41
Kit #902-100-KIT Contains:
Lower Stem
Assembly
#902-40
Part Number
Description
902-41
Bonnet Assembly
902-40
Lower Stem Assembly
1931-24A
Vent Valve
R-903
Instruction Sheet
Vent Valve
#1931-24A
READ THIS INSTRUCTION COMPLETELY BEFORE BEGINNING.
General
This instruction is intended for people familiar with LP gas equipment and
applications. IF YOU ARE NOT FAMILIAR WITH THIS EQUIPMENT — STOP.
tLeaking gas can cause fires or explosions
tOnly trained personnel should work on gas systems
tInspect gas systems regularly
tReplace equipment as required
This instruction covers the renovation of Sherwood 902A and 902B
Unloading Adapters using Kit #902-100-KIT. Read this instruction completely
before beginning.
These adapter valves are used to open the Sherwood Model 623A filler valve
installed on old-style (pre-1961) domestic tanks so that liquid LP gas can be
removed. The 623A Filler Valve is installed into a tank flange with an internal
dip tube that withdraws liquid from the bottom of the tank..
Make sure the adapter valve model number is either 902A or 902B. The
model number is embossed on the adapter valve body. Also make sure the
filler valve is a model 623A
All Safe, Inc. 1-866-958-3473
SHERWOOD LPG PRODUCTS
Instruction Sheets
Step 3: Re-Assembly
Tools Required
1. Use petroleum jelly to lightly lubricate the inner bore
of the valve body where the O-ring travels up and
down.
R Medium slotted screwdriver
(or #25 Torx® screwdriver)
R Toothbrush
R Deep hex socket, 1”
R Fine wire brush
R Torque wrench, 0–100 foot-pounds
R Pressurized LP gas tank fitted with a
623A filler valve
R Bench vise with softfaced jaws
R Alcohol
R Commercial leak-test solution*
R Petroleum jelly lubricant
* Must be approved for use on brass and with LP gas.
SAFETY INSTRUCTIONS
t6TFBOBDDVSBUFUPSRVFXSFODIUPUJHIUFOUIFCPOOFUBTTFNCMZ
t"MXBZTEFTUSPZBEBNBHFEPSXPSOWBMWFBOEQBSUTTPUIFZDBOOPUCFSFVTFE
Step 1: Disassembly
4. With the 1" socket and an appropriate wrench, fully
loosen the bonnet nut by turning it counterclockwise,
as shown in Figure 2. With the bonnet threads
disengaged from the body, slowly pull the bonnet and
the attached push-rod assembly straight out of the
body. Discard the entire bonnet/push-rod assembly.
Do not reuse any of the old parts except the handwheel and screw.
Lower Stem Assembly
#902-40
Figure 3
Figure 3
3. Insert the new bonnet and push-rod assembly, push rod first,
into the valve body. By hand, screw the bonnet nut into the
valve until the push rod almost touches the inside of the rod
guide at the bottom of the valve.
Figure
Figure 44
5. Thread sealant is not necessary on the bonnet nut since the bonnet seat provides a metalto-metal seal. Secure the valve in a vise as described earlier. Use an accurate torque
wrench to tighten the bonnet nut at 50 to 60 foot-pounds. Do not overtighten.
6. Replace the handwheel and handwheel screw. Tighten the screw between 20 and 25
inch-pounds. Install the new vent valve finger-tight into the side of the adapter-valve body.
Figure
Figure11
2. Remove and discard the vent valve located on the side
of the main valve body.
3. Use the screwdriver (or #25 Torx driver) to remove the
handwheel screw and handwheel. By hand, turn the
threaded stem fully clockwise, withdrawing the bottom
of the push rod into the valve body. Turn the stem back
approximately half a turn counterclockwise to keep the
assembly loose.
2. Turn the new bonnet nut so it is in the middle of the
upper threaded stem, as shown in Figure 3. Slide the
locking groove of the lower stem onto the upper stem
locking pin. Hold the top of the upper stem. Turn the
bonnet nut counterclockwise down the stem so that
the nut covers the top of the lower stem, preventing
the lower stem from slipping off the locking pin (see
Figure 4).
Bonnet Nut
4. Hold the valve and bonnet nut to prevent the nut from turning
in the valve. Turn the threaded stem counterclockwise so
the rod passes through the hole in the middle of the guide. If
binding occurs, loosen the stem and try again. Finish turning
the bonnet nut fully clockwise into the valve body.
Renovation Procedures
1. Place the adapter valve in the vise so that the
handwheel is up and the valve outlet is held flat against
one of the vise jaws. Make sure that the ACME hand
nut at the bottom of the valve clears the vise jaw (see
Figure 1). Do not overtighten. Overtightening the vise
can distort the valve body, making it difficult to remove
the poppet assembly. Should this occur, the entire valve
must be destroyed so it cannot be reused.
Stem
Step 4: Testing
1. Turn the handwheel through its full range to ensure easy operation. If there is any binding
or grinding, destroy the entire valve so it cannot be reused.
2. Turn the handwheel fully clockwise to withdraw the push rod fully into the valve body.
Note that this does not “close” the adapter valve since it does not have any internal
shutoff seat.
Figure
Figure2 2
Vent Valve
1931-24A
Step 2: Inspection
1. A damaged valve-to-bonnet seat may not allow a positive seal. Use a light to inspect
the raised valve seat where the bottom of the bonnet nut contacts the valve when fully
tightened. If the seat is nicked, scratched, worn, or distorted, destroy the entire valve so it
cannot be reused.
2. Inspect all connections. Destroy the entire valve if any threaded connection is damaged or
has worn threads. Clean all threads as necessary.
3. Inspect the smooth bore in the valve body where the O-ring of the push rod rides. If the
bore is gouged, dented, pitted, or scratched, destroy the entire valve so it cannot be
reused. If the bore is in good condition but is dirty, clean it with a toothbrush and alcohol.
Re-inspect the bore. Do not use sandpaper, emery cloth, or similar abrasive to clean the
bore. Abrasives will scratch the sealing surface too deeply.
4. Inspect the vent opening on the side of the valve. If the orfice sealing surface is dirty, clean
it with a toothbrush and alcohol. if the orifice sealing surface is gouged, dented and pitted,
corroded, or scratched, destroy the entire valve so it cannot be reused.
3. Install the adapter valve onto a Sherwood 623A Filler Valve pre-installed on a pressurized
LP gas tank. Plug the adapter valve outlet with an appropriate (1⁄2" or 3⁄4") NPT pipe plug.
Never screw the adapter valve into the filler valve when the push rod is extended
past the cone-shaped rod guide. This can force the filler valve open before the hand nut
is fully tightened, releasing liquid LP gas. Never use a 902A or 902B Unloading Adapter
on anything but a Sherwood 623A Filler Valve. Permanent damage to both parts
can result.
4. Turn the handwheel fully counterclockwise to extend the push rod, opening the filler valve.
Using a commercial leak-test solution approved for use on brass and with LP gas, check
for leaks at the bonnet nut, stem thread, inlet collar, and vent valve.
5. If any leaks are found, close the valve (turn clockwise). Open the vent valve on the
side of the adapter valve body. When the venting stops, remove the adapter valve from the
filler valve. Do not attempt to repair the leak. Destroy the entire adapter valve so it cannot
be reused.
6. If no leaks are found, close the valve (turn clockwise) to close the filler valve. Open the
vent valve on the side of the adapter valve body. The adapter valve may now be placed
in service.
All Sherwood products must be used in strict compliance with the requirements
and provisions of National Fire Protection Association Pamphlets #54 and #58,
DOT, ANSI, and all applicable federal, state, provincial, and local standards, codes, regulations, and
laws. It is the responsibility of the sellers, installation and maintenance personnel, and end users to
remain knowledgeable of and in compliance with all standards, codes, regulations, and laws.
NOTICE: All Safe, Inc. 1-866-958-3473
SHERWOOD LPG PRODUCTS
Instruction Sheets
Component Replacement Instructions for Model PV903A
and PV903B Unloading Adapters 903-100-KIT —
Instruction Sheet R-903
Kit # 903-100-KIT Contains:
Bonnet Assembly
#902–41
Lower Stem Assembly
#903–20
Part Number
Description
902-41
Bonnet Assembly
903-20
Plug and Plunger Assembly
1931-24A
Vent Valve
R-903
Instruction Sheet
Vent Valve
#1931–24A
READ THIS INSTRUCTION COMPLETELY BEFORE BEGINNING.
General
This instruction is intended for people familiar with LP gas equipment and
applications. IF YOU ARE NOT FAMILIAR WITH THIS EQUIPMENT — STOP.
tLeaking gas can cause fires or explosions
tOnly trained personnel should work on gas systems
tInspect gas systems regularly
tReplace equipment as required
This instruction covers the renovation of Sherwood PV903A and PV903B
Unloading Adapters using Kit #903-100-KIT. Read this instruction completely
before beginning.
These adapter valves are used to open the Sherwood Model PV623B or
PV1855SD filler valve installed on domestic tanks or cylinders so that liquid
LP gas can be removed.
Make sure the adapter valve model number is either PV903A or PV903B.
The model number is located at the top of the handwheel.
Also make sure the filler valve is either Model PV623B or PV1855SD.
All Safe, Inc. 1-866-958-3473
SHERWOOD LPG PRODUCTS
Instruction Sheets
Step 3: Re-Assembly
Tools Required
❏ Medium slotted screwdriver
(or #25 Torx® screwdriver)
❏ Toothbrush
❏ Deep hex socket, 1”
❏ Fine wire brush
❏ Torque wrench, 0–100 foot-pounds
❏ Bench vise with softfaced jaws
❏ Petroleum jelly lubricant
1. Use petroleum jelly to lightly lubricate the inner bore of the valve body where the O-ring travels
up and down.
❏ Alcohol
❏ Pressurized LP gas tank fitted with a
PV623B or PV1855SD filler valve
❏ Commercial leak-test solution*
2. Insert the plug and plunger assembly into the inlet of the valve until the upper plug (with the
O-ring) extends past the bonnet portion of the body (see Fig. 4).
3. Turn the new bonnet nut so it is in the middle of the upper threaded stem as shown in Fig. 3.
Slide the locking groove of the lower stem onto the upper stem locking pin. Hold the top of the
upper stem.Turn the bonnet nut counterclockwise down the stem so that the nut covers the top
of the lower stem, preventing the lower stem from slipping off the locking pin (see Fig. 4).
* Must be approved for use on brass and with LP gas.
Bonnet Assembly
#902–41
SAFETY INSTRUCTIONS
t6TFBOBDDVSBUFUPSRVFXSFODIUPUJHIUFOUIFCPOOFUBTTFNCMZ
t"MXBZTEFTUSPZBEBNBHFEPSXPSOWBMWFBOEQBSUTTPUIFZDBOOPUCFSFVTFE
Plug and Plunger Assembly
#903–20
Renovation Procedures
Step 1: Disassembly
Figure 3
1. Place the adapter valve in the vise so that the handwheel
is up and the valve outlet is held flat against one of the vice
jaws. Make sure that the ACME hand nut at the bottom of
the valve clears the vice jaw (see Fig. 1). Do not overtighten.
Overtightening the vise can distort the valve body, making it
difficult to remove the poppet assembly. Should this occur,
the entire valve must be destroyed so it cannot be reused.
2. Remove and discard the vent valve located on the side of
the main valve body.
4. Push the new assembly into the valve until the bonnet nut engages the threads in the body.
Make sure the upper stem and plunger assembly does not disengage during assembly. Turn the
bonnet nut clockwise (by hand) until the threads bottom out into the body.
5. Thread sealant is not necessary on the bonnet nut since the bonnet seat provides metal-tometal seal. Secure the valve in a vise as described earlier. Use an accurate torque wrench to
tighten the bonnet nut at 50 to 60 foot-pounds. Do not over tighten.
Figure 1
3. Use the screwdriver (or #25 Torx driver) to remove the
handwheel screw and handwheel. By hand, turn the threaded stem fully clockwise, withdrawing
the bottom of the push rod into the valve body. Turn the stem back approximately half a turn
counterclockwise to keep the assembly loose.
4. With the 1" socket and an appropriate wrench, fully loosen the bonnet nut by turning it
counterclockwise as shown in Fig. 2. With the bonnet threads disengaged from the body, slowly
pull the bonnet and the attached plug and plunger assembly straight out of the body until the
connection of the bonnet assembly and plug and plunger assembly is exposed. Disengage the
bonnet assembly from the plug and plunger assembly and push the plug and plunger assembly
through the valve body and remove it from the inlet side of the valve body. Discard the entire
bonnet/plug and plunger assembly. Do not reuse any of the old parts except the handwheel and
the screw.
Step 2: Inspection
6. Replace the handwheel and handwheel screw. Tighten the screw between 20 to 25 inchpounds. Install the new vent valve finger-tight into the side of the adapter-valve body.
Step 4: Testing
1. Turn the handwheel through its full range to ensure easy operation. If there is any binding or
grinding, destroy the entire valve so it cannot be reused.
2. Turn the handwheel fully clockwise to withdraw the push rod fully into the valve body. Note that
this does not “close” the adapter valve since it does not have any internal shutoff seat.
3. Install the adapter valve onto a Sherwood PV623B or PV1855SD filler valve pre-installed on
a pressurized LP gas tank. Plug the adapter valve outlet with an appropriate (1⁄2" or 3⁄4") NPT
pipe plug. Never screw the adapter valve into the filler valve when the push rod is in an
extended position. This can force the filler valve open before the hand nut is fully tightened,
releasing liquid LP gas. Never use a PV903A or PV903B unloading adapter on anything but
a Sherwood PV623B or PV1855SD filler valve. Permanent damage to both parts can result.
4. Turn the handwheel fully counterclockwise to extend the push rod, opening the filler valve. Using
a commercial leak-test solution approved for use on brass and with LP gas, check for leaks at
the bonnet nut, stem thread, inlet collar, and vent valve.
1. A damaged valve-to-bonnet seat may not allow a positive
seal. Use a light to inspect the raised valve seat where the
bottom of the bonnet nut contacts the valve when fully
tightened. If the seat is nicked, scratched, worn, or distorted,
destroy the entire valve so it cannot be reused.
5. If any leaks are found, close the valve (turn clockwise). Open the vent valve on the side of the
adapter valve body. When the venting stops, remove the adapter valve from the filler valve. Do
not attempt to repair the leak. Destroy the entire adapter valve so it cannot be reused.
2. Inspect all connections. Destroy the entire valve if any
threaded connection is damaged or has worn threads.
Clean all threads as necessary.
3. Inspect the smooth bore in the valve body where the O-ring
of the push rod rides. If the bore is gouged, dented, pitted,
or scratched, destroy the entire valve so it cannot be reused.
If the bore is in good condition but is dirty, clean it with a
toothbrush and alcohol. Re-inspect the bore. Do not use
sandpaper, emery cloth, or similar abrasive to clean the bore.
Abrasives will scratch the sealing surface too deeply.
Figure 4
6. If no leaks are found, close the valve (turn clockwise) to close the filler valve. Open the vent
valve on the side of the adapter valve body. The adapter valve may now be placed in service.
Figure 2
Vent Valve
#1931–24A
4. Inspect the vent opening on the side of the valve. If the orifice sealing surface is dirty,
clean it with a toothbrush and alcohol. If the orifice sealing surface is gouged, dented, pitted,
corroded, or scratched, destroy the entire valve so it cannot be reused.
All Sherwood products must be used in strict compliance with the requirements
and provisions of National Fire Protection Association Pamphlets #54 and #58,
DOT, ANSI, and all applicable federal, state, provincial, and local standards, codes, regulations, and
laws. It is the responsibility of the sellers, installation and maintenance personnel, and end users to
remain knowledgeable of and in compliance with all standards, codes, regulations, and laws.
NOTICE: All Safe, Inc. 1-866-958-3473
SHERWOOD LPG PRODUCTS
Instruction Sheets
Filler-Section Replacement Instructions for Model
1855-Series Filler Valve 1855-100-KIT —
Instruction Sheet R-1855
Kit #1855-100-KIT Contains:
Filler O-Ring
#G216B
(1855SD and
185SD-30 Only)
Poppet
#1855D-50
Spring
#2030-7
Part Number
Description
G216B
Filler O-Ring
1855D-50
Poppet
2030-7
Poppet Spring
G021B
Body O-Ring
1570 or 272
omniFIT® or Loctite®
R-1855
Instruction Sheet
Body O-Ring
#G021B
READ THIS INSTRUCTION COMPLETELY BEFORE BEGINNING.
General
This instruction is intended for people familiar with LP gas equipment and
applications. IF YOU ARE NOT FAMILIAR WITH THIS EQUIPMENT — STOP.
tLeaking gas can cause fires or explosions
tOnly trained personnel should work on gas systems
tInspect gas systems regularly
tReplace equipment as required
This instruction covers the filler-section replacement of Sherwood Model
1855SD, 1855SD-30, 1855SPD, 1855SVFD and 1855SD-90 Filler Valves
using Kit #1855-100-KIT. Read this instruction completely before beginning.
Any 1855 Series valve other than those listed must not be repaired with this
instruction. Make sure the valve model number stamped into the valve body
is listed above.
Each valve covered in this instruction is pictured in Figure 1. Note that a filler
O-ring is used on 1855SD and 1855SD-30 valves only. Figure 2 shows an
exploded view of a typical valve.
The internal poppet, poppet spring, and body O-ring are identical for all
valves. All valves include dual internal check valves (known in the industry
as a “double back-check”). Parts for the bottom check valve are not
field replaceable.
All Safe, Inc. 1-866-958-3473
SHERWOOD LPG PRODUCTS
Instruction Sheets
4. Replace the entire valve if any of the upper-section threads are damaged or worn. Destroy the old
valve so it cannot be reused.
Tools Required
R A large adjustable wrench or 13⁄4"
open-end wrench
R Torque wrench, 0–50 foot-pounds
R Commercial leak-test solution*
5. Inspect the poppet seat of the upper section. If this seat is nicked, scratched, or distorted, replace
the entire valve. Destroy the old valve so it cannot be reused.
R Small, fine wire brush
R Mild ammonia-free soap-and-water
solution for lubrication
6. On valves 1855SD and 1855SD-30, inspect the ACME threads. If damaged or worn, replace the
entire valve. Destroy the old valve so it cannot be reused.
R Small wooden dowel
* Must be approved for use on brass and with LP gas.
7. Using a fine wire brush, clean the old threadlocking residue from the fine female threads of the
lower section. Blow the valve clean with compressed air.
Tools Required (Specific Valve)
8. Where the upper section of the valve can be reused, clean the fine male threads that screw into the
lower section.
Valve 1855SD
9. Inspect the internal poppet guide post for wear or nicks around the center guide hole. If any are
present, replace the entire valve. Destroy the old valve so it cannot be reused.
Valve 1855SVFD
R 1⁄2" Allen wrench
R 13⁄16" socket and wrench
10. Inspect the valve cap. If it is cracked, worn, loose, or defective in any way, replace the cap. Use part
#1850-10.
R 1⁄2" crowfoot adapter
Valve 1855SD-30 Valve
1855SD-90
R 11⁄16" crowfoot adapter and wrench
Valve 1855SPD
R 13⁄16" (12mm) crowfoot adapter and
wrench
R 13⁄8" socket and wrench
Note: Torque wrench, socket wrench, and crowfoot adapter should all have the same drive size.
t6TFBOBDDVSBUFUPSRVFXSFODIUPUJHIUFOUIF"$.&DPOOFDUPS
t"MXBZTEFTUSPZBEBNBHFEPSXPSOWBMWFBOEQBSUTTPUIFZDBOOPUCFSFVTFE
Filler-Section Replacement Procedures
2. Put three to four drops of omniFIT® 1570 or Loctite® 272 on the middle male threads of the new
ACME connector.
4. Push the poppet and spring all the way down and use a pencil or wooden dowel to hold it down.
Slide the upper section over the dowel and turn clockwise until the fine threads engage. NOTE:
Loctite 272 will begin to cure within seconds of being confined within brass threads. If this happens
before the following tightening procedure is completed, the sections must be separated, cleaned,
and reassembled.
5. Continue screwing the upper section into the lower section until it begins to bottom out. Inspect
the O-ring. Make sure it is not sticking out anywhere around the seal. If it appears OK, immediately
tighten the sections between 30 to 40 foot-pounds of torque. Do not overtighten the sections.
6. Push the poppet down several times to make sure it moves without binding.
Step 1: Disassembly
Figure 1
1. Remove all traces of LP gas from the cylinder using
the procedures specified in National Fire Protection
Association Pamphlet #58 and National Propane
Gas Association Installation and Service Guide Book
#4003.
3. On valves 1855SD and 1855SD-30, remove the
valve cap. Destroy the O-ring inside the ACME
connector so it cannot be reused. On valves
1855SPD, 1855SVFD, and 1855SD-90, disconnect
any tubing at the upper section of the valve.
1. Lubricate a new #G021B O-ring with a mild, ammonia-free, soap-and-water solution. Shake off the
excess liquid and install it into the valve at the O-ring seat. Be careful not to get any liquid on the
female threads since it prevents the threadlocking adhesive from curing properly.
3. Install the new poppet spring onto new poppet stem. Guide the poppet stem through the guide hole
in the middle of the poppet guide.
SAFETY INSTRUCTIONS
2. Clean the valve with clean compressed air so dirt
does not enter the valve’s interior.
Step 3: Re-Assembly
7. On the 1855SD and 1855SD-30, install a new #G216B O-ring into the inlet of the ACME fitting.
Step 4: Testing
1. Pressurize the cylinder with LP gas at 50 to 150 psig. Using the commercial leak-test solution
specified above, check for leaks where the top section screws into the valve body. As a precaution,
check the valve-to-tank connection as well.
1855SD
1855SD
1855SPD
1855SPD
4. Using the tool appropriate to the valve (Allen
wrench, crowfoot adapter, or socket), remove
(turn counterclockwise) the upper body section Figure 2
from the valve. If necessary, prevent the lower
valve section from turning by holding it steady
with the adjustable wrench (or 13⁄4" open-end
wrench). Note that the upper section of valve
1855SD is completely inside the lower section
and is removed with the Allen wrench.
BodyO-RING
O-Ring
BODY
#G021B
#G021B
5. Remove the poppet and poppet spring.
Destroy the parts so they cannot be reused.
1855SD-30
1855SD-30
1855SVFD
1855SVFD
1855SD-90
1855SD-90
Filler O-Ring
FILLER O-RING
#G216B
#G218B
(1855SD & 1855SD-30 ONLY)
(1855SD & 1855SD-30 Only)
Poppet
#1855D-50
POPPET
#1855D-50
Spring
SPRING
#2030-7
#2030-7
6. Remove and discard the O-ring where the upper
and lower valve sections mate. Destroy the
O-ring so it cannot be reused.
2. On 1855SD, 1855SD-30, and 1855SPD, carefully place two or three drops of commercial leak-test
solution around the poppet seat and inspect for leaks. Keep your body away from the valve opening.
When complete, use a clean cloth or paper towel to remove the excess liquid. Do not use a soapand-water solution for this test — it could corrode the internal parts. On 1855SVFD and
1855SD-90, screw a 1⁄2" SAE cap on the inlet for two or three turns. Apply a commercial leak-test
solution around the cap and valve threads and inspect for leaks.
3. If any leaks are found, evacuate the tank according to NFPA Pamphlet #58 and NPGA Installation and
Service Guide Book #4003. Remove and destroy the entire valve so it cannot be reused. Replace it
with a new valve.
4. If no leaks were found, the valve may now be placed in service. On 1855SD and 1855SD-30 valves,
make sure the valve cap is in place and tightened.
Warn Your Customer
t Leaking gas can cause fires or explosions
t If you smell gas:
- Immediately call your gas supplier from a neighbor’s phone
- If you can’t reach your gas supplier, call the Fire Department
- Do not touch electrical switches or telephones
- Do not light appliances
Step 2: Inspection
1. Inspect the internal valve shoulder of the lower section, where the O-ring seats. If the seat is nicked,
scratched, or distorted, replace the entire valve. Destroy the old valve so it cannot be reused.
2. Inspect all threaded connections. If any are damaged or worn, replace the entire valve. Destroy the
old valve so it cannot be reused.
3. Inspect the bottom mating-seat rim of the upper section. If the rim is nicked, scratched, or distorted,
replace the entire valve. Destroy the old valve so it cannot be reused.
All Sherwood products must be used in strict compliance with the requirements
and provisions of National Fire Protection Association Pamphlets #54 and #58,
DOT, ANSI, and all applicable federal, state, provincial, and local standards, codes, regulations, and
laws. It is the responsibility of the sellers, installation and maintenance personnel, and end users to
remain knowledgeable of and in compliance with all standards, codes, regulations, and laws.
NOTICE: All Safe, Inc. 1-866-958-3473
SHERWOOD LPG PRODUCTS
Instruction Sheets
Vapor-Return Replacement Instructions for Model 1876
Vapor-Return Valve 1876-100-KIT —
Instruction Sheet R-1876
Gasket
GASKET
#797-2
#797–2
Kit #1876-100-KIT Contains:
ACME Connector
ACME CONNECTOR
#1876–2
#1876-2
Poppet
POPPET
#1876–40
#1876-40
Poppet Spring
POPPET SPRING
#1876-12
#1876–12
Body O-Ring
Part Number
Description
797-2
Gasket
1876-2
ACME Connector
G019B
Body O-Ring
1876-40
Poppet
1876-12
Poppet Spring
1570 or 272
omniFIT® or Loctite®
R-1876
Instruction Sheet
BODY O-RING
G019B
#G019B
READ THIS INSTRUCTION COMPLETELY BEFORE BEGINNING.
General
This instruction is intended for people familiar with LP gas equipment and
applications. IF YOU ARE NOT FAMILIAR WITH THIS EQUIPMENT — STOP.
tLeaking gas can cause fires or explosions
tOnly trained personnel should work on gas systems
tInspect gas systems regularly
tReplace equipment as required
This instruction covers the vapor-return section replacement of Sherwood
Model 1876 Vapor-Return Valve using Kit #1876-100-KIT. The valve cap
and bottom section may be reused if they are in good condition. Read this
instruction completely before beginning.
The 1876 valve includes an excess-flow device that is an integral part of
the valve’s lower section. Parts for the excess-flow device are not field
replaceable.
Make sure model number PV1876 is stamped into the valve body.
All Safe, Inc. 1-866-958-3473
SHERWOOD LPG PRODUCTS
Instruction Sheets
Step 3: Re-Assembly
Tools Required
❏ A medium adjustable wrench or 1 ⁄4"
open-end wrench.
❏ Torque wrench, 0–50 foot-pounds
❏ A 3⁄4" open-end wrench
❏ Small, fine wire brush
❏ Mild ammonia-free soap-and-water
solution for lubrication
❏ Small wooden dowel
❏ Commercial leak-test solution*
1
❏ ⁄4" crowfoot adapter
3
* Must be approved for use on brass and with LP gas.
Note: Torque wrench and crowfoot adapter should all have the same drive size.
SAFETY INSTRUCTIONS
t6TFBOBDDVSBUFUPSRVFXSFODIUPUJHIUFOUIFWBMWFTFDUJPOT
t"MXBZTEFTUSPZBEBNBHFEPSXPSOWBMWFTPJUDBOOPUCFSFVTFE
Vapor-Return Section
Replacement Procedures
Step 1: Disassembly
Gasket
GASKET
#797-2
#797–2
ACME
Connector
ACME
CONNECTOR
#1876-2
#1876–2
1. Remove all traces of LP gas from
Poppet
POPPET
#1876-40
#1876–40
the cylinder using the procedures
specified in National Fire
Poppet
POPPET Spring
SPRING
#1876-12
#1876–12
Protection Association Pamphlet
Figure 1
Body
#58 and National Propane Gas
BODYO-Ring
O-RING
#GO19B
#GO19B
Association Installation and
Service Guide Book #4003.
2. Clean the valve with clean
compressed air so dirt does not
enter the valve’s interior.
3. Remove the valve cap. Remove and discard the gasket inside the ACME
connector. Destroy the gasket so it cannot be reused.
4. Using the 3⁄4" wrench, remove (turn counterclockwise) the ACME connector
section from the valve. If necessary, prevent the lower valve section from
turning by holding it steady with the adjustable wrench (or 11⁄4" open-end
wrench). Destroy the old ACME connector so it cannot be reused.
5. Remove and discard the poppet and poppet spring. Destroy the parts so
they cannot be reused.
6. Remove and discard the O-ring where the upper and lower valve sections
mate. Destroy the O-ring so it cannot be reused.
Step 2: Inspection
1. Inspect the internal valve shoulder of the lower section, where the O-ring
seats. If the seat is nicked, scratched, or distorted, replace the entire valve.
Destroy the old valve so it cannot be reused.
2. Replace the entire valve if the internal threads are damaged or worn.
Destroy the old valve so it cannot be reused.
3. Using a fine wire brush, clean the old threadlocking residue from the fine
female threads of the lower section. Blow the valve clean with compressed
air. Clean all other threads as necessary.
4. Inspect the internal poppet-guide post for wear or nicks. If any are present,
replace the entire valve. Destroy the old valve so it cannot be reused.
5. Inspect the valve cap. If it is cracked, worn, loose, or defective in any way,
replace the cap.
1. Lubricate a new #G019B O-ring with a mild, ammonia-free, soap-and-water
solution. Remove the excess liquid and install it into the valve at the O-ring
seat. Be careful not to get any liquid on the female threads since it prevents
the threadlocking adhesive from curing.
2. Put two to three drops of omniFIT® 1570 or Loctite® 272 on the middle male
threads of the new ACME connector.
3. Install the new poppet spring onto the round stem of the new poppet. The
hexagonal poppet stem must face up as shown. Guide the lower poppet
stem into the middle of the poppet guide.
4. Push the poppet and spring all the way down and use a wooden dowel
to hold it down. Slide the new ACME connector over the dowel and turn
clockwise until the fine threads engage. NOTE:Loctite 272 will begin to
cure within seconds of being confined within brass threads. If this happens
before the following tightening procedure is completed, the sections must
be separated, cleaned, and reassembled.
5. Continue screwing the ACME connector into the lower section until it
bottoms out. Tighten the sections between 25 to 35 foot-pounds of torque.
Do not overtighten the sections.
6. Push the poppet down several times to make sure it moves without binding.
7. Install a new #797-2 gasket into the inlet of the ACME fitting.
Step 4: Testing
1. Pressurize the cylinder with LP gas at 50 to 150 psig. Using the commercial
leak-test solution, check for leaks where the ACME connector screws into the
valve body. As a precaution, check the valve-to-tank connection as well.
2. Keep your body away from the valve inlet. Carefully place two or three
drops of commercial leak-test solution around the poppet seat and inspect
for leaks. When complete, use a clean cloth or paper towel to remove the
excess liquid. Do not use a soap-and-water solution for this test — it
could corrode the internal parts.
3. If any leaks are found, evacuate the tank according to NFPA Pamphlet #58
and NPGA Installation and Service Guide Book #4003. Remove and destroy
the entire valve so it cannot be reused. Install a new valve.
4. If no leaks were found, the valve may now be placed in service. Make sure
the valve cap is in place and tightened.
Warn Your Customer
t Leaking gas can cause fires or explosions
t If you smell gas:
- Immediately call your gas supplier from a neighbor’s phone
- If you can’t reach your gas supplier, call the Fire Department
- Do not touch electrical switches or telephones
- Do not light appliances
All Sherwood products must be used in strict compliance with the requirements
and provisions of National Fire Protection Association Pamphlets #54 and #58,
DOT, ANSI, and all applicable federal, state, provincial, and local standards, codes, regulations, and
laws. It is the responsibility of the sellers, installation and maintenance personnel, and end users to
remain knowledgeable of and in compliance with all standards, codes, regulations, and laws.
NOTICE: All Safe, Inc. 1-866-958-3473
SHERWOOD LPG PRODUCTS
Instruction Sheets
Filler-Section Replacement Instructions for Model 2030BC Multi-Purpose
Cylinder Valves 2030-100-KIT —
Instruction Sheet R-2030
Kit #2030-100-KIT Contains:
Filler Gasket
#697-2
ACME Connector
#2030-2
Poppet
#2030-40
Poppet Spring
#2030-7
Body O-Ring
#G021B
Liquid Level Stem
#1931-24A
Part Number
Description
697-2
Filler Gasket
2030-2
ACME Connector
G021B
Body O-Ring
2030-40
Poppet
2030-7
Poppet Spring
1931-24A
Liquid Level Stem
272
omniFIT® 1570 or Loctite®
R-2030
Instruction Sheet
READ THIS INSTRUCTION COMPLETELY BEFORE BEGINNING.
General
tLeaking gas can cause fires or explosions
tOnly trained personnel should work on gas systems
tInspect gas systems regularly
tReplace equipment as required
This instruction is intended for people familiar with LP gas equipment and
applications. IF YOU ARE NOT FAMILIAR WITH THIS EQUIPMENT — STOP.
Read the instructions completely before beginning. This instruction covers the
filler-section replacement of Sherwood Model 2030BC Multi-Purpose Cylinder
Valves using Sherwood Kit #2030-100-KIT. These valves include a filler section
with a 13⁄4" ACME connector, a pressure-relief device, dual internal check
valves (known in the industry as a “double back-check”), a maximum-liquidlevel indicator, and a vapor service on-off valve. These valves are used on
cylinders up to 200 pounds capacity.
Make sure the valve model number embossed on the valve body is 2030BC.
A white plastic tag should be attached to the bonnet stem on the side of the
valve. It should read “Quick Fill 2030 BC Double Back-Check.”
Any valve marked 2030C is obsolete. Should the ACME connector leak LP
gas anywhere, the valve should be removed and destroyed to prevent reuse
after all LP gas has been removed from the tank. Replace it with a Sherwood
2030BC.
Note the date code stamped on one of the wrench flats. Compare it to the date
code chart on page 13. If the valve is 10 years old or older, replace the entire
valve. Destroy the old valve so it cannot be reused.
All Safe, Inc. 1-866-958-3473
SHERWOOD LPG PRODUCTS
Instruction Sheets
Step 2: Inspection
Tools Required
1. Inspect the internal valve shoulder where the O-ring seats. If the seat is nicked, scratched, or
distorted, replace the entire valve. Destroy the old valve so it cannot be reused.
t A large adjustable wrench or open-end
wrench, 11⁄8" and 19⁄16"
t Small wooden dowel
t Spring scale, 20 to 40 pounds
t Toothbrush and alcohol
t Small, fine wire brush
t Commercial leak-test solution*
t Petroleum jelly lubricant
2. Inspect all threaded connections. Replace the entire valve if any threaded connection is damaged or
has worn threads. Destroy the old valve so it cannot be reused.
* Must be approved for use on brass and with LP gas.
Note: Torque wrench, socket wrench, and crowfoot adapter should all have the same drive size.
SAFETY INSTRUCTIONS
3. Using a fine wire brush, clean the old threadlocking residue from the fine female threads where the
ACME connector screws into the valve. Blow the valve clean with compressed air. Clean all other
threads as necessary.
4. Inspect the poppet guide while it is installed in the valve. If rust is present, the entire valve must be
replaced. Destroy the old valve so it cannot be reused. Sherwood does not provide for the replacement
of the poppet guide or bottom check-valve parts.
5. Inspect the wire attaching the poppet guide to the bottom check valve. If it is missing and the poppet
guide is loose, the entire valve must be replaced. Destroy the old valve so it cannot be reused.
Sherwood does not provide for the replacement of the poppet guide or bottom check-valve parts.
t6TFBOBDDVSBUFUPSRVFXSFODIUPUJHIUFOUIF"$.&DPOOFDUPS
t"MXBZTEFTUSPZBEBNBHFEPSXPSOWBMWFBOEQBSUTTPUIFZDBOOPUCFSFVTFE
t/FWFSSFQBJSPSDMFBOBTBGFUZSFMJFGEFWJDF
6. Inspect the vent opening on the side of the valve. If the orifice sealing surface is corroded, clean it with
a toothbrush and alcohol. If the orifice sealing surface is gouged, dented, pitted, or scratched, replace
the entire valve. Destroy the old valve so it cannot be reused.
7. Inspect the safety relief device. If its openings are clogged with foreign matter or if it shows any sign
of tampering or is dented, bent, or damaged in any way, replace the entire valve. Destroy the old valve
so it cannot be reused. Never attempt to repair or clean a safety relief device.
Bonnet and Handwheel Inspection
Before evacuating the tank, make sure the bonnet assembly is in good working order. There must be at least 35
psig of cylinder pressure to perform this test. Plug the valve outlet with a POL plug. Open the outlet valve halfway
and thoroughly check the bonnet nut and stem for leaks using a commercial leak-test solution.
Turn the handwheel clockwise until the bonnet just bottoms on the seat. Tighten the handwheel approximately one
tenth of a turn further. Carefully remove the outlet plug. A small release of LP gas may occur as the plug is loosened.
Thoroughly check the outlet for leaks using a leak-test solution. Remove any excess liquid when complete. If any
leak is found during either of the above tests, the bonnet assembly must also be replaced (see Sherwood Instruction
Sheet R-3329).
8. Inspect the ACME cap. If it is cracked or broken, replace with a new cap.
Step 3: Re-Assembly
1. Lightly lubricate a new #G021B O-ring with petroleum jelly and install it into the valve at the O-ring seat.
2. Make sure the poppet guide is in the correct position inside the valve. Install the new poppet spring onto the
new poppet stem. Guide the poppet stem through the guide hole in the middle of the poppet guide.
3. Push the poppet and spring all the way down and use a pencil or wooden dowel to hold it down. Slide
the new ACME connector over the dowel and turn clockwise until the fine threads engage.
4. Continue screwing the ACME connector until only two or three of the fine male threads remain
visible. Place two or three drops of omniFIT® 1570 or Loctite® 272 on the threads. NOTE: Loctite
272 will begin to cure within seconds of being confined within brass threads. If this happens before
the following tightening procedure is completed, the sections must be separated, cleaned, and
reassembled.
5. Tighten the ACME connector at 30 to 40 foot-pounds of torque by applying 30 to 40 pounds of pull at
the end of a standard 12-inch-long wrench, or 24 to 32 pounds at the end of a standard 15-inch-long
wrench. Do not overtighten.
HANDWHEEL
Handwheel
Safety Relief
SAFETY
RELIEF
DEVICE
Device
6. Push the poppet down several times to make sure it moves without binding.
ValveOUTLET
Outlet
VALVE
7. Install the new liquid-level stem into the side of the valve body and tighten finger tight.
Figure
Figure 11
Step 1: Disassembly
1. Remove all traces of LP gas from the cylinder using the procedures specified in National Fire Protection
Association Pamphlet #58 and National Propane Gas Association Installation and Service Guide Book #4003.
2. Clean the valve with clean compressed air so dirt does not enter the valve’s interior.
3. Remove and destroy the liquid-level stem located on the side of the main valve body.
t*GZPVTNFMMHBT
Figure 2
- Immediately call your gas supplier from a neighbor’s phone
- If you can’t reach your gas supplier, call the Fire Department
- Do not touch electrical switches or telephones
POPPET SPRING
Poppet
Spring
#2030-7
BODY O-RING
6. Remove the O-ring that seals the ACME
connector to the valve body. Destroy
the O-ring so it cannot be reused.
t-FBLJOHHBTDBODBVTFmSFTPSFYQMPTJPOT
#2030-2
5. Remove the poppet and poppet spring.
#G021B
Liquid Level Stem
Destroy the parts so they cannot be
#1931-24A
reused. Do not remove the poppet
LIQUID-LEVEL
STEM
#1931-24A
guide or the wire that holds the
poppet guide and the bottom check
valve together. See Paragraph 4
under Inspection.
3. If any leaks are found, evacuate the tank according to NFPA Pamphlet #58 and NPGA Installation and
Service Guide Book #4003. Remove and destroy the entire valve so it cannot be reused. Install a new
valve.
Warn Your Customer
ACME CONNECTOR
ACME
Connector
#2030-2
#2030-7
2. Keep your body away from the valve inlet. Carefully place two or three drops of commercial leak-test
solution around the poppet seat and inspect for leaks. When complete, use a clean cloth or paper
towel to remove the excess liquid. Do not use a soap-and-water solution for this test — it could
corrode the internal parts.
4. If no leaks were found, the valve may now be placed in service. Put the ACME cap tag on the valve so
the cap will be right-side up. Install the cap and tighten.
FillerGASKET
Gasket
FILLER
#697-2
#697-2
Poppet
POPPET
#2030-40
#2030-40
Step 4: Testing
1. Pressurize the cylinder with LP gas at 50 to 150 psig. Using the commercial leak-test solution, check
for leaks where the ACME connector screws into the valve body.
Filler-Section Replacement Procedures
4. Prevent the valve from turning while
removing the ACME connector by
holding it steady with an adjustable
wrench (or 11⁄8" open-end wrench)
applied at the valve’s wrench flats.
Use the other adjustable wrench (or
19⁄16" open-end wrench) on the flats
of the ACME connector. Remove (turn
counterclockwise) and destroy the
ACME connector so it cannot be reused.
8. Install the new filler gasket into the inlet of the new ACME connector.
Body O-Ring
#G021B
- Do not light appliances.
All Sherwood products must be used in strict compliance with the requirements
and provisions of National Fire Protection Association Pamphlets #54 and #58,
DOT, ANSI, and all applicable federal, state, provincial, and local standards, codes, regulations, and
laws. It is the responsibility of the sellers, installation and maintenance personnel, and end users to
remain knowledgeable of and in compliance with all standards, codes, regulations, and laws.
NOTICE: All Safe, Inc. 1-866-958-3473
SHERWOOD LPG PRODUCTS
Instruction Sheets
Vapor-Return Section Replacement Instructions for Model 2033CL Multi-Purpose
Cylinder Valves 2033-100-KIT —
Instruction Sheet R-2033
Kit # 2033-100-KIT Contains:
Gasket
#797-2
Poppet
#2033-130
Liquid-Level Stem
#1931-24A
ACME Connector
#2000-3
Poppet Spring
#2000-16
Body Gasket
#2000-19
Part Number
Description
797-2
Gasket
2000-3
ACME Connector
2000-19
Body Gasket
2033-130
Poppet
2000-16
Poppet Spring
1931-24A
Liquid-Level Stem
1570 or 272
omniFIT® 1570 or Loctite®
R-2033
Instruction Sheet
READ THIS INSTRUCTION COMPLETELY BEFORE BEGINNING.
General
This instruction is intended for people familiar with LP gas equipment and
applications. IF YOU ARE NOT FAMILIAR WITH THIS EQUIPMENT — STOP.
tInspect gas systems regularly
This instruction covers the vapor-return section replacement of Sherwood
Model 2033CL Multi-Purpose Cylinder Valves using Sherwood Kit #2033100-KIT. These valves include a vapor return connection, a maximum-liquidlevel indicator, and a vapor service on-off valve. They are used on domestic
ASME bulk tanks. They cannot be used to add or remove liquid LP gas.
Read this instruction completely before beginning.
tReplace equipment as required
Make sure the valve model number embossed into the valve body is 2033CL.
tLeaking gas can cause fires or explosions
tOnly trained personnel should work on gas systems
All Safe, Inc. 1-866-958-3473
SHERWOOD LPG PRODUCTS
Instruction Sheets
3. Using a fine wire brush, clean the old threadlocking residue from the fine female threads where the
ACME connector screws into the valve. Blow the valve clean with compressed air. Clean all other
threads as necessary.
Tools Required
R Socket wrench
R Small wooden dowel
R Torque wrench, 0–50 foot-pounds
R Petroleum jelly lubricant
R Deep hex socket, 11⁄4"
R Toothbrush and alcohol
R Small, fine wire brush
R Commercial leak-test solution*
4. Inspect the poppet guide for wear or nicks around the center guide hole. If any are present, contact
Sherwood for a replacement. The poppet guide may be reused if it is in good condition.
* Must be approved for use on brass and with LP gas.
SAFETY INSTRUCTIONS
5. Inspect the vent opening on the top of the valve. If the orifice sealing surface is corroded, clean it
with a toothbrush and alcohol. If the orifice sealing surface is gouged, dented, pitted, or scratched,
replace the entire valve. Destroy the old valve so it cannot be reused.
6. Inspect the valve cap. If it is cracked or broken, replace with a new cap.
Step 3: Re-Assembly
t6TFBOBDDVSBUFUPSRVFXSFODIUPUJHIUFOUIF"$.&DPOOFDUPS
1. Install a new #2000-19 gasket into the valve at the gasket seat.
t"MXBZTEFTUSPZBEBNBHFEPSXPSOWBMWFBOEQBSUTTPUIFZDBOOPUCFSFVTFE
Bonnet and Handwheel Inspection
Before evacuating the tank, make sure the bonnet assembly is in good working order. There must be
at least 35 psig of cylinder pressure to perform this test. Plug the valve outlet with a POL plug. Open
the outlet valve halfway and thoroughly check the bonnet nut and stem for leaks using a commercial
leak-test solution.
Turn the handwheel clockwise until the
bonnet just bottoms on the seat. Tighten the
handwheel approximately one tenth of a turn
further. Carefully remove the outlet plug.
Thoroughly check the outlet for leaks using
a commercial leak-test solution. If any leak
is found during either of the above tests,
the bonnet assembly must be replaced (see
Sherwood Instruction Sheet I-3329, FillerSection Replacement Procedures).
Handwheel HA
2. Install the new poppet spring onto the round stem of the new poppet. The hexagonal poppet stem
must face up as shown. Guide the lower poppet stem through the guide hole in the middle of the
poppet guide.
3. Push the poppet and spring all the way down and use a wooden dowel to hold it down. Slide the
new ACME connector over the dowel and turn clockwise until the fine threads engage.
4. Continue screwing the ACME connector until only two or three of the fine male threads remain
visible. Place two or three drops of omniFIT® 1570 or Loctite® 272 on the threads. NOTE: Loctite
272 will begin to cure within seconds of being confined within brass threads. If this happens before
the following tightening procedure is completed, the sections must be separated, cleaned, and
reassembled.
5. Make sure the metal gasket is correctly positioned in its seat. Using the torque wrench and 11⁄4"
socket, tighten the ACME connector with 50 to 60 foot-pounds of torque. Do not overtighten.
Valve Outlet V
Figure 1
6. Push the poppet down several times to make sure it moves without binding.
7. Install the new liquid-level stem into the top of the valve body and tighten finger tight.
8. Install the new gasket into the inlet of the new ACME connector.
Vapor-Return Section Replacement Procedures
Step 1: Disassembly
1. Remove all traces of LP gas from the cylinder using the procedures specified in National Fire
Protection Association Pamphlet #58 and National Propane Gas Association Installation and Service
Guide Book #4003.
2. Clean the valve with clean compressed air so dirt does not enter the valve’s interior.
3. Remove the liquid-level stem valve located on the top of the main valve body. Destroy the part so it
cannot be reused.
4. Use the socket wrench and 11⁄4" socket, remove (turn counterclockwise) the ACME threaded vaporreturn connector. Destroy the connector so it cannot be reused.
5. Remove the poppet and poppet spring. Destroy the parts so they cannot be reused.
6. Remove the flat metal gasket that seals the ACME connector to the valve body. Destroy the gasket
so it cannot be reused.
Step 4: Testing
1. Pressurize the cylinder with LP gas at 50 to 150 psig. Using the commercial leak-test solution
specified above, check for leaks where the ACME vapor return connector screws into the valve body.
As a precaution, check the valve-to-tank connection as well.
2. Keep your body away from the valve inlet. Carefully place two or three drops of commercial leak-test
solution around the poppet seat and inspect for leaks. When complete, use a clean cloth or paper
towel to remove the excess liquid. Do not use a soap-and-water solution for this test — it could
corrode the internal parts.
3. If any leaks are found, evacuate the tank according to NFPA Pamphlet #58 and NPGA Installation
and Service Guide Book #4003. Remove and destroy the entire valve so it cannot be reused. Install
a new valve.
4. If no leaks were found, the valve may now be placed in service. Make sure the valve cap is in place
and tightened.
Warn Your Customer
t-FBLJOHHBTDBODBVTFmSFTPSFYQMPTJPO
t*GZPVTNFMMHBT
Gasket
GASKET
#797-2
#797-2
POPPET
#2033-130
Poppet
#2033-130
Liquid-Level Stem
LIQUID-LEVEL STEM
#1931-24A
#1931-24A
- Immediately call your gas supplier from a neighbor’s phone
- If you can’t reach your gas supplier, call the Fire Department
- Do not touch electrical switches or telephones
- Do not light appliances
AMCE
Connector
ACME CONNECTOR
#2000-3
#2000-3
POPPET
SPRING
Poppet
Spring
#2000-16
#2000-16
Body
BODY GASKET
#2000-19
Gasket
#2000-19
2
FigureFigure
2
Step 2: Inspection
1. Inspect the internal valve shoulder where the metal gasket seats. If the seat is nicked, scratched, or
distorted, replace the entire valve. Destroy the old valve so it cannot be reused.
2. Inspect all threaded connections. Replace the entire valve if any threaded connection is damaged or
has worn threads. Destroy the old valve so it cannot be reused.
All Sherwood products must be used in strict compliance with the requirements
and provisions of National Fire Protection Association Pamphlets #54 and #58,
DOT, ANSI, and all applicable federal, state, provincial, and local standards, codes, regulations, and
laws. It is the responsibility of the sellers, installation and maintenance personnel, and end users to
remain knowledgeable of and in compliance with all standards, codes, regulations, and laws.
NOTICE: All Safe, Inc. 1-866-958-3473
SHERWOOD LPG PRODUCTS
Instruction Sheets
Filler-Section Replacement Instructions for Model 2035A
Multi-Purpose Cylinder Valves 2035-100-KIT —
Instruction Sheet R-2035
Filler Gasket
#697-2
Kit #2035-100-KIT Contains:
E Connector
#623-2
Poppet
#2035A-10
Poppet Spring
#19-1855-12
Body O-Ring
#623-12
Liquid-Level Stem
#1931-24A
Rain Cap
#UT12X
Part Number
Description
697-2
Filler Gasket
623-2
ACME Connector
623-12
Body O-Ring
2035A-10
Poppet
19-1855-12
Poppet Spring
1931-24A
Liquid-Level Stem
UT12X
Rain Cap
1570, 272
omniFIT®, Loctite®
R-2035
Instruction Sheet
READ THIS INSTRUCTION COMPLETELY BEFORE BEGINNING.
General
This instruction is intended for people familiar with LP gas equipment and
applications. IF YOU ARE NOT FAMILIAR WITH THIS EQUIPMENT — STOP.
tLeaking gas can cause fires or explosions
tOnly trained personnel should work on gas systems
tInspect gas systems regularly
tReplace equipment as required
This instruction covers the filler-section replacement of Sherwood Model
2035A and 2035A250 Multi-Purpose Cylinder Valves using Sherwood Kit
#2035-100-KIT. These valves include a filler section with a 13⁄4" ACME
connector, a pressure-relief device, dual internal check valves (known in
the industry as a “double back-check”), a maximum-liquid-level indicator,
and a vapor service on-off valve. The 2035A valve is used on customer
DOT cylinders up to 420 pounds capacity. The 2035A250 is used only on
100-gallon ASME tanks. Read this instruction completely before beginning.
Make sure the valve model number embossed into the valve body is 2035A
or 2035A250.
Note the date code stamped on one of the wrench flats. Compare it to the
data code chart on page 13. If the valve is 10 years old or older, replace the
entire valve. Destroy the old valve so it cannot be reused.
All Safe, Inc. 1-866-958-3473
SHERWOOD LPG PRODUCTS
Instruction Sheets
Step 2: Inspection
Tools Required
❏ A large adjustable wrench or
13⁄8" open-end wrench
❏ Commercial leak-test solution*
❏ Torque wrench, 0–50 foot-pounds
❏ Toothbrush and alcohol
❏ Socket wrench
❏ Open-end crowfoot adapter, 11⁄8"
❏ Petroleum jelly lubricant
❏ Small wooden dowel
❏ Small, fine wire brush
* Must be approved for use on brass and with LP gas.
Note: Torque wrench, socket wrench, and crowfoot adapter should all have the same drive size.
SAFETY INSTRUCTIONS
t6TFBOBDDVSBUFUPSRVFXSFODIUPUJHIUFOUIF"$.&DPOOFDUPS
t"MXBZTEFTUSPZBEBNBHFEPSXPSOWBMWFTPJUDBOOPUCFSFVTFE
t/FWFSSFQBJSPSDMFBOBTBGFUZSFMJFGEFWJDF
Bonnet and Handwheel Inspection
Before evacuating the tank, make sure the bonnet assembly is in good working order. There must be
at least 35 psig of cylinder pressure to perform this test. Plug the valve outlet with a POL plug. Open
the outlet valve halfway and thoroughly check the bonnet nut and stem for leaks using a commercial
leak-test solution.
Turn the handwheel clockwise until the bonnet just bottoms on the seat. Tighten the handwheel
approximately one tenth of a turn further. Carefully remove the outlet plug.
Thoroughly check the outlet for leaks using a commercial leak-test solution. Remove any excess liquid
when complete. If any leak is found during either of the above tests, the bonnet assembly must also be
replaced. See Sherwood Instruction Sheet R-3250-8LH.
Figure 1
Safety Relief
Device
Handwheel
Valve Outlet
Filler-Section Replacement Procedures
Step 1: Disassembly
1. Inspect the internal valve shoulder where the O-ring seats. If the seat is nicked, scratched,
or distorted, replace the entire valve. Destroy the old valve so it cannot be reused.
2. Inspect all threaded connections. Replace the entire valve if any threaded connection is
damaged or has worn threads. Destroy the old valve so it cannot be reused.
3. Using a fine wire brush, clean the old threadlocking residue from the fine female threads where
the ACME connector screws into the valve. Blow the valve clean with compressed air. Clean all
other threads as necessary.
4. Inspect the poppet guide for wear or nicks around the center guide hole. If any are present,
contact Sherwood for a replacement. The poppet guide may be reused if it is in good condition.
5. Inspect the vent opening on the side of the valve. If the orifice sealing surface is corroded,
clean it with a toothbrush and alcohol. If the orifice sealing surface is gouged, dented, pitted,
or scratched, replace the entire valve. Destroy the old valve so it cannot be reused.
6. Remove and discard the rain cap on the safety relief device. Inspect the safety-relief spring
for corrosion. If anything but light surface corrosion is present on the spring, replace the entire
valve. Destroy the old valve so it cannot be reused.
7. Inspect the safety relief device. If its openings are clogged with foreign matter or if it shows any
sign of tampering or is dented, bent, or damaged in any way, replace the entire valve. Destroy
the old valve so it cannot be reused. Never attempt to repair or clean a safety relief device.
8. Inspect the valve cap. If it is cracked or broken, replace with a new cap.
Step 3: Re-Assembly
1. Lightly lubricate a new #623-12 O-ring with petroleum jelly and install it into the valve at the
O-ring seat.
2. Make sure the poppet guide is in the correct position inside the valve. Install the new poppet
spring onto the new poppet stem. Guide the poppet stem through the guide hole in the middle
of the poppet guide.
3. Push the poppet and spring all the way down and use a pencil or wooden dowel to hold it down.
Slide the new ACME connector over the dowel and turn clockwise until the fine threads engage.
See Figure 2.
4. Continue screwing the ACME connector until only two or three of the fine male threads remain
visible. Place two or three drops of omniFIT® 1570 or Loctite® 272 on the threads. NOTE: Loctite
272 will begin to cure within seconds of being confined within brass threads. If this happens
before the following tightening procedure is completed, the sections must be separated,
cleaned, and reassembled.
5. Using the torque wrench and 11⁄8" crowfoot adapter, tighten the ACME connector with 30 to 40
foot-pounds of torque. Do not overtighten.
6. Push the poppet down several times to make sure it moves without binding.
7. Install the new liquid-level stem into the side of the valve body and tighten finger tight.
8. Install the new filler gasket into the inlet of the new ACME connector.
Step 4: Testing
1. Remove all traces of LP gas from the cylinder using the procedures specified in National Fire
Protection Association Pamphlet #58 and National Propane Gas Association Installation And
Service Guide Book #4003.
2. Clean the valve with clean compressed air so dirt does not enter the valve’s interior.
3. Remove the liquid-level stem valve located on the side of the main valve body. Destroy the part
so it cannot be reused.
4. Prevent the valve from turning while removing the ACME connector by holding it steady with an
adjustable wrench (or 13⁄8" open-end wrench) applied at the valve’s wrench flats. Use the socket
wrench and 11⁄8" open-end crowfoot adapter on the flats of the threaded ACME connector.
Remove (turn counterclockwise) the ACME threaded connector. Destroy the connector so it
cannot be reused.
5. Remove the poppet and poppet spring. Destroy the parts so they cannot be reused.
6. Remove the O-ring that seals the ACME connector to the valve body. Destroy the O-ring so it
cannot be reused.
Filler Gasket #697-2
ACME Connector #623-2
1. Pressurize the cylinder with LP gas at 50 to 150 psig. Using the commercial leak-test solution,
check for leaks where the ACME connector screws into the valve body.
2. Keep your body away from the valve inlet. Carefully place two or three drops of commercial
leak-test solution around the poppet seat and inspect for leaks. When complete, use a clean
cloth or paper towel to remove the excess liquid. Do not use a soap-and-water solution for
this test — it could corrode the internal parts.
3. If any leaks are found, evacuate the tank according to NFPA Pamphlet #58 and NPGA Installation
and Service Guide Book #4003. Remove and destroy the entire valve so it cannot be reused.
Install a new valve.
4. If no leaks were found, the valve may be placed in service. Make sure the valve cap is in place
and tightened.
Warn Your Customer
t -FBLJOHHBTDBODBVTFmSFTPSFYQMPTJPOT
t If you smell gas:
- Immediately call your gas supplier from a neighbor’s phone
- If you can’t reach your gas supplier, call the Fire Department
- Do not touch electrical switches or telephones
- Do not light appliances
Poppet #2035A-10
Poppet Spring #19-1855-12
Body O-Ring #623-12
Liquid-Level Stem #1931-24A
Poppet Gauge
Rain Cap #UT12X
Figure 2
All Sherwood products must be used in strict compliance with the requirements
and provisions of National Fire Protection Association Pamphlets #54 and #58,
DOT, ANSI, and all applicable federal, state, provincial, and local standards, codes, regulations, and
laws. It is the responsibility of the sellers, installation and maintenance personnel, and end users to
remain knowledgeable of and in compliance with all standards, codes, regulations, and laws.
NOTICE: omniFIT is a registered trademark of the Henkel Adhesives Corporation.
Loctite is a registered trademark of the Loctite Corporation.
All Safe, Inc. 1-866-958-3473
SHERWOOD LPG PRODUCTS
Instruction Sheets
Operating Instructions for Sherwood 2341 Series Transfer Valve —
Instruction Sheet I-2341
READ THIS INSTRUCTION COMPLETELY BEFORE BEGINNING.
General
This instruction is intended for people familiar with LP gas equipment and
applications. IF YOU ARE NOT FAMILIAR WITH THIS EQUIPMENT — STOP.
tLeaking gas can cause fires or explosions
tOnly trained personnel should work on gas systems
This instruction covers the use of the Sherwood 2341 Series Transfer Valve
and PA5138 Adapter to withdraw liquid LP gas from stationary or domestic
tanks that have been pre-fitted with a Sherwood PVE5136 or PVE5137
Checkmate™ as shown in Figure 1.
tInspect gas systems regularly
ALL THREE COMPONENTS ARE NECESSARY TO REMOVE LIQUID LP GAS.
tReplace equipment as required
At low temperatures, (less than 15º F), the excess flow valve in the
Checkmate™ may not close due to inadequate vapor pressure in the tank.
Refer to NPGA Bulletin #113-90 for more information.
These components are designed to evacuate liquid LP gas from a stationary
tank in case of an emergency or if the tank must be relocated.
The transfer valve and adapter must not be used as a permanent outlet
and MUST BE REMOVED FROM THE CHECKMATE WHEN THE LIQUID
TRANSFER IS COMPLETE.
All Safe, Inc. 1-866-958-3473
SHERWOOD LPG PRODUCTS
Instruction Sheets
SAFETY INSTRUCTIONS
t8FBSBQQSPWFEFZFBOEIBOEQSPUFDUJPOEVSJOHMJRVJEUSBOTGFSQSPDFEVSFT
t6TFPOMZUIF1"BEBQUFSCFUXFFOUIF$IFDLNBUFBOE
2341 Series Transfer Valve
Liquid Transfer Procedures
Step 1
Figure 3
1. Loosen the cap of the Checkmate using two wrenches; one to prevent
the Checkmate™ from turning while the other loosens the cap by turning
counterclockwise as shown in Figure 2. Do not loosen the cap fully. A bleed
hole in the cap allows for a small accumulation of liquid and gas to escape.
3. With a wrench, turn the valve approximately an eighth to a quarter turn further
to ensure a snug fit. Do not overtighten. The assembly should resemble Figure 3,
without the transfer pipe installed. The adapter seals with a gasket. If the transfer
valve-to-adapter joint leaks when installed on the tank, remove the valve/adapter
assembly and replace the adapter gasket or use a new adapter.
Step 3
1. Turn the handwheel to close the valve, as shown at the right in Figure 1. This allows
tank gas pressure to open the excess-flow valve inside the Checkmate. Liquid LP
gas then enters the transfer valve up to the valve shut-off seat.
2. Attach full-size piping to the outlet of the transfer valve as shown in Figure 3,
and connect this piping to the liquid-transfer equipment.
Gasket
Gasket
Step 4
1. Slowly open the transfer valve, filling the piping and hose to the pump with liquid
LP gas. Begin pumping the liquid from the tank. NOTE: Opening the transfer
valve too quickly may cause the excess flow valve in the Checkmate to close,
stopping the liquid flow. Should this occur, equalize the tank and transfer pipe
pressures using the tank’s vapor-return valve. Alternately, open the Checkmate
by momentarily pumping liquid from the transfer equipment back through the
Checkmate into the tank, then reversing the flow to empty the tank. Should these
methods fail, the liquid should be removed using another appropriate method.
The damaged Checkmate must be removed and destroyed so it cannot be reused.
Figure
Figure1 1
Step 5
Figure
Figure
2 2
2. If this venting does not stop, re-tighten the cap. Since the Checkmate may be
damaged, use another appropriate procedure to remove the liquid. When the tank
is empty, remove and destroy the damaged Checkmate so it cannot be reused.
Step 2
1. Apply a thread sealant, suitable for LP gas, to the pipe threads of the transfer valve.
Make sure the gasket is in place on the bottom of the adapter as shown in Figure
1. Screw the adapter onto the transfer valve and, using two wrenches, tighten the
adapter until snug. Do not overtighten.
2. Before you screw the valve and adapter assembly into the Checkmate, open the
transfer valve as shown at the left in Figure 1. This keeps the Checkmate closed,
preventing a large release of LP gas when the transfer valve is installed. Do not use
pipe dope on the male threads of the adapter. Screw the assembled transfer valve
and adapter clockwise into the Checkmate and hand tighten until snug. A small,
steady release of LP gas is normal at this time. This release will stop when the
transfer valve is closed.
1. After the LP gas is removed, close the transfer valve and remove the piping from
the valve outlet.
2. Open the transfer valve quickly and fully. This will cause the tank pressure to
close the Checkmate, but will still allow a small but continuous flow of LP gas at
the transfer valve outlet. NOTE: If the tank pressure is too low because of outside
temperature (less than 15º F), the excess flow valve may not close. If this happens,
close the transfer valve and remove it later when the outside temperature gets
warmer. If anything but a small release of gas persists, or if liquid LP gas is
present at the valve outlet, immediately close the transfer valve and plug the
outlet with an appropriate NPT pipe plug. Do not remove the valve until the tank is
evacuated by another method. Damaged parts must be removed from service and
replaced with new parts.
3. After the Checkmate closes, remove the transfer valve/adapter assembly. Re-install
the Checkmate cap and cap gasket.
All Sherwood products must be used in strict compliance with the requirements
and provisions of National Fire Protection Association Pamphlets #54 and #58,
DOT, ANSI, and all applicable federal, state, provincial, and local standards, codes, regulations, and
laws. It is the responsibility of the sellers, installation and maintenance personnel, and end users to
remain knowledgeable of and in compliance with all standards, codes, regulations, and laws.
NOTICE: All Safe, Inc. 1-866-958-3473
SHERWOOD LPG PRODUCTS
Instruction Sheets
Component Replacement Instructions for Sherwood 2341 Series
Liquid-Withdrawal Valves 2341-100-KIT —
Instruction Sheet R-2341
Kit #2341-100-KIT Contains:
Bonnet/Stem Assembly
BONNET/STEM ASSY
#2341-20
#2341-20
Part Number
Description
2341-20
Bonnet Assembly
2341-9
Gasket
R-2341
Instruction Sheet
BODY
GASKET
Body Gasket
#2341-9
#2341-9
READ THIS INSTRUCTION COMPLETELY BEFORE BEGINNING.
General
This instruction is intended for people familiar with LP gas equipment and
applications. IF YOU ARE NOT FAMILIAR WITH THIS EQUIPMENT — STOP.
tLeaking gas can cause fires or explosions
tOnly trained personnel should work on gas systems
tInspect gas systems regularly
tReplace equipment as required
This instruction covers the renovation of Sherwood 2341 Series LiquidWithdrawal Valves using Kit #2341-100-KIT. These valves are used with
a Sherwood PA5133 Adapter to withdraw liquid LP gas from stationary or
domestic tanks that have been pre-fitted with a Sherwood 5133S or 5135S
Checkmate™. Read this instruction completely before beginning.
See Sherwood Instruction I-2341 for instructions on how to operate
the valve.
Make sure the valve model number is either 2341, 2341A, 2341X,
or 2341AX. The model number is embossed on the valve body.
All Safe, Inc. 1-866-958-3473
SHERWOOD LPG PRODUCTS
Instruction Sheets
Tools Required
Step 3: Re-Assembly
R Medium slotted screwdriver (or #25 Torx
screwdriver)
®
R A 13⁄16" -deep socket and wrench
1. Insert a new #2341-9 gasket into the valve-to-bonnet seat.
R Alcohol
R Fine wire brush
R Bench vise with soft-faced jaws
R Empty LP gas tank with a ⁄4" NGT female
connection
R Torque wrench, 0–100 foot-pounds
R Commercial leak-test solution*
R Petroleum jelly lubricant
R Pipe dope suitable for LP gas
3
3. Replace the handwheel and handwheel screw. Tighten the screw between 20 to 25 inchpounds of torque.
R Toothbrush
4. Apply pipe dope suitable for use with LP gas on the male threads of the pipe plug. Install into
the side of the valve and tighten.
* Must be approved for use on brass and with LP gas.
Step 4: Testing
SAFETY INSTRUCTIONS
1. Turn the handwheel through its full range to verify easy operation. If there is any binding
or grinding, destroy the entire valve so it cannot be reused.
t6TFBOBDDVSBUFUPSRVFXSFODIUPUJHIUFOUIFCPOOFUBTTFNCMZ
2. Install the valve onto an empty LP gas tank fitted with a 3⁄4" NGT female connection. Turn
the handwheel fully clockwise to close (frontseat) the valve. Pressurize the tank with air to
approximately 150 psig.
t"MXBZTEFTUSPZBEBNBHFEPSXPSOWBMWFBOEQBSUTTPUIFZDBOOPUCFSFVTFE
Renovation Procedures
Step 1: Disassembly
1. Place the adapter valve in the vise so that
the handwheel is up and the valve outlet
is held flat against one of the vise jaws.
DO NOT OVERTIGHTEN. Overtightening
the vise can distort the valve body,
making it difficult to remove the bonnet
and stem assembly. Should this occur,
the entire valve must be destroyed so it
cannot be reused.
See Figure 1.
2. Use the screwdriver (or #25 Torx driver)
to remove the handwheel screw and
handwheel. With the 13⁄16" socket and
Figure 1 1
Figure
wrench, fully loosen the bonnet nut by
turning it in a clockwise direction (bonnet
threads are left-hand) as shown in Figure 2. With the bonnet threads disengaged from the
body, lift the bonnet and stem assembly out of the valve body and discard the entire assembly.
Do not reuse any of the old parts except the handwheel and screw. See Figure 2.
Step 2: Inspection
1. A damaged valve-to-bonnet seat may not allow
a positive seal. Inspect the valve seat where the
bottom of the bonnet nut contacts the valve when
fully tightened. If the seat is nicked, scratched,
worn, or distorted, destroy the entire valve so it
cannot be reused.
2. Inspect the inlet and outlet connections. Destroy the
entire valve if any threaded connection is damaged
or has worn threads. Clean all threads as necessary.
3. Remove the pipe plug from the side of the valve.
Inspect the access port. If the port threads are
damaged or worn, destroy the entire valve so it
cannot be reused. Replace the pipe plug, part
#2426B, if the threads are damaged or worn.
4. On valves fitted with the optional excess-flow valve
at the inlet of the valve body, press the mechanism
several times to make sure the spring returns the
valve to the open position. If there is any binding,
if the spring post is bent, or if the valve disk is
damaged in any way, use a 3⁄4" socket wrench to
remove the excess-flow valve. Destroy the part.
Replace with kit #2341-110-KIT.
2. Insert the new bonnet and stem assembly into the valve body. By hand, screw the bonnet
assembly counterclockwise into the valve. Thread sealant is not necessary since the bonnet
seat provides a seal. Secure the valve in a vise as described earlier. Use an accurate torque
wrench to tighten the bonnet nut between 45 to 50 foot-pounds of torque. Do not overtighten.
Figure 2
3. Screw an appropriate (1⁄2"
or 3⁄4") NPT pipe plug one to
three turns into the outlet of
the valve. Apply a commercial
leak-test solution around the
outlet plug and check for leaks.
A leak here indicates a leaking
lower (front-seating) seal. If a
leak was found, evacuate the
cylinder according to NFPA
Pamphlet #58 and NPGA
Installation and Service Guide
Book #4003. Remove and
destroy the entire valve so it cannot be reused.
Install a new valve.
Figure 3 3
Figure
BACK-SEATING
Back-Seat Seal
SEAL
#2341-3
#2341-3
LOWER
STEM
Lower
Stem Assembly
ASSEMBLY
#2341-40
#2341-40
4. Tighten the outlet pipe plug at 15 to 25 foot-pounds of torque. Open the valve (turn
counterclockwise). Use the leak-test solution to check for leaks around the bonnet nut,
stem, and gauge port.
5. If any leaks are found, close the valve (turn clockwise). Remove the outlet plug. Slowly open
the valve to allow the air to escape. When the venting stops, remove the valve from the tank.
Do not attempt to repair the leak. Destroy the entire valve so it cannot be reused.
6. If no leaks were found, close the valve (turn clockwise). Remove the outlet plug. Open the
valve to allow the air to escape. When the venting stops, remove the valve from the tank.
The valve may now be placed in service.
Warn Your Customer
t Leaking gas can cause fires or explosions
t If you smell gas
- Immediately call your gas supplier from a neighbor’s phone
- If you can’t reach your gas supplier, call the Fire Department
BonnetBONN
Assembly
#23
#2341-20
- Do not touch electrical switches or telephones
- Do not light appliances
BodyBODY
Gasket G
#2341-9#23
Pipe Plug
All Sherwood products must be used in strict compliance with the requirements
and provisions of National Fire Protection Association Pamphlets #54 and #58,
DOT, ANSI, and all applicable federal, state, provincial, and local standards, codes, regulations, and
laws. It is the responsibility of the sellers, installation and maintenance personnel, and end users to
remain knowledgeable of and in compliance with all standards, codes, regulations, and laws.
NOTICE: All Safe, Inc. 1-866-958-3473
SHERWOOD LPG PRODUCTS
Instruction Sheets
Optional Excess-Flow Valve Replacement Instructions for 2341 Series
Liquid-Withdrawal Valves 2341-110-KIT —
Instruction Sheet R-2341-110
Kit #2341-110-KIT Contains:
Part Number
Description
2341-110
Excess-Flow Valve
271
omniFIT® 1550 or Loctite®
R-2341-110
Instruction Sheet
Excess-Flow Valve
#2341-110
READ THIS INSTRUCTION COMPLETELY BEFORE BEGINNING.
General
This instruction is intended for people familiar with LP gas equipment and
applications. IF YOU ARE NOT FAMILIAR WITH THIS EQUIPMENT — STOP.
tLeaking gas can cause fires or explosions
tOnly trained personnel should work on gas systems
tInspect gas systems regularly
This instruction covers the replacement or addition of the excess-flow valve
on Sherwood 2341 Series Liquid-Withdrawal Valves using Kit #2341-110-KIT.
Read this instruction completely before beginning. See Sherwood Instruction
I-2341 for instructions on how to operate the valve.
Make sure the valve model number is either 2341, 2341A, 2341X,
or 2341AX. The model number is embossed on the valve body.
tReplace equipment as required
All Safe, Inc. 1-866-958-3473
SHERWOOD LPG PRODUCTS
Instruction Sheets
Tools Required
Replacement Procedures
R A 3⁄4" socket and wrench
Step 1: Disassembly
R Torque wrench, 0–50 inch-pounds
R Bench vise with soft-faced jaws
R Fine wire brush
SAFETY INSTRUCTIONS
t6TFBOBDDVSBUFUPSRVFXSFODIUPUJHIUFOUIFCPOOFUBTTFNCMZ
t"MXBZTEFTUSPZBEBNBHFEPSXPSOWBMWFBOEQBSUTTPUIFZDBOOPUCFSFVTFE
1. Place the adapter valve in the vise so that the valve outlet is
held flat against one of the vise jaws. DO NOT OVERTIGHTEN.
Overtightening the vise can distort the valve body, making it
difficult to remove the poppet assembly. Should this occur, the
entire valve must be destroyed so it cannot be reused.
See Figures 1 & 2.
Step 2: Inspection
1. Press the mechanism of the excess-flow valve several times to see if the
spring returns the valve to the open position. If there is any binding, if the
spring post is bent, or if the valve disk is damaged in any way, use a 3⁄4"
socket wrench to remove (turn counterclockwise) the excess-flow valve.
Destroy the part so it cannot be reused.
Step 3: Re-Assembly
1. Use a fine wire brush to clean the threadlocking residue from the female
threads at the bottom inlet of the valve body. Apply two drops of omniFIT®
1550 or Locktite® 271 onto the male threads of the new excess-flow
valve. Screw the part into the inlet and tighten between 10 to 20 inchpounds of torque. NOTE: Loctite 271 will begin to cure within seconds of
being confined within brass threads. If this happens before the following
tightening procedure is completed, the parts must be separated, cleaned,
and reassembled.
Step 4: Testing
1. Press the excess-flow mechanism several times to make sure the spring
returns it to the open position.
Warn Your Customer
Figure 1
t Leaking gas can cause fires or explosions
t If you smell gas:
- Immediately call your gas supplier from a neighbor’s phone
- If you can’t reach your gas supplier, call the Fire Department
- Do not touch electrical switches or telephones
- Do not light appliances
Figure 2
Excess-Flow Valve
#2341-110
All Sherwood products must be used in strict compliance with the requirements
and provisions of National Fire Protection Association Pamphlets #54 and #58,
DOT, ANSI, and all applicable federal, state, provincial, and local standards, codes, regulations, and
laws. It is the responsibility of the sellers, installation and maintenance personnel, and end users to
remain knowledgeable of and in compliance with all standards, codes, regulations, and laws.
NOTICE: All Safe, Inc. 1-866-958-3473
SHERWOOD LPG PRODUCTS
Instruction Sheets
Bonnet Assembly Replacement Instructions for LP Gas Cylinder Valves
3250-8ALH-KIT —
Instruction Sheet R-3250-8ALH
Kit #3250-8ALH-KIT Contains:
Part Number
Description
3250-8ALH
Bonnet Assembly
R-3250-8ALH
Instruction Sheet
BONNET
ASSEMBL
Bonnet Assembly
#3250-8ALH
3250-8ALH
READ THIS INSTRUCTION COMPLETELY BEFORE BEGINNING.
GENERAL
This instruction is intended for people familiar with LP gas equipment and
applications. IF YOU ARE NOT FAMILIAR WITH THIS EQUIPMENT — STOP.
tLeaking gas can cause fires or explosions
tOnly trained personnel should work on gas systems
tInspect gas systems regularly
tReplace equipment as required
This instruction covers the bonnet replacement for the Sherwood 3359
Series Cylinder Valve models. Read these instructions completely before
beginning. Do not use these instructions for valves not listed. The valve
model number is either stamped on a wrench flat located on the side of the
valve or embossed into the valve body. Make sure the bonnet kit number is
correct for the valve model. Use no substitutes.
Note the date code stamped on one of the wrench flats. Compare it to the
date code chart on page 13. If the valve is 10 years old or older, replace the
entire valve. Destroy the old valve so it cannot be reused.
All Safe, Inc. 1-866-958-3473
SHERWOOD LPG PRODUCTS
Instruction Sheets
2. Inspect all threaded connections. Replace the entire valve if threaded connection is
damaged or worn. Destroy the old valve so it cannot be reused.
Tools Required
R Chain wrench or cylinder vise
R Hex socket, 7⁄8"
3. Inspect the safety-relief device. If the openings are clogged with foreign matter or if
it shows any sign of tampering, replace the entire valve. Destroy the old valve so it
cannot be reused. Never attempt to repair or clean a safety-relief device.
R Torque wrench, 50 to 60 foot-pounds
Step 3: Re-Assembly
R Commercial leak-test solution*
1. Before installing the bonnet assembly into the valve body, make sure the stem
is turned fully counterclockwise at the top of the bonnet, as shown in Figure 1.
The stem threads will be exposed as shown. This prevents the valve seat from
damaging the nylon stem seat as the bonnet is tightened.
R Medium slotted screwdriver (or #25 Torx® screwdriver)
* Must be approved for use on brass and with LP gas.
SAFETY INSTRUCTIONS
t6TFBOBDDVSBUFUPSRVFXSFODIUPUJHIUFOUIFCPOOFUBTTFNCMZ
t"MXBZTEFTUSPZBEBNBHFEPSXPSOWBMWFBOEQBSUTTPUIFZDBOOPUCFSFVTFE
2. Screw the new bonnet assembly (left-hand thread) counterclockwise into the valve
body. Use the socket and torque wrench to tighten the bonnet between 50 and
60 foot-pounds. Thread sealant is not necessary since the bonnet seat provides a
metal-to-metal seal.
3. Re-install the handwheel and handwheel screw onto the bonnet. The screw is self
tapping and the new stem is not threaded. Tighten the screw until it bottoms and
the handwheel is tight.
t/FWFSSFQBJSPSDMFBOBTBGFUZSFMJFGEFWJDF
Bonnet Replacement Procedures
Step 4: Testing
Step 1: Bonnet Removal
1. Turn the handwheel through its full range to verify easy operation. If there is any
binding or grinding, replace the entire valve. Destroy the old valve so it cannot be
reused.
1. Remove all traces of LP gas from the cylinder using the procedures specified in
NFPA Pamphlet #58 and NPGA Installation and Service Guide Book #4003. Secure
the cylinder with the chain wrench or cylinder vise so it cannot be moved.
2. Use the screwdriver (or #25 Torx driver) to remove the handwheel screw
and handwheel. Use the socket and wrench to remove the bonnet assembly
(left hand thread) by turning it clockwise. Destroy the old bonnet assembly so it
cannot be reused.
SELF-TAPPING
Self-TappingSCREW
Screw
¦
}
3. If no leak was found, proceed to #4. If a leak was found, evacuate the cylinder
according to NFPA Pamphlet #58 and NPGA Installation And Service Guide Book
#4003. Remove and destroy the entire valve so it cannot be reused. Install a new
valve.
4. Turn the handwheel clockwise until the bonnet just bottoms on the seat. Tighten
the handwheel approximately one tenth of a turn further. Carefully remove the
outlet plug. Thoroughly check the outlet for leaks using a leak-test solution. If a
leak is found, evacuate the cylinder according to NFPA Pamphlet #58 and NPGA
Installation and Service Guide Book #4003. Remove and destroy the entire valve so
it cannot be reused. Install a new valve.
Handwheel
HANDWHEEL
STEM
Stem
2. Pressurize the cylinder with LP gas at 50 to 150 psig. Plug the outlet. Open the
valve halfway and thoroughly check the bonnet nut, stem, and cylinder-to-valve
connections for leaks using a mild ammonia-free soap-and-water solution or
commercial leak-test solution.
5. If no leaks were found, blow the outlet dry with clean, dry compressed air. The
cylinder can now be filled according to NPGA Bulletin #129 or #130.
Bonnet
BONNET
Assembly
ASSEMBLY
3250-8ALH
3250-BALH
Warn Your Customer
t Leaking gas can cause fires or explosions
¦
LEFT-HAND THREAD
t If you smell gas:
Left-Hand Thread
- Immediately call your gas supplier from a neighbor’s phone
VALVE
ValveCHAMBER
Chamber
- If you can’t reach your gas supplier, call the Fire Department
- Do not touch electrical switches or telephones
- Do not light appliances
WRENCH
FLAT
Wrench
Flat
Figure
Figure 11
Step 2: Inspection
1. A damaged shut-off seat may not allow a positive seal. Use a light to inspect the
valve shut-off seat located at the bottom of the bonnet-connection opening. The
outer rim of the seat is about 3⁄8" in diameter. If the seat is nicked, scratched, or
distorted, replace the entire valve. Destroy the old valve so it cannot be reused.
All Sherwood products must be used in strict compliance with the requirements
and provisions of National Fire Protection Association Pamphlets #54 and #58,
DOT, ANSI, and all applicable federal, state, provincial, and local standards, codes, regulations, and
laws. It is the responsibility of the sellers, installation and maintenance personnel, and end users to
remain knowledgeable of and in compliance with all standards, codes, regulations, and laws.
NOTICE: All Safe, Inc. 1-866-958-3473
SHERWOOD LPG PRODUCTS
Instruction Sheets
Bonnet Assembly Replacement Instructions
for LP Gas Cylinder Valves 3250-8LH-KIT —
Instruction Sheet R-3250-8LH
Kit #3250-8LH-KIT Contains:
Part Number
Description
3250-8LH
Bonnet Assembly
R-3250-8LH
Instruction Sheet
Bonnet Assembly
#3250-8LH
READ THIS INSTRUCTION COMPLETELY BEFORE BEGINNING.
General
This instruction is intended for people familiar with LP gas equipment and
applications. IF YOU ARE NOT FAMILIAR WITH THIS EQUIPMENT — STOP.
tLeaking gas can cause fires or explosions
tOnly trained personnel should work on gas systems
tInspect gas systems regularly
tReplace equipment as required
This instruction covers the bonnet replacement for the Sherwood Cylinder
Valve models listed in Table 1 of this instruction sheet. Read these
instructions completely before beginning. Do not use these instructions for
valves not listed. The valve model number is either stamped on a wrench flat
located on the side of the valve or embossed into the valve body. Make sure
the bonnet kit number is correct for the valve model. Use no substitutes.
Note the date code stamped on one of the wrench flats. Compare it to the
date code chart on page 13. If the valve is 10 years old or older and has a
pressure-relief device, replace the entire valve. Destroy the old valve so it
cannot be reused.
All Safe, Inc. 1-866-958-3473
SHERWOOD LPG PRODUCTS
Instruction Sheets
Step 2: Inspection
Tools Required
R Torque wrench, 50 to 60
foot-pounds
R Chain wrench or cylinder vise
R Medium slotted screwdriver
(or #25 Torx® screwdriver)
R Commercial leak-test solution*
R Hex socket, ⁄8"
7
* Must be approved for use on brass and with LP gas.
SAFETY INSTRUCTIONS
t6TFBOBDDVSBUFUPSRVFXSFODIUPUJHIUFOUIFCPOOFUBTTFNCMZ
t"MXBZTEFTUSPZBEBNBHFEPSXPSOWBMWFBOEQBSUTTPUIFZDBOOPUCFSFVTFE
t/FWFSSFQBJSPSDMFBOBTBGFUZSFMJFGEFWJDF
Step 3: Re-Assembly
TABLE 1
Bonnet
Number
3250-8HL
Valve Model Numbers
1425B
1426B
1427B
1445B
1445BMF
1445CA
1446B
1446BMF
1447B
1447BMF
2035A (Series)
3250A-375
3250A-375MU
3250A-405
3250AD
3250AD-7
3250AD-7X
3250ALG-7
3250AALG-375
3250ALG7-11.0
3250ALM-375
3250ALG-405
Bonnet Replacement Procedures
1. Before installing the bonnet assembly into the valve body, make sure the stem
is turned fully counterclockwise at the top of the bonnet, as shown in Figure 1.
The stem threads will be exposed as shown. This prevents the valve seat from
damaging the nylon stem seat as the bonnet is tightened.
2. Screw the new bonnet assembly (left-hand thread) counterclockwise into the
valve body. Use the socket and torque wrench to tighten the bonnet between
50 and 60 foot-pounds. Thread sealant is not necessary since the bonnet seat
provides a metal-to-metal seal.
3. Re-install the handwheel and handwheel screw onto the bonnet. The screw is
self tapping and the new stem is not threaded. Tighten the screw until it bottoms
and the handwheel is tight.
Step 4: Testing
Step 1: Bonnet Removal
1. Remove all traces of LP gas from the cylinder using the procedures specified
in NFPA Pamphlet #58 and NPGA Installation and Service Guide Book #4003.
Secure the cylinder with the chain wrench or cylinder vise so it cannot be moved.
2. Use the screwdriver (or #25 Torx driver) to remove the handwheel screw and
handwheel. Use the socket and wrench to remove the bonnet assembly (lefthand thread) by turning it clockwise. Destroy the old bonnet assembly so it
cannot be reused.
Figure 1
1. A damaged shut-off seat may not allow a positive seal. Use a light to inspect
the valve shut-off seat located at the bottom of the bonnet-connection
opening. The outer rim of the seat is about 3⁄8" in diameter. If the seat is nicked,
scratched, or distorted, replace the entire valve. Destroy the old valve so it
cannot be reused.
2. Inspect all threaded connections. Replace the entire valve if threaded connection
is damaged or worn. Destroy the old valve so it cannot be reused.
3. Inspect the safety-relief device. If the openings are clogged with foreign
matter or if it shows any sign of tampering, replace the entire valve. Destroy
the old valve so it cannot be reused. Never attempt to repair or clean a safetyrelief device.
Self Tapping Screw
Handwheel
Stem
Bonnet Assembly
#3250-8HL
Left-Hand Thread
Valve Chamber
1. Turn the handwheel through its full range to verify easy operation. If there is any
binding or grinding, replace the entire valve. Destroy the old valve so it cannot
be reused.
2. Pressurize the cylinder with LP gas at 50 to 150 psig. Plug the outlet. Open the
valve halfway and thoroughly check the bonnet nut, stem, and cylinder-to-valve
connections for leaks using a mild ammonia-free soap-and-water solution or
commercial leak-test solution.
3. If no leak was found, proceed to #4. If a leak was found, evacuate the cylinder
according to NFPA Pamphlet #58 and NPGA Installation and Service Guide Book
#4003. Remove and destroy the entire valve so it cannot be reused. Install a new
valve.
4. Turn the handwheel clockwise until the bonnet just bottoms on the seat. Tighten
the handwheel approximately one tenth of a turn further. Carefully remove the
outlet plug. Thoroughly check the outlet for leaks using a leak-test solution. If a
leak is found, evacuate the cylinder according to NFPA Pamphlet #58 and NPGA
Installation and Service Guide Book #4003. Remove and destroy the entire valve
so it cannot be reused. Install a new valve.
5. If no leaks were found, blow the outlet dry with clean, dry compressed air.
The cylinder can now be filled according to NPGA Bulletin #129 or #130.
Warn Your Customer
t Leaking gas can cause fires or explosions
t If you smell gas:
- Immediately call your gas supplier from a neighbor’s phone
- If you can’t reach your gas supplier, call the Fire Department
- Do not touch electrical switches or telephones
- Do not light appliances
All Sherwood products must be used in strict compliance with the requirements
and provisions of National Fire Protection Association Pamphlets #54 and #58,
DOT, ANSI, and all applicable federal, state, provincial, and local standards, codes, regulations, and
laws. It is the responsibility of the sellers, installation and maintenance personnel, and end users to
remain knowledgeable of and in compliance with all standards, codes, regulations, and laws.
NOTICE: Wrench Flat
All Safe, Inc. 1-866-958-3473
SHERWOOD LPG PRODUCTS
Instruction Sheets
Bonnet Assembly Replacement Instructions
for LP Gas Cylinder Valves 3250D-8LH-KIT—
Instruction Sheet R-3250D-8LH
Kit #3250D-8LH-KIT Contains:
Part Number
Description
3250D-8LH
Bonnet Assembly
R-3250D-8LH
Instruction Sheet
Bonnet Assembly
#3250D-8LH
READ THIS INSTRUCTION COMPLETELY BEFORE BEGINNING.
General
This instruction is intended for people familiar with LP gas equipment and
applications. IF YOU ARE NOT FAMILIAR WITH THIS EQUIPMENT — STOP.
tLeaking gas can cause fires or explosions
tOnly trained personnel should work on gas systems
tInspect gas systems regularly
This instruction covers the bonnet replacement for the Sherwood Cylinder
Valve models listed in Table 1 of this instruction sheet. Read these
instructions completely before beginning. Do not use these instructions for
valves not listed. The valve model number is either stamped on a wrench flat
located on the side of the valve or embossed into the valve body. Make sure
the bonnet kit number is correct for the valve model. Use no substitutes.
tReplace equipment as required
All Safe, Inc. 1-866-958-3473
SHERWOOD LPG PRODUCTS
Instruction Sheets
Step 2: Inspection
Tools Required
R Torque wrench, 50 to 60
foot-pounds
R Chain wrench or cylinder vise
R Medium slotted screwdriver
(or #25 Torx® screwdriver)
R Commercial leak-test solution*
R Hex socket, ⁄8"
1. A damaged shut-off seat may not allow a positive seal. Use a light to inspect the
valve shut-off seat located at the bottom of the bonnet-connection opening. The
outer rim of the seat is about 3⁄8" in diameter. If the seat is nicked, scratched, or
distorted, replace the entire valve. Destroy the old valve so it cannot be reused.
7
2. Inspect all threaded connections. Replace the entire valve if threaded connection
is damaged or worn. Destroy the old valve so it cannot be reused.
* Must be approved for use on brass and with LP gas.
SAFETY INSTRUCTIONS
t6TFBOBDDVSBUFUPSRVFXSFODIUPUJHIUFOUIFCPOOFUBTTFNCMZ
t"MXBZTEFTUSPZBEBNBHFEPSXPSOWBMWFBOEQBSUTTPUIFZDBOOPUCFSFVTFE
t/FWFSSFQBJSPSDMFBOBTBGFUZSFMJFGEFWJDF
TABLE 1
Bonnet Number
3250D-8HL
Valve Model Numbers
1445CAF
1445D
1445DMF
1446CAH
1446D
1446DMF
1447CAH
1447D
1447DMF
3. Inspect the safety-relief device. If the openings are clogged with foreign matter or
if it shows any sign of tampering, replace the entire valve. Destroy the old valve so
it cannot be reused. Never attempt to repair or clean a safety-relief device.
Step 3: Re-Assembly
1. Before installing the bonnet assembly into the valve body, make sure the stem
is turned fully counterclockwise at the top of the bonnet, as shown in Figure 1.
The stem threads will be exposed as shown. This prevents the valve seat from
damaging the nylon stem seat as the bonnet is tightened.
2. Screw the new bonnet assembly (left-hand thread) counterclockwise into the valve
body. Use the socket and torque wrench to tighten the bonnet between 50 and 60
foot-pounds. Thread sealant is not necessary since the bonnet seat provides
a metal-to-metal seal.
3. Re-install the handwheel and handwheel screw onto the bonnet. The screw is self
tapping and the new stem is not threaded. Tighten the screw until it bottoms and
the handwheel is tight.
Bonnet Replacement Procedures
Step 4: Testing
Step 1: Bonnet Removal
1. Remove all traces of LP gas from the cylinder using the procedures specified in
NFPA Pamphlet #58 and NPGA Installation and Service Guide Book #4003. Secure
the cylinder with the chain wrench or cylinder vise so it cannot be moved.
2. Use the screwdriver (or #25 Torx driver) to remove the handwheel screw
and handwheel. Use the socket and wrench to remove the bonnet assembly
(left-hand thread) by turning it clockwise. Destroy the old bonnet assembly so it
cannot be reused.
Figure 1
Self-Tapping Screw
Handwheel
Stem
Bonnet Assembly
#3250D-8HL
1. Turn the handwheel through its full range to verify easy operation. If there is any
binding or grinding, replace the entire valve. Destroy the old valve so it cannot be
reused.
2. Pressurize the cylinder with LP gas at 50 to 150 psig. Plug the outlet. Open the
valve halfway and thoroughly check the bonnet nut, stem, and cylinder-to-valve
connections for leaks using a mild ammonia-free soap-and-water solution or
commercial leak-test solution.
3. If no leak was found, proceed to #4. If a leak was found, evacuate the cylinder
according to NFPA Pamphlet #58 and NPGA Installation And Service Guide Book
#4003. Remove and destroy the entire valve so it cannot be reused. Install a new
valve.
4. Turn the handwheel clockwise until the bonnet just bottoms on the seat. Tighten
the handwheel approximately one tenth of a turn further. Carefully remove the
outlet plug. Thoroughly check the outlet for leaks using a leak-test solution. If a
leak is found, evacuate the cylinder according to NFPA Pamphlet #58 and NPGA
Installation and Service Guide Book #4003. Remove and destroy the entire valve
so it cannot be reused. Install a new valve.
5. If no leaks were found, blow the outlet dry with clean, dry compressed air.
The cylinder can now be filled according to NPGA Bulletin #129 or #130.
Warn Your Customer
t Leaking gas can cause fires or explosions
Left-Hand Thread
Valve Chamber
t If you smell gas:
- Immediately call your gas supplier from a neighbor’s phone
- If you can’t reach your gas supplier, call the Fire Department
- Do not touch electrical switches or telephones
- Do not light appliances
All Sherwood products must be used in strict compliance with the requirements
and provisions of National Fire Protection Association Pamphlets #54 and #58,
DOT, ANSI, and all applicable federal, state, provincial, and local standards, codes, regulations, and
laws. It is the responsibility of the sellers, installation and maintenance personnel, and end users to
remain knowledgeable of and in compliance with all standards, codes, regulations, and laws.
NOTICE: Wrench Flat
All Safe, Inc. 1-866-958-3473
SHERWOOD LPG PRODUCTS
Instruction Sheets
Bonnet Assembly Replacement Instructions
For LP Gas Cylinder Valves 3329-13LH-KIT—
Instruction Sheet R-3329-13LH
Kit #3329-13H-KIT Contains:
Part Number
Description
3329-13LH
Bonnet Assembly
R-3329
Instruction Sheet
Bonnet Assembly
#3329-13LH
READ THIS INSTRUCTION COMPLETELY BEFORE BEGINNING.
General
This instruction is intended for people familiar with LP gas equipment and
applications. IF YOU ARE NOT FAMILIAR WITH THIS EQUIPMENT — STOP.
tLeaking gas can cause fires or explosions
tOnly trained personnel should work on gas systems
tInspect gas systems regularly
tReplace equipment as required
This instruction covers the bonnet replacement for the Sherwood Cylinder
Valve models listed in Table 1 of this instruction sheet. Read these
instructions completely before beginning. Do not use these instructions for
valves and bonnets not listed. The model number is either stamped on a
wrench flat located on the side of the valve or embossed into the valve body.
Make sure the bonnet kit number is correct for the valve model. Use only
Sherwood parts.
Note the date code stamped on one of the wrench flats. Compare it to the
date code chart on page 13. If the valve is 10 years old or older and has
a relief valve, replace the entire valve. Destroy the old valve so it cannot
be reused.
All Safe, Inc. 1-866-958-3473
SHERWOOD LPG PRODUCTS
Instruction Sheets
Step 2: Inspection
Tools Required
R Chain wrench or cylinder vise
R Hex socket, ⁄8"
R Medium slotted screwdriver
(or #25 Torx® screwdriver)
R Torque wrench, 50 to 60 foot-pounds
7
R Commercial leak-test solution*
* Must be approved for use on brass and with LP gas.
2. Inspect all threaded connections. Replace the entire valve if threaded connection is
damaged or worn. Destroy the old valve so it cannot be reused.
SAFETY INSTRUCTIONS
t6TFBOBDDVSBUFUPSRVFXSFODIUPUJHIUFOUIFCPOOFUBTTFNCMZ
t"MXBZTEFTUSPZBEBNBHFEPSXPSOWBMWFBOEQBSUTTPUIFZDBOOPUCFSFVTFE
TABLE 1
3329-13HL
Valve Model Numbers
1446C
1447C
2030BC
2030CL
2033CL
2034CL
1425C
1426C
1427C
1427CV
1445C
3. Inspect the safety-relief device. If the openings are clogged with foreign matter or if
it shows any sign of tampering, replace the entire valve. Destroy the old valve so it
cannot be reused. Never attempt to repair or clean a safety-relief device.
Step 3: Re-Assembly
1. Before installing the bonnet assembly into the valve body, make sure the stem is
turned fully counterclockwise at the top of the bonnet, as shown in Figure 1. The
stem threads will be exposed as shown. This prevents the valve seat from damaging
the nylon stem seat as the bonnet is tightened.
t/FWFSSFQBJSPSDMFBOBTBGFUZSFMJFGEFWJDF
Bonnet
Number
1. A damaged shut-off seat may not allow a positive seal. Use a light to inspect the
valve shut-off seat located at the bottom of the bonnet-connection opening. The outer
rim of the seat is about 1⁄4" in diameter. If the seat is nicked, scratched, or distorted,
replace the entire valve. Destroy the old valve so it cannot be reused.
3250AC375
3250ACLG375
3250BC312
3329 (series)
3347 (series)
3349 (series)
2. Screw the new bonnet assembly (left-hand thread) counterclockwise into the valve
body. Use the socket and torque wrench to tighten the bonnet between 50 and 60
foot-pounds. Thread sealant is not necessary since the bonnet seat provides a metalto-metal seal.
3. Re-install the handwheel and handwheel screw onto the bonnet. The screw is self
tapping and the new stem is not threaded. Tighten the screw until it bottoms and
the handwheel is tight.
Step 4: Testing
1. Turn the handwheel through its full range to verify easy operation. If there is any
binding or grinding, replace the entire valve. Destroy the old valve so it cannot be
reused.
Bonnet Replacement Procedures
Step 1: Bonnet Removal
1. Remove all traces of LP gas from the cylinder using the procedures specified in NFPA
Pamphlet #58 and NPGA Installation and Service Guide Book #4003. Secure the
cylinder with the chain wrench or cylinder vise so it cannot be moved.
2. Pressurize the cylinder with LP gas at 50 to 150 psig. Plug the outlet. Open the
valve halfway and thoroughly check the bonnet nut, stem, and cylinder-to-valve
connections for leaks using a mild ammonia-free soap-and-water solution or
commercial leak-test solution.
2. Use the screwdriver (or #25 Torx driver) to remove the handwheel screw
and handwheel. Use the socket and wrench to remove the bonnet assembly
(left-hand thread) by turning it clockwise. Destroy the old bonnet assembly so it
cannot be reused.
3. If no leak was found, proceed to #4. If a leak was found, evacuate the cylinder
according to NFPA Pamphlet #58 and NPGA Installation and Service Guide Book
#4003. Remove and destroy the entire valve so it cannot be reused. Install
a new valve.
Figure 1
Self-Tapping Screw
Handwheel
4. Turn the handwheel clockwise until the bonnet just bottoms on the seat. Tighten
the handwheel approximately one tenth of a turn further. Carefully remove the outlet
plug. Thoroughly check the outlet for leaks using a leak-test solution. If a leak is
found, evacuate the cylinder according to NFPA Pamphlet #58 and NPGA Installation
and Service Guide Book #4003. Remove and destroy the entire valve so it cannot be
reused. Install a new valve.
5. If no leaks were found, blow the outlet dry with clean, dry compressed air.
The cylinder can now be filled according to NPGA Bulletin #129 or #130.
Warn Your Customer
t Leaking gas can cause fires or explosions
Remove
Stem
Bonnet Assembly
#3329-13LH
Left-Hand Thread
t If you smell gas:
- Immediately call your gas supplier from a neighbor’s phone
- If you can’t reach your gas supplier, call the Fire Department
- Do not touch electrical switches or telephones
- Do not light appliances
Valve Chamber
All Sherwood products must be used in strict compliance with the requirements
and provisions of National Fire Protection Association Pamphlets #54 and #58,
DOT, ANSI, and all applicable federal, state, provincial, and local standards, codes, regulations, and
laws. It is the responsibility of the sellers, installation and maintenance personnel, and end users to
remain knowledgeable of and in compliance with all standards, codes, regulations, and laws.
NOTICE: Wrench Flat
All Safe, Inc. 1-866-958-3473
SHERWOOD LPG PRODUCTS
Instruction Sheets
Dual Bonnet Assembly Conversion Instructions
for LP Gas Cylinder Valves 3429-100-KIT —
Instruction Sheet R-3429
Kit #3429-100-KIT Contains:
Part Number
Description
3429-100
Dual Bonnet Conversion Assembly
R-3429
Instruction Sheet
Dual Bonnet
Assembly
READ THIS INSTRUCTION COMPLETELY BEFORE BEGINNING.
General
This instruction is intended for people familiar with LP gas equipment and
applications. IF YOU ARE NOT FAMILIAR WITH THIS EQUIPMENT — STOP.
tLeaking gas can cause fires or explosions
tOnly trained personnel should work on gas systems
tInspect gas systems regularly
tReplace equipment as required
This instruction covers the bonnet replacement for the Sherwood Cylinder
Valve models listed in Table 1 of this instruction sheet. Read these
instructions completely before beginning. Do not use these instructions for
valves and bonnets not listed. The model number is either stamped on a
wrench flat located on the side of the valve or embossed into the valve body.
Make sure the bonnet kit number is correct for the valve model. Use only
Sherwood parts.
Note the date code stamped on one of the wrench flats. Compare it to the
date code chart on page 13. If the valve is 10 years old or older and has
a relief valve, replace the entire valve. Destroy the old valve so it cannot
be reused.
All Safe, Inc. 1-866-958-3473
SHERWOOD LPG PRODUCTS
Instruction Sheets
2. Inspect all threaded connections. Replace the entire valve if any threaded connection is
damaged or worn. Destroy the old valve so it cannot be reused.
Tools Required
R
⁄4" wrench
3
R Hex socket, 5⁄8"
3. Inspect the safety-relief device. If the openings are clogged with foreign matter or if it shows
any sign of tampering, replace the entire valve. Destroy the old valve so it cannot be reused.
Never attempt to repair or clean a safety-relief device.
R Torque wrench, 25 to 50 foot-pounds
Step 3: Re-Assembly
R Commercial leak-test solution*
1. Before installing the dual bonnet assembly into the valve body, make sure the stem is turned
fully counterclockwise at the top of the bonnet, as shown in Figure 1. The stem threads will
be exposed as shown. This prevents the valve seat from damaging the nylon stem seat as the
bonnet is tightened.
R Medium slotted screwdriver (or #25 Torx® screwdriver)
* Must be approved for use on brass and with LP gas.
SAFETY INSTRUCTIONS
t6TFBOBDDVSBUFUPSRVFXSFODIUPUJHIUFOUIFCPOOFUBTTFNCMZ
t"MXBZTEFTUSPZBEBNBHFEPSXPSOWBMWFBOEQBSUTTPUIFZDBOOPUCFSFVTFE
t/FWFSSFQBJSPSDMFBOBTBGFUZSFMJFGEFWJDF
2. Screw the new dual bonnet assembly (left-hand thread) counterclockwise into the valve body.
Use the socket and torque wrench to tighten the dual bonnet between 25 and 30 foot-pounds.
Thread sealant is not necessary since the bonnet seat provides a metal-to-metal seal. NOTE:
To prevent loosening of the valve body from the cylinder, hold the body with a second wrench
while installing the bonnet. Be sure to use the lower wrenching flats when installing the
bonnet assembly.
3. Re-install the handwheel and handwheel screw onto the dual bonnet. The screw is self
tapping and the new stem is not threaded. Tighten the screw until it bottoms and the
handwheel is tight.
Step 4: Testing
This conversion kit will convert standard-style 3329-13LH
bonnets to dual bonnets in designated Sherwood valves only
TABLE 1
Bonnet
Number
3429-100
PV2033CL
PV2030BC
4. Turn the handwheel clockwise until the bonnet just bottoms on the seat. Tighten the
handwheel approximately one tenth of a turn further. Carefully remove the outlet plug.
Thoroughly check the outlet for leaks using a leak-test solution. If a leak is found, evacuate
the cylinder according to NFPA Pamphlet #58 and NPGA Installation and Service Guide Book
#4003. Remove and destroy the entire valve so it cannot be reused. Install a new valve.
Bonnet Conversion Procedures
5. If no leaks were found, blow the outlet dry with clean, dry compressed air. The cylinder can
now be filled according to NPGA Bulletin #129 or #130.
Step 1: Bonnet Removal
Self-Tapping
Screw
Step 2: Inspection
1. A damaged shut-off seat may not allow a
positive seal. Use a light to inspect the valve
shut-off seat located at the bottom of the
bonnet-connection opening. The outer rim of
the seat is about 1⁄4" in diameter. If the seat
is nicked, scratched, or distorted, replace
the entire valve. Destroy the old valve so it
cannot be reused.
Warn Your Customer
t Leaking gas can cause fires or explosions
t If you smell gas
Handwheel
- Immediately call your gas supplier from a neighbor’s phone
- If you can’t reach your gas supplier, call the Fire Department
- Do not touch electrical switches or telephones
Stem
- Do not light appliances
Dual Bonnet
Assembly
3429-10
Remove
2. Use the screwdriver (or #25 Torx driver)
to remove the handwheel screw and
handwheel. Use the socket and wrench to
remove the bonnet assembly 3329-13LH
(left-hand thread) by turning it clockwise.
Destroy the old bonnet assembly so it cannot
be reused.
2. Pressurize the cylinder with LP gas at 50 to 150 psig. Plug the outlet. Open the valve halfway
and thoroughly check the bonnet nut, stem, and cylinder-to-valve connections for leaks using
a mild ammonia-free soap-and-water solution or commercial leak-test solution.
3. If no leak was found, proceed to Paragraph 4. If a leak was found, evacuate the cylinder
according to NFPA Pamphlet #58 and NPGA Installation and Service Guide Book #4003.
Remove and destroy the entire valve so it cannot be reused. Install a new valve.
Valve Model Numbers
1. Remove all traces of LP gas from the
cylinder tank using the procedures specified
in NFPA Pamphlet #58 and NPGA Installation
and Service Guide Book #4003. Secure the
cylinder with the chain wrench or cylinder
vise so it cannot be moved.
1. Turn the handwheel through its full range to verify easy operation. If there is any binding or
grinding, replace the entire valve. Destroy the old valve so it cannot be reused.
Left-Hand Thread
Valve Chamber
Wrench Flat
Figure 1
All Sherwood products must be used in strict compliance with the requirements
and provisions of National Fire Protection Association Pamphlets #54 and #58,
DOT, ANSI, and all applicable federal, state, provincial, and local standards, codes, regulations, and
laws. It is the responsibility of the sellers, installation and maintenance personnel, and end users to
remain knowledgeable of and in compliance with all standards, codes, regulations, and laws.
NOTICE: All Safe, Inc. 1-866-958-3473
SHERWOOD LPG PRODUCTS
Instruction Sheets
Handwheel, Bonnet, and Stem Assembly Replacement Instructions
for LP Gas Cylinder Valves 6775-60-KIT —
Instruction Sheet R-6775-60
Kit #6775-60-KIT Contains:
Part Number
Description
6775-60
Handwheel, Bonnet, and Stem Assembly
R-6775-60
Instruction Sheet
Handwheel, Bonnet,
and Stem Assembly
6775-60
READ THIS INSTRUCTION COMPLETELY BEFORE BEGINNING.
General
This instruction is intended for people familiar with LP gas equipment and
applications. IF YOU ARE NOT FAMILIAR WITH THIS EQUIPMENT — STOP.
tLeaking gas can cause fires or explosions
tOnly trained personnel should work on gas systems
tInspect gas systems regularly
tReplace equipment as required
The instruction covers the handwheel, bonnet, and stem assembly
replacement for the Sherwood Cylinder valve models listed in Table 1 of the
instruction sheet. Read these instructions completely before beginning. Do
not use these instruction on valves not listed. The valve model number is
either stamped on a wrench flat located on the side of the valve or embossed
into the valve body. Make sure the handwheel, bonnet, and stem assembly is
correct for the valve model. Use no substitutes.
Note the date code stamped on one of the wrench flats. Compare it to the
date code chart on page 13. If the valve is 10 years old or older, replace the
entire valve. Destroy the old valve so it cannot be reused.
All Safe, Inc. 1-866-958-3473
SHERWOOD LPG PRODUCTS
Instruction Sheets
2. Hold the lower portion of the dual bonnet in place with a 3⁄4" end
wrench. Without turning the handwheel, use a second 11⁄16" end
wrench to remove the upper stem assembly by turning the bonnet cap
counterclockwise (see Fig. 1). Destroy the old assembly so it cannot
be reused.
Tools Required
R 3⁄4" end wrench
R 11⁄16" end wrench
R Commercial leak-test solution
* Must be approved for use on brass and LP gas.
B. IF GAS SERVICE HAS BEEN DISCONNECTED:
1. The valve is in the closed position.
SAFETY INSTRUCTIONS
t6TFBOBDDVSBUFUPSRVFXSFODIUPUJHIUFOUIFCPOOFUBTTFNCMZ
t"MXBZTEFTUSPZBEBNBHFEPSXPSOWBMWFBOEQBSUTTPUIFZDBOOPUCFSFVTFE
2. Turn handwheel counterclockwise to fully open and backseat
the lower stem.
3. See A-2 above.
Step 2: Re-Assembly:
t/FWFSSFQBJSPSDMFBOBTBGFUZSFMJFGEFWJDF
1. Place the new handwheel, bonnet, and stem assembly in the lower portion
of Ihe dual bonnet. Make the new assembly finger-tight by engaging the
bonnet cap two or three threads.
2. Rotate the handwheel counterclockwise while pushing down on the
handwheel until you feel the upper stem engage the lower stem.
This conversation kit will not convert existing Sherwood Multivalves with standard bonnets
to the dual bonnet configuration.
3. Tighten the bonnet cap clockwise with 50 to 70 inch-pounds of torque.
Step 3: Testing
TABLE 1
Bonnet Number
677S-60-KIT
Valve Model Numbers
2033CLDB Series
1. Turn the handwheel approximately a half turn towards the closed position.
DO NOT FULLY CLOSE THE HANDWHEEL AS THIS WILL SHUT OFF THE
GAS AND INTERRUPT THE SERVICE. Note if there is any binding or
grinding. Replace the assembly.
Handwheel, Bonnet, and Stem Assembly
Replacement Procedures
2. Check the bonnets and stem connections for leaks, using a mild
ammonia-free soap-and-water solution or an approved commercial-leak
solution. If no leak occurs, turn the handwheel counterclockwise to fully
open and backseat the lower stem.
Step 1: Bonnet Removal
Warn Your Customer
A. IF GAS SERVICE HAS NOT BEEN DISCONNECTED:
1. Turn handwheel counterclockwise to fully open and backseat
the lower stem.
t Leaking gas can cause fires or explosions
t If you smell gas
- Immediately call your gas supplier from a neighbor’s phone
- If you can’t reach your gas supplier, call the Fire Department
- Do not touch electrical switches or telephones
- Do not light appliances
Bonnet and Cap
Upper Assembly
Lower Stem
Figure 1
All Sherwood products must be used in strict compliance with the requirements
and provisions of National Fire Protection Association Pamphlets #54 and #58,
DOT, ANSI, and all applicable federal, state, provincial, and local standards, codes, regulations, and
laws. It is the responsibility of the sellers, installation and maintenance personnel, and end users to
remain knowledgeable of and in compliance with all standards, codes, regulations, and laws.
NOTICE: Valve
backseated for
bonnet/stem
removal
All Safe, Inc. 1-866-958-3473
SHERWOOD LPG PRODUCTS
Notes
Notes:
All Safe, Inc. 1-866-958-3473
All Safe, Inc. 1-866-958-3473
All Safe, Inc.
Sherwood Master Distributor
26443 Fallbrook Avenue
Wyoming, MN 55092
Toll Free: 866-958-3473
Email: [email protected]
Web: www.allsafe.net
Twitter: @allsafeinc
All Safe, Inc. 1-866-958-3473