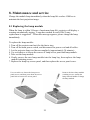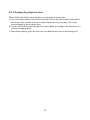
1
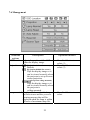
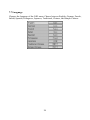
Table of Contents 1. Introduction ···················································································· 2 2. Features ··························································································· 2 3. Operation notice ··········································································· 3 4. Projector figure ············································································· 4 4.1 Function list of control panel 4 5. Accessories ···················································································· 7 5.1 Remote control 8 5.2 Function list of remote control panel 9 6. Operation guide ·········································································· 11 6.1 Connecting component 11 6.2 How to connect the projector to your computer 12 6.3 How to connect the projector to a DVD or VCR 12 6.4 Turning on the projector 13 6.5 Basic Image Adjustment 13 6.6 Turning off the projector 14 6.7 Adjusting the projected image height 14 6.8 Adjusting the image focus and zoom 15 7. OSD menu ····················································································· 16 7.1 Image (Computer mode) 16 7.2 Image (Video mode) 17 7.3 Display (Computer mode) 18 7.4 Display (Video mode) 20 7.5 Audio 21 7.6 Projection setting 22 7.7 Language 23 8. Maintenance and service ························································ 24 8.1 Replacing the lamp module 24 8.2 Cleaning the projector lens 24 9. Appendix························································································ 26 9.1 Common problems and solutions 26 9.2 Distance ratio of screen and projector 28 9.3 Specifications 29 1 1.Introduction Please read this manual carefully before using, to find out: • How to use the projector safely • How to use the remote control • How to set up and connect the projector • How to start and turn off the projector • How to use the On-screen display (OSD) menus • How to replace the lamp module • How to solve troubleshoot common problems 2.Features • • • • • • • • • • Use the technology of chip TI 0.7”/ 0.6” DLPTM. Full-function remote including mouse controls. High quality manual zoom lens. Weight only 7.5 pounds with beautifully designed appearance. Expandable module design, compact and lightweight. High brightness/high contrast. Clear images. Provide the adjustment of 4:3 / 16:9 aspect ratio. Compatible with the VGA of P- Scan (480P) & HDTV (1080i / 720P). Compatible with the video of NTSC / PAL / HDTV. Multi languages function window. 2 3.Operation notice: Please read and follow the following safety instructions and description carefully. Inappropriate operation method may result in fire, electrical shock, and personal injury or shorten the life span of projector. Warning: Do not cover the lens while the lamp lights up. Warning: To protect your eyes, do not look directly into the projector’s light source. Warning: Make sure that you provide adequate ventilation for the projector. Do not block the ventilation holes in the case Warning: To prevent electrical shock, never open the projector case. Warning: Before using, please make sure that the power cord is connected to an AC receptacle with a protective safety ground terminal. Do not neglect the receptacle with protective safety ground terminal. Warning: To replace the lamp, turn the projector off and unplug the power cord. To avoid burns, wait 1 hr before opening the lamp door. For relevant operation procedures, please refer to page 24 the section of “changing lamp”. Warning: Please use the power cord provided. And use the receptacle with a protective safety ground terminal. Warning: Do not block ventilation openings to avoid danger. Warning: Do not place any drinks on top of your projector. Spilled liquids may damage the projector. Warning: Do not place the projector on a hot surface, moisture or in direct sunlight. Warning: Handle carefully during transportation. Avoid dropping it. 3 4.Projector figure Control panel Infrared remote sensor Zoom ring Focus ring Lens Cap 4.1 Function list of control panel: POWER ↑↓←→ MENU LAMP LED SOURCE TEMP LED AUTO/ENTER POWER LED 4 Power LED (Indicator light) • When the projector is on, Power LED will blink. Press “Power” button to enter screen, Power LED remains lit continually. Temp LED (Indicator light) • • When fan malfunctions, the screen will shows the message stating “fan error, system is forced to turn off!”. Temp LED remains lit continually. When the temperature is unusual, screen will shows the message stating “temperature error, system is forced to turn off!”. Temp LED blinks once every half of second. Lamp LED (Indicator light) • Lamp LED will turn on automatically when lamp is on. Lamp LED will turn off automatically when the lamp is off.. Power • • (On/Standby) Press to turn power off and on. Please refer to the “Starting and turning off the projector” section in Page 13. Menu (OSD menu) • • Press this button to display the menu, press once again to close the menu. If no other action is taken after the menu is opened, it will disappear automatically after 20 sec. Source • (Signal source) Select the signal of Analog RGB, Analog Y Pb Pr, Digital RGB, Composite Video, S-Video and Component Video in proper order, and automatically adjust the phase and frequency. Auto/Enter (confirm/Sync) • • When using menu, this button is the Enter function. Under general condition, this button is the Sync function. 5 ÇÈ (Up and down button) • OSD active: Press to move between menu options. • OSD inactive: Press to select the video input source. ÅÆ(Left and right button) • When using these buttons, press ”Auto/Enter” button then press right key to add setting value; on the contrary, left button to reduce the setting value. 6 5.Accessories You should check to make sure the accessories below are complete with nothing missing. For any missing accessory, please contact the local distributor. Projector lens cap power cord Composite Video cable PC Audio in/out cable VGA cable USB cable VGA-RCA cable DVI cable 7 Component Video cable S-Video cable Carry bag remote control & 2 AAA batteries 5.1 Remote Control The infrared sensor is located on the top of the projector. The distance between the sensor and remote control should not exceed 10 meters for the remote control to function correctly. How to insert batteries in the remote control: 1) Remove the battery compartment cover. 2) Insert two AAA batteries into the battery compartment. Ensure the batteries polarity is aligned correctly. 3) Replace the battery compartment cover. • Using remote control 8 5.2Function list of remote control panel: Function key Function description Freeze/Esc/L • Enter/R • • • Power • • Mode • • • Menu Source • • Blank • Auto • Pg.Up • • • • Pg.Dn OSD inactive: press this button to freeze the display image. Press again to resume motion. OSD active: press this button to exit. Mouse active: Use as the left mouse button. During common status or using OSD options, please refer to “Auto/Enter” of “Projector panel” in page 5. Mouse active: Use as the right mouse button. Please refer to “Turning on and turning off the projector” section in page 13. Press ”Mode” button to make LED light become green. At this time, the remote control presents mouse status and capable of simulating mouse. If no action is input within 15 sec, remote control will return to common status automatically. Please press “Mode” button again to return to mouse mode. You must have USB cable connected between your computer and the projector to use this option. Please refer to “Menu” of “Projector panel” in page 5. Select the signal of Analog RGB, Analog Y Pb Pr, Digital RGB, Composite Video, S-Video and Component Video in proper order. Press to set the current image into a plain blue screen. Press again to restore the display image. This button can automatically adjust the picture position and frequency. Use as display image magnifying (*). Mouse active: Use as Page up cursor. Use as display image minifying (*). Mouse active: Use as Page down cursor. 9 • Press this button, then press right and left button to execute keystone correction. • Press button to correct a display image that is wider at the bottom. • Press button to correct a display image that is wider at the top.(*) • Do not activate when displaying text or spreadsheets to eliminate text distortion. • OSD inactive: The same as the Up, Down, Left, Right control button on the panel. (*) • Mouse active: Use as the Up, Down, Left, Right button of mouse. Press “Auto” button to return to previous setting value. 10 6.Operation guide 6.1 Connecting components You can connect the projector to your computer, DVD player or VCR. To connect the projector to a DVD player or VCR, go to “Connecting to a DVD player or VCR” on page 12. 1. 2. 3. 4. 5. 6. VGA In/Out port USB In port S-Video In port Composite Video port PC Audio In/Out In port DVI-D In port 11 6.2 How to connect the projector to your computer 1) Plug the VGA cable into the VGA port at the left side of projector, then plug the other end of VGA cable into the computer. Note: If you are connecting to a notebook, you may need to make adjustments to the notebook’s display settings first. Please refer to the user’s guide that came with your notebook. 2) If you want to use the remote control as a mouse, plug the USB cable into the USB port at the left side of projector, and then plug the other end into the computer. 3) If your presentation contains an audio track, plug the PC Audio in/out cable into the Audio In port at the left side of projector then plug the other end into the computer. 4) Turn on the projector first, then the computer. 6.3 How to connect the projector to a DVD player or VCR If you are using composite video cable, please refer to the following description to complete the connection action. 1) Plug the yellow, red, and white composite cable connectors separately into the same color port at the left side of projector. 2) Then plug the yellow, red, and white connectors on the other end into the corresponding ports on the back of the DVD player or VCR. If you are using S-video cable, please refer to the following description to complete the connection action. 1) Plug the S-Video cable connector into the S-Video port at the left side of projector, then plugs the other end into the DVD player or VCR. 2) Plug the red and white connectors from a composite video cable into the corresponding ports at the left side of projector, then plug the other end of red and white connectors into the corresponding ports on the back of DVD player or VCR. Note: When you are using the S-Video cable along with the A/V cable, make sure you do not plug in the A/V cable’s yellow connector. 12 After you have connected all components to the projector, you are ready to begin using the projector. 6.4 Turning on the projector: 1) Remove the lens cap. 2) Ensure the cable connectors have connected properly. 3) Plug the power cord, press the main switch on the top of power cord socket of the projector, Power LED blinks steadily and slowly. 4) Press down the “Power” button on the remote control or panel to turn on the projector, the Power LED displays steady green. 5) The projection screen displays “Warming up! Please wait! ”. Please wait for 30sec; the projector will automatically detect the input source. 6) If the screen displays “No signal”, ensure the source is turned on and the cables are properly connected. 7) To have the best image performance, press “AUTO/ENTER” each time when you turn on the projector. Note: After the projector is turned on, it will detect the interior temperature automatically. If it is overheated, Lamp LED will blink rapidly and the fan will carry out cooling action automatically after rotating 8 sec. At this time, “Power” will have no function. 6.5 Basic image adjustment 1) Power up your equipment in right order and aim the projector at the screen. 2) Please rotate the zoom ring to adjust the image size. 3) Please rotate the focus ring to adjust the image focus. 4) Please use the tilt foot to adjust the image height. 5) Please use the panel or remote control to adjust the horizontal and vertical position of image or execute keystone correction. 6) Please use the OSD menu to adjust the brightness, contrast and color of the screen. 13 6.6 Turning off the projector 1) Press “Power” button to turn off the projector lamp. 2) When you press the “Power ” button, you will see the message stating “Press Power again to turn off the lamp!”. At this time, you only have to press “Power” button again to turn off the projector. Or else the message will disappear automatically after 5 sec. 3) After the lamp is turned off, LED indicator will blink rapidly. At this time, “Power” will have no function. To restart the projector, please wait 60 sec, when LED indicator blinks slowly and steadily, you can restart the projector. 4) After turning off the main switch on the top of power cord socket of the projector, then disconnect the power cable. Note: To extend the lamp life-span, please do not unplug the power cord immediately after the lamp is turned off. Please allow at least 120 sec for the fan to stop, and then you can unplug the power cord. 6.7 Adjusting the projected image height. Adjustor-foot release button Adjustor-foot To adjust the tilt angle of the projector To raise the projector 1. Press and hold the Adjustor-foot release button. 2. Raise the projector to the height you want, then release the button to lock the foot into position. 14 To lower the projector 1. Press and hold the Adjustor-foot release button. 2. Lower the projector to the height you want, then release the button to lock the foot into position. 6.8 Adjusting the image focus and zoom Zoom Wheel Focus ring You can adjust the zoom ring to magnify or minify the image. Rotate counterclockwise to magnify the image. Rotate clockwise to minify the image. To adjust the focus, please rotate the focus ring to obtain the best focus. The focus distance of this projector is 1.4~12 meter. 15 7.OSD Menu Press “Menu” button to open the menu. Press up and down button to choose the OSD options or press Esc to exit. To enter the submenu, please press “Auto/Enter” button or right button. Under the submenu, press “Menu” or the Esc button on the remote control to return to Menu main screen or double click to exit the OSD menu. 7.1 Image (Computer mode) Submenu options Brightness (**) Contrast Description Adjusts the brightness of the display image Operation method • • Adjusts the contrast of the display image. • • Keystone Corrects a display image that is • wider at the top or at the bottom. • Zoom Enlarges or reduces the display image. • • • Press button can reduce the brightness of display image. Press button can increase the brightness of display image.(*) Press button can reduce the contrast of display image. Press button to increase the contrast of display image.(*) Press button to correct the display image that is wider at the bottom. Press button to correct the display image that is wider at the top.(*) Press button to reduce the display image. Press button to enlarge the display image.(*) Please press Auto/Enter button to enter zoom operation. Under this mode, press buttons to shift the image, press the Pg Up and Pg Dn button on the remote control to adjust the image size. * Press “Auto” button to return to previous setting value. **If the source is switched to HDTV/DVD 480P, the “Brightness” turns to “Tint” the adjust the balance between red and blue colors in the image. 16 7.2 Image (Video mode) Submenu Description options Brightness Adjusts the brightness of the Operation method • display image. • Contrast Adjusts the contrast of the display image. • • Hue Adjusts the balance between red and green color levels. • • Saturation Changes the display image • from black and white to color. • Sharpness Adjusts the sharpness of the display image.. • • Press button can reduce the brightness of display image. Press button can increase the brightness of display image.(*) Press button can reduce the contrast of display image. Press button to increase the contrast of display image.(*) Press button to increase the color level of green. Press button to increase the color level of red.(*) Press button to reduce the color saturation. Press button to increase the color saturation level.(*) Press button to reduce the sharpness. Press button to increase the sharpness.(*) * Press “Auto” button to return to previous setting value. 17 7.3 Display (Computer mode) Submenu options Description Minimizes any vertical bars • Frequency Phase V position or stripes visible on the screen background. Removes any horizontal distortion and clears or sharpens the displayed characters. Adjusts the display image up and down. • Press Å Æ button to adjust(*). • PressÅ button to move down the display image. PressÆ button to move up the display image.(*) • H position Adjusts the display image left and right. • • 18 Operation method PressÅ Æ button to adjust (*). PressÅ button to move the display image to the left. PressÆ button to move the display image to the right.(*) Proportion User color Red Gain Switches between a display • image mode of 4:3 or 16:9. Activates individual red, • green, or blue color correction controls. • Customizes the red color levels. • • Green Gain Customizes the green color • levels. • Blue Gain Customizes the blue color levels. • • Color temperature Increases the red or blue • tint of the display image. • * Press “Auto” button to return to previous setting. 19 Press Å Æ button to choose. Choose Yes, and the red gain, green gain, green gain option emerges. Choose No, and only color temperature appears. PressÅbutton to reduce the red color levels of the image. PressÆbutton to increase the red color levels of the image.(*) PressÅbutton to reduce the green color levels of the image. PressÆbutton to increase the green color levels of the image.(*) PressÅbutton to reduce the blue color levels of the image. PressÆbutton to increase the blue color levels of the image.(*) PressÅbutton to reduce the color temperature, and the screen will display the warmer feeling. PressÆbutton to increase the color temperature, and the screen will display the colder feeling.(*) 7.4 Display (Video mode) Submenu options Description Corrects a display image Keystone Operation method • that is wider at the top or at the bottom. • To choose the screen • image proportion 16:9 or 4:3. Press “Auto” button to return to previous setting. Proportion * 20 Press button to correct the display image that is wider at the bottom. Press button to correct the display image that is wider at the top.(*) Press button to choose. 7.5 Audio Submenu options • Volume Description or operation method Press button to decrease the volume. Press button to increase the volume.(*) Press button to decrease the volume of the left Balance speaker. • Press button to increase the volume of the right speaker.(*) • Press button to decrease the treble Treble • Press button to increase the treble.(*) To adjust the low frequency of the sound source. Bass • Press button to weaken the bass. • Press button to enhance the bass.(*) • Choose “Yes” to mute. Mute * Press “Auto” button to return to previous setting. • • 21 7.6 Management Submenu Description options OSD location Adjusts the position of the OSD Operation method • within the display image. Projection (Projection before the screen) • Default Press button to select (*). Press button to select (*). (Projection behind the screen) Flips the display image so it can be viewed correctly when the projector is set up for rear screen projection. (Projection ceiling-mounted) Flips the display image so it can be viewed correctly when the projector is ceiling-mounted. Displays the hours that the lamp • Lamp remind has been in use and lets you set a warning message that will be displayed when the lamp is within 30 hours of maximum lamp life. 22 Press select. button to Lamp Reset Resets the lamp timer after replacing the lamp module. • Auto Adjust Automatically adjusts the display image to the ideal settings for the display source. • • Returns all settings to the factory • defaults. Source type Switches between available vide • input sources. * Press “Auto” button to return to previous setting. Reset All 23 Press right button, then it will display the message stating “Press Auto/Enter button, reset the lamp timer” to confirm that the user has replaced the lamp. After replacing the lamp, please press “Auto/Enter” button. Or otherwise, press “Menu” button or the “Esc” on remote control. Select Yes, and the brightness and contrast value will be adjusted automatically each time you press “Auto” button. Select No, the brightness and contrast value is fixed and unchanged. Press right button. Press choose. button to 7.7 Language Changes the language of the OSD menu. Choose between English, German, French, Italian, Spanish, Portuguese, Japanese, Traditional, Chinese, and Simple Chinese. 24 8. Maintenance and service Change the module lamp immediately when the lamp life reaches 1500 hrs to maintain the best projection image. 8.1 Replacing the lamp module When the lamp is within 30 hours of maximum lamp life, projector will display a warning automatically stating, “Lamp has reached its end of life! Lamp replacement is suggested!”. When this message appears, please change the lamp immediately. To replace the lamp module: 1. Turn off the projector and wait for the fan to stop. 2. Turn off the main power switch, and disconnect the power cord and all cables. 3. Let the projector lamp cool down completely (approximately 30 minutes). 4. Use screwdriver to loosen the screws of lamp access panel and lamp module. 5. Take out the lamp module. 6. Gently process the new lamp module into the lamp bay, then replaces the lamp module retaining screws. 7. Replace the lamp bay access panel, and then replace the access panel screw. Remove the three lamp module retaining screws, unsnap the lamp removal handle to change the lamp module. Use screwdriver to loosen the lamp access panel screws, and then press down the access panel lock to remove the access panel. 25 8.2 Cleaning the projector lens Please follow the following procedures to clean the projector lens: 1 Pour out a little cleaner on a clean soft cloth. Do not use the cleaner with particle, the cleaner that contains solvent or other chemicals of poor quality, they may cause damage to the projector lens. 2 Use the soft cloth to wipe the projector lens lightly according to the direction of a certain circling motion. 3 After finish wiping, place the lens cap on when the projector is not being used. 26 9. Appendix 9.1 Common problems and solutions When you encounter problems while using the projector, please refer to the following contents: If the suggestions in the troubleshooting section does not correct the problem, please contact the local distributor or our customer service center. No picture on the screen ÖMake sure that all components are connected correctly and securely in accordance to the connection method and line that is introduced in the previous chapter. ÖMake sure the power cord is not bended or broken. ÖMake sure that the main switch of projector is turned on. ÖCheck whether the lamp of projector is securely installed. ÖMake sure you have removed the lens cap and turn on the projector switch. The screen resolution is not right Ö Make sure the computer’s video card is set for a resolution of no greater than 1280 X 1024. Display image is instable or flashing ÖPlease press the “Auto” button on the remote control or the Auto/Enter button on the projector. ÖOr use “Phase” option in the “Display” menu to correct. ÖOr change the color setting of display from your computer. Display image has vertical flashing stripes or bars. ÖPlease press the “Auto” button on the remote control or the Auto/Enter button on the projector. Ö Or use “Frequency” option in the “Display” menu to adjust. ÖOr check and resetting the display mode of your display card and make it be compatible with this product. 27 The focus of display image is blurred ÖAdjust the focus ring on the projector. ÖMake sure the projection screen is 1.4 ~12 meters from the projector. Projected colors don’t match the computer or video player’s colors ÖThis is a normal phenomenon; just adjust the brightness, color or contrast value in the menu. When projector is connected to DVD, and the film aspect ratio is 16:9, the display image is distorted. ÖPlease adjust the image proportion of projector into 4:3. Image is reversed ÖOpen the Menu, and then choose “Projection setting” option to adjust the projection method. Lamp is burned or cracking sound happens. ÖWhen the lamp has reached its end of life, it will burn out and may produce shatter of glass. Sometimes, it will jam the fan and causing it unable to start. If this kind of condition is happening, please contact the local authorized distributor to buy the lamp module for replacement. If you want to change the lamp, please refer to the procedures of “Changing the lamp module” and act accordingly. 28 9.2 The distance proportion between screen and projector (Based on Zoom Ratio 1.18:1, for reference only) Projection distance 1.45M 2M 4M 6M 12M Tele Projection screen size 30” 40” 80” 120” 240” Wide Projection screen size 35” 47” 94” 141” 283” 29 9.3 Specifications EIP-25 Model No. Resolution XGA(1024*768), SXGA(1280*1024) compressed Lamp 250W User Replaceable VIP Lamp Brightness 2500 Lumens Dimensions 330 x 276 x 104 mm Weight 7.5 lbs Projection distance Ratio of projection screen and distance Zoom ratio 1.4m--12m Uniformity 80% Screen proportion 4:3 / 16:9 screen selectable Contrast ratio 1800 : 1 H. Frequency 31.5 -- 80 kHz V. Scan rate 56 -- 85 Hz Video compatibility NTSC / PAL /SECAM HDTV compatibility 480p/720p/1080i Power supply 90 to 240 VAC, 50 to 60 Hz Power consumption 350W IO port DVI, USB Mouse, RGB In(D-Sub 15 pin), RGB Out(D-Sub 15 pin), Component Video, S-Video Mini DIN 4 pin, Audio: RCA Jack, 3.5mm Mini Jack, Composite Video(RCA Jack), PC Audio In, PC Audio Out, 2 watt speaker 1.34:1-- 1.6:1 (Distance: Diagonal) 1.2:1 (Manual Zoom/Focus) * The specifications are subject to change without notice. This device complies with Part 15 of the FCC Rules. Operation is subject to the following two conditions: (1) the device may not cause harmful interference, and (2) this device must accept any interference received, including interference that may cause undesired operation. 30