1
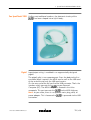
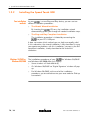
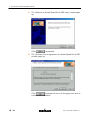
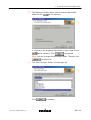
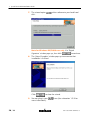
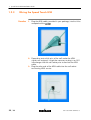
Status Change Note Released B D Fa a29236 Short Title CD-UG STUSB WinPPPoA All rights reserved. Passing on and copying of this document, use and communication of its contents not permitted without written authorization from Alcatel. 2 / 66 3EC 16807 AAAA TCZZA Ed. 07 Contents Contents 1 Speed Touch USB Installation Guide . . . . . . . . . . . . . . . . . . . . . . . . . . . . . . . . . . 1.1 1.2 9 Get Acquainted with your Speed Touch USB . . . . . . . . . . . . . . . . . . . . . . . Speed Touch USB Installation . . . . . . . . . . . . . . . . . . . . . . . . . . . . . . . . . . . . 1.2.1 What you Need . . . . . . . . . . . . . . . . . . . . . . . . . . . . . . . . . . . . . . 1.2.2 Installing the Speed Touch USB . . . . . . . . . . . . . . . . . . . . . . . . . 1.2.3 Wiring the Speed Touch USB . . . . . . . . . . . . . . . . . . . . . . . . . . . 1.2.4 Installation Results . . . . . . . . . . . . . . . . . . . . . . . . . . . . . . . . . . . . 10 13 14 16 22 24 Speed Touch USB PPPoA Connection Guide . . . . . . . . . . . . . . . . . . . . . . . . . . . 25 2.1 2.2 Making and Releasing a Connection . . . . . . . . . . . . . . . . . . . . . . . . . . . . . Speed Touch USB Connection Entries . . . . . . . . . . . . . . . . . . . . . . . . . . . . . 26 31 Speed Touch USB Diagnostics . . . . . . . . . . . . . . . . . . . . . . . . . . . . . . . . . . . . . . . . 35 3.1 3.2 Speed Touch USB Status System Tray Icon . . . . . . . . . . . . . . . . . . . . . . . . . Speed Touch USB Diagnostics . . . . . . . . . . . . . . . . . . . . . . . . . . . . . . . . . . . 3.2.1 Basic Speed Touch USB Diagnostics . . . . . . . . . . . . . . . . . . . . . 3.2.2 Speed Touch USB Diagnostics Properties . . . . . . . . . . . . . . . . . Detailed Speed Touch USB Diagnostics . . . . . . . . . . . . . . . . . . . . . . . . . . . . 3.3.1 Connection Diagnostics . . . . . . . . . . . . . . . . . . . . . . . . . . . . . . . 3.3.2 Physical Diagnostics . . . . . . . . . . . . . . . . . . . . . . . . . . . . . . . . . . 3.3.3 ATM Diagnostics . . . . . . . . . . . . . . . . . . . . . . . . . . . . . . . . . . . . . 3.3.4 OAM F5 Diagnostics . . . . . . . . . . . . . . . . . . . . . . . . . . . . . . . . . . 3.3.5 AAL5 Diagnostics . . . . . . . . . . . . . . . . . . . . . . . . . . . . . . . . . . . . . 3.3.6 Version Diagnostics . . . . . . . . . . . . . . . . . . . . . . . . . . . . . . . . . . . 36 37 38 40 42 43 44 45 46 47 48 Speed Touch USB Software . . . . . . . . . . . . . . . . . . . . . . . . . . . . . . . . . . . . . . . . . . . 49 4.1 4.2 4.3 Removing Driver Software . . . . . . . . . . . . . . . . . . . . . . . . . . . . . . . . . . . . . . . Upgrading/Repairing Driver Software . . . . . . . . . . . . . . . . . . . . . . . . . . . . Speed Touch USB Web Upgrade . . . . . . . . . . . . . . . . . . . . . . . . . . . . . . . . . 50 52 54 Abbreviations . . . . . . . . . . . . . . . . . . . . . . . . . . . . . . . . . . . . . . . . . . . . . . . . . . . . . . . . . . . . 55 AppendixA Troubleshooting . . . . . . . . . . . . . . . . . . . . . . . . . . . . . . . . . . . . . . . . . 57 AppendixB LED Description and Port Description . . . . . . . . . . . . . . . . . . . . . . 59 AppendixC Safety and Agency Regulatory Notices . . . . . . . . . . . . . . . . . . . . 61 2 3 3.3 4 3EC 16807 AAAA TCZZA Ed. 07 3 / 66 Contents 4 / 66 3EC 16807 AAAA TCZZA Ed. 07 Welcome to the Speed Touch USB Welcome to the Alcatel Speed Touch modem. Asymmetric Digital Subscriber Line (ADSL) From now on, your online experience will be revolutionized by the high speed Internet access that Alcatel's ADSL technology delivers. is With download speeds up to 8Mega bits per second (Mbps), your Speed Touch around 200 times faster than present day modems. This superior Alcatel ADSL technology outperforms all similar product on the market. 3EC 16807 AAAA TCZZA Ed. 07 5 / 66 This will be your partner in exploiting the features of this highly advanced product. Prior to connecting the Speed Touch Instructions (See Appendix C). , read the Safety The following words and symbols mark special messages throughout this document: CAUTION WARNING 6 / 66 WARNING: indicates that failure to follow the directions could cause bodily harm or loss of life. CAUTION: indicates that failure to follow the directions could result in damage to equipment or loss of information. The following trademarks are used in this document: " Speed Touch is a trademark of the Alcatel Company " Windows and Internet Explorer are trademarks of Microsoft Corporation " Netscape and Netscape Navigator are registered trademarks of Netscape Communications Corporation For readability, the Speed Touch will be referred to as , or STUSB further in this User Manual. For readability, Service Provider (SP) will refer to all instances, responsible for your ADSL connections, i.e. ADSL Service Provider (ASP), Internet Service Provider (ISP), Corporate, etc. 3EC 16807 AAAA TCZZA Ed. 07 Due to the continuous evolution of Alcatel ADSL technology, existing products are often upgraded. Alcatel's Speed Touch documentation, and Speed Touch software changes accordingly. For more information on the newest technological breakdowns, software upgrades, and documents, please consult our Alcatel web site at: http://www.alcatel.com http://www.alcateldsl.com 3EC 16807 AAAA TCZZA Ed. 07 7 / 66 8 / 66 3EC 16807 AAAA TCZZA Ed. 07 1 Speed Touch USB Installation Guide 1 Speed Touch USB Installation Guide 3EC 16807 AAAA TCZZA Ed. 07 Use this chapter to quickly prepare your Topic for the Internet. See Get Acquainted with your STUSB 1.1 STUSB Installation 1.2 9 / 66 1 Speed Touch USB Installation Guide 1.1 Get Acquainted with your Speed Touch USB 10 / 66 Check your package for the following items: " The Speed Touch " 2m ADSL cable (RJ11/RJ11 , RJ14/RJ14) " A CDĆrom, containing installation software and this User Manual. In the event of damaged or missing items, contact your local product dealer for further instructions. Your shipping carton may also include release notes, safety and conformity declarations, and other materials. 3EC 16807 AAAA TCZZA Ed. 07 1 Speed Touch USB Installation Guide Unlike most traditional modems, the electronic circuitry of the has been shaped into a stylish body: Input/output wiring is moulded in an ergonomically designed pigtail. The pigtail splits in two separate parts. From the body to the first connector block it contains the ADSL cord as well as the USB cord. At the end of the tail only the USB cord remains. On the rear end of the tail you find the USB connector. That's the interface which connects the to your Personal Computer (PC). The ADSL Line port is situated in the inline receptacle. This port connects the to the ADSL highway. Note: As you notice, there is no separate mains plug, cord, or power adapter. This is because the is powered via the USB connection. 3EC 16807 AAAA TCZZA Ed. 07 11 / 66 1 Speed Touch USB Installation Guide ADSL provides simultaneous highĆspeed Internet access and regular phone services over the existing telephone line already in your house. With downloads at up to 8Mbps it's up to 200 times faster than traditional modems. What's more, your connection to the Internet is established immediately and busy tones are a thing of the past. ADSL is short for Asymmetric Digital Subscriber Line. This somewhat cryptic name is best explained in straightforward terms: 12 / 66 " Line: ADSL uses the ordinary existing copper line, known as local loop", running between your local premises and the telephone Central Office (CO). " Subscriber: That's you, the end user. Because this is what Service Provider (SP)s, or operators call their customers. " Digital: ADSL is a digital transmission technology. To a certain extend, digital information is not affected by impairments on the telephone line, thus achieving a higher reliability. " Asymmetric: ADSL can transmit data much faster from the Internet towards the end user than vice versa. 3EC 16807 AAAA TCZZA Ed. 07 1 Speed Touch USB Installation Guide 1.2 Speed Touch USB Installation 3EC 16807 AAAA TCZZA Ed. 07 Execute the steps in this section and in noĆtime you are connected to the Internet. Topic See What you Need 1.2.1 Installing the STUSB 1.2.2 Wiring the STUSB 1.2.3 Installation Results 1.2.4 13 / 66 1 Speed Touch USB Installation Guide 1.2.1 What you Need ADSL service must be enabled on your telephone line. You need a central splitter, or distributed filters for decoupling ADSL and telephone signals. In all cases contact your ADSL service provider about splitter/filter installation ! WARNING Public telephone lines carry voltages that can cause electric shock. Only install splitter/filters yourself if these are qualified for that purpose. Other splitter/filters may only be installed by qualified service personnel. You must have a user account for Internet access via a Service Provider (SP): For this user account, it will provide you: " A user name (logon ID) " A password. 14 / 66 3EC 16807 AAAA TCZZA Ed. 07 1 Speed Touch USB Installation Guide Your PC should meet the following minimum requirements for installation: " One of the following Operating System (OS) must be readily installed on your PC: D Microsoft Windows 98 D Windows 98 Second Edition (98SE) D Microsoft Windows Millennium (ME) D Microsoft Windows 2000 You may need the Windows 98/98SE/ME/2000 CDĆrom during installation. " For Windows98/98SE/ME: D Pentium processor 166 MHz, or higher (or compatible) D 32 Mega Byte (MB) of memory, or more. " For Window2000 OS: D Pentium II processor, or higher (or compatible) D 64 Mega Byte (MB) of memory, or more. " 30 MB of free hard disk space One highĆpowered USB port, i.e. an USB port, capable of powering attached USB devices. " Note: Make sure you are not using lowĆpowered USB ports to connect the . In case you are unsure of the type of USB port, see the User manual of your PC, or USB port hub. For the PPPoA connection service you need Microsoft DialĆUp Networking, default installed with MS Windows 98/98SE and Windows ME/2000. For surfing the Internet: a Web browser, e.g. Netscape Navigator, Internet Explorer, ... 3EC 16807 AAAA TCZZA Ed. 07 15 / 66 1 Speed Touch USB Installation Guide 1.2.2 Installing the Speed Touch USB As your is a true PlugĆandĆPlay device, you can use two different installation procedures: " The Alcatel Wizard Installation CDĆrom, the installation wizard By inserting the automatically guides you through all needed installation steps. " The Plug and Play Compliant Installation The installation procedure is initiated by connecting the to your PC's USB port. It does not matter which method you use, both are equally valid. In this subsection, the wizard installation is fully described. In case you experience problems with this installation, you can try the PnP compliant installation, shortly described at the end of this subsection. 16 / 66 The installation procedures of your for Windows 98/98SE and Windows ME/2000 differ only slightly: " Some windows will look differently " On Windows 98/98SE no 'Digital Signature' window will pop up " For Windows 98/98SE, at the end of the installation procedure, you are asked to enter your area code for DialĆup connections. 3EC 16807 AAAA TCZZA Ed. 07 1 Speed Touch USB Installation Guide 1. Insert the drive: The Alcatel installation CDĆrom in your PC's CDĆrom wizard will start automatically. wizard does not start Note: In case the Alcatel automatically, open a window via ³ from the Start menu and enter following path: D:\Setup.exe, where D stands for the drive letter of your CDĆrom drive. 2. The Setup program prepares the installation wizard: As soon as the preparation is finished, the installation will start automatically. 3EC 16807 AAAA TCZZA Ed. 07 17 / 66 1 Speed Touch USB Installation Guide 3. The 'Welcome to Alcatel Speed Touch USB setup' window pops up: Click to proceed. 4. The 'Software License Agreement for Alcatel Speed Touch USB' window pops up: Click to accept the terms of the agreement and to continue the installation. 18 / 66 3EC 16807 AAAA TCZZA Ed. 07 1 Speed Touch USB Installation Guide 5. The following window allows you to choose a destination driver software: folder for the In most cases the proposed destination is best suited for the driver software. Click to proceed. Note: You can change the destination folder. Therefor, click to select one. 6. The 'Select Program Folder' window pops up: Click 3EC 16807 AAAA TCZZA Ed. 07 to proceed. 19 / 66 1 Speed Touch USB Installation Guide 7. The wizard copies disk: driver software to your local hard Note for Windows ME/2000 user only: If a 'Digital Signature' window pops up, then click to continue. 8. The 'Setup Complete' window pops up to announce that installation is finished: Click to close the wizard. 9. You can plug in your more information). 20 / 66 now (See subsection 1.2.3 for 3EC 16807 AAAA TCZZA Ed. 07 1 Speed Touch USB Installation Guide 10. The installation wizard will automatically continue with the 's ADSL PPPoA DialĆUp Networking installation of connections. This installation procedure will create the appropriate DialĆUp entries to allow easy connectivity to your SP, and hence, the Internet. 11. At the end of the procedure the 'Speed Touch DialĆUp' window pops up, allowing you to immediately connect to the Internet (See chapter 2 for more information). 1. Connect the to the ADSL wall socket and the PC, according the procedure described in subsection 1.2.3. Note: ADSL must be available, as well as the appropriate central splitter, or distributed filters. 2. Windows will automatically recognize the . The Windows 'Found new Hardware' wizard pops up. This wizard will guide you through the installation procedure. Follow all the instructions. In most cases you only have to click to proceed with the installation procedure. 3. The installation wizard will automatically continue with the installation of 's ADSL PPPoA DialĆUp Networking connections. This installation procedure will create the appropriate DialĆUp entries to allow easy connectivity to your SP, and hence, the Internet. At the end of the procedure the 'Speed Touch DialĆUp' window pops up, allowing you to immediately connect to the Internet (See chapter 2 for more information). 3EC 16807 AAAA TCZZA Ed. 07 21 / 66 1 Speed Touch USB Installation Guide 1.2.3 Wiring the Speed Touch USB 1. Plug the ADSL cable, provided in your package, into the inline : receptacle of the 2. Depending onto which pins of the wall socket the ADSL signals are assigned, it might be necessary to plug in an RJ11 interchanger into the wall socket prior to connect the ADSL cable. 3. Plug the other end of the ADSL cable into the wall socket terminating ADSL service: 22 / 66 3EC 16807 AAAA TCZZA Ed. 07 1 Speed Touch USB Installation Guide 4. Plug the 's USB connector into the PC's USB port: The PC's USB port can be easily located, it is marked with the typical USB symbol . 5. The is automatically recognized. The needed installations will be performed by your Windows OS. 3EC 16807 AAAA TCZZA Ed. 07 23 / 66 1 Speed Touch USB Installation Guide 1.2.4 Installation Results After you have correctly followed the installation procedures, the following folders and icons are added to your system: " SpeedTouch USB program folder: The SpeedTouch USB folder is added, which contains two applications: " D SpeedTouch USB DialĆUp (See chapter 2) D SpeedTouch USB Diagnostics (See chapter 3). Desktop SpeedTouch DialĆup icon: A SpeedTouch DialĆup icon is added to your desktop. See chapter 2 for more information. " System tray SpeedTouch status icon: status icon is added to the system tray, allowing An instant status information of the . See chapter 3 for more information. " Microsoft DialĆUp Networking folder: A DialĆUp Networking icon is added for the connection. 24 / 66 PPPoA 3EC 16807 AAAA TCZZA Ed. 07 2 Speed Touch USB PPPoA Connection Guide 2 Speed Touch USB PPPoA Connection Guide 3EC 16807 AAAA TCZZA Ed. 07 Use this chapter to quickly connect to the Internet. Topic See Making and Releasing a Connection 2.1 STUSB Connection Entries 2.2 25 / 66 2 Speed Touch USB PPPoA Connection Guide 2.1 Making and Releasing a Connection Proceed as follows: DoubleĆclick the 'SpeedTouch DialĆup' icon on your desktop: Or open the DialĆup window via Start ³ Programs ³ SpeedTouch USB ³ SpeedTouch USB DialĆup: 26 / 66 3EC 16807 AAAA TCZZA Ed. 07 2 Speed Touch USB PPPoA Connection Guide 2. As a result the DialĆup window pops up: 3. Enter the user name and password for your user account at the SP, and click . 4. As soon the connection is made, the following message pops up: 3EC 16807 AAAA TCZZA Ed. 07 27 / 66 2 Speed Touch USB PPPoA Connection Guide Click . The message box and dialĆup window are minimized into a DUN icon in the system tray: In case you have more than one account, and/or multiple connected to your PC, you can create multiple entries for the DialĆup application, with specific credentials, DUN entry, and home web page. See section 2.2 for more information. 28 / 66 3EC 16807 AAAA TCZZA Ed. 07 2 Speed Touch USB PPPoA Connection Guide As soon as you are connected, your web browser will open automatically and browse to Alcatel's consumer web page. In case your web browser does not open automatically, you must open it manually. While you are connected, you can find the DUN icon showing two PCs connected to each other in the system tray. The DUN icon itself symbolizes activity on the PPPoA connection by flashing PC(s): " A flashing Front" PC symbolizes upstream (TX) link activity (from your local PC towards the remote device). " A flashing Behind" PC symbolizes downstream (RX) link activity (from the remote device towards your PC). In case you position your mouse pointer over the DUN icon, an informational box pops up: 3EC 16807 AAAA TCZZA Ed. 07 29 / 66 2 Speed Touch USB PPPoA Connection Guide Proceed as follows: 1. DoubleĆclick the MSDUN icon in the system tray: 2. As a result, the 'Speed Touch USB Status' window pops up (Windows 2000 example): 3. Click 30 / 66 . The connection is released. No Internet connectivity exists anymore. 3EC 16807 AAAA TCZZA Ed. 07 2 Speed Touch USB PPPoA Connection Guide 2.2 Speed Touch USB Connection Entries In case you have more than one connected, and/or in case you have more than one account for ADSL connectivity, e.g. one to the Internet, and one to your corporate, you are able to create multiple DialĆup entries in the DialĆup application. Proceed as follows: 1. Open the As a result the DialĆup window as described in section 2.1. DialĆup window pops up: 2. To select another entry, click in the field and select the entry, if more than one, of your choice. 3. You are now able to overview the properties of this entry, and/or make a connection, using the credentials of your current entry selection. 3EC 16807 AAAA TCZZA Ed. 07 31 / 66 2 Speed Touch USB PPPoA Connection Guide 1. Open the As a result the 2. Click 32 / 66 DialĆup window as described in section 2.1. DialĆup window pops up: to open the following drop down box: 3EC 16807 AAAA TCZZA Ed. 07 2 Speed Touch USB PPPoA Connection Guide 3. To overview the properties of the current selected entry (in most cases a default entry), select (as in the example above. As a result the window of your current entry pops up: 4. In case you have only one account, you can add your user name and password to the default entry properties. The next time you open the DialĆup application, these values are automatically filled in. 5. Click to resume. 3EC 16807 AAAA TCZZA Ed. 07 to save your changes, or click 33 / 66 2 Speed Touch USB PPPoA Connection Guide 1. Open the DialĆup window, click drop down box, and select ' window pops up. to open the . As a result , an empty In this window you can add your additional credentials, e.g. to your corporate: 2. Click to save your changes and close the ' window. 1. Open the DialĆup window and select the entry you want to remove via the 'DUN Entry list. 2. Click to open the drop down box, and select . 3. A window pops up, asking for for confirmation: Click to confirm the removal. As a result, the entry is deleted from the entry selection list. 34 / 66 3EC 16807 AAAA TCZZA Ed. 07 3 Speed Touch USB Diagnostics 3 Speed Touch USB Diagnostics 3EC 16807 AAAA TCZZA Ed. 07 While your session is active, i.e. the PPPoA connection is established, various diagnostics are available from the software, to overview the momentary connection. Topic See STUSB Status System Tray Icon 3.1 STUSB Diagnostics 3.2 Detailed STUSB Diagnostics 3.3 35 / 66 3 Speed Touch USB Diagnostics 3.1 Speed Touch USB Status System Tray Icon As soon your is installed, a your desktop's system tray: The status icon is colored, depending the state of the device. If you position your mouse pointer over the status icon, a message pops up: System tray icon Message Description Alcatel ADSL Modem The STUSB is not plugged into the PC's USB port. An ADSL connection can not be established. Modem not plugged in Alcatel ADSL Modem Initializing ADSL line Alcatel ADSL Modem. Sent : X bytes Received : Y bytes 36 / 66 status icon is shown at The STUSB is plugged in, but has not (yet) accomplished synchronization over the ADSL line. The STUSB is connected, and synchronized, and has, up to this moment, sent X bytes, and received Y bytes over the ADSL line. 3EC 16807 AAAA TCZZA Ed. 07 3 Speed Touch USB Diagnostics 3.2 Speed Touch USB Diagnostics The exhibits specific ADSLĆlevel information" diagnostics windows. These windows allow you to view specific information on the various layers ADSL uses to transmit or receive information over the ADSL link. 3EC 16807 AAAA TCZZA Ed. 07 Topic See Basic STUSB Diagnostics 3.2.1 STUSB Diagnostics Properties 3.2.2 37 / 66 3 Speed Touch USB Diagnostics 3.2.1 Basic Speed Touch USB Diagnostics DoubleĆclick the open the status icon in the system tray to Diagnostics window. The same result is achieved via Start ³ Programs ³ SpeedTouch USB ³ SpeedTouch USB Diagnostics ( 38 / 66 Opening the window: ): Diagnostics, pops up the following generic 3EC 16807 AAAA TCZZA Ed. 07 3 Speed Touch USB Diagnostics In the left box, the following figures can be displayed: Data Description Indicates that your STUSB is not (properly) connected to your PC, or malfunctioning. Note: To solve the problem, reconnect your STUSB to the PC. Non spinning globe: Your STUSB is connected to your PC, and the modem software is loaded, but your ADSL link is not active. Spinning globe: Your STUSB has established the ADSL connection. In the case of a spinning globe (physical connection), the following data are displayed: Data Description Bytes Sent Shows the number of bytes you sent over the ADSL link. Bytes Received Shows the number of bytes you received over the ADSL link. The following buttons are available: Button Functionality To update all diagnostical data. This invokes the data to be updated to the current condition of the connection. Note: This button applies only if the 'Screen update' box of the 'Properties' menu is unflagged. See subsection 3.2.2 for more information. To reset all diagnostical data. This is used to start a new reading of data. Pops up an extension to the Diagnostics window. Closes the extension to the Diagnostics window. 3EC 16807 AAAA TCZZA Ed. 07 39 / 66 3 Speed Touch USB Diagnostics 3.2.2 Speed Touch USB Diagnostics Properties LeftĆclick the upperĆleft corner of the Diagnostics window ( ), or rightĆclick its caption bar to pop up a box menu. In this box menu, click 'Properties' to pop up the 'Properties' window: Field Description Screen update Allows to set the update rate of the information displayed in the Diagnostics windows: By default automatic screen updating is enabled: However, you can also disable, i.e. unflag, the 'Screen update' box. Then, an update of the windows is only performed in case you click Options If tray icon is flagged, the STUSB system is shown in the system tray (default). If is flagged, the STUSB systemtray icon, and diagnostics are started when you start your PC. 40 / 66 3EC 16807 AAAA TCZZA Ed. 07 3 Speed Touch USB Diagnostics Button Description Saves the changes you made, and closes the window. Cancels changes you made, and closes the window. 3EC 16807 AAAA TCZZA Ed. 07 41 / 66 3 Speed Touch USB Diagnostics 3.3 Detailed Speed Touch USB Diagnostics 42 / 66 Click to pop up an extension to the basic Diagnostics (See subsection 3.2.1 for more information). Topic See Connection Diagnostics 3.3.1 Physical Diagnostics 3.3.2 ATM Diagnostics 3.3.3 OAM F5 Diagnostics 3.3.4 AAL5 Diagnostics 3.3.5 Version Diagnostics 3.3.6 3EC 16807 AAAA TCZZA Ed. 07 3 Speed Touch USB Diagnostics 3.3.1 Connection Diagnostics By default the detailed 'Connection' tab selected: Diagnostics will appear with the Field Description VPI/VCI The STUSB's ADSL PPPoA connections use Asynchronic Transfer Mode (ATM)'s virtual channels for accessing the ADSL line. Virtual Path Identifier (VPI) /Virtual Channel Identifier (VCI) are 2 numbers that together uniquely identify a Virtual Channel (VC) and Virtual Path (VP) . Type Indicates which method (VCMUX, or LLC) is used for encapsulating/decapsulating the PPP packets in/from the ATM Adaption Layer 5 (AAL5). SDU Transmit Indicates the number of Service Data Unit (SDU)s which are transmitted; and received. SDU Receive Tx/Rx SDU Size 3EC 16807 AAAA TCZZA Ed. 07 Indicates the size of the SDUs which are transmitted (Tx), and received (Rx). 43 / 66 3 Speed Touch USB Diagnostics 3.3.2 Physical Diagnostics Click the 'PHY' tab to pop up the following window: Field Description USB Retry: Indicates the number of times your STUSB had to retry the transmission/reception of data to/from your PC due to USB bus failures (delays, congestion or reflections). Transmit Receive ADSL Line Rate: Transmit Receive 44 / 66 Indicates the maximum ATM transmit and receive rates in Kilo bits per second (Kbps) on the ADSL line. Loss of signal Indicates how many times the ADSL signal was interrupted.. Loss of link Indicates how many times the ADSL connection was down. Loss of frame Indicates how many times the bit synchronization was lost over the ADSL link. Errored seconds Indicates how many seconds the ADSL link was not functioning correctly, i.e. loss of link, signal, and/or frame occurred. 3EC 16807 AAAA TCZZA Ed. 07 3 Speed Touch USB Diagnostics 3.3.3 ATM Diagnostics Click the 'ATM' tab to pop up the following window: Field Description Bandwidth Indicates the maximum transmit/receive service your service provider offers for your current subscription. Cell count: Indicates the number of all AAL5 and Operations And Management (OAM) cells sent through the ATM layer towards the ADSL line. Transmitted Cell count: Received Cell count: Invalid Cell count: Loopback 3EC 16807 AAAA TCZZA Ed. 07 Indicates the number of cells received and passed through the ATM Layer. Indicates the number of cells that are dropped because they do not belong to the current information flow or, are incorrect. Indicates the number of cells sent by the service provider (e.g. for maintenance). 45 / 66 3 Speed Touch USB Diagnostics 3.3.4 OAM F5 Diagnostics Click the 'OAM F5' tab to pop up the following window: Field Description OAM F5 State: Flagged Alarm Indication Signal (AIS), Remote Defect Indication (RDI), and /or Continuity Check (CC) upĆ and downstream boxes, indicate reception, and/or occurrence of these situations. AIS, RDI CC up/down F5 Cell count: loopback Indicates the number of sent/received F5 loopback, and/or continuity check cells. CC Note: This window is only used in exceptional cases for problem solving in cooperation with the service provider. 46 / 66 3EC 16807 AAAA TCZZA Ed. 07 3 Speed Touch USB Diagnostics 3.3.5 AAL5 Diagnostics 3EC 16807 AAAA TCZZA Ed. 07 Click the 'AAL5' tab to pop up the following window: You can find the following information: Field Description SDU Indicates the number of SDUs, which are transmitted and received. CRC Errors Indicates the number of times a Cyclic Redundancy Check (CRC) on the received cell was negative. SDU Length Errors Indicates the number of times the length of a received SDU was incorrect. SAR Timeouts Indicates the number of times the Segmentation And Reassembly (SAR) of the received cells failed, because their timeĆout expired. 47 / 66 3 Speed Touch USB Diagnostics 3.3.6 Version Diagnostics Click the tab to pop up the following window: This window provides information on Alcatel's software. 48 / 66 driver 3EC 16807 AAAA TCZZA Ed. 07 4 Speed Touch USB Software 4 Speed Touch USB Software 3EC 16807 AAAA TCZZA Ed. 07 This chapter describes how to upgrade, remove, or repair the driver software. Topic See Removing Driver Software 4.1 Upgrading/Repairing Driver Software 4.2 STUSB Web Upgrade 4.3 49 / 66 4 Speed Touch USB Software 4.1 Removing Driver Software Your is a hot swapable USB device, meaning that you can plug it in and out without powering down the PC. Plugging out does however not mean that all software is removed as well. Therefor, you must perform a removal of all software, via your installation CDĆrom. Proceed as follows: 1. Unplug the from your PC's USB port. Note: You do not need to turn off your PC prior to . disconnecting the 2. Insert your installation CDĆrom in the PC's CDĆrom drive and start the installation wizard. 3. The 'Speed Touch USB Setup' window pops up: Select 50 / 66 and click to continue. 3EC 16807 AAAA TCZZA Ed. 07 4 Speed Touch USB Software Various windows will pop up to indicate the software removal process. At the end of the process, the following window pops up: Click to finish the removal. Result: All related software and shortcuts are removed from your system. 3EC 16807 AAAA TCZZA Ed. 07 In case you do not have the installation CDĆrom, you can also remove related software via the 'Add/remove programs' application in your Windows 98/98SE/ME/2000 'Control panel'. 51 / 66 4 Speed Touch USB Software 4.2 Upgrading/Repairing Driver Software Prior to a driver software upgrade, or repair, the software must be readily available on a CDĆrom or resident on your hard disk. 1. Start the installation wizard from the location where your upgrade software resides. Therefor, open a 'Run' window and enter following path: C:\...\Setup.exe, where C:\...\ stands for the location where your upgrade software resides. Or, Insert the The Alcatel upgrade CDĆrom in the PC's CDĆrom drive. wizard will start automatically. wizard does not start Note: In case the Alcatel automatically, open a 'Run' window via Start ³ Run from the Start menu and enter following path: D:\Setup.exe, where D stands for the drive letter of your CDĆrom drive. 2. The 'Speed Touch USB Setup' window pops up: Select 52 / 66 and click to continue. 3EC 16807 AAAA TCZZA Ed. 07 4 Speed Touch USB Software Follow all the instructions. 3EC 16807 AAAA TCZZA Ed. 07 When upgrading the driver software, the installation process could slightly differ with the procedure described in chapter 1. 53 / 66 4 Speed Touch USB Software 4.3 Speed Touch USB Web Upgrade The Alcatel support web pages on the Internet provide executable driver software upgrades for download. These upgrades are regularly updated and can be found at: http://www.alcatel.com http://www.alcateldsl.com 1. Download the newest web upgrade software from the Internet to a location on your local PC. 2. Browse to the location where the web upgrade resides. 3. DoubleĆclick it. 4. Follow all instructions. 54 / 66 When performing a web upgrade of the driver software, the installation process could slightly differ with the procedure described in chapter 1. 3EC 16807 AAAA TCZZA Ed. 07 Abbreviations Abbreviations AAL5 ATM Adaption Layer 5 ADSL Asymmetric Digital Subscriber Line AIS Alarm Indication Signal ASP ADSL Service Provider ATM Asynchronic Transfer Mode CC Continuity Check CO Central Office CRC Cyclic Redundancy Check ISP Internet Service Provider Kbps Kilo bits per second LEDs Light Emitting Diodes MB Mega Byte Mbps Mega bits per second OAM Operations And Management OS Operating System PC Personal Computer POST Power On Self Test RDI Remote Defect Indication REN Ringer Equivalence Number SAR Segmentation And Reassembly SDU Service Data Unit SP Service Provider VC Virtual Channel VCI Virtual Channel Identifier VP Virtual Path VPI Virtual Path Identifier 3EC 16807 AAAA TCZZA Ed. 07 55 / 66 Abbreviations 56 / 66 3EC 16807 AAAA TCZZA Ed. 07 AppendixA AppendixA Troubleshooting Troubleshooting This appendix provides information on how to identify and correct some common problems you may encounter when using the . In most cases the described solutions will solve the problem. However, if the problem keeps persistent, reinstallation after a (hardware and software) as described in removal of your chapter 4, might solve the problem. If reinstallation has not resolved the problem, contact the company from which you purchased the for assistance. 3EC 16807 AAAA TCZZA Ed. 07 57 / 66 AppendixA Troubleshooting Your is equipped with two BiĆcolored LEDs (See appendix B for more information). These indicators may help you to sort out the problem. Indication & Problem Solution Speed TouchUSB does not work: Verify the Speed TouchUSB connections, as described in subsection 1.2.3. No LEDs light up. Check if the Speed TouchUSB's cord is damaged in any way. There is no power supplying connection. When using a portable PC in battery mode, it is possible that its USB port is not powered. Refer to the portable PC's User Manual for more information. Check if the Speed TouchUSB is not connected to a lowĆpowered USB hub port. Refer to the USB hub's User Manual for more information. Speed TouchUSB is recognized by the installation wizard, but installation failed. Verify your PC is running Windows 98, Windows 98SE, Windows ME, or Windows 2000 and that it meets the according minimum requirements (See subsection 1.2.1). Check whether the Speed TouchUSB is not connected to a lowĆpowered USB hub port. Refer to the USB hub User Manual for more information. USB LED flashes red, or stays solid red. Your USB port congests, meaning that too much traffic is passing through the port. Avoid using multiple high speed USB devices, e.g. scanners, speaker, etc. during heavy duty, e.g. a data download. Both USB LED and ADSL LED are solid amber. Power On Self Test (POST) failed. See subsection 1.2.3 to check whether the connections are correctly made. Windows Error 730. TCP/IP is not installed on your PC. Install the TCP/IP protocol suite on your PC. (Windows98/98SE) 58 / 66 3EC 16807 AAAA TCZZA Ed. 07 AppendixB AppendixB LED Description and Port Description Two Light Emitting Diodes (LEDs) indicate the status of the . On the left side resides the USB LED, on the right the ADSL LED. As soon you turn on your Phase Attaching and USB LED Downloading Connecting to ADSL 3EC 16807 AAAA TCZZA Ed. 07 , it passes three phases: ADSL LED Description Color Timing Color Red Flashing, very short time Off Green Solid, 2seconds Green Green Flashing, from 1 up to 10 seconds Off Green Solid Amber Solid Download successful. Green Solid Green Flashing Trying to achieve synchronization on the ADSL line. Green Solid Green Solid Ready for connectivity Configuring LED Description and Port Description Timing - Solid, 2seconds - Indicates that the STUSB is attached. Ready to continue. Downloading driver software from MAC to STUSB. When a Power On Self Test (POST) failed, both LEDs are solid amber. 59 / 66 AppendixB LED Description and Port Description In this state the is assigned to the downstream (RX) data channel (towards the USB connection). The is assigned to the upstream (TX) data channel (towards the ADSL channel). Both LEDs stay green. When an ATM cell is processed in a channel, the associated LED will go off for a short time. During a session, the flashes red, when the USB bus congests. Refer to appendix A for troubleshooting this state. Port 12 3456 Pin no. Signal name Function 3 Wire A Subscriber line wire A 4 Wire B Subscriber line wire B RJ 11/RJ / 14 Front view 60 / 66 Connector pins not mentioned are not connected. 3EC 16807 AAAA TCZZA Ed. 07 AppendixC AppendixC Safety and Agency Regulatory Notices Safety and Agency Regulatory Notices This appendix provides basic Safety Information on your Speed Touch product. Prior to using the Speed Touch, read this appendix carefully. Follow all warnings and instructions marked on the product. Topic See Safety Instructions C.1 European Declaration of Conformity C.2 Radio Frequency Interference Statement C.3 Canadian Class B Notice C.4 STORE THESE INSTRUCTIONS CAREFULLY 3EC 16807 AAAA TCZZA Ed. 07 61 / 66 AppendixC C.1 Safety and Agency Regulatory Notices Safety Instructions The Speed Touch equipment is intended for: " InĆhouse stationary desktop use; the maximum ambient temperature may not exceed 40ºC (104ºF). " It must not be mounted in a location exposed to direct or excessive solar and/or heat radiation. " It must not be exposed to heat trap conditions and must not be subjected to water or condensation. " It must be installed in a Pollution Degree 2 environment. Unplug this product from the wall socket and PC before cleaning. Do not use liquid cleaners or aerosol cleaners. Use a damp cloth for cleaning. Do not use this product near water, for example, near a bathtub, wash bowl, kitchen sink, laundry tub, in a wet basement or near a swimming pool. The Speed Touch is powered via the USB connector on your computer, or an USB hub port. The powering of this product must adhere to the power specifications indicated on the marking labels. Do not allow anything to rest on the USB cord. Do not locate this product where the cord will be subject to persons walking on it. Pay particular attention to the cord's plug, receptacle and cableĆtoĆbody entry point; do not use the product when these points of the cord are damaged. 62 / 66 Do not overload wall (mains) outlets and extension cords as this increases the risk of fire or electric shock. 3EC 16807 AAAA TCZZA Ed. 07 AppendixC Safety and Agency Regulatory Notices To reduce the risk of electric shock, do not disassemble this product. None of its internal parts are userĆreplaceable; therefore, there is no reason to access the interior. Opening or removing covers may expose you to dangerous voltages. Incorrect reassembly could cause electric shock if the appliance is subsequently used. If service or repair work is required, take it to a qualified service dealer. Unplug this product from the wall outlet and refer servicing to qualified service personnel under the following conditions: " When the power supply cord or plug is damaged or frayed. " If liquid has been spilled into the product. " If the product has been exposed to rain or water. " If the product does not operate normally. " If the product has been dropped or damaged in any way. If the product exhibits a distinct change in performance. " Avoid using a modem/telephone (other than a cordless type) during an electric storm. There is a slight risk of electric shock caused by lightning. Do not use the telephone to report a gas leak in the vicinity of the leak. If telephone service is required on the same line, a central splitter or distributed filter(s) must be installed for optimal ADSL performance. Depending on your ADSL configuration and type of splitter/filters, installation must be carried out by qualified service personnel. Consult your telephone service company or ADSL service provider for instructions. 3EC 16807 AAAA TCZZA Ed. 07 Changes or modifications not expressly approved by Alcatel could invalidate the users authority to operate this equipment. 63 / 66 AppendixC C.2 Safety and Agency Regulatory Notices European Community Declaration of Conformity Products with the marking comply with both EMC and Low Voltage Directives issued by the Commission of the European Community. 64 / 66 A copy of the European Community Declaration of Conformity is provided in your Speed Touch product shipping box. 3EC 16807 AAAA TCZZA Ed. 07 AppendixC C.3 Safety and Agency Regulatory Notices Radio Frequency Interference Statement This device has been tested and found to comply with the limits for a Class B digital device, pursuant to Part 15 of the FCC Rules. These limits are designed to provide reasonable protection against such interference in a residential installation. This equipment generates, uses and can radiate radio frequency energy. If not installed and used in accordance with the instructions, it may cause harmful interference to radio communications. However, there is no guarantee that interference will not occur in a particular installation. If this equipment does cause harmful interference to radio or television reception, which can be determined by turning the equipment ON and OFF, the user is encouraged to try correct the interference by one or more of the following measures: " Reorient or relocate the receiving antenna " Increase the separation between the equipment and receiver " Connect the equipment into an outlet on a circuit different from that to which the receiver is connected " Consult the dealer or an experienced radio/television technician for help. This equipment complies with Part 68 of the FCC Rules. On the back of this equipment is a label that contains, among other information, the FCC certification number (FCC ID) and Ringer Equivalence Number (REN) for this equipment. If requested, this information must be provided to the telephone company. An FCC compliant telephone cord and modular plug is provided with this equipment. This equipment is designed to be connected to the telephone network or premises wiring using a compatible modular jack that is Part 68 compliant (See Appendix NO TAG: Hardware Reference) for details. The Ringer Equivalence Number (REN) is used to determine the quantity of devices that may be connected to the telephone line. Excessive RENs on the telephone line may result in the devices not ringing in response to an incoming call. Typically, the sum of RENs should not exceed five (5.0). To be certain of the number of devices that may be connected to a line (as determined by the total RENs) contact the local telephone company. If this equipment causes harm to the telephone network, the telephone company will notify you in advance that temporary discontinuance of service may be required. But if advance notice is not practical, the telephone company will notify the customer as soon as possible. Also you will be advised of your right to file a compliant with the FCC if you believe it is necessary. The telephone company may make changes to its facilities, equipment, operations or procedures that could affect the operation of the equipment. If this happens the telephone company will provide advance notice so you can make the necessary modifications to maintain uninterrupted service. If the equipment is causing harm to the telephone network, the telephone company may request that you disconnect the equipment until the problem is resolved. Connection to party lines is subject to state tariffs (contact the state public utility commission, public service commission or corporation commission for information). No repairs can be performed by the customer, if you experience trouble with this equipment for repair or warranty information, please contact: (919) 850-1231 for locations in North America. 3EC 16807 AAAA TCZZA Ed. 07 65 / 66 AppendixC C.4 Safety and Agency Regulatory Notices Canadian DOC Class B Notice Notification of Canadian RF Interference Statements This digital apparatus does not exceed the Class B limits for radio noise emissions from digital apparatus as set out in the radio interference regulations of the Canadian Department of Communication. Le présent appareil numérique n'émet pas de bruits radioélectriques dépassant les limites applicable aux appareils numérique de classe B prescrites dans le règlement sur le brouillage radioélectrique édicté par le Ministère des Communications du Canada. 66 / 66 3EC 16807 AAAA TCZZA Ed. 07