1
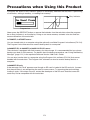
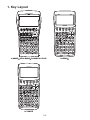
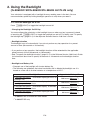
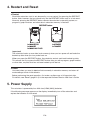
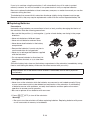
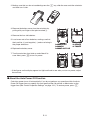
E
fx-9860GII SD
fx-9860GII
fx-9860G AU PLUS
fx-9750GII
fx-7400GII
Hardware
User’s Guide
CASIO Worldwide Education Website
http://edu.casio.com
CASIO EDUCATIONAL FORUM
http://edu.casio.com/forum/
GUIDELINES LAID DOWN BY FCC RULES FOR USE OF THE UNIT IN THE U.S.A. (not applicable to other areas).
NOTICE
This equipment has been tested and found to comply with the limits for a Class B digital
device, pursuant to Part 15 of the FCC Rules. These limits are designed to provide reasonable
protection against harmful interference in a residential installation. This equipment generates,
uses and can radiate radio frequency energy and, if not installed and used in accordance with
the instructions, may cause harmful interference to radio communications. However, there is
no guarantee that interference will not occur in a particular installation. If this equipment does
cause harmful interference to radio or television reception, which can be determined by turning
the equipment off and on, the user is encouraged to try to correct the interference by one or
more of the following measures:
• Reorient or relocate the receiving antenna.
• Increase the separation between the equipment and receiver.
• Connect the equipment into an outlet on a circuit different from that to which the receiver is
connected.
• Consult the dealer or an experienced radio/TV technician for help.
FCC WARNING
Changes or modifications not expressly approved by the party responsible for compliance could
void the user’s authority to operate the equipment.
Proper connectors must be used for connection to host computer and/or peripherals in order to
meet FCC emission limits.
Connector SB-62
Power Graphic Unit to Power Graphic Unit
USB connector that comes with the fx-9860GII SD/ fx-9860GII
Power Graphic Unit to Windows® compatible PC
Declaration of Conformity
Model Number:
fx-9860GII SD/fx-9860GII/fx-9860G AU PLUS
fx-9750GII/fx-7400GII
Trade Name:
CASIO COMPUTER CO., LTD.
Responsible party: CASIO AMERICA, INC.
Address:
570 MT. PLEASANT AVENUE, DOVER, NEW JERSEY 07801
Telephone number: 973-361-5400
This device complies with Part 15 of the FCC Rules. Operation is subject to the
following two conditions: (1) This device may not cause harmful interference, and (2)
this device must accept any interference received, including interference that may
cause undesired operation.
Windows is a registered trademark of Microsoft Corporation.
Company and product names used in this manual may be registered trademarks or trademarks
of their respective owners.
BEFORE USING THE CALCULATOR
FOR THE FIRST TIME...
Batteries are not loaded in your calculator at the factory.
Be sure to follow the procedure below to load batteries and adjust the display contrast
before trying to use the calculator for the first time.
1. Making sure that you do not accidently press the M key, slide the case onto the
calculator and then turn the calculator over. Remove the battery cover from the
calculator by pulling with your finger at the point marked .
fx-9860GII SD
fx-9750GII
fx-9860GII
fx-7400GII
fx-9860G AU PLUS
2. Load the four batteries that come with the
calculator.
• Make sure that the positive (+) and negative (–)
ends of the batteries are facing correctly.
3. Replace the battery cover, making sure that
its tabs enter the holes marked and turn the
calculator front side up. The calculator will turn on
automatically and the MAIN MENU will appear on
the display.
i
• If the Main Menu shown to the right is not on the
display, press the RESTART button on the back
of the calculator.
RESTART button
The above screen shows
the fx-9860GII SD. The
appearance of the screens
of other models may be
slightly different.
4. Use the cursor keys (D, A, B, C) to select the SYSTEM icon and press U,
then press (
) to display the contrast adjustment screen.
5. Adjust the contrast.
• The C cursor key makes display contrast darker.
• The B cursor key makes display contrast lighter.
• (INIT) returns display contrast to its initial default.
6. To exit display contrast adjustment, press K.
ii
Precautions when Using this Product
A progress bar and/or a busy indicator appear on the display whenever the calculator is performing
a calculation, writing to memory, or reading from memory.
Busy indicator
Progress bar
Never press the RESTART button or remove the batteries from the calculator when the progress
bar or busy indicator is on the display. Doing so can cause memory contents to be lost and can
cause malfunction of the calculator.
fx-7400GII, fx-9750GII users...
You can transfer data to a computer using the optionally available Program-Link software (FA-124).
The Program-Link software can be used to backup data to a computer.
fx-9860GII SD, fx-9860GII, fx-9860G AU PLUS users...
The calculator is equipped with flash memory for data storage. It is recommended that you always
backup your data to flash memory. For details about the backup procedure, see “Using the Memory
Manager” (page 11-1) in the separate Software Version 2.00 User’s Guide.
You can also transfer data to a computer using the Program-Link software (FA-124) that comes
bundled with the calculator. The Program-Link software can also be used to backup data to a
computer.
fx-9860GII SD only
If the message “No Card” appears even though an SD card is loaded in the SD card slot, it means
that the calculator is not recognizing the card for some reason. Try removing the card and then
loading it again. If this does not work, contact the developer of the SD card. Note that some SD
cards may not be compatible with this calculator.
E-1
Handling Precautions
• Your calculator is made up of precision components. Never try to take it apart.
• Avoid dropping your calculator and subjecting it to strong impact.
• Do not store the calculator or leave it in areas exposed to high temperatures or humidity, or large
amounts of dust. When exposed to low temperatures, the calculator may require more time to
display results and may even fail to operate. Correct operation will resume once the calculator is
brought back to normal temperature.
• The display will go blank and keys will not operate during calculations. When you are operating
the keyboard, be sure to watch the display to make sure that all your key operations are being
performed correctly.
• Replace the main batteries once every one year regardless of how much the calculator is used
during that period. Never leave dead batteries in the battery compartment. They can leak and
damage the unit.
• Do not use an oxyride battery* or any other type of nickel-based primary battery with this product.
Incompatibility between such batteries and product specifications can result in shorter battery life
and product malfunction.
• Keep batteries out of the reach of small children. If swallowed, consult a physician immediately.
• Avoid using volatile liquids such as thinner or benzine to clean the unit. Wipe it with a soft, dry
cloth, or with a cloth that has been moistened with a solution of water and a neutral detergent and
wrung out.
• Always be gentle when wiping dust off the display to avoid scratching it.
• In no event will the manufacturer and its suppliers be liable to you or any other person for any
damages, expenses, lost profits, lost savings or any other damages arising out of loss of data
and/or formulas arising out of malfunction, repairs, or battery replacement. It is up to you to
prepare physical records of data to protect against such data loss.
• Never dispose of batteries, the liquid crystal panel, or other components by burning them.
• Be sure that the power switch is set to OFF when replacing batteries.
• If the calculator is exposed to a strong electrostatic charge, its memory contents may be
damaged or the keys may stop working. In such a case, perform the Reset operation to clear the
memory and restore normal key operation.
• If the calculator stops operating correctly for some reason, use a thin, pointed object to press the
RESTART button on the back of the calculator. Note, however, that this clears all the data in
calculator memory.
• Note that strong vibration or impact during program execution can cause execution to stop or can
damage the calculator’s memory contents.
• Using the calculator near a television or radio can cause interference with TV or radio reception.
• Before assuming malfunction of the unit, be sure to carefully reread this User’s Guide and ensure
that the problem is not due to insufficient battery power, programming or operational errors.
* Company and product names used in this manual may be registered trademarks or trademarks of
their respective owners.
E-2
Be sure to keep physical records of all important data!
The large memory capacity of the unit makes it possible to store large amounts of data.
You should note, however, that low battery power or incorrect replacement of the batteries that
power the unit can cause the data stored in memory to be corrupted or even lost entirely. Stored
data can also be affected by strong electrostatic charge or strong impact. It is up to you to keep
back up copies of data to protect against its loss.
Since this calculator employs unused memory as a work area when performing its internal
calculations, an error may occur when there is not enough memory available to perform
calculations. To avoid such problems, it is a good idea to leave 1 or 2 kbytes of memory free
(unused) at all times.
In no event shall CASIO Computer Co., Ltd. be liable to anyone for special, collateral, incidental, or
consequential damages in connection with or arising out of the purchase or use of these materials.
Moreover, CASIO Computer Co., Ltd. shall not be liable for any claim of any kind whatsoever
against the use of these materials by any other party.
• The contents of this User’s Guide are subject to change without notice.
• No part of this User’s Guide may be reproduced in any form without the express written
consent of the manufacturer.
• Be sure to keep all user documentation handy for future reference.
E-3
Contents
1. Key Layout
2. Using the Backlight
3. Specifications
4. Restart and Reset
5. Power Supply
E-4
1. Key Layout
fx-9860GII SD/fx-9860GII/fx-9860G AU PLUS
fx-7400GII
E-5
fx-9750GII
2. Using the Backlight
(fx-9860GII SD/fx-9860GII/fx-9860G AU PLUS only)
Your calculator is equipped with a backlight for easy reading, even in the dark. You can
conserve battery power by limiting backlight operation to only when you need it.
S To turn the backlight on or off
Press *(LIGHT) to toggle the backlight on and off.
• Changing the Backlight On/Off Key
You can configure the calculator so the backlight turns on when any key is pressed, instead
of requiring the *(LIGHT) to toggle the backlight on and off. For details, see “To specify
the backlight key” (page 12-2) in the separate Software Version 2.00 User’s Guide.
• Backlight duration
The backlight turns off automatically if you do not perform any key operation for a preset
amount of time (30 seconds or 10 seconds).
• If you perform a key operation, the backlight duration will be extended for the applicable
preset amount of time (30 seconds or 10 seconds).
• See “To specify the backlight duration” (page 12-2) in the Software Version 2.00 User’s Guide
for information about how to specify 30 seconds or 10 seconds as the backlight duration
time.
• Backlight and Battery Life
• Frequent use of the backlight will shorten battery life.
• The following are guidelines that show how battery life is affected by backlight use. It is
based on a new set of alkaline batteries at a temperature of 25°C.
Backlight Use
Approximate Battery Life
1
5 minutes calculation* , 55 minutes display per hour; no
backlight use
200 hours (80 hours*2)
5 minutes calculation*1, 55 minutes display, 3 minutes
backlight operation per hour
190 hours (75 hours*2)
5 minutes calculation*1, 55 minutes display, 15 minutes
backlight operation per hour
150 hours (70 hours*2)
5 minutes calculation*1, 55 minutes display per hour;
continuous backlight use
*1 fx-9860GII SD: 5 minutes SD card access
*2 fx-9860GII SD only
E-6
80 hours (50 hours*2)
3. Specifications
Variables: 28
Calculation range:
p1 × 10–99 to p9.999999999 × 1099 and 0. Internal operations use 15-digit mantissa.
Exponential display range: Norm 1: 10–2 > |x|, |x| 1010
Norm 2: 10–9 > |x|, |x| 1010
Program capacity: fx-9860GII SD/fx-9860GII/fx-9860G AU PLUS/fx-9750GII
62,000 bytes (max.)
fx-7400GII
20,000 bytes (max.)
Storage memory capacity: fx-9860GII SD/fx-9860GII/fx-9860G AU PLUS: 1.5MB (max.)
fx-9750GII/fx-7400GII: None
Power supply: Four AAA-size batteries (LR03 (AM4))
Power consumption: fx-9860GII SD/fx-9860GII/fx-9860G AU PLUS: 0.7 W
fx-9750GII/fx-7400GII: 0.35 W
Approximate battery life
fx-9860GII SD/fx-9860GII/fx-9860G AU PLUS:
280 hours (continuous display of main menu)
200 hours* continuous operation (5 minutes calculation, 55 minutes display)
* fx-9860GII SD: 80 hours when an SD card is used
190 hours* continuous operation (5 minutes calculation, 55 minutes display,
3 minutes backlight operation per hour)
* fx-9860GII SD: 75 hours when an SD card is used
1 year (unused with power off)
fx-9750GII/fx-7400GII:
300 hours (continuous display of main menu)
230 hours continuous operation (5 minutes calculation, 55 minutes display)
1 year (unused with power off)
• Any of the following can shorten battery life.
- Certain SD card types or frequent SD card access
- Frequent use of the backlight
- Sequential program calculation execution
- Certain battery types
Auto power off:
Power is automatically turned off approximately 10 minutes or 60 minutes after last operation.
Ambient temperature range: 0°C to 40°C (32°F to 104°F)
E-7
Dimensions: fx-9860GII SD/fx-9860GII/fx-9860G AU PLUS:
21.2 mm (H) s 91.5 mm (W) s 184.0 mm (D)
7 8
/ " (H) s 3 5/8" (W) s 7 1/4" (D)
fx-9750GII/fx-7400GII:
21.3 mm (H) s 87.5 mm (W) s 180.5 mm (D)
7 8
/ " (H) s 3 1/2" (W) s 7 1/8" (D)
Approximate weight: fx-9860GII SD: 225 g (7.9 oz) (including batteries)
fx-9860GII/fx-9860G AU PLUS: 220 g (7.8 oz) (including batteries)
fx-9750GII/fx-7400GII: 205 g (7.2 oz) (including batteries)
Data Communications
3-pin serial port
Method: Start-stop (asynchronous), half-duplex
Transmission speed (BPS):
115200 bits/second (normal)
9600 bits/second (When connected to CFX-9850G series or fx-7400G series calculator;
Send/Receive commands)
38400 bits/second (Send38k/Receive38k commands)
<115200 bits/second>
Parity: EVEN
Bit length: 8 bits
Stop bit:
Send: 1 bit
Receive: 1 bit
Includes parity (None) 1-bit
X ON/X OFF Control: None
<9600, 38400 bits/second>
Parity: None
Bit length: 8 bits
Stop bit:
Send: 3 bits
Receive: 2 bits
Includes parity (None) 1-bit
X ON/X OFF Control: None
USB port (All models except fx-7400GII)
In accordance with USB 1.1 standards
E-8
4. Restart and Reset
S Restart
Should the calculator start to act abnormally, you can restart it by pressing the RESTART
button. Note, however, that you should only use the RESTART button only as a last resort.
Normally, pressing the RESTART button reboots the calculator’s operating system, so
programs, graph functions and other data in calculator memory is retained.
RESTART button
fx-9860GII SD
fx-9860GII
fx-9860G AU PLUS
fx-9750GII
fx-7400GII
Important!
The calculator backs up user data (main memory) when you turn power off and loads the
backed up data when you turn power back on.
When you press the RESTART button, the calculator restarts and loads backed up data.
This means that if you press the RESTART button after you edit a program, graph function,
or other data, any data that has not been backed up will be lost.
S Reset
Use reset when you want to delete all data currently in calculator memory and return all
mode settings to their initial defaults.
Before performing the reset operation, first make a written copy of all important data.
For details, see “Reset” (page 12-3) in the separate Software Version 2.00 User’s Guide.
5. Power Supply
This calculator is powered by four AAA-size (LR03 (AM4)) batteries.
If the following message appears on the display, immediately turn off the calculator and
replace the batteries as instructed.
E-9
If you try to continue using the calculator, it will automatically turn off in order to protect
memory contents. You will not be able to turn power back on until you replace batteries.
Be sure to replace the batteries at least once every one year, no matter how much you use the
calculator during that time.
The batteries that come with this calculator discharge slightly during shipment and storage.
Because of this, they may require replacement sooner than the normal expected battery life.
I Replacing Batteries
Precautions:
Incorrectly using batteries can cause them to burst or leak, possibly damaging the interior of
the calculator. Note the following precautions:
• Be sure that the positive (+) and negative (–) poles of each battery are facing in the proper
directions.
• Never mix batteries of different types.
• Never mix old batteries and new ones.
• Never leave dead batteries in the battery
compartment.
• Remove the batteries if you do not plan to
use the calculator for long periods.
• Never try to recharge the batteries supplied
with the calculator.
• Do not expose batteries to direct heat, let
them become shorted, or try to take them
apart.
(Should a battery leak, clean out the battery compartment of the calculator immediately, taking
care to avoid letting the battery fluid come into direct contact with your skin.)
Keep batteries out of the reach of small children. If swallowed, consult with a physician
immediately.
S To replace the batteries
• Never turn on the calculator while the batteries are removed or not loaded correctly. Doing
so can cause memory data to be deleted and malfunction of the calculator. If mishandling
of batteries causes such problems, correctly load batteries and then perform the restart
operation to resume normal operation.
• Be sure to replace all four batteries with new ones.
1. Press M(OFF) to turn off the calculator.
Warning!
• Be sure to turn the calculator off before replacing batteries. Replacing batteries with power
on will cause data in memory to be deleted.
E-10
2. Making sure that you do not accidently press the M key, slide the case onto the calculator
and then turn it over.
3. Remove the battery cover from the calculator by
pulling with your finger at the point marked .
fx-9860GII SD
fx-9860GII
fx-9860G AU PLUS
fx-9750GII
fx-7400GII
4. Remove the four old batteries.
5. Load a new set of four batteries, making sure that
their positive (+) and negative (–) ends are facing in
the proper directions.
6. Replace the battery cover.
7. Turn the calculator front side up and slide off its
case. Next, press M to turn on power.
• If the figures on the display appear too light and hard to see after you turn on power, adjust
the contrast.
I About the Auto Power Off Function
Calculator power turns off automatically if you do not perform any operation within the Auto
Power Off trigger time you specify. You can specify either 10 minutes or 60 minutes as the
trigger time (see “Power Properties Settings” on page 12-1). To restore power, press M.
E-11
Manufacturer:
CASIO COMPUTER CO., LTD.
6-2, Hon-machi 1-chome
Shibuya-ku, Tokyo 151-8543, Japan
Responsible within the European Union:
CASIO EUROPE GmbH
Casio-Platz 1
22848 Norderstedt, Germany
This mark applies in EU countries only.
CASIO COMPUTER CO., LTD.
6-2, Hon-machi 1-chome
Shibuya-ku, Tokyo 151-8543, Japan
One or more of the following patents may be used in the product.
U.S.Pats. 5,166,897 5,210,708 5,535,317 5,539,867
SA0902-A