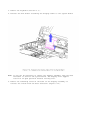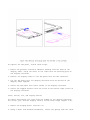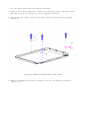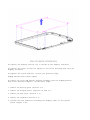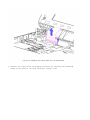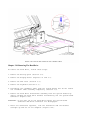
1
Notice
The information in this guide is subject to change without notice.
Compaq Computer Corporation shall not be liable for technical or editorial
errors or omissions contained herein; nor for incidental or consequential
damages resulting from the furnishing, performance, or use of this
material.
This guide contains information protected by copyright. No part of this
guide may be photocopied or reproduced in any form without prior written
consent from Compaq Computer Corporation.
Copyright 1994 Compaq Computer Corporation.
All rights reserved. Printed in the USA.
Compaq, Deskpro, LTE, Contura
Registered U.S. Patent and Trademark Office.
Contura Aero is a trademark of Compaq Computer Corporation.
The software described in this guide is furnished under a license agreement
or nondisclosure agreement. The software may be used or copied only in
accordance with the terms of the agreement.
Product names mentioned herein may be trademarks and/or registered
trademarks of their respective companies.
MAINTENANCE AND SERVICE GUIDE
Compaq Contura Aero Family of Personal Computers
First Edition (February 1994)
Part Number 197235-001
Preface
This Maintenance and Service Guide is used for reference when servicing the
Compaq Contura Aero Family of Personal Computers. Additional information
is available in the following publications:
o Compaq Contura Aero Documentation:
- QUICK SETUP
- BEYOND SETUP
- Online USER'S GUIDE
o COMPAQ SERVICE QUICK REFERENCE GUIDE
o Service Training Guides
o Compaq Service Advisories and Bulletins
Compaq Computer Corporation reserves the right to make changes to the
Compaq Contura Aero Family of Personal Computers without notice.
Symbols
The following words and symbols mark special messages throughout this
guide:
>>>>>>>>>>>>>>>>>>>>>>>>>>>>>>>>> WARNING <<<<<<<<<<<<<<<<<<<<<<<<<<<<<<<<<
Text set off in this manner indicates that failure to follow directions in
the warning could result in bodily harm or loss of life.
>>>>>>>>>>>>>>>>>>>>>>>>>>>>>>>>>>>>><<<<<<<<<<<<<<<<<<<<<<<<<<<<<<<<<<<<<<
>>>>>>>>>>>>>>>>>>>>>>>>>>>>>>>>> CAUTION <<<<<<<<<<<<<<<<<<<<<<<<<<<<<<<<<
Text set off in this manner indicates that failure to follow directions
could result in damage to equipment or loss of data.
>>>>>>>>>>>>>>>>>>>>>>>>>>>>>>>>>>>>><<<<<<<<<<<<<<<<<<<<<<<<<<<<<<<<<<<<<<
IMPORTANT: Text set off in this manner presents clarifying information or
specific instructions.
NOTE: Text set off in this manner presents commentary, sidelights, or
interesting points of information.
Technician Notes
>>>>>>>>>>>>>>>>>>>>>>>>>>>>>>>>> WARNING <<<<<<<<<<<<<<<<<<<<<<<<<<<<<<<<<
Only authorized technicians trained by Compaq should repair this equipment.
All troubleshooting and repair procedures are detailed to allow only
subassembly/module level repair. Because of the complexity of the
individual boards and subassemblies, no one should attempt to make repairs
at the component level or to make modifications to any printed circuit
board. Improper repairs can create a safety hazard. Any indications of
component replacement or printed circuit board modifications may void any
warranty.
>>>>>>>>>>>>>>>>>>>>>>>>>>>>>>>>>>>>><<<<<<<<<<<<<<<<<<<<<<<<<<<<<<<<<<<<<<
Chapter 1. Illustrated Parts Catalog
Chapter 1.0 Introduction
Chapter 1.1 Illustrated Parts Breakdown: Compaq Contura Aero Family Of Personal Computers
The Compaq Contura Aero Family of Personal Computers joins a display
assembly and system unit together with a clutch secured by screws in the
chassis, display enclosure, and a display pin allowing it to open and
close. The display assembly is secured by screws installed in the front of
the display enclosure. The system unit is secured to the system unit
enclosure by screwlocks in the rear and screws in the bottom of the system
unit enclosure.
SYSTEM UNIT MODULE DESCRIPTION
The system unit (Figure 1-4) includes the following replaceable parts:
o
o
o
o
o
Battery and spacer
Base enclosure
Keyboard
Hard drive
Power supply
o
o
o
o
PCMCIA ejector rails
Trackball assembly
Memory expansion board (optional)
System board
The keyboard is secured to the system unit with four screws and a hook
latch in the front. Once the screws are removed, the keyboard must be
rotated from the rear forward to disengage it from the hook latch. The
keyboard must be removed to allow access to any of the system board
components. The keyboard is connected to the system board with two ribbon
cables and zero insertion force (ZIF) connectors. The cables do not
necessarily have to be disconnected to service the system board. The
keyboard may be laid on top of the battery compartment to access the system
board.
The hard drive is connected directly to the system board with no
intervening cables. It is mounted to the chassis with a hard drive bracket.
The hard drive bracket is secured to the hard drive with three screws.
The power supply is secured to the system board with one threaded standoff.
There is no cable between the power supply and the system board; the power
supply connects directly to the system board.
The trackball assembly consists of the trackball, buttons, flex cable, and
speaker. The trackball plugs directly into the cable with a low insertion
force (LIF) connector and mounts with two screws in the right front corner
of the base enclosure. The flex cable includes the buttons and speaker. The
buttons fit in a recessed area on the right side of the base enclosure and
control the functions of the trackball. The speaker is connected to the
flex cable with two wires and fits in a narrow area in the right front
corner of the base enclosure. Sound is directed through the enclosure. The
remainder of the flex cable is routed behind and over the hard drive
assembly and plugs with a LIF connector directly into the system board.
The system board is mounted directly to the chassis. All system module
components connected to the system board must be removed prior to removing
the system board.
The PCMCIA rails are secured to the system board header with two screws at
the top. The rails plug directly into the system board connector.
The memory expansion board plugs into the system board in the bottom of the
base enclosure. Remove the door, and the memory expansion board plugs into
a single connector. System memory can be increased to a maximum 12 MB by
adding an 8 MB Memory Expansion Board. A 4 MB Memory Expansion Board is
also available.
DISPLAY ASSEMBLY MODULE DESCRIPTION
The display assembly (Figures 1-5 and 1-6) includes the following
replaceable parts:
o
o
o
o
o
o
Display bezel
Liquid crystal display (LCD) panel
Display inverter board
Display cable
Display shield
Display enclosure
Compaq Contura Aero 4/25
The display assembly is secured with two screws in the bottom corners of
the display bezel and by a screw in a clutch and a pin to the base
enclosure. To remove the display assembly from the base enclosure, the
display bezel must be removed first. Then the CPU cover is removed to allow
access to the system board.
The monochrome LCD is secured to the display enclosure with two screws in
the top left corner and one screw in the top right corner. The bottom
right corner has two small cables attached to a connector for the backlight
and the inverter board.
The display cable is a flex cable plugged into a connector on the left side
of the LCD, folded, and secured to the display shield with a pressure
sensitive adhesive. One end of the display cable is exposed at the bottom
of the display enclosure and is connected to the system board with a zero
insertion force (ZIF) slider. The other end is connected with a low
insertion force (LIF) connector to the display inverter board.
The display inverter board is aligned in the bottom of the display
enclosure with pins. One end connects to the display cable; the other end
plugs into the backlight cable of the LCD panel and is held in place with
pressure sensitive adhesive tape.
The display shield lays in the display enclosure.
Compaq Contura Aero 4/33C
The display assembly is secured with two screws in the bottom corners of
the display bezel and by a screw in a clutch and a pin to the base
enclosure. To remove the display assembly from the base enclosure, the
display bezel must be removed first. Then the CPU cover is removed to allow
access to the system board.
The color LCD is secured to the display enclosure with four screws in the
corners of the LCD panel. The top right corner has two small cables
attached to a connector for the backlight and the inverter board.
The display cable is a flex cable plugged into a ZIF connector on the left
side of the LCD, folded, and secured to the display shield with a pressure
sensitive adhesive. One end of the display cable is exposed at the bottom
of the display enclosure and is connected to the system board with a ZIF
connector. The other end plugs into a LIF connector on the display inverter
board in the lower right hand corner of the display enclosure.
The display inverter board is aligned on the right side of the display
enclosure and mounted component side down. One end connects to the display
cable; the other end plugs into the backlight cable of the LCD panel.
The display shield lays in the display enclosure and has tabs that bend
over the screw holes of the LCD and secure the display shield to the LCD.
Chapter 1.2 System Unit Module
Table 1-1. System Unit
===========================================================================
Description
Spare Part No.
Notes
===========================================================================
1 Base enclosure
197253-001
Includes screw covers.
--------------------------------------------------------------------------2 System board, 4 MB
Does not include PCMCIA ejector
rails.
Compaq Contura
197241-001
Includes screw covers.
Aero 4/25
Compaq Contura
199222-001
Aero 4/33C
--------------------------------------------------------------------------3 Door assembly
197239-001
Includes battery and memory
expansion board doors.
--------------------------------------------------------------------------4 Power supply, DC-DC
190521-001
Includes screw covers.
--------------------------------------------------------------------------5 Hard drive
- Model 250
199233-001
Does not include hard drive
- Model 170
190661-001
bracket. Includes screw covers.
- Model 84
190660-001
--------------------------------------------------------------------------6 Memory expansion
board
- 4 MB
190565-001
- 8 MB
190596-001
--------------------------------------------------------------------------7 Real time clock
117099-001
battery
--------------------------------------------------------------------------8 NiMH Battery Pack
- 8A: Extended Life
190626-001
Extended Life battery does not
- 8B: Standard
190697-001
include spacer. Standard battery
- 8C: Spacer
197317-001
includes spacer.
--------------------------------------------------------------------------9 Trackball cable and
197312-001
Includes screw covers.
speaker assembly
--------------------------------------------------------------------------10 Trackball assembly
197286-001
Includes screw covers.
--------------------------------------------------------------------------11 Hard drive bracket
197236-001
Includes screws and screw
covers.
--------------------------------------------------------------------------12 System ROM
197229-001
Includes screw covers.
--------------------------------------------------------------------------13 CPU cover
197311-001
Includes screw covers.
--------------------------------------------------------------------------14 CPU chassis
199276-001
Includes clip and screw covers.
===========================================================================
Chapter 1.3 VGA Display
Table 1-2. Compaq Contura Aero 4/25 Monochrome VGA Display
===========================================================================
Description
Spare Part No.
Notes
===========================================================================
1 Display enclosure
197237-001
Includes enclosure, clutch, pin,
kit
latch, spring, screws, display
shield, slotted bushing, ground
clip, screw covers and logo.
--------------------------------------------------------------------------2 Display panel
190624-001
Includes labels, screw covers.
--------------------------------------------------------------------------3 Display bezel
197344-001
Includes screw covers.
--------------------------------------------------------------------------4 Backlight inverter
190522-001
Includes adhesive tape, screw
board
covers.
--------------------------------------------------------------------------5 Display cable
197238-001
Includes ZIF slider and screw
covers.
--------------------------------------------------------------------------6 Display hardware *
197316-001
Includes screws, ground clip,
and screw covers.
--------------------------------------------------------------------------* Not Shown
===========================================================================
Table 1-3. Compaq Contura Aero 4/33C Color VGA Display
===========================================================================
Description
Spare Part No.
Notes
===========================================================================
1 Display enclosure
199257-001
Includes enclosure, clutch, pin,
kit
latch, spring, screws, display
shield, slotted bushing, screw
covers and logo.
--------------------------------------------------------------------------2 Display panel
199232-001
Includes labels, screw covers.
--------------------------------------------------------------------------3 Display bezel
199260-001
Includes screw covers.
--------------------------------------------------------------------------4 Backlight inverter
199223-001
Includes screw covers.
board
--------------------------------------------------------------------------5 Display cable
199258-001
Includes ZIF slider and screw
covers.
--------------------------------------------------------------------------6 Display hardware *
197316-001
Includes screws and screw
covers.
--------------------------------------------------------------------------* Not Shown
===========================================================================
Chapter 1.4 Keyboards
Table 1-4. Notebook Keyboards
===========================================================================
Description
Spare Part Number
===========================================================================
1 U.S.
190620-001
2 U.K.
190620-003 *
3 German
190620-004 *
4 French
190620-005 *
5 Italian
190620-006 *
6 Spanish
190620-007 *
7 Danish
190620-008 *
8 Norwegian
190620-009 *
9 Swedish/Finnish
190620-010 *
10 Swiss
190620-011 *
11 French Canadian
190620-012 *
12 Portuguese
190620-013 *
13 Latin American
190620-016 *
14 Belgium
190620-018 *
15 Japanese
190620-019 *
--------------------------------------------------------------------------* Not Shown
===========================================================================
Table 1-5. Enhanced Keyboards
===========================================================================
Description
Spare Part Number
===========================================================================
1 Enhanced II Keyboard U.S.
112573-001 (No longer
available)*
2 Enhanced III Keyboard U.K.
140536-103 *
3 Enhanced III Keyboard German
140536-104 *
4 Enhanced III Keyboard French
140536-105 *
5 Enhanced III Keyboard Italian
140536-106 *
6 Enhanced III Keyboard Spanish
140536-107 *
7 Enhanced III Keyboard Danish
140536-108 *
8 Enhanced III Keyboard Norwegian
140536-109 *
9 Enhanced III Keyboard Swedish/Finnish
140536-110 *
10 Enhanced III Keyboard Swiss
140536-111 *
11 Enhanced III Keyboard French Canadian
140536-112 *
12 Enhanced III Keyboard Portuguese
140536-113 *
13 Enhanced III Keyboard Turkish
140536-114 *
14 Enhanced III Keyboard Greek
140536-115 *
15 Enhanced III Keyboard Latin American
140536-116 *
16 Enhanced III Keyboard Arabic
140536-117 *
17 Enhanced III Keyboard Belgian
140536-118 *
18 Enhanced III Keyboard Japanese
140536-119 *
19 Enhanced III Keyboard BHCSY **
140536-120 *
20 Enhanced III Keyboard Hungarian
140536-121 *
21 Enhanced III Keyboard Polish
140536-122 *
22 Enhanced III Keyboard Slovakian
140536-123 *
23 Enhanced III Keyboard Russian
140536-124 *
24 Enhanced III Keyboard Czech
140536-129 *
25 Enhanced III Keyboard Thai
140536-130 *
--------------------------------------------------------------------------* Not Shown
** Bosnia-Herzegovina, Croatia, Slovenia, and Yugoslavia
===========================================================================
Chapter 1.5 Cables
Table 1-6. Cables
===========================================================================
Description
Spare Part Number
===========================================================================
1 Display Cable (Compaq Contura Aero 4/25)
197238-001
2 Trackball/Speaker Cable
197312-001
3 Communication Cable
197318-001
4 Display Cable (Compaq Contura Aero 4/33C)
199258-001
===========================================================================
Chapter 1.6 AC Adapter And Power Cord
Table 1-7. AC Adapter and Power Cord
===========================================================================
Description
Spare Part Number
===========================================================================
1 AC Adapter
190621-001
2 Power Cord (U.S./Canada)
197230-001
3 Power Cord (U.K.)
197232-001 *
4 Power Cord (Europe)
197231-001 *
5 Power Cord (Japan)
197233-001 *
6 Power Cord (Asia Pacific)
197234-001 *
--------------------------------------------------------------------------* Not shown
===========================================================================
Table 1-8. Documentation and Software
===========================================================================
Description
Spare Part Number
===========================================================================
MAINTENANCE AND SERVICE GUIDE
197235-001
--------------------------------------------------------------------------QUICK SETUP CARD, BEYOND SETUP
English
197243-001
German
197243-041
French
197243-051
Italian
197243-061
Spanish
197243-071
--------------------------------------------------------------------------COMPAQ SERVICE QUICK REFERENCE GUIDE
106854-001
--------------------------------------------------------------------------LOTUS ORGANIZER MANUAL
English
137885-001
German
137885-041
French
137885-051
Italian
137885-061
Spanish
137885-071
--------------------------------------------------------------------------Online USER'S GUIDE
English
190512-001
German
190512-041
French
190512-051
Italian
190512-061
Spanish
190512-071
--------------------------------------------------------------------------WINLINK (diskettes)
English
197330-001
German
197330-041
French
197330-051
Italian
197330-061
Spanish
197330-071
===========================================================================
Table 1-9. Accessories
===========================================================================
Description
Spare Part Number
===========================================================================
Automobile adapter
190551-001
Memory expansion board
4 MB
8 MB
190565-001
190596-001
Base unit
190568-001
PCMCIA external diskette drive
190563-001
Mobile port expander
197364-001
Carrying case
121423-001
Briefcase
129930-001
Slipcase cover
197242-001
===========================================================================
Table 1-10. Mounting Hardware
===========================================================================
Description
Spare Part Number
===========================================================================
Kit, CPU base screws and screwlocks
197315-001
Kit, display screws
197316-001
Trackball removal tool
194041-001
===========================================================================
Table 1-11a. Fastener List for CPU Base Screws and Screwlocks
===========================================================================
Description
Type
Where Used
Part Number
Drive
Qty
===========================================================================
M2.5 x 7.0 *
Hex
System board to
139576-004
3/16
2
chassis
--------------------------------------------------------------------------M2.5 x 3.55 * Hex
Power supply board to
197257-001
3/16
1
chassis
--------------------------------------------------------------------------#4-40 *
Hex
I/O connector
106902-004
3/16
4
--------------------------------------------------------------------------M3.0 x 3.0
Pan
Hard drive bracket to
139574-001
PH/1
3
hard drive
--------------------------------------------------------------------------M2.0 x 7.0
Pan
PCMCIA rails to
144762-002
PH/1
2
chassis
--------------------------------------------------------------------------M2.0 x 2.5
Truss
Keyboard to chassis
144863-002
T8/SL
3
--------------------------------------------------------------------------M2.5 x 12.0
Truss
Hard drive to keyboard
144864-005
T8/SL
1
to chassis
--------------------------------------------------------------------------M2.5 x 6.0
Truss
Clutch, system board
144865-003
T8/SL
7
--------------------------------------------------------------------------M2.5 x 16.0
Truss
Base
144865-005
T8/SL
4
--------------------------------------------------------------------------* Screwlocks
===========================================================================
Table 1-11b. Fastener List for the Compaq Contura Aero 4/25 Display
===========================================================================
Description
Type
Where Used
Part Number
Drive
Qty
===========================================================================
M2.0 x 4.0
Truss
Pin
144863-001
T8/SL
2
M2.5 x 4.5
Truss
Clutch
144864-001
T8/SL
2
M2.0 x 6.0
Pan
Bezel
197341-002
PH/1
2
M2.0 x 2.5
Truss
Panel to enclosure
144863-002
T8/SL
3
===========================================================================
Table 1-11c. Fastener List for the Compaq Contura Aero 4/33C Display
===========================================================================
Description
Type
Where Used
Part Number
Drive
Qty
===========================================================================
M2.0 x 4.0
Truss
Pin and inverter board
144863-001
T8/SL
2
M2.5 x 4.5
Truss
Clutch
144864-001
T8/SL
2
M2.0 x 6.0
Pan
Bezel
197341-002
PH/1
2
M3.0 x 6.0
Truss
Panel to enclosure
198889-001
T8/SL
4
===========================================================================
Table 1-12. Miscellaneous Kits
===========================================================================
Description
Spare Part Number
===========================================================================
Base unit tilt feet
197346-001
CPU enclosure feet
197345-001
Battery and memory doors
197239-001
PCMCIA eject rails
197314-001
Carton, quantity 5
137863-001
Carton and buns, quantity 1
137864-001
Display connector slider
140071-001
Plate logo
197251-001
Battery spacer
197317-001
===========================================================================
Chapter 2. Service Preliminaries
Chapter 2.0 Introduction
This chapter provides general service information for the computer and the
base unit.
Adherence to the procedures and precautions described in this chapter is
essential for proper service.
Chapter 2.1 Electrostatic Discharge (International)
A sudden discharge of static electricity from a finger or other conductor
can destroy static sensitive devices or micro circuitry. Often the spark is
neither felt or heard, but damage occurs. An electronic device exposed to
electrostatic discharge (ESD) may not be affected at all and will work
perfectly throughout a normal cycle. Or it may function normally for a
while, then degrade in the internal layers, reducing its life expectancy.
Networks built into many integrated circuits provide some protection, but
in many cases, the discharge contains enough power to alter device
parameters or melt silicon junctions.
Generating Static
Table 2-1 shows how different activities generate static electricity and at
different electrostatic voltage levels.
Table 2-1. Typical Electrostatic Voltages
===========================================================================
Relative Humidity
Event
10%
40%
55%
===========================================================================
Walking across carpet
35,000V
15,000V
7,500V
Walking across vinyl floor
12,000V
5,000V
3,000V
Motions of bench worker
6,000V
800V
400V
Removing DIPS from plastic tubes
2,000V
700V
400V
Removing DIPS from vinyl trays
11,500V
4,000V
2,000V
Removing DIPS from styrofoam
14,500V
5,000V
3,500V
Removing bubble pack from PCBs
26,000V
20,000V
7,000V
Packing PCBs in foam lined box
21,000V
11,000V
5,000V
--------------------------------------------------------------------------NOTE: 700 volts can degrade a product.
===========================================================================
Preventing Electrostatic Damage To Equipment
Many electronic components are sensitive to ESD. Circuitry design and
structure determine the degree of sensitivity. The following proper
packaging and grounding precautions are necessary to prevent damage:
o Protect all electrostatic parts and assemblies with conductive or
approved containers or packaging.
o Keep electrostatic sensitive parts in their containers until they arrive
at static free stations.
o Place items on a grounded surface before removing them from their
container.
o Always be properly grounded when touching a sensitive component or
assembly.
o Place reusable electronic sensitive parts from assemblies in protective
packaging or conductive foam.
Use transporters and conveyors made of antistatic belts and metal roller
bushings. Mechanized equipment used for moving materials must be wired to
ground and proper materials selected to avoid static charging. When
grounding is not possible, use an ionizer to dissipate electric charges.
Preventing Damage to Drives
To prevent static damage to hard drives, use the following precautions:
o Handle drives gently, using static guarding techniques.
o Store drives in the original shipping containers.
o Avoid dropping drives from any height onto any surface.
o Handle drives on surfaces that have at least one inch of shock proof
foam.
o Always place drives PCB assembly side down on the foam.
Grounding Methods
The method for grounding must include a wrist strap or a foot strap at a
grounded workstation. When seated, wear a wrist strap connected to a
grounded system. When standing, use footstraps and a grounded floor mat.
Table 2-2. Static Shielding Protection Levels
===========================================================================
Method
Voltages
===========================================================================
Antistatic Plastic
1,500
Carbon Loaded Plastic
7,500
Metallized Laminate
15,000
===========================================================================
Grounding Workstations
To prevent static damage at the workstation, use the following precautions:
o Cover the workstation with approved static dissipative material. Provide
a wrist strap connected to the work surface and properly grounded tools
and equipment.
o Use static dissipative mats, heel straps, or air ionizers to give added
protection.
o Handle electrostatic sensitive components, parts, and assemblies by the
case or PCB laminate. Handle them only at static free workstations.
o Avoid contact with pins, leads, or circuitry.
o Turn off power and input signals before inserting and removing connectors
or test equipment.
o Use fixtures made of static safe materials when fixtures must directly
contact dissipative surfaces.
o Keep work area free of nonconductive materials such as ordinary plastic
assembly aids and Styrofoam.
o Use field service tools, such as cutters, screwdrivers, vacuums, that are
conductive.
o Use a portable field service kit with a static dissipative vinyl pouch
that folds out of a work mat. Also use a wrist strap and a ground cord
for the work surface. Ground the cord to the chassis of the equipment
undergoing test or repair.
Grounding Equipment
Use the following equipment to prevent static electricity damage to the
equipment:
Wrist Straps are flexible straps with a minimum of 1 megohm +/- 10%
resistance to the ground cords. To provide proper ground, a strap must be
worn snug against the skin. On grounded mats without banana plug
connectors, connect a wrist strap with alligator clips.
Heelstraps/Toestraps/Bootstraps can be used at standing workstations and
are compatible with most types of boots and shoes. On conductive floors or
dissipative floor mats, use them on both feet with a minimum of 1 megohm
resistance between operator and ground. To be effective, the conductive
strips must be worn in contact with the skin.
Recommended Materials and Equipment
Other materials and equipment that are recommended for use in preventing
static electricity include:
o Antistatic tape
o Antistatic smocks, aprons, or sleeve protectors
o Conductive bins, and other assembly or soldering aids
o Conductive foam
o Conductive table top workstations with ground cord of 1 megohm of
resistance
o Static dissipative table or floor mats with hard tie to ground
o Field service kits
o Static awareness labels
o Wrist straps and footwear straps providing 1 megohm +/- 10% resistance
o Material handling packages
o Conductive plastic bags
o Conductive plastic tubes
o Conductive tote boxes
o Metal tote boxes
o Opaque shielding bags
o Transparent metallized shielding bags
o Transparent shielding tubes
SERVICE CONSIDERATIONS
Listed below are some of the considerations that should be kept in mind
during the disassembly and assembly of the computer.
Tool Requirements:
o Flat bladed screwdriver
o Torx T8 screwdriver (included in 130619-001)
o Hex socket driver (3/16)
o 25 Pin printer loopback plug (included in 100767-001)
o 9 Pin serial loopback plug (included in 100767-001)
o Cross recess (Phillips) screwdriver (included in 130619-001)
o Trackball tool (spare part number 194041-001)
o Case utility tool (spare part number 119070-001 and included in
10076-001)
o PCMCIA external diskette drive (part number 190533-001)
o Preloaded application diskettes
Screws
The screws used in these products are not interchangeable. If an incorrect
screw is used during the reassembly process, it could cause damage to the
unit. Compaq strongly recommends that all screws removed during the
disassembly process be kept with the part that was removed, then returned
to their proper locations.
IMPORTANT: As each subassembly is removed from the computer, it should be
placed away from the work area to prevent damage.
Cables and Connectors
Most cables used throughout the unit are flex cables (Figures 2-1, 2-2,
2-3). These cables must be handled with extreme care to avoid damage. Apply
only the tension required to seat or unseat the cables during insertion or
removal from the connector. Handle cables by the connector or pull tabs
whenever possible. In all cases, avoid bending, twisting, or tearing the
cables, and ensure that cables are placed in such a way that they cannot be
caught or snagged by parts being removed or replaced.
>>>>>>>>>>>>>>>>>>>>>>>>>>>>>>>>> CAUTION <<<<<<<<<<<<<<<<<<<<<<<<<<<<<<<<<
When servicing these units, ensure that cables are placed in their proper
location during the reassembly process. Improper cable placement can cause
severe damage to the unit.
>>>>>>>>>>>>>>>>>>>>>>>>>>>>>>>>>>>>><<<<<<<<<<<<<<<<<<<<<<<<<<<<<<<<<<<<<<
Plastics
The plastics used can be damaged by application of excessive force during
disassembly and reassembly. When handling the plastic cases and housing
assemblies, use care. Do not use screwdrivers or similar tools to pry apart
plastics. Where necessary, use the Case utility tool (spare part number
119070-001). Proper handling of this tool is illustrated in the
disassembly and reassembly procedures.
Disposal of a Used Battery
Battery components are considered environmentally harmful. Disposal of a
Nickel Metal Hydride (NiMH) Battery Pack should comply with country, state,
province, or local regulations. Whenever possible, battery components
should be recycled.
>>>>>>>>>>>>>>>>>>>>>>>>>>>>>>>>> CAUTION <<<<<<<<<<<<<<<<<<<<<<<<<<<<<<<<<
Never attempt to open or service a battery pack. Opening a battery pack not
only damages the pack and makes it unusable, but also exposes potentially
harmful battery components.
>>>>>>>>>>>>>>>>>>>>>>>>>>>>>>>>>>>>><<<<<<<<<<<<<<<<<<<<<<<<<<<<<<<<<<<<<<
Chapter 2.1 Electrostatic Discharge (U.S. and Canada)
A sudden discharge of static electricity from a finger or other conductor
can destroy static sensitive devices or micro circuitry. Often the spark is
neither felt or heard, but damage occurs. An electronic device exposed to
electrostatic discharge (ESD) may not be affected at all and will work
perfectly throughout a normal cycle. Or it may function normally for a
while, then degrade in the internal layers, reducing its life expectancy.
Networks built into many integrated circuits provide some protection, but
in many cases, the discharge contains enough power to alter device
parameters or melt silicon junctions.
Generating Static
Table 2-1 shows how different activities generate static electricity and at
different electrostatic voltage levels.
Table 2-1. Typical Electrostatic Voltages
===========================================================================
Relative Humidity
Event
10%
40%
55%
===========================================================================
Walking across carpet
35,000V
15,000V
7,500V
Walking across vinyl floor
12,000V
5,000V
3,000V
Motions of bench worker
6,000V
800V
400V
Removing DIPS from plastic tubes
2,000V
700V
400V
Removing DIPS from vinyl trays
11,500V
4,000V
2,000V
Removing DIPS from styrofoam
14,500V
5,000V
3,500V
Removing bubble pack from PCBs
26,000V
20,000V
7,000V
Packing PCBs in foam lined box
21,000V
11,000V
5,000V
--------------------------------------------------------------------------NOTE: 700 volts can degrade a product.
===========================================================================
Preventing Electrostatic Damage To Equipment
Many electronic components are sensitive to ESD. Circuitry design and
structure determine the degree of sensitivity. The following proper
packaging and grounding precautions are necessary to prevent damage:
o Protect all electrostatic parts and assemblies with conductive or
approved containers or packaging.
o Keep electrostatic sensitive parts in their containers until they arrive
at static free stations.
o Place items on a grounded surface before removing them from their
container.
o Always be properly grounded when touching a sensitive component or
assembly.
o Place reusable electronic sensitive parts from assemblies in protective
packaging or conductive foam.
Use transporters and conveyors made of antistatic belts and metal roller
bushings. Mechanized equipment used for moving materials must be wired to
ground and proper materials selected to avoid static charging. When
grounding is not possible, use an ionizer to dissipate electric charges.
Preventing Damage to Drives
To prevent static damage to hard drives, use the following precautions:
o Handle drives gently, using static guarding techniques.
o Store drives in the original shipping containers.
o Avoid dropping drives from any height onto any surface.
o Handle drives on surfaces that have at least one inch of shock proof
foam.
o Always place drives PCB assembly side down on the foam.
Grounding Methods
The method for grounding must include a wrist strap or a foot strap at a
grounded workstation. When seated, wear a wrist strap connected to a
grounded system. When standing, use footstraps and a grounded floor mat.
Table 2-2. Static Shielding Protection Levels
===========================================================================
Method
Voltages
===========================================================================
Antistatic Plastic
1,500
Carbon Loaded Plastic
7,500
Metallized Laminate
15,000
===========================================================================
Grounding Workstations
To prevent static damage at the workstation, use the following precautions:
o Cover the workstation with approved static dissipative material. Provide
a wrist strap connected to the work surface and properly grounded tools
and equipment.
o Use static dissipative mats, heel straps, or air ionizers to give added
protection.
o Handle electrostatic sensitive components, parts, and assemblies by the
case or PCB laminate. Handle them only at static free workstations.
o Avoid contact with pins, leads, or circuitry.
o Turn off power and input signals before inserting and removing connectors
or test equipment.
o Use fixtures made of static safe materials when fixtures must directly
contact dissipative surfaces.
o Keep work area free of nonconductive materials such as ordinary plastic
assembly aids and Styrofoam.
o Use field service tools, such as cutters, screwdrivers, vacuums, that are
conductive.
o Use a portable field service kit with a static dissipative vinyl pouch
that folds out of a work mat. Also use a wrist strap and a ground cord
for the work surface. Ground the cord to the chassis of the equipment
undergoing test or repair.
Grounding Equipment
Use the following equipment to prevent static electricity damage to the
equipment:
Wrist Straps are flexible straps with a minimum of 1 megohm +/- 10%
resistance to the ground cords. To provide proper ground, a strap must be
worn snug against the skin. On grounded mats without banana plug
connectors, connect a wrist strap with alligator clips.
Heelstraps/Toestraps/Bootstraps can be used at standing workstations and
are compatible with most types of boots and shoes. On conductive floors or
dissipative floor mats, use them on both feet with a minimum of 1 megohm
resistance between operator and ground. To be effective, the conductive
strips must be worn in contact with the skin.
Recommended Materials and Equipment
Other materials and equipment that are recommended for use in preventing
static electricity include:
o Antistatic tape
o Antistatic smocks, aprons, or sleeve protectors
o Conductive bins, and other assembly or soldering aids
o Conductive foam
o Conductive table top workstations with ground cord of 1 megohm of
resistance
o Static dissipative table or floor mats with hard tie to ground
o Field service kits
o Static awareness labels
o Wrist straps and footwear straps providing 1 megohm +/- 10% resistance
o Material handling packages
o Conductive plastic bags
o Conductive plastic tubes
o Conductive tote boxes
o Metal tote boxes
o Opaque shielding bags
o Transparent metallized shielding bags
o Transparent shielding tubes
SERVICE CONSIDERATIONS
Listed below are some of the considerations that should be kept in mind
during the disassembly and assembly of the computer.
Tool Requirements:
o Flat bladed screwdriver
o Torx T8 screwdriver (included in 130619-001)
o Hex socket driver (3/16)
o 25 Pin printer loopback plug (included in 100767-001)
o 9 Pin serial loopback plug (included in 100767-001)
o Cross recess (Phillips) screwdriver (included in 130619-001)
o Trackball tool (spare part number 194041-001)
o Case utility tool (spare part number 119070-001 and included in
10076-001)
o PCMCIA external diskette drive (part number 190533-001)
o Preloaded application diskettes (Compaq Order Center, 1-800-952-7689)
Screws
The screws used in these products are not interchangeable. If an incorrect
screw is used during the reassembly process, it could cause damage to the
unit. Compaq strongly recommends that all screws removed during the
disassembly process be kept with the part that was removed, then returned
to their proper locations.
IMPORTANT: As each subassembly is removed from the computer, it should be
placed away from the work area to prevent damage.
Cables and Connectors
Most cables used throughout the unit are flex cables (Figures 2-1, 2-2,
2-3). These cables must be handled with extreme care to avoid damage. Apply
only the tension required to seat or unseat the cables during insertion or
removal from the connector. Handle cables by the connector or pull tabs
whenever possible. In all cases, avoid bending, twisting, or tearing the
cables, and ensure that cables are placed in such a way that they cannot be
caught or snagged by parts being removed or replaced.
>>>>>>>>>>>>>>>>>>>>>>>>>>>>>>>>> CAUTION <<<<<<<<<<<<<<<<<<<<<<<<<<<<<<<<<
When servicing these units, ensure that cables are placed in their proper
location during the reassembly process. Improper cable placement can cause
severe damage to the unit.
>>>>>>>>>>>>>>>>>>>>>>>>>>>>>>>>>>>>><<<<<<<<<<<<<<<<<<<<<<<<<<<<<<<<<<<<<<
Plastics
The plastics used can be damaged by application of excessive force during
disassembly and reassembly. When handling the plastic cases and housing
assemblies, use care. Do not use screwdrivers or similar tools to pry apart
plastics. Where necessary, use the Case utility tool (spare part number
119070-001). Proper handling of this tool is illustrated in the
disassembly and reassembly procedures.
Disposal of a Used Battery
Battery components are considered environmentally harmful. Disposal of a
Nickel Metal Hydride (NiMH) Battery Pack should comply with country, state,
province, or local regulations. Whenever possible, battery components
should be recycled.
>>>>>>>>>>>>>>>>>>>>>>>>>>>>>>>>> CAUTION <<<<<<<<<<<<<<<<<<<<<<<<<<<<<<<<<
Never attempt to open or service a battery pack. Opening a battery pack not
only damages the pack and makes it unusable, but also exposes potentially
harmful battery components.
>>>>>>>>>>>>>>>>>>>>>>>>>>>>>>>>>>>>><<<<<<<<<<<<<<<<<<<<<<<<<<<<<<<<<<<<<<
Compaq offers its portable product customers an environmentally sound
method for disposing of depleted Compaq rechargeable battery packs used in
Compaq laptop and subnotebook personal computers.
In the interest of our customers and the protection of our environment,
Compaq has initiated a disposal/recycling program for these battery packs.
Further, because Compaq is funding all costs associated with the program,
it is offered at no cost to the Compaq laptop and notebook customer.
IMPORTANT: Toll Free Number (U.S) 1-800-524-9859, (Canada) 1-800-263-5868
Customers in North America can take advantage of this program immediately.
If you want to safely dispose of a depleted Compaq rechargeable battery
pack, call the Compaq toll free telephone number. A recorded message asks
you to provide your name, mailing address, and information about the
battery pack. Within approximately two to three weeks, Compaq will send a
postage paid "battery mailer" envelope preaddressed to the reclamation
facility. Place the Compaq rechargeable battery pack into the battery
mailer and mail it to the Compaq address shown on the mailer. Do not return
Compaq rechargeable battery packs to Authorized Compaq Service Providers
(except in the case of service or warranty exchanges) nor to any Compaq
address other than the address on the preaddressed battery mailer envelope.
Chapter 3. Removal and Replacement Procedures
Chapter 3.0 Introduction
This chapter provides subassembly/module level removal and replacement
procedures for the Compaq Contura Aero Family of Personal Computers.
After completing all necessary removal and replacement procedures, run the
diagnostics program to verify that all components operate properly.
Chapter 3.1 Replacement Procedures
For replacement procedures, follow the removal procedures in this chapter
in reverse order.
Chapter 3.2 Disassembly/Assembly Sequence Chart
This section provides instructions for removing and replacing these
components:
|
3.4 |---BATTERY PACK
|
3.5 |---CPU COVER
|
3.6 |---KEYBOARD
|
3.7 |---VGA BACKLIT DISPLAY
| |--Compaq Contura Aero 4/25
| |----Bezel
| |----Inverter Board
| |----LCD Panel
| |--Compaq Contura Aero 4/33C
| |----Bezel
| |----Inverter Board
| |----LCD Panel
|
3.8 |---POWER SUPPLY
|
3.9 |---TRACKBALL
|
3.10 |---HARD DRIVE
|
3.11 |---SYSTEM BOARD
| |---Real time Clock Battery
|
3.12 |---CHASSIS
Chapter 3.3 Preparation Procedures
Before beginning the removal and replacement procedures, follow these
steps (Figure 3-1):
1. Turn off the power switch on the computer.
>>>>>>>>>>>>>>>>>>>>>>>>>>>>>>>>> CAUTION <<<<<<<<<<<<<<<<<<<<<<<<<<<<<<<<<
Turn off the computer before any cables are connected or disconnected.
>>>>>>>>>>>>>>>>>>>>>>>>>>>>>>>>>>>>><<<<<<<<<<<<<<<<<<<<<<<<<<<<<<<<<<<<<<
2. Disconnect all external devices (diskette drive, base unit, printer, and
other devices) from the computer.
3. Disconnect the power cord from the electrical outlet.
4. Disconnect the AC adapter cable from the computer.
Chapter 3.4 Removing The Battery Pack
To remove an installed battery pack, follow these steps (Figure 3-2):
1. Press the battery release latch on the cover of the battery compartment
2. Slide the door forward. The battery will spring out slightly
3. Remove the battery pack by gently pulling it out of the battery
compartment
>>>>>>>>>>>>>>>>>>>>>>>>>>>>>>>>> CAUTION <<<<<<<<<<<<<<<<<<<<<<<<<<<<<<<<<
Metal objects will damage the battery pack as well as the connectors in the
compartment. To prevent damage, do not let metal objects touch any of the
connectors. Do not place any objects other than the battery pack in the
battery compartment.
>>>>>>>>>>>>>>>>>>>>>>>>>>>>>>>>>>>>><<<<<<<<<<<<<<<<<<<<<<<<<<<<<<<<<<<<<<
NOTE: Be careful not to misplace the battery door or battery spacer (if
applicable).
To replace the battery pack, follow these steps:
>>>>>>>>>>>>>>>>>>>>>>>>>>>>>>>>> CAUTION <<<<<<<<<<<<<<<<<<<<<<<<<<<<<<<<<
To prevent damage to the battery contacts, do not force the battery pack
into the battery compartment.
>>>>>>>>>>>>>>>>>>>>>>>>>>>>>>>>>>>>><<<<<<<<<<<<<<<<<<<<<<<<<<<<<<<<<<<<<<
1. Align the slot in the battery pack with the rib inside the computer.
2. Insert the battery pack, with the battery contacts facing to the inside
of the battery compartment.
3. Push firmly on the battery pack until it slides into place.
4. Slide the battery door on until the lock snaps into place.
Chapter 3.5 Removing The Cpu Cover
To remove the CPU cover, follow these steps:
1. Remove the battery pack (Figure 3-2).
2. Turn the computer upside down.
3. Remove the four screws from the bottom of the computer (Figure 3-3).
4. Remove the screw from the clutch on the display enclosure in the rear of
the computer (Figure 3-3).
5. Turn the computer right side up.
6. Slide the latch on the front of the computer to the right and open the
display (Figure 3-4).
7. Remove the screw covers from the bottom right and left corners of the
display panel assembly. Using a Phillips screwdriver, remove the two
screws (Figure 3-5).
8. Remove the bezel from the display assembly by gently pulling the
bezel frame and working from the bottom up (Figure 3-6).
9. Unsnap the CPU cover with the Case utility tool and lift it off of the
computer (Figure 3-7).
To replace the CPU cover, reverse the previous steps.
>>>>>>>>>>>>>>>>>>>>>>>>>>>>>>>>> CAUTION <<<<<<<<<<<<<<<<<<<<<<<<<<<<<<<<<
When replacing the CPU cover, be sure not to pinch the trackball cables on
the right side of the cover (see Figure 3-41).
>>>>>>>>>>>>>>>>>>>>>>>>>>>>>>>>>>>>><<<<<<<<<<<<<<<<<<<<<<<<<<<<<<<<<<<<<<
Chapter 3.6 Removing The Keyboard
To remove the keyboard, follow these steps:
1. Remove the battery pack (Section 3.4).
2. Remove the display bezel and the CPU cover (Section 3-5).
3. Remove the four screws that secure the keyboard (Figure 3-8).
4. Gently lift up on the rear of the keyboard and unhook it from the hook
latches in the front (Figure 3-9).
5. Rotate the rear of the keyboard toward you until the two ZIF connectors
are exposed and lay the keyboard upside down on top of the battery
compartment (Figure 3-10).
NOTE: You may not have to disconnect the cables from the keyboard to have
access to the component you want to remove and/or replace.
6. Using the Case utility tool, carefully lift up on the two ZIF sliders
one at a time to release the keyboard cables (Figure 3-10).
7. Carefully lift the keyboard out of the computer.
To replace the keyboard, reverse the previous steps.
NOTE: When replacing the keyboard, position the clip on the rear of the
keyboard [1] on top of the display cable ZIF slider [2]
(Figure 3-10).
Chapter 3.7 Removing The VGA Backlit Display
Compaq Contura Aero 4/25 Display
To remove the monochrome VGA backlit display from the Compaq Contura
Aero 4/25 Personal Computer, follow these steps:
1. Remove the battery pack (Section 3.4).
2. Remove the display bezel and the CPU cover (Section 3.5).
3. Remove the keyboard (Section 3.6).
4. Release the ZIF slider attaching the display cable to the system board.
NOTE: It may not be necessary to remove the display assembly from the base
enclosure to service the system board. The display will support
itself in an open position without falling over.
5. Remove the remaining screw on the back of the display assembly to
release the clutch from the base enclosure (Figure 3-12).
>>>>>>>>>>>>>>>>>>>>>>>>>>>>>>>>> CAUTION <<<<<<<<<<<<<<<<<<<<<<<<<<<<<<<<<
Do not bend the support loop.
>>>>>>>>>>>>>>>>>>>>>>>>>>>>>>>>>>>>><<<<<<<<<<<<<<<<<<<<<<<<<<<<<<<<<<<<<<
6. Lift the display assembly out of the computer by sliding it to the right
to pull the display pin out of the support loop. (Figure 3-13).
To replace the display assembly, follow these steps:
1. Position the display assembly by aligning the display clutch and pin
with the support loop and keyed bushing (Figure 3-14).
2. Reattach the screw to the base enclosure and clutch.
To reconnect the display cable to the system board, follow these steps
(Figure 3-15):
1. Insert the display cable into the ZIF connector and lightly press the
slider down to lock the connector.
2. Push the curved portion of the display cable inward with your finger,
remove your finger, close the computer, and immediately reopen.
The display cable should pop into place around the hinge forming an "S"
shape.
Display Inverter Board
To remove the display inverter board, follow these steps:
1. Remove the display bezel (Figures 3-5 and 3-6).
2. Remove the display cable and the backlight cable from the display
inverter board in the bottom of the display enclosure by gently pulling
the cables toward you, then unplugging from the inverter board LIF
connector (Figure 3-16).
3. Lift the inverter board out of the display enclosure (Figure 3-17).
>>>>>>>>>>>>>>>>>>>>>>>>>>>>>>>>> CAUTION <<<<<<<<<<<<<<<<<<<<<<<<<<<<<<<<<
When servicing these units, ensure that cables are placed in their proper
location to avoid pinching during the reassembly process. Improper cable
placement can cause severe damage to the unit.
>>>>>>>>>>>>>>>>>>>>>>>>>>>>>>>>>>>>><<<<<<<<<<<<<<<<<<<<<<<<<<<<<<<<<<<<<<
To replace the inverter board, follow these steps:
>>>>>>>>>>>>>>>>>>>>>>>>>>>>>>>>> CAUTION <<<<<<<<<<<<<<<<<<<<<<<<<<<<<<<<<
These steps must be followed whenever replacing any component in the
display assembly because of high susceptibility to electrostatic discharge,
which will damage the LCD panel.
>>>>>>>>>>>>>>>>>>>>>>>>>>>>>>>>>>>>><<<<<<<<<<<<<<<<<<<<<<<<<<<<<<<<<<<<<<
1. Attach the inverter board LIF connector to the display cable.
2. Attach the backlight cable to the inverter board.
3. Align the inverter board with the three mounting posts.
Liquid Crystal Display Panel
To remove the backlit liquid crystal display (LCD) panel, follow these
steps:
1. Remove the display bezel (Figures 3-5 and 3-6).
2. Remove the remaining two top left screws and the one top right screw
that secure the LCD panel to the display enclosure (Figure 3-18).
3. Remove the top clutch screw and ground clip bracket in the bottom right
corner of the display enclosure (Figure 3-18).
4. Carefully rotate the LCD panel to the left and out of the display
enclosure (Figure 3-19).
5. Remove the display cable from the rear of the LCD panel by gently
pulling the cable toward you (Figure 3-20).
6. Carefully lift up on the ZIF connector to release the display cable from
the side of the LCD panel (Figure 3-20).
To replace the LCD panel, follow these steps:
1. Remove the pressure sensitive adhesive backing from the back of the
display cable. Align the holes in the cable with the mounting pins on
the display enclosure.
2. Connect the display cable to the LCD panel with the ZIF connector.
3. Lay the LCD panel into the display enclosure with the bottom of the
display cable exposed.
4. Secure the LCD panel with three screws to the display enclosure.
5. Secure the support bracket with one screw in the bottom right corner of
the display enclosure.
Latch, Clutch, Pin, and Display Shield
To remove and replace the latch from the middle of the display enclosure,
the clutch, pin, and the display shield, follow these steps (Figure 3-21):
1. Remove the display bezel (Section 3.5).
2. Using a small flat bladed screwdriver, remove the spring from the latch.
Pry the latch away from the display enclosure.
3. Using a Phillips screwdriver, remove the remaining screw from the clutch
and then remove the clutch out of the display enclosure.
4. Remove the two screws from the pin and remove the pin from the display
enclosure.
5. Remove the display shield by lifting it out of the display enclosure
(Figure 3-22).
To replace the display shield, lay it inside of the display enclosure.
To replace the latch, attach the spring to the latch and snap them into the
display enclosure.
To replace the clutch and pin, reverse the previous steps.
Compaq Contura Aero 4/33C Display
To remove the color VGA backlit display assembly from the Compaq Contura
Aero 4/33C Personal Computer, follow these steps:
1. Remove the battery pack (Section 3.4).
2. Remove the display bezel (Figures 3-5 and 3-6).
3. Remove the CPU cover (Section 3.5).
4. Remove the keyboard (Section 3.6).
5. Release the ZIF connector attaching the display cable to the system
board (Figure 3-23).
6. Release the clutch from the display enclosure by removing the remaining
screw on the back of the base enclosure (Figure 3-24).
>>>>>>>>>>>>>>>>>>>>>>>>>>>>>>>>> CAUTION <<<<<<<<<<<<<<<<<<<<<<<<<<<<<<<<<
Do not bend the support loop.
>>>>>>>>>>>>>>>>>>>>>>>>>>>>>>>>>>>>><<<<<<<<<<<<<<<<<<<<<<<<<<<<<<<<<<<<<<
7.
Lift the display panel assembly out of the computer by sliding it to
the right to pull the display pin out of the support loop
(Figure 3-25).
To replace the display panel assembly, follow these steps:
1. Position the display assembly by aligning the display clutch and pin
with the support loop and keyed bushing (Figure 3-26).
2. Reattach the screw to the base enclosure and clutch.
To reconnect the display cable to the system board, follow these steps
(Figure 3-27):
1. Insert the display cable into the ZIF connector and lightly press the
slider down to lock the connector.
2. Push the curved portion of the display cable inward with your finger,
remove your finger, close the computer, and immediately reopen.
The display cable should pop into place around the hinge forming an "S"
shape.
Display Inverter Board
To remove the display inverter board, follow these steps:
1. Remove the display bezel (Figures 3-5 and 3-6).
2. With a Phillips screwdriver, remove the three screws that secure the
inverter board to the display enclosure (Figure 3-28).
3. Gently lift the inverter board out of the display enclosure and unplug
the display cable and the backlight cable (Figure 3-29).
>>>>>>>>>>>>>>>>>>>>>>>>>>>>>>>>> CAUTION <<<<<<<<<<<<<<<<<<<<<<<<<<<<<<<<<
When servicing these subassemblies, ensure that cables are placed in their
proper location to avoid pinching during the reassembly process. Improper
cable placement can cause severe damage to the computer.
>>>>>>>>>>>>>>>>>>>>>>>>>>>>>>>>>>>>><<<<<<<<<<<<<<<<<<<<<<<<<<<<<<<<<<<<<<
To replace the inverter board, follow these steps:
>>>>>>>>>>>>>>>>>>>>>>>>>>>>>>>>> CAUTION <<<<<<<<<<<<<<<<<<<<<<<<<<<<<<<<<
Because of high susceptibility to electrostatic discharge that will damage
the LCD panel, these steps must be followed whenever replacing any
component in the display assembly.
>>>>>>>>>>>>>>>>>>>>>>>>>>>>>>>>>>>>><<<<<<<<<<<<<<<<<<<<<<<<<<<<<<<<<<<<<<
1. Connect the inverter board connector to the display cable.
2. Connect the backlight cable to the inverter board.
3. Place the inverter board with the component side down on the right side
of the display enclosure and secure with three screws.
Liquid Crystal Display Panel
To remove the backlit liquid crystal display (LCD) panel, follow these
steps:
1. Remove the display bezel (Section 3.5).
2. Remove the remaining four screws that secure the LCD panel to the
display enclosure and carefully bend back the tabs that secure the
display shield to the LCD panel (Figure 3-30).
3. Carefully rotate the LCD panel to the left and out of the display
enclosure (Figure 3-31).
4. Remove the display cable from the rear of the LCD panel by gently
pulling the cable toward you (Figure 3-32).
5. Carefully lift up on the ZIF connector to release the display cable from
the side of the LCD panel (Figure 3-32).
To replace the LCD panel, follow these steps:
1. Remove the pressure sensitive adhesive backing from the back of the
display cable. Align the holes in the cable with the mounting pins on
the display enclosure.
2. Connect the display cable to the LCD panel by inserting it into the ZIF
connector.
3. Lay the LCD panel into the display enclosure with the bottom of the
display cable exposed.
IMPORTANT: Ensure that the ferrite [1] on the display cable is not pinched
between the display enclosure and the ZIF connector [2]
(Figure 3-33).
4. Carefully press down the tabs of the display shield back into place.
5. Secure the LCD panel with four screws to the display enclosure.
Latch, Clutch, Pin, and Display Shield
To remove and replace the latch, the clutch, and display shield from the
display assembly, follow these steps:
1. Remove the remaining four screws that secure the LCD panel to the
display enclosure and carefully bend back the tabs that secure the
display shield to the LCD panel and remove the LCD panel (Figures 3-30,
3-31).
2. Using a Phillips screwdriver, remove the screws from the clutch and the
pin (Figure 3-34).
3. Lift the display shield out of the display enclosure (Figure 3-34).
4. Using a small flat bladed screwdriver, remove the spring from the latch.
Pry the latch away from the display enclosure [1] (Figure 3-35).
5. Remove the clutch [2] and the pin [3] out of the display enclosure
(Figure 3-35).
To replace the display shield, lay it inside of the display enclosure.
To replace the latch, attach the spring to the latch and snap them into the
display enclosure.
Chapter 3.8 Removing The DC-DC Power Supply
>>>>>>>>>>>>>>>>>>>>>>>>>>>>>>>>> CAUTION <<<<<<<<<<<<<<<<<<<<<<<<<<<<<<<<<
Before removing the CPU cover, be sure the AC Adapter is unplugged and the
battery pack is removed from the battery compartment. If the battery pack
remains in the battery compartment, it will damage the power supply.
>>>>>>>>>>>>>>>>>>>>>>>>>>>>>>>>>>>>><<<<<<<<<<<<<<<<<<<<<<<<<<<<<<<<<<<<<<
To remove the power supply, follow these steps:
1. Remove the battery pack (Section 3.4).
2. Remove the display bezel (Figures 3-5 and 3-7).
3. Remove the CPU cover (Section 3.5).
4. Remove the keyboard (Section 3.6).
5. Remove the threaded standoff that secures the power supply
(Figure 3-36).
6. Gently grasp the power supply and pull up to unplug (Figure 3-36).
To replace the power supply, reverse the previous steps.
Chapter 3.9 Removing The Trackball/Buttons/Speaker Assembly
To remove the trackball, follow these steps:
1. Remove the battery pack (Section 3.4).
2. Remove the display bezel (Figures 3-5 and 3-6).
3. Remove the CPU cover (Section 3.5).
4. Remove the keyboard (Section 3.6).
5. Using a small screwdriver, remove the two screws that secure the
trackball to the base (Figure 3-37).
6. With the Case utility tool, disconnect the trackball cable from the
system board connector. (Figure 3-38).
7. Remove the trackball, speaker, and cable assembly. Unplug the trackball
from the cable/buttons/speaker assembly (Figure 3-39).
To replace the trackball/cable assembly, follow these steps:
1. Connect the trackball to the small tab on the cable assembly
(Figure 3-40).
2. Fold up the trackball and fold back the button section of the cable
(Figure 3-41).
3. Place the speaker in the recessed area in the right front corner of the
base enclosure and the buttons in the recessed area on the right and
secure with two screws (Figure 3-41).
4. Route the speaker wires over the trackball and around the base enclosure
screw hole (Figure 3-42).
>>>>>>>>>>>>>>>>>>>>>>>>>>>>>>>>> CAUTION <<<<<<<<<<<<<<<<<<<<<<<<<<<<<<<<<
The trackball cable and speaker wires must be routed carefully to prevent
them from being pinched when the CPU cover is replaced.
>>>>>>>>>>>>>>>>>>>>>>>>>>>>>>>>>>>>><<<<<<<<<<<<<<<<<<<<<<<<<<<<<<<<<<<<<<
5. Route the folded portion of the trackball cable behind and over the hard
drive. Plug the cable into the system board LIF connector (Figure 3-43).
Chapter 3.10 Removing The Hard Drive
To remove the hard drive, follow these steps:
1. Remove the battery pack (Section 3.4).
2. Remove the display bezel (Figures 3-5 and 3-7).
3. Remove the CPU cover (Section 3.5).
4. Remove the keyboard (Section 3.6).
5. Disconnect the trackball cable from the system board, but do not remove
the trackball cable assembly completely (Section 3.9).
6. Remove the hard drive and bracket assembly from the system chassis by
gently sliding the hard drive bracket horizontally off the system board
connector (Figure 3-44).
IMPORTANT: Do not pull up on the hard drive before the system board
connector and drive connector are disengaged.
7. After the connectors separate, lift the hard drive and the bracket
straight up and out of the computer (Figure 3-44).
8. To remove the hard drive bracket from the hard drive, with a P1
screwdriver, remove the three screws from the sides of the bracket and
slip the hard drive out of the bracket. (Figure 3-45).
IMPORTANT: Ensure that the screwdriver tip fits the recess properly or
damage may occur to the screw head.
To replace the hard drive, follow these steps:
1. Place the hard drive inside the hard drive bracket and align the holes
on the side.
2. Align the hard drive inside the bracket by inserting the screws into the
holes, then tightening the screws.
3. Slide the hard drive bracket into the system chassis.
>>>>>>>>>>>>>>>>>>>>>>>>>>>>>>>>> CAUTION <<<<<<<<<<<<<<<<<<<<<<<<<<<<<<<<<
To prevent damage to the system board connectors ensure that the hard drive
is aligned correctly.
>>>>>>>>>>>>>>>>>>>>>>>>>>>>>>>>>>>>><<<<<<<<<<<<<<<<<<<<<<<<<<<<<<<<<<<<<<
Chapter 3.11 Removing The System Board
Before you can remove the system board, you must remove the optional memory
expansion board, optional base unit, and the optional PCMCIA external
drive, if applicable.
To remove the system board, follow these steps:
1. Remove the battery pack (Section 3.4).
2. Remove the display bezel (Figures 3-5 and 3-6)
3. Remove the CPU cover (Section 3.5).
4. Remove the keyboard (Section 3.6).
5. Remove the power supply (Section 3.8).
6. Remove the trackball (Section 3.9).
7. Remove the hard drive (Section 3.10).
8. Using a hex socket driver, remove the six screw locks from the rear of
the computer that secure the connectors to the chassis (Figure 3-46).
9. Open the computer and remove the two remaining standoffs from the system
board with a hex socket driver (Figure 3-47).
10. Remove the two Phillips screws from the PCMCIA rails (Figure 3-48).
11. Remove the three remaining screws from the system board (Figure 3-49).
NOTE: An insulator must be present under the center screw. If the insulator
is not present, order a new system board.
12. Rotate the system board out of the system chassis (Figure 3-50).
13. Slide the PCMCIA rails out of the system board (Figure 3-51).
To replace the system board, reverse the previous steps.
Real Time Clock Battery
To remove the real time clock battery, follow these steps:
1. Remove the display bezel (Figures 3-5 and 3-6).
2. Remove the CPU cover (Section 3.5).
3. Remove the keyboard (Section 3.6).
4. Remove the real time clock battery from the system board by inserting a
nonconductive probe into the battery holder and pushing back on the
battery to release it (Figure 3-52).
To replace the real time clock battery, reverse the previous steps.
Chapter 3.12 Removing The Chassis
To remove the system chassis, follow these steps:
1. Remove the battery pack (Section 3.4).
2. Remove the display bezel (Figures 3-5 and 3-6).
3. Remove the CPU cover (Section 3.5).
4. Remove the keyboard (Section 3.6).
5. Remove the VGA backlit display.
6. Remove the power supply (Section 3.8).
7. Remove the trackball (Section 3.9).
8. Remove the hard drive (Section 3.10).
9. Remove the system board (Section 3.10).
10. Remove the system chassis by gently separating it from the computer
base and lifting it out (Figure 3-53).
To replace the system chassis, reverse the previous steps.
Chapter 4. Power On Self Test (POST)
Chapter 4.0 Introduction
This section lists the assemblies checked by the Power On Self Test (POST).
The section also includes procedures for clearing the power on password.
Chapter 4.1 POST
POST is a series of diagnostic tests that run automatically when the system
is turned on. POST checks the following assemblies to ensure that the
computer system is functioning properly:
o
o
o
o
o
o
o
o
Keyboard
Power supply
System board
System memory
Memory expansion board
Controller circuitry
VGA display
Hard drive
POST also detects the type of mass storage device installed in the
computer. If POST finds an error in the system, an error condition is
indicated by an audible and/or visual message. Refer to Chapter 5, "Error
Messages and Codes," for more information about the error codes and a
recommended course of action.
Chapter 4.2 Preliminary Steps
If you encounter an error condition, complete the following steps before
starting troubleshooting procedures:
1. Turn off the computer by holding down the FN key and pressing the power
button. Do not remove the battery pack.
2. Remove the computer from the base unit, if applicable. Connect the AC
Adapter. Connect the printer if you want to test it or use it to log
error messages.
3. Install all appropriate loopback plugs and terminating plugs for
complete testing.
4. Turn on the computer by pressing the power button.
5. Clear the power on password, if preset by the user.
You will know that the power on password is set when a key icon (o--m)
appears on the screen when POST completes. If this occurs, you must
enter the password to continue. If you enter the password incorrectly,
a broken key icon (o-x-m) is displayed. Try again. After three
unsuccessful tries, you must turn off the computer, then on again before
you can continue. To delete the password, type the current password
immediately followed by a backslash (\) and press the Enter key.
NOTE: If you don't have access to the power on password, you must
disable the power on password by removing the real time clock
battery. Refer to section 3.11, "Real Time Clock Battery," for
removal procedures. Once the real time clock battery is removed,
short the real time clock battery terminals in the processor board
by touching the battery terminals with two ends of a wire. Replace
all components, and resume POST.
Chapter 5. Error Messages and Codes
Chapter 5.0 Introduction
This chapter contains Power On Self Test (POST) messages, Diagnostic error
codes, and memory error codes.
The messages and codes appear in tables that include a description of the
error, the probable cause, and the recommended action that should be taken
to resolve the error condition.
Chapter 5.1 Power On Self Test Messages
An error message results if a problem is encountered from the Power On Self
Test utility. This utility runs automatically when the system is turned
on.
Table 5-1 lists the messages for POST, the audible (beep) message, probable
cause, and recommended action.
Table 5-1. Power On Self Test Messages
===========================================================================
Message:
101 ROM Error
Beeps:
1 Long, 1 Short (Beeps can be disabled by the user from
the Computer Setup utility.
Probable Cause:
ROM checksum option
Recommended Action: 1. Verify the correct ROM.
2. Replace the system board.
--------------------------------------------------------------------------Message:
101 ROM Error
Beeps:
1 Long, 1 Short (Beeps can be disabled by the user from
the Computer Setup utility.
Probable Cause:
System ROM
Recommended Action: 1. Verify the correct ROM.
2. Replace the system board.
--------------------------------------------------------------------------Message:
101 ROM Error
Beeps:
1 Long, 1 Short (Beeps can be disabled by the user from
the Computer Setup utility.
Probable Cause:
VDU ROM checksum error
Recommended Action: 1. Verify the correct ROM.
2. Replace the system board.
--------------------------------------------------------------------------Message:
101 ROM Error
Beeps:
1 Long, 1 Short (Beeps can be disabled by the user from
the Computer Setup utility.
Probable Cause:
System, ROM checksum error
Recommended Action: 1. Verify the correct ROM.
2. Replace the system board.
--------------------------------------------------------------------------Message:
101 ROM Error
Beeps:
1 Long, 1 Short (Beeps can be disabled by the user from
the Computer Setup utility.
Probable Cause:
Second system ROM does not pass the checksum
Recommended Action: 1. Verify the correct ROM.
2. Replace the system board.
--------------------------------------------------------------------------Message:
101 ROM Error
Beeps:
1 Long, 1 Short (Beeps can be disabled by the user from
the Computer Setup utility.
Probable Cause:
Option ROM does not pass the checksum
Recommended Action: 1. Verify the correct ROM.
2. Remove PCMCIA card and retest.
3. Replace the system board.
--------------------------------------------------------------------------Message:
102 System Board Failure
Beeps:
None (Beeps can be disabled by the user from the
Computer Setup utility.
Probable Cause:
System Board
Recommended Action: Replace the system board.
--------------------------------------------------------------------------Message:
102 System Board Failure
Beeps:
None (Beeps can be disabled by the user from the
Computer Setup utility.
Probable Cause:
Counter zero check failed
Recommended Action: Replace the system board.
--------------------------------------------------------------------------Message:
102 System Board Failure
Beeps:
None (Beeps can be disabled by the user from the
Computer Setup utility.
Probable Cause:
Refresh bit does not toggle
Recommended Action: Replace the system board.
--------------------------------------------------------------------------Message:
102 System Board Failure
Beeps:
None (Beeps can be disabled by the user from the
Computer Setup utility.
Probable Cause:
CMOS read/write failed
Recommended Action: Replace the system board.
--------------------------------------------------------------------------Message:
102 System Board Failure
Beeps:
None (Beeps can be disabled by the user from the
Computer Setup utility.
Probable Cause:
DMA register read/write test failed
Recommended Action: Replace the system board.
--------------------------------------------------------------------------Message:
102 System Board Failure
Beeps:
None (Beeps can be disabled by the user from the
Computer Setup utility.
Probable Cause:
Protected mode test failed enabling/disabling A20 or
entering/existing protected mode
Recommended Action: Replace the system board.
--------------------------------------------------------------------------Message:
102 System Board Failure
Beeps:
None (Beeps can be disabled by the user from the
Computer Setup utility.
Probable Cause:
Failed entering protected mode for memory test
Recommended Action: Replace the system board.
--------------------------------------------------------------------------Message:
102 System Board Failure
Beeps:
None (Beeps can be disabled by the user from the
Computer Setup utility.
Probable Cause:
Test of timer zero interrupt failed (no interrupt
occurred)
Recommended Action: Replace the system board.
--------------------------------------------------------------------------Message:
162 System Options Not Set
Beeps:
2 Short (Beeps can be disabled by the user from the
Computer Setup utility.
Probable Cause:
Configuration incorrect
Recommended Action: Run Computer Setup.
--------------------------------------------------------------------------Message:
162 System Options Not Set
Beeps:
2 Short (Beeps can be disabled by the user from the
Computer Setup utility.
Probable Cause:
CMOS reflects that an invalid configuration has been
set
Recommended Action: Run Computer Setup.
---------------------------------------------------------------------------
Message:
164 Memory Size Error
Beeps:
2 Short (Beeps can be disabled by the user from the
Computer Setup utility.
Probable Cause:
Increase in the memory size found compared to the one
stored in CMOS
Recommended Action: Run Computer Setup.
--------------------------------------------------------------------------Message:
164 Memory Size Error
Beeps:
2 Short (Beeps can be disabled by the user from the
Computer Setup utility.
Probable Cause:
Decrease in the memory size found compared to the one
stored in CMOS
Recommended Action: Run Computer Setup.
--------------------------------------------------------------------------Message:
167 Lost Power
Beeps:
2 Short (Beeps can be disabled by the user from the
Computer Setup utility.
Probable Cause:
Real time clock/calendar battery
Recommended Action: Replace real time clock battery.
--------------------------------------------------------------------------Message:
167 Lost Power
Beeps:
2 Short (Beeps can be disabled by the user from the
Computer Setup utility.
Probable Cause:
RTC has lost power. This only shows up on a cold boot,
no beeps
Recommended Action: Replace real time clock battery.
--------------------------------------------------------------------------Message:
XX000YZZ 201 Memory Error
Beeps:
None (Beeps can be disabled by the user from the
Computer Setup utility.
Probable Cause:
RAM failure
Recommended Action: 1. Replace the memory expansion board (Figure 5-1).
2. Replace the system board.
--------------------------------------------------------------------------Message:
XX000YZZ 201 Memory Error
Beeps:
None (Beeps can be disabled by the user from the
Computer Setup utility.
Probable Cause:
Memory test data error
Recommended Action: 1. Replace the memory expansion board (Figure 5-1).
2. Replace the system board.
--------------------------------------------------------------------------Message:
XX000YZZ 201 Memory Error
Beeps:
None (Beeps can be disabled by the user from the
Computer Setup utility.
Probable Cause:
XX000YZZ RAM failure
Recommended Action: Replace the system board.
--------------------------------------------------------------------------Message:
203 Memory Address Error
Beeps:
None (Beeps can be disabled by the user from the
Computer Setup utility.
Probable Cause:
Memory test high address line error
Recommended Action: Replace the memory expansion board (Figure 5-1).
--------------------------------------------------------------------------Message:
205 Memory Error
Beeps:
None (Beeps can be disabled by the user from the
Computer Setup utility.
Probable Cause:
Cache memory error
Recommended Action: 1. Remove PCMCIA card and retest.
2. Remove memory expansion board and retest
(Figure 5-1).
3. Replace the system board.
--------------------------------------------------------------------------Message:
205 Memory Error
Beeps:
None (Beeps can be disabled by the user from the
Computer Setup utility.
Probable Cause:
Cache memory data error
Recommended Action: 1. Remove PCMCIA card and retest.
2. Remove memory expansion board and retest
(Figure 5-1).
3. Replace the system board.
--------------------------------------------------------------------------Message:
208 Invalid Memory Expansion Board
Beeps:
None (Beeps can be disabled by the user from the
Computer Setup utility.
Probable Cause:
Memory expansion board is an invalid type
Recommended Action: Replace memory expansion board (Figure 5-1).
---------------------------------------------------------------------------
--------------------------------------------------------------------------Message:
301 Keyboard Error
Beeps:
None (Beeps can be disabled by the user from the
Computer Setup utility.
Probable Cause:
Keyboard
Recommended Action: Replace the keyboard.
--------------------------------------------------------------------------Message:
301 Keyboard Error
Beeps:
None (Beeps can be disabled by the user from the
Computer Setup utility.
Probable Cause:
Keyboard or test fixture installed
Recommended Action: Replace the keyboard.
--------------------------------------------------------------------------Message:
301 Keyboard Error
Beeps:
None (Beeps can be disabled by the user from the
Computer Setup utility.
Probable Cause:
Keyboard loopback plug installed
Recommended Action: Replace the keyboard.
--------------------------------------------------------------------------Message:
301 Keyboard Error
Beeps:
None (Beeps can be disabled by the user from the
Computer Setup utility.
Probable Cause:
Bad results from keyboard test
Recommended Action: Replace the keyboard.
--------------------------------------------------------------------------Message:
301 Keyboard Error
Beeps:
None (Beeps can be disabled by the user from the
Computer Setup utility.
Probable Cause:
Keyboard failed interface test
Recommended Action: Replace the keyboard.
--------------------------------------------------------------------------Message:
303 Keyboard Controller Error
Beeps:
None (Beeps can be disabled by the user from the
Computer Setup utility.
Probable Cause:
8042 error clearing the output buffer
Recommended Action: 1. Replace the keyboard
2. Replace the trackball and trackball cable.
3. Replace the system board.
--------------------------------------------------------------------------Message:
303 Keyboard Controller Error
Beeps:
None (Beeps can be disabled by the user from the
Computer Setup utility.
Probable Cause:
Keyboard controller (8042) self test failed
Recommended Action: 1. Replace the keyboard.
2. Replace the trackball and trackball cable.
3. Replace the system board.
--------------------------------------------------------------------------Message:
303 Keyboard Controller Error
Beeps:
None (Beeps can be disabled by the user from the
Computer Setup utility.
Probable Cause:
System board keyboard controller
Recommended Action: 1. Replace the keyboard.
2. Replace the trackball and trackball cable.
3. Replace the system board.
--------------------------------------------------------------------------Message:
303 Keyboard Controller Error
Beeps:
None (Beeps can be disabled by the user from the
Computer Setup utility.
Probable Cause:
Reset of A20 failed
Recommended Action: 1. Replace the keyboard.
2. Replace the trackball and trackball cable.
3. Replace the system board.
--------------------------------------------------------------------------Message:
304 Keyboard of System Unit Error
Beeps:
None (Beeps can be disabled by the user from the
Computer Setup utility.
Probable Cause:
Keyboard
Recommended Action: 1. Replace the keyboard.
2. Replace the trackball and trackball cable.
3. Replace the system board.
--------------------------------------------------------------------------Message:
304 Keyboard of System Unit Error
Beeps:
None (Beeps can be disabled by the user from the
Computer Setup utility.
Probable Cause:
Reset of keyboard failed
Recommended Action: 1. Replace the keyboard.
2. Replace the trackball and trackball cable.
3. Replace the system board.
--------------------------------------------------------------------------Message:
601 Diskette Controller Error
Beeps:
None (Beeps can be disabled by the user from the
Computer Setup utility.
Probable Cause:
Diskette controller circuitry
Recommended Action: 1. Run Computer Checkup (TEST).
2. Replace PCMCIA external diskette drive.
3. Replace the system board.
--------------------------------------------------------------------------Message:
1125 Internal Serial Port Failure
Beeps:
2 Short (Beeps can be disabled by the user from the
Computer Setup utility.
Probable Cause:
Internal serial port failed to respond
Recommended Action: Replace the system board.
--------------------------------------------------------------------------Message:
1780 Primary Hard Drive 0 Failure
Beeps:
None (Beeps can be disabled by the user from the
Computer Setup utility.
Probable Cause:
Disk 0 failed to respond
Recommended Action: 1. Run Computer Checkup (TEST).
2. Replace the hard drive.
--------------------------------------------------------------------------Message:
1780 Primary Hard Drive 0 Failure
Beeps:
None (Beeps can be disabled by the user from the
Computer Setup utility.
Probable Cause:
Hard drive format error
Recommended Action: 1. Run Computer Checkup (TEST).
2. Replace the hard drive.
--------------------------------------------------------------------------Message:
1781 Disk 1 Failure
Beeps:
None (Beeps can be disabled by the user from the
Computer Setup utility.
Probable Cause:
Disk 1 failed to respond
Recommended Action: 1. Run Computer Checkup (TEST).
2. Replace the drive.
--------------------------------------------------------------------------Message:
1781 Disk 1 Failure
Beeps:
None (Beeps can be disabled by the user from the
Computer Setup utility.
Probable Cause:
Hard drive format error
Recommended Action: 1. Run Computer Checkup (TEST).
2. Replace the drive.
--------------------------------------------------------------------------Message:
1782 Disk Controller Failure
Beeps:
None (Beeps can be disabled by the user from the
Computer Setup utility.
Probable Cause:
Reset of the hard drive subsystem failed
Recommended Action: 1. Run Computer Checkup (TEST).
2. Replace the drive.
3. Replace the system board.
--------------------------------------------------------------------------Message:
1790 Disk 0 Error
Beeps:
None (Beeps can be disabled by the user from the
Computer Setup utility.
Probable Cause:
Disk 0 responded with an error
Recommended Action: 1. Run Computer Checkup (TEST).
2. Replace the drive.
3. Replace the system board.
--------------------------------------------------------------------------Message:
1790 Disk 0 Error
Beeps:
None (Beeps can be disabled by the user from the
Computer Setup utility.
Probable Cause:
Hard Drive Error
Recommended Action: 1. Run Computer Checkup (TEST).
2. Replace the drive.
3. Replace the system board.
--------------------------------------------------------------------------Message:
1791 Disk 1 Error
Beeps:
None (Beeps can be disabled by the user from the
Computer Setup utility.
Probable Cause:
Disk 1 responded with an error
Recommended Action: 1. Run Computer Checkup (TEST).
2. Replace the drive.
3. Replace the system board.
--------------------------------------------------------------------------Message:
1791 Disk 1 Error
Beeps:
None (Beeps can be disabled by the user from the
Computer Setup utility.
Probable Cause:
Hard Drive 1 Error
Recommended Action: 1. Run Computer Checkup (TEST).
2. Replace the drive.
3. Replace the system board.
--------------------------------------------------------------------------Message:
None
Beeps:
1 Short or 2 Short (Beeps can be disabled by the user
from the Computer Setup utility.
Probable Cause:
Power on successful
Recommended Action: None
--------------------------------------------------------------------------Message:
None
Beeps:
1 Short or 2 Short (Beeps can be disabled by the user
from the Computer Setup utility.
Probable Cause:
Resume= "F1" key as indicated to continue
Recommended Action: None
===========================================================================
Chapter 5.2 Diagnostic Error Codes
Diagnostic error codes occur if the system recognizes a problem while
running the Computer Checkup (TEST). These error codes help identify
possible defective subassemblies.
Tables 5-2 through 5-15 list possible error codes, a description of the
error condition, and the action required to resolve the error condition.
IMPORTANT: Retest the system after completing each step. If the problem has
been resolved, do not proceed with the remaining steps.
For assistance in the removal and replacement of a particular subassembly,
see Chapter 3, "Removal and Replacement Procedures."
Table 5-2. System Test Error Codes
===========================================================================
Error Code
Description
Recommended Action
===========================================================================
101 - xx
CPU test failed
Replace the system board and retest.
--------------------------------------------------------------------------103 - xx
DMA page registers test
Replace the system board and retest.
failed
--------------------------------------------------------------------------104 - xx
Interrupt controller
The following steps apply to
master test failed
104 - xx through 105 - xx error
codes:
105 - xx
Port 61 error
Replace the system board and retest.
--------------------------------------------------------------------------106 - xx
Keyboard controller
Replace the system board and retest.
self test failed
--------------------------------------------------------------------------107 - xx
CMOS RAM test
The following steps apply to
failed
107 - xx through 113 - xx error
codes:
108 - xx
CMOS interrupt test
failed
Replace the system board and retest.
109 - xx
CMOS clock load data
test failed
110 - xx
Programmable timer
load data test failed
111 - xx
Refresh detect test
failed
112 - xx
Speed test slow mode
out of range
113 - xx
Protected mode test
failed
--------------------------------------------------------------------------114 - 01
Speaker test failed
1. Check system configuration.
2. Verify cable connections.
3. Replace the system board and
retest.
--------------------------------------------------------------------------116 - xx
Cache test failed
Replace the system board and retest.
===========================================================================
Table 5-3. Memory Test Error Codes
===========================================================================
Error Code
Description
Recommended Action
===========================================================================
200 - xx
Invalid memory
Reinsert memory expansion board
configuration
(Figure 5-1).
--------------------------------------------------------------------------201 - xx
Memory machine ID test
The following steps apply to
failed
201 - xx through 202 - xx error
codes:
202 - xx
Memory system ROM
checksum failed
1. Replace the memory expansion
board and retest (Figure 5-1).
2. Replace the system board and
retest.
--------------------------------------------------------------------------203 - xx
Memory write/read test
The following steps apply to
failed
203 - xx through 211 - xx error
codes:
204 - xx
Memory address test
failed
If you don't have a memory expansion
board, replace the system board.
210 - xx
Increment pattern test
failed
If you have a memory expansion
board:
211 - xx
Random pattern test
failed
Replace the memory expansion board
and retest (Figure 5-1).
===========================================================================
Table 5-4. Keyboard Test Error Codes
===========================================================================
Error Code
Description
Recommended Action
===========================================================================
301 - xx
Keyboard short test
The following steps apply to
8042 self test failed
301 - xx through 304 - xx error
codes:
302 - xx
Keyboard long test
failed
1. Check the keyboard connection.
If an external keyboard is
303 - xx
Keyboard LED test,
disconnected, turn off the
8042 self test failed
computer and connect the
keyboard.
304 - xx
Keyboard typematic
2. Replace the keyboard and retest.
test failed
3. Replace the system board and
retest.
===========================================================================
Table 5-5. Parallel Printer Test Error Codes
===========================================================================
Error Code
Description
Recommended Action
===========================================================================
401 - xx
Printer failed or not
The following steps apply to
connected
401 - xx through 498 - xx error
codes:
402 - xx
Printer data register
failed
1. Connect the printer.
2. Check the power to the printer.
403 - xx
Printer pattern test
3. Install the loopback connector
failed
and retest.
4. Replace the printer cable and
498 - xx
Printer failed or not
retest.
connected
5. Replace the system board.
===========================================================================
Table 5-6. PCMCIA External Diskette Drive Test
===========================================================================
Error Code
Description
Recommended Action
===========================================================================
600 - xx
Diskette ID drive types
The following steps apply to
test failed
600 - xx through 698 - xx error
codes:
601 - xx
Diskette format failed
1. Replace the diskette and retest.
602 - xx
Diskette read test
failed
603 - xx
Diskette write, read,
compare test failed
604 - xx
Diskette random seek
test failed
605 - xx
Diskette ID media
failed
606 - xx
Diskette speed test
failed
607 - xx
Diskette wrap test
failed
608 - xx
Diskette write protect
test failed
609 - xx
Diskette reset
controller test failed
610 - xx
Diskette change line
test failed
697 - xx
Diskette type error
2. Check and/or replace the diskette
power and signal cables and
PCMCIA external diskette drive.
3. Replace the diskette drive and
retest.
4. Replace the system board and
retest.
698 - xx
Diskette drive speed
not within limits
--------------------------------------------------------------------------699 - xx
Diskette drive/media
1. Replace diskette.
ID error
2. Run Computer Setup.
===========================================================================
Table 5-7. Serial Test Error Codes
===========================================================================
Error Code
Description
Recommended Action
===========================================================================
1101 - xx
Serial Port test
The following steps apply to
1101 - xx through 1109 - xx error
1109 - xx
Clock Register test
codes:
Replace the system board and retest.
===========================================================================
Table 5-8. PCMCIA Modem Test Error Codes
===========================================================================
Error Code
Description
Recommended Action
===========================================================================
1201 - xx
Modem Internal
The following steps apply to
Loopback Test
1201 - xx through 1210 - xx error
codes:
1202 - xx
Modem Time Out Test
1. Refer to modem documentation for
1203 - xx
Modem External
correct Computer Setup
Termination Test
procedures.
2. Check the modem line.
1204 - xx
Modem Auto Originate
Test
1206 - xx
Dial Multifrequency
Tone Test
3. Replace the modem and retest.
1210 - xx
Modem Direct Connect
Test
===========================================================================
Table 5-9. Hard Drive Test Error Codes
===========================================================================
Error Code
Description
Recommended Action
===========================================================================
1700 - xx
Hard ID drive types
The following steps apply tm
test failed
1700 - xx through 1799 - xx error
codes:
1701 - xx
Hard drive format
test failed
1. Run Computer Setup and verify
drive type.
1702 - xx
Hard drive read
2. Replace the hard drive and
test failed
retest.
3. Replace the system board and
1703 - xx
Hard drive write/read/
retest.
compare test failed
1704 - xx
Hard drive random seek
test failed
1705 - xx
Hard drive controller
test failed
1706 - xx
Hard drive ready
test failed
1707 - xx
Hard drive
recalibration test
failed
1708 - xx
Hard drive format
bad track test
failed
1709 - xx
Hard drive reset
controller test
failed
1710 - xx
Hard drive park head
test failed
1714 - xx
Hard drive file write
test failed
1715 - xx
Hard drive head
select test failed
1716 - xx
Hard drive conditional
format test failed
1717 - xx
Hard drive ECC *
test failed
1719 - xx
Hard drive power mode
test failed
1799 - xx
Invalid hard drive
type failed
--------------------------------------------------------------------------* Error Correction Code
===========================================================================
Table 5-10. Video Test Error Codes
===========================================================================
Error Code
Description
Recommended Action
===========================================================================
2402 - xx
Video memory test
The following recommendation applies
failed
to 2402 - xx through 2456 - xx error
codes:
2403 - xx
Video attribute test
failed
Replace the system board.
2404 - xx
Video character set
test failed
2405 - xx
Video 80 x 25 mode
9 x 14 character
cell test failed
2406 - xx
Video 80 x 25 mode
8 x 8 character
cell test failed
2407 - xx
Video 40 x 25 mode
test failed
2408 - xx
Video 320 x 200 mode
color set 0 test
failed
2409 - xx
Video 320 x 200 mode
color set 1 test failed
2410 - xx
Video 640 x 200 mode
test failed
2411 - xx
Video screen memory
page test failed
2412 - xx
Video gray scale
test failed
2414 - xx
Video white screen
test failed
2416 - xx
Video noise pattern
test failed
2418 - xx
ECG/VGC memory test
failed
2419 - xx
ECG/VGC ROM checksum
test failed
2421 - xx
ECG/VGC 640 x 200
graphics mode test
failed
2422 - xx
ECG/VGC 640 x 350
16 color set test
failed
2423 - xx
ECG/VGC 640 x 350
64 color set test
failed
2424 - xx
ECG/VGC monochrome
text mode test failed
2425 - xx
ECG/VGC monochrome
graphics mode test
failed
2431 - xx
640 x 480 graphics
test failure
2432 - xx
320 x 200 graphics
(256 color mode)
test failure
2448 - xx
Advanced VGA
Controller test
failed
2451 - xx
132 column Advanced
VGA test failed
2456 - xx
Advanced VGA 256 color
test failed
--------------------------------------------------------------------------2458 - xx
Advanced VGA BitBLT
The following recommendation applies
test
to 2458 - xx through 2480 - xx error
codes:
2468 - xx
Advanced VGA DAC test
Replace the system board and retest.
2477 - xx
Advanced VGA data path
test
2478 - xx
Advanced VGA BitBLT
test
2480 - xx
Advanced VGA Linedraw
test
===========================================================================
Table 5-11. Pointing Device Interface Test Error Codes
===========================================================================
Error Code
Description
Recommended Action
===========================================================================
8601 - xx
Pointing Device
1. Replace with a working pointing
Interface test failed
device and retest.
2. Replace the system board and
retest.
===========================================================================
Table 5-12. Audio Test Error Codes
===========================================================================
Error Code
Description
Recommended Action
===========================================================================
3206 - xx
Audio System Internal
Replace the system board and retest.
Error
===========================================================================
Chapter 6. Specifications
Chapter 6.0 Introduction
This chapter provides physical, environmental, and performance
specifications for the following Compaq Contura Aero Family of Personal
Computer subsystems:
o
o
o
o
o
o
o
o
Computer
VGA Display
Hard Drives
Internal Power Supply
NiMH Battery Pack
AC Adapter
Base Unit
External Diskette Drive
Chapter 6.1 System Unit
===========================================================================
U.S.
Metric
===========================================================================
Dimensions:
Contura Aero 4/25
Height
1.53 in
3.81 cm
Width
10.25 in
26 cm
Depth
7.5 in
19 cm
Contura Aero 4/33C
Height
1.7 in
4.32 cm
Width
10.25 in
26 cm
Depth
7.5 in
19 cm
--------------------------------------------------------------------------Weight (approximate):
Contura Aero 4/25
Model 84 (standard battery)
3.5 lbs
1.59 kg
Model 84 (extended life)
3.9 lbs
1.77 kg
Model 170 (standard battery)
3.6 lbs
1.63 kg
Model 170 (extended life)
4.0 lbs
1.81 kg
Contura Aero 4/33C
Model 170
4.3 lbs
1.95 kg
--------------------------------------------------------------------------Power Requirements
10.8V
10.8V
--------------------------------------------------------------------------Environmental Requirements:
Temperature
Operating
50oF to 104oF
10oC to 40oC
Nonoperating
-4oF to 140oF
-20oC to 60oC
--------------------------------------------------------------------------Relative Humidity (noncondensing):
Operating
10% to 90%
10% to 90%
Nonoperating
5% to 95%
5% to 95%
--------------------------------------------------------------------------Shock and Vibration
Shock
Operating
10g, 11ms, half sine
Nonoperating
60g, 11ms, half sine
Vibration
Operating
0.25g, 5-500 Hz 1/2 octave/min sweep,
1 hour duration
Nonoperating
1.00g, 5-500 Hz 1/2 octave/min sweep,
1 hour duration
--------------------------------------------------------------------------Maximum Altitude (unpressurized):
Operating
10,000 ft
3,658m
Nonoperating
30,000 ft
12,192m
===========================================================================
Chapter 6.2 VGA Display
===========================================================================
U.S.
Metric
===========================================================================
Dimensions
Height
4.82 in
122.4 mm/12.24 cm
Width
6.42 in
163.2 mm/16.32 cm
--------------------------------------------------------------------------Diagonal Size
8.03 in
20.4 cm
--------------------------------------------------------------------------Mounting
Internal
--------------------------------------------------------------------------Display
MSTN Backlit LCD
--------------------------------------------------------------------------Gray Scales
16 High Resolution (640 x 480)
64 Low Resolution (340 x 200)
--------------------------------------------------------------------------Brightness/Contrast
Adjustable
--------------------------------------------------------------------------Maximum Pixel Resolution
640 x 480
--------------------------------------------------------------------------Character Display
80 x 25
--------------------------------------------------------------------------Frequency:
Horizontal
31.2 KHz (CRT mode) 32 KHz (LCD mode)
Vertical
125 Hz (60 VGA/70 CGA)
--------------------------------------------------------------------------Display Inverter Board:
Operating Voltage (Backlight)
+5.1V, +9V , +18.7V
Operating Output Voltage
310 Vrms
Maximum Input Power
1.8W
Maximum Output Power
1.25 Wrms
===========================================================================
Table 6-3. Compaq Contura Aero 4/33C Color VGA Display
===========================================================================
U.S.
Metric
===========================================================================
Dimensions (Image area):
Height
4.74 in
120.5 mm/12.05 cm
Width
6.34 in
161 mm/16.10 cm
--------------------------------------------------------------------------Diagonal Size
7.75 in
196.9 mm/19.69 cm
---------------------------------------------------------------------------
Mounting
Internal
--------------------------------------------------------------------------Display
CSTN Backlit LCD
--------------------------------------------------------------------------Color Resolution
256 Colors - low resolution
16 Colors - high resolution
--------------------------------------------------------------------------Brightness/Contrast
Adjustable through keyboard
--------------------------------------------------------------------------Maximum Pixel Resolution
640 x 480
--------------------------------------------------------------------------Character Display
80 x 25
--------------------------------------------------------------------------Frequency:
Horizontal
31.2 KHz (CRT mode) 32 KHz (LCD mode)
Vertical
125 Hz (70 VGA/70 CGA)
--------------------------------------------------------------------------Display Inverter Board:
Operating Voltage (Backlight)
+26V, +34V,+38V
Maximum Input Power
2.8W
Maximum Output Power
(Backlight)
2.0 Wrms
===========================================================================
Chapter 6.3 Hard Drives
===========================================================================
Model
170
84
===========================================================================
Standard Configurations
170
84
--------------------------------------------------------------------------Formatted Capacity Per Drive (MB):
Physical
171.6
85
Logical
171.6
85
--------------------------------------------------------------------------Drives Supported
One
One
--------------------------------------------------------------------------Drive Height (with drive frame)
12.7 mm
12.7 mm
--------------------------------------------------------------------------Drive Size (inches)
2.5 x 0.5
2.5 x 0.5
--------------------------------------------------------------------------Drive Type
65
65
--------------------------------------------------------------------------Transfer Rate (Mbps)
14.72 - 22.13
14.32 - 28.33
--------------------------------------------------------------------------Sector Interleave
1:1
1:1
--------------------------------------------------------------------------Typical Seek Time
(including settling):
Track to Track (ms)
7
8
Average (ms)
20
19
Maximum (ms)
28
27
--------------------------------------------------------------------------Physical Configuration:
Cylinders
1440
1389
Heads
4
2
Sectors/Track
48 - 72
44 - 75
Bytes Per Sector
512
512
--------------------------------------------------------------------------Logical Configuration:
Cylinders
873
722
Heads
16
10
Sectors/Track
24
23
Bytes Per Sector
512
512
===========================================================================
Chapter 6.4 Internal Power Supply
===========================================================================
Input Requirements:
Input Voltage
10.8 - 17.5 VDC
Standby
10.8 - 17.5 VDC
--------------------------------------------------------------------------Power Output:
Steady State
10W
Peak
17W
--------------------------------------------------------------------------VDC Output
V01 (+5)
V02 (+12)
V03 (+40)
----------------------------------------Nominal Voltage
5.10V
12.0V
43.0V
Continuous Current
1.25A
60.0 mA
40.0 mA
Peak Current
3.0A
60.0 mA
40.0 mA
Regulation Tolerance
+/- 3%
+/- 5%
+/- 5%
===========================================================================
Chapter 6.5 Nickel Metal Hydride (NIMH) Battery Pack
===========================================================================
Standard
Extended Life
U.S.
Metric
U.S.
Metric
===========================================================================
Dimensions:
Height
0.725 in
1.84 cm
0.725 in
1.84 cm
Length
5.37 in
13.64 cm
8.07 in
20.5 cm
Width
2.04 in
5.18 cm
2.04 in
5.18 cm
--------------------------------------------------------------------------Weight (approximate)
0.696 lb
0.316 kg
1.09 lb
0.494 kg
--------------------------------------------------------------------------Power Supply:
Nominal Voltage
10.8
10.8
Capacity
1500 mAh
2300 mAh
--------------------------------------------------------------------------Battery Life *
Contura Aero 4/25
2.5 to 4 hr
4 to 6 hr
Contura Aero 4/33C
2.5 to 4 hr
--------------------------------------------------------------------------Environmental Requirements:
Operating
Standard (U.S.)
50oF to 104oF
Standard (Metric)
10oC to 40oC
Extended Life (U.S.)
50oF to 104oF
Extended Life (Metric)
10oC to 40oC
Nonoperating
Standard (U.S.)
-4oF to 122oF
Standard (Metric)
-20oC to 50oC
Extended Life (U.S.)
-4oF to 122oF
Extended Life (Metric)
-20oC to 50oC
--------------------------------------------------------------------------* Battery life is based on an estimated typical use pattern of an average
user. Battery life will vary based on the configuration of the computer
and the usage pattern of the individual user. To maximize battery life,
Compaq recommends that power conservation be set to high.
===========================================================================
Chapter 6.6 AC Adapter
===========================================================================
U.S.
Metric
===========================================================================
Dimensions:
Height
1.1 in
2.79 cm
Depth
2.4 in
6.10 cm
Width
2.24 in
11.68 cm
--------------------------------------------------------------------------Weight (without cords)
6 oz
0.227 kg
--------------------------------------------------------------------------Voltage
17.5 - 20 volts, 1.4 amps
--------------------------------------------------------------------------Power (watts):
Minimum
17
Maximum
20
--------------------------------------------------------------------------Minimum Charge Time
1.0 hr
===========================================================================
Chapter 6.7 Base Unit
===========================================================================
US
Metric
===========================================================================
Dimensions:
Height
2.63 in
6.67 cm
Width
12.0 in
30.5 cm
Depth
12.4 in
31.6 cm
--------------------------------------------------------------------------Weight
2.9 lbs
1.32 kg
--------------------------------------------------------------------------Environmental Requirements:
Temperature
Operating
50oF to 104oF
10oC to 40oC
Nonoperating
-7.6oF to 140oF
-20oC to 60oC
--------------------------------------------------------------------------Relative Humidity:
Operating
10% to 90%, noncondensing
Nonoperating
5% to 95%, noncondensing
--------------------------------------------------------------------------Shock and Vibration:
Shock
Operating
10g, 11 ms, half sine
Nonoperating
60g, 11 ms, half sine
Vibration
Operating
0.25g, 5-500 Hz/octave/min sweep
Nonoperating
1.00g, 5-500 Hz/octave/min sweep
--------------------------------------------------------------------------Maximum Unpressurized Altitude:
Operating
10,000 ft
3,658 m
Nonoperating
40,000 ft
15,750 m
===========================================================================
Chapter 6.8 External Diskette Drive
===========================================================================
US
Metric
===========================================================================
Dimensions:
Disk Drive
Height
1.10 in
2.8 cm
Width
4.25 in
10.8 cm
Depth
5.87 in
14.9 cm
PCMCIA Interface Card
Height
0.19 in
0.48 cm
Width
2.13 in
5.40 cm
Depth
4.37 in
11.1 cm
--------------------------------------------------------------------------Diskette Size
3.5 in
8.89 cm
--------------------------------------------------------------------------Weight
12.2 oz
340 g
--------------------------------------------------------------------------Led Indicator
Green
--------------------------------------------------------------------------Capacity Per Diskette
1.44 MB/720 KBYTE
--------------------------------------------------------------------------I/O Space Configuration:
Primary
3FX
Secondary
37X
--------------------------------------------------------------------------PCMCIA Interface Card
Type II
--------------------------------------------------------------------------Read/Write Heads
2
--------------------------------------------------------------------------Voltage Requirement
+5 Vdc
--------------------------------------------------------------------------Environmental Requirements:
Temperature
Operating
41oF to 113oF
5oC to 45oC
Nonoperating
-7.6oF to 140oF
-22oC to 60oC
--------------------------------------------------------------------------Relative Humidity:
Operating
10% to 90%, noncondensing
Nonoperating
5% to 90%, noncondensing
--------------------------------------------------------------------------Shock and Vibration:
Shock
Operating
8g, 11 ms, half sine
Nonoperating
100g, 11 ms, half sine
Vibration
Operating
1.0g, 5-500 Hz/octave/min sweep
Nonoperating
1.5g, 5-500 Hz/octave/min sweep
--------------------------------------------------------------------------Acoustic Noise
33 dBA
--------------------------------------------------------------------------Maximum Unpressurized Altitude:
Operating
9,850 ft
3,077m
Nonoperating
50,000 ft
12,308m
===========================================================================
Appendix A.1 External Connectors
Table A-1. Compaq Contura Aero and External Connectors
===========================================================================
Index
Description
===========================================================================
1
AC Adapter
2
Parallel (25 pin)
3
External Options (60 pin)
4
Serial (9 pin)
5
PCMCIA Slot
===========================================================================
Appendix B.1 Base Unit
This appendix contains information about the base unit that is available
for use with the Compaq Contura Aero Family of Personal Computers.
Table B-1. Front View
===========================================================================
Index
Description
===========================================================================
1
Battery Charger Slot
2
Charger Light
3
External Options Connector
4
AC Adapter
===========================================================================
Table B-2. Base Unit External Connectors
===========================================================================
Index
Description
===========================================================================
1
DC Power
2
Parallel port
3
External VGA monitor
4
Serial port
5
External keyboard
6
PS/2 mouse
===========================================================================
Troubleshooting the Base Unit
If the battery charger does not work, follow these steps:
1. Disconnect the computer from the base unit and reinsert the battery pack
in the charger.
2. Try another AC Adapter.
3. Check the battery slot and make sure it is clear.
If the mouse or keyboard does not work, check to make sure they are plugged
into the correct jack.
If the printer or serial ports do not work, follow these steps:
1. Disconnect the computer from the base unit.
2. Connect the cables to the printer and serial ports of the computer.
3. If the ports work on the computer, the base unit is defective.
Replacing the Tilt Feet
To replace the tilt feet on the base unit, follow these steps:
1. Remove the computer from the base unit.
2. Turn the base unit upside down.
3. Open up the foot and remove the screw that secures the foot to the base.
4. Pull out the foot, then press in a new one.
5. Replace the screw.
Appendix C.1 Connector Pin Assignments
Parallel Connector
C-1. Parallel Connector Pin Assignments
===========================================================================
Pin
Signal
Pin
Signal
===========================================================================
1
Strobe *
13
Select
2
Data Bit 0
14
Auto Linefeed *
3
Data Bit 1
15
Error *
4
Data Bit 2
16
Initialize Printer *
5
Data Bit 3
17
Select In *
6
Data Bit 4
18
Ground
7
Data Bit 5
19
Ground
8
Data Bit 6
20
Ground
9
Data Bit 7
21
Ground
10
Acknowledge *
22
Ground
11
Busy
23
Ground
12
Paper Out
24
Ground
25
Ground
--------------------------------------------------------------------------* Active low
===========================================================================
Serial Connector
Serial Connector Pin Assignments
===========================================================================
Pin
Signal
===========================================================================
1
Carrier Detect
2
Receive Data
3
Transmit Data
4
Data Terminal Ready
5
Ground
6
Data Set Ready
7
Ready to Send
8
Clear to Send
9
Ring Indicator
===========================================================================
External Options Connector
External Options Connector Pin Assignments
===========================================================================
Pin
Signal
===========================================================================
1
Not Connected
2
Ground
3
Ground
4
Serial Carrier Detect
5
Serial Ring Indicator
6
Serial Data Set Ready
7
Keyboard Data
8
Keyboard Clock
9
Mouse Clock
10
Printer Busy
11
Printer Paper Out *
12
Printer Auto Line Feed *
13
Printer Error *
14
Printer Select In *
15
Not Connected
16
Battery LED
17
CRT - Vertical Sync
18
CRT - Horizontal Sync
19
Ground
20
Serial Ready To Send
21
Ground
22
Ground
23
Ground
24
Printer Strobe *
25
Ground
26
Printer Select
27
Ground
28
Printer Initialize *
29
Ground
30
Not Connected
31
Ground
32
Ground
33
Ground
34
Serial Data Term Ready
35
Ground
--------------------------------------------------------------------------* Active low
===========================================================================
Pin
Signal
===========================================================================
36
Serial Clear To Send
37
Ground
38
Ground
39
Ground
40
Printer Data Bit 7
41
Ground
42
Printer Data Bit 4
43
Ground
44
Printer Data Bit 1
45
Battery Voltage (Main DC Unit Voltage)
46
CRT - Blue Analog
47
CRT - Green Analog
48
CRT - Red Analog
49
Serial Transmit Data
50
Serial Receive Data
51
VCC
52
VCC
53
Mouse Data
54
Printer Acknowledge *
55
Printer Data Bit 6
56
Printer Data Bit 5
57
Printer Data Bit 3
58
Printer Data Bit 2
59
Printer Data Bit 0
60
Battery Voltage (Main DC Unit Voltage)
--------------------------------------------------------------------------* Active low
===========================================================================
Pcmcia Connector
PCMCIA Connector Pin Assignments
===========================================================================
Pin
Signal
===========================================================================
1
Ground
2
Data bit 3
3
Data bit 4
4
Data bit 5
5
Data bit 6
6
Data bit 7
7
Card enable 1
8
Address bit 10
9
Output enable
10
Address bit 11
11
Address bit 9
12
Address bit 8
13
Address bit 13
14
Address bit 14
15
Program/Write enable
16
Ready or busy/Interrupt request
17
Power
18
Programming and peripheral supply 1
19
Address bit 16
20
Address bit 15
21
Address bit 12
22
Address bit 7
23
Address bit 6
24
Address bit 5
25
Address bit 4
26
Address bit 3
27
Address bit 2
28
Address bit 1
29
Address bit 0
30
Data bit 0
31
Data bit 1
32
Data bit 2
33
Write protect/IO Port is 16 bit
34
Ground
35
Ground
36
Card detect 1
37
Data bit 11
38
Data bit 12
39
Data bit 13
40
Data bit 14
41
Data bit 15
42
Card enable 2
43
Refresh
44
IO Read
45
IO Write
46
Address bit 17
47
Address bit 18
48
Address bit 19
===========================================================================
Pin
Signal
===========================================================================
49
Address bit 20
50
Address bit 21
51
Power
52
Programming and peripheral supply 2
53
Address bit 22
54
Address bit 23
55
Address bit 24
56
Address bit 25
57
Reserved
58
Card reset
59
Extend bus cycle
60
Input port acknowledge
61
Register select and IO
62
Battery voltage detect 2/Audio digital waveform
63
Battery voltage detect 1/Card status changed
64
Data bit 8
65
Data bit 9
66
Data bit 10
67
Card detect 2
68
Ground
===========================================================================