1
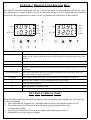
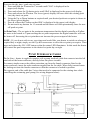
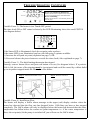
In-Line + Swimming
Pool Heater
Installation Instructions
& Operating Manual
PLEASE READ CAREFULLY BEFORE INSTALLING
Incorrect Installation Will Affect Your Warranty
Do Not Discard, Keep For Future Reference
POSITIONING
Your heater must be screw fixed to a firm base or wall. The heater MUST be horizontal and upright i.e. with the control enclosure located above the flow tube (see diagram below). Under no
circumstances should the heater be operated in any other orientation.
The heater should be installed at a low point in the filtration system. It should be positioned after
(i.e. downstream) of the filter but before (i.e. upstream) of any dosing or other water treatment
plant.
NOTE If the
flow direction
is reversed
(explained
later in this
booklet) the
heater MUST
remain sited
after the filter.
Only clean filtered water
should enter the heater.
PIPE WORK
It is essential that the pipe work connecting to and from the heater has a minimum bore (internal
diameter) of 1¼’’ (32-mm).
All heaters are supplied with 2 hosetail adapters which allow coupling to flexible pipe work or
50-mm solvent weld unions for rigid pipe work. For ease of installation please use the rubber O
rings supplied, simply roll each O ring over the threaded part of the adapter you require before
screwing into the heater.
To assist correct air purging and to ensure the heater remains completely full of water during operation, the return pipe which carries the water back to the pool must incorporate a safety loop or
kick up in the pipe, installed as close as possible to the heater (see diagram on following page).
Note: When coupling to flexible pipe a safety loop can simply be created by routing the pipe up
and over an obstacle. Remember to use pipe clips to securely fasten all hose connections.
WEATHER PROTECTION
The heater should be installed within a dry weatherproof enclosure.
CAUTION
If the heater is not used during winter months it must be drained to prevent frost damage.
Upon completion of the installation, run the water-circulating pump to purge the system & heater
of air (i.e. remove any trapped air in the system & heater).
ELECTRICAL CONNECTION
The heater must be installed in accordance with the country / regional requirements & regulations. In any event the work must be carried out by a qualified electrician, who will provide a
certificate of conformity upon completion of the work.
The power supply must be fitted with a RCD. If required your electrician may replace the supplied cable entry gland with a larger one to secure the cable powering the heater, this will not affect your warranty if carried out by a qualified electrician.
Cable section: should be calculated at 5-amp / mm² for distances up to 20 metres (these sections
are indicative and should be checked and adapted if necessary for cable lengths over 20 metres).
POWER REQUIREMENTS
Power Output
Volt (V)
Amp
2-kW
230
9
3-kW
230
13
4.5-kW
230
20
6-kW
230
27
9-kW
230
12-kW
3 Phase
Power
Output
400V
Star /
230V
Delta
Amp
40
9-kW
400V / 230V
13 / 23
230
53
12-kW
400V / 230V
18 / 31
15-kW
230
66
15-kW
400V / 230V
22 / 38
18-kW
230
79
18-kW
400V / 230V
26 / 46
FLOW REQUIREMENTS
Your heater is factory set to accept input water flow entering on the left and exiting on the right,
this can be reversed by rotating the flow switch 180° (i.e. ½ turn) (see diagram below).
Warning!
The flow switch paddle can be damaged when reversing the flow direction if it is lifted by more
than 5-mm from its housing and turned with force. If the flow switch has been rotated it is important to ensure that it is finally locked in the correct orientation perpendicular (at right angles) to
the flow of water.
The flow rate of water entering the heater must not exceed 13,000-litres per hour (2,860 UK gallons per hour). A higher flow rate will require the installation of a by-pass to prevent damage to
the element(s).
The heater will not operate with a flow rate of less than 1,000-litres per hour (220 UK gallons per
hour).
WATER QUALITY
When adding chemicals to your pool do not place them in the skimmer basket or this will result
in a very high concentration of chemicals being passed through the heater, this will cause damage
to Stainless Steel heaters.
For Stainless Steel heaters the water quality must be within the following limits:
•
•
•
•
Chloride Content MAX: 150-mg/litre
Total Bromine MAX: 4.5-mg/litre
•
PH 6.8-8.0
Free Chlorine: 2.0-mg/litre
NOT Suitable for use on salt water pools
Titanium heaters are unaffected by water chemistry levels and are also suitable for salt water
pools.
Water chemistry is complicated if in doubt seek expert advise.
IN-LINE + DIGITAL CONTROLLER KEY
The digital controller fitted to the In-Line + heater has been pre-programmed with all the necessary parameters to ensure reliable service & operation. Below is a key explaining the controllers
buttons & LED signals however these will all be explained in detail later in this booklet.
STATUS
STATUS
Item Number
Description
1
On - Off / Man button. When pushed for longer than 1 second switches the controller to
standby mode. When pushed momentarily and released overrides the timed ON or OFF
position .
2
Up Button - Used to increase the value.
3
Down Button - Used to decrease the value.
4
P Button - Used to access the time clock parameters & the peak rate (day time) set point
temperature.
5 Fully Illuminated
5 Flashing
When fully illuminated shows the pool water temperature has fallen more than 0.6˚C
below the current set point temperature.
When flashing shows the heater is in timed delay mode (explained on page 9).
6
Shows the filter pump is on when pump interlock cable is fitted.
7
Shows an Alarm condition.
8
Shows the heater is in standby mode.
9
LED STATUS - Shows the heater is in a timed ON period when illuminated.
SET THE CURRENT TIME
When the heater has been installed and connected to a constant power supply the first step is to
set the current time:
1.) Press and hold the P button for 2 seconds until the upper (red) display shows CLOC.
2.) Press and release the P button so that the lower (green) display shows the
existing time setting.
3.) Use the Up or Down arrow buttons as required until the current time is
displayed in the lower (green) display.
4.) Press and release the P button once more so that the upper (red) display
reverts to displaying CLOC.
The current time has now been programmed and after 20 seconds the heater will permanently
store the new time. In the event of a power failure you may need to re-programme the clock settings.
PROGRAMME THE ON & OFF TIME PERIODS
NOTE - To start the swimming season and to bring the swimming pool up to temperature as
quickly as possible it is advised that you operate your elecro heater continuously. Once the set
point temperature has been reached, the heater can then be programmed to operate utilising offpeak electricity in the timed mode.
The In-line + digital controller has 4 programmable On & Off time periods (or zones much like
your central heating system in your home). You may use as many or as few as you wish by following the below procedure:
1.) Press and hold the P button for 2 seconds until CLOC is displayed in the upper (red) display.
2.) Press and release the down button until 1on is displayed in the upper (red) display.
3.) Press and release the P button, the lower (green) display will now show OFF (the current
setting).
4.) Using the Up button scroll through until the time you would like the heater to first come on
is displayed in the lower (green) display.
5.) Press and release the P button so the upper (red) display reverts to showing 1on.
6.) Press and release the down button once so that the upper (red) display is now showing 1of.
7.) Following the same process as step 4 select the time you would like the heater to switch
off.
Follow steps 3 to 7 for the remaining 3 on and off time periods (labelled 2on, 2of, 3on, 3of, 4on
& 4of) if you wish to use all 4 time settings. If you only wish to use 1 or part of the settings simply leave the existing setting as OFF.
SET POINTS
The In-Line + digital heater has been designed to operate as cost effectively as possible utilising
2 programmable set points:
· An off-peak set point when electricity is at it’s lowest cost (usually at night time).
· And a peak-rate set point when electricity is most expensive (usually during the day).
The 2 set points enable you to set a higher off-peak set point to take advantage of the cheaper
electricity rates, whilst the peak-rate set point can be set at a lower temperature (2 degrees C is
recommended).
To access the off-peak set point press the up or down buttons as required – the off-peak set point
will then be displayed in the lower (green) display. When the lower (green) display is showing
your desired off-peak set point temperature do not touch any buttons for 15 seconds and the
heater will then permanently store the new off-peak set point.
During any timed ON position the heater will now control the swimming pool to the desired offpeak set point temperature.
To access the day time / peak rate set point:
1.) Press and hold the P button for 2 seconds until CLOC is displayed in the
upper (red) display.
2.) Press and release the Up button twice until SPoF is displayed in the upper (red) display.
3.) Press and release the P button. The lower (green) display will now show the existing peak
rate (day time) set point.
4.) Using the Up or Down buttons as required until your desired peak-rate set point is shown in
the lower (green) display.
5.) Press & release the P button so that SPoF is displayed in the upper (red) display.
6.) Do not touch any buttons for 15 seconds and the heater will then permanently store the new
off-peak set point.
Set Point Note - The set point is the maximum temperature that the digital controller will allow
the water to be heated to. Upon reaching the set point temperature the digital controller will turn
the heater off. Increasing the set point does not increase the power output of the heater.
NOTE - If you do not wish to use your timer and would like your heater to switch on whenever
required day or night, simply use the Up & Down arrows to select the set point you require. Then
press and release the ON / OFF button so that the status LED illuminates. In this mode the heater
will control the pool temperature to the desired set point day or night.
PUMP INTERLOCK CABLE
The In-Line + heater is supplied complete with a pump interlock cable that connects into the left
hand side of the heater enclosure, directly below the power in cable.
To connect simple remove the rubber protection cap from the female connector fitted to the
heater enclosure, insert the male connector supplied on the 5m cable. When fully inserted rotate
the locking nut onto the female connector so that the connector is locked in position.
The opposite end of the cable has 2 wires that need to be connected to the existing time clock
controlling the swimming pool pump (See wiring diagram below).
NOTE - Do NOT connect the pump interlock cable directly to the swimming pool pump as this
will result in overloading the heaters digital controller. If in doubt seek the advise of a qualified
electrician. If you do not have a contactor controlling your pump please contact your retailer or a
qualified electrician who will be able to supply one.
PRIORITY HEATING
Now you have set the current time, On & Off time periods & set points your In-Line + heater is
now ready to work as efficiently as possible.
During any timed ON period the heater will automatically control the swimming pool temperature to the off-peak (night time) set point that you have selected. When in a timed OFF period the
heater will check the swimming pool temperature once every hour by switching on the circulation pump for 3 minutes. If when the temperature measurement is taken and the water temperature has dropped below the day-time set point the heater will switch on and remain on until the
day time set point has been achieved. When the day time set point has been achieved the heater
will switch off and after 3 minutes the heater will then turn off the pump.
The heater will continue to monitor the swimming pool temperature throughout any timed OFF
period once every hour and if required heat the pool to the day time set point as described above.
TIME SWITCHING DELAY
To prevent overheating of the switch components within the heater caused by frequent on and off
switching (cycling), the In Line + digital controller has been pre-programmed with a time delay
function. This prevents rapid fluctuations in temperature or velocity from switching the heater on
and off more than once in a two minute period.
The time delay mode is indicated by the flashing LED next to the word HEAT on the digital display. (See diagram on following page).
DIFFERENTIAL
When the pool water has reached the set point temperature (for that time period) the heater will
switch off and will not switch back on until the water temperature has dropped 0.6˚C. This value
is known as the differential and is also in place to prevent overheating of the switch components
caused by cycling.
TROUBLE SHOOTING
Heater will not switch to HEATER ON mode
In most cases this will be the result of one of the following not being met.
Possible Cause 1.) The set point temperature has been achieved.
To confirm that the digital controller is requesting the unit to heat check that the window next to
the word HEAT is illuminated (see diagram on following page). If illuminated go to step 2, if not
illuminated increase the set point temperature to a value higher than the current water temperature. Confirm whether the heater now switches to HEATER ON mode
TROUBLE SHOOTING CONTINUED
HEAT = If Continuously Illuminated
Indicates that the water temperature has fallen below the set point temperature & the differential.
HEAT = If Flashing
Indicates that the heater is in timed delay mode (see
previous page).
Possible Cause 2.) The heater is in a Timed-OFF period
The time clock ON or OFF status is shown by the LED illuminating above the word STATUS
(see diagram below).
STATUS
If the Status LED is illuminated, check the set point value as above.
If the status LED is not illuminated you have the following 2 options available:
1.) Increase the off-peak set point (explained on page 7) OR
2.) Press and release the power button to override the time clock (Also explained on page 7).
Possible Cause 3.) The high limiting thermostat has tripped.
Remedy; remove button cover and press red button to re-set (See diagram below). If a positive
click is felt, the cause of the tripping must be investigated and could be caused by a debris build
up or air pocket trapped inside the flow tube of the heater.
Step 1 - Unscrew the black cover
Step 2 - Push the red button
Possible Cause 4.) Insufficient Flow.
The heater will display a NoFlo alarm message in the upper (red) display window when the
heater has detected that the flow rate has dropped below 1,000-litres per hour or has stopped
completely. The NoFlo alarm will only be displayed when the heater has detected that the water
temperature has fallen below the current set point temperature i.e. if the water temperature is
above the set point(s) & the pump is switched off you will not see the NoFlo alarm.
TROUBLE SHOOTING CONTINUED
Confirm this by running the system with the cartridge removed from your pump & filter unit, this
will supply the heater with the maximum flow rate your unit is capable of. If the heater then
switches on (i.e. red light on) a blocked cartridge can be confirmed to be the cause. The cartridge
should be cleaned or replaced.
If using a sand filter check the pressure indicator on your sand filter and back wash if necessary
Note; In some cases the high limit thermostat tripping and a low flow rate can be linked; When a
filter becomes choked air can be drawn into the filtration system and become trapped inside the
heater so causing the thermostat to trip.
Quick Function Test
Observe the property’s main electricity meter when the heater is on (i.e. HEATER ON LED illuminated) and then observe it again when the heater is in standby mode. The test should show that
the meter is recording more electricity being used by the heater when the HEATER ON LED is
illuminated is on.
It is impossible for an electric heater to waste energy, if it is drawing power then that power will
be turned into heat that will be transferred to the water.
Accurate Function Test
If a more accurate test is required to confirm that your heater is delivering the specified heat output, two electricity meter readings will need to be taken from the property’s main electricity meter, with an exact one hour interval (i.e. take one meter reading and then a second reading exactly
one hour later). Then by subtracting the first reading from the second reading the number of
units (kilo watts kW) consumed can be calculated. Note that your heater is also rated in kW
hours. The pool pump and heater will need to be running continuously during the test (i.e. with
the HEATER ON LED illuminated).
To avoid inaccurate results when performing this test, it is important to refrain from using other
high current drawing appliances in the property (such as tumble dryer, showers, cooker etc).
A large domestic pool pump of 1-horsepower will draw less than 1-kW in a one hour period. The
conclusion of the test should prove that for example a 6-kW heater and a ½ horsepower pump
will draw between 6.3-kW to 6.5-kW in one hour. It is impossible for an electric heater to waste
energy, if it is drawing power then that power will be turned into heat that will be transferred to
the water.
The water entering my pool doesn’t feel much warmer
The temperature gain of the water after it has passed through the heater will be directly proportional to the volume of water being pumped in relationship to the power output of the heater.
For example: A 6-kW heater, when connected to a 4000-litre per hour pump, will produce a lift in
temperature of approximately 1.2˚C (almost undetectable to the human hand). However, as the
water being heated is recirculated from a single body of water, the time required to heat it remains unaffected by the volume of flow. A popular misconception is that slowing down the flow
rate will speed up the heating process.
The flow tube does not feel warm
Due to the high efficiency of your electric heater no warmth should be detectable from the flow
tube of the heater.
The most likely causes of the flow tube feeling warm are
Possible Cause 1.) The heater has been positioned in direct sunlight.
Possible Cause 2.) An air pocket is trapped inside the heater, particularly if the tank feels warmer
at the highest point of the tank (as air rises).
No lights appear on the heater when it is switched on
Possible cause: Power Failure external to the heater - Remedy:
Check any fuses, RCD or other switch components installed in the supply cable.
Q = How long will it take to heat my pool?
A = Assuming no heat losses, and a heater sized in the ratio 1.5-kW per 1,000-gallons of water
(4,545-litres): it will take 2 days of continuous running to raise the temperature of a pool from
tap temperature to swimming temperature.
Heat loss will slow the heating process, particularly during periods of cold weather, hence the
higher the water temperature is to be maintained above average ambient air temperature, the
slower the heating process will become. The only influencing factors are the level of insulation
and the sighting of the pool with regard to wind shelter.
Useful advice: To reduce running costs and speed up the heating process ;
Insulate the pool wherever possible. A floating solar cover is an essential minimum to retain
heat.
WASTE OF ELECTRICAL / ELECTRONIC EQUIPMENT
This product complies with EU directive 2002/96/EC
Do Not dispose of this product as unsorted municipal waste.
This symbol on the product or on it’s packaging indicates that this product should not be treated
as household waste. Instead it should be handed over to the applicable collection point for the recycling of electrical and electronic equipment.
By ensuring this product is disposed of correctly you will help prevent potential negative consequences for the environment and human health, which could otherwise be caused by inappropriate waste handling of this product. The recycling of materials will help to conserve natural resources. For more information please contact your local Civic office, your household waste disposal service or the retailer where you purchased the product.
ROHS COMPLIANCE STATEMENT
Elecro Engineering Limited certify that our Electric Swimming Pool Heater Range complies in
accordance with RoHS Directive 2002/95/EC on the restriction of hazardous substances.
GUARANTEE
Your heater is guaranteed for 2 years from the date of purchase against faulty
workmanship and materials.
The manufacturer will replace or repair, at it’s discretion, any faulty units or components returned to the company for inspection. Proof of purchase may be required.
The manufacturer will not be liable in cases of incorrect installation of the heater, or
inappropriate use, or neglect of the heater.
CE Declaration Of Conformity
The manufacturer declares that the herewith products or ranges
ELECTRIC SWIMMING POOL HEATER RANGE
Are in conformity with the provisions:
of the ELECTROMAGNETIC COMPATIBILITY directive 89/336/EEC, as
amended 93/068/EEC. Controlled by AEMC Measures laboratory—technical report
no P96045T
The harmonised standards have been applied: EN 55014—EN 55104
EN 55011
EN 55022
CEI 801-4
CEI 801-2
CEI 801-3
of the LOW VOLTAGE directive 73/23/EEC.
The harmonised standards have been applied
EN 60335-2-35
Elecro Engineering Limited
Unit 14 Leyden Road
Stevenage
Hertfordshire
SG1 2BW
UK
Tel: +44 (0) 1438 749 474
Website: www.elecro.co.uk
Fax : +44 (0) 1438 361 329
Email: [email protected]
Copyright 2006