1
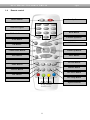
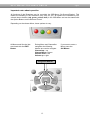
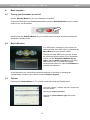
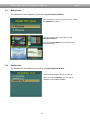
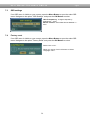
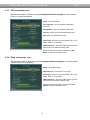
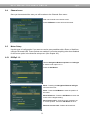
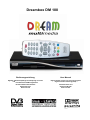
Dreambox DM 100
Bedienungsanleitung
User Manual
Digitaler Satellitenempfänger zum Empfang von freien
und verschlüsselten DVB-Programmen.
Digital satellite receiver for free and encrypted
Digital Video Broadcasting (DVB).
Kommunikations-Schnittstelle
Smartcard Leser
Real Time OS
Communication-Port
Smartcard Reader
Real Time OS
User Manual Dreambox DM 100
english
Table of contents
1. Before initial operation of the receiver
1.1
Safety instructions ...................................................................................... 4
1.2
Packaging contents .................................................................................... 7
1.3
Views ....................................................................................................... 8
1.3.1 Explanation front panel....................................................................... 9
1.3.2 Explanation rear panel........................................................................ 9
1.4
Remote control ......................................................................................... 11
2. Installation
2.1
Turning the device on ............................................................................. 16
3. Start wizard
3.1
Language selection .................................................................................. 17
4. Basic operation
4.1
Turning your Dreambox on and off............................................................ 18
4.2
Main OSD Menu ........................................................................................ 18
4.3
Teletext ................................................................................................... 18
4.4
Audio tracks............................................................................................... 19
4.5
Favorite list ............................................................................................... 19
4.6
Zoom
4.7
Multi picture ............................................................................................... 20
4.8
Sattelite list ............................................................................................... 20
4.9
History list .................................................................................................. 21
................................................................................................... 19
4.10 Radio list ................................................................................................... 21
4.11 Infobar
................................................................................................... 22
5. Electronic Program Guide - EPG ........................................................... 23
2
User Manual Dreambox DM 100
english
6. Edit the channellist
6.1
Channel list ............................................................................................... 24
6.2
Edit channels ............................................................................................ 25
6.3
Edit favorites ............................................................................................. 25
6.4
Parental control ......................................................................................... 26
7. Setup
7.1 Language ................................................................................................... 27
7.2 Timezone ................................................................................................... 27
7.3 A/V Settings ............................................................................................... 27
7.4 OSD Settings.............................................................................................. 28
7.5 Factory reset .............................................................................................. 28
8. Service searching
8.1 Select the satellite ..................................................................................... 29
8.2 Antenna setup ........................................................................................... 29
8.3 Transponder scan ..................................................................................... 29
8.3.1 Automatic transponder scan............................................................. 30
8.3.2 Manual transponder scan ................................................................. 30
8.3.3 PID transponder scan....................................................................... 31
8.3.4 Blind transponder scan..................................................................... 31
8.4 Channel scan ............................................................................................ 32
8.5 Motor setup ............................................................................................... 32
8.5.1 DiSeqC 1.2 ...................................................................................... 32
8.5.2 USALS ............................................................................................. 33
8.6 Edit transponder ........................................................................................ 33
9. Technical data .................................................................................................. 34
10. Contact & support information .................................................................. 36
11. Copyright notes ............................................................................................. 36
12. Service slip ..................................................................................................... 37
3
User Manual Dreambox DM 100
1.
english
Before initial operation of the receiver
1.1 Safety instructions
Please read the safety instructions completely and carefully, before using the Dreambox.
The Manufacturer takes no responsibility for damages as a result of incorrect handling of the
Dreambox.
¾ Allow enough space around the Dreambox for sufficient ventilation, minimum 10cm.
¾ Do not cover the top of the Dreambox and allow enough space to other devices. The
louvers of the devices must be free at all times to allow sufficient heat transfer from inside
the device.
¾ Never put vases or any other liquid filled containers on top of the device. Do not expose
the device to dripping or splashing liquids.
¾ Do not place open flame sources, such as lit candles, on top of the device.
¾ The device may only be operated in moderate climate.
¾ Do not remove the cover. Risk of electric shock. If it is necessary to open the device
please contact a trained professional.
¾ Do not put any metal things into the slots or ventilation openings.
ATTENTION!
Modifications and changes to the Dreambox lead to loss of warranty if not
performed and documented by skilled personal.
ATTENTION!
We recommend not to remove SIM card inside Dreambox, it will
lead to loss of warranty.
Note:
The Dreambox DM 100 carries the CE-sign and fulfills all requirements form the EU.
Subject to change without prior notification.
4
User Manual Dreambox DM 100
english
Shut down
¾ In case your Dreambox is in use for a longer period of time disconnect the power plug
from the power outlet.
¾ During thunder storm the unit should also be physically disconnected from the power
outlet.
Additional safety instructions
¾ (Dis-)Connecting to a LNB:
Turn the Dreambox off before you connect or disconnect a cable coming from or going to
a LNB.
¾ Connecting to a TV:
Before connecting or disconnecting your Dreambox to/from a TV please turn it off.
¾ In case you notice any damage to the power cord or power plug immediately disconnect
the device from the power outlet.
¾ In case the device was exposed to humidity immediately disconnect the device from the
power outlet.
¾ In case you notice any serious damage to the outer shell of the device immediately
disconnect the device from the power outlet.
¾ Do not expose the Dreambox to direct sunlight, lightning or rain.
¾ Grounding:
The LNB cable must be grounded.
The grounding system must meet SABS 061 requirements.
¾ Cleaning:
Disconnect the mains power cord before cleaning the cover. Use a slightly damp cloth
without cleaning agents.
¾ Connect the Dreambox only to suitable sockets. Do not allow overloads to occur.
¾ Plug of the power supply should be easy to reach for shutting down the main power in an
emergency situation.
5
User Manual Dreambox DM 100
english
Disposal instructions
The packaging of the Dreambox only consists of reusable materials. Please recycle if
possible.
This symbol on the product or on its packaging indicates that this product must not be
disposed of with your other household waste. Instead, it is your responsibility to dispose of
your waste equipment by handing it over to a designated collection point for the recycling of
waste electrical and electronic equipment. The separate collection and recycling of your
waste equipment at the time of disposal will help to conserve natural resources and ensure
that it is recycled in a manner that protects human health and the environment.
For more information about where you can drop off your waste equipment for recycling,
please contact your local city office, your household waste disposal service or the shop
where you purchased the product.
Please note that empty batteries and electric waste is not to be put into the regular garbage.
6
User Manual Dreambox DM 100
1.2
english
Packaging contents
Please check the completeness of the box’s contents.
Included in box:
2 Batteries
(1,5V Mignon / AA / LR6)
Dreambox DM 100
Remote control
Power supply CWT 12V, 2A, 24W
1 Power cord
1 User manual (most recent version online:
http://www.dream-multimedia-tv.de )
7
User Manual Dreambox DM 100
1.3
english
Views
Front panel
RC LED
Smartcard Reader
Standby LED
Standby
On / off
Network
interface
Audio
Output
(Digital)
Power supply
connector
Rear panel
LNB
Output
LNB
Input
USB
interface
8
TV Scart
S-Video
Output
User Manual Dreambox DM 100
english
1.3.1 Explanation Front Panel
Smartcard Reader
Insert your Dreamcrypt Smartcard with the golden chip facing down and forward into the
Smartcard reader. Dreamcrypt is a registered trademark of Dream-Multimedia.
Standby LED
The Standby LED lights up red if the Dreambox is in standby mode. It lights up green if the
Dreambox is powered on.
Remote Control (RC) Led
The remote control LED lights up every time the Dreambox receives a signal from the remote
control.
Standby on/off
The Standby on/off button toggles between standby mode and powered on mode.
1.3.2 Explanation rear panel
LNB input
Connect the coaxial cable from your LNB here.
LNB output
You can connect an analogue/digital receiver here. Remember to shutdown your Dreambox
completely in order for the receiver to work.
S-Video output
Connect your S-Video cable to get better video quality.
TV Scart
Connect your TV or beamer to your Dreambox using a Scart cable.
Audio output - digital (Toslink)
You can connect your Dreambox with an optical (Toslink) cable to your HiFi-Amplifier or
DSP. The AC3 signal is also available at this port in case the selected channel transmits
Digital signals.
9
User Manual Dreambox DM 100
english
Power supply connector
Plug the power cable of the power supply that came with your Dreambox into power outlet.
Connect your power supply to your Dreambox. You must not connect the power plug of the
power supply to anything other than a socket that supplies 230V/50Hz.
Network interface (Ethernet 10/100Mbit, RJ45)
The Communication Port is an Ethernet port. It is used to communicate with your Dreambox
via HTTP, FTP, NFS, Telnet and Samba. This port is also used to update the operating
system of your Dreambox. Please use a regular patch cable to connect your Dreambox to
your LAN.
USB interface
This USB Port is to connect your Dreambox to PC to update the operation system of your
Dreambox. It’s only for update the operation system of Dreambox, any other USB equipment
doesn’t work with this USB Port.
10
User Manual Dreambox DM 100
1.4
english
Remote control
MUTE-Button
Standby-Button
Numeric Keypad
Back-Button
TV/Radio-Button
Channel-up-Button
INFO-Button
MENU-Button
OK-Button
Volume-down-Button
Volume-up-Button
EPG-Button
EXIT-Button
Channel-down-Button
Favorite-Button
Audio–Button
Subtitle-Button
Teletext-Button
PIP Move-Button
PIP–Button
PIP Swap-Button
PIP Channel –Button
Options-Buttons
11
User Manual Dreambox DM 100
english
Important notes about operation
All functions of the Dreambox can be controlled via OSD-Menu (On-Screen-Display). This
makes the handling of the Dreambox very easy for you. All options are indicated by four
colored dots or beams (red, green, yellow, blue) in the OSD-Menu and can be started with
the Option-Buttons on the Remote Control.
Depending on the chosen Menu, these options do vary.
All Menus and Service lists
are closed with the EXITButton.
During Menu and Channellist
navigation the following
buttons are used to navigate:
Channel-up = up
Channel-down = down
Volume down = left
Volume up = right
Navigation-Buttons
12
If you want to enter a
Menu press the
OK-Button.
User Manual Dreambox DM 100
english
Explanation remote control buttons
MENU-Button
- INFORMATION
- INSTALLATION
- SYSTEM SETTINGS
- EDIT
- GAMES
- CARDS
You can switch to the needed option by pressing the Navigation-Buttons left or right. Also
see: Important notes about operation.
If you are in the service list, pressing the MENU-Button brings up the service menu. The
shown options may vary depending on the service list you selected.
Standby-Button
The Standby-Button switches your Dreambox on and off.
Also see: Turning your Dreambox on / off.
Numeric Keypad
Enter a service number to directly access the option by using the Numeric Keypad. The
service numbers are on the left side of the service list.
The Numeric Keypad can also be used to enter the page number in teletext mode, if you
have pressed the TEXT-Button and activated the teletext decoder. The TV station has to
submit teletext information; otherwise this feature cannot be used.
MUTE-Button
Pressing the MUTE-Button mutes the Volume. A crossed speaker symbol will appear on the
TV screen. Pressing it again or pressing one of the Volume-up or down-Buttons brings back
the audio.
Arrow-left-Button
Arrow-right-Button
These Buttons enable to jump back or forwards through the Playlist. The Playlist contains the
last chosen services, which have been selected.
Once having opened the service list, you are able to jump at the Beginning or the End of the
Service list or to the next Marker.
13
User Manual Dreambox DM 100
english
INFO-Button
If no OSD menu is visible on the screen and you are in TV or RADIO-Mode, pressing the
INFO-Button will reveal the Infobar. Pressing it again while the Infobar still is visible will bring
up the EPG information of the chosen station as long as it available.
OK-Button
By pressing the OK-Button you confirm a selection in the menu or service list navigation.
If no OSD menu is present on your screen, the service list is shown once you press the OKButton.
Channel-up-Button
Pressing the Channel-up-Button takes you to the next station in your selected service list. If
the menu or service list is visible this button will move the cursor up.
Channel-down-Button
Pressing the Channel-down-Button takes you to the previous station in your selected
service list. If the menu or service list is visible this button will move the cursor down.
Volume-up-Button
Pressing the Volume-up-Button will turn up the volume. If the menu or service list is visible
this button will move the cursor to the right.
Volume-down-Button
Pressing the Volume-down-Button will lower the volume. If the menu or service list is visible
this button will move the cursor to the left.
AUDIO-Button
By pressing the AUDIO-Button you can choose the different audio tracks
offered by the station. Different audio tracks are indicated by the yellow
dot in the Infobar.
EXIT-Button
You can leave all menus and service lists by pressing the EXIT-Button.
14
User Manual Dreambox DM 100
english
TEXT-Button
The TEXT-Button activates the Teletext (TuxTxt). If you are in the stations list, pressing this
button will directly take you to the FILE-Mode.
TV/RADIO-Button
Pressing the TV/RADIO-Button activates the TV-Mode or RADIO Mode
PIP-Button
Pressing the PIP-Button activates Picture in Picture model. You can see main picture and
small sub picture at the same time
PIP Channel-Buttons
Pressing the PIP Channel-Button you can select channel for small picture
PIP Move-Button
Pressing the PIP Move-Button will move the location of small screen where you want to
place.
PIP Swap-Button
Pressing the PIP-Swap-Button you can swap main screen and small PIP screen each other.
Options-Buttons
All possible options are shown by the four colored dots/blocks (red, green, yellow, blue) and
can be activated by the Options-Buttons.
Depending on the menu you currently are in the options will change and will be named
differently.
15
User Manual Dreambox DM 100
2.
Installation
2.1
Turning the device on
english
¾ Place the batteries inside the battery compartment of the remote control keeping in mind
the right polarity.
¾ Before using the Dreambox, please read the safety instructions (See chapter 1.1 Safety
instructions)
¾ Connect the LNB or antenna with a coaxial cable to LNB in or Antenna in at your
Dreambox.
See chapter 1.3.2 Explanation rear panel.
¾ Connect the Dreambox with a Scart cable to your television screen and if available
connect your DVD Player or VCR to the VCR Scart of the Dreambox.
¾ Plug in the power cable into the Dreambox and then into a 110V/60Hz or 230V/50Hz
power socket.
¾ If you are using a switchable power socket please shutdown your Dreambox into deep
standby before switching off the power socket. See chapter 4.1 Turning your Dreambox
on and off
¾ If you switch on your Dreambox for the first time, you will see the setup wizard.
The setup wizard will guide you through the first time installation. Follow the instructions
on the screen.
¾ Please note that the factory setting for the video format is CVBS (FBAS).
16
User Manual Dreambox DM 100
3.
Start wizard
3.1
Language selection
english
When you turn on Dreambox for the first time, or run ‘factory reset’ you have to choose OSD
language first.
Select your desired and language with the
Navigation-Buttons up and down.
Press the OK-Button to activate.
Pressing the OK-Button will enter next menu.
17
User Manual Dreambox DM 100
4.
Basic operation
4.1
Turning your Dreambox on and off
english
Use the Standby-Button to turn your Dreambox on and off.
To put your Dreambox into Standby-Mode either press the Standby-Button on your remote
control or on your Dreambox.
Holding down the Standby-Button on your remote control for three seconds will show the
Shutdown / Standby menu.
4.2
Main OSD menu
If no OSD menu is shown on your screen you
can access the main OSD menu by pressing the
Menu-Button on your remote control.
Through the main OSD menu you can access
the submenus and functions of your Dreambox.
Please use the Navigation-Buttons left and
right or up and down, depending on you main
OSD menu’s view, to access the desired
functions and submenus. Use the OK-Button to
activate your selection.
As an alternative you can directly access the submenu or function by pressing the
corresponding number in your remote control’s Numeric Keypad.
4.3
Teletext
Pressing the Teletext-Button in TV or Radio mode will reveal the Teletext menu.
The option Teletext - Software Decoder“ will open the
service’s teletext.
See section Teletext (TuxText).
Pressing the Teletext-Button again will exit the
Teletext.
18
User Manual Dreambox DM 100
4.4
english
Audio tracks
Press Audio-Button in TV or Radio mode will reveal the audio menu of the service.
Use the Navigation-Buttons up and down to move
to desired audio track. Press the OK-Button to
select.
The contents of this menu will vary from service to
service.
Move to the option “Stereo”. Use the NavigationButtons left or right to choose the different audio
modes, Left-Mono, Stereo, Right-Mono. Press the
OK-Button to select.
.
4.5
Favorite list
The Favorite List menu appears by pressing the FAV-Button.
You can see 7 channels in the FAV1 folder.
You can put your favorite channels in FAV1 - FAV8
folders.
You can create favorite lists from “Edit Favorites”
menu.
4.6
Zoom
The Zoom menu appears by pressing the red Options-Button.
You can choose from 4-times and 16times zoom.
You can move up, down, left, right by
Navigation-buttons.
19
User Manual Dreambox DM 100
4.7
english
Multi-picture
The Multi-picture menu appears by pressing the green Options-Button.
You can select to see 4 or 9 pictures in one. Press
the OK-Button to select.
You can move up, down, left, right by using
Navigation-buttons.
You can press OK-Button to see switch to the
selected channel.
4.8
Satellite list
The Satellite List menu appears by pressing the yellow Options-Button.
You can see all satellite that were scanned.
When you press OK-Button, you can see all
channels on the selected satellite.
20
User Manual Dreambox DM 100
4.9
english
History list
The History List menu appears by pressing the blue Options-Button.
You can see all channels you watched so far.
The first channel in the list is the most recent one.
Select a channel and press OK-Button.
4.10
Radio channel
The Radio channel appears by pressing the blue TV/Radio-Button.
You can select TV or Radio mode by pressing the
TV/Radio-Button.
21
User Manual Dreambox DM 100
4.11
english
Infobar
The Infobar appears by pressing the OK-Button once, if no OSD menu is shown on your
screen. The Infobar shows all necessary Information about the selected service.
Channel number
Scrambled
Channel name
Satellite/TP
Signal/Quality
Current time
Lock
Teletext
Subtitle
Dolby Digital
Scrambled: is highlighted yellow if you are watching an encrypted channel
Locked: is highlighted yellow if the channel is locked
Teletext: is highlighted yellow if the channel broadcasts Teletext information
Subtitle: is highlighted yellow if the channel broadcasts subtitle information
Dolby Digital: is highlighted yellow if the channel broadcasts an AC-3 audio track
22
User Manual Dreambox DM 100
5.
english
Electronic Program Guide – EPG
The EPG menu appears by pressing the EPG-Button.
If no OSD menu is visible on your screen and you are
in TV mode press the TV-Button to access the
service list.
Press the Info-Button to get to the extended EPG.
Select „Channel EPG“ and press the OK-Button to
activate it.
Use the Navigation-Buttons to navigate to the
desired event and press the OK-Button to view
selected channel.
Pressing the EXIT-Button will quit the EPG.
Press the red Options-Button to get to the daily
EPG.
Pressing the blue Options-Button will show the
“Timer” menu. You can reserve channel.
Use the Navigation-Buttons to navigate to the
desired event and press the OK-Button to view
selected channel.
Pressing the EXIT-Button will quit the EPG.
23
User Manual Dreambox DM 100
6.
Edit the channellist
6.1
Channel list
english
When you press OK-Button in TV or Radio mode, you can see channel list menu.
Press the red Options-Button to sort channels
alphabetically.
Press the green Options-Button to sort channels by
input alphabet.
Press the yellow Options-Button to sort
FTA/Scramble/All channels.
Press the OK-Button to switch to the selected
channel.
Press the Info-Button to view specific
information.
24
User Manual Dreambox DM 100
6.2
english
Edit channels
If no OSD menu is visible on your screen, press the Menu-Button to open the main OSD
menu. Navigate to the option “Edit Channels” and press the OK-Button to select.
Press the red Options-Button to lock or unlock the
selected channel.
Press the green Options-Button to delete the
selected channel.
Press the yellow Options-Button to move the
selected channel.
Press the blue Options-Button to rename the
selected channel.
Select channel and press the OK-Button to activate
it.
6.3
Edit favorites
If no OSD menu is visible on your screen, press the Menu-Button to open the main OSD
menu. Navigate to the option “Edit Favorites” and press the OK-Button to select.
Press the red Options-Button to change window.
Press the green Options-Button to delete the
selected channel.
Press the yellow Options-Button to move or stop
the selected channel.
Press the blue Options-Button to rename the
selected channel.
Select channel and press the OK-Button to activate
it.
25
User Manual Dreambox DM 100
6.4
english
Parental control
If no OSD menu is visible on your screen, press the Menu-Button to open the main OSD
menu. Navigate to the option “Parental Lock” and press the OK-Button to select.
It prevents anyone else from having unauthorized access to certain services, videos and
audios. It also offers the possibility to only make certain services available to your kids.
These protection mechanisms are controlled by a four digit PIN that only is know to you.
Age Limit : you can setages from 4 to 16.
Menu Lock : locks the Installation menu.
Channel Lock : locks channels.
Receiver Lock : locks the reciver from being turned
on.
Change PIN : changes the PIN code.
Attention : If you loose your PIN you will have to reset your Dreambox to the factory defaults
in order to deactivate any locks.
26
User Manual Dreambox DM 100
7.
Setup
7.1
Language
english
If no OSD menu is visible on your screen, press the Menu-Button to open the main OSD
menu. Navigate to the option “Language Settings” and press the OK-Button to select.
OSD Language: select your desired OSD language.
Audio Language: select you desired standard audio
language.
Subtitle Language: select your desired standard
subtitle language.
7.2
Setting the time zone
The time can be set automatically by switching the mode to Auto.
Select your time and time zone with the Navigation
Buttons up and down. Press the OK-Button to
activate.
Pressing the green Options-Button will enter next
menu.
Pressing the EXIT-Button will enter previous menu.
7.3
A/V settings
If no OSD menu is visible on your screen, press the Menu-Button to open the main OSD
menu. Navigate to the option “A/V Settings” and press the OK-Button to select.
Color format : ‘CVBS’(FBAS), ‘RGB’ (Red, Green,
Blue separated), YPbPr(YUV)
Aspect Ratio : ’4:3’ (16:9 programs will be
displayed on 4:3 TV’s with black beams at top and
bottom), ‘16:9’ (programs transmitted in 16:9 will be
displayed automatically in 16:9, on 4:3 TV’s the
picture will be reduced in height).
TV System : Choose the standard that your TV
supports. ‘PAL’ or ‘NTSC’.
Note: How to change the color format from CVBS or RGB to YPbPr if your screen is black
The factory setting for the video output of your DM100 is RBG. If you connect it to a digital TV using a
YUV cable you will only see a black screen. Follow these two steps to change this:
1. If you install your DM100 for the first time, press the red Options-Button and the 0 and 1 on the
Numeric-Keypad to switch to YPbPr output
2. If you already have your Dreambox installed and switched TV sets you can still proceed in the
same manner: Press the red Options-Button and the 0 and 1 on the Numeric-Keypad to switch
to YPbPr output
27
User Manual Dreambox DM 100
7.3
english
OSD settings
If no OSD menu is visible on your screen, press the Menu-Button to open the main OSD
menu. Navigate to the option “OSD Settings” and press the OK-Button to select.
OSD Transparency : change transparency
between 50 ~ 100%
Banner Timeout : set infobar timeout between 1 ~
5sec.
7.4
Factory reset
If no OSD menu is visible on your screen, press the Menu-Button to open the main OSD
menu. Navigate to the option “Factory Reset” and press the OK-Button to select.
Select ‘Yes’ or ‘No’.
When you choose ‘Yes’ it will return to ‘Select
Language menu’.
28
User Manual Dreambox DM 100
8.
Service searching
8.1
Select the satellite
english
You can select which satellites you want to scan in this menu.
Use the Navigations-Buttons up/down to navigate
and press the OK-Button to select or unselect the
highlighted satellite.
Pressing the yellow Options-Button enables you to
rename the sattelite.
Pressing the green Options-Button takes you to the
next menu.
Pressing the EXIT-Button takes you to the previous
menu.
8.2
Setting antenna setup
You can set up ‘LNB, 22Khz, and DiSEqC, Motor’ in this menu.
LNB Frequency : Select your desired frequency and
press the OK-Button.
22KHz : Can be toggled on and off.
DiSEqC Type : Choose from DiSEqC 1 / DiSEqC 2 /
DiSEqC 3 / DiSEqC 4 / SMATV.
DiSEqC Port : If DiSeqC is enabled you can choose
from port 1 to 16.
Motor : Choose from 1.2 / USALS. Press the OKButton to enter the sub menu (See chapter 8.5).
Pressing the green Options-Button takes you to the
next menu.
29
User Manual Dreambox DM 100
english
8.3.1 Automatic transponder scan
Set the Mode option to Auto by using the Navigation-Buttons left/right to scan a preset list
of transponders.
Mode : Select Auto mode.
Network Scan : Choose from on and off.
Scan Type : Choose from All TV/Radio, All TV, All
Radio, Free TV, Free Radio.
LNB Frequency : Show the LNB Frequency which
was set up in the Antenna Setup menu.
Select the Scart Scan option and press the OKButton to start the automatic scan.
8.3.2 Manual transponder scan
Set the Mode option to Manual by using the Navigation-Buttons left/right to scan a single
transponder.
Mode : Select Manual mode.
TP Frequency : Set you desired transponder
frequency.
Symbol Rate : Set your desired symbol rate.
Polarity : Choose from Horizontal and Vertical.
Network Scan : Choose from on and off.
Scan Type : Choose from All TV/Radio, All TV, All
Radio, Free TV, Free Radio.
LNB Frequency : Show the LNB Frequency which
was set up in the Antenna Setup menu.
Select the Scart Scan option and press the OKButton to start the automatic scan.
30
User Manual Dreambox DM 100
english
8.3.3 PID transponder scan
Set the Mode option to PID by using the Navigation-Buttons left/right to scan a desired
PIDs on a single transponder.
Mode : Select PIDmode.
TP Frequency : Set you desired transponder
frequency.
Symbol Rate : Set your desired symbol rate.
Polarity : Choose from Horizontal and Vertical.
PID: Enter your desired PID value.
Scan Type : Choose from All TV/Radio, All TV, All
Radio, Free TV, Free Radio.
LNB Frequency : Show the LNB Frequency which
was set up in the Antenna Setup menu.
Select the Scart Scan option and press the OKButton to start the automatic scan.
8.3.4 Blind transponder scan
Set the Mode option to Blind by using the Navigation-Buttons left/right to scan the whole
possible range of transponders.
Mode : Select Blind mode.
Network Scan : Choose from on and off.
Scan Type : Choose from All TV/Radio, All TV, All
Radio, Free TV, Free Radio.
LNB Frequency : Show the LNB Frequency which
was set up in the Antenna Setup menu.
Select the Scart Scan option and press the OKButton to start the automatic scan.
31
User Manual Dreambox DM 100
8.4
english
Channel scan
Once you have started the scan you will be taken to the Channel Scan menu.
Wait until channel scan reaches 100%.
Press OK-Button to save all found channels.
8.5
Motor Setup
Use this type of configuration if you want to receive many satellites with a Rotor or Stab from
a Single Universal LNB. These options are enabled if you select anything other than disabled
for the motor option in the Antenna setup menu (See chapter 8.2).
8.5.1 DiSEqC 1.2
Use the Navigation-Buttons up/down and left/right
to set the motor option to 1.2.
Press the OK-Button.
Move : Pressing the Navigation-Buttons left/right
will move the motor.
Store : Press the OK-Button to save the position of
the motor.
Move Reference : Press the OK-Button to return the
motor to the 0 degree setting.
Save Current Limit : Limit the motor movement up
to current position. Press the OK-Button to save.
Remove Current Limit : Deletes all saved limit.
32
User Manual Dreambox DM 100
english
8.5.2 USALS
Use the Navigation-Buttons up/down and left/right
to set the motor option to USALS.
Press the OK-Button.
My Longitude/Latitude: Enter the latitude and
longitude of your position.
Goto: Press the OK-Button and the motor will turn
your dish to the selected satellite.
Move : Pressing the Navigation-Buttons left/right
will move the motor. You can fine tune the motor.
Store : Press the OK-Button to save the position of
the motor.
Move Reference : Press the OK-Button to return the
motor to the 0 degree setting.
8.6
Edit transponder
If no OSD menu is visible on your screen, press the Menu-Button to open the main OSD
menu. Navigate to the TP Edit option and press the OK-Button to select.
This menu will let you edit transponder lists that are used for the service scan. New
transponders are usually announced in the Internet or in magazines.
Press the red Options-Button to add a transponder.
Press the green Options-Button to edit the selected
transponder.
Press the yellow Options-Button to remove the
selected transponder.
Press the blue Options-Button to rename the
transponder.
33
User Manual Dreambox DM 100
9.
Technical data
Fully MPEG-2 and DVB-S Compliant
Input Frequency 950 ~ 2150MHz
Tuner Symbol Rate: 1 ~ 45MS/s
1 x Smart Card-Reader & 1 x SIM Card
1 x SCART interfaces
USB-B interface
S/PDIF Interface for digital bit stream out(AC-3)
Supports Subtitle and Teletext(OSD)
Multi Picture View(4, 9 pictures)
Supports Electronic Program Guide(EPG), Picture In Graphic(PIG)
Supports SCPC and MCPC from C/Ku band
Favorite channel list editing and sorting
Full automatic service scan & blind scan
Supports Picture In Picture(PIP)
DiSEqC 1.0, 1.1, Motor(1.2) and USALS(1.3) Compatible
10/100MBit compatible Ethernet Interface
Zoom Function
Powerful Channel Sorting and Grouping
User friendly and 3D(Dimension) OSD
Slim and fashionable STB
Parental Control Video and Audio Mode
History Channel List( 9 Channels)
Internal Audio DAC(24bit, 192kHz Stereo DAC)
DBS-Tuner:
Frequency Range 950 …. 2150 MHz
Signal Level - 65 dBm …. - 25 dBm
Signal-to-Noise Level 12 dB max.
DBS-Tuner Input Connector F-Type female
Input Impedance 75 Ohm
AFC +/- 3 MHz
Demodulation Shaped QPSK
FEC Viterbi and Reed-Solomon
Viterbirate 1/2, 2/3, 3/4, 5/6, 7/8, automatic assimilation
Roll-off Factor 35 %
Demultiplexing according ISO 13818-1
Video decoder:
Video Compression MPEG-2 and MPEG-1 compatible
Video Standard PAL G/ 25 Hz
Video Formats 4:3 / 16:9
Footage 16:9, automatic assimilation for 16:9 TV-Device (over SCART)
Letterbox percolating for 4:3 TV-Device
Audio decoder:
Audio compression MPEG-1 & MPEG-2 Layer I and II
Audio Mode Dual (main/sub), Stereo
Frequency: 32 kHz, 44.1 kHz, 48 kHz, 16 kHz, 22.05 kHz, 24 kHz
Output analog:
Output Level L/R 0,5 Vss on 600 Ohm
THD > 60 dB (1 kHz)
Crosstalk < -65 Db
34
english
User Manual Dreambox DM 100
Output digital:
Output Level 0,5 Vss on 75 Ohm
Sampled Data Filtering 32 kHz, 44.1 kHz, 48 kHz, 96 kHz
S/PDIF-Output optical (AC3)
Video parameter:
Input Level FBAS 1 Vss +/- 0.3 dB on 75 Ohm
Teletext filter in conformity with ETS 300 472 Standard
TV-SCART:
Output: RGB,CVBS
USB:
USB-B connector
Ethernet:
10/100 Mbit compatible interface
LNB Power and polarization:
LNB Current 500mA max. ; Short-circuit-proof
LNB Voltage vertical < 14V without load, > 11,5V at 400mA
LNB Voltage horizontal < 20V without load, > 17,3V at 400mA
LNB shut-off at Standby-Mode
Count of active satellite position:
DiSEqC 1.0/1.1/1.2 SAT POSITION / SAT OPTION
DiSEqC - Motor Control
Power consumption:
< 10W / 12V
Input voltage:
DC12V,alternating acurrent +/- 15%
External power supply:
Input: 110-240V AC / 50-60Hz / 0,6A
Output: 12V = / 1A
35
english
User Manual Dreambox DM 100
10.
Contact & support information
Headquarter & Distribution:
Dream-Multimedia GmbH
Pierbusch 24-26
44536 Lünen
Germany
Dealer’s Hotline:
(Dealers only)
Tel.: +49 (0)180 - 3 85 85 90 112 (0,09€/min.)
Fax: +49 (0)180 - 3 85 85 90 777 (0,09€/min.)
You can reach the dealer’s hotline from :
Mo - Fr. 09:00 am - 03:00 pm
Technical Hotline:
Tel.: +49 (0)180 - 3 85 85 90 110 (0,09€/min.)
Fax: +49 (0)180 - 3 85 85 90 111 (0,09€/min.)
You can reach the technical hotline from:
Mo - Fr. 09:00 am - 03:00 pm
Sales:
Tel.: +49 (0)180 - 3 85 85 90 770 (0,09€/min.)
You can reach the sales hotline from:
Mo - Fr. 09:00 am - 03:00 pm
Dealers & Pricing:
E-Mail: [email protected]
Technical Support:
E-Mail: [email protected]
Website:
Weblink: http://www.dream-multimedia-tv.de
Support Forum:
Weblink: http://www.dream-multimedia-tv.de/board
Software Support (actual images):
Weblink DM 100: http://www.dm100.de
11.
Copyright Notes
© Dream-Multimedia 2008. All rights reserved.
36
english