1
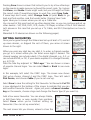
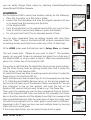
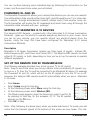
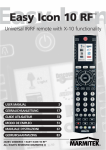
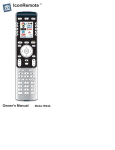
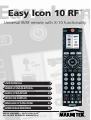
Easy Icon
Easy Icon 10 RF
™
Universal IR/RF remote with X-10 functionality
USER MANUAL
3
GEBRAUCHSANLEITUNG
17
GUIDE UTILISATEUR
33
MODO DE EMPLEO
51
MANUALE D’ISTRUZIONI
67
GEBRUIKSAANWIJZING
83
20281/ 20080903 • EASY ICON 10 RF™
ALL RIGHTS RESERVED MARMITEK ©
The most user-friendly remote control ever.
SAFETY WARNINGS
•
•
•
•
•
•
•
To prevent short circuits, this product should only be used inside and only in dry
spaces. Do not expose the components to rain or moisture. Do not use the product
close to a bath, swimming pool etc.
Do not expose the components of your systems to extremely high temperatures or
bright light sources.
In case of improper usage or if you have altered and repaired the product yourself,
all guarantees expire. Marmitek does not accept responsibility in the case of improper usage of the product or when the product is used for purposes other than specified. Marmitek does not accept responsibility for additional damage other than covered by the legal product responsibility.
This product is not a toy. Keep out of reach of children.
Do not open the product (battery panel excepted): The product should only be
repaired or serviced by a qualified expert.
Keep batteries out of the reach of children. Dispose of batteries as chemical waste.
Never use old and new batteries or different types of batteries together. Remove the
batteries when you are not using the system for a longer period of time. Check the
polarity (+/-) of the batteries when inserting them in the product. Wrong positioning
can cause an explosion.
Automatic switching devices provide comfort, but can also be dangerous. They can
surprise people or can ignite clothing hanging over an electric heat source. Please be
careful and take appropriate measures to avoid accidents.
EASY ICON 10 RF™
3
ENGLISH
Easy Icon 10 RF™
HOW DOES MARMITEK X-10 WORK?
Marmitek X-10 components use the existing mains wiring to communicate (using
Marmitek X-10 signals). You can build a complete system using the three different kind
of components of the Marmitek X-10 System:
1. Modules:
These components will receive Marmitek X-10 signals and will switch
or dim the attached lamp or appliance. Examples of these modules
are lamp modules and appliance modules. These are available as
build-in, micro, DIN rail and plug-in modules.
2. Controllers:
These components will transmit Marmitek X-10 signals and thus will
control the Modules.
3. Transmitters: Wireless components like remotes. The signals of these components
will be received by a controller with transceiver functionality (IRRF
7243, TM13 or CM15Pro). The Transceiver will translate the signals
into Marmitek X-10 signals on the power line.
ADRESSES
Up to a maximum of 256 different addresses can be preset. These are subdivided into a
so-called HouseCode (A to P incl.) and a UnitCode (1 to 16 incl.). The HouseCode can
also be set on the controllers, so that the controllers and modules become part of the
same system. The address can be set either using code dials or by pressing buttons,
depending on the type of module.
The Marmitek X-10 System uses standard commands, which control all units with the
same HouseCode at the same time (e.g. all lights on, all off, etc.).
SIGNAL RANGE
Range of Marmitek X-10 signals over the Power Line and how to increase the
range.
The Marmitek X-10 System is based on power line communication. The range of the
Marmitek X-10 signals very much depends on the local circumstances. On average the
range is a cable length of 80 meters.
If you have difficulties with the range of your Marmitek X-10 signals, please
pay attention to the following facts:
1. When more than one phase is used for your electrical system, it is necessary to couple these phases for the Marmitek X-10 signals. For coupling you can use FD10 Phase
Couplers/Filters. You only need to install a Phase Coupler/Filter when your wall outlets
and light switches are divided over more than one phase (more than one group is no
problem). For bigger buildings or longer distances we advice you to use an active
repeater instead of passive FD10’s.
2. It is possible that Marmitek X-10 signals are attenuated by devices and lights which
4
© MARMITEK
Known devices which can cause attenuation are:
PC Monitors
PCs with heavy internal power supplies
Old Televisions
Copiers
Fluorescent Lights
Gas Discharge Lamps (Energy Saving Lamps)
3. Some (old) devices are able to disturb the signal by transmitting noise on the power
line. Because the Marmitek X-10 signals are transmitted on 120 kHz, only noise on or
near this frequency will have influence on the range. When you use a FM10 Filter to connect this device to the power line, the noise will be filtered.
4. The Marmitek X-10 protocol has several mechanism to avoid modules to be switched
on or off by other sources than your Marmitek X-10 Controllers. However, it is possible
that the Marmitek X-10 signals are disturbed by e.g. baby phones which are in TALK
mode (continuous transmission). When these kind of signals are present on the power
line it is possible that the Marmitek X-10 signals will not come through.
5. The mains do not stop at the front door of your home. Everything that is attached to
mains nearby your home can have influence on Marmitek X-10 signals (e.g. heavy
machinery). If you think that your system is influenced by devices out of your house, it
is advisable to install FD10 Phase Coupler/Filter on each phase entering the house. These
filters will block signals coming into or going out of your house, but will also match the
impedance for the mains. Hereby make your house Marmitek X-10 compatible for these
units. The FD10’s will not only filter but will also couple the phases (please see 1).
EASY ICON 10 RF™
5
ENGLISH
are connected to the power line. In a normal home situation this effect is negligible (the
Marmitek X-10 system is using active gain control to eliminate the effects). However, it
is possible that a particular device in your house is attenuating the signals so much that
the range of Marmitek X-10 signals is decreased significantly. When you have range
problems, it is wise to try to locate the device which is attenuating the signals simply by
unplugging devices from the power line, and testing the differences in range for your
Marmitek system. When e.g. your conclusion is that e.g. your computer monitor is
attenuating the signal, you can use a FM10 Plug-in Filter between the power line and
the monitor to eliminate the effects.
INSTRUCTIONS FOR USE
USING THE WIZARD
After you insert the batteries and choose “English,” the Setup Wizard
screen appears. You can exit the Wizard at any time by pressing the
HOME key (located just below the screen). Follow the instructions on
the Wizard screens to familiarize yourself with the OK, Back, and Side
Keys.
You can go back and forth through the Wizard, but once you’ve set up your devices and
quit to save the settings, you won’t see the Wizard again unless you do a Master Reset.
To do a Master Reset: Press the HOME key, Setup, More, Advanced, Clear
Settings, More, and then Master Clear. Note this will erase everything you have set
up in the remote.
SETTING UP YOUR DEVICE
After you’ve been through the Wizard for the first time, the screen shown to the right
appears. This is the start of the Wizard for setting up your devices (TV being the first
one).
If you know your brand of TV, select Yes, which results in a faster
search for your TV’s code. Selecting No searches the complete library
of TV codes, rather than just the codes for your brand of TV.
Pressing the Side Key for Yes takes you to the screen that shows the
most common brands. Use the Side Keys to select your brand of device.
If your brand isn’t shown, you can press the Side Key adjacent to Next
to show more brands, (shown alphabetically); or press the Side Key
adjacent to Back to go back to the previous screen of brands.
After you select your brand, the next screen tells you to point the remote at your TV
and keep pressing Power until it responds.
Pressing Power sends the Power code to your TV, and the screen shows that you’ve sent
code 1 of xx (xx will vary by brand). Keep pressing Power until your TV responds and
then press Save. (You can press the Side Key adjacent to Last Code if you overshoot).
6
© MARMITEK
SETTING FAVOURITES
Once you’ve gone through the Wizard and set up at least a TV, and set
up more devices, or skipped the rest of them, you arrive at screen
shown to the right.
When you press any digit key, say digit 4, to enter a channel number,
you go to a screen where you can enter more digits if desired. The
channel number can include a dash (-) for digital channels, e.g., 2-3, or
can include ENTER, or OK, if your device requires it to change channels,
e.g. 472 OK
Press the Side Key adjacent to “Pick Logo.” You are shown a screen
of popular channel logos. You can select Next or Back to see more
logos.
In this example, let’s select the CNBC logo. The screen now shows
that we’ve chosen channel 4 and the CNBC logo. Then let’s select
Pick Device, and choose Cable (if you’ve set one up).
Select Save to save the setting for this Favourite. Set Favourite 2 of 10
is now displayed at the bottom of the screen to indicate that you can
add another Favourite channel. Again just press a channel number
key on the remote, choose a logo and change the Device Type (if you want to).
Add a few more Favourites. You can always Delete,
or Edit them later, or even reorder their positions.
Select Done when you’re finished setting up
Favourites. (You can set up more later.)
The next screen lets you choose, where to store the
EASY ICON 10 RF™
7
ENGLISH
Pressing Save shows a screen that instructs you to try a few other keys
on the remote to make sure you’ve found the correct code. Tip: try keys
like Menu, and Guide. Power might work, but you still might not have
the correct code. If several keys seem to work fine, press Save Code.
If some keys don’t work, select Change Code (or press Back) to go
back and find another code that works better. Pressing Save Code
again takes you to screen where you set up a Cable box.
You can quit at this point and set up other devices later, or you can continue and set up
other devices - SAT, DVR, DVD, VCR, Audio, CD Player, or either of the 2 AUX devices.
Let’s assume in this case that you set up a TV, Cable, and SAT. (Descriptions on how to
set up
Marmitek X-10 devices are shown on the following pages.)
Favourites that you just set up, either in
group or
group.
Selecting
takes you to a screen showing that you now have CNBC
set as the first Favourite in
Group, as well as any other Favourites
that you’ve set up.
When you’re finished setting up Favourites, press the HOME button to
go back to the Home screen.
WORKING WITH FAVOURITES
At any time, you can press the FAVOURITES key and select either the
or
Side
Keys; or, you can press the
or
buttons on the remote to go to your Favourites
screen. Then, pressing the Side Key next to the CNBC logo will (for example) change the
channel on your Cable box to CNBC (in this example, channel 4).
Pressing either
or
button a second time accesses the Marmitek
X-10 Home Automation modules that you’ve set up in All Rooms. (See
All Rooms image.)
The All Rooms function will display all the Marmitek X-10 icons from
every room you’ve set up. However, they are displayed in one convenient screen for you to select from.
Use the Side Keys or the Navigation Buttons to select the icon you want to operate.
DELETING FAVOURITES
To delete any Marmitek X-10 Single Device:
Select Home/Setup/X10/Delete/The Room you want to delete from/press Side Key
next to the icon you want to delete/Press OK/Select Yes.
To delete a Favourite Channel Icon (TV station):Home/Setup/Favourites/Delete/Favourite
Category/press Side Key next to Favourite Icon you want to delete/Press OK/Select Yes.
To Clear an Entire Category of Channel Favourites:
Home/Setup/More/Advanced/Clear Settings/Favourites/Favourite Category you want to
clear/ Press Clear key.
To Clear an Entire Room of X10 Favourites:
Home/Setup/More/Advanced/Clear Settings/More/Clear X10/Room Category you want
to clear (Living Room, Kitchen, etc)/Press Clear key.
Also, if the default names are not in accordance with what you want, please note that
8
© MARMITEK
LEARNING
For the EasyIcon10RF to learn from another remote, do the following:
• Place the 2 remotes on a flat surface (table).
• Ensure that the transmitter end from the original remote is 40 mm
or so away from the receiving end (bottom)
of the EasyIcon10RF.
• Press the key/button on the original remote that you want to learn
from for about a second and release it (press and release).
• Do not press and hold it for an extended period of time.
You can learn commands from an existing remote and store them
under the “Main” Keys on the EasyIcon10RF, or learn commands from
an existing remote and store them under any of the 10 Side Keys.
At the HOME screen press the Side Keys next to Setup, More, and Learn.
The next screen asks, “Where do you want to learn?” The question
means, do you want to learn a command and place it on a Side key of
the EasyIcon10RF, or do you want to learn a Main Key command and
place it on a Main Key of the EasyIcon10RF.
If you press a right Side Key (to select Main Keys) you are going to learn,
say, the Chan Up key from an existing remote and store it under the
Chan Up key on the EasyIcon10RF.
Or, learn the Power key from an existing remote and store it under the
Power key on the EasyIcon10RF, etc.
Select the Device you want to learn keys for. In this example we only have
a TV, Cable Box and Satellite Receiver set up, so the rest are grayed out,
but you can still select any of the devices to learn commands for. You are
then instructed to line up the remotes, and press the key on the
EasyIcon10RF remote that you want to learn, e.g., the Power key.
Then, point the remote you want to learn commands from at the bottom of the EasyIcon10RF. Press and hold (in this example) the Power
key on the other remote until the display shows that the command has
been successfully learned. Note for some types of keys you might need
to hold the key pressed, but for other types a quick press is sufficient.
Experiment a bit. If keys you learn are sent multiple times try learning
them with just a quick press.
If the screen says Failure, you can press the key and try again.
EASY ICON 10 RF™
9
ENGLISH
you can easily change these names by selecting Home/Setup/Favourites/Rename or
Home/Setup/X10/More Rename.
You can continue learning more individual keys by following the instructions on the
screen, and then press Done when you’re finished.
POWERMID XL AND XS
The Marmitek Powermid XL allows you to extend the distance you can use your remote!
You will be able to hide your IR sender from sight, and still operate your TV or other electronic devices through entertainment centers, cabinet doors, from another room, etc.
The IR-transmitter will receive the RF commands and sends them using IR through the
transmitter cable included with your package!
SETTING UP MARMITEK X-10 DEVICES
The EasyIcon10RF Remote - coupled with other Marmitek X-10 Home Automation
Modules - gives you the ability to operate everything electrical in your home. Once
you set up your remote, you can operate almost any electrical device from the
remote, using the keys that have been configured for Marmitek X-10 Home
Automation Modules.
Description
Marmitek X-10 Home Automation systems use three types of signals - Infrared (IR),
Radio Frequency (RF), and Power Line Carrier (PLC). The EasyIcon10RF remote can send
either IR, RF signals, or both, depending on how you’ve set up the remote to operate
different equipment.
SET UP THE REMOTE FOR RF TRANSMISSION
The following example describes how to set up your TV for RF control.
Note: Keep in mind that when you set up a device to be controlled by RF signals, e.g.,
to turn on a TV, then the TV must be connected to an Marmitek RF device, for example
the Powermid XL and XS, which will act on the RF signals to turn the TV on or off.
However, the EasyIcon10RF remote sends RF automatically when you are in Marmitek
X-10 mode.
•
•
•
•
•
•
Press Home.
Select Setup using the Side Key.
At the following screen select More using the Side Key.
At the following screen select Wireless (RF).
The Mode screen appears; select the Device you want to set for RF
by pressing its Side Key. (In this example, it’s TV. The RF symbol
appears on the TV icon.)
Press OK to Save.
Note: After following the above steps, when you make selections in TV mode, you will
notice that the transmit signals at the bottom of the screen are now Green. This indi10
© MARMITEK
SETTING UP MARMITEK X-10
Setting Up the EASYICON10RF to operate the TM13 Transceiver using Housecode “B.”
The TM13 Transceiver receives RF signals to control lights and appliances. Do the following to setup this transceiver.
• Press the HOME key to display the setup screen. Select Setup.
• Select X-10.
• Select Add/Edit at the next screen.
• Choose the room where you will locate the TM13. For this example choose
Basement.
• Press the Side Key to select.
• At the add an X-10 device screen, press OK.
• Select Pick Device.
• Select Appliances and then scroll until you see the TM13 icon.
Select TM13 using the appropriate Side Key.
• At the following screen select Address.
• Using the Side Keys, select “B.”
• Select Save using the Side Key.
Note: The values in the Address screen must match the physical hardware settings for
the Marmitek X-10 device. In this example, the settings were set to B. This means that
B matches the physical settings for the TM13.
•
•
•
•
•
•
Use the appropriate Side Keys to create a Label. The Label feature can have two
lines of labels. The example on the right shows a Bath as an “Extra Bath.” You enter
each line of the label by pressing the Side Key for the line number, for example, 1 or
2, and then entering the label using the alphanumeric keys as shown.
Select Save to save the Label(s).
Using the Side Keys, Pick Logo and select an appropriate logo (for example, the
bathtub logo on screen 10 of 21).
Select Save using the Side Key.
Select Done using the Side Key.
The Saving Settings screen appears.
USING MARMITEK X-10 FEATURES
After you’ve set up an Marmitek X-10 module, like the TM13 in the previous example,
follow these steps to use the device.
• Press the Mode key to display the various components.
• Select X-10 using the Side Key.
• Select the room that has the Marmitek X-10 device. (In the previous example it was
EASY ICON 10 RF™
11
ENGLISH
cates that it is sending RF and IR to the TV. If the signals are in Red, it means that the
remote is transmitting IR only.
•
the Basement.)
Press the Side Key for the icon to operate the device. You can turn it on, dim, or off.
(Note: Many devices have follow-up screens, which also provide additional features
for operating the device. Use the Side Keys and Navigation buttons to operate those
features.)
QUICKPOWER FOR MARMITEK X-10 DEVICES
•
•
•
•
•
•
Set up an Marmitek X-10 device using the Wizard or Add-Edit mode, for example a
light in your Living Room with an LM12 module.
Select Home/Setup/X10/More/QuickPower Macro.
Select Pick Module, and select the command (s) you want to send. Try a simple
“Off” command for now, but understand that you can string many commands from
different modules and different rooms together in conjunction with delays as well.
Select Save and then Done.
Select Home/QuickPower.
Press the Side Key next to the Marmitek X-10 icon to trigger the Quick Power Macro.
SET UP FOR SLEEP MACRO.
•
•
•
•
•
•
Set up an Marmitek X-10 device using the Wizard or Add-Edit mode, for example a
light in your Living Room with an LM12 module.
Select Home/Setup/X10/More/Sleep Macro.
Select “Pick Module” and select the command (s) you want to send. Try a simple
“Off” command for now, but understand that you can string many commands from
different modules and different rooms together in conjunction with delays as well.
Select Save and then Done.
Select Home/Sleep/X10.
Press the Side Key to toggle when the command(s) will be sent for 15 minutes to up
to an hour and a half away from the current time.
VOICE DIALER SECURITY
The EasyIcon10RF Remote used in conjunction with the
SafeGuard/TotalGuard (SC9000) security console gives you the ability to
operate your home security directly from your remote.
Description:
To set up your remote for the SafeGuard/TotalGuard console do the following:
•
•
•
•
•
12
Press the Home key.
Press the Set Up Side Key.
Press the X-10 Side Key.
Press the Add/Edit Side Key.
Use the Side key to select the room that you want to associate the security device.
© MARMITEK
•
•
•
At the “add an X-10 device!” screen, press the OK key.
Use the Side Key to Pick Device.
Press the Security Side Key.
Press the Side Key to select the SC9000.
At the Security Options screen, press the Side Key to Set Password.
Enter your 4-digit security code using the alphanumeric keys (This is your choice; do
not forget your security code.)
Press the Side Key for the Set Console Link.
Following the screen instructions to set your console to program mode by pressing
and holding the OK key until the console chimes. (Note: Make sure that the SC9000
is in install mode.)
Press the Side Key for Done.(2x)
USING THE REMOTE
Pressing either the
or
key once at any time accesses the
favourites that you’ve set up. You can select any of your favourites by
pressing the button next to the icon you want.
Pressing either the
or
key a second time accesses the Marmitek
X-10 Home Automation modules that you’ve set up for All Rooms.
Use the Side Keys or the Navigation Buttons to select the icon you want to control.
Marmitek X-10 RF Devices
Selecting Marmitek X-10 from the MODE key screen displays the Pick
Group screen.
• Press the side key for the room that has the device that you want
to operate. (For example, press the Side Key for “Living Room.”)
The screen shows the device icons according to the way “Living
Room” was set up.
• Press the Side Key to see an overview of the commands that can be
send. Now press a Side Key to really send this command.
Extended Features
Note: Icons that have additional features follow with additional
screen(s) when you select the icon. This allows you to operate those
features. Some icons will only provide On or Off functions, some may
provide dimming. It depends on the device’s capabilities.
Any Side Key associated with an icon can always be used to operate the features for the
device. In addition, the Main Keys on the EasyIcon10RF remote can be used to operate
Marmitek X-10 devices in unique ways.
Note: Controls for lights are as follows:
• Prog up and down turns the light On and Off.
EASY ICON 10 RF™
13
ENGLISH
•
•
•
•
•
•
• VOL up and down operates bright and dim if applicable.
You can press the Side Key next to the module you wish to operate and toggle an “On”
or “Off” function as well.
MACROS
Macros allow you to combine a number of commands, including time delays, by using
a single key press.
• Press the Home key.
• At the screen shown, press the Side Key for Macros and press OK to access the first
time Macro’s Wizard.
• Press the Pick Module Side Key.
• Select the room, which contains the TM13 that you want the Macro for.
• Press the Side Key next to the icon that you choose for the TM13.
• Select the On Side Key.
• Press the Set Delay Side Key once for each second of delay you wish to add to the
Macro.
• Press the Pick Module Side Key.
• Press the Side Key next to the icon that you choose for the TM13.
• Select the Off Side Key.
• Select Save and then Done using the Side Keys.
Note: When you want to create another Macro, you must do the following:
• Press Home, then the Setup Side Key.
• Press the X10 Macros Side Key.
• You’ll notice that the M 1 Side Key is a green color and that the remaining Macro
numbers are black in color. Green signifies a Macro that has already been created,
while black indicates an unused Macro placeholder. You’ll want to choose any of the
black Macro number to set up a new Macro.
FREQENTLY ASKED QUESTIONS
What is the reason for modules to switch on/off spontaneously?
It is possible that a Marmitek X-10 System is installed at one of your neighbours using
the same House Code. To solve this problem try to change the House Code of your system, or have FD10 Phase Coupler/Filter installed at your incoming mains.
My modules will not respond to my controller.
Make sure that the House Code on all Modules and Controllers are set to the same
House Code (A .. P).
My modules will not react to my remote / sensor.
When you use a remote or sensor, you should have at least one TM13 Transceiver or
Marmitek X-10 Security Console installed in your house. These components will trans14
© MARMITEK
Am I able to increase the range of my remotes by using more Transceivers?
Yes, you can use more than one TM13 Transceiver in your home when the range of your
remotes is not sufficient. The TM13 is using so called collision detection to prevent signals to be disturbed when more than one TM13 is transmitting. TM13’s will wait for a
quite power line before transmitting their data. To prevent your Marmitek X-10 System
to become slow or to prevent dimming from becoming less smooth, make sure that the
TM13 units are placed as far away from each other as possible.
The Favourites you set up don’t operate your device.
Make sure you selected the correct device (TV, Cable, Sat, etc., when you set up each
favourite.
The Remote’s hard keys do not operate your product.
Make sure the remote is set to the correct Mode by pressing the MODE key followed by
the appropriate Side Key for the device mode that you want.
• Program the remote with a new code.
• The remote may not contain the code for your device. Try learning the codes you
need from your old remote.
• Install new batteries.
The remote does not operate some features of your product.
• Program the remote with a new code.
• The remote may not be able to operate all the features of your product or key names
might be different than your product. Try learning codes from your old remote.
Having problems with learning?
If some learned keys transmit multiple times, e.g., if a learned Channel Up key changes
more than one channel when you press it, or Up/Down/Left/Right navigation keys move
more than one step when you press the learned key; try just giving the key to be learned
a quick press (when you learn it) rather than holding the key pressed until the screen displays Success.
Your TV turns on when you press a Favourite key.
Some types of TV, e.g., Philips flat panel TVs turn on and go to the selected channel when
you press a channel number while the TV is off. So for this type of TV pressing a favourite
key will do the same thing (but it might not work for 3-digit channels, e.g., 550).
Do you still have questions? Please check out www.marmitek.com for more
information.
EASY ICON 10 RF™
15
ENGLISH
late the radio signals to the Marmitek X-10 signal on the power line. Using several
remotes and sensors, you only need one central transceiver.
TECHNICAL DATA
Hardware
LCD display:
Display Colours:
Surface Luminance:
IR frequency range:
RF frequency:
Dimensions:
Software
Protocol
Code library:
Symbol library:
Macros:
Learn function:
for code library:
Languages:
Functions:
Power
Operating current:
Operating current:
Standby current:
Power:
176 * 220 pixel with back light
65536
150 cd/ m2
30-70 kHz
433.92 MHz
230 x 58 x 28 mm
100% Marmitek X-10 RF Protocol Support
Operates all major brands
944 channel logos
165 appliance logos
up to 1024 steps
saved on flash memory permanently Memory chip
128K
English, Deutsch, Francais, Español, Italiano, Nederlands.
Punch through, Macro- , Mute- , Videotext- and
Toptext
<=75mA (with LCD on)
<=150mA (with LCD on and key pressed)
<=250uA (LCD off, no key pressed)
3 x 1.5V AA batteries (included)
Environmental Information for Customers in the European Union
European Directive 2002/96/EC requires that the equipment bearing this symbol on the product
and/or its packaging must not be disposed of with unsorted municipal waste. The symbol indicates
that this product should be disposed of separately from regular household waste streams. It is your
responsibility to dispose of this and other electric and electronic equipment via designated collection facilities appointed by the government or local authorities. Correct disposal and recycling will help prevent
potential negative consequences to the environment and human health. For more detailed information about the
disposal of your old equipment, please contact your local authorities, waste disposal service, or the shop where
you purchased the product.
16
© MARMITEK