1
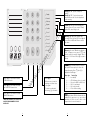
Master Code
The 4 digit Master Code is used to arm and disarm the security system, to
program additional security codes and to change other system features.
The Master Code will be supplied to you by your installer. All keypad
entries are made by pressing one key at a time. (See Additional Codes
section)
Arming the System
.c
om
.m
y
Check the following items before arming the system:
Bypass Light
If the “Bypass” light is ON, insure that zones are intentionally bypassed
before arming the system (See Zone Bypassing section).
Trouble Light
If the “ Trouble” light is ON, check to see what the trouble condition is and
call for service. (See Viewing Trouble Conditions section).
Ready Light
If the “Ready” light is NOT ON, check to see that all doors and windows are
closed and that motion is stopped in areas covered by motion detectors.
The system cannot be armed unless the “Ready” light is ON indicating that
all zones are closed.
NOTE: The system may be armed with a zone bypassed or a trouble
present but your security protection will be reduced.
rm
To Arm
w
w
w
.e
a
la
Enter your 4 digit access code. As each digit is entered, the keypad
sounder will beep. If the correct access code is entered, the keypad
sounder will beep quickly and the “Armed” light will come ON.
If the access code was entered incorrectly or the “Ready” light comes ON,
the keypad buzzer will sound steadily for 2 seconds. If this occurs, press
the [#] key and re-enter your access code.
When the correct access code is entered and the “Armed” light comes ON,
exit the premises through the door indicated by your installer as the ExitEntry door.
At the end of the exit delay period, all lights, except the “Armed” light, will
go out and the system will be armed. The exit time delay can be changed
by your installer.
Auto-Bypass Option - Home-Away Arming
This feature, if selected by your installer, will allow you to arm your system
with any valid user code and the system will automatically bypass the
interior zones. The “Bypass” light will come on. If you exit within the allowed
exit time, the system will automatically activate the interior zones and the
“Bypass” light will go out. This feature is designed to save the customer
from having to manually bypass interior zones each time they wish to arm
the system and remain at home.
In residential applications where the system has been armed and the
interior zones are automatically bypassed, the interior zones can be
reactivated from a keypad that is outside the interior zone's protection area.
To reactivate the interior zones, press [ ] then [1] and the “Bypass” light
will go out.
*
2
Entry Delay Off Arming
*
If you wish to arm your system and eliminate the entry delay, enter [ ][9]
before your access code. The “Armed” light will flash as a reminder that the
system is armed and has no entry delay. An entry through any zone
programmed as a delay zone will create an instant alarm.
e.g. To arm without entry delay, press [ ][9][access code]
*
Disarming the System
.e
a
la
rm
.c
om
.m
y
Enter the premises only through the door(s) designated by your installer as
the entry door. Entering by any other door will sound an immediate alarm.
As soon as the entry door is opened, the keypad sounder will come on to
indicate that the system should be disarmed. Go to the keypad and enter
your four digit access code. If an error is made entering the code, press
the [#] key and enter your code again. As soon as the correct code is
entered, the “Armed” light will go out and the keypad sounder will silence.
The correct access code must be entered before the entry time expires.
The entry time delay may be changed by your installer. If an alarm
occurred during the period the system was armed, the “Memory” light and
the zone light of the zone that caused the alarm will flash for two minutes.
After the two minute period, the “Memory” light and zone light will stop
flashing and the panel will return to the ready state. Pressing the [#] key
during the two minute period will cancel the alarm memory display.
If a trouble is present when the panel is disarmed, the “Trouble” light will
come ON (See Viewing Trouble Conditions section to determine the source
of the trouble.) Note that troubles will not display while the system is in the
Alarm Memory Display Mode.
If you return home and find that an alarm has occurred while you were
away, it is possible that an intruder may still be on the premises. Go to a
neighbour's house and call the local police to investigate.
w
Quick Arm Feature
w
w
When the Quick-Arm feature is enabled, the system may be armed simply
by pressing [ ][0] instead of the 4 digit access code. This feature allows a
person to arm but not disarm the system.
Enter [ ][6][Master Code][4] to turn the Quick-Arm feature ON and OFF.
When the command is entered, the keypad buzzer will beep 3 times if
Quick-Arm is being enabled and will sound one long beep if it is being
disabled.
Press [#] to return to ready.
*
*
Door Chime Feature
The door chime feature is used, while the panel is disarmed, to provide a
tone from the keypad each time a door or window is opened or closed.
The doors and windows which will provide this indication are programmed
by your installer.
Enter [ ][6][Master Code][6] to turn the door chime feature ON and OFF.
When the command is entered, the keypad buzzer will beep 3 times if the
door chime feature is being enabled, and will sound one long beep if it is
being disabled.
Press [#] to return to Ready.
*
3
Alarm Test
*
Enter [ ][6][Master Code][8] for a 2-second test of the keypad lights,
keypad buzzer, battery and the bell/siren.
Press [#] to return to Ready.
Programming Security Codes
The Master Code
Enter [ ][5][current Master Code][1][new Master Code]
Press [#] to return to Ready.
Record your new Master Code on the System Information page in this
booklet.
*
y
Additional Codes
Up to 5 additional access codes (2 through 6) may be programmed. The
6th access code may be established by your installer as a One-Time use
code.
ogram a new code:
To pr
program
Enter [ ][5][Master Code][code number][new 4 digit code]
The [code number] is a single digit either 2, 3, 4, 5 or 6.
Press [#] to return to Ready.
If an access code already exists, it will be replaced by the new code.
Record your new code(s) on the System Information page in this book.
To rremove
emove a code:
]
Enter [ ][5][Master Code][code number][
The [code number] is a single digit either 2, 3, 4, 5 or 6.
Press [#] to return to ready.
Do not erase the Master Code (code number 1).
NOTE: It is recommended that the factory default Master Code [1234] not be used.
.c
om
.m
*
****
.e
a
la
rm
*
w
One-Time Use Code
w
w
The One-Time Use code is designed for entry and exit of the premises for
one occasion only. The panel must be programmed by the installer for this
option to be enabled. The 6th access code is the one-time code.
To use this code, enter your one-time code as the 6th access code using
the previously described commands. When you leave the premises, arm
your system with any access code except the newly entered one-time use
code. This one-time code is given to a person (e.g. a maid) who will enter
the premises while the system is armed and you are away.
The one-time code user enters the premises and disarms the system using
the one-time access code. Upon leaving, the same code is used to arm the
system. As soon as the system is armed, the one-time code is erased and
can not be used to re-enter the premises. A different code can be provided
each time for the one-time user.
Alarm Memory Display
If the “Memory” light is ON, an alarm has occurred during the last armed
period. The alarm memory will automatically be displayed when the system
is disarmed (See Disarming the System).
Press [ ] then [3] to display the zone which caused the alarm.
Press [#] to return to Ready.
*
4
NOTE: The alarm memory is cleared each time the panel is armed so that
any alarms showing are alarms that occurred only during the last
armed period.
If An Alarm Sounds
Fire Alarm
If your system has been installed with fire detectors and the alarm sounds
in a pulsing mode, follow your Emergency Evacuation Plan immediately.
See the guide for family escape planning elsewhere in this manual.
y
Intrusion Alarm
If an intrusion alarm sounds (continuous Bell/Siren), the alarm may be
silenced by entering your access code. If the alarm was unintentional, call
local authorities immediately to avoid an unnecessary response.
You can determine the source of the alarm by following the instructions in
the Alarm Viewing section of this manual. Once the source of the alarm has
been corrected, the panel can be restored to its original armed state.
om
.m
Zone Bypassing
rm
.c
Use zone bypassing when access is needed to part of the protected area
while the system is armed. Bypassed zones will not cause an alarm. Zones
that are temporarily out of service due to damaged wiring or contacts may
be bypassed to allow system arming (partial protection) until repairs can
be made. Zones cannot be bypassed after the system is armed.
To bypass zones:
Enter [ ][1][Zone number(s) to be bypassed]
Enter zone number(s) as single digits (1-6).
As each zone is bypassed, the zone light will come ON. If a zone is
bypassed in error, press that zone number again and the zone light will go
OFF indicating that the zone is not bypassed.
Press [#] to return to Ready.
w
w
w
.e
a
la
*
To recall last group of zones bypassed:
Enter [ ][1][9]
Zone lights for the last group of zones bypassed will come ON to show
which zones are bypassed. If you wish to add or delete a zone from the
group, press [#] to exit then go to zone bypass as described above.
Press [#] to return to Ready.
*
Zone Bypassing (Continued)
For security reasons, your installer may prevent the bypass command from
working on certain zones. The “Bypass” light is ON as long as ONE or more
zones are bypassed. Do not unintentionally arm the system with zones
bypassed.
Zone bypasses are automatically cancelled each time the system is
disarmed and must be re-applied before the next arming.
Viewing Trouble Conditions
The PC1500/1550 continuously monitors a number of possible trouble
conditions. If one of these trouble conditions occur, the keypad will beep
twice every 10 seconds and the keypad “Trouble” indicator will light.
5
Pressing any key on the keypad will silence the sounder but the “Trouble”
light will remain ON until the trouble condition is cleared. If you cannot
determine the cause of the trouble condition, contact your installer for
assistance.
Press [ ][2] to display the type of trouble. A zone light will come on to
indicate which type of trouble exists. Press [#] to return to Ready.
*
LIGHT
TYPE OF TROUBLE
1 .................... Low battery.
2 .................... Loss of AC power (“Trouble” light will come ON, but
..................... keypad buzzer will not sound).
3 .................... Fuse open (BELL or AUX fuse).
4 .................... Fail to communicate with monitoring station.
5 .................... Fire loop(s) trouble.
6 .................... Loss of time on system clock.
Keypad Zones
w
w
w
.e
a
la
rm
.c
om
.m
y
There are three keys on the keypad labelled [F] Fire, [A] Auxiliary and [P]
Panic. These keys are only functional if they have been programmed by
your installer. The installer should indicate which of these keys are
functional by placing a coloured label next to the key symbol on the
keypad door label.
[F] Fire
Holding this key down for two seconds will sound a Fire Alarm. The alarm will
sound pulsing. The keypad will sound three beeps once the panel has
accepted the alarm. An auxiliary warning device is also activated if your
installer has connected it to your system. To silence the alarm, enter a valid
access code.
[A] Auxiliary
Holding this key down for two seconds activates this function if your installer
has programmed it. There is no audible alarm and no lights on the keypad
will come on. When the panel has accepted the alarm, the keypad will sound
a series of beeps. An auxiliary warning device is activated ONLY IF connected
to your system by your installer.
[P] Panic
Holding this key down for two seconds causes a steady tone on your siren or
bell if your installer has programmed this key for audible operation. An auxiliary
warning device is also activated if your installer has connected it to your
system. Enter a valid access code to silence the alarm.
Fire Alarm Operations
Alarm
On a fire alarm, the bell/siren will sound pulsing. The digital communicator
transmission is delayed for 30 seconds. If the alarm is not acknowledged
within the 30 second delay, the communicator will transmit to the monitoring
station.
Silence
To silence the bell/siren, press the [#] key. If the alarm is silenced and the
smoke detector is not reset, the alarm will resound after 90 seconds.
6
Reset
To restore the smoke detector(s) to normal, press [ ][7]. If the detector still
has smoke in it, the alarm will resound and the sequence described above
will repeat. If the detector is clear of smoke, the system will return to
normal.
NOTE: If you suspect that the communicator has transmitted and there is
no fire condition, call the monitoring station to avoid an
unnecessary response.
If a fire condition is apparent, follow your evacuation plan
immediately. If the alarm sounds at night, evacuate
immediately.
*
Testing Your System
om
.m
*
y
It is recommended that you test your system weekly.
NOTE: Perform system tests in the off-peak hours, such as early morning
or late evening.
1. Inform the monitoring station that you are testing your system.
2. Disarm the system (“Ready” light ON).
3. Perform a bell/battery test by pressing [ ][6][Master Code][8]. The
signal will sound for about 2 seconds. If a trouble occurs after the test,
press [ ][2] to view the trouble condition.
4. Activate each sensor in turn (e.g. open a door/window or walk in motion
detector areas). Observe the zone light come ON when the zone is
activated. The zone light will go OFF when the system restores to
normal (i.e. door or window closed).
5. If they are programmed for operation, press the [F], [A], and [P] keys in
turn. The [F] key will sound the bell/siren in a pulsed mode. Enter the
access code to silence the alarm. The [A] key is silent. The [P] key may
be programmed as silent or audible. If the alarm sounds, enter the
access code to silence.
6. If the panel has a zone programmed for fire, activation will cause the
alarm signal to sound in a pulsed mode.
CAUTION: Do not use an open flame or burn materials to test a smoke
detector. Contact your alarm installer for information on safe methods to
activate a smoke detector.
7. Should the system fail to operate properly, call your alarm dealer for
service.
8. When testing is complete, call and advise the monitoring station.
w
w
w
.e
a
la
rm
.c
*
Maintenance
With normal use, the system requires minimum maintenance. The following
points should be observed.
1. Do not wash the keypad with a wet cloth. Light dusting with a barely
damp cloth should remove normal accumulations of dust.
2. The battery/bell test is designed to determine battery condition, however
it is recommended that the standby battery be replaced every three
years.
3. For other system devices such as passive infrared, ultrasonic or
microwave motion detectors, glassbreak detectors or smoke detectors,
consult the respective manufacturer’s literature for testing and
maintenance.
7
1
2
1
3
2
Ready light ON - System is ready for
arming.
Ready light OFF - System has an open
zone which must be closed or bypassed
before arming.
Ready
Armed
5
6
4
7
5
8
9
0
#
6
Memory
Bypass
Armed light will come ON indicating the
system is armed. To arm, ensure “Ready”
light is ON - enter 4 digit code.
Trouble
Zone 1
y
4
Zone 2
.m
3
Zone 3
om
Zone 4
Memory light ON means an alarm has
occurred. Press [ ] then [3]. Zone light will
come ON to indicate which zone caused
the alarm.
*
Zone 5
A
P
F
A
Zone 6
w
.e
a
TEST SYSTEM WEEKLY
P
la
rm
.c
F
w
w
Press [F] for 2 seconds to activate
FIRE transmission.
Press [A] for 2 seconds to activate
an AUXILIARY transmission.
Bypass light comes ON when you bypass a
zone. To bypass a zone, press [ ][1] and
then the zone(s) you wish to bypass. Enter 1
for zone 1....6 for zone 6. Press [#] to return to
Ready.
*
Trouble light is ON when there is a fault in
the system. Press any key to silence the
keypad beeping. Press [ ] then [2] to
display the trouble type .
*
Zone Light
Press [#].....
.....
When an error is made in
entering code, then enter
code again.
To return to ready state
after using [ ] commands.
Trouble Type
1 ............. Low battery
2 ............. AC fail (buzzer does not sound)
3 ............. Fuse open (BELL or AUX fuse)
4 ............. Fail to communicate
5 ............. Fire loop(s) trouble
6 ............. Clock needs resetting
*
Press [P] for 2 seconds to activate
PANIC transmission.
Zone light(s) when ON in the disarmed mode,
indicate an open zone. e.g. open door,
window, etc. Refer to zone chart on the
keypad door for zone information.
THESE BUTTONS WILL NOT FUNCTION
UNLESS PROGRAMMED BY YOUR
INSTALLER.
8
9
.m
y
Instruction
Manual
PC15OO/PC155O
om
© 1997 Digital Security Controls Ltd.
1645 Flint Road, Downsview, Ontario, Canada M3J 2J6
Printed in Canada 29000203 R3
• W A R N I N G •
w
w
w
.e
a
la
rm
.c
This manual contains information on
limitations regarding product use and
function and information on the limitations
as to liability of the manufacturer. The entire
manual should be carefully read.