1
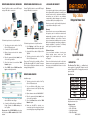
INTERNET SHARING FROM CABLE / DHCP MODEM
INTERNET SHARING FROM IPHONE 3G & 3GS
6. DISCLAIMER AND WARRANTY
Dension Trip Stick is able to create a WiFi hotspot
using a LAN cable for connection.
Dension Trip Stick is able to create a WiFi hotspot
using a LAN cable for connection.
Disclaimer
If your device begins to behave erratically, please
turn it off immediately and have it checked by your
reseller. Dension and its authorized distributors
and retailers are not liable for any incidental
consequential or indirect damages or loss and do
not assume liability for any diagnostic fees.
Trip Stick
Hotspot & Power Bank
Dension reserves the right to modify its products
or specifications without prior notice.
Follow the steps below to set up this function:
1. Turn the mode selector switch of the Trip
Stick to ‘R’ (Router) mode.
2. Connect to the Trip Stick via WiFi.
3. Open a browser and enter the address
‘192.168.169.1’
4. Enter the password (default ‘admin’) and
click on the Login button.
5. Select the internet icon and then ‘WAN
Network’ option.
6. Select ‘DHCP’ option as WAN Connection
type from the drop down list.
Follow the steps below to set up this function:
1. Go to ‘Settings’ on the iPhone and select
‘Personal Hotspot’ and turn that option ON .
Warranty
Dension devices carry a one-year limited warranty
that protects you from defects in material and
workmanship of products sold by Dension or its
authorized distributors and retailers. Dension
does not warrant any installation work or assume
liability for any damage caused due to negligence,
improper installation or operation. For warranty
claims, proof of purchase is required.
3. Turn the mode selector switch of the Trip
Stick to ‘R’ (Router) mode.
Further assistance
If you need further assistance in using your
Dension product, please contact your local
supplier or visit www.dension.com and click
on ‘Support’.
Please note: This function is available on iPhone
3G / 3Gs with using iOS 4.3.5 or below. The newer
iPhone devices already have internet connection
sharing (tethering) built-in.
Please check the download section for the latest
firmware version and product documentation, as
these may provide additional features or easier
use of the product.
2. Connect the iPhone cable to USB port of the
Trip Stick.
INTERNET SHARING FROM WIFI
Quick Start Guide
v.1.0
1. INTRODUCTION
The Dension Trip Stick is a multifunctional
device capable of creating WiFI Hotspot from 3G
modem, Ethernet, WiFi or charging any connected
phone via USB.
Specifications
Installation steps:
1. Turn the mode selector switch of the Trip
Stick to ‘R’ (Router) mode.
2. Use your Wireless LAN option on your
device and connect to the Trip Stick using
WiFi option.
3. Open a browser and enter ‘192.168.169.1’
7. Press ‘Apply’ and wait until the Trip Stick
reboots with the new settings.
8. Connect the LAN cable from the Modem /
Router / Switch to the RJ45 cable port of
the Trip Stick.
Please note: Select PPPOE (ADSL) option from
the list if you use ADSL modem instead of DHCP
modem.
4. Enter the password (default ‘admin’) and
click on the Login button.
5. Select the internet icon and then ‘WAN
Network’ option.
6. Make sure that WiFi is selected as a
connection type in the drop down list and
save settings by pressing the ‘Apply’ button.
For 3G modem compatibility please visit:
http://densionsmart.com
Package content
• Trip Stick device
• Micro USB Cable
• Cigar lighter adapter
• Quick Start Guide
MHS-9201-1
2. DEVICE CONNECTIONS AND INDICATORS
INTERNET SHARING FROM 3G USB MODEM
Dension Trip Stick is capable of creating WiFi
hotspot using a 3G USB dongle. Follow the steps
below in order to set up this function:
3. CHARGING
1. Connect the 3G USB modem to the USB
port of the Trip Stick
The battery of the Trip Stick can be charged using
a standard USB cable via
2. Turn the mode selector switch of the Trip
Stick to ‘R’ (Router) mode.
3. Turn ON your Wireless LAN option on your
device and connect it to the Trip Stick (WiFi
name: 3GRouter…)
• AC Power Adapter (5V DC out)
• PC / Notebook
• Cigar lighter charger (5V DC out)
While the Trip Stick is charged the blue LED next
to the DC connector will be constantly ON. The
LED turns off immediately when the battery is fully
charged (approx. 4hrs).
Enter the default password ‘admin’ and click on
the Login button.
7. Select “3G” option as a WAN Connection
type from the drop down list
The Dension Trip Stick works as a portable
charger that lets you enjoy more time with your
portable devices (like phone, digital camera,
handheld consoles or portable player) which use
standard USB cable for charging.
1. Connect the USB cable of the device to the
Trip Stick.
2. Turn the Mode Selector switch of the Trip
Stick either to ‘C’ (Charge) mode.
Please note: Charging function is available also
in ‘R’ (Router) mode, if the Router function is also
necessary.
5. Enter the password (default ‘admin’) and
click on the Login button.
6. Select the internet icon and then ‘WAN
Network’ option
4. POWER BANK
How to charge connected device(s)
4. Open a web browser on your computer and
enter the address ’192.168.169.1’
You are now on the settings page of your Trip
Stick device, where you can set up your internet
connection and WiFi preferences.
5. WIRELESS ROUTER OPTIONS
Computer settings
Before connecting to the Dension Trip Stick please
make sure that the wireless network settings on
your computer are set to ‘automatically obtain IP
address’ and ‘automatically obtain DNS’.
Turn the mode selector switch of the Trip Stick to
‘R’ (Router) mode.
Turn the Wireless LAN (WiFi) of the computer
ON, search for available networks and connect to
‘3Grouter_...’. The name of the WiFi connection
can be changed later in the Trip Stick’s settings
menu.
Open a web browser on your computer and
enter the address ‘192.168.169.1’ to get to the
configuration page of the device.
Please note: If you changed the WiFi preferences
(e.g. Network name, Password), you may need to
reconnect your computer to the Trip Stick. If the
Trip Stick does not work as it is expected, press
and hold the reset button on the device for 5
seconds in order to set all settings back to the
factory default.
8. Add the PIN code of the SIM card
(if necessary) and press ‘Apply’. The
connection will be established (status LED
will be solid) within 1 minute (depending on
your signal strength & speed).
If the connection cannot be established, please
go back to the ’WAN Network’ settings, select
‘Manual APN’ option and fill in manually the APN
settings from your provider. When it’s done, press
the ‘Apply’ button and test the connection again.