1
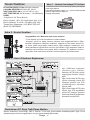
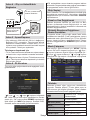
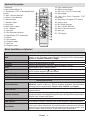
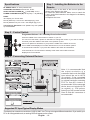
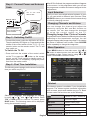
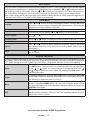
VESTEL
TELEViZYON
KULLANIM KILAVUZU
OPERATING INSTRUCTIONS
PERFORMANCE 24VF3021 24” LED TV
İçindekiler
GÜVENLİK ÖNLEMLERİ....................................................................1
Teknik Özellikler..................................................................................2
Desteklenen PC Girişi Tipik Ekran Modları.........................................2
Adım 1 – Uzaktan Kumandaya Pil Takılması.......................................2
Adım 2 - Kontrol Düğmesi...................................................................2
Adım 3 – Harici Cihazların Bağlanması ..............................................2
Adım 4 – Güç ve Anten/Kablo Bağlantısı............................................3
Adım 5 - Açmak/Kapatmak..................................................................3
Adım 6 - İlk Kurulum............................................................................3
Menü Çalışması..................................................................................3
Uzaktan Kumanda ..............................................................................4
Menü özellikleri ve İşlevleri..................................................................4
GÜVENLİK ÖNLEMLERİ
Kendi güvenliğiniz için aşağıdaki güvenlik önlemlerini
okuyun.
Güç Kaynağı: Televizyon, yalnızca 220-240 V AC 50 Hz
çıkışla çalıştırılmalıdır. Kullanım kolaylığınız için doğru
voltajı seçtiğinizden emin olunuz.
Güç Kablosu: Güç kablosu (elektrik kablosu) üzerine TV,
mobilya, vs. yerleştirmeyiniz veya kabloyu bükmeyiniz.
Bağlantı fişi, elektrik kablosuna ve prizlere kolayca
erişebilmelidir. Elektrik kablosunu fişten tutarak çekiniz.
Cihazın fişini güç kablosundan çekerek çıkarmayınız ve
güç kablosuna asla elleriniz ıslakken dokunmayınız; bu
kısa devreye veya elektrik çarpmasına neden olabilir.
Kabloyu asla düğümlemeyiniz veya başka kablolarla birlikte
bağlamayınız. Güç kabloları, üzerlerine basılmayacak
şekilde yerleştirilmelidir. Hasar görmüş bir güç kablosu
yangına veya elektrik çarpmasına neden olabilir. Kablo
hasar gördüğünde ve değiştirilmesi gerektiğinde, bu işlem
vasıflı personel tarafından yapılmalıdır.
Nem ve Su: Bu cihazı nemli ve ıslak yerlerde kullanmayınız
(banyoda, mutfak lavabosu ve bulaşık makinesi yakınlarında
kullanmaktan kaçınınız). Tehlike yaratabileceğinden, bu
aleti yağmura veya suya maruz bırakmayınız ve üzerine
vazo gibi sıvı içeren nesneler koymayınız. Su damlatmaktan
veya sıçratmaktan kaçınınız. Eğer kabinin üzerine herhangi
sert bir nesne düşecek veya sıvı dökülecek olursa, TV’nin
fişini çekiniz ve tekrar çalıştırmadan önce vasıflı eleman
tarafından kontrol ettiriniz.
Temizlik: Temizlemeden önce TV’nin fişini prizden çekiniz.
Sıvı veya sprey temizleyiciler kullanmayınız. Yumuşak ve
kuru bir kumaş kullanınız.
Havalandırma: TV seti üzerindeki yuva ve delikler
havalandırma ve güvenli çalışma için yapılmışlardır.
Aşırı ısınmadan kaçınmak için bu delikler hiçbir şekilde
engellenmemeli veya kapatılmamalıdır.
Isı ve Ateş Kaynakları: Cihaz, çıplak alevlerin veya
elektrikli ısıtıcı gibi yoğun ısı kaynaklarının yakınına
yerleştirilmemelidir. TV’nin üzerine, yanan mumlar
gibi hiçbir çıplak ateş kaynağının koyulmadığından
emin olunuz. Pillerin güneş ışığı, ateş veya benzeri
türde aşırı ısıya maruz bırakılmaması gerekmektedir.
Yıldırım: Fırtına ve yıldırım halinde veya tatile çıkarken
güç kablosunu prizden çıkarınız.
Yedek Parçalar: Yedek parça gerektiğinde, servis
teknisyeninin üretici tarafından belirtilen veya aslıyla aynı
teknik özelliklere sahip parçalar kullandığından emin
olunuz. Yan sanayi parçalarla değişim yapılması halinde
yangın çıkabilir, elektrik çarpabilir veya başka tehlikelere
neden olunabilir.
Servis İşlemleri: Lütfen bütün servis işlemleri için
yetkili personele danışınız. Elektrik çarpmasına neden
olabileceğinden, kapağı kendiniz çıkartmayınız.
Atıkların yok edilmesi: Ambalaj ve ambalaja yardımcı
malzemeler geri dönüşebilir ve geri dönüştürülmeleri gereklidir.
Folyo poşet gibi paketleme malzemeleri çocuklardan uzak
tutulmalıdır. Pillerin –ağır metal içermeyenler de dâhil olmak
üzere- evsel atıklar ile birlikte atılmaması gerekir. Lütfen
kullanılmış pilleri çevreye saygılı bir şekilde yok ediniz.
Bulunduğunuz bölgede geçerli olan yasal yönetmelikler
hakkında bilgi edininiz. Pilleri yeniden şarj etmeyi denemeyin.
Patlama tehlikesi vardır. Pilleri sadece aynı veya dengi tür
pillerle değiştirin. LED PANEL’de bulunan soğuk katotlu
floresan lamba az miktarda cıva içerir; lütfen atık bertaraf
etme için yerel tertip ve yönetmeliklere uyunuz.
Ürün veya ambalajı üzerindeki bu simge,
elektrik veya elektronik cihazınızın, kullanım
ömrünü tamamladığında, evsel atıklarınızdan
ayrı olarak bertaraf edilmesi gerektiği anlamına
gelir. AB’de geri dönüşüme yönelik ayrı toplama
sistemleri bulunmaktadır. Ayrıntılı bilgi için,
lütfen ürünü satın aldığınız yerel yetkili merci
veya bayi ile temasa geçiniz.
Cihazı Prizden Çıkarma: Elektrik kablosu TV’ setinin
elektrik şebekesi ile olan bağlantısının kesilmesi için
kullanılır, dolayısı ile hali hazırda işleyebilir kalacaktır.
Kulaklık Sesi: Kulaklıklardan gelen aşırı ses basıncı
duyma kaybına yol açabilir.
Kurulum: Yaralanmaları önlemek için, bu cihaz duvara
monte edilirken kurulum talimatlarına uygun olarak, sağlam
şekilde duvara tutturulmalıdır (bu seçenek mevcutsa).
LED Ekran: Bu LED paneli, yaklaşık bir milyon ince film
transistörü içeren, ince görüntü detaylarını sağlayan son
derece yüksek bir teknoloji ürünüdür. Ara sıra ekranda
sabit noktalar halinde mavi, yeşil veya kırmızı bir kaç ölü
piksel belirebilir. Lütfen bunun ürününüzün çalışmasını
etkilemediğini göz önünde bulundurunuz.
Uyarı: Evden ayrılırken TV’nizi bekleme konumunda veya
çalışır halde bırakmayınız.
Ayarlayıcıdan Bir TV Dağıtım Sistemine Bağlantı
Elektrik bağlantısı yoluyla veya koruyucu topraklamaya
bağlantısı bulunan başka bir cihaz aracılığıyla binanın
koruyucu topraklamasına bağlanan ve koaksiyal kablo
kullanılarak bir televizyon dağıtım sistemine bağlanan cihazlar,
bazı koşullarda yangın tehlikesi oluşturabilir. Bu nedenle
belirli bir frekans aralığının altında elektriksel izolasyon
sağlayan bir aygıt yoluyla bir kablo dağıtım sistemine bağlantı
sağlanmalıdır (galvanik yalıtıcı, bkz EN 60728-11).
Not : PC ile TV arasındaki HDMI bağlantısı radyo
parazitlerine neden olabilir. Bu durumda VGA (DSUB-15)
bağlantısının kullanılması önerilir.
Elektrikli cihazların çocuklar tarafından kullanılmasına
hiçbir zaman izin verilmemelidir. Çocuklar muhtemel
tehlikeleri her zaman farkına varamazlar. Çocuklar olası
tehlikeleri her zaman düzgün bir şekilde algılayamaz.
Piller / akümülatörler yutulduğunda ölüm tehlikesi
oluşturabilir. Pilleri küçük çocukların erişemeyeceği bir
yerde saklayın. Bir pilin yutulması durumunda derhal
tıbbi yardım aranmalıdır. Ayrıca ambalaj malzemelerini de
çocuklardan uzak tutun. Boğulma tehlikesi vardır.
Türkçe - 1 -
Teknik Özellikler
RF ANTEN GİRİŞİ 75 Ohm (dengeli olmayan)
ÇALIŞMA GERİLİMİ 220-240V AC, 50 Hz.
SES ÇIKIŞ GÜCÜ (WRMS.) (%10 THD): 2 x 2,5
GÜÇ TÜKETİMİ (W): 50 W (maks) < 1 W (Bekleme)
PANEL
16:9 görüntü, 24” Ekran Boyutu
BxUxY (Ayaklı): 135 x 579 x 408 Ağırlık (Kg): 5,20
BxUxY (Ayaksız): 35 x 579 x 372 Ağırlık (Kg): 4,80
Transmisyon Standartları: VHF (BANT I/III) UHF
(BANT U) HİPERBANT
Adım 1 – Uzaktan Kumandaya Pil Takılması
1. Uzaktan kumandanın arkasındaki kapağı şekilde gösterildiği gibi
yukarı doğru kaldırınız.
2. Iki adet AAA pili takınız. Pillerin + ve – uçlarının pil bölmesindeki
gösterime uygun olmasını sağlayınız.
3. Kapağı yerine takınız.
+
-
-+
Adım 2 - Kontrol Anahtarı
Program/Ses / AV / Bekleme-açık seçim anahtarı
TV’nizi açmak için kontrol anahtarının ortasına basın.
Anahtarı yukarı ve aşağı hareket ettirerek sesi değiştirebilirsiniz. Eğer
kanalları değiştirmek isterseniz anahtarın ortasına bir kez basın (konum 3)
ve sonra yukarı veya aşağı hareket ettirin. Eğer anahtarın ortasına bir kez
daha basarsanız kaynak ekran menüsü görüntülenir. Eğer anahtarın ortasına
bastıktan sonra birkaç saniye daha basılı tutarsanız TV bekleme moduna
geçecektir. Ana menü ekran menüsü kontrol tuşları ile görüntülenemez.
Adım 3 – Harici Cihazların Bağlanması
Not: HDMI’dan bağlanan
cihazların çıkış çözünürlüklerinin AUTO(veya orjinal)
seçeneğine alınması tavsiye
edilir.
Eğer cihazınızda AUTO(veya
orjinal) seçeneği yoksa HD
olmayan içerikler için 576i
çözünürlüğünün seçilmesi
tavsiye edilir.
Eğer cihazınızda AUTO(veya
orjinal) veya 576i seçenekleri
yoksa HD olmayan içerikleri
Scart veya Side AV girişlerinden
izlemeniz tavsiye edilir.
Desteklenen PC Girişi Tipik Ekran Modları
Ekranın maksimum çözünürlüğü 1920 X 1080’dir. TV’niz farklı çözünürlükleri desteklemeyebilir. Eğer PC’nizi
desteklenmeyen bir konuma geçirirseniz, bir uyarı yazısı ekranda görünecektir.
Türkçe - 2 -
APS sonlandıktan sonra ekranda program tablosu
belirecektir. Program tablosunda, program numaralarını
ve programlara verilen isimleri görürsünüz.
Adım 4 – Güç ve Anten/Kablo
Bağlantısı
75 ohm yuvarlak anten
kablosu kullanınız.
TV'nin ARKASI
Giriş Seçimi
Harici sistemleri TV’nize bağladıktan sonra farklı giriş
kaynaklarına geçebilirsiniz. Kaynakları doğrudan
değiştirebilmek için kumanda üzerindeki SOURCE
tuşuna basınız.
Kanal ve Ses Değiştirmek
Uzaktan kumanda üstünde yer alan V+/- ve P+/tuşlarını kullanarak kanalı değiştirebilir ve sesi
ayarlayabilirsiniz. Kontrol anahtarını kullanarak da
kanalları değiştirebilirsiniz.
Veya
Elektrik fişinizi duvar
prizine güvenli bir
şekilde takınız.
Fişi takınız…
Adım 5 - Açma/Kapama
•Güç kablosunu 220-240V AC 50 Hz.’e bağlayınız.
Bekleme LED’i yanacaktır. Televizyonda kontrol
anahtarının ortasına basın ve basılı tutun, P+ / Ptuşlarına veya uzaktan kumanda üzerindeki sayısal
bir tuşa basın. Televizyon açılacaktır.
Televizyonu kapatmak için
•TV’nin üzerindeki kontrol anahtarının ortasına basın
ve basılı tutun veya uzaktan kumanda üzerindeki “
” düğmesine basın, böylece TV bekleme moduna
geçer. Televizyonu tamamen kapatmak için elektrik
fişini prizden çekiniz
Görüntü Boyutunu Değiştirme:
Resim Formatları
Programlar alınan yayına bağlı olarak farklı resim
formatlarında izlenebilir. Farklı yakınlaştırma (zoom)
modlarında resim görüntülemek için TV’nin görünüm
oranını (resim boyutunu) değiştirebilirsiniz. Resim
boyutunu değiştirmek için SCREEN tuşuna üst üste
basınız.
Menü Çalışması
Ana menüyü görüntülemek için “MENU” tuşuna
basınız. Bir menü simgesini seçmek için “ ” veya “
” tuşunu kullanınız veya bir öğeyi vurgulamak için “
” veya “ ” tuşunu kullanınız. “ ” veya “ ” tuşunu
kullanarak bir öğe seçiniz. Onaylamak veya girmek
için OK tuşuna basınız.
Adım 6 - İlk Kurulum
TV’nizi ilk defa açtığınızda ekranda aşağıdaki menü
gösterilecektir
Teleteks
Teletekst sistemi eğer yayıncınız desteklerse
uygundur. Teleteks sistemi, TV’nize haber, spor ve
hava durumu gibi bilgileri gönderir. Temel uzaktan
kumanda tekst fonksiyonları aşağıdaki gibidir
“ ” veya “ ” ve “ ” veya “ ” tuşlarını kullanarak
Dil , Metin Dili ve Ülke seçimi yapabilirsiniz. Devam
etmek için, “OK” tuşuna ya da KIRMIZI tuşa basınız.
İptal etmek için MAVİ tuşa basınız. Sıradaki OSD,
otomatik arama esnasında görüntülenecektir:
Teletekst Açık / Karıştır /
Teletekst Kapalı
Alt kod Sayfaları
RETURN (GERİ)
Teletekst Dizin sayfası
BİLGİ
Göster
SCREEN
Genişlet
P+/P- / 0-9
Sayfa seç
Renkli Tuşlar
Türkçe - 3 -
Uygun şekilde çalışır
Uzaktan Kumanda
1. Bekleme
2. Mono-Stereo/Dual I-II
3. Genişletme (TXT modunda)/Görüntü
boyutu
4. Yeşil / Görüntü Menüsü
5. Kırmızı / Ses Menüsü
6. Rakam tuşları
7. Teleteks / Miks
8. İmleç sola
9. Menü açık / kapalı
10. AV / Kaynak
11. İşlev yok
12. Ses Seviyesini Artırma
13. Bilgi/Göster (TXT modunda)
14. Sessiz
15. Ses azaltma
16. Program aşağı
17. İşlev yok
18. Program yukarı
1
30
2
3
4
5
6
7
SUBTITLE
29
28
PIP
SCREEN
LANG
1
2
6
3 4
7 8
27
5
9
0
25
26
24
8
9
OK
10
11
12
13
14
15
23
22
21
RETURN
MENU
SOURCE
FAV
PRESETS
20
SLEEP
V+ P+
V
V
?
V
INFO
19
18
19. Uyku zamanlayıcısı
20. Resim modu seçimi
21. OK / Seç / Tut (TXT modunda)
22. İmleç aşağı
23. Geri dön /Dizin Sayfaları (TXT
modunda)
24. Sağ imleç / Alt sayfa (TXT modu)
25. İmleç yukarı
26. Bir önceki program
27. Sarı / Özellik Menüsü
28. Mavi/ Yükleme menüsü
29. İşlev yok
30. TXT Altyazı
EPG
V-
P-
17
16
Menü özellikleri ve İşlevleri
Görüntü Menüsü
Mod
Kontrast
Parlaklık
Keskinlik
Renk
Ton
Renk Sıcaklığı
Görüntü Yakınlaştırma
Sıfırlama
Görüntüleme gereksinimleriniz için, ilgili mod seçeneğini girebilirsiniz.
Resim modu aşağıdaki seçeneklerden herhangi birisine ayarlanabilir:
Kullanıcı, Sinema, Dinamik ve Doğal.
Ekranın aydınlık ve karanlık değerlerini ayarlar.
Ekranın parlaklık değerini ayarlar.
Ekranda görüntülenen cisimlerin keskinlik değerini ayarlar.
Renk değerini girer, renkleri ayarlar.
Düzeyi kaydetmek için “ ” veya “ ” tuşlarına basınız. Ton seçeneği TV,
NTSC sinyali aldığında görüntülenebilir.
İstenen renk tonunu ayarlar.
Resim boyutunu Otomatik, 16:9 veya 4:3 olarak ayarlar.
Resim ayarlarını fabrika ayarlarına sıfırlar.
Gelişmiş Kontroller
Gürültü Azaltma
Film Konumu
Dinamik Kontrast
Eğer yayın sinyali zayıfsa ve görüntü karlı ise, düzeltmek için, “Gürültü
Azaltma” ayarını kullanınız. Gürültü Azaltma aşağıdaki seçeneklerden
herhangi birisine ayarlanabilir: Düşük, Orta, Yüksek veya Kapalı.
Bu özelliği, hızlı hareketleri net bir şekilde görmek istediğiniz filmleri
izlerken açınız.
Kontrast seviyesini seçilen moda göre gösterilen içeriğe uygun şekilde ayarlar.
Dinamik kontrast oranı aşağıdaki seçeneklerden herhangi birisine ayarlanabilir:
Düşük, Orta, Yüksek veya Kapalı.
Ten rengi tonu
İstenen ten rengi tonunu ayarlar.
RGB Kazancı
RGB Kazancı özelliğini kullanarak renk sıcaklık değerlerini yapılandırabilirsiniz.
Oyun Modu
Oyun Konumu açık olarak seçildiğinde, daha iyi görüntü kalitesi alabilmek için geliştirilmiş
oyun konumu ayarları yüklenecektir. Oyun Konumu açıkken, Görüntü Konumu, Parlaklık,
Keskinlik, Renk ve Renk Sıcaklığı ayarları görüntülenemeyecek ve kapalı olacaktır. Oyun
Konumu açıkken, Görüntü Konumu seçme tuşunun işlevi kaybolacaktır.
Türkçe - 4 -
HDMI Gerçek Siyah
TV HDMI kaynaktan izlenirken bu özellik Gelişmiş Ayarları menüsünde gösterilecektir.
Görüntünün siyahlığını iyileştirmek için bu özelliği kullanabilirsiniz. HDMI Gerçek Siyah
modunu etkinleştirmek için bu özelliği “Açık” olarak ayarlayabilirsiniz.
Ses Menüsü
Ses
Ekolayzır
Balans
Ses Modu
AVL
Sıfırlama
Sesi seviyesini ayarlar.
Ekolayzır menüsünde önceki ayar Müzik, Film, Konuşma, Düz veya
Kullanıcı olarak değiştirilebilir. Önceki menüye geri dönmek için “MENU”
tuşlarına basınız. Ekolayzır menüsü ayarları sadece Ekolayzır, Kullanıcı
Konumunda olduğu zaman manüel olarak değiştirilebilir.
Bu ayar, sol veya sağ hoparlör dengesini belirtmek için kullanılır.
Seçilen kanalın o modu desteklemesi halinde Mono, Stereo, Dual I veya
Dual II modlarını seçebilirsiniz.
Otomatik Ses Sınırlama (AVL) işlevi, programlar arasında sabit bir çıkış
seviyesi elde etmek için sesi ayarlar (Örneğin reklamların ses seviyesi,
genellikle programlardan daha yüksektir).
Resim ayarlarını fabrika ayarlarına sıfırlar.
Özellik Menüsü
Otomatik Kapanma
Çocuk Kilidi
Dil
Varsayılan
(Opsiyonel)
Mavi Arkaplan
Menü Zaman Aşımı
Teleteks Dili
Uyku zamanlayıcısını ayarlar. Zamanlayıcı, 10 dakikalık adımlarla, Kapalı
ile 2 saat (120 dakika) arasında programlanabilir. Otomatik Kapanma
etkinleştirilirse seçilen süre sonunda TV otomatik olarak bekleme
konumuna geçer.
Çocuk kilidini etkinleştirir veya devre dışı bırakır. Açık seçildiğinde, TV’niz
yalnızca uzaktan kumanda ile kontrol edilebilir. Bu durumda, kontrol
panelindeki BEKLEME düğmesi dışındaki hiçbir düğme çalışmayacaktır.
Çocuk kilidi etkinleştirildiğinde Bekleme / Açık düğmesi ile TV’yi Bekleme
moduna alabilirsiniz. TV’yi tekrar açmak için uzaktan kumanda gereklidir.
Dolayısıyla, bu tuşlardan birine basılırsa, menü ekranda değilken ekranda
“Çocuk Kilidi Açık” mesajı görüntülenir.
Dili ayarlar.
Zoom Konumu OTOMATİK’e ayarlanmışsa, TV’niz yayınlanan sinyale
uygun olarak görüntüyü yakınlaştıracaktır. Eğer WSS ya da açı oran
Zoom bilgisi bulunmuyorsa, TV’niz varsayılan ayarını kullanacaktır. Geçerli
Yakınlaştırma menüsünü seçmek için “ ” veya “ ” düğmesine basın. “
” veya “ ” düğmesine basarak, Varsayılan Yakınlaştırma‘yı 16:9 veya
4:3 olarak ayarlayabilirsiniz.
Sinyal zayıfsa veya yoksa mavi arka plan sistemini etkinleştirir veya devre dışı bırakır.
Menü ekranlarının zaman aşımı süresini değiştirir.
Teletekst dilini ayarlar.
EXT Çıkışını etkinleştirir veya devre dışı bırakır. Bir DVD veya VCR
cihazından kopyalama yapmak için kaynak menüsünden istenilen
EXT Çıkışı
kaynağı seçip, özellik menüsünden EXT Out (EXT Çıkışı’nı “Açık”konuma
getirmeniz gerekir. DTV modunda Zamanlayıcılar işlevinin kullanılabilmesi
için Ext Çıkış Açık (On) konumunda olmalıdır.
Otomatik kapanma özelliğinin zaman aşımı değerini belirleyebilirsiniz.
Otomatik TV Kapama
Zaman aşımı değerine ulaşıldığında ve TV belirtilen süre boyunca
kullanılmadığında, TV kapanacaktır.
Store modunu “AÇIK” olarak ayarlarsanız, TV’nizin özellikleri ekranın
Store modu (opsiyonel)
üstünde görüntülenecektir. Bu özelliği devre dışı bırakmak için lütfen
“KAPALI” olarak ayarlayın.
Arka Işığı (opsiyonel)
Arka Işığı; Otomatik, Orta, Maksimum veya Minimum olarak ayarlar.
Enerji Tasarruf Modunu açar veya kapatır. Enerji Tasarrufu Modunu
Enerji
Tasarrufu
Modu açarsanız, TV enerji tasarrufu moduna geçecek ve TV’nin parlaklığı
(opsiyonel)
optimum seviyeye indirilecektir. TV Enerji Tasarrufu Modunda olduğunda
bazı görüntü ayarlarının değiştirilemeyeceğine dikkat ediniz.
Türkçe - 5 -
Kaynak Menüsü
TV’nize harici sistemler bağladıktan sonra, o kaynaktan görüntü alabilmek için gerekli girişi seçmelisiniz
Kaynak menüsünde, “ ” veya “ ” tuşlarına basarak kaynağın ışığının yanmasını sağlayınız ve OK
tuşuna basarak o moda geçiniz. “ ” veya “ ” düğmeleri ile Açık veya Kapalı ayarlarını seçebilirsiniz. Kapalı
seçimi yapıldığında, uzaktan kumanda üzerindeki “SOURCE” düğmesine basıldığında bu kaynak ekran
menüsünde görüntülenmez.
Not : YPbPr sadece YPbPr çıkışlı bir cihazı PC-VGA girişiniz aracılığı ile YPbPr kablosunu PC kablosuna
bağladığınızda kullanılabilir (YPbPr kablosu cihazla birlikte verilmez).
Kurulum Menüsü
Program
Kanal numarasını seçmek için “ ” veya “ ” tuşlarına basınız. Uzaktan
kumanda üzerinde bulunan rakam tuşlarıyla da bir rakam girebilirsiniz. 0
ile 199 arasında 200 program belleği vardır.
Bant
Bant, C veya S olarak seçilebilir
Kanal
Kanal “ ” veya “ ” tuşu veya rakam tuşları ile değiştirilebilir.
Renk Sistemi
Renk sistemini AUTO, PAL veya SECAM olarak değiştirmek için “ ” veya
“ ” tuşunu kullanınız.
Ses Sistemi
“ ” veya “ ” tuşuna basarak, ses sistemini BG, DK, I, Lveya L’ olarak
değiştirebilirsiniz.
İnce Ayar
Kanalların ince ayarını yapmak için bu ayarı kullanabilirsiniz.
Arama
Kanal aramasını başlatmak için “ ” veya “ ” tuşlarını kullanınız. Ayrıca,
Arama öğesi seçiliyken, rakamlı tuşları kullanarak istenen frekansı
girebilirsiniz.
Kaydet
Ayarları kaydetmek için “ ” veya OK tuşuna basınız. Ekranda
“Kaydedildi…” iletisi görüntülenecektir.
Program Tablosu Menüsü
Program tablosunu kullanarak ve imleci dört yöne hareket ettirerek aynı sayfada 20 programa ulaşabilirsiniz.
TV Konumunda (AV Konumları dışında) tüm programları görmek için yön tuşlarına basarak sayfaları aşağı
ve yukarı kaydırabilirsiniz. İmleç hareketiyle program seçimi kendiliğinden yapılır.
İsimlendirme
Bir programın adını değiştirmek için programı seçiniz ve KIRMIZI tuşa
basınız. Seçilen adın ilk harfi belirgin hale gelecektir. Bu harfi değiştirmek
için “ ” veya “ ” tuşlarına veya sayısal tuşlara ve diğer harfleri seçmek
için “ ” veya “ ” tuşlarına basınız. KIRMIZI tuşa basarak ismi hafızaya
alabilirsiniz.
Sil
Bir programı silmek için SARI tuşa basınız. SARI tuşa tekrar basmak,
seçilen programı, program listesinden siler ve sıradaki programları bir
satır yukarı kaydırır.
Taşı (Move)
APS
Taşımak istediğiniz programı yön tuşlarıyla seçiniz. YEŞİL tuşa basınız.
Yön tuşlarını kullanarak seçilen programı belirlenen program alanına
götürünüz ve YEŞİL tuşa tekrar basınız.
Tüm kaydedilen kanalları ve ayarları siler, TV’yi fabrika ayarlarına sıfırlar
ve ilk kurulumu başlatır. Bu işlemle ilgili daha fazla bilgi için İlk Kurulum
bölümüne bakınız.
“AEEE Yönetmeliğine Uygundur”
Türkçe - 6 -
PC Pozisyonu Menüsü
Ekranı otomatik olarak en uygun hale getirir. En
uygun hale getirmek için OK tuşuna basınız.
Bu özellik, görüntüyü ekranın sağ veya sol tarafına
yatay olarak kaydırır.
Bu özellik, görüntüyü ekranın üstüne veya altına
doğru dikey olarak kaydırır.
TV setine girdiğiniz çözünürlüğe ve tarama sıklığına
bağlı olarak ekranda bulanık veya gürültülü bir
görüntü görebilirsiniz. Böyle bir durumda, deneme
yanılma yöntemiyle daha net bir görüntü almak için
bu özelliği kullanabilirsiniz.
Nokta Saati (Dot Clock) ayarlamaları, hesap çizelgesi
gibi yoğun nokta içeren sunumlar veya küçük
karakterlerin kullanıldığı paragraflar ya da metinlerde
dikey şerit olarak görünen paraziti düzeltir.
Otomatik konum (PC modunda)
H Yatay (PC modunda)
V Yatay (PC modunda)
Faz (PC modunda)
Nokta Saati (PC modunda)
Sayın Müşterimiz;
Bu üründe TFT LED Display teknolojisi kullanılmıştır.
TFT-LED ürünlerde görüntü piksel adı verilen renkli ışık noktaları ile oluşturulur.
Her bir piksel 3 adet alt-pikselden [sabit renkli (kırmızı, yeşil, mavi) ışık noktası] oluşmaktadır.
Üretim teknolojileri gereği söz konusu alt-pikseller sürekli yanık ya da sürekli olarak sönük kalmak şeklinde
“alt-piksel hatasına” neden olabilirler.
Olası bir alt piksel hatası ile ilgili aşağıdaki açıklamayı dikkate almanızı rica ederiz.
Bu problem ile ürünün üretimi aşamasında karşılaşılacağı gibi, kullanım sürecinde de karşılaşılabilinir.
Alt-piksel hataları 2 ana çeşittir.
Tip 1 : Sürekli yanan alt-piksel (kırmızı, yeşil veya mavi olabilir)
Tip 2 : Sürekli sönük alt-piksel (siyah bir şekilde görünür)
ISO 13406-2 standardına göre aşağıdaki özet tablo alt-piksel hataları için belirlenmiştir.
Tipi Açıklama
Adet
Not
Rastgele (5 mm ya da daha fazla aralıklı) 2 adet Kriter dahilidir, müdahale edilmez
Tip1 Bitişik 2 pixel
1 adet Kriter dahilidir, müdahale edilmez
Bitişik 3 ya da daha fazla pixel
Kriter haricidir
Rastgele (5 mm ya da daha fazla aralıklı) 7 adet Kriter dahilidir, müdahale edilmez
Tip2 Bitişik 2 pixel
2 adet Kriter dahilidir, müdahale edilmez
Bitişik 3 ya da daha fazla pixel
Tip1 ve Tip2 Toplam
Kriter haricidir
7 adet Kriter dahilidir, müdahale edilmez
Türkçe - 7 -
ÖNEMLİ UYARILAR
1. Üreticinin saklı bulundurduğu haklar:
Üretici firma, üründe ya da ürünün kullanım kılavuzunda belirtilen özellikleri, teknolojideki ilerlemenin gereği
olarak, herhangi bir bilgilendirme yapmadan değiştirme hakkını saklı tutar.
2. Ekran Teknolojisi ile İlgili Uyarılar:
TFT ve Plazma teknolojisi gereği, ekranda aktif olmayan ya da sürekli parlayan beyaz, kırmızı ya da mavi
noktacıklar (pixeller) bulunabilir. Bu ürünün performansını etkilemez, bu bir arıza değildir. Bununla ilgili detaylar
kullanım kılavuzunun ilgili sayfalarında belirtilmiştir. Kriterler dahilindeki durumlarda üretici firma herhangi bir
sorumluluk taşımaz.
3. Ekranda sürekli sabit görüntünün kalması:
TFT ve Plazma teknolojisi gereği, ekranda sürekli sabit görüntünün kalması, sürekli aynı arka planın ekranda
gösterilmesi ya da 16:9 bir televizyonda, uzun süre 4:3 görüntü izlenmesi sonrası, ekranda “yanma” etkisi
meydana gelebilir. Bu etkinin oluşmaması için aşağıdakilere uymanız önemle tavsiye edilir.
•Sürekli sabit görüntü izlemeyiniz.
•16:9 formattaki televizyonunuzda 4:3 formatta görüntü izlemeyiniz.
•Kontrast ve parlaklığı en düşük seviyede kullanmaya çalışınız.
4. Full HD ürünlerde;
TV yayını yada diğer kaynaklardan verilen yüksek çözünürlük desteği olmayan uydu alıcısı, DVD player ya da
kablolu kanal yayınlarında beklenen performans alınamayabilir ve bu yayınlarda resimde mozaiklenme veya
resim netlik ve keskinliği az, görüntüde ekranda bazı efektler oluşabilir. Bu bir arıza değildir. Yüksek çözünürlüğü
(1920x1080) destekleyen TV’nizin iyi bir performans ile çalışabilmesi için Full HD teknolojisi gereği, yüksek
çözünürlüklü yayın (HD yayın) ile izlenilmesi tavsiye edilir. TV yayını ya da diğer kaynaklardan verilen yüksek
çözünürlük desteği olmayan uydu alıcısı, DVD player ya da kablolu kanal yayınlarında beklenen performans
alınamayabilir ve bu yayınlarda resimde mozaiklenme veya resim netlik ve keskinliği az, görüntüde ekranda
bazı efektler oluşabilir. Bu bir arıza değildir. Eğer ürününüz yüksek çözünürlüğü destekleyen bir ürün ise, iyi
bir görüntü performansı alabilmeniz için; yüksek çözünürlük (HD) teknolojisi gereği; yüksek çözünürlüklü yayın
kaynağı kullanmanız tavsiye edilir.
5. Cihazın çalışma sesi hakkında:
Cihazınızdaki elektronik devrelerde, teknolojisi gereği; çalışma ya da standby durumunda, üzerinden geçen
akıma bağlı olarak bir çalışma sesi oluşabilmektedir. Oluşan bu ses, standartlar dahilinde olsa dahi, insan
kulağının hassasiyetine ve izleme mesafesine göre bazen duyulabilir. Duyulan bu ses, cihazınızın performansını
etkilemez ve bu bir arıza değildir.
6. Cihazınızın paneline (ekranına) dışarıdan hiçbir şekilde mekanik bir darbe uygulanmamasına dikkat
ediniz:
TFT-LED televizyonların panelleri (ekranlar) yekpare bir cam parçası değildir ve katmanlardan oluşmaktadır.
Cihazınız, dışarıdan uygulanan bir darbe sonucu ön kısım olan panelden (ekrandan) darbe alırsa, ekranın
dış dünyaya en yakın katmanında kırılma/çatlama oluşmadan içerisindeki katman kırılabilir/çatlayabilir ve bu
durumun yetkili servis tarafından teknik olarak tespiti mümkündür. Bu nedenle, cihazınızın paneline (ekranına)
dışarıdan hiçbir şekilde mekanik bir darbe uygulanmamasına dikkat ediniz. Aksi halde, “dış kaynaklı bir darbe
sonucu meydana gelen” bir hasar, kullanım hatası sayılacağından, üretici firmanın hukuken hiçbir sorumluluğu
olmayacaktır.
7. Cihaz kullanımı hakkında:
Aldığınız cihaz, ev tipi kullanım için üretilmiş olup, sadece evde ve belirtilen amaçlar için kullanılabilir. Ticari ya
da toplu kullanıma uygun değildir. Tüketicinin buna aykırı kullanımında, TKHK hükümlerinde belirlenmiş, ücretsiz
onarım ve garanti süresi içinde arızalardan üretici ve satıcının mesuliyetinin kalktığını önemle belirtiriz.
Türkçe - 8 -
Contents
SAFETY PRECAUTIONS....................................................................9
Specifications....................................................................................10
Supported PC Input Typical Display Modes......................................10
Step 1 - Installing the Batteries to the Remote..................................10
Step 2 - Control Touch Buttons..........................................................10
Step 3 - Connecting External Devices ..............................................10
Step 4 - Connect Power and Antenna/Cable..................................... 11
Step 5 - Switching On/Off.................................................................. 11
Step 6 - First Time Installation........................................................... 11
Menu Operation................................................................................. 11
Remote Control ................................................................................12
Menu Features and Functions...........................................................12
SAFETY PRECAUTIONS
Read the following recommended safety precautions
carefully for your safety.
Power Source: The TV set should be operated only from
a 220-240 V AC, 50 Hz outlet. Ensure that you select the
correct voltage setting for your convenience.
Power Cord: Do not place the set, a piece of furniture,
etc. on the power cord (mains lead) or pinch the cord. The
connection plug should be readily accessible to the power
cord and mains. Handle the power cord by the plug. Do
not unplug the appliance by pulling from the power cord
and never touch the power cord with wet hands as this
could cause a short circuit or electric shock. Never make a
knot in the cord or tie it with other cords. The power cords
should be placed in such a way that they are not likely to be
stepped on. A damaged power cord can cause fire or give
you an electric shock. When it is damaged and needs to be
replaced, it should be done by qualified personnel.
Moisture and Water: Do not use this device in a humid and
damp place (avoid the bathroom, the sink in the kitchen,
and near the washing machine). Do not expose this device
to rain or water, as this may be dangerous and do not place
objects filled with liquids, such as flower vases, on top.
Avoid from dripping or splashing. If any solid object or liquid
falls into the cabinet, unplug the TV and have it checked by
qualified personnel before operating it any further.
Cleaning: Before cleaning, unplug the TV set from the
wall outlet. Do not use liquid or aerosol cleaners. Use a
soft, dry cloth.
Ventilation: The slots and openings on the TV set are
intended for ventilation and to ensure reliable operation. To
prevent overheating, these openings must not be blocked
or covered in anyway.
Heat and Flames: The set should not be placed
near to open flames and sources of intense
heat such as an electric heater. Ensure that no
open flame sources, such as lighted candles,
are placed on top of the TV. Batteries should
not be exposed to excessive heat such as sunshine, fire
or the like.
Lightning: In case of storm and lightning or when going on
holiday, disconnect the power cord from the wall outlet.
Replacement Parts: When replacement parts are
required, make sure that the service technician has used
replacement parts, which are specified by the manufacturer
or have the same specifications as the original one.
Unauthorized substitutions may result in fire, electrical
shock or other hazards.
Servicing: Please refer all servicing to qualified personnel.
Do not remove the cover yourself as this may result in an
electric shock.
Waste Disposal: Packaging and packaging aids are
recyclable and should principally be recycled. Packaging
materials, such as a foil bag, must be kept away from
children. Batteries, including those which are heavy metalfree, should not be disposed of with household waste.
Please dispose of used batteries in an environmentally
friendly manner. Find out about the legal regulations which
apply in your area. Don’t try to recharge batteries. Danger
of explosion. Replace batteries only with the same or
equivalent type. Cold cathode fluorescent lamp in LED
PANEL contains a small amount of mercury; please follow
the local laws or regulations for disposal.
This symbol on the product or on its packaging
means that your electrical device should be
disposed at the end of its service life separately
from your household wastes. There are
separate collection systems for recycling in
the EU. For more information, please contact
the local authority or the dealer where you
purchased the product.
Disconnecting the Device: The mains plug is used to
disconnect the TV set from the mains and therefore it must
remain readily operable.
Headphone Volume: Excessive sound pressure from
earphones and headphones can cause hearing loss.
Installation: To prevent injury, this device must be securely
attached to the wall in accordance with the installation
instructions when mounted to the wall (if the option is
available).
LED Screen: The LED panel is a very high technology
product with about a million thin film transistors, giving you
fine picture details. Occasionally, a few non-active pixels
may appear on the screen as a fixed blue, green or red
point. Please note that this does not affect the performance
of your product.
Warning: Do not leave your TV in standby or operating
mode when you leave your house.
Connection to a TV Distribution System from Tuner
Device connected to the protective earthing of the building
installation through the mains connection or through other
apparatus with a connection to protective earthing-and to
a television distribution system using coaxial cable, may
in some circumstances create a fire hazard. Connection
to a cable distribution system has therefore to be provided
through a device providing electrical isolation below a
certain frequency range (galvanic isolator, see EN 6072811).
Note: The HDMI connection between PC and TV may
cause radio interference in which case it is recommended
to use VGA(DSUB-15) connection.
Never let children use electrical device unsupervised.
Children can´t always recognize properly the possible
dangers. Batteries / accumulators can be life threatening
when swallowed. Store batteries unreachable for small
children. In case of swallowing a battery medical aid has to
be sought immediately. Also keep the packaging foils away
from children. There is danger of suffocation.
English - 9 -
Specifications
RF AERIAL INPUT 75 Ohm (unbalanced)
OPERATING VOLTAGE 220-240V AC, 50 Hz.
AUDIO OUTPUT POWER (WRMS.) (10% THD): 2 x 2,5
POWER CONSUMPTION (W): 50 W (max) < 1 W (Standby)
PANEL
16:9 display, 24” Screen Size
Step 1 - Installing the Batteries to the
Remote
1. Lift the cover on the back of the remote upward as
shown in the figure to the right.
2. Install two AAA batteries. Make sure to match the
+ and - ends of the batteries to the diagram in the battery
compartment.
3. Replace the cover.
DxLxH (With foot): 135 x 579 x 408 Weight (Kg): 5,20
DxLxH (Without foot): 35 x 579 x 372 Weight (Kg): 4,80
Transmission Standards: VHF (BAND I/III) UHF (BAND
U) HYPERBAND
+
-
-+
Step 2 - Control Switch
Programme/Volume / AV / Standby-On selection switch
Press the middle of the control button to switch on your TV.
You can move the switch, upward or downward to change the volume. If you want to change
channels, press the middle of the switch once (Position 3) and
then move upward or downward. If you press the middle of the switch once more,
source OSD will be displayed. To select desired source, move the switch upward
or downward and release. If you press the middle of the switch and hold about
a few seconds, the TV will switch to standby mode. Main menu OSD cannot be
displayed via control button.
Step 3 - Connecting External Devices
Note: It is recommended that
the output resolution of a
connected device via the HDMI
input should be set to AUTO
(or original). If the connected
device does not include AUTO
(or original) resolution, selecting
576i for non-HD content is
recommended. If the connected
device does not include AUTO
(or original); or 576i options,
watcing non-HD content via the
Scart or Side AV connectors is
recommended.
Supported PC Input Typical Display Modes
The display has a maximum resolution of 1920 X 1080. Your TV may not support different resolutions. If you switch your
PC to an unsupported mode, a warning OSD will appear on the screen.
English - 10 -
Step 4 - Connect Power and Antenna/
Cable
Use 75 ohm round
antenna cable.
REAR OF THE TV
Input Selection
Once you have connected external systems to your
TV, you can switch to different input sources. Press
SOURCE button on your remote control consecutively
for directly changing sources.
Changing Channels and Volume
or
Make sure the power
plug is plugged securely
to the wall outlet.
After APS is finalized, the programme table will appear
on the screen. In the programme table you will see
the programme numbers and names assigned to the
programmes.
insert plug...
Step 5 - Switching On/Off
•Connect the power cord to the 220-240V AC 50 Hz.
Then the standby LED lights up. Press and hold the
middle of the control switch on the TV, P+ / P- or a
numeric button on the remote control. The TV will
then switch on..
To Switch the TV Off
•Press and hold the middle of the control switch
on the TV or press the “ ” button on the remote
control, so the TV will switch to standby mode. To
power down the TV completely, unplug the power
cord from the mains socket.
You can change the channel and adjust the
volume by using the V+/- and P+/- buttons on
the remote. You can also change the channels
b y u s i n g t h e c o n t r o l s w i t c h o n t h e T V.
Changing Image Size: Picture Formats
Programmes can be watched in different picture formats,
depending on the transmission received. You can
change the aspect ratio (image size) of the TV for viewing
the picture in different zoom modes. Press SCREEN
button repeatedly to change the image size.
Menu Operation
Press MENU button to view main menu. Use “ ” or
“ ” button to select a menu icon and use “ ” or “ ”
to highlight an item. Set an item by using “ ” or “ ”
button. Press OK to confirm or enter.
Step 6 - First Time Installation
The following menu appears on the screen for the first
time you switch on your TV:
Teletext
The teletext system is available if your broadcaster
supports. The teletext system transmits information
such as news, sports and weather on your TV. Basic
remote control txt functions are as the following:
Select your Language, Text language and Country
by using “ ” or “ ” and “ ” or “ ” buttons. Press
“OK” or RED button to continue. To cancel, press
BLUE button. The following menu will be displayed
during the automatic tuning:
Teletext On / Mix / Teletext Off
Subcode Pages
RETURN
Teletext index page
INFO
Reveal
SCREEN
Expand
P+/P- / 0-9
Select page
Coloured Buttons
English - 11 -
Operates accordingly
Remote Control
17. No function
1. Standby
18. Programme up
2. Mono-Stereo / Dual I-II
3. Expand (in TXT mode) / Image size
4. Green / Picture menu
1
30
2
29
28
3
4
5
6
5. Red / Sound menu
6. Numeric buttons
7
7. Teletext / Mix
SUBTITLE
PIP
SCREEN
LANG
1
2
6
3 4
7 8
27
5
9
0
25
26
24
8
8. Cursor left
9
9. Menu on/off
OK
10
10. AV / Source
11. No function
11
12
13
14
15
12. Volume Up
13. Info / Reveal (in TXT mode)
14. Mute
23
22
21
RETURN
MENU
SOURCE
FAV
PRESETS
20
SLEEP
V+ P+
V
V
?
V
INFO
19
18
P-
20. Picture mode selection
21. OK / Select / Hold (in TXT mode)
22. Cursor down
23. Return / Index page (in TXT
mode)
24. Cursor right / Subpage (in TXT
mode)
25. Cursor up
26. Previous programme
17
27. Yellow / Feature menu
16
28. Blue / Install menu
EPG
V-
19. Sleep timer
29. No function
15. Volume down
30. TXT Subtitle
16. Programme down
Menu Features and Functions
Mode
Contrast
Brightness
Sharpness
Colour
Hue
Colour Temperature
Picture Zoom
Reset
Picture Menu
For your viewing requirements, you can set the related mode option.
Picture mode can be set to one of these options: User, Cinema,Dynamic
and Natural.
Sets the lightness and darkness values of the screen.
Sets the brightness value for the screen.
Sets the sharpness value for the objects displayed on the screen.
Sets the colour value, adjusting the colors.
Press “ ” or “ ” button to set the level. Hue option can only be visible when
the TV receives an NTSC signal.
Sets the desired colour tone.
Sets the picture size to Auto,16:9 or 4:3.
Resets the picture settings to factory default settings.
Advanced Controls
Noise Reduction
Film Mode
Dynamic Contrast
If the broadcast signal is weak and the picture is noisy, use Noise Reduction
setting to reduce the noise amount. Noise Reduction can be set to one of
these options: Low, Medium, High or Off.
Turn this feature on when you are watching films to see the fast motion
scenes clearly.
Sets the contrast level in accordance with the displayed content with regard
to the selected mode. Dynamic contrast rate can be set to one of these
options: Low, Medium, High or Off.
Skin Tone
Adjust the desired skin tone.
RGB Gain
You can configure the colour temperature values using the RGB Gain feature.
Game Mode
When Game Mode is set to On, specific game mode settings, which are
optimized for better video quality, will be loaded. Picture Mode, Contrast,
Brightness, Sharpness, Colour and Colour Temperature settings will be
invisible and disabled while Game Mode is on. Picture mode selection
button will have no function while Game Mode is on.
English - 12 -
HDMI True Black
While watching from HDMI source,this feature will be visible in the Advanced
Settings menu.You can use this feature to enhance blackness in the picture.
You can set this feature as “On” for activating HDMI True Black mode
Sound Menu
Volume
Adjusts volume level.
Equalizer
In equalizer menu, the preset can be changed to Music, Movie, Speech,
Flat and User. Press the MENU button to return to the previous menu.
Equalizer menu settings can be changed manually only when the Equalizer
Mode is in User.
Balance
This setting is used for emphasizing left or right speaker balance.
Sound Mode
You can select Mono, Stereo, Dual I or Dual II mode, only if the selected
channel supports that mode.
AVL
Automatic Volume Limiting (AVL) function sets the sound to obtain
fixed output level between programmes (For instance, volume level of
advertisements tend to be louder than programmes).
Reset
Resets the picture settings to factory default settings.
Feature Menu
Sleep Timer
Sets sleep timer. The timer can be programmed between Off and 2 hours
(120 minutes) in steps of 10 minutes. If Sleep Timer is activated, at the end
of the selected time, the TV goes automatically to standby mode.
Child Lock
Enables or disables child lock. When On is selected, the TV can only be controlled
by the remote control. In this case the control panel buttons will not work, except
for the Standby/On button. When Child Lock is activated you are able to switch the
TV to Standby mode with the Standby/ On button. To switch the TV on again, you
need the remote control. Hence, if one of those buttons is pressed, Child Lock Is
On will be displayed on the screen when the menu screen is not visible.
Language
Sets the language.
Default Zoom (Optional)
While zoom mode is set as AUTO, the TV will set the zoom mode in accordance
with the signal of the broadcast. If there is no WSS or aspect ratio information,
the TV will then use this setting to adopt. Press “ ” or “ ” button to select Default
Zoom. You can set Default Zoom to 16:9 or 4:3 pressing “ ” or “ ” button.
Blue Background
Activates or deactivates blue background system when the signal is weak
or absent.
Menu Timeout
Changes timeout duration for menu screens.
TXT Language
Sets the teletext language.
EXT Out
Enables or disables EXT Out. For copying from a DVD or VCR device, you should
choose desired source from source menu and turn “On” to EXT Out from feature
menu. Ext Out should be On in order to use Timers function in the DTV mode.
Auto TV Off
You can set the timeout value of auto off feature. After the timeout value is
reached and the Tv is not operated for selected time , the TV will go off.
Store Mode (optional)
If you set store mode to “ON”, your TV’s features will be illustrated on the
top of the screen. To deactivate this feature, please set to “OFF”.
Backlight (optional)
Sets Backlight to Auto,Medium, Maximum or Minimum.
Sets Power Save Mode as On or Off. If you set Power Save Mode as On,
TV will switch to energy-saving mode and luminance level of TV set
Power Save Mode (optional) the
will be decreased to optimum level. Note that some picture settings will be
unavailable to be changed when the TV is in Power Save Mode.
English - 13 -
Source Menu
Once you have connected optional equipment systems to your TV, you should select the required input to
view pictures from that source. In source menu, highlight a source by pressing “ ” or “ ” button and switch to
that mode by pressing “OK” button. With the “ ” or “ ” buttons you can set Off or On. When Off is selected;
this source does not appear in the OSD when you press the “SOURCE” button of the remote control.
Note: YPbPr mode can be used only when you connect a device that has a YPbPr output through the PCVGA input with YPbPr to PC cable (YPbPr cable is not supplied).
Install Menu
Band
Use “ ” or “ ” button to select the program number. You can also enter
a number using the numeric buttons on the remote control. There are 200
programme storage between 0 and 199.
Band can be selected either C or S
Channel
Channel can be changed by “ ” or “ ” button or numeric buttons.
Colour System
Use “ ” or “ ” button to change the colour system to AUTO, PAL or
SECAM.
Sound System
Press “ ” or “ ” button to change the sound system to BG,DK, I, L or L’.
You can use this setting for fine tuning channels.
Program
Fine Tune
Search
Use “ ” or “ ” button to start programme searching. You can also enter
the desired frequency using the numeric buttons while Search item is
highlighted.
Store
Press “ ” or OK button to store the settings. “Stored...” will be displayed
on the screen.
Program Table Menu
Using the program table and by moving the cursor in four directions you can reach 20 programmes in the
same page. You can scroll the pages up or down by pressing the navigation buttons to see all the programmes
in TV mode (except for the AV modes). By cursor action, programme selection is done automatically.
Name
Delete
Move
APS
To change the name of a programme, select the programme and press
the RED button. The first letter of the selected name will be highlighted.
Press “ ” or “ ” button or numeric buttons to change that letter and “ ”
or “ ” button to select the other letters. By pressing the RED button, you
can store the name.
To delete a programme, press the YELLOW button. Pressing the YELLOW
button again erases the selected programme from the programme list, and
the following programmes shift one line up.
Select the programme which you want to move by using the navigation
buttons. Press the GREEN button. By using the navigation buttons move
the selected programme to the decided programme space and press the
GREEN button again.
Deletes all stored channels and settings, resets TV to factory settings and
starts first time installation. See the First Time Installation section for more
information on this process.
“In conformity with the WEEE Regulation.”
English - 14 -
PC Position Menu
Autoposition (in PC mode)
H Position (in PC mode)
V Position (in PC mode)
Phase (in PC mode)
Dot Clock (in PC mode)
Automatically optimizes the display. Press OK to
optimize.
This item shifts the image horizontally to right hand
side or left hand side of the screen.
This item shifts the image vertically towards the top
or bottom of the screen.
Depending on the resolution and scan frequency that
you input to the TV set, you may see a hazy or noisy
picture on the screen. In such a case you can use this
item to get a clear picture by trial and error method.
Dot Clock adjustments correct the interference
that appear as vertical banding in dot intensive
presentations like spreadsheets or paragraphs or
text in smaller fonts.
Dear Customer;
This appliance is manufactured with TFT LED Display technology.
An image is created with colour light points called pixels in TFT-LED appliances.
Each pixel consists of 3 sub-pixels [fixed colour (red, green, blue) light points].
As a requirement of production technologies, the abovementioned sub-pixels may cause
“sub-pixel errors” by way of lighting continuously or remaining dim continuously.
Please consider the following explanation about a possible sub-pixel error.
This problem can be encountered during the production phase as well as during use.
Sub-pixel errors are mainly 2 types.
Type 1 : The sub-pixel lighting continuously (may be red, green or blue)
Type 2 : The sub-pixel which is continuously dim (seems black)
The sub-pixel errors determined according to the ISO 13406-2 standard are given in the following table.
English - 15 -
IMPORTANT WARNINGS
1. Rights reserved by the manufacturer:
The manufacturer reserves the right to change the features stated in the product or in the user’s manual of
the product without giving any information, when required by the improvements in technology.
2. Warnings about Screen Technology:
Due to TFT and Plasma technologies, there may be inactive or continuously shining white, red or blue pixels
in the screen. This does not affect the performance of the product, and it is not a failure. The related details
are given in the related pages of the user’s manual. The manufacturer does not have any responsibility in the
cases within the compass of the criteria.
3. A continuous fixed image on the screen:
Due to TFT and Plasma technologies, “burning” effect may arise in the screen after a continuous fixed image
on the screen, displaying the same background continuously or watching a 4:3 video on a 16:9 television for
a long time. In order to avoid this effect, it is highly recommended that you follow the followings.
•Do not watch a fixed image continuously.
•Do not watch videos in the format of 4:3 in your television which supports the format of 16:9.
•Try to use contrast and brightness at a minimum level.
4. In Full HD products;
The expected performance may not be achieved in TV broadcasts and the broadcasts of satellite receivers
which are not supported by other sources in terms of high definition, DVD players or cable television; and
in these broadcasts, mosaic images may occur, sharpness and resolution of the image may be low; some
effects may arise on the screen. This is not a failure. It is advisable to watch high definition broadcasts for
your TV which supports high definition (1920x1080) to work with a high performance as a requirement of the
Full HD technology. The expected performance may not be achieved in TV broadcasts and the broadcasts of
satellite receivers which are not supported by other sources in terms of high definition, DVD players or cable
television; and in these broadcasts, mosaic images may occur, sharpness and resolution of the image may be
low; some effects may arise on the screen. This is not a failure. If your appliance supports high definition, it is
recommended that you use high definition broadcast sources in order to achieve a high screen performance
as a requirement of the high definition (HD) technology.
5. About Working Sound of the Appliance:
A working sound may be generated in the electronic circuits in your appliance as a requirement of its technology
depending on the current on it while running or in standby status. This sound can sometimes be heard depending
on the sensitivity of human ear and watching distance although it is within the compass of the standards. This
sound does not affect the performance of your appliance and it is not a failure.
6. Make sure that the panel (screen) of your appliance is never subjected to any external mechanical
impact:
The panels (screens) of the TFT-LCS televisions are not only a piece of glass; on the contrary they are
composed of layers. If your appliance is damaged in its panel (screen) which is the front part by an external
impact, the inner layer of the screen might be broken / cracked even when no break/crack arises in the layer
of the screen which is the closest to the outer environment. This can be technically detected by the authorized
service. Therefore, make sure that the panel (screen) of your appliance is never subjected to any external
mechanical impact. Otherwise, as any damage “caused by an external hit” is considered as a usage error,
the manufacturer will not have any legal responsibility.
7. About the use of the appliance:
The appliance you purchased was produced for home-type use, and it can be used only at home and for
the specified purposes, not for commercial or collective use. Otherwise, the manufacturer and the dealer will
not be responsible for the failures within the period of warranty and free repair, which is determined in the
provisions of the Act on the Protection of Consumers.
English - 16 -
Üretici firma: Vestel Elektronik Sanayi ve Ticaret A.Ş.
Adres: Organize Sanayi Bölgesi 45030 Manisa
Tel: 0236 233 01 31
Fax: 0236 233 25 85
Vestel Danışma Hattı’nı arayarak;
Ürüninizle ilgili tüm soru ve taleplerinizi Vestel Danışma
hattına iletebilir, şikayet, dilek, önerileriniz ve Vestel Şirketler
Grubu ile ilgili sorularınızı ilgili birimlere aktarabilirsiniz.
E-mail başvurularınız için; [email protected]
Cihazınızın T.C. Gümrük ve Ticaret Bakanlığı Tüketicinin Korunması ve Piyasa Gözetimi Genel
Müdürlüğü’nce tespit ve ilan edilen kullanım ömrü (cihazın fonksiyonlarını yerine getirebilmesi için
gerekli yedek parça bulundurma süresi) 10 yıldır.
Vestel Ticaret A.Ş.
Zorlu Plaza Avcılar 34310 İstanbul - TÜRKİYE
Tel: 44 44 123 Faks: (0212) 321 17 90