1
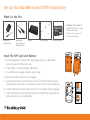
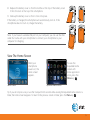
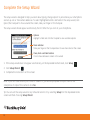
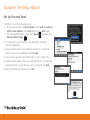
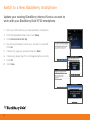
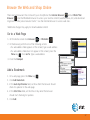
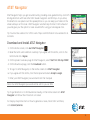
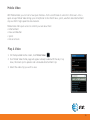
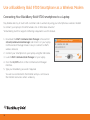
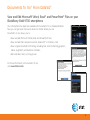
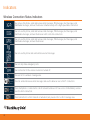
BLACKBERRY
BL
L
BOLD 9700
Q
Quickstart
u
Welcome To AT&T
Use this Quickstart to quickly get an overview of
the major features and services available for your
smartphone.
OR
Use our interactive web tutorial available at
att.com/tutorials
for the most complete and up-to-date information
available for setting up and using your new
smartphone and services. The online tutorials include
step-by-step instructions and screen shots to assist
you as well as provide an easy search function.
Before you use your smartphone or any accessories
for your smartphone, see the Safety and Product
Information Booklet. For the most recent version of
the booklet visit blackberry.com/go/docs
2
Your BlackBerry®
smartphone is shown and
described on this foldout
Table of Contents
Welcome To AT&T
Set Up Your BlackBerry® Bold™ 9700 Smartphone
Tips and Tricks
Complete the Setup Wizard
Switch to a New BlackBerry Smartphone
Make Calls
Visual Voice Mail
Voice Mail
Manage Contacts and Appointments
Send a Text Message
Pictures and Videos
Browse the Web and Shop Online
Send an Email
Manage Wireless Connections
Connect to a Wi-Fi Network
AT&T Navigator
AT&T Features and Services
BlackBerry Desktop Software
Load and Play Music and Videos
Use a BlackBerry Bold 9700 Smartphone as a Wireless Modem
Documents To Go From DataViz
Troubleshooting
Carry Your Smartphone
Indicators
BlackBerry Bold 9700 Smartphone Key Functions
BlackBerry Bold 9700 Smartphone Applications and Functions
2
4
7
10
14
16
17
18
19
22
23
27
28
29
30
31
32
33
34
36
37
38
39
42
44
45
3
Set Up Your BlackBerry Bold 9700 Smartphone
What’s in the Box
BlackBerry® User Tools CD
Includes BlackBerry® Desktop
Software, User Guide,
Software License Agreement
and Limited Warranty.
BlackBerry®
Travel Charger
BlackBerry®
USB Datasync &
Charging Cable
Battery
Stereo Headset
2GB Memory Card
Insert the SIM Card and Battery
2
1. Push down gently on the top-left and top-right corners of the battery
cover and slide off the battery cover.
2. If the battery is inserted, remove the battery.
3. If your SIM card is already inserted, skip to Step 7.
4. Remove the SIM card from any packaging.
5. Hold the SIM card so that the metal contacts on the SIM card face down
and the cutoff corner points toward the top-left corner of the smartphone.
6. Slide the SIM card into the holder so that it lies flat below the metal guide.
1
7. Insert the battery so that the metal contacts on the battery align with the
metal contacts on your smartphone.
2
4
8. Replace the battery cover so that the notches at the top of the battery cover
fit into the slots at the top of the smartphone.
2
1
9. Slide up the battery cover so that it clicks into place.
If the battery is charged, the smartphone will automatically turn on. If the
smartphone does not turn on, charge the battery.
1
2
Note: If you have an available USB port on your computer, you can use the USB
cable that came with your smartphone to connect your smartphone to your
computer for charging.
View The Home Screen
To view the
Expanded Home
screen with
more application
icons, press the
Menu key.
When your
smartphone
powers on, the
Home screen
appears.
Home screen
Expanded Home screen
Tip: If you do not press a key or use the trackpad for 30 seconds while viewing the Expanded Home screen or a
folder, the Home screen reappears. To return to the previous screen or folder, press the Menu key.
5
Set Up Your BlackBerry Bold 9700 Smartphone
Charge The Battery
1
1. Connect the small end of the travel charger cable to the
micro-USB port on the side of your smartphone.
2
2. Fold down the plug blades on the power adapter.
3. Plug the power adapter into a power outlet.
4. Charge the battery to full power.
Insert a microSD™ Memory Card
Use a microSD™ memory card to extend the memory available on your
smartphone for storing your media files such as ringtones, videos,
pictures, or songs.
1. Push down gently on the top-left and top-right corners of the battery
cover and slide off the battery cover.
2. Hold the memory card so that the metal contacts on the card
point down and the cut-off end of the card points toward the
right side of the smartphone.
1
3. Slide the card into the card slot so that the card clicks into place.
To remove the memory card, press the card in and then pull the card out.
6
2
Tips and Tricks
Move the cursor in any direction and highlight items
Slide your finger on the trackpad.
Select an item or follow a link
Click the trackpad.
Move back a screen
Press the Escape key.
Return to the Home screen
Press the End/Power key.
Access the Expanded Home screen
On the Home screen, press the Menu key.
View more available actions for a highlighted item
Press the Menu key or click Full Menu, if available.
To close a menu
Press the Escape key.
Insert a period
Press the Space key twice. The next letter is
capitalized.
Capitalize a letter
Hold the letter key until the capitalized letter
appears or press the Left Shift key or the Right
Shift key and the letter key.
Type the alternate character on a key
Press the ALT key and then the character key.
Insert @ and periods in an email field
Press the Space key.
Type a symbol
Press the Symbol key. To view more symbols, press
the Symbol key again. Type the letter that appears
below the symbol.
Turn on number lock
Press the ALT key and the Left Shift key.
Turn on CAP lock
Press the ALT key and the Right Shift key.
For pictures of the keys and buttons on your smartphone
refer to the foldout at the back of this guide.
7
Tips and Tricks
Turn off number lock or CAP lock
Press the ALT key.
Lock the keyboard
Click the Lock icon on the Expanded Home screen,
press the Lock button at the top of the smartphone,
or press and hold the A key
To type an accented or special character
Hold the letter key and slide your finger on the
trackpad. Release the letter key when the accented
or special character appears.
Unlock the keyboard
Press the Star (*) key and then the Send key.
Move to the top of the screen
Press T
Move to the bottom of the screen
Press B
Move down screen
Press the Space key.
Reboot
Remove and reinsert the battery.
Turn speaker phone on/off during a call
Press the Speakerphone key.
Search for text in an attachment
Press F
Check voicemail
Press and hold the 1 key.
To pause a video or song
Press the Mute key.
To resume playing a video or song
Press the Mute key.
To play the next song in a category
Press N
To play the previous song in a category
Press P
8
Adjust the volume for songs, ringtones,
and videos
Press the Volume Up or Volume Down key until you
reach the desired volume setting.
To rotate a picture
Press L
To zoom in to a picture
Press R
To zoom out from a picture
Press C
Return to the original picture size
Press Z
For step-by-step instructions for using the features and services of your smartphone visit
att.com/tutorials
9
Complete the Setup Wizard
The setup wizard is designed to help you learn about typing, change options to personalize your smartphone
and set up one or more email addresses. To select highlighted buttons and fields in the setup wizard, click
(press) the trackpad. To move around the screen, slide your finger on the trackpad.
The setup wizard should appear automatically the first time that you turn on your smartphone.
Options
Highlight a field and click the trackpad to view available options
More indicator
Slide your finger on the trackpad down to view more text on the screen
Close, Back and Next buttons
Click to move between screens in the wizard
1. If the setup wizard does not appear automatically, on the Expanded Home Screen, click Setup.
2. Click Setup Wizard.
3. Complete the instructions on the screen.
Note: If your SIM card currently has contacts saved to it, you will be prompted to import them to the
smartphone. To import the contacts click Yes.
Tip: You can exit the setup wizard at any time and return to it by selecting Setup from the Expanded Home
screen and then choosing Setup Wizard.
10
Email Setup
If you have an existing BlackBerry smartphone and want to switch your email account to work with a new
BlackBerry smartphone, see Switch to a new BlackBerry smartphone on page 14.
On the Email Setup screen of the Setup Wizard, you can choose one of these new account setup options:
I want to create or add an email address
– Select the I want to create or add an email address option to associate your smartphone with one or
more (up to ten) existing Internet email accounts (like AT&T, Yahoo!®, AOL® and Gmail®). This option will
also allow you to create a new email address for your smartphone itself. This option is most common
for individual users. If you select this option, the Email Setup screen opens.
I want to use a work email account with a BlackBerry Enterprise Server
– Select the I want to use a work email account with a BlackBerry® Enterprise Server option if your
company’s BlackBerry Enterprise Server system administrator has provided you with a password that you
can use to activate your company IT managed email, calendar, and contacts (like Microsoft® Outlook® or
Lotus Notes®) with your smartphone over the wireless network.
You can skip Email Setup if any of the following apply:
– A representative from the store where you purchased your smartphone has already helped you to set up
your email account
– You have visited att.com/blackberrystart to set up your email account
– You have an existing email account and have access to a BlackBerry Enterprise Server, but your
BlackBerry Enterprise Server system administrator has not provided you with a password. Contact your
system administrator for more information about setting up email for your smartphone.
11
Complete the Setup Wizard
Set Up Personal Email
1. Perform one of the following actions:
• In the Setup Wizard, click Email Setup. Click I want to create or
add an email address. Click Next and then click Next again.
• On the Expanded Home screen, click Setup
and then click
Personal Email Setup.
2. Scroll down to view the terms of the BlackBerry Prosumer
Services Agreement.
3. Please read the terms and conditions carefully. To accept the
terms of the service agreement, click I Accept.
4. Click an email account type (AT&T, Yahoo!®, AOL®, Gmail® etc.).
5. Type the email address and password information for the existing
supported email account that you want to add and click Next.
6. After the confirmation displays, click OK.
12
7. On the Email Accounts screen, perform one of the following actions:
• To add another existing supported email address (up to 10), or to create a
new email address for your smartphone, click Add.
• To exit Email Setup, click Close.
Note: Once you add a supported email account, messages sent to that account will also appear in the
message list on your smartphone.
Tip: If you have associated your smartphone with more than one supported email address, in the Send
Using field, you can set the email address that you use to send the email message.
For more information on how to Send an email see page 28.
13
Switch to a New BlackBerry Smartphone
Update your existing BlackBerry Internet Service account to
work with your BlackBerry Bold 9700 smartphone
1.
Insert your SIM card into your new BlackBerry smartphone.
2.
From the Expanded Home screen, click Setup.
3.
Click Personal Email Set Up.
4.
You will be prompted to switch your account to a new PIN.
Click Yes.
5.
If necessary, type your password and click Next.
6.
If necessary, repeat step 5 for all integrated email accounts.
7.
Click OK.
8.
Click Close.
14
Transfer your existing BlackBerry smartphone data to your
BlackBerry Bold 9700 smartphone
Note: Before you begin, verify that you have installed the most recent version of the BlackBerry Desktop
Software. Go to att.com/bbdownloads to download the latest version of the BlackBerry Desktop
Software.
1.
Connect your current BlackBerry smartphone to your computer.
2.
Open the Desktop Manager.
3.
Click Device Switch Wizard.
4.
Under Switch BlackBerry devices, click Start.
5.
Select the PIN for your current BlackBerry smartphone and click OK.
6.
Type the password for your current BlackBerry smartphone and click OK.
7.
Click the checkboxes for the following options:
• Device data and options
• Third-party applications
8.
Click Next. The BlackBerry Desktop Software will back up all the information on your current
BlackBerry smartphone.
9.
When prompted, connect your new BlackBerry smartphone to your computer.
10. Select the PIN for your new BlackBerry smartphone and click OK.
11. Type the password for your current BlackBerry smartphone and click OK.
12. Click Finish. The BlackBerry Desktop Software will load the supported data from your old smartphone
onto your new one.
15
Make Calls
Make A Phone Call
1. On the Home screen or in the phone application
, perform one of the
following actions:
• Type a phone number
• Type part of a contact name. Highlight a contact name.
2. Press the Send key.
3. To end the call, press the End key.
Tip: To view recent call logs, click Call Log from the Expanded
Home screen. To view all call logs, press the ALT key and the
P key in the message list.
16
Visual Voice Mail
Visual Voice Mail is a service that allows you to quickly review important voicemail
messages in any order you choose. You may activate the Visual Voicemail service
or you may set up Basic Voicemail. It’s your choice.
With Visual Voice Mail you can:
• Store up to 40 messages for 14 days in inbox
• Save important numbers to Contacts
• Reply to messages via return call, SMS, email, or MMS
• Share messages by forwarding via email or MMS
• Save messages to device memory or to memory card
Before signing up for Visual Voice Mail, make sure you have listened to all of your messages as you will lose
your voicemail box, messages and greetings.
Set Up Visual Voice Mail
1. Log into att.com/mywireless from a computer. Go to Manage Your Features and select Visual Voicemail
under the Voicemail Features section. BlackBerry Enterprise Server users may wish to ask their company’s
BlackBerry Enterprise Server administrator how to obtain Visual Voicemail.
2. Press the Menu key
to view the Expanded Home screen.
3. Click Visual Voice Mail.
4. Follow the steps on the screen to enter your password, select standard greeting or to record your personal
greeting.
Tip: Voicemail messages may be viewed by clicking Messages
or Visual Voice Mail.
17
Voicemail
Set Up Voicemail
1. To connect to the AT&T voicemail system, hold the 1 key.
2. Create your password.
3. Record your name.
4. Record a greeting.
Check Your Voicemail Messages
1. Press and hold the 1 key.
2. Follow the voice prompts.
18
Manage Contacts, Appointments and Ringtones
Add a Contact
1. On the Home screen, click Contacts.
2. Press the Menu key.
3. Click New Contact.
4. Type the contact information.
5. Press the Menu key.
6. Click Save.
Add a Contact Using an On-screen Phone Number
1. Highlight a phone number on the screen.
2. Press the Menu key.
3. Click Add to Contacts.
4. Edit the contact information.
5. Press the Menu key.
6. Click Save.
19
Manage Contacts, Appointments and Ringtones
Schedule an Appointment
1. On the Home screen, click Calendar.
2. Press the Menu key.
3. Click New.
4. Type the appointment information.
5. Press the Menu key.
6. Click Save.
Tip: To change calendar views, press the Menu key
and select the desired view.
More Info
To learn more about Calendar features, while in the Calendar, press the Menu key.
20
Click Help.
Change Your Ringtone
1. On the Home screen, click Media.
2. Click Ring Tones.
3. Click a category.
4. Highlight a ringtone.
5. Press the Menu key.
6. Click Set As Ring Tone.
Tip: To listen to a ringtone before selecting it, highlight the ringtone.
Click the trackpad.
21
Send a Text Message
You can send each text message to as many as 10 recipients at a time.
1. On the Expanded Home screen, click SMS And MMS.
2. Press the Menu key.
3. Click Compose SMS Text.
4. In the To field, perform one of the following actions:
• Type a phone number (include the country code and area code).
• Type a contact name.
• Type part of a contact name. Click a contact.
5. Click OK.
6. Type a message.
7. Press Enter.
Tip: To view all text messages, click SMS And MMS
Home screen.
22
on the Expanded
Pictures and Videos
Take a Picture
1. Press the Right Convenience key or click the Camera icon on the Expanded
Home screen and then perform one of the following actions:
• To zoom in, slide your finger up on the trackpad.
• To zoom out, slide your finger down on the trackpad.
• To take a picture, click the trackpad.
2. After you take a picture, perform one of the following actions:
• To take another picture, click the Take Another Picture icon.
• To set the picture as a caller ID picture or Home screen
wallpaper, click the Set Picture As icon.
• To rename and save the picture, click the Rename Picture icon.
• To delete the picture, click the Delete Picture icon.
• To send the picture, click the Send Picture icon.
Note: Your use of the camera application on your smartphone may be prohibited or restricted at certain times.
Use the camera application responsibly and abide by all applicable laws, rules and regulations. To increase
the amount of space available for saving media files, insert a memory card. New pictures are automatically
saved to the memory card if inserted.
More Info
To learn more about Camera features, while in the Camera application, press the Menu key.
Click Help.
23
Pictures and Videos
Record a Video
1. On the Expanded Home screen, click Media.
2. Click Video Camera.
3. To start recording, click the trackpad.
4. To pause recording, click the trackpad.
5. Perform one of the following actions:
• To resume recording, click the Continue Recording icon.
• To stop recording and save the video, click the Stop icon.
• To play the video, click the Play icon.
• To rename and save the video, click the Rename icon.
• To delete the video, click the Delete icon.
• To send the video, click the Send icon.
Note: A memory card is required to use the video recording feature.
More Info
To learn more about Video features, while in the Video Camera application, press the Menu key.
24
Click Help.
Send a Picture Message
1. On the Home screen, click Media.
2. Click Pictures.
3. Click a category.
4. If necessary, click a folder.
5. Highlight a picture.
6. Press the Menu key.
7. Click Send/Share.
8. Click MMS.
Note: To send an image via email, click Email.
9. Perform one of the following actions:
• If the contact is not in your address book, click [Use Once]. Click Phone. Type a
phone number. Click the trackpad.
• If the contact is in your address book, click a contact. Click a phone number.
10. Select an image size and click OK.
11. If necessary, change the subject line and then scroll down and type a message.
12. Press the Menu key.
13. Click Send.
Tip: To view all picture messages sent as MMS, click SMS and MMS
on the Expanded Home screen.
25
Pictures and Videos
Send a Video Message
1. On the Home screen, click Media.
2. Click Videos.
3. Highlight a video.
4. Press the Menu key.
5. Click Send as MMS.
6. Perform one of the following actions:
• If the contact is not in your address book, click [Use Once].
Click Phone. Type a phone number. Click the trackpad.
• If the contact is in your address book, click a contact.
If necessary, click a phone number.
7. If necessary, change the subject line and then scroll down and type a message.
8. Press the Menu key.
9. Click Send.
26
Browse the Web and Shop Online
There are two browsers that come with your smartphone: the Internet Browser
and an MEdia™Net
Browser.
Use the MEdiaNet Browser to access your favorite content (weather, news, etc.) and download
ringtones or other personalization items*. Use the Internet Browser to access web sites.
*Additional charges may apply for downloadable content.
Go to a Web Page
1. On the Home screen click Browser
or MEdiaNet
2. In the browser, perform one of the following actions:
• If a web address field appears on the screen, type a web address.
• If a web address field does not appear on the screen, press the
Menu key.
Click Go To. Type a web address.
3. Click the trackpad.
Add a Bookmark
1. On a web page, press the Menu key.
2. Click Add Bookmark.
3. In the Auto Synchronize field, set how often the browser should
check for updates to the web page.
4. In the Start time field, set the time of day when the browser
should start checking for updates.
5. Click Add.
27
Send an Email
To send email you must set up an email account on your smartphone. To set up an email account, on the
Expanded Home screen, click Setup.
Click Personal Email Setup.
1. On the Home screen, click Messages.
2. Press the Menu key.
3. Click Compose Email.
4. In the To field, perform one of the following actions:
• Type an email address.
• Type a contact name.
• Type part of a contact name. Click a contact.
5. Add a subject.
6. Type a message.
7. Click the trackpad.
8. Click Send.
Tip: If you have associated your smartphone with more than one supported email address, you can set the
email address that you use to send messages in the Send Using field.
For more information on Email Setup, see pages 11 - 14.
More Info
To learn more about Messages features, while in the Messages application, press the Menu key.
28
Click Help.
Manage Wireless Connections
Your smartphone must be connected to a wireless network to use features such as messaging, phone and
browser. When the wireless network connection is turned off, you can still compose and save draft messages
and use other features such as media and calendar.
The Manage Connections screen displays the status of all wireless network connections. Use this screen to
turn mobile network, Wi-Fi and Bluetooth® connections on and off.
Pair with a Bluetooth Accessory
1. On the Expanded Home screen, click Manage Connections.
2. Click Set Up Bluetooth.
3. Click Search. When you choose Search, Bluetooth technology is turned on
automatically.
4. Click the accessory you want to connect to.
5. If required, type the numeric passkey for the accessory you are trying to connect to.
6. Once the accessory is connected, the Paired Devices screen appears.
Note: Your smartphone features Bluetooth® 2.0 with full stereo support.
You can simultaneously use more than one Bluetooth enabled accessory
with your smartphone.
Tip: To turn Bluetooth on or off, on the Expanded Home screen, click Manage
Connections, then select the Bluetooth checkbox.
More Info
To learn more about Bluetooth features, while in the Bluetooth application,
press the Menu key.
Click Help.
29
Manage Wireless Connections
Connect to AT&T Wi-Fi Hotspots
You can access email and connect to the Internet using a Wi-Fi® network at work, home, or public hotspots –
including thousands of AT&T Wi-Fi Hotspots. Your smartphone is designed to automatically connect to AT&T
Wi-Fi Hotspots when Wi-Fi is enabled. Corporate users might need to contact their system administrator
regarding access to Wi-Fi networks.
Turn On Wi-Fi Connectivity
1. On the Expanded Home screen, click Manage Connections.
2. Select the Wi-Fi checkbox.
Connect to a Wi-Fi Network
You might be able to send and receive email messages and visit web pages using a
work, home, or public Wi-Fi network. This may require a VPN connection.
1.
2.
3.
4.
5.
6.
7.
8.
30
On the Expanded Home screen, click Setup.
Click Set Up Wi-Fi.
Click Next.
Click Scan for Networks.
Click the network you want to connect to.
If required, enter the network password or pass key and click Connect.
Click Next.
Click Finish.
AT&T Navigator
AT&T Navigator helps you get around town by providing voice guided turn-by-turn GPS
driving directions with real-time traffic based navigation and 3D maps. As you drive,
the directions are spoken over the speakerphone so you can keep your hands on the
wheel and eyes on the road. AT&T Navigator automatically monitors traffic ahead of
you and gives you the option to route around traffic using just one keypad click.
Tip: You must be outdoors for GPS to work. Maps and information not available for all
locations.
Download and Install AT&T Navigator
1. On the Home screen, click Get AT&T Navigator.
2. Read the terms and conditions carefully. If you agree with the terms, scroll to the
bottom and click I Agree.
3. On the product overview page for AT&T Navigator, select Start first 30 days FREE!
4. On the Download page, click the Download button.
5. To log in to AT&T Navigator, on the Home screen click AT&T Navigator.
6. If you agree with the terms, click the trackpad and select Accept & Login.
7. Enter your AT&T Navigator password and click the trackpad.
Note: Your AT&T Navigator password will be sent to you via SMS.
Tip: To get directions or to find businesses nearby, on the Home screen click AT&T
Navigator and follow the instructions on screen.
For step-by-step instructions on how to generate a route, check traffic and more,
visit att.com/tutorials.
31
AT&T Features and Services
Applications: Facebook® - Connect, share, and keep current with the people in your life.
MySpace™ - Log into the MySpace community for access to music, videos, friends, and more.
Mobile Banking - View balances, perform transfers, view financial transaction history and pay bills.
My-Cast® Weather - Stay safe with radar, lightning, forecasts and severe weather information.
AT&T Mall:
Shop for Ringtones, Answer Tones, themes, graphics, games, Cool Tools, and applications.
AT&T Music: Make-UR-Tones - Create your own custom ringtones from a catalog of thousands of
popular songs.
MusicID 2 - Recognize songs by listening to music, Lyrics, Artist Search and more.
Shop Music - Purchase songs from eMusic and Napster Mobile.
XM Radio - Channel surf dozens of commercial free music stations.
Games:
Tetris® - Move and rotate falling Tetriminos to form horizontal lines in the Matrix. When a line is
completed, it disappears from the Matrix.
Scrabble - Play this classic crossword board game, complete with multiple difficulty levels and
built-in word lists.
Brain Challenge Vol. 2 - Boost your brain and relieve stress with this entertaining, adaptive brain
training program.
PAC-MAN® by Namco - Guide PAC-MAN through the maze and avoid the ghosts as you gobble
dots in this famous arcade classic.
Instant
Take Instant Messaging (IM) mobile. Mobile IM provides mobile access to Yahoo!® Messenger,
Messaging: AOL® Instant Messenger (AIM), and Windows Live™ Messenger (Search for “Mobile IM” on
MEdiaNet to download).
For information on setting up or using these services visit att.com/tutorials
Note: If some or all of these applications do not appear on your smartphone, you may wish to ask your IT
department if your company has restricted access to install and run applications.
32
BlackBerry Desktop Software
Note: If you already have BlackBerry Desktop Software installed verify that you have the most recent version.
To download the latest version go to att.com/bbdownloads.
BlackBerry® Desktop Software is loaded on the BlackBerry® User Tools CD that came with your smartphone.
After you install the desktop software on your computer and connect your smartphone to your computer, you
can perform any of the following actions:
• Synchronize organizer data such as contacts, calendar entries, tasks, and memos between your
smartphone and your computer.
• Back up and restore smartphone data.
• Transfer media files between your computer and your smartphone.
• Add applications to your smartphone.
• Set up and manage wireless email, calendar, and/or contacts synchronization.
What You Need
• Intel® compatible 486 or higher computer that is compliant with USB 1.1 or later
• Microsoft® Windows® XP, or later
• Available USB port
• CD drive
For step-by-step instructions for installing BlackBerry Desktop Software, synchronizing data with your
computer and more visit att.com/tutorials.
33
Load and Play Music and Videos
Media
Play media files such as songs, ringtones, videos, or voice notes. Use wireless Bluetooth® stereo headphones
or speakers to enjoy your music. Shuffle your songs or enjoy your favorite playlist while you reply to messages
or surf the web.
Play a Media File
1. On the Home screen, click Media.
2. In the Media folder, click a media type.
3. If necessary, click a category.
4. Click a song, ring tone, video, or voice note.
Tip: To view other media files while playing a media file, press the
Menu key.
Click Media Home. To stop playing a media file, click
the Stop icon.
For step-by-step instructions for using the features and services of
your smartphone visit att.com/tutorials.
34
Mobile Video
With Mobile Video you can turn a few spare minutes—from a lunch break to a doctor’s office wait—into a
quick escape. Mobile Video brings your smartphone to life. Watch news, sports, weather and entertainment
clips via AT&T’s high-speed 3G data network.
Mobile Video offers quick access to content you care about most:
• Entertainment
• News and Weather
• Sports
• Kids & Cartoons
Play A Video
1. On the Expanded Home screen, click Mobile Video.
2. Your Mobile Video home page will appear already loaded with the day’s top
news, the latest sports updates and a featured entertainment clip.
3. Select the video clip you wish to view.
35
Use a BlackBerry Bold 9700 Smartphone as a Wireless Modem
Connecting Your BlackBerry Bold 9700 smartphone to a Laptop
Stay flexible and stay in touch with customers and co-workers by using your smartphone as wireless modem
to connect your laptop to the AT&T wireless 3G or EDGE data networks.*
*A BlackBerry plan that supports tethering is required to use this feature.
1. Download the AT&T Communication Manager software from
att.com/communicationmanager and install it on your laptop.
Communication Manager makes it easy to connect to AT&T’s
wireless network.
2. Connect your smartphone to your laptop using the USB cable.
3. Launch AT&T Communication Manager on your laptop.
4. Click the On/Off button on the Communication Manager
interface.
5. Type your BlackBerry password if required.
You are now connected to the Internet and you can browse
the Internet and access email wirelessly.
36
Documents To Go® From DataViz®
View and Edit Microsoft® Word, Excel® and PowerPoint® Files on your
BlackBerry Bold 9700 smartphone
Your smartphone has been pre-loaded with Documents To Go Standard Edition.
Now you can get even more work done no matter where you are.
Documents to Go allows you to:
• View and edit Microsoft Word, Excel and PowerPoint files;
• View and edit files received via email, Bluetooth® or memory card;
• View original document formatting, including text & cell formatting, graphics,
tables, alignment, and bullets & numbers;
• Edit and select text, cut/copy/paste.
For more information on Documents To Go,
visit www.dataviz.com.
37
Troubleshooting
If you’re having trouble with your new smartphone see page 10 in this guide for
instructions on using the Setup Wizard.
Visit att.com/tutorials for information on the
following common troubleshooting topics:
• Network Connections
• Email Setup
• Sending and Receiving Messages
• Sending and Receiving Calls
• Media files and Memory Cards
• Ringtones and Notifications
• Bluetooth
• GPS
38
Carry Your Smartphone
Your BlackBerry® smartphone might not come with a holster (body-worn carrying solution equipped with an
integrated belt clip). If you wear the smartphone on your body, always put the smartphone in a holster with
an integrated belt clip supplied or approved by Research In Motion (RIM). Carrying solutions, including RIM
approved carrying solutions and carrying solutions not approved by RIM, that do not come equipped with
an integrated belt clip should not be worn or carried on the body. For more information about carrying your
smartphone, including separation distances when wearing your smartphone, see the Safety and Product
Information booklet that came with your smartphone.
To purchase RIM approved holsters equipped with an integrated belt clip or other accessories for your
smartphone, contact your wireless service provider or visit www.shopblackberry.com
39
© 2009 AT&T Intellectual Property. All rights reserved. AT&T and the AT&T logo are trademarks of AT&T Intellectual
Property.
All rights reserved. BlackBerry®, RIM®, Research In Motion®, SureType®, SurePress™ and related trademarks, names and
logos are the property of Research In Motion Limited and are registered and/or used in the U.S. and countries around the
world. Used under license from Research In Motion Limited.
Bluetooth is a trademark of Bluetooth SIG. Documents To Go and DataViz are trademarks of DataViz Inc. Intel is a trademark
of Intel Corporation. IBM, Lotus, and Lotus Notes are either registered trademarks or trademarks of International Business
Machines Corporation. Microsoft, Excel, Outlook, PowerPoint and Windows are trademarks of Microsoft Corporation.
Yahoo!® is a trademark of Yahoo! Inc. AOL® is a trademark of AOL LLC. Gmail® is a trademark of Google Inc. SD and
microSD are trademarks of SD-3C, LLC. Wi-Fi is a trademark of the Wi-Fi Alliance. All other brands, product names,
company names, trademarks, and service marks are the properties of their respective owners.
Portions of the BlackBerry® Device Software are copyright © 2007-2008 The FreeType Project (www.freetype.org). All
rights reserved.
Your use of third party products and services shall be governed by and subject to you agreeing to the terms of separate
software licenses, if any, for those products or services. RIM makes no representation, warranty or guarantee whatsoever
in relation to the third party products and services and assumes no liability whatsoever in relation to the third party
products and services even if RIM has been advised of the possibility of such damage.
The BlackBerry smartphone and/or associated software are protected by copyright, international treaties, and various
patents, including one or more of the following U.S. patents: 6,278,442; 6,271,605; 6,219,694; 6,075,470; 6,073,318;
D445,428; D433,460; D416,256. Other patents are registered or pending in various countries around the world. Visit
www.rim.com/patents for a list of RIM [as hereinafter defined] patents.
This document is provided ‘as is’ and Research In Motion Limited and its affiliated companies (‘RIM’) and AT&T Knowledge
Ventures (‘AT&T’) assume no responsibility for any typographical, technical, or other inaccuracies in this document. In order
to protect RIM and/or AT&T (“RIM/AT&T”) proprietary and confidential information and/or trade secrets, this document
may describe some aspects of RIM/AT&T technology in generalized terms. RIM reserves the right to periodically change
information that is contained in this document; however, RIM/AT&T makes no commitment to provide any such changes,
updates, enhancements, or other additions to this document to you in a timely manner or at all. RIM/AT&T MAKES NO
REPRESENTATIONS, WARRANTIES, CONDITIONS, OR COVENANTS, EITHER EXPRESS OR IMPLIED (INCLUDING WITHOUT
LIMITATION, ANY EXPRESS OR IMPLIED WARRANTIES OR CONDITIONS OF FITNESS FOR A PARTICULAR PURPOSE, NON-
40
INFRINGEMENT, MERCHANTABILITY, DURABILITY, TITLE, OR RELATED TO THE PERFORMANCE OR NON-PERFORMANCE
OF ANY SOFTWARE REFERENCED HEREIN OR PERFORMANCE OF ANY SERVICES REFERENCED HEREIN). IN CONNECTION
WITH YOUR USE OF THIS DOCUMENTATION, NEITHER RIM/AT&T NOR THEIR RESPECTIVE AFFILIATED COMPANIES,
DIRECTORS, OFFICERS, EMPLOYEES, OR CONSULTANTS SHALL BE LIABLE TO YOU FOR ANY DAMAGES WHATSOEVER BE
THEY DIRECT, ECONOMIC, COMMERCIAL, SPECIAL, CONSEQUENTIAL, INCIDENTAL, EXEMPLARY, OR INDIRECT DAMAGES,
EVEN IF RIM/AT&T HAS BEEN ADVISED OF THE POSSIBILITY OF SUCH DAMAGES, INCLUDING WITHOUT LIMITATION, LOSS
OF BUSINESS REVENUE OR EARNINGS, LOST DATA, DAMAGES CAUSED BY DELAYS, LOST PROFITS, OR A FAILURE TO
REALIZE EXPECTED SAVINGS.
This document might contain references to third-party sources of information, hardware or software, products or services
and/or third-party web sites (collectively the ‘Third-Party Information’). RIM does not control, and is not responsible
for, any Third-Party Information, including, without limitation the content, accuracy, copyright compliance, compatibility,
performance, trustworthiness, legality, decency, links, or any other aspect of Third-Party Information. The inclusion of
Third-Party Information in this document does not imply endorsement by RIM of the Third-Party Information or the thirdparty in any way. Installation and use of Third-Party Information with RIM’s products and services may require one or
more patent, trademark, or copyright licenses in order to avoid infringement of the intellectual property rights of others.
Any dealings with Third-Party Information, including, without limitation, compliance with applicable licenses and terms
and conditions, are solely between you and the third-party. You are solely responsible for determining whether such
third-party licenses are required and are responsible for acquiring any such licenses relating to Third-Party Information.
To the extent that such intellectual property licenses may be required, RIM expressly recommends that you do not install
or use Third-Party Information until all such applicable licenses have been acquired by you or on your behalf. Your use
of Third-Party Information shall be governed by and subject to you agreeing to the terms of the Third-Party Information
licenses. Any Third-Party Information that is provided with RIM’s products and services is provided ‘as is’. RIM makes no
representation, warranty or guarantee whatsoever in relation to the Third-Party Information and RIM assumes no liability
whatsoever in relation to the Third-Party Information even if RIM has been advised of the possibility of such damages or
can anticipate such damages.
Research In Motion Limited
295 Phillip Street
Waterloo, ON N2L 3W8
Canada
AT&T Mobility, LLC
1055 Lenox Park Boulevard N.E.
Atlanta, GA 30319
41
Indicators
Wireless Connection Status Indicators
You can use the phone, send and receive email messages, PIN messages, text messages, and
multimedia messages, and use the browser simultaneously with a high-speed data connection.
You can use the phone, send and receive email messages, PIN messages, text messages, and
multimedia messages, and use the browser with a fast data connection.
You can use the phone, send and receive email messages, PIN messages, text messages, and
multimedia messages, and use the browser.
You can use the phone and send and receive text messages.
You can only make emergency calls.
Your connection to the wireless network is turned off.
You are not in a wireless coverage area.
+ Wi-Fi
network
name
You can send and receive email messages and use the browser over a Wi-Fi® connection.
+ Wi-Fi
network
name
Your smartphone is connected to a Wi-Fi network but does not have access to BlackBerry services
over the Wi-Fi connection.
Your connection to a Wi-Fi network is turned on, but you are not in a Wi-Fi coverage area.
42
Home Screen
Message List
Calendar
alarm set
unopened message
reminder set
unopened message count
opened message
meeting
missed calendar reminder
message with an attachment
voice mail
message is high priority
missed call count
SMS text message
sending data
MMS message
receiving data
sent message
flash is turned on
roaming
message is sending
flash is turned off
Bluetooth® technology
is turned on
message not sent
automatic flash mode
paired with Bluetooth
enabled accessory
draft message
slow shutter speed
recurring appointment
or meeting
exception to recurring
appointment or meeting
calendar entry with notes
Camera
Phone
Battery
full battery power
missed call
low battery power
placed call
battery charging
received call
43
BlackBerry Bold 9700 Smartphone Key Functions
Mute key
Play/pause a media file
Mute a call
Lock key
Lock the keyboard
Headset jack
Volume keys
Adjust the volume
Micro-USB port
Right Convenience key
Open the camera
Autofocus
Take a picture
Left Convenience key
Open the voice dialing
application
Backspace/Delete key
Speakerphone key
Turn on/off the speakerphone
during a call
Alt key
Type the alternate character
on a key
Enter key
Right Shift key
Capitalize letters
Symbol key
Open the symbol list
Left Shift key
Capitalize letters
Tip: If you are not on a call, you can turn
on standby mode to avoid pressing keys
accidentally when you are not using your
smartphone. Hold the Mute key to turn
on standby mode. To turn off standby
mode, press the Mute key again.
Send key
Open the phone
Call a highlighted
phone number
44
Escape key
Move back a screen
Close a menu
Menu key
Open the menu in
an application
Trackpad
Slide your finger to move around a screen
Click (press) to select an item
End/Power key
End a call
Turn on/off the device
Return to the Home screen
BlackBerry Bold 9700 Smartphone Applications and Functions
Click Setup Wizard to learn about typing, set
options to personalize your smartphone, and set up
your email address.
Click Call Log to see the date on which a call was
made or received, the phone number that the call
was made to or from and the duration of the call.
Click Personal Email Setup to set up one or more
email addresses or change BlackBerry® Internet
Service email options.
Click Contacts to view your contact list or
add a new contact.
Click Calendar to view your calendar or
add a new appointment.
Click SMS And MMS to view a list of your sent and
received SMS and MMS messages.
Click Media to play saved ringtones, videos, pictures
or songs.
Click Messages to view a list of your messages.
More than one message list might appear on your
smartphone.
Click Camera to take a picture. You can also
access the Video Camera from the menu.
Click Visual Voice Mail to listen to your voicemail
messages in any order you choose.
Click AT&T Navigator to get directions, view maps,
and find nearby businesses.
Click Set Up Wi-Fi to set up a connection
to a Wi-Fi® network.
Click Set Up Bluetooth to to pair your BlackBerry®
device with a Bluetooth enabled device, such as a
wireless stereo headset or a BlackBerry Bluetooth
Stereo Music Gateway.
Click Sounds to set different notification options
for different items, set ringtones, or set the volume
for notification.
Click AT&T Mall to visit a one-stop shop to personalize
and customize your smartphone with ringtones, games,
applications, and much more.
Click AT&T Music to get the ultimate mobile music
experience.
Click Options to view the main list of smartphone
options. You can also access additional options from
the menu in each application.
Click Help to view the user guide for your
smartphone. The user guide provides procedures to
help you use your smartphone.
Tip: For pictures of the keys and buttons on your smartphone
refer to the foldout at the back of this guide.
45
Find More Information
On Your
Smartphone
On The Web
On The Phone
– To view the User Guide on your smartphone, click Help from
the Expanded Home screen or when in an application, press
the Menu key and click Help.
– Interactive web tutorials, tips & tricks and FAQs are available at
att.com/tutorials. Select Manufacturer: RIM BlackBerry and Model:
Bold 9700 from the drop down menus.
– Detailed support information including smartphone specifications,
user manual, troubleshooting, user forums and knowledgebase
articles are available at att.com/devicesupport
– Enterprise and Government customers can go to
wireless.att.com/businesssupport for device tutorials, device
setup, and on-line technical support chat for instant answers
to questions about your device and its features.
– For information about your wireless account, service plan or network,
visit att.com/wireless
– Call AT&T Customer Care at 1-800-331-0500 or dial 611 from any
AT&T mobile phone for assistance with your service or smartphone.
Find Accessories
Accessories for your smartphone, are available at: att.com/wirelessaccessories
or visit your AT&T store.
BlackBerry® Bold™ 9700™ from AT&T
46
RCM71UW
MAT-30239-001
PRINTSPEC-024