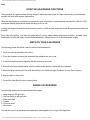
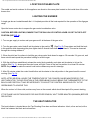
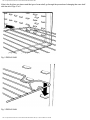
1
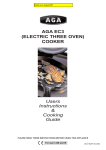
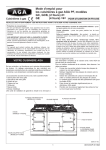
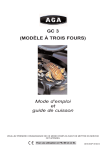
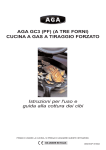
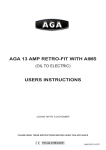
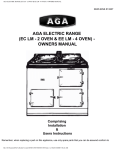
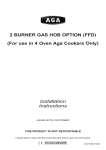
file:///D:/System/DATA/Dx/ds1/US/iss1/EOPI33643/EPOI33643.htm
09/05 EOPI 33643
Use and Care of your new
Aga Gas Fired Range Models:GC Open Flue Range (2 Oven)
GC Direct Vent Range (2 Oven)
GE Open Flue Range (4 Oven)
GE Direct Vent Range (4 Oven)
For U.S. and Canadian Markets
NOTE: THESE INSTRUCTIONS SHOULD BE LEFT WITH THE APPLIANCE AND THE USER TO RETAIN FOR
FUTURE REFERENCE.
This booklet has been prepared in the interest of providing you, the customer with basic information on the safe,
correct use of your Aga Gas Range.
Instructions are provided on the operation and maintenance after care of the Aga range, and we would recommend
that you read this instruction leaflet before you begin cooking.
WARNING: IF THE INFORMATION IN THIS MANUAL IS NOT FOLLOWED EXACTLY, A FIRE OR EXPLOSION
MAY RESULT CAUSING PROPERTY DAMAGE, PERSONAL INJURY OR DEATH.
●
●
DO NOT STORE OR USE GASOLINE OR OTHER FLAMMABLE VAPORS AND LIQUIDS IN THE
VICINITY OF THIS OR ANY OTHER APPLIANCE.
WHAT TO DO IF YOU SMELL GAS:
- DO NOT TRY TO LIGHT ANY APPLIANCE.
- DO NOT TOUCH ANY ELECTRICAL SWITCH; DO NOT USE ANY PHONE IN YOUR BUILDING.
- IMMEDIATELY CALL YOUR GAS SUPPLIER FROM A NEIGHBOR’S PHONE. FOLLOW THE GAS
SUPPLIER’S INSTRUCTIONS.
- IF YOU CANNOT REACH YOUR GAS SUPPLIER, CALL THE FIRE DEPARTMENT.
●
INSTALLATION AND SERVICE MUST BE PERFORMED BY A QUALIFIED INSTALLER, SERVICE
AGENCY OR THE GAS SUPPLIER.
file:///D:/System/DATA/Dx/ds1/US/iss1/EOPI33643/EPOI33643.htm (1 of 10)10/2/2006 4:01:50 PM
file:///D:/System/DATA/Dx/ds1/US/iss1/EOPI33643/EPOI33643.htm
SAFETY PRECAUTIONS
NOTE: READ ALL INSTRUCTIONS BEFORE USING THIS RANGE.
Basic Range Safety Precautions
1. Do not store combustible materials, gasoline or other inflammable vapors and liquids near a range.
2. Ensure and maintain the continual free passage of air to the burner housing. Do not stand obstacles against
burner outer door and loose hair from dog or cats must not be allowed to accumulate behind the burner outer door.
Child Safety
Children MUST be taught safe range practices to prevent possible injury. Listed below are some basic practices we
recommend you read and follow for safe use of this appliance when children are present.
Children are more sensitive to heat than adults, therefore:
1. Do not leave children alone or unsupervised near the range and discourage them from this area.
2. Children should not be allowed to mount on any part of the range.
3. Children MUST be taught that the range and its utensils can be hot.
4. Children should be taught that the range is not a toy. They should be forbidden to play with the range gas
controls behind burner outer door or any other range parts.
5. Let the heavy, hot utensils cool in a safe place but out of reach of small children.
CAUTION: AVOID STORING ITEMS OF INTEREST TO CHILDREN IN ANY CABINETS INSTALLED ABOVE THE
RANGE TO PREVENT THE RANGE BEING USED TO OBTAIN CABINET ACCESS AND POSSIBLE SERIOUS
INJURY.
Gas Odours
If a gas odour is apparent with the pilot and main burner alight, turn off the gas supply to the range. Call your
installer or local gas company to ensure that the gas pipework is sound.
WARNING: NEVER USE A MATCH OR NAKED FLAME TO LOCATE A GAS LEAK.
Safety Precautions and Hints
Temperatures in cabinet storage spaces above the range may be unsafe for storage of some types of materials
such as volatile liquids or aerosol sprays which can explode.
Ensure spare storage cabinets are capable of supporting the heavy weight of cooking utensils of the range.
file:///D:/System/DATA/Dx/ds1/US/iss1/EOPI33643/EPOI33643.htm (2 of 10)10/2/2006 4:01:50 PM
file:///D:/System/DATA/Dx/ds1/US/iss1/EOPI33643/EPOI33643.htm
The maximum depth of any cabinets installed above the top of the range must not exceed 330mm (13in).
Grease
WARNING: HOT GREASE IS FLAMMABLE.
Wipe off any grease deposits on the range top and front. Do not leave containers of cooking fat around the range.
In the event of a grease fire, do not remove the pan but cover the pan to extinguish the flame.
WARNING: DO NOT DOUSE FLAME WITH WATER. Use a dry chemical type fire extinguisher if available, or
sprinkle heavily with baking soda.
Range Cooking Safety Precautions and Hints
Never reach directly into a hot oven to add or remove cooking utensils. Instead, pull the grill shelf out to its
maximum projection and load or remove utensils. Oven gloves will be necessary on utensils removal.
Although the range itself provides gently radiation and convected warm air currents, it may not be used for
increased space heating by exposing the hotplate with the insulating covers permanently raised or the oven doors
left open. This instruction is based on safety considerations where accidents could occur, as does the use of ovens
for storage space.
WARNING: DO NOT HEAT A CLOSED GLASS OR METAL CONTAINER IN THE OVEN.
Pressure-build in the container may cause it to burst and result in harmful personal damage
General Safety Precautions and Hints for Cooking Utensils.
1. Ensure utensils have flat machined bases to obtain perfect contact with the hotplates.
2. Ensure the correct size utensil is chosen to prevent food boil-over.
WARNING: NEVER LEAVE A DEEP FAT FRYING OPERATION UNATTENDED.
3. Always turn utensil handles away from the front of the range and out of reach of small children.
THE ORIGIN OF THE AGA RANGE
Developed in the late 1920s as a solid fuel unit, the concept provided the facility to bake, boil, braise, broil, roast,
stew, toast and fry with the minimum of attention, and that the same time provide perfect cooking and easy
management, with automatic heat control.
Later gas-firing developments have maintained this same standard of cooking facility, combined with safe
automatic gas burning to ensure the absolute minimum of attention.
The range operates without any electrical power supply and can be operated on Natural or L.P.G. gases
(depending on model type), the range being connected to a chimney flue to duct the flue products and ovens smells
file:///D:/System/DATA/Dx/ds1/US/iss1/EOPI33643/EPOI33643.htm (3 of 10)10/2/2006 4:01:50 PM
file:///D:/System/DATA/Dx/ds1/US/iss1/EOPI33643/EPOI33643.htm
away.
HOW THE AGA RANGE FUNCTIONS
The Aga range is a gas-fired heat storage range in which the main burner is a light continuously to automatically
maintain the oven and hotplate temperature.
When the temperatures are attained, the amount of gas to the burner is automatically reduced from HIGH to LOW
to maintain steady temperatures when the range is not in use.
Loading the range will cause the main burner to revert to HIGH so that temperatures are brought back as quickly as
possible.
From initial cold lighting, it will take the range about 6 hours to attain steady temperature condition, and after initial
temperature checks the range is controlled automatically, without the use of an electrical power supply.
HINTS ON YOUR AGA RANGE
The following points should be carefully observed and adhered to:
1. Cook as much as possible in the ovens.
2. Close the hotplate insulating lids whenever the hotplates are not in use.
3. Clean the hotplate surface regularly with the wire brush provided.
4. Utensils with flat machined bases must be used to make perfect contact with the hotplates.
5. Have the range serviced at 12-month intervals by your Authorised Aga Distributor or local Gas Company.
6. Mop up spills as they occur.
7. Consult the Aga Book for more cooking hints.
RANGE ACCESSORIES
The following accessories are provided with the range:
1- Large meat tin with grill rack
1- Half size meat tin with grill rack
1- Plain oven shelf
1- Toaster
2- Grid oven shelf
1- Wire brush
You will also receive a guarantee and registration card together with a copy of the Aga Book.
file:///D:/System/DATA/Dx/ds1/US/iss1/EOPI33643/EPOI33643.htm (4 of 10)10/2/2006 4:01:50 PM
file:///D:/System/DATA/Dx/ds1/US/iss1/EOPI33643/EPOI33643.htm
LOCATION OF NAME PLATE
The model and serial numbers for this appliance are found on the name plate located on the inside face of the outer
burner door.
LIGHTING THE BURNER
A single gas burner located beneath the L.H. hotplate provides all the heat required for the operation of the Aga gas
range.
Open the burner outer door to expose the gas control combination valve.
CAUTION: BEFORE LIGHTING, ENSURE THAT THE GAS VALVE CONTROL KNOB 2 IS SET IN THE O OFF
POSITION (SEE FIG. A).
1. Turn on gas supply to cooker and open gas cock 1 at the base of the gas valve.
2. Turn the gas valve control knob 2 anti-clockwise to the position
(See Fig. B). Press down and hold the knob
in this position while depressing the piezo lighter knob 3 several times until the pilot has lit. This can be observed
through the viewing window 4.
3. When the pilot has lit continue to hold the gas valve control knob down for approx. 30 seconds. If it goes out, wait
three minutes and repeat the procedure holding for a little longer.
4. With the pilot flame established, release the control knob gradually and rotate anti-clockwise to its low fire
position (See Fig. C), whereupon the main burner will light. Leave in the low fire position for at least 30 minutes.
NOTE: Any attempt to rotate the control knob before release may result in damage.
5. After 30 minutes rotate the control knob further anti-clockwise to the mid-position in the green band for normal
running. (See Fig. D).
NOTE: AFTER SEVERAL HOURS THE TEMPERATURE OF THE COOKER CAN BE MONITORED BY THE
HEAT INDICATOR. THE MID POSITION IN THE GREEN BAND SHOULD BRING THE THERMOMETER TO THE
BLACK LINE POSITION. IT MAY BE NECESSARY TO ADJUST THE CONTROL KNOB SLIGHTLY IN THE
GREEN BAND TO ACHIEVE THIS.
When the cooker is lit from cold, moisture may form on the enamel which should be wiped off to prevent staining.
IF THE FLAME HAS EXTINGUISHED FOR WHATEVER REASON, WAIT THREE MINUTES (MINIMUM) BEFORE
RELIGHTING.
THE HEAT INDICATOR
The heat indicator is located above the Top Roasting Oven door and three indicators - black, silver and red, with a
black line between the black and red sections.
file:///D:/System/DATA/Dx/ds1/US/iss1/EOPI33643/EPOI33643.htm (5 of 10)10/2/2006 4:01:50 PM
file:///D:/System/DATA/Dx/ds1/US/iss1/EOPI33643/EPOI33643.htm
When the mercury is on or about the black line in the silver section, the range is at the correct working temperature.
The purpose of the heat indicator is to show whether the range contains the full amount of stored heat and it should
only be referred to first thing in the morning or after a period of several hours recovery from cooking.
A steady mercury line in the red section indicates ovens with too high a temperature, or in the black section, too low.
The heat indicator is located above the Top Roasting Oven door and three indicators - black, silver and red, with a
black line between the black and red sections.
The setting of the combustion gas valve knob in green band should normally ensure the range running at the
correct temperature, with the mercury on or about the black line in the silver section.
Any discrepancy can be resolved by marginally advancing or retarding the knob within the green band to
compensate. Once the correct setting has been confirmed, the heat control will operate automatically to maintain
the range at full temperatures.
NOTE: REMEMBER TO NOTE THE SETTING POSITION IF TURNING THE RANGE OFF.
TO EXTINGUISH THE BURNER
Short Periods
Turn the combination gas valve thermostat knob 2 clockwise until the knob symbol
is adjacent to its register
point. This will extinguish the main gas burner, leaving the pilot flame alight, and will maintain some warmth within
the range during the period of non-use.
Long Periods
To completely extinguish the pilot burner, set the knob to symbol
position.
. Turn the service gas valve (1) to the OFF
This will extinguish both the main and pilot burners.
SERVICE
The burner should be checked and cleaned at regular 12- month intervals and arrangements should be made with
your Aga Distributor or local Gas Company for regular maintenance.
GENERAL CLEANING
DO NOT USE A STEAM CLEANER TO CLEAN THIS COOKER.
All that is needed to keep the vitreous enamelled surfaces of the Aga bright and clean is a daily rub over with a
damp cloth and, maybe, a little soapy water, followed by a clean, dry duster.
file:///D:/System/DATA/Dx/ds1/US/iss1/EOPI33643/EPOI33643.htm (6 of 10)10/2/2006 4:01:50 PM
file:///D:/System/DATA/Dx/ds1/US/iss1/EOPI33643/EPOI33643.htm
Do not use detergents to clean appliance labels, wipe with a damp cloth only.
If milk or fruit juice, or anything containing acid, is spilt on the top plate or front plate, be sure to wipe off
immediately. Also clean off any condensation streaks on the front plate around oven doors, or the vitreous enamel
may be permanently discoloured.
The linings of the insulating lids and oven doors may be cleaned with a soap pad. Open the lids and lift off the oven
doors to allow them to cool a little before cleaning. Do not, however, immerse the doors in water as they are packed
with insulating material, and this may be damaged by excessive moisture.
The Roasting Oven (and the Baking Oven in Model GE) keeps itself clean and merely needs to be brushed out
occasionally with a long-handled stiff brush. The Simmering Oven and Plate Warming Ovens may be cleaned with
a stiff brush and a damp, soapy cloth. The wire brush is provided for cleaning the hotplates.
Fig. 1
FITTING OF OVEN SHELVES
file:///D:/System/DATA/Dx/ds1/US/iss1/EOPI33643/EPOI33643.htm (7 of 10)10/2/2006 4:01:50 PM
file:///D:/System/DATA/Dx/ds1/US/iss1/EOPI33643/EPOI33643.htm
If the is the first time you have used this type of oven shelf, go through the procedure of changing the oven shelf
with the aid of Figs. 2 to 5.
Fig. 2 DESN 512403
Fig. 3 DESN 512404
file:///D:/System/DATA/Dx/ds1/US/iss1/EOPI33643/EPOI33643.htm (8 of 10)10/2/2006 4:01:50 PM
file:///D:/System/DATA/Dx/ds1/US/iss1/EOPI33643/EPOI33643.htm
REMOVAL OF OVEN SHELVES
Fig. 4 DESN 512405
Fig. 5 DESN 512406
file:///D:/System/DATA/Dx/ds1/US/iss1/EOPI33643/EPOI33643.htm (9 of 10)10/2/2006 4:01:50 PM
file:///D:/System/DATA/Dx/ds1/US/iss1/EOPI33643/EPOI33643.htm
For further advice or information contact your local distributor/stockist
With Aga’s policy of continuous product improvement, the Company reserves the right to change specifications and
make modifications to the appliance described and illustrated at any time.
Manufactured By
Aga
Station Road
Ketley Telford
Shropshire TF1 5AQ
England
www.aga-web.co.uk
www.agacookshop.co.uk
www.agalinks.com
file:///D:/System/DATA/Dx/ds1/US/iss1/EOPI33643/EPOI33643.htm (10 of 10)10/2/2006 4:01:50 PM