1
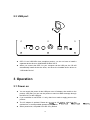
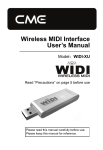
USB Programmable Grand Piano Style MIDI Pedal User’s Manual ————————————————— Model:GPP-3 Read “Precautions” on page 5 before use Please ready this manual carefully before use. Please keep this manual for reference. Thank you for choosing CME GPP-3 — USB Programmable Grand Piano Style MIDI Pedal Please keep all the important information here Attach your invoice or receipt here ~~~~~~~~~~~~~~~~~~~~~~~ for reference Serial(on the back of the product) Purchase date Dealer’s name and addr. Dealer’s tel. Warning: z Improper connection may cause damage to the device. Copyright z Copyright of the manual belongs to Central Music Co. Anyone must get a written permission from Central Music Co. before copying any part of the manual to any kind of media. © Central Music Co. 2006 Open the package Please check all the items in your GPP-3 package: z z z The GPP-3 product 1 pcs USB cable 1 pcs User’s manual 1 pcs 2 Special Message Section This product utilizes batteries or an external power supply (adapter). Do NOT connect this product to any power supply or adapter other than the one described in the manual, on the product, or specifically recommended by CME. user safe and environment friendly. We sincerely believe that our products and the production methods used to produce them, meet these goals. In keeping with both the letter and the spirit of the law, we want you to be aware of the following: WARNING: Do not place this product in a position where anyone could walk on, trip over, or roll anything over the power or the connecting cords of any kind. The use of an extension cord is not recommended! If you must use an extension cord, make sure that the cord has the ability to handle the maximum current needed by this product. Please consult a local electrician when possible. Battery Notice: This product should be used only with the components supplied or recommended by CME. When used with any components, please observe all safety markings and instructions that accompany the accessory product. This product may also use “household” type batteries. Some of these may be rechargeable. Make sure that the battery being charged is a rechargeable type and that the charger is intended for the battery being charged. SPECIFICATIONS SUBJECT TO CHANGE: When installing batteries, do not mix batteries with new ones, or with batteries of different types. Batteries MUST be installed correctly. Mismatches of incorrect installation may result in overheating and battery case rupture. This product MAY contain a small non-rechargeable battery which (if applicable) is soldered in place. The average life span of this type of battery is approximately five years. When replacement becomes necessary, contact a qualified service representative to perform the replacement. The information contained in this manual is believed to be correct at the time of printing. However, CME reserves the right to change or modify any of the specifications, without notice or obligation to update existing units. Warning: Do not attempt to disassemble, or incinerate any battery. Keep all batteries away from children. Dispose the used batteries promptly and as regulated by the laws in your area. Note: Check with any retailer of household type batteries, in your area, for battery disposal information. This product, either alone or in combination with an amplifier and headphones or speaker(s), may be capable of producing sound levels that could cause permanent hearing loss. Do NOT operate for long periods of time at a high volume level or at a level that is uncomfortable. If you experience any hearing loss or ringing in the ears, you should consult an audiologist. Disposal Notice: Should this product become damaged beyond repair, or for some reason its useful life is considered to be at an end, please observe all local, state, and federal regulations that relate to the disposal of products that contain lead, batteries, plastics, etc. If your dealer is unable to assist you, please contact CME directly. IMPORTANT: The louder the sound, the shorter the time period before damage occurs. Some CME products may have stands and/or accessory mounting fixtures that are either supplied with the product or as optional accessories. Some of these items are designed to be dealer assembled or installed. Please make sure that stands are stable and any optional fixtures (where applicable) are well secured BEFORE using. Stands supplied by CME are designed for the respective products only. No other uses are recommended. NOTICE: Service charges, incurred due to a lack of knowledge relating to how a function or effect works (when the unit is operating as designed), are not covered by the manufacturer’s warranty, and are therefore the owners responsibility. Please study this manual carefully and consult your dealer before requesting service. ENVIRONMENTAL ISSUES: CME strives to produce products that are both 3 FCC INFORMATION (U.S.A) 1. IMPORTANT NOTICE: DO NOT MODIFY THIS UNIT! This product, when installed as indicated in the instructions contained in this manual, meets FCC requirements. Modifications not expressly approved by CME may void your authority, granted by the FCC, to use the product. 2. IMPORTANT: When connecting this product to accessories and/or another products use only high quality shielded cables. Cable(s) supplied with this product MUST be used. Follow all installation instructions. Failure to follow instructions could void your FCC authorization to use this product in the USA. 3. NOTE: This product has been tested and found to comply with the limits for a Class B Digital device, pursuant to Part 15 of the FCC Rules. These limits are designed to provide reasonable protection against harmful interferences in a residential environment. This equipment generates, uses and can radiate radio frequency energy and, if not installed and used according to the instructions found in the users manual, may cause interferences, harmful to the operation of other electronic devices. Compliance with FCC regulations does not guarantee that interferences will not occur in all installations. If this product is found to be the source of interferences, which can be determined by turning the unit “OFF” and “ON”, please try to eliminate the problems by using one of the following measures: Relocate either this product or the device that is being affected by the interferences. Utilize power outlets that are on different branch (circuit breaker or fuse) circuits or install AC line filter(s). In the case of radio or TV interferences, relocate/reorient the antenna. If the antenna lead-in is 300 ohm ribbon lead, change the lead-in to co-axial type cable. If these corrective measures do not produce satisfying results, please contact the local retailer, authorized to distribute this type of product. If you cannot locate the appropriate retailer, please contact CME. The above statements apply ONLY to those products distributed in the USA. 4 PRECAUTIONS IMPORTANT Always follow the basic precautions listed below to avoid the possibility of serious injury or even death from electrical shock, damages, fire or other hazards. These precautions include, but are not limited to, the follows: 1. Read and understand all the instructions. 2. Always follow the instructions on the instrument. 3. Before cleaning the instrument, always remove the electric plug from the outlet as well as the USB cable. When cleaning, use a soft and dry cloth. Do not use gasoline, alcohol, acetone, turps or any other organic solutions; do not use liquid cleaner, spray cleaner or too wet cloth. 4. Do not use the instrument near water or moisture, such as bathtub, washbasin, washing poor in the kitchen or similar places. 5. Do not place the instrument in an unstable position where it might accidentally fall over. 6. Do not jam sinks or holes of the instrument; those sinks of holes are used for air circulation to prevent the instrument from overheating. Do not place the instrument near heat sink or any places with poor air circulation. 7. Do not place anything on the power cord. Make sure the power cord is set on a safe place, so nobody will step on it and no body will trip over it. 8. Do not overload the outlet and the AC cable to avoid fire or electrical shock. 9. Do not insert anything in the instrument, which may cause fire or electrical shock. Do not splash any kind of liquid to the instrument. 10. Do not disassemble the instrument in case of accidental electrical shock. 11. Always take the instrument to a qualified service center in need of repair. You will cause yourself in danger if you open or remove the cover, and improper assembly may cause electrical shock in the future use. 12. Unplug all the connectors and take the instrument to a qualified service center if anything in the below listed happens: A. The power cord or connector get hurt or worn out. B. Any liquid get in the instrument. C. The instrument gets rain or water splash. D. The instrument dose not work properly after following all the instructions regarding to the trouble shootings. E. The instrument falls down or gets broken. F. The instrument functions poorly. 13. Do not use the instrument when thundering; otherwise the thundering may cause long-distance electrical shock. 14. Do not use the instrument when there is a gas leak nearby. Keep this manual in safe place CAUTION: 5 Setting up Do not connect the instrument when thundering. Do not set up the cord or outlet to a moist place, except for that the outlet is specially designed for moist places. When the power cord is connected to the AC outlet, do not touch the naked part of the cord or the connector. Always follow the instructions carefully when setting up the instrument. WARNING: z Do not expose the instrument to rain or moisture, to avoid fire or electrical shock. Other precautions: z z z z z z z Keep the instrument away from electrical interface sources, such as fluorescent light and electrical motors. Keep the instrument away from dust, heat and vibration. Do not expose the instrument to sunlight. Do not place heavy objects on the instrument; do not place containers with liquid on the instrument. Do not touch the connectors with wet hands Central Music Co. is not responsible for any damage or data loss caused by improper operation to the instrument. All the pictures and the LED display in the manual are used for demonstration; they may be different from the real instrument. Features z 3 pedals in Grand piano style with an elegant and stable wood base z With a built-in CPU, the three pedals are assignable to any MIDI controller z USB port, MIDI out port and standard pedal ports z Automatically memorizes and stores the settings, even after power off z 3 LEDs for MIDI activities z Switchable polarity and fine tuning for flexible connectivity z Windows XP/MAC OS X USB MIDI class-compliant z USB bus power and DC in z Firmware upgradeable via USB 6 Content 1 2 3 4 5 6 7 General view .............................................................................................................. 8 1.1 Front panel .................................................................................................. 8 1.2 Rear panel ................................................................................................... 8 Connection................................................................................................................. 8 2.1 PEDAL out ports .......................................................................................... 9 2.2 MIDI OUT port ............................................................................................. 9 2.3 USB port .................................................................................................... 10 Operation ................................................................................................................. 10 3.1 Power on ................................................................................................... 10 3.2 Pedal Outs..................................................................................................11 3.3 MIDI OUT ...................................................................................................11 3.4 USB Out .....................................................................................................11 3.5 Reset ..........................................................................................................11 Settings.................................................................................................................... 12 4.1 Polarity....................................................................................................... 12 4.2 Range ........................................................................................................ 12 4.3 Assign Controller# ..................................................................................... 12 4.4 Assign MIDI Channel ................................................................................. 13 Controller list ............................................................................................................ 14 Firmware upgrade.................................................................................................... 17 Specifications ........................................................................................................... 17 7 1 General view 1.1 Front panel Pedal 3 Pedal 2 Pedal 1 1.2 Rear panel 2 Connection z ON/OFF: You can use the power switch to power on/off this product. 8 z z z z z DC: You can use the DC port to connect an AC adaptor. USB: You can use the USB port for computer connection. MIDI OUT: You can connect the MIDI OUT port to the MIDI IN port of another MIDI device. PEDAL 1-3:You can connect the Pedal 1-3 output to the pedal in jacks of your instruments. TRIM.: This is the fine tuning knob for PEDAL 3. 2.1 PEDAL out ports 2.2 MIDI OUT port 9 2.3 USB port z z GPP-3 is an USB MIDI class compliant product; you do not have to install a separate device driver on WINDOWS XP/MAC OS X. When you connect the GPP-3 to your computer via the USB port, the OS will automatically install the device driver, and show the installed device driver as “USB Audio Device”. 3 Operation 3.1 Power on z z z z You can supply the power via the USB port or an AC adaptor, then switch on the product. After that you can use the product to send out MIDI message through the MIDI OUT or the USB port. If you would like to use PEDAL 1-3 only, there is no need to supply power to the product. The AC adaptor is optional. Please do not use an AC adaptor, other then the optional one, to avoid possible damage to the product. When powered on, the pedal LEDs are off by default. 10 3.2 Pedal Outs z Please use cables, with the right connectors, as below: Pedal out port Pedal type Connector type PEDAL 1 Switch TS PEDAL 2 Switch TS PEDAL 3 Continuous TRS 3.3 MIDI OUT z z z z z Please connect the MIDI OUT port to the MIDI IN port of another MIDI device. Power supply via USB or AC adaptor is necessary when using MIDI OUT port. Each time when a pedal is depressed, the corresponded LED will flash. Please do not use a MIDI cable which is more than 5 meters long to avoid data delay or loss. By default, the product will send following MIDI messages from the MIDI OUT port: Pedal Controller # Controller type PEDAL 1 CC#67 Pedal (soft) PEDAL 2 CC#66 Pedal (sostenuto) PEDAL 3 CC#64 Pedal (sustain) 3.4 USB Out z z z z When the USB connection is made, the power can be supplied via USB only. This product is Windows XP/MAC OS X USB MIDI class-compliant. Each time when a pedal is depressed, the corresponded LED will flash. By default, the product will send following MIDI messages from the USB port: Pedal Controller # Controller type PEDAL 1 CC#67 Pedal (soft) PEDAL 2 CC#66 Pedal (sostenuto) PEDAL 3 CC#64 Pedal (sustain) 3.5 Reset z To reset the product, please depress all the three pedals, then power on the 11 z product. The 3 pedals will flash for 5 times, then the reset operation is completed. The reset operation will clear all the settings, you have made to the product. 4 Settings 4.1 Polarity z z If you find a pedal is working in the reverse way, please change its polarity setting. Please depress the pedal you want to change, and power on the product, then the pedal polarity is changed. 4.2 Range z z You can adjust the data range of PEDAL3 . To adjust the data range, please use the fine tuning knob(TRIM.). 4.3 Assign Controller# z z By assigning a controller#, you can change the sent out MIDI messages of a pedal, for the MIDI OUT and the USB port. Follow the below steps to assign a controller#: I. After you power on the product, depress all the three pedals for 3 seconds. Then the 3 LEDs flash slowly to show, that the product is ready for assigning controller#. II. Depress one of the three pedals, to select the pedal you want to assign. Now only the corresponded LED flashes slowly, the other two LEDs go off. III. Depress the three pedals in turn, to assign the controller#. Use PEDAL1 to change the hundred digit, use PEDAL2 to change the tenth digit, use PEDAL3 to change the most right digit. As you depress the pedal, the digit will increase by one from 0-9, and the corresponded LED will flash once. z Please refer to《Controller list》in a later chapter. z If no pedal is depressed for 3 seconds, after you entered the controller# 12 assigning mode for a pedal, then the controller# will not be changed and you will enter the MIDI channel assigning mode. 4.4 Assign MIDI Channel z By assigning a MIDI channel, you can change the sent out MIDI messages of a pedal for the MIDI OUT and the USB port. z Follow the below steps to assign the MIDI channel: I. After you finished the controller# assigning for a pedal and no pedal is depressed for 3 seconds, you will enter the MIDI channel assigning mode for the same pedal, that the LED is on. II. Depress the pedal that you want to assign the MIDI channel for. Each time you depress the pedal, the MIDI channel value will increase by one from 0-15, which means channel 1-16, and the corresponded LED will flash once. III. If no pedal is depressed for 3 seconds, the product will save the new settings and return to the normal power on mode. 13 5 Controller list Controller# Controller name Data type Data range 0 Bank Select Controller 0-127 1 Modulation wheel Controller 0-127 2 Breath control Controller 0-127 3 Undefined Controller 0-127 4 Foot controller Controller 0-127 5 Portamento time Controller 0-127 6 Data Entry Controller 0-127 7 Channel Volume Controller 0-127 8 Balance Controller 0-127 9 Undefined Controller 0-127 10 Pan Controller 0-127 11 Expression Controller 0-127 12 Effect control 1 Controller 0-127 13 Effect control 2 Controller 0-127 14 Undefined Controller 0-127 15 Undefined Controller 0-127 16 General Purpose #1 Controller 0-127 17 General Purpose #2 Controller 0-127 18 General Purpose #3 Controller 0-127 19 General Purpose #4 Controller 0-127 20 Undefined Controller 0-127 21 Undefined Controller 0-127 22 Undefined Controller 0-127 23 Undefined Controller 0-127 24 Undefined Controller 0-127 25 Undefined Controller 0-127 26 Undefined Controller 0-127 27 Undefined Controller 0-127 28 Undefined Controller 0-127 29 Undefined Controller 0-127 30 Undefined Controller 0-127 31 Undefined Controller 0-127 32 Bank Select Controller 0-127 33 Modulation wheel Controller 0-127 34 Breath control Controller 0-127 35 Undefined Controller 0-127 36 Foot controller Controller 0-127 37 Portamento time Controller 0-127 38 Data entry Controller 0-127 39 Channel Volume Controller 0-127 40 Balance Controller 0-127 41 Undefined Controller 0-127 Controller 0-127 42 Pan 14 Controller# Controller name Data type 43 Expression Controller 0-127 44 Effect control 1 Controller 0-127 45 Effect control 2 Controller 0-127 46 Undefined Controller 0-127 47 Undefined Controller 0-127 48 General Purpose #1 Controller 0-127 49 General Purpose #2 Controller 0-127 50 General Purpose #3 Controller 0-127 51 General Purpose #4 Controller 0-127 52 Undefined Controller 0-127 53 Undefined Controller 0-127 54 Undefined Controller 0-127 55 Undefined Controller 0-127 56 Undefined Controller 0-127 57 Undefined Controller 0-127 58 Undefined Controller 0-127 59 Undefined Controller 0-127 60 Undefined Controller 0-127 61 Undefined Controller 0-127 62 Undefined Controller 0-127 63 Undefined Controller 0-127 64 Damper pedal Controller 0-127 65 Portamento on/off Controller 0-127 66 Sustenuto on/off Controller 0-127 67 Soft pedal on/off Controller 0-127 68 Legato Footswitch Controller 0-127 69 Hold 2 Controller 0-127 70 Sound Variation Controller 0-127 71 Timbre/Harmonic Intens. Controller 0-127 72 Release Time Controller 0-127 73 Attack Time Controller 0-127 74 Brightness Controller 0-127 75 Decay Time Controller 0-127 76 Vibrato Rate) Controller 0-127 77 Vibrato Depth Controller 0-127 78 Vibrato Delay Controller 0-127 79 Sound Cont. Controller 0-127 80 General Purpose #5 Controller 0-127 81 General Purpose #6 Controller 0-127 82 General Purpose #7 Controller 0-127 83 General Purpose #8 Controller 0-127 84 Portamento Control Controller 0-127 85 Undefined Controller 0-127 86 Undefined Controller 0-127 87 Undefined Controller 0-127 88 Undefined Controller 0-127 89 Undefined Controller 0-127 15 Data range Controller# Controller name Data type Data range 90 Undefined Controller 0-127 91 Reverb Send Level Controller 0-127 92 Tremolo Depth Controller 0-127 93 Chorus Send Level Controller 0-127 94 Celeste/Detune Depth Controller 0-127 95 Phaser Depth Controller 0-127 96 Data entry +1 Controller 0-127 97 Data entry -1 Controller 0-127 98 NRPN LSB Controller 0-127 99 NRPN MSB Controller 0-127 100 RPN LSB Controller 0-127 101 RPN MSB Controller 0-127 102 Undefined Controller 0-127 103 Undefined Controller 0-127 104 Undefined Controller 0-127 105 Undefined Controller 0-127 106 Undefined Controller 0-127 107 Undefined Controller 0-127 108 Undefined Controller 0-127 109 Undefined Controller 0-127 110 Undefined Controller 0-127 111 Undefined Controller 0-127 112 Undefined Controller 0-127 113 Undefined Controller 0-127 114 Undefined Controller 0-127 115 Undefined Controller 0-127 116 Undefined Controller 0-127 117 Undefined Controller 0-127 118 Undefined Controller 0-127 119 Undefined Controller 0-127 120 All Sound Off Controller 0-127 121 Reset All Controllers Controller 0-127 122 Local control on/off Controller 0-127 123 All notes off Controller 0-127 124 Omni mode off Controller 0-127 125 Omni mode on Controller 0-127 126 Poly mode off Controller 0-127 127 Poly mode on Controller 0-127 16 6 Firmware upgrade z You can upgrade the firmware of GPP-3 via an USB connection, by using the upgrade program. z To enter the upgrade mode, please depress both PEDAL1 and PEDAL3. Now power on the product. z You can find the upgrade program and the instructions on the CME web site. (http://www.cme-pro.com). 7 Specifications z Pedal 3 pedals including two switch pedals and one continuous pedal. z Functions Basic functions: switch data and continuous data. MIDI data sent: Controller# change. Parameter change: MIDI send channel and MIDI controller type. z Panel Controls and Indicators 3 LED indicators z Input/Output Terminals MIDI OUT, PEDAL out 1-3, USB port, DC IN port,POWER switch. z Power Supply Power can be supplied via USB port (when connected to computer via USB) Power can also be supplied via AC Power Adaptor (When used separately.) AC Power Adaptor requirement: 9V 500mA z Dimensions (W x D x H) GPP-3:373*278*97.5(mm) z Weight : 4 kg * Specifications and appearance are subject to change without notice. 17 2006-Aug Central Music Co. Tel: +86-10-8580 1115 Fax:+86-10-8580 1114 Web: www.cme-pro.com E-mail for support: [email protected]