1
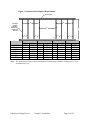
Fiberglass Cooling Towers
Part Number: 882.00440.00
Bulletin Number: SC6-610.4
Effective: 04/01/05
Write Down Your Serial Numbers Here For Future Reference:
_________________________
_________________________
_________________________
_________________________
_________________________
_________________________
We are committed to a continuing program of product improvement.
Specifications, appearance, and dimensions described in this manual are subject to change
without notice.
DCN No. ____________
© Copyright 2006
All rights reserved.
Shipping Information
Unpacking and Inspection
You should inspect your equipment for possible shipping damage. Thoroughly check the
equipment for any damage that might have occurred in transit, such as broken or loose wiring
and components, loose hardware and mounting screws, etc.
In the Event of Shipping Damage
According to the contract terms and conditions of the Carrier, the responsibility of the
Shipper ends at the time and place of shipment.
Notify the transportation company’s local agent if you discover damage
Hold the damaged goods and packing material for the examining agent’s inspection. Do not
return any goods before the transportation company’s inspection and authorization.
File a claim with the transportation company. Substantiate the claim by referring to the
agent’s report. A certified copy of our invoice is available upon request. The original Bill of
Lading is attached to our original invoice. If the shipment was prepaid, write us for a
receipted transportation bill.
Advise customer service regarding your wish for assistance and to obtain an RMA (return
material authorization) number.
If the Shipment is Not Complete
Check the packing list as back-ordered items are noted on the packing list. In addition to the
equipment itself, you should have:
þ Bill of lading
þ Packing list
þ Operating and Installation packet
þ Electrical schematic and panel layout drawings
þ Component instruction manuals (if applicable)
Re-inspect the container and packing material to see if you missed any smaller items during
unpacking.
If the Shipment is Not Correct
If the shipment is not what you ordered, contact the shipping department immediately. For
shipments in the United States and Canada, call 1 (800) 423-3183; for all other countries, call
our international desk at (262) 641-8600. Have the order number and item number available.
Hold the items until you receive shipping instructions.
Returns
Do not return any damaged or incorrect items until you receive shipping instructions from the
shipping department.
Fiberglass Cooling Towers
ii
Table of Contents
CHAPTER 1: SAFETY................................................................ 6
1-1
How to Use This Manual ................................................................................. 6
1-2
1-3
Warnings and Precautions .............................................................................. 7
Responsibility .................................................................................................. 7
Safety Symbols Used in this Manual....................................................................6
CHAPTER 2: FUNCTIONAL DESCRIPTION ............................. 8
2-1
2-2
2-3
Models Covered in This Manual ...................................................................... 8
General Description......................................................................................... 8
Standard Features........................................................................................... 8
2-4
Optional Features ............................................................................................ 9
Materials of Construction .....................................................................................8
CHAPTER 3: INSTALLATION.................................................. 10
3-1
Tower Installation Location............................................................................ 10
Roof Installation.................................................................................................10
Ground Installation.............................................................................................10
Alternative Installations......................................................................................10
3-2
3-3
3-4
3-5
3-6
3-7
Assembling the Cooling Tower in the Field ................................................... 12
Rigging .......................................................................................................... 12
Installing the Fan Package ............................................................................ 13
Installing Piping ............................................................................................. 13
Setting Up the Water Balancing Valve........................................................... 15
Initial Start-up ................................................................................................ 15
CHAPTER 4: OPERATION....................................................... 16
4-1
4-2
Bleed-Off and Evaporation Rates .................................................................. 16
Winter Operation Considerations................................................................... 16
CHAPTER 5: MAINTENANCE ................................................. 17
5-1
Preventative Maintenance ............................................................................. 17
Water Treatment................................................................................................17
Routine Maintenance.........................................................................................17
5-2
Corrective Maintenance................................................................................. 18
Replacing Nozzles and Fill.................................................................................18
CHAPTER 6: APPENDIX.......................................................... 19
6-1
6-2
Warranty........................................................................................................ 19
Technical Assistance..................................................................................... 20
Parts Department...............................................................................................20
Service Department ...........................................................................................20
Sales Department ..............................................................................................20
Contract Department .........................................................................................20
Fiberglass Cooling Towers
iii
6-3
6-4
6-5
Drawings and Specifications.......................................................................... 21
Parts List ....................................................................................................... 23
Electrical Schematics .................................................................................... 24
Fiberglass Cooling Towers
iv
List of Figures
Figure 1: Structural Steel Support Requirements ......................................................................... 11
Figure 2: Rigging Arrangement .................................................................................................... 12
Figure 3: Cooling Tower with Tower Reservoir Piping Diagram ................................................ 13
Figure 4: Cooling Tower with Basin as Reservoir Piping Diagram ............................................. 14
Figure 5: Flexible PVC Outlet Coupler ........................................................................................ 14
Figure 6: Throttling Valve Pressures ............................................................................................ 15
Figure 7: Dimensions and Weights............................................................................................... 21
Figure 8: Tower Performance•.................................................................................................... 22
Figure 9: Cooling Tower Nozzle Capacity ................................................................................... 22
Figure 10: Supplied Parts for Field Assembly.............................................................................. 23
Figure 11: Spare Parts List............................................................................................................ 23
Figure 12: Typical Wiring Diagram ............................................................................................. 24
Fiberglass Cooling Towers
v
Chapter 1: Safety
1-1
How to Use This Manual
Use this manual as a guide and reference for installing, operating, and maintaining your
equipment. The purpose is to assist you in applying efficient, proven techniques that enhance
equipment productivity.
This manual covers only light corrective maintenance. No other maintenance should be
undertaken without first contacting a service engineer.
The Functional Description section outlines models covered, standard features, and optional
features. Additional sections within the manual provide instructions for installation, preoperational procedures, operation, preventive maintenance, and corrective maintenance.
The Installation chapter includes required data for receiving, unpacking, inspecting, and setup
of the equipment. We can also provide the assistance of a factory-trained technician to help
train your operator(s) for a nominal charge. This section includes instructions, checks, and
adjustments that should be followed before commencing with operation of the equipment.
These instructions are intended to supplement standard shop procedures performed at shift,
daily, and weekly intervals.
The Operation chapter includes a description of electrical and mechanical controls, in
addition to information for operating the equipment safely and efficiently.
The Maintenance chapter is intended to serve as a source of detailed assembly and
disassembly instructions for those areas of the equipment requiring service. Preventive
maintenance sections are included to ensure that your equipment provides excellent, long
service.
The Troubleshooting chapter serves as a guide for identification of most common problems.
Potential problems are listed, along with possible causes and related solutions.
The Appendix contains technical specifications, drawings, schematics, and parts lists. A
spare parts list with part numbers specific to your machine is provided with your shipping
paperwork package. Refer to this section for a listing of spare parts for purchase. Have your
serial number and model number ready when ordering.
Safety Symbols Used in this Manual
The following safety alert symbols are used to alert you to potential personal injury hazards.
Obey all safety messages that follow these symbols to avoid possible injury or death.
Danger!
DANGER indicates an imminently hazardous situation which, if not avoided,
will result in death or serious injury.
Warning! WARNING indicates a potentially hazardous situation or practice which, if not
avoided, could result in death or serious injury.
Caution! CAUTION indicates a potentially hazardous situation or practice which, if not
avoided, may result in minor or moderate injury or in property damage.
Fiberglass Cooling Towers
Chapter 1: Safety
Page 6 of 24
1-2
Warnings and Precautions
Our equipment is designed to provide safe and reliable operation when installed and operated
within design specifications, following national and local safety codes.
To avoid possible personal injury or equipment damage when installing, operating, or
maintaining this equipment, use good judgment and follow these safe practices:
þ Follow all SAFETY CODES.
þ Wear SAFETY GLASSES and WORK GLOVES.
þ Disconnect and/or lock out power before servicing or maintaining the equipment.
þ Use care when LOADING, UNLOADING, RIGGING, or MOVING this
equipment.
þ Operate this equipment within design specifications.
þ OPEN, TAG, and LOCK ALL DISCONNECTS before working on equipment.
You should remove the fuses and carry them with you.
þ Make sure the equipment and components are properly GROUNDED before you
switch on power.
þ When welding or brazing in or around this equipment, make sure VENTILATION is
ADEQUATE. PROTECT adjacent materials from flame or sparks by shielding with
sheet metal. An approved FIRE EXTINGUISHER should be close at hand and
ready for use if needed.
þ Refrigeration systems can develop refrigerant pressures in excess of 500 psi (3,447.5
kPa/ 34.47 bars). DO NOT CUT INTO THE REFRIGERATION SYSTEM. This
must be performed by a qualified service technician only.
þ Do not restore power until you remove all tools, test equipment, etc., and the
equipment and related components are fully reassembled.
þ Only PROPERLY TRAINED personnel familiar with the information in this
manual should work on this equipment.
We have long recognized the importance of safety and have designed and manufactured our
equipment with operator safety as a prime consideration. We expect you, as a user, to abide
by the foregoing recommendations in order to make operator safety a reality.
1-3
Responsibility
These machines are constructed for maximum operator safety when used under standard
operating conditions and when recommended instructions are followed in the maintenance
and operation of the machine.
All personnel engaged in the use of the machine should become familiar with its operation as
described in this manual.
Proper operation of the machine promotes safety for the operator and all workers in its
vicinity.
Each individual must take responsibility for observing the prescribed safety rules as outlined.
All warning and danger signs must be observed and obeyed. All actual or potential danger
areas must be reported to your immediate supervisor.
Fiberglass Cooling Towers
Chapter 1: Safety
Page 7 of 24
Chapter 2: Functional Description
2-1
Models Covered in This Manual
This manual covers fiberglass cooling tower models. Model numbers are listed on the serial
tag. A model number followed by –Q is specially-constructed, and the information in this
manual may not apply. Make sure you know the model and serial number of your equipment
before contacting the manufacturer for parts or service.
2-2
General Description
The fiberglass cooling tower system is constructed of lightweight polyester-reinforced
fiberglass for corrosion resistance and durability. PVC fill material resists decay, corrosion,
and microorganisms, and handles temperatures up to 130ºF (54ºC). Access panels allow easy
inspection of fill material. Fan blades are factory-tuned for optimum performance. ABS water
distribution nozzles are pre-piped and feature a non-clogging design.
2-3
Standard Features
Materials of Construction
Component
Material
Shell
Fiberglass-reinforced polyester
Fan blade
Aluminum fabrication
Fan motor support
Galvanized, mild steel
Fill, eliminator
PVC Plastic
Louver pack
PVC Plastic
Nozzle
ABS plastic
Piping assembly
Schedule 80 PVC plastic
Fasteners
Stainless Steel
Base assembly
Galvanized brackets standard, fiberglass channel optional
Fiberglass Cooling Towers Chapter 2: Functional Description
Page 8 of 24
2-4
Optional Features
Bottom Outlet. The bottom outlet allows complete drainage of the basin. It is used with
factory-installed remote inside reservoirs only.
Water Balancing Valve. The water balancing valve includes a butterfly-type balancing valve
and pressure gauge with fittings
Starter Package. The starter package includes a starter, a remote On/Off switch, a
thermostat, and a well.
Basin Reservoir. The basin reservoir includes an automatic float valve, overflow and drain
connections, and an outlet basket strainer for towers with no inside reservoir.
Basin Heater. The basin heater includes a heater and a low water level heater shutoff. It is
used on towers with basin reservoirs to guard against freeze-up when your tower system is
shut down.
Structural Base. The structural base is a factory-installed structural fiberglass mounting
base. It speeds tower installation and gives your tower proper support.
Access Ladder. The access ladder meets OSHA specifications and allows for easier
maintenance and inspection.
Fiberglass Cooling Towers Chapter 2: Functional Description
Page 9 of 24
Chapter 3: Installation
3-1
Tower Installation Location
Roof Installation
Select a location over or nearest to the heaviest building structural members. These members
should be outside load-bearing walls, building columns, or roof joists. You may need to
spread the load over several structural members to provide support without over-stressing any
one member. See Figure 1 on page 11 for structural steel support requirements. You are
responsible for contacting a structural engineer to verify support requirements.
Choose a site with easy access to simplify routine maintenance. This consideration is
especially important when a tower is located near a roof edge.
Avoid locations where wind currents can re-circulate tower discharge air.
Stay clear of roof discharge points. Avoid stacks, exhaust fans, dust collector discharges, or
any process that can contaminate air circulating through the tower.
Caution! Multiple tower installations require at least five feet (60”/ 152cm) clearance
between towers to reduce freeze-ups. The manufacturer is not responsible for
damages resulting from improper site selection.
Ground Installation
Elevate the tower so that positive pressure is on pump suction and to allow maintenance
access to the underside of the tower cell.
Alternative Installations
Outside Installation with the Pump Tank Reservoir Inside. Water exits the tower and
drains to a pump tank reservoir inside the building below. The tower outlet must be at least
three feet (approximately 1 meter) above the top of the pump tank. The outside tower basin
must drain completely when shut down to avoid winter freeze up.
Outside Installation Using the Tower Basin as a Reservoir. Process pump suction piping
is directly connected to the bottom outlet on the tower. Install the optional outlet basket filter
and automatic float assembly. Contact the Sales department for this accessory kit.
Fiberglass Cooling Towers
Chapter 3: Installation
Page 10 of 24
Figure 1: Structural Steel Support Requirements
Structural steel
B
B
2 X 2 angle
to support
tower basin,
flush with top
of structural
steel rails
D
A
C
C
C
C
TSE50
Model
number
SF2003
SF2004
SF2005
SF2007
SF2009
SF2011
SF2015
A
in.
52
52
68
68
87
87
87
B
cm
132.1
132.1
172.7
172.7
221.0
221.0
221.0
in.
50
50
67
67
85
85
85
C
cm
127.0
127.0
170.2
170.2
215.9
215.9
215.9
in.
16
16
22
22
28
28
28
D
cm
40.6
40.6
55.9
55.9
71.1
71.1
71.1
in.
69
69
69
69
69
69
69
cm
175.3
175.3
175.3
175.3
175.3
175.3
175.3
Note: The illustration in Figure 1 shows structural steel with spacing for two (2) cooling towers. Your
installation may vary.
Fiberglass Cooling Towers
Chapter 3: Installation
Page 11 of 24
3-2
Assembling the Cooling Tower in the Field
Your cooling tower may have been shipped on two skids to reduce shipping charges.
One skid contains the lower section, identified by the black fill wrapped in plastic on the
inside of the lower section. The second skid contains the top tower section bolted over the
fan/motor assembly. Perform the following procedure to properly assemble the two sections
if the sections shipped separately.
1. Remove the clear plastic protective wrapping from the fill.
2. Inspect both sections for any damage, and locate the red orientation mark on one of
the vertical sides of each section.
3. The manufacturer supplies self-adhesive gasketing material to insure a water-tight
seal between the top and bottom sections. Install this material on the top of the
attachment flange on the lower section prior to mating the top and bottom sections.
Make sure that the flange is clean, dry, and free of rough spots before applying the
gasketing material.
4. Align the holes in the gasket with the bolt holes in the flange, then remove the paper
on the back side. Cut the gasketing material to fit properly, and apply the gasket to
the flange as you realign gasket holes with flange holes. Repeat on all four sides of
the tower.
5. Apply silicone caulk in cut lines and voids to complete sealing between sections.
6. Unbolt the top section from the skid and make sure that the flange on the top section
is clean, dry, and free of rough spots.
7. Place the upper section on the gasketed lower section, aligning the red orientation
marks. Take care not to disturb the gasketing and silicone caulk while aligning bolt
holes.
8. After aligning, bolt the two sections together with the fasteners provided. Use a flat
washer under the bolt head on top and a flat washer, a lock washer, and nut on the
bottom side of the flange.
3-3
Rigging
Handle the fiberglass cooling tower shell section very carefully. Until installed and properly
supported, it is subject to handling damage. See Figure 2 for rigging information.
Caution! Use an appropriately rated hoist to support the equipment.
Figure 2: Rigging Arrangement
Channel
I-beam
Spreader bar wide
enough to protect
cooling tower shell
Rope stay
The rope stay goes
all the way around the
tower to keep the
vertical rope in position.
Fiberglass Cooling Towers
Chapter 3: Installation
Page 12 of 24
3-4
Installing the Fan Package
Install the fan package after the tower is in position.
1. Remove the dunnage securing the fan package to the pallet.
2. Carefully rig the package using the lifting eyebolts provided.
3. Mounting holes have been pre-drilled at the factory; move the package into position
and fasten it securely with the stainless steel hardware provided.
3-5
Installing Piping
Make sure that all piping attached to the cooling tower is externally supported. Do not
support anything from the cooling tower shell.
The cooling tower and related fittings and connections are constructed of plastic materials
and are not designed to bear external weight.
Do not apply high torque to the fittings that are made up into the tower fittings. Use a backup
wrench when applying torque to the fittings.
Install the piping according to the piping diagrams in Figure 3 on page 13, Figure 4 on page
14, and Figure 5 on page 14.
Figure 3: Cooling Tower with Tower Reservoir Piping Diagram
Fiberglass Cooling Towers
Chapter 3: Installation
Page 13 of 24
Figure 4: Cooling Tower with Basin as Reservoir Piping Diagram
Inlet
Balancing valve
Pressure
gauge
1/4" swing check valve
12" above highest point
in return line
Bypass
TWR
TWS
TWR
P
Caution!
3/4" constant bleed
Do not apply
excessive torque
to fittings
Overflow
Cooling
tower
Makeup
City water line
City water
Building
exterior
TWS
Side outlet
Drain
Tower water return
Tower water supply
TR
To drain
To drain
Support piping to eliminate
load from tower casing
Thermostat-mount
in piping (1/2" fitting)
TR
P
P-1
Figure 5: Flexible PVC Outlet Coupler
Fiberglass Cooling Towers
Chapter 3: Installation
Page 14 of 24
3-6
Setting Up the Water Balancing Valve
Install the plug provided in the unused water inlet on the side of the tower. Tighten and check
for leaks.
To prevent damage to the tower fill material, use the water throttling valve and pressure
gauge to regulate the water pressure to the tower spray nozzle(s). The recommended
throttling valve is a butterfly-type valve that can be locked in the correct position with a
locknut. See Figure 6 for recommended throttling valve pressures.
Figure 6: Throttling Valve Pressures
Model
3-7
Pressure
psig
KPa
SF2003
6 psig
68.95
SF2004
4 psig
48.26
SF2005
8 psig
10.68
SF2007
5 psig
34.47
SF2009
7 psig
41.37
SF2011
5 psig
55.16
SF2015
6 psig
68.95
Initial Start-up
Check for proper rotation on all fan and pump motors. Refer to the arrows atop the tower and
on pump housings.
Fill the system with water and adjust the float valve if you are using a float. Maintain a water
level in the tower basin approximately one inch (25 mm) below the overflow opening.
The tower basin acts as a sump to maintain water level. Towers using inside tanks do not
carry water in the basin.
Fiberglass Cooling Towers
Chapter 3: Installation
Page 15 of 24
Chapter 4: Operation
4-1
Bleed-Off and Evaporation Rates
A proper bleed-off rate is important to limit the concentration of minerals and foreign
materials in re-circulated water. A bleed-off equal to the evaporation rate, normally about two
gallons per hour per ton (7.57 liters per hour per 3,780 Kcal/hr), is sufficient for many
makeup water conditions. Refer to the suggested bleed-off arrangements in Figure 3 and
Figure 4 on pages 13 and 14 for more information. For automatic bleed rate control, a
conductivity controller is available through the Sales department.
4-2
Winter Operation Considerations
All cooling towers are subject to ice formation in sub-freezing weather. Your cooling tower
requires a certain amount of attention and maintenance to prevent damage during these
operating conditions.
Follow these guidelines to reduce the chance of ice buildup:
• Maintain full design flow. Any reduction in water flow greatly increases the
probability of ice forming on and around the air inlet louvers.
• Do not use free cooling applications during freezing weather. Reduced water
temperatures or loading dramatically increases the chance of ice formation. Make sure
that the leaving water temperature is set above 80ºF (27ºC) during sub-freezing
weather so heat from the water warms the air inlet louvers and reduces ice formation
when the fan is off. Using a thermostat to control fan cycling by leaving water
temperature is mandatory.
• Do not run fans backward to thaw ice. Ice can form on the fan ring, fan guard, and
support structures, and can severely damage fan blades. Reversed airflow can also
blow water vapor out onto the roof and create ice fields around the cooling tower.
• Maintain a heat load of at least 60% of tower capacity at all times during operation in
freezing weather. A lack of substantial load can create uneven temperatures in the
tower and cause freezing.
• If you shut down your cooling tower during freezing weather, you must drain it
completely. We recommend that you use an indoor reservoir tank to permit water to
drain into the tank on system shutdown, whether for emergencies or actual planned
shutdowns.
• An alternative is to use basin heaters if a tower basin is used as a sump. Basin heaters
are available as an option. However, basin heaters can permit freeze-up during power
failures if water remains in the sump. The customer is responsible for determining risk
factors for each specific application.
Fiberglass Cooling Towers
Chapter 4: Operation
Page 16 of 24
Chapter 5: Maintenance
5-1
Preventative Maintenance
Water Treatment
Control of slime, algae, and bacteria growth is extremely important. Cooling towers and
reservoir pump tanks are superb environments for microorganism growth. Warm water,
organic debris, and air encourage bacterial growth. Treat your system with chemicals
(microbiocides) to control microorganism growth.
Caution! Uncontrolled microorganism growth causes system problems such as fouling
and corrosion, and can spread bacterially-transmitted diseases.
You must reduce slime growth and bacterial contamination to eliminate disease-causing
bacteria.
Properly used, environmentally approved microbiocide controls system bacteria. Chemical
treatments must be regularly monitored by qualified personnel.
The manufacturer strongly recommends use of EPA-registered microbiocides on a regular
basis. We do NOT recommend use of chlorine or backyard swimming pool chemicals.
Permitting the discharge of such chemicals into a city sewer may violate local, state, and/or
federal laws.
We offer a full-service water treatment program including chemicals, dispensing equipment,
automatic bleed-off, and monthly water analysis. Contact the Parts and Service department
for more information.
Routine Maintenance
• The fan motor has double-sealed bearings and needs no lubrication
• Inspect basket strainers (where used) and clean as needed.
• Check constant bleed back to the tank for flow during operation.
• Check the bleed-off line to verify that water flows to the drain during operation.
• Inspect the tower basin for dirt and debris, and clean as needed.
• Check the tower nozzle(s) for proper operation at full water flow.
• Check the water treatment equipment for proper operation. Refer to the information
supplied with these devices.
• Check the throttling valve pressure gauge.
Fiberglass Cooling Towers
Chapter 5: Maintenance
Page 17 of 24
5-2
Corrective Maintenance
Replacing Nozzles and Fill
The PVC fill used in these cooling towers provides years of maintenance-free service under
normal conditions. If you discover dirty water or defective nozzle(s) damage the fill, you can
order a replacement kit from the parts department.
You can easily remove and replace the fill by removing the tower access door on the side of
the tower. Open the door to gain access to the nozzle system.
Fiberglass Cooling Towers
Chapter 5: Maintenance
Page 18 of 24
Chapter 6: Appendix
6-1
Warranty
We warrant all of our equipment to be free from defects in workmanship and material when
used under recommended conditions. The manufacturer’s obligation is limited to repair or
replace FOB the factory any parts that are returned prepaid within one year of equipment
shipment to the original purchaser, and which, in the manufacturer’s opinion, are defective.
Any replacement part assumes the unused portion of this warranty.
This parts warranty does not cover any labor charges for replacement of parts, adjustment
repairs, or any other work. This warranty does not apply to any equipment which, in the
manufacturer’s opinion, has been subjected to misuse, negligence, or operation in excess of
recommended limits, including freezing or which has been repaired or altered without the
manufacturer’s express authorization. If the serial number has been defaced or removed from
the component, the warranty on that component is void. Defective parts become the property
of the warrantor and are to be returned.
The manufacturer is not liable for any incidental, consequential, or special damages or
expenses. The manufacturer’s obligation for parts not furnished as components of its
manufactured equipment is limited to the warranty of the manufacturers of said parts.
Any sales, use, excise, or other tax incident to the replacement of parts under this warranty is
the responsibility of the purchaser.
The manufacturer neither assumes nor authorizes any other persons to assume for it any
liability in connection with the sale of its equipment not expressed in this warranty.
Many types of the manufacturer’s equipment carry an additional one-year service policy.
Consult your sales representative for specific details.
Fiberglass Cooling Towers
Chapter 6: Appendix
Page 19 of 24
6-2
Technical Assistance
Parts Department
Call toll-free 7am–5pm CST [800] 423-3183 or call [262] 641-8600, Fax [262] 641-8653.
The ACS Customer Service Group will provide your company with genuine OEM quality
parts manufactured to engineering design specifications, which will maximize your
equipment’s performance and efficiency. To assist in expediting your phone or fax order,
please have the model and serial number of your unit when you contact us. A customer
replacement parts list is included in this manual for your convenience. ACS welcomes
inquiries on all your parts needs and is dedicated to providing excellent customer service.
Service Department
Call toll-free 8am–5pm CST [800] 423-3183 or call [262] 641-8600
Emergencies after 5pm CST, call [800] 423-3183
We have a qualified service department ready to help. Service contracts are available for most
products.
Sales Department
Call [262] 641-8600 Monday–Friday, 8am–5pm CST
Our products are sold by a world-wide network of independent sales representatives. Contact
our Sales Department for the name of the sales representative nearest you.
Contract Department
Call [262] 641-8600 Monday–Friday, 8am–5pm CST
Let us install your system. The Contract Department offers any or all of these services:
project planning; system packages including drawings; equipment, labor, and construction
materials; and union or non-union installations.
.
Fiberglass Cooling Towers
Chapter 6: Appendix
Page 20 of 24
6-3
Drawings and Specifications
A
A0536711
B
Top View
Fan guard
Fan motor
Motor support
assembly
Fan blade
Supply piping
Access
door
D
Nozzle
adaptor
C
Nozzle
Rigid PVC
tower fill
Water
diverter
E
Return
piping
Side View
Cutaway View
Figure 7: Dimensions and Weights
Model
A
number in. cm
SF2003 64 163
SF2004 64 163
SF2005 82 208
SF2007 82 208
SF2009 100 254
SF2011 100 254
SF2015 100 254
B
in.
64
64
82
82
100
100
100
cm
163
163
208
208
254
254
254
Dimensions
Weights
C
D (supply)
E (return)
Shipping
Operating
in.
cm in.
mm •
in. mm •
lbs.
kg
lbs.
kg
104 264 4” 76.2 mm 4” 101.6 mm
600
273 1,300
591
125 318 4” 76.2 mm 6” 152.4 mm
750
341 1,700
772
121 307 4” 101.6 mm 8” 203.2 mm 1,400
636 2,900 1,317
121 307 4” 101.6 mm 8” 203.2 mm 1,500
681 3,200 1,453
123 313 4” 101.6 mm 8” 203.2 mm 1,950
886 3,800 1,726
123 313 4” 101.6 mm 8” 203.2 mm 2,100
954 4,400 1,998
124 315 4” 101.6 mm 8” 203.2 mm 2,600 1,181 5,200 2,361
• Millimeter measurement is approximate. Customer is responsible for converting to metric piping sizes.
Fiberglass Cooling Towers
Chapter 6: Appendix
Page 21 of 24
Figure 8: Tower Performance•
Model
number
SF2003
SF2004
SF2005
SF2007
SF2009
SF2011
SF2015
Cooling
capacity
tons Kcal/hr
50 151,200
75 226,800
100 302,400
125 378,000
150 453,600
175 529,200
200 604,800
Nozzles
no.
1
4
4
4
4
4
4
Fan
motor
hp kW
rpm
2
1.5 1,200
5
3.7 1,200
5
3.7
900
5
3.7
900
10
7.5
900
10
7.5
900
15 11.2
900
NEC
amp draw
460/3/60
3.4
7.6
7.6
7.6
14.0
14.0
21.0
Nominal
air flow
cfm
cmh
12,000 20,388
18,000 30,582
23,500 39,926
26,000 44,174
30,000 50,970
33,000 56,067
43,000 73,057
• Rating conditions are based on 78ºF (26ºC) wet bulb, 95ºF (35ºC) entering water
temperature, and 85ºF (29ºC) leaving water temperature; flow capacity is based on 3
gpm/ton (2.563 lpm per 1,000 Kcal/hr).
Figure 9: Cooling Tower Nozzle Capacity
Fiberglass Cooling Towers
Chapter 6: Appendix
Page 22 of 24
6-4
Parts List
Figure 10: Supplied Parts for Field Assembly
Part Number
A0101485
A0533163
A0539417
W00015514
A0534121
A0539598
Quantity
1
110
55
55
55
40 ft.
Description
Silicone
Stainless steel flat washers, 5/16”
Stainless steel screws, 5/16”-18 x 1 3/4”
Stainless steel hex nut, 5/16”-18
Stainless steel split lock washers, 5/16”
SF Tower gasketing
Figure 11: Spare Parts List
Part
SF2003 •
SF2004
SF2005 ‚
SF2007
SF2009
description
qty
Part no. qty Part no. qty
Part no. qty
Part no. qty
Part no.
Shell, top section
1
A0533079
1 A0539552
1
A0536702
1
A0536702
1
A0535879
Shell, side outlet
1
A0533078
1 A0539550
1
A0536700
1
A0536700
1
A0535880
Shell, bottom outlet 1
A0533666
1 A0539551
1
A0536701
1
A0536701
1
A0536668
Shell, S/O w/base
1
A0536601
1 A0539553
1
A0536703
1
A0536703
1
A0536602
Shell, B/O w/base
1
A0536667
1 A0539554
1
A0536704
1
A0536704
1
A0533669
Tower access door 1
A0533082
1 A0533082
2
A0533082
2
A0533082
2
A0533082
Motor support assy. 1
A0533090
1 A0533090
1
A0536712
1
A0536712
1
A0539586
Fan guard
1
A0533092
1 A0533092
1
A0536706
1
A0536706
1
A0535883
Fan motor ƒ
1
A0533094
1 A0539555
1
A0536710
1
A0536710
1
A0547120
Fan blade
1
A0533097
1 A0539556
1
A0547121
1
A0536708
1
A0541387
PVC fill ƒ
10 A0533101 15 A0539557 26 A0533099 39 A0533099 32 A0533099
Eliminator ƒ
5
A0533104
5 A0539558 13 A0533103 13 A0533103 16 A0533103
Louver
16 A0533106 16 A0539559 20 A0533106 20 A0533106 24 A0533106
Nozzle ƒ
1
A0064022
4 A0539572
4
A0046022
4
A0064022
4
A0064022
Nozzle adapterƒ
1
A0101006
4 A0539573
4
A0101006
4
A0101006
4
A0101006
PVC plug
1
A0064023
1 A0064023
2
A0500867
2
A0500867
2
A0500867
Flexible coupling
1
A0502553
1 A0539565
1
A0535957
1
A0535957
1
A0535957
Balancing valve
1
A0504421
2 A0504421
2
A0504422
2
A0504422
2
A0504422
Pressure gauge ƒ 1
A0102314
1 A0102314
2
A0102314
2
A0102314
2
A0102314
Strainer basket
1
A0500860
1 A0500860
1
A0535956
1
A0535956
1
A0535956
Float valve assy.
1
A0076209
1 A0076209
1
A0538700
1
A0538700
1
A0538700
Starter kit, 208 VAC 1
A0518023
1 A0518055
1
A0538701
1
A0538704
1
A0518030
Starter kit, 230 VAC 1
A0518024
1 A0518056
1
A0538702
1
A0538705
1
A0518031
Starter kit, 460 VAC 1
A0518025
1 A0518057
1
A0538703
1
A0538706
1
A0518032
Nozzle„
1
A0547133
1 A0547131
1
A0547131
1
A0547132
1
A0547132
Nozzle adapter„
1
A0547130
1 A0547130
1
A0547130
1
A0547130
1
A0547130
•
Fan motor spacer bracket part no. A0539566; available on SF2003 and SF2005 models only.
‚
Fan motor spacer bracket part no. A0536717; available on SF2003 and SF2005 models only.
ƒ
Recommended spare parts prior to April 2002
„
Recommended spare parts after April 2002
Fiberglass Cooling Towers
Chapter 6: Appendix
qty
1
1
1
1
1
2
1
1
1
1
48
16
24
4
4
2
1
2
2
1
1
1
1
1
1
1
SF2011
Part no.
A0535879
A0535880
A0536668
A0536668
A0533669
A0533082
A0539586
A0535883
A0547120
A0541387
A0533099
A0533103
A0533106
A0064022
A0101006
A0500867
A0535957
A0504422
A0102314
A0535956
A0538700
A0518030
A0518031
A0518032
A0547133
A0547130
qty
1
1
1
1
1
2
1
1
1
1
48
16
28
4
4
2
1
2
2
1
1
1
1
1
1
1
SF2015
Part no.
A0539585
A0539586
A0539587
A0539588
A0539589
A0533082
A0539586
A0535883
A0539577
A0539576
A0539578
A0539579
A0539580
A0064022
A0101006
A0500867
A0535957
A0504422
A0102314
A0535956
A0538700
A0518059
A0518060
A0518061
A0547133
A0547130
Page 23 of 24
6-5
Electrical Schematics
Figure 12: Typical Wiring Diagram
115/1/60
208-230-460/3/60
Fused
disconnect
switch
ON/OFF
switch
Thermostat
M
Immerse
bulb in tank
Starter with
overloads
Non-fused
disconnect
at tower
Fan
Fiberglass Cooling Towers
Chapter 6: Appendix
Page 24 of 24