1
TELECOM
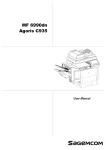
MF5990
Agoris M943
User Manual
Dear Customer
For your safety and comfort, we urge you to carefully read the chapter safety [ 121] before attempting use.
Congratulations on your purchase of a new generation communications terminal. A multifunction device able to fax,
print, copy and scan, your machine suits even the most demanding professional requirements.
Combining power, user-friendliness and ease of use thanks to its touch screen, your machine offers the following
functions:
• copy, print, and send/receive faxes in black and white
• scan in colour
• print server with hard disk
• local network usage (LAN 10 BaseT/100 BaseTx, PC Kit Companion Suite Pro)
• secure document printing
• access protection (user account management, biometric identification, user rights and administration of appliance
resources)
• management of resources available to users (quotas, counters)
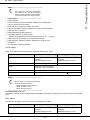
Dual-line model - Recommendations
Depending on your machine model you can use 2 telephone lines simultaneously. For example, you can reserve one
line for sending faxes and the other for receiving them. In this configuration, it is preferable to use direct telephone lines
reserved exclusively for the machine in order to maintain it constantly in service and to receive communications without
user intervention. Contact your administrator or telephone operator for how to connect your machine to the telephone
network.
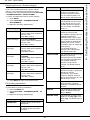
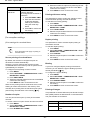
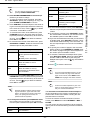
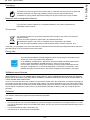
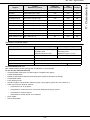
Rules for using symbols
This document makes use of symbols designed to help the reader identify the information supplied:
Symbol
CAUTION
Warning
Important
Note
Definition
Indicates important safety information.
Failure to respect these notes may lead to serious or even fatal injury. Read these
notes carefully. You will find them in the Safety section of this manual.
Indicates important safety information.
Failure to respect these notes may lead to minor to moderate injury, or damage to
the apparatus or equipment. Read these notes carefully. You will find them in the
Safety section of this manual.
Indicates points to be read with special attention when using the device, and
explanations of probable causes of paper jams, damage to originals or loss of
data. Read these explanations carefully.
Indicates additional explanations about device functions, and instructions for
resolving user errors.
-2-
1 - Dear Customer
MF 5990 - Agoris M943
MF 5990 - Agoris M943
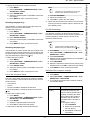
Table of contents
Fax Settings ......................................................... 27
Rules for using symbols .......................................2
Defining the machine name and phone number ....... 27
Fax emission settings ............................................... 28
Fax reception settings ............................................... 30
Configuring the fax server (optional) ......................... 32
Advanced fax settings ............................................... 33
Presentation of the machine ............................. 6
Service default settings ...................................... 33
Dear Customer.................................................... 2
Description of the machine ...................................6
Control panel description .....................................7
Copy function default settings ................................... 34
Fax emission default settings................................... 34
Scan to default settings............................................. 34
Installation .......................................................... 8
Local network settings........................................ 35
Packaging contents ...............................................8
Installing the machine ...........................................8
Installing options ...................................................8
Configuring the Ethernet network ............................. 35
Configuring the SNTP server .................................... 36
Configuring the client FTP port ................................. 37
Configuring the SNMP service .................................. 37
Configuring the SMTP server.................................... 37
Active Directory configuration ................................... 38
Configuring the print server (RAW, LPR or IPP) ....... 38
Configuring the LDAP server .................................... 38
Additional paper tray ................................................... 8
Perfume diffuser .......................................................... 8
Installing the toner cartridge ................................8
Loading media........................................................9
Loading paper into the paper tray ............................... 9
Loading paper format larger than A4......................... 10
Loading transparencies into the paper tray ............... 11
Internet settings via the telephone line ............. 39
Configuring the internet connection .......................... 39
Starting up the machine ......................................12
Email settings ...................................................... 39
Connecting the machine............................................ 12
Initial configuration of the machine............................ 13
Accessing the email configuration settings ............... 39
Configuring the email service connection ................. 39
Defining a reply address ........................................... 40
Defining the type of emission report.......................... 40
Getting to know the machine .......................... 15
Navigation principles...........................................15
Using the buttons ...................................................... 15
Virtual editor .............................................................. 15
Screen scrolling......................................................... 15
Navigation path ......................................................... 15
PC Management................................................... 40
Unregistering a PC.................................................... 40
Automatic Consumable Ordering (ACO)
and maintenance ................................................. 40
Presentation of specific functions .....................15
Presentation of the home screen and menus ...16
Connecting to the server centre ................................ 40
Triggering an ACO .................................................... 41
Triggering remote maintenance ............................... 41
Configuration utilities and menus .............................. 16
Monitoring of operations and communications
in progress................................................................. 17
Warning and error messages .................................... 17
Printing / Exporting / Importing settings........... 41
Printing out a list of settings ...................................... 41
Printing out a list of fonts........................................... 41
Exporting setting to the integrated website ............... 41
Exporting the settings to a USB key ......................... 41
Importing the settings from the integrated website ... 42
Importing the settings from a USB key...................... 42
Inserting original documents..............................18
Using the flatbed scanner.......................................... 18
Using the autofeed scanner ...................................... 18
Using the Multiple Scan option correctly ................... 18
Logging in on the machine .................................19
Machine monitoring and activity counters ....... 42
Logging in or out of your user account ...................... 19
Personalising your user account / fingerprint ............ 19
Communications log ................................................. 42
Activity counters ........................................................ 43
Configuring the machine and the services.... 21
Printing out the guide to functions ....................21
Remote configuration ..........................................21
General settings ...................................................21
Consumable status ............................................. 43
Hardware and software information .................. 43
Creating and managing user accounts .......... 45
Activating / Deactivating user rights
management ........................................................ 45
Creating a user account...................................... 46
Modifying a user account ................................... 47
Deleting a user account ...................................... 47
Printing the list of user accounts....................... 47
User account reports and usage counters ....... 47
Date/Time Settings.................................................... 21
Geographic Settings.................................................. 22
Switching the machine to standby............................. 22
Economy mode settings ............................................ 23
Ergonomics ............................................................... 24
Paper settings ......................................................25
Defining the paper format.......................................... 25
Defining the paper type ............................................. 25
Printing an interim report........................................... 48
Sending an interim report.......................................... 48
Resetting the usage counters ................................... 48
Scanner / Printer Settings ...................................25
Scanner / Printer paper format .................................. 25
Adjusting Scanner / Printer margins.......................... 26
PC printing parameters ............................................. 26
Default paper tray...................................................... 27
Photocopying documents ............................... 49
Choosing the photocopy options correctly ...... 49
Binding ...................................................................... 49
Mosaic copy .............................................................. 49
-3-
MF 5990 - Agoris M943
Poster copy ............................................................... 49
Zoom ......................................................................... 50
Editing a print task .................................................... 66
Deleting a print task .................................................. 66
Simple photocopy ................................................50
Duplex photocopying ..........................................50
Photocopy with toner saving ..............................50
Elaborated photocopy .........................................51
Identity card photocopy ......................................52
Using a USB memory key ................................ 67
Faxing documents............................................ 53
Printing photos from a USB key ................................ 67
Printing documents from a USB key ......................... 68
Support compatibility.......................................... 67
Recommendations for using USB keys ............ 67
Viewing the content of a USB key...................... 67
Printing files from a USB key ............................. 67
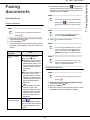
Sending faxes.......................................................53
Simple emission ........................................................ 53
Elaborate emission.................................................... 53
Deferred emission ..................................................... 55
Saving a document on a USB key...................... 69
Analyzing the content of your USB key ............ 70
Importing and exporting from a USB key.......... 70
Stopping an emission in progress .....................56
Receiving faxes....................................................56
Scanning and sending documents ................. 71
Scan to Key .......................................................... 71
Scan to Mail.......................................................... 71
Scan to FTP.......................................................... 73
Scan to SMB......................................................... 74
Scan to PC............................................................ 76
Scan to Archive ................................................... 76
Stopping an emission in progress..................... 77
Receiving emails ................................................. 77
Monitoring document emissions ....................... 77
Printing received faxes in the memory ...................... 56
Monitoring fax emissions....................................56
Forcing an emission request ..................................... 56
Editing an emission request ...................................... 56
Deleting a document awaiting emission .................... 56
Print out a document awaiting emission.................... 57
Printing documents from a PC........................ 58
Prerequisites ........................................................58
Choosing print options correctly .......................58
Forcing an emission request ..................................... 78
Editing an emission request ...................................... 78
Deleting a document awaiting emission.................... 78
Print out a document awaiting emission.................... 78
Paper tab................................................................... 58
Custom sizes tab....................................................... 58
Job security tab ......................................................... 58
Advanced tab ............................................................ 59
Watermarks tab ......................................................... 59
Overlays tab .............................................................. 59
Fonts tab ................................................................... 59
Device options tab..................................................... 59
Settings tab ............................................................... 59
Address book ................................................... 79
Simple printing.....................................................59
Duplex printing.....................................................60
Secure printing.....................................................60
Creating and managing contact lists................. 80
Creating and managing contacts....................... 79
Contact properties..................................................... 79
Creating a contact ..................................................... 79
Editing a contact ....................................................... 80
Deleting a contact ..................................................... 80
Properties of a contact list......................................... 80
Creating a list of contacts.......................................... 81
Editing a list of contacts ............................................ 81
Deleting a list of contacts .......................................... 81
Receiving your fingerprint.......................................... 60
Launching secure printing ......................................... 60
Retrieving/Releasing secure prints............................ 61
Printing the address book .................................. 82
Accessing contacts on the LDAP server .......... 82
Exporting / Importing the address book ........... 82
Cancelling a print in progress ............................61
Monitoring printing ..............................................61
Print out the list of saved print tasks.......................... 61
Force a print task....................................................... 61
Editing a print task..................................................... 62
Deleting a print task................................................... 62
Exporting the address book to the integrated
website ...................................................................... 82
Exporting the address book to a USB key ................ 82
Importing the address book to the integrated
website ...................................................................... 83
Importing an address book from a USB key ............. 83
Printing documents sent by email.................. 63
Prerequisites ........................................................63
Configuring the connection ................................63
Printing .................................................................63
Retrieving the machine's email address and
safeguarding printing................................................. 63
Sending documents to the machine by email
for printing ................................................................. 64
Printing from the Mobile Print menu .......................... 64
Retrieving/Releasing prints from the print queue ...... 64
Managing configuration of secure printing ................ 64
Restoring the address book (Directory
card option).......................................................... 83
PC Functions .................................................... 85
Introduction.......................................................... 85
Required configuration ....................................... 85
Installing the software......................................... 85
Complete installation of the software ........................ 85
Installing drivers using the Companion Suite Pro
software .................................................................... 86
Manual installation of the drivers............................... 87
Cancelling a print in progress ............................66
Monitoring printing ..............................................66
Monitoring the multifunction machine .............. 87
Companion Director ............................................ 88
Print out the list of saved print tasks.......................... 66
Force a print task....................................................... 66
-4-
MF 5990 - Agoris M943
Graphic presentation ................................................. 88
Activating utilities and applications............................ 88
Precautions for using the machine.......................... 123
Precautions for using the touch screen................... 124
Companion Monitor .............................................88
Safety information ............................................. 124
Graphic presentation ................................................. 88
Peripheral management ............................................ 88
Displaying the status of consumables ....................... 90
Links .......................................................................... 91
Safety during operation ........................................... 124
Handling and moving the machine .................. 125
Shocks during handling........................................... 125
Moving the machine ................................................ 125
Handling toner cartridges ........................................ 126
Companion Suite Pro functions .........................91
Document analysis .................................................... 91
Printing ...................................................................... 92
Environment....................................................... 126
Packaging ............................................................... 127
Batteries and rechargeable batteries ...................... 127
The product ............................................................. 127
Energy Star ............................................................. 127
Fax communications ...........................................92
Presentation of the Fax window ................................ 92
Sending a fax ............................................................ 93
Receiving a fax.......................................................... 94
Monitoring fax communications................................. 94
Fax settings ............................................................... 94
Cover page................................................................ 95
Software user license........................................ 127
Definition ................................................................. 127
License.................................................................... 127
Ownership ............................................................... 128
Duration .................................................................. 128
Warranty ................................................................. 128
Liability .................................................................... 128
Development ........................................................... 128
Applicable law ......................................................... 128
Uninstalling the software ....................................98
Complete uninstallation of the software .................... 98
Uninstalling the drivers .............................................. 98
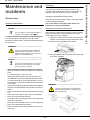
Maintenance and incidents ........................... 100
Maintenance .......................................................100
Registered trademarks...................................... 128
Reproductions prohibited................................. 129
Software licenses .............................................. 129
General information................................................. 100
Cleaning .................................................................. 100
Replacing consumables .......................................... 102
Servicing.................................................................. 104
GNU GENERAL PUBLIC LICENSE Version 2,
June 1991 ............................................................... 129
GNU LESSER GENERAL PUBLIC LICENSE
Version 2.1, February 1999 .................................... 132
Removing paper jams........................................104
Possible paper jam locations................................... 104
Considerations for removing paper jams................. 105
Scanner paper jam .................................................. 105
Paper tray paper jam............................................... 105
Duplex module paper jam ....................................... 105
Fuser unit paper jam ............................................... 106
Toner cartridge paper jam ....................................... 107
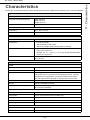
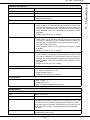
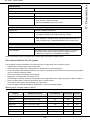
Characteristics ............................................... 137
Recommendations for the paper ..................... 139
Which paper formats can be used? ........................ 139
Standard / recycled paper ....................................... 140
Thick paper ............................................................. 141
Fine paper ............................................................... 141
Envelopes ............................................................... 142
Labels ..................................................................... 142
Cards ...................................................................... 143
Transparencies ....................................................... 143
Index cards ............................................................. 144
Printable surface ..................................................... 144
Page margins .......................................................... 145
Storage................................................................108
Packing and transporting the machine............108
Updating the Firmware from the integrated
website................................................................108
Updating the Firmware via USB key ................108
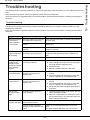
Troubleshooting ............................................. 110
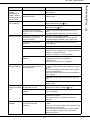
Troubleshooting.................................................110
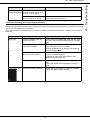
Troubleshooting paper jams.............................112
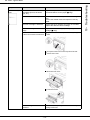
Troubleshooting print quality problems ..........113
Smart card incidents .........................................118
Communication failures ....................................118
Scanning failure....................................................... 118
Sending failure ........................................................ 118
Communication failure codes .................................. 119
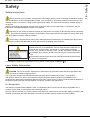
Safety............................................................... 121
Safety Instructions.............................................121
Laser Safety Information...................................121
For Europe/Asia ...................................................... 121
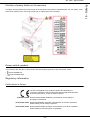
Position of safety labels on the machine ........122
Power switch symbols ......................................122
Regulatory information .....................................122
Certifications in Europe ........................................... 122
Location conditions ...........................................123
Precautions for use ...........................................123
Operating environment............................................ 123
-5-
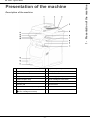
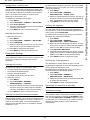
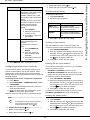
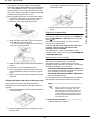
Presentation of the machine
Description of the machine
1
Automatic document feeder (ADF)
10
Paper reception stop
2
Paper adjustment guide
11
Main paper tray
3
Automatic document feeder
12
On/Off button
4
Original document output
13
Secondary paper tray
5
Paper reception stop
14
Toner cartridge access button
6
Fingerprint reader
15
Smartcard reader
7
Number pad
16
Touch screen
8
Master USB connector (USB key)
17
Access handle to flatbed scanner
9
Paper output
Toner cartridge access flap
-6-
1 - Presentation of the machine
MF 5990 - Agoris M943
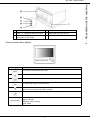
18
Power cable connection
21
LAN connector
19
LINE 1 In - telephone cable connection
22
Slave USB connector (for PC)
20
LINE 2 In - telephone cable connection
(depending on the model)
23
Duplex module
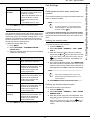
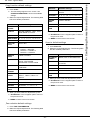
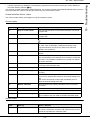
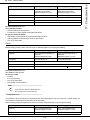
Control panel description
Key
Description
To access the machine's home screen
To activate the Send Fax function
To activate the Scan Document function
To activate the Copy Document function
To cancel the operation in progress
To exit a menu without saving the changes
To run the operation in progress (copy, fax emission, scanning)
Light indicator
Machine status indicator:
green: standby
flashing orange: starting
red: failure
-7-
1 - Presentation of the machine
MF 5990 - Agoris M943
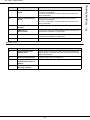
Installation
Packaging contents
To activate and configure this option, consult the section
Perfume setting [ 24].
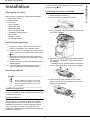
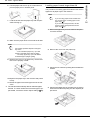
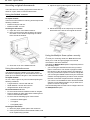
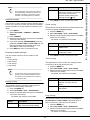
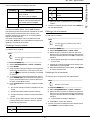
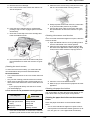
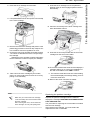
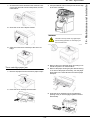
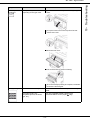
Installing the toner cartridge
1 Stand opposite the machine.
2 Press the toner cartridge access button.
The packaging contains the components listed below:
• Multifunction printer
• Duplex module
• Front panel
• 1 toner cartridge
• 1 initialisation card
• 1 installation guide
• 1 User manual CD-ROM
• 1 installation CD-ROM for PC
• 1 power cable
• 1 telephone cable
• 1 consumable leaflet
3 Lift up the flatbed scanner and open the access flap
to the toner cartridge.
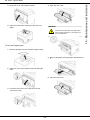
Installing the machine
1 Unpack the machine and remove all protective
shims, as illustrated in the installation guide.
2 Install the printer in a suitable place respecting the
safety instructions described in the section Safety
[ 121].
3 Place the front panel and remove the protective
plastic film from the screen, as illustrated in the installation guide.
4 Unpack the duplex module, as illustrated in the installation guide.
5 Install the duplex module at the rear of the machine, as illustrated in the installation guide.
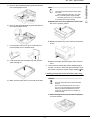
4 Unpack the new toner cartridge and shake it gently
7 to 8 times to distribute the toner evenly through
the cartridge.
Shaking the toner cartridge carefully will guarantee the maximum number of copies per cartridge.
Installing options
Caution
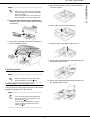
5 Take hold of the toner cartridge by the handle,
place it on a flat surface and remove the cover by
pulling on it horizontally.
Before installing any options, the machine
and the option to be installed must be switched off and disconnected from the mains
power supply.
Additional paper tray
Consult the installation guide supplied with this option for
installation instructions.
Perfume diffuser
The perfume unit is an option enabling you to install a
perfume diffuser on the machine. When this option is
installed and activated, the machine diffuses perfume
every hour, and for a period of time defined by you.
Consult the installation guide supplied with this option for
installation instructions.
-8-
2 - Installation
MF 5990 - Agoris M943
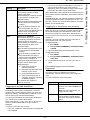
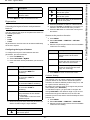
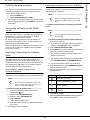
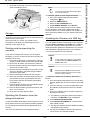
1 Remove the paper tray from the machine and place
it on a flat surface.
Note
Make sure you remove the toner cartridge
cover horizontally so as not to break it inside
the toner cartridge.
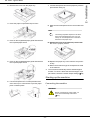
After removing the cover, do not shake the
toner cartridge. You may risk spilling toner.
6 Insert the toner cartridge into its compartment,
pushing it fully in until it engages (last movement
downwards).
2 Remove the cover from the paper tray.
7 Close the access flap to the toner cartridge and
lower the flatbed scanner.
3 Press the paper compression flap to lock it.
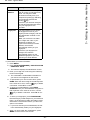
4 Press on the longitudinal paper guide and slide it to
the required paper format.
Loading media
Note
Before loading paper, consult the section
Recommendations for paper [ 139].
5 Press on the right lateral paper guide and slide it to
the required paper format.
Loading paper into the paper tray
The procedure for loading paper described in this section
applies to all paper trays in the machine.
Note
If you are using paper format greater than
A4, see the section Loading paper format
larger than A4 [ 10].
If you are using transparencies, see the
section Loading transparencies into the
paper tray [ 11].
-9-
2 - Installation
MF 5990 - Agoris M943
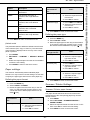
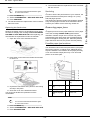
Loading paper format larger than A4
6 Fan the paper and even it up on a flat surface to
prevent paper jams or skewed prints.
The procedure for loading paper described in this section
applies to all paper trays in the machine.
Note
If you are using paper format smaller than
A4, see the section Loading paper in the
paper tray [ 9].
If you are using transparencies, see the
section Loading transparencies into the
paper tray [ 11].
7 Load the sheets into the paper tray with the print
surface facing up.
1 Remove the paper tray from the machine and place
it on a flat surface.
8 Make sure the paper does not exceed the fill limit.
Note
The loading capacities depend on the paper
tray used:
- main / additional paper tray: up to 550
sheets of standard paper (80g/m² [22lb])
- secondary paper tray: up to 150 sheets
of standard paper (80g/m² [22lb])
2 Remove the cover from the paper tray.
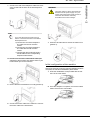
9 Replace the cover on the paper tray. Ensure that
the cover is properly closed.
3 Unlock the two catches by sliding them towards the
outside.
10 Replace the paper tray in the machine and push it
in fully.
11 Define the paper format and type used in the machine.
The machine automatically detects standard paper
formats. To check / define the format and type of paper loaded, consult the section Paper settings [ 25].
- 10 -
4 Pull the extendable part of the paper tray by taking
hold of the handle and pulling it to the required paper format.
2 - Installation
MF 5990 - Agoris M943
5 Press on the longitudinal paper guide and slide it to
the required paper format.
Note
The loading capacities depend on the paper
tray used:
- main / additional paper tray: up to 550
sheets of standard paper (80g/m² [22lb])
- secondary paper tray: up to 150 sheets
of standard paper (80g/m² [22lb])
10 Replace the cover on the paper tray. Ensure that
the cover is properly closed.
6 Press on the right lateral paper guide and slide it to
the required paper format.
11 Replace the paper tray in the machine and push it
in fully.
7 Fan the paper and even it up on a flat surface to
prevent paper jams or skewed prints.
8 Load the sheets into the paper tray with the print
surface facing up.
12 Define the paper format and type used in the machine.
The machine automatically detects standard paper
formats. To check / define the format and type of paper loaded, consult the section Paper settings [ 25].
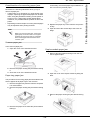
Loading transparencies into the paper tray
Caution
9 Make sure the paper does not exceed the fill limit.
Only use transparencies for black and white
printing.
Never use transparencies for colour printing. You may risk damaging the machine.
Remove printed transparencies from the
output tray to prevent the accumulation of
static electricity.
1 Remove the paper tray from the machine and place
it on a flat surface.
- 11 -
2 - Installation
MF 5990 - Agoris M943
2 Remove the cover from the paper tray.
7 Load the transparencies into the paper tray with the
print surface facing up.
3 Press the paper compression flap to lock it.
8 Make sure the transparencies do not exceed the fill
limit.
Note
The loading capacities depend on the thickness of the transparencies used. You can
load up to 100 transparencies of standard
thickness in the paper trays.
4 Press on the longitudinal paper guide and slide it to
the required paper format.
9 Replace the cover on the paper tray. Ensure that
the cover is properly closed.
5 Press on the longitudinal paper guide and slide it to
the required paper format.
10 Replace the paper tray in the machine and push it
in fully.
11 Define the format and type of transparencies used
in the machine.
The machine automatically detects standard paper
formats. To check / define the format and type of paper loaded, consult the section Paper settings [ 25].
Starting up the machine
6 Fan the transparencies in small quantities and
even them up on a flat surface to prevent paper
jams or skewed prints.
Connecting the machine
WARNING
Before connecting the power cable, you
must consult the Safety Instructions
[ 121].
- 12 -
2 - Installation
MF 5990 - Agoris M943
1 Connect one end of the telephone cable to the machine socket and the other to the wall telephone
socket.
WARNING
The power cable is used to disconnect the
machine from the power supply. As a precaution, the mains power socket must be located near the machine and easily
accessible in the event of danger.
Note
If you have the dual-line model, and you
want to connect the machine to two dedicated telephone lines:
a) Connect the end of the telephone
line cable 1 to the L1 machine
socket.
b) Connect the end of the telephone
line cable 2 to the L2 machine
socket.
c) Connect the other ends of the line 1
and 2 cables to the corresponding
telephone wall sockets.
7 Press the On/Off button to switch the machine on
(position I).
4 Connect one end of the LAN network cable (not
supplied) to the machine port and the other to your
local network port for the machine.
Initial configuration of the machine
After a few seconds, when the printer preheating phase is
complete, the machine initialisation phase starts.
1 Insert the initialization card provided with the machine in the card reader.
5 Ensure that the On/Off button is on Off (position 0).
2 Once the analysis is complete, remove the initialization card from the card reader.
6 Connect the mains cable to the machine. Connect
the mains cable to the wall socket.
- 13 -
2 - Installation
MF 5990 - Agoris M943
In this section, you will find the initial settings to be
configured to be able to use your machine's basic
functions:
• geographic settings (country, language, communication network);
• date / time settings;
• fax settings (machine name and number);
• local network settings (automatic configuration of the
Ethernet network);
• paper settings.
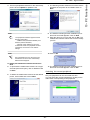
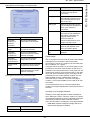
2 Select AUTOMATIC from the options available in
the list. Press OK to confirm the new setting.
The machine will search for a DHCP or BOOTP
server on the local network that can dynamically
allocate its network settings.
This operation may take a few minutes.
Note
This section will help you to first configure
the machine, assuming the use of a direct
telephone line on the PSTN network, and an
Ethernet configuration via a DHCP server
with automatic allocation of IP address.
Consult the section Configuring the
machine and services [ 21] if you want to
configure the machine differently.
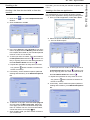
To configure the geographic settings:
1 Press the MENU key.
2 Press OTHER COMMANDS > SETTINGS >
GENERAL > GEOGRAPHICAL > COUNTRY.
3 Select the required country from the list. Use the up
and down arrows to scroll through the available
countries. Press OK to confirm the new setting.
Choosing the country automatically configures
the machine's default language and the telecommunications network.
3 Check that the parameters IP ADDRESS,
SUBNET MASK, GATEWAY, PRIMARY DNS,
SECONDARY DNS, WINS 1 SERVER and WINS
2 SERVER are correctly entered. If this is not the
case, you will have to configure them manually.
4 Press MENU to return to the home screen.
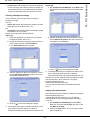
To check and/or specify the paper type and format for
each machine tray:
1 Press PAPER.
2 Press FORMAT. Check that the paper format detected in each tray is correctly entered. To correct
a paper format, press on the corresponding tray;
select the required format from the list and press
OK to confirm.
3 Press TYPE. Check that the paper type detected in
each tray is correctly entered. To correct a paper
type, press on the corresponding tray, select the required paper type from the list and press OK to
confirm.
4 Press MENU to return to the home screen.
Consult the section Configuring the machine and services
[ 21] for more available parameters, and to configure the
machine according to your specific needs.
4 In the navigation path at the top of the screen,
press GENERAL to return to the previous menu.
To set the machine's date and time:
1 In the menu GENERAL, press DATE AND TIME.
2 Press TIME. Enter the time using the virtual keyboard. Press OK to confirm the new setting.
3 Press DATE. Enter the date using the virtual keyboard. Press OK to confirm the new setting.
4 In the navigation path at the top of the screen,
press GENERAL to return to the previous menu.
To define the machine's number and name, required for
the fax function:
1 In the menu GENERAL, press FAX.
2 Press PHONE NUMBER LINE 1. Enter the number
using the virtual keyboard. Press OK to confirm the
new setting.
3 Press LINE 1 NAME. Enter the machine's name
using the virtual keyboard. Press OK to confirm the
new setting.
4 In the navigation path at the top of the screen,
press SETTINGS to return to the previous menu.
To run an automatic configuration of the Ethernet
network (automatic allocation of the IP address via the
DHCP server):
1 In the menu SETTINGS, press COMMUNICATION
> LOCAL NETWORK >IPV4>ADDRESS
ALLOCATION.
- 14 -
2 - Installation
MF 5990 - Agoris M943
Getting to know
the machine
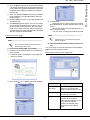
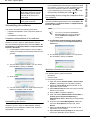
2 Press the ADDRESS BOOK button.
3 Press the CONTACTS button.
4 Press CREATE.
The upper frame displays the following navigation
path: icon Home > ADDRESS BOOK > CONTACTS
> CREATE.
Please read this section carefully to get to know your
machine.
In it you will find the operating principles required
whatever function you are using.
Navigation principles
Using the buttons
Navigating through the machine's functions and menus is
very intuitive.
The touch screen displays the functions, menus, actions
and parameters in the form of buttons.
Just press on a button to open a menu and access the
sub-menus, run an action or change a parameter.
A greyed-out button means the function or action is
unavailable (depends on another deactivated setting, or
an option not installed, etc.).
Use the navigation path to find your way around the
menus, but also to return to a previous menu or directly to
the home screen, by pressing directly the required button:
• CONTACTS to return to the previous menu
• Home icon to return to the home screen, etc.
The procedures described in this document use the
principles of the navigation path. Thus, access to the
creation of a contact in the address book is described as
follows:
1 Press the MENU key.
2 Select ADDRESS BOOK > CONTACTS >
CREATE.
The parameters that can be changed are then presented
one by one with a description of the required data and
confirmation of the modifications.
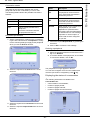
Presentation of specific functions
The machine is equipped with special keys enabling you
to access specific functions directly:
Virtual editor
When you press on a parameter to change it, the machine
automatically displays a virtual editor: a number pad for
entering figures (e.g.: fax number), an alphabetical
keypad for entering text (e.g.: file name). Check boxes or
lists are used for activating or selecting functions.
When changing a field, conventional text editing actions
are available: delete the character before the cursor
(
), move through the data field ( / ), switch from
upper to lower case, or display / hide punctuation marks
and special characters.
Whatever the modification to be made, the editor allows
you to carry out the following:
• OK: confirm the modification
• CANCEL: cancel the modification
•
: activates the send fax function.
In this mode, the machine displays by default the
screen for entering a fax number. You can start to
configure your fax emission.
•
: activates the scan and send document
function.
In this mode, the machine displays by default the
screen to select a Scan to function. Once selected,
you can start to configure how your document is sent.
•
: activates the copy document function.
In this mode, the machine displays by default the
screen for entering the number of copies to make.
You can start to configure how your document is copied.
Screen scrolling
When a dedicated function (e.g. copy a document) or
menu (e.g. create a contact in the address book) includes
a series of parameters on several screens, the lower
frame on the screen displays the button OTHER
COMMANDS or OTHER PARAMETERS.
You can scroll through the screens by pressing the button
OTHER COMMANDS or OTHER PARAMETERS.
Navigation path
The backlit key identifies the mode activated on the
machine.
Refer to the specific chapters for these functions for more
information on how they work and tips for using them:
• Photocopying documents [ 49]
• Faxing documents [ 53]
• Scanning and sending documents [ 71]
To help know where you are in the menu arborescence,
the upper frame of the screen displays the navigation
path leading to the current menu. For example, to create
a contact in the address book, the path is as follows:
1 Press the MENU key to display the home screen.
- 15 -
3 - Getting to know the machine
MF 5990 - Agoris M943
Presentation of the home screen and
menus
The home screen allows you to access:
• machine configuration utilities and menus
• monitoring of operations and communications in progress
• warning and error messages
The machine displays the home screen either:
• by pressing the MENU key
• by pressing the Home icon in the navigation path
• or when a specific function is running, to display the
current operation progress (document being scanned,
fax being sent, etc.)
The home screen displays the available menus in the left
and right frames. The central frame displays the current
operations and warning or error messages in the form of
buttons.
Button
Description
STANDBY
Press this button to switch the
machine to standby
immediately.
For more information, consult
the section Immediate standby
[ 22].
SETTINGS
This menu allows you to access
the machine's configuration
parameters.
For more information, see
section Configuring the machine
and services [ 21].
STATUS
This menu includes the
hardware and software
information for the machine, for
use in the event of technical
intervention.
For more information, consult
the section Hardware and
software information [ 43].
REPORTS
This menu allows you to access
report printing (function guide,
consumable status, activity
counters, current settings,
address book entries, existing
user accounts, prints to be
released, installed fonts and
communications log).
IDENTIFICATION
The administrator may restrict
access to certain machine
functions.
In this case, only authorised
users can use the restricted
functions after they have
identified themselves correctly.
This menu allows you to access
the options in your user account.
For more information, consult
the section Logging in on the
machine.
CONSUMABLES
This utility allows you to check
the status of the machine's
consumables.
For more information, consult
the section Consumable status
[ 43].
PAPER
Use this menu to check or
specify paper formats and types
loaded in the machine's paper
trays.
For more information, consult
the section Paper settings
[ 25].
Configuration utilities and menus
The home screen allows you to access the following
configuration utilities and menus:
Button
Description
SEND QUEUE
The emission queue contains all
the documents waiting to be
sent and being sent (faxes, sent
by the local network, etc.).
For more information, see
sections Monitoring fax
emissions [ 56] et Monitoring
document emissions [ 77].
PRINT QUEUE
The print queue holds all the
documents waiting to be printed
or being printed.
For more information, consult
the section Monitoring printing
[ 61].
USB KEY
This menu is specially for a USB
key and is only accessible when
a USB key is inserted in the
machine.
For more information, see
section Using a USB memory
key [ 67].
ADDRESS BOOK
Press this button to access the
machine's address book and
manage contacts and contact
lists.
For more information, consult
the section Address book [ 79].
MOBILE PRINT
This menu is used for printing
documents sent by email.
For more information, consult
the section Printing documents
sent by email [ 63].
- 16 -
3 - Getting to know the machine
MF 5990 - Agoris M943
Button
Description
Label
Action in progress
LANGUAGE
The administrator may define
two preferred languages for
displaying machine menus.
Press this button to switch
from one language to the other.
PRINT
REPORT
INTERNET
The administrator can configure
the machine to connect to the
internet via the telephone line.
This menu allows you to
manually force a connection in
order to:
send / receive emails;
authorise technical support to
take control of the machine
(see Remote reading and
maintenance [ 40])
Printing in progress automatically
generated by the machine
(emission report, communication
log) or launched by a user from
the machine menu (printing of
function guide, address book,
settings, etc.).
ANALYSE
USB KEY
Analysis in progress of the
content of a USB key inserted in
the machine.
SWITCH TO
STANDBY
machine switching to standby
when conditions are met.
Monitoring of operations and
communications in progress
The operations and communications in progress are
displayed in the central frame of the home screen in the
form of buttons.
Sending a fax is thus represented by a button labelled Fax
emission, receiving a fax by a button labelled Fax
reception, etc.
To help you identify the operations and communications
in progress, the possible labels are as follows:
Label
Action in progress
COPY
Photocopy in progress.
FAX SCAN
Document scanning in progress
before fax emission.
PC SCAN
Document scanning in progress
before sending to a computer
(Scan to PC function).
FAX
EMISSION
Fax emission in progress on the
telephone line.
FAX
RECEPTION
Fax reception in progress on the
telephone line.
MAIL
EMISSION
Email emission in progress.
MAIL
RECEPTION
Email reception in progress.
PRINT PC
Document printing in progress
sent from a computer.
PRINT FAX
Printing in progress of a fax or
email received.
To check or consult the operation data, just press the
corresponding button. A detailed description window is
displayed on the screen. In the event of simultaneous
actions, a selection list allows you to choose the operation
you require.
Once the operation or communication is complete, the
corresponding button disappears.
If a communication could not be completed and requires
sending again, the button disappears but the emission
request is reallocated to the emission queue for
subsequent emission.
To cancel the operation in progress, press the
confirmation message is displayed.
key. A
Warning and error messages
When there is a problem on the machine, a warning
window is automatically displayed on the screen, with a
detailed description of the problem encountered.
Depending on the gravity of the problem, you should act
immediately to correct it (paper jam, empty paper tray,
etc.), or confirm that you acknowledge the warning (toner
nearly out).
If you ignore the message by closing the window or if the
touch screen is not touched for several seconds, the
warning or error window closes. However, it is recorded in
the central frame of the home screen in the form of a
button.
The label is used to rapidly identify the nature of the
problem (e.g.: paper jam). A colour code is used to
identify the gravity of the problem:
• red: a serious error has occurred, rendering one or
more machine functions unusable. You must resolve
the incident immediately (e.g.: paper jam, paper out,
cover open, toner out).
• orange: a minor problem has occurred. You must resolve the incident as soon as possible (e.g.: toner
nearly out).
To consult the warning message or error, just press the
corresponding button. A detailed description window is
displayed on the screen.
- 17 -
3 - Getting to know the machine
MF 5990 - Agoris M943
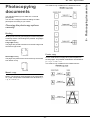
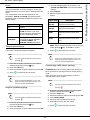
Inserting original documents
3 Adjust the paper guides against the document.
The instructions for inserting original documents are the
same for copies, faxes or scanned documents.
Using the flatbed scanner
Accepted formats
The format of documents for scanning should respect the
following conditions:
• Maximum length: 299 mm.
• Maximum width: 219 mm.
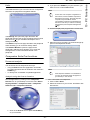
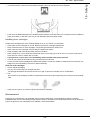
Inserting the document
1 Open the cover of the flatbed scanner.
2 Place your document with the side to be copied
face down on the window respecting the indications around the window.
4 Set the limit stop on the output tray for scanned
documents to the size of the original document.
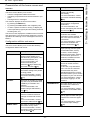
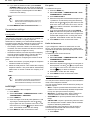
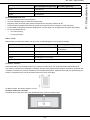
Using the Multiple Scan option correctly
3 Close the cover of the flatbed scanner.
Using the autofeed scanner
The autofeed scanner enables you to scan original
documents comprising one or several sheets. You can
place up to 70 sheets of 80 g/m² in the automatic feeder.
Accepted formats
A5, A4, Letter, Legal or any other format respecting the
following conditions:
• Length between 140 mm and 358 mm.
• Width between 139 mm and 219 mm.
• Weight between 60 and 105 g/m².
Recommendations for use
• Do not load documents of different sizes or weights.
• Remove staples or paper clips before inserting documents in the automatic feeder.
• Do not insert the following types of documents:
–
Creased or folded paper.
–
Torn paper.
–
Corrugated paper
To meet your scanning needs, the Scan to functions
allow you to "add" and group pages from several
documents in the same emission.
Activating the Multiple Scan option is especially useful in
the following cases:
• you are using the autofeed scanner and your document is voluminous. The number of pages exceeds
the capacity of the document feeder (70 pages 80 g/
m²), but you want the recipient to receive a single file.
• you are using the flatbed scanner and your document
contains several pages that you want to scan one after
the other so that the recipient receives a single file.
• you want to use the flatbed scanner and the autofeed
scanner to scan different pages, but you want the recipient to receive a single file.
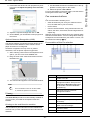
Use the following table to know how to configure and use
the Multiple Scan option.
Inserting the document
1 Move the paper guides apart to the maximum.
2 Insert your document in the automatic feeder, side
to be copied facing upwards.
- 18 -
3 - Getting to know the machine
MF 5990 - Agoris M943
if you have recorded your fingerprint in your user account (see Personalising your user account /
fingerprint), place your reference finger on the fingerprint reader and slide it slowly downwards.
When identification is successful, the machine allows you
to access the function requested or performs the action in
progress.
If identification fails, the machine displays an explanatory
message (insufficient rights, unknown account, etc.). In
this case, consult your machine administrator to check the
validity of your identification.
•
Setting
Description
NO
Multiple Scan deactivated.
The machine operates a single
scanning operation.
Before sending, the machine checks
for the presence of paper in the
document feeder.
If a document is detected, the scan
is launched from the autofeed
scanner.
If no document is present in the
document feeder, the scan is
launched from the flatbed scanner.
Once the scan is complete, the
machine sends the document.
YES
Logging in or out of your user account
When the use of or access to a function requires rights,
the machine displays the identification screen. If the
machine is unused for a certain time, defined by the
security level in your user account, you are automatically
logged out.
However, you may manually force the connection or
disconnection from your user account.
To login manually:
1 Press MENU.
2 Press [OTHER COMMANDS] > IDENTIFICATION
> LOGIN.
Multiple Scan activated.
The machine allows you to repeat
the scanning operations, and scan
several groups of documents.
Before sending, the machine checks
for the presence of paper in the
document feeder.
If a document is detected, the scan
is launched from the autofeed
scanner.
If no document is present in the
document feeder, the scan is
launched from the flatbed scanner.
Once the scan is complete, a
message is displayed asking you to
accept or refuse scanning of
additional pages.
1 retrieve the previously
scanned document.
2 Place the next document in the
scanner of your choice.
3 Accept the additional scan.
4 Once the document scan is
complete, refuse the scanning
of additional pages.
The machine then sends the
scanned document.
The machine displays the identification screen.
To log out manually:
1 Press MENU.
2 Press [OTHER COMMANDS] > IDENTIFICATION
> LOG OFF.
The machine disconnects you from your user account.
Personalising your user account /
fingerprint
Your user account is created by the machine
administrator, who will inform you of your 4-digit user
code.
You can personalise some information:
Logging in on the machine
Depending on the machine configuration, access to
functions may require logging in with a user code or by
fingerprint reading. This information is defined in your
user account by the machine administrator.
For your login information and user rights attributed to
you, consult your machine administrator.
When a function (e.g.: copy, scan, etc.) or access to a
function requires authorisation, a login screen is
displayed.
To login in under your user account:
• enter your 4-digit user code using the virtual keyboard
or the keypad.
- 19 -
Information
Description
Code
The 4-digit code for your user
account. This code is unique and
personal.
Note: only the administrator can
modify the user code.
Name
This information is optional, and
may be useful to rapidly identify
your work, especially in the print
queue.
3 - Getting to know the machine
MF 5990 - Agoris M943
Information
Description
Email
Address
Enter your email address if you
wish to receive your fingerprint by
email. You may then send
documents securely from your
computer for printing by attaching
your fingerprint (see Secure
printing [ 60]).
Each time your email is changed,
the machine automatically sends
you your fingerprint if it is
recorded.
Fingerprint
This action allows you to record
the fingerprint of one of your
fingers (reference finger), and use
this identification method on the
machine.
Note: you are free to use either
your 4-digit user code or your
fingerprint to identify you.
If you have entered your email
address, the machine
automatically sends you your
fingerprint.
Each time your fingerprint is
changed, the machine
automatically sends you the
updated fingerprint if you have
entered your email address.
3 - Getting to know the machine
MF 5990 - Agoris M943
To personalise your user information:
1 Press MENU.
2 Press [OTHER COMMANDS] > IDENTIFICATION
> PERSONAL DATA.
The machine displays the identification screen.
3 Enter your 4-digit user code using the virtual keyboard or the keypad.
The consultable / customisable information in
your user account appears on the screen.
4 To personalise your user account name, press
NAME. Enter the name using the virtual keyboard.
key to delete
In the event of an error, use the
a character. Press OK to confirm.
5 To enter your email address, press EMAIL
ADDRESS Enter your email address using the virtual keyboard. In the event of an error, use the
key to delete a character. Press OK to confirm.
6 To enter your fingerprint, press FINGERPRINT
Place the finger you will always use, your reference
finger, on the fingerprint reader and slide it slowly
downwards. The machine informs you when the
option is successful.
If you have entered your email address, the machine automatically sends you your fingerprint.
7 When you have made the modifications, press
MENU to return to the home screen.
- 20 -
Configuring the
machine and the
services
•
•
the site will only accept 1 active session per user connected.
some operations may be cancelled if they are already
being executed by another connected user.
General settings
Date/Time Settings
User rights
Note
Note
Access to functions depends on your user
rights. To know which rights you have, consult your machine administrator.
The date and the time can be set automatically if an SNTP server is present on the
network. For more information, consult the
section Configuring the SNTP server [ 36].
Printing out the guide to functions
Print out the guide to functions to familiarize yourself with
the machine's available functions and the structure of the
menus.
To print out the guide to functions:
1 Press MENU.
2 Select REPORTS > GUIDE.
The machine prints out the guide to functions.
Setting the date and the time
At any time, you can edit the machine's date and time.
1 Press MENU.
2 Select SETTINGS > GENERAL > DATE AND
TIME.
3 Select TIME to set the machine time.
4 Enter the time using the virtual keyboard. Use the
and
Remote configuration
You can configure and consult the same parameters
remotely as those used locally.
Prerequisites
To be able to remotely configure the terminal, you should:
• have a web browser on your PC (Internet Explorer version 5 or later for optimal operation).
• define the parameters of the machine's local network IP address, local address filter, etc. (see Network
characteristics).
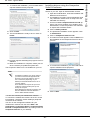
Accessing the integrated web server
1 Open a browser with the PC that is registered on
the network.
2 Enter the machine's IP address in the address field
and confirm by pressing Enter.
3 When the home page opens, select the interface
language.
4 Change the required parameters on the screen and
confirm.
User rights
Note
Access to functions depends on your user
rights. To know which rights you have, consult your machine administrator.
keys to pass from one character to the
next. In the event of an error, use the
key to
delete a character. Press OK to confirm the new
setting.
5 Select DATE to set the machine date.
6 Enter the date using the virtual keyboard. Use the
and
keys to pass from one character to the
next. In the event of an error, use the
key to
delete a character. Press OK to confirm the new
setting.
7 Press MENU to return to the home screen.
Personalizing the date and time format
You can modify the display format of the date and time to
your needs.
1 Press MENU.
2 Select SETTINGS > COMFORT > DATE/TIME.
3 Select TIME FORMAT.
4 Select the required format from the list. Press OK
to confirm the new setting.
5 Select DATE FORMAT.
6 Select the required format from the list. Use the up
and down arrows to scroll through the available formats. Press OK to confirm the new setting.
7 Press MENU to return to the home screen.
If user rights management is activated, and if access to
the web server is restricted only to authorized user
accounts:
• the site will only accept a maximum of 5 users connected at once.
- 21 -
4 - Configuring the machine and the services
MF 5990 - Agoris M943
Setting winter / summer time
You can activate automatic management of winter and
summer time. The time will be changed automatically on
the last Sunday in March for the switchover to summer
time (+1hr) and the last Sunday in October for the
switchover to winter time (-1hr).
To activate the automatic time change:
1 Press MENU.
2 Select SETTINGS > COMFORT > DATE/TIME.
3 Press AUTO ADJUST.
4 Select the required status from the list. Press OK to
confirm the new setting.
5 Press MENU to return to the home screen.
Defining the time zone
To define the time zone:
1 Press MENU
2 Select SETTINGS > COMFORT > DATE/TIME.
3 Press TIME ZONE.
4 Select the time zone from the list. Use the up and
down arrows to view all available time zones.
5 Press OK to confirm the new setting.
6 Press MENU to return to the home screen.
Geographic Settings
These parameters enable you to use your machine in the
various pre-configured countries and in various
languages.
By choosing a country, the following are reset:
• the public telephone network parameters;
• the machine's default language;
• the type of virtual keyboard;
• the display format for the date and time.
To define the country:
1 Press MENU.
2 Select SETTINGS > GENERAL >
GEOGRAPHICAL > COUNTRY.
3 Select the required country from the list. Use the up
and down arrows to scroll through the available
countries. Press OK to confirm the new setting.
4 Press MENU to return to the home screen.
This parameter enables you to specify manually the type
of public telephone network for a country, so that your
machine can communicate on the public telephone
network of the selected country in accordance with the
standards in force.
Defining the language
You can define two favourite languages to display the
machine menus. To choose these two languages from the
home screen, press LANGUAGE.
By default, when configuring the country, the preferred
languages are defined automatically.
1 Press MENU.
2 Select SETTINGS > GENERAL >
GEOGRAPHICAL > FIRST LANGUAGE.
3 Select the required language from the list. Use the
up and down arrows to scroll through the available
options. Press OK to confirm the new setting.
4 Press SECOND LANGUAGE.
5 Select the required language from the list. Use the
up and down arrows to scroll through the available
options. Press OK to confirm the new setting.
6 Press MENU to return to the home screen.
Defining the virtual keyboard
Defining the country
Defining the telecommunication network
By default, when configuring a country, the type of public
telephone network to be used in the country concerned is
defined automatically.
1 Press MENU.
2 Select SETTINGS > GENERAL >
GEOGRAPHICAL > PHONE TYPE.
3 Select the required option from the list. Use the up
and down arrows to scroll through the available options. Press OK to confirm the new setting.
4 Press MENU to return to the home screen.
This parameter is used to define the type of virtual
keyboard to be displayed on the screen depending on the
country where the machine is used.
By default, when configuring the country, the type of
virtual keyboard is automatically defined.
1 Press MENU.
2 Select SETTINGS > GENERAL >
GEOGRAPHICAL > KEYBOARD.
3 Select the required country from the list. Press OK
to confirm the new setting.
4 Press MENU to return to the home screen.
Switching the machine to standby
Immediate standby
It is possible to switch the machine to standby instantly
from the home screen by pressing the STANDBY button.
The message SWITCH TO STANDBY is displayed in the
central frame of the home screen, the machine instantly
switches to standby and the screen switches off
automatically.
- 22 -
4 - Configuring the machine and the services
MF 5990 - Agoris M943
Note
Some operations may prevent the machine
from immediately switching to standby. For
example, if printing is in progress or if the
machine is accessing data on a USB key.
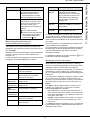
Planned standby
This parameter is used to set all documents printed on the
machine by default to Duplex printing.
1 Press the MENU key.
2 Select SETTINGS > ECO > ECO PAPER.
3 Select the required option from the list. Press OK to
confirm the new setting.
By default, the machine is set to NO.
Option
Description
YES
All printing is set by default to
Duplex mode.
NO
Each print job takes its default
configuration value
Toner saving
This parameter is used to reduce the quantity of toner
consumer by all the machine's print-outs.
1 Press the MENU key.
2 Select SETTINGS > ECO > ECO TONER.
3 Select the required option from the list. Press OK to
confirm the new setting.
By default, the machine is set to NO.
Note
To avail of the energy saving modes in PC
printing, a version of the software Companion Suite Pro LH2 greater than or equal to
v1.2 must be used.
Energy saving
This parameter sets the switching of the machine to
standby to its lowest setting of 5 minutes.
1 Press the MENU key.
2 Select SETTINGS > ECO > ECO ENERGY.
3 Select the required option from the list. Press OK to
confirm the new setting.
By default, the machine is set to NO.
The machine switches to standby
after 5 minutes (lowest setting).
The time before the machine
switches to standby corresponds
to the value chosen in the
planned standby setting (see
Planned standby [ 23]).
4 Press MENU to return to the home screen.
You can activate various economy modes on the
machine:
• Energy saving,
• Paper saving,
• Toner saving,
• Easy saving.
YES
NO
Paper saving
Economy mode settings
Description
Description
4 Press MENU to return to the home screen.
This function is used to activate machine standby when it
is not in use. The time to switch the machine to standby
can be immediate or several minutes according to your
needs.
1 Press MENU.
2 Select SETTINGS > COMFORT > ENERGY
SAVING.
3 Press TIMEOUT.
4 Select the required option from the list. Press OK to
confirm the new setting.
5 If you have selected PROGRAMMING, enter the
parameters START TIME and END TIME with the
start and end times of the standby time range.
Press OK to confirm the new setting.
6 Press MENU to return to the home screen.
Option
Option
Option
Description
YES
The quantity of toner used is
reduced. The print-outs are
lighter.
NO
Printing with toner saving is
deactivated.
4 Press MENU to return to the home screen.
Easy saving
This function activates the parameters ECO ENERGY,
ECO PAPER and ECO TONER to their best value in
terms of electricity, paper and ink consumption.
1 Press the MENU key.
2 Select SETTINGS > ECO > EASY SAVE.
3 Select the required option from the list. Press OK to
confirm the new setting.
By default, the machine is set to NO.
- 23 -
4 - Configuring the machine and the services
MF 5990 - Agoris M943
Option
Description
YES
The 3 parameters are set to YES .
NO
Each parameter conserves its
previous value.
Key
Move the list up 10 parameters at a
time at each press.
Move the list down 1 parameter at a
time at each press.
4 Press MENU to return to the home screen.
Move the list down 10 parameters at
a time at each press.
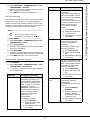
Ergonomics
5 Press the parameter to select it. It becomes blue.
6 Press the forward or recede key to move the parameter in the list and reorder it as you want.
7 Press the OK button to confirm the new layout of
the buttons.
Choosing the layout of menu and parameter
buttons
You can configure the layout of the parameter buttons of
the following functions:
• MENU,
• FAX,
• SCAN,
• COPY.
All parameters in each function can be ordered differently
as the user requires.
Return to the previous function
1 Press MENU.
2 Select SETTINGS > COMFORT > RETURN
FUNCTION.
3 Select the required option from the list. Press OK to
confirm the new setting.
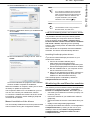
Configuring the layout of buttons
To configure the layout of menu buttons and their
parameters, proceed as follows:
1 Press the MENU key.
2 Select SETTINGS > MyMFP.
3 Press the button whose parameters you want to reorder.
Button
Description
MENU
Access the list of all parameters
for the button MENU for
reordering.
COPY
Access the list of all parameters
for the button FAX for reordering.
SCAN
Access the list of all parameters
for the button SCAN for
reordering.
RESET
Reset the order of menus and
their parameters to their default
configuration.
Press OK to confirm the return
to default layout.
Description
WITHOUT
At the end of a user operation, the
machine returns to the home
screen.
MODERATE
The machine returns to the home
screen after the machine has not
been used for a few minutes.
ALWAYS
The machine displays the settings
screen for the last function used
(copy, fax, scanning).
Perfume Setting
4 Browse through the list to select the parameter you
want to reorder using the keys available:
Key
Option
4 Press MENU to return to the home screen.
Access the list of all parameters
for the button COPY for
reordering.
FAX
Action
The perfume unit is an option enabling you to install a
perfume diffuser on the machine. When this option is
activated, the machine diffuses perfume every hour, and
for a period of time defined by you.
By default, the machine does not recognize the perfume
unit installed (set in WITHOUT).
To activate this option, you just need to configure the
setting PERFUME to the diffusion length of your choice.
Note that the longer the diffusion time, the more the
perfume is pronounced, and the shorter the lifespan of the
perfume unit.
1 Press MENU.
2 Select SETTINGS > COMFORT > PERFUME.
3 Select the required option from the list. Press OK to
confirm the new setting.
Action
Move the list up 1 parameter at a
time at each press.
- 24 -
4 - Configuring the machine and the services
MF 5990 - Agoris M943
Option
Description
WITHOUT
The perfume unit option is
deactivated.
LIGHT
The perfume unit option is
activated, with a light diffusion
time.
LOW
The perfume unit option is
activated, with a low diffusion
time.
MODERATE
The perfume unit option is
activated, with a moderate
diffusion time.
HIGH
The perfume unit option is
activated, with a high diffusion
time.
To define the paper format for
the...
secondary tray
1 Press TRAY 2.
2 Select the required format
from the list.
3 Press OK to confirm.
additional tray(s)
1 Press TRAY 3 or TRAY 4.
2 Select the required format
from the list.
3 Press OK to confirm.
4 Press MENU to return to the home screen.
Defining the paper type
1 Press the MENU key.
2 Select PAPER > TYPE.
3 Define the paper type for each tray on the machine.
To choose the right type of paper to use, consult
the section Recommendations for paper [ 139].
4 Press MENU to return to the home screen.
Default world
This parameter allows to define the default active function
of the machine (Fax, Copy or Scan To). The idle screen
of the function is displayed when one key of the control
panel is pressed.
To define the paper type for the...
1. Press MENU.
3. Select the required option from the list. Press OK to
confirm the new setting.
1 Press TRAY 1.
2 Select the required paper
type from the list.
3 Press OK to confirm.
secondary tray
1 Press TRAY 2.
2 Select the required paper
type from the list.
3 Press OK to confirm.
additional tray(s)
1 Press TRAY 3 or TRAY 4.
2 Select the required paper
type from the list.
3 Press OK to confirm.
4. Press MENU to return to the home screen.
Paper settings
The machine automatically detects standard paper
formats. You may however use this setting to check and/
or specify the paper type and format in each paper tray.
Defining the paper format
4 Press MENU to return to the home screen.
1 Press the MENU key.
2 Select PAPER > FORMAT.
3 Define the paper format for each tray on the machine. To select the right format of paper to use,
consult the section Which paper formats can be
used [ 139].
main tray
then...
main tray
2. SETTINGS > COMFORT > DEFAULT WORLD
FAX.
To define the paper format for
the...
then...
then...
1 Press TRAY 1.
2 Select the required format
from the list.
3 Press OK to confirm.
Scanner / Printer Settings
Scanner / Printer paper format
The paper format defined in this menu becomes the
default format of the main printing paper tray and the
flatbed scanner.
1 Press MENU.
2 Select SETTINGS > SCANNER/PRINTER >
PAPER FORMAT.
3 Select the required format from the list: A4 or LETTER. Press OK to confirm the new setting.
4 Press MENU to return to the home screen.
- 25 -
4 - Configuring the machine and the services
MF 5990 - Agoris M943
Adjusting Scanner / Printer margins
Parameters
If you notice an offset between the printer and the
scanner, correct the margins (expressed in pixels)
according to the reference paper specified in SETTINGS
> SCANNER/PRINTER > PAPER FORMAT.
To correct and adjust the scanner / printer margins:
1 Press MENU.
2 Select SETTINGS > SCANNER/PRINTER >
ADJUSTMENTS.
3 Make the necessary adjustment(s).
Setting
Description / Procedure
Printer top margin
Press TOP PRINTER.
Enter an offset value of between
-100 and +100.
Press OK to confirm.
Printer left margin
Press LEFT PRINTER.
Enter an offset value of between
-100 and +100.
Press OK to confirm.
Flatbed scanner
top margin
Press TOP FB SCANNER.
Enter an offset value of between
-100 and +100.
Press OK to confirm.
Flatbed scanner
left margin
Press LEFT FLATBED
SCANNER.
Enter an offset value of between
-100 and +100.
Press OK to confirm.
Autofeed scanner
top margin
Press HIGH TOP SCANNER.
Enter an offset value of between
-100 and +100.
Press OK to confirm.
Autofeed scanner
left margin
FONTS
This parameter is used to draw
up the set of symbols. The
possible values are between
CS1 and CS30 included. The
default value is CS1 (Roman8).
FONT NUMBER
Start printing the list of fonts.
This parameter can be used to
set the default PCL font. The
possible values are between 1
and 77 included. The default
value is 1.
LINES PER PAGE This parameter is used to set the
number of lines per page.
This variable is linked to the PJL
variables: PAPER and
ORIENTATION. If you change
one of these variables, the Line
format variable is automatically
updated (only for the current
print task) in order to respect the
same spacing.
The possible values are
between 5 and 128 included.
The default value is 60.
FONT SPACING
This parameter is used to set the
default font spacing in
characters per inch (the default
font must be non-proportional).
The possible values are
between 0.44 and 99.99
included. The default value is
10.00.
FONT SIZE
This parameter is used to set the
default font height, in points (the
default font must be
proportional). The possible
values are between 4.00 and
999.75 (in intervals of 0.25). The
default value is 12.00.
ORIENTATION
This parameter is used to set the
page orientation: portrait or
landscape. The default value is
"portrait".
DUPLEX
This parameter is used to print
duplex. By default, printing is
done in duplex.
BINDING EDGE
This parameter is used to print
duplex on the long edge or the
short edge. The default value is
"long".
Press LEFT ADF SCANNER.
Enter an offset value of between
-100 and +100.
Press OK to confirm.
4 Press MENU to return to the home screen.
PC printing parameters
To personalize PC printing parameters:
1 Press the MENU key.
2 Select SETTINGS > SCANNER/PRINTER > PC
PRINT.
3 Make the necessary adjustment(s).
Parameters
Description / Procedure
TONER SAVE
Lightens printing to save toner
cartridge ink.
TASK DELAY
Waiting time for data from the
PC before the PC print task is
cancelled.
Description / Procedure
- 26 -
4 - Configuring the machine and the services
MF 5990 - Agoris M943
Fax Settings
Parameters
OVERRIDE A4/
LETTER
Description / Procedure
YES: This parameter allows a
document in Letter format to be
printed on A4 paper.
NO: This parameter does not
allow a document in Letter
format to be printed on A4
paper.
The default value is "yes".
Defining the machine name and phone
number
Your machine enables you to print the saved number and
name on all faxes emitted.
Note
4 Press MENU to return to the home screen.
To use this function, you must set the parameter HEADER on YES (see Advanced fax
emission settings [ 29]).
Default paper tray
This parameter allows to define the default paper tray of
the machine. All printing operations on the machine will
use this tray (Copy, fax reception, printing report,...). The
machine never switches to another tray except for PC
printing requirement. In this case, the user can choose
another tray from the printing driver.
To define the default paper tray:
1 Press MENU.
2 Select SETTINGS > SCANNER/PRINTER >
PAPER TRAY.
3 Select the required option from the list. Press OK to
confirm the new setting.
Parameters
Tray 1 is used by default, then
tray 2, then tray 3 and tray 4.
TRAY 1
Tray 1 is used for all operations
performed on the machine. The
machine never switches to
another tray except for PC
printing requirement.
TRAY 3 (if
installed)
TRAY 4 (if
installed)
Defining the machine name
To record the name of the machine:
1 Press the MENU key.
2 Select SETTINGS > GENERAL > FAX > NAME
LINE 1.
3 Enter the machine's name using the virtual keyboard. Use the and keys to pass from one character to the next. In the event of an error, use the
Description
AUTOMATIC
TRAY 2
If you have the dual-line model, you can specify a name
and number for each of the telephone lines. The machine
will print the name and number of the line used on sent
faxes.
key to delete a character. Press OK to confirm the new setting.
4 If you have the dual-line model, press NAME LINE
2 to enter the name of telephone line 2 (L2) on the
machine, and enter the desired name using the virtual keyboard. Press OK to confirm the new setting.
Note
Tray 2 is used for all operations
performed on the machine. The
machine never switches to
another tray except for PC
printing requirement.
Tray 3 is used for all operations
performed on the machine. The
machine never switches to
another tray except for PC
printing requirement.
Tray 4 is used for all operations
performed on the machine. The
machine never switches to
another tray except for PC
printing requirement.
If the name of telephone line 2 (L2) is not
defined, the name of telephone line 1 (L1) is
used by default.
5 Press MENU to return to the home screen.
Defining the machine phone number
To record the number of the machine:
1 Press the MENU key.
2 Select SETTINGS > GENERAL > FAX > PHONE
NUMBER LINE 1.
3 Enter the number using the virtual keyboard. Use
the
and
keys to pass from one character to the
next. In the event of an error, use the
key to
delete a character. Press OK to confirm the new
setting.
4 Press MENU to return to the home screen.
- 27 -
4 - Configuring the machine and the services
MF 5990 - Agoris M943
4 If you have the dual-line model, press PHONE
NUMBER LINE 2 to enter the number of telephone
line 2 (L2) on the machine, and enter the dedicated
number using the virtual keyboard. Press OK to
confirm the new setting.
Note
If the number of telephone line 2 (L2) is not
defined, the number of telephone line 1 (L1)
is used by default.
Fax prefix
To define the fax prefix:
1 Press the MENU key.
2 Select SETTINGS > COMMUNICATION > FAX >
TRANSMISSION > PREFIXES.
3 Press PREFIX LINE 1.
4 Enter the local prefix associated with telephone line
1 (maximum 10 characters) using the virtual keyboard. Use the and keys to pass from one character to the next. In the event of an error, use the
5 Press MENU to return to the home screen.
key to delete a character. Press OK to confirm the new setting.
5 If you have the dual-line model, press PREFIX
LINE 2 to define the fax prefix for telephone line 2
(L2) on the machine, and enter the local prefix associated with telephone line L2 using the virtual
keyboard. Press OK to confirm the new setting.
6 Press MENU to return to the home screen.
Fax emission settings
Local prefix
This function is used when your machine is installed in a
private network, behind a company telephone
switchboard. It enables you to set automatic dialling of a
local prefix (to be defined), allowing the call to leave the
company telephone network, on the condition that:
• the company extension numbers, for which the prefix
is useless, are short numbers less than the minimum
length (for example 10 digits in France).
• the external numbers, for which the prefix is obligatory,
are long numbers greater than or equal to the minimum length (for example 10 digits in France).
There are two steps for configuring the machine's local
prefix:
1. define the minimum (or equal) length for telephone
numbers outside the company;
Prefix for fax server
If you configure the machine to send faxes via a fax
server, you can specify in this menu the outside prefix
required for the fax server (see Configuring the fax server
(optional) [ 32]).
To define the prefix for the fax server:
1 Press MENU.
2 Select SETTINGS > COMMUNICATION > FAX >
TRANSMISSION > PREFIXES.
3 Press FAX SERVER.
4 Enter the local prefix for the fax server using the virtual keyboard. Use the and keys to pass from
one character to the next. In the event of an error,
2. define the local prefix for a line outside the company
telephone network. This prefix will be automatically
added when a number outside the company is dialled.
Note
use the
key to delete a character.
5 Press OK to confirm the new setting.
6 Press MENU to return to the home screen.
Emission report
If you define a local prefix, do not insert it in
the numbers saved in the address book: it
will be added automatically to each number.
Prefix length
To define the length of the local prefix:
1 Press MENU.
2 Select SETTINGS > COMMUNICATION > FAX >
TRANSMISSION > PREFIXES.
3 Press LENGTH.
4 Enter the length of the local prefix (between 1 and
10) using the virtual keyboard. Use the and
keys to pass from one character to the next. In the
event of an error, use the
key to delete a character. Press OK to confirm the new setting.
5 Press MENU to return to the home screen.
You can print out an emission report for communications
made via the telephone network.
You can choose between several criteria for printing out
emission reports:
• WITH : a report is printed when the emission was successful or when it is definitively abandoned (but there
is only one report per emission request);
• WITHOUT: no emission report, but the machine records all emissions made in its emissions log;
• SYSTEMATIC: a report is printed at each emission attempt;
• ON FAILURE: a report is printed only when the emission attempts have ended in failure and the emission
request is definitively abandoned.
A reduced image of the first page of the document is
automatically associated with each emission report.
To select the type of report:
1 Press MENU.
- 28 -
4 - Configuring the machine and the services
MF 5990 - Agoris M943
2 Select SETTINGS > COMMUNICATION > FAX >
TRANSMISSION > REPORT .
3 Select the required report type from the list. Press
OK to confirm the new setting.
4 Press MENU to return to the home screen.
Parameter
Description / Procedure
Emission speed
Emission speed of outgoing
documents.
If the quality of the telephone
line is good (suitable, without
echo), calls are usually made
at maximum speed.
However, it may be necessary
to limit the emission speed for
certain communications.
To change the emission
speed:
1 Press SPEED.
2 Select the required value from the list.
3 Press OK to confirm the
new setting.
Anti echo
If this function is active, the
line echo in long distance
communications will be
attenuated.
To change the status of the
Anti echo parameter:
1 Press ANTI ECHO.
2 Select the required status.
3 Press OK to confirm the
new setting.
Overseas
For some long distance calls
(satellites), the line echo may
make communication difficult.
To change the status of the
Overseas parameter:
1 Press OVERSEAS.
2 Select the required status.
3 Press OK to confirm the
new setting.
Number of call
backs
Number of attempts to be
made by the machine if
emission fails.
To change the number of call
backs:
1 Press ATTEMPTS
NUMBER.
2 Enter the number of call
backs the machine
should make using the
virtual keyboard.
3 Press OK to confirm the
new setting.
Fax TX forwarding
This function is used to set the machine to send a copy of
any document sent (by fax or to an email address) to
another recipient. The recipient should be chosen from
the entries in the machine's address book. It may be a fax
number, an email address or an FTP address.
Note
Check that the recipient exists in the
address book (see Address book [ 79]).
1 Press MENU.
2 Select SETTINGS > COMMUNICATION > FAX >
TRANSMISSION > COPY.
3 Press ACTIVATION.
4 Select the required option from the list. Press OK to
confirm the new setting.
5 Press RECIPIENT.
6 Select the required recipient from the entries in the
address book. Press OK to confirm the new setting.
7 Press MENU to return to the home screen.
Advanced fax emission settings
1 Press MENU.
2 Select SETTINGS > COMMUNICATION > FAX >
TRANSMISSION > ADVANCED.
3 To configure the advanced fax emission settings,
use the table below:
Parameter
Description / Procedure
Emission heading If this function is active, all
documents received by your
correspondents will be printed
with heading containing your
name, number, the date and
the number of pages.
Important: If you send a fax
from a document feeder, the
emission heading will not
appear on the document
received by your
correspondent.
To change the setting:
1 Press HEADER.
2 Select the required statusfrom the list.
3 Press OK to confirm the
new setting.
- 29 -
4 - Configuring the machine and the services
MF 5990 - Agoris M943
Parameter
Description / Procedure
Interval between
call backs
Time between two machine
call back attempts.
To change the time between 2
call backs:
1 Press ATTEMPT TIME.
2 Enter the time between
2 call back attempts
made by the machine
using the virtual keyboard.
3 Press OK to confirm the
new setting.
4 Enter the number of copies to be printed by the machine for each document received. Press OK to
confirm the new setting.
5 Press MENU to return to the home screen.
Printing with toner saving
This parameter is used to reduce the quantity of toner
consumed when printing received documents.
To activate toner saving printing:
1 Press MENU.
2 Select SETTINGS > COMMUNICATION > FAX >
RECEPTION > PRINT.
3 Press TONER SAVE.
4 Select the required status from the list. Press OK to
confirm the new setting.
5 Press MENU to return to the home screen.
4 Press MENU to return to the home screen.
Fax reception settings
Duplex printing
Print settings for received faxes
Note
Some parameters also apply to printing of
received emails.
Secure printing of received faxes
By default, the machine is configured to print all
documents received automatically.
However, you may configure the machine to keep
confidential faxes in the memory and not print them out
systematically on reception.
To configure secure printing of faxes received:
1 Press MENU.
2 Select SETTINGS > COMMUNICATION > FAX >
RECEPTION > PRINT.
3 Press PRINT HELD.
4 Select the required status from the list. Press OK to
confirm the new setting.
5 Press MENU to return to the home screen.
When secure printing of faxes received is active, users
wishing to retrieve a document in the memory must
manually force printing from the machine's print queue
(see Printing received faxes in the memory [ 56]).
Number of copies
You can print several copies (1 to 99) of documents
received.
To set the number of copies of each document received:
1 Press MENU.
2 Select SETTINGS > COMMUNICATION > FAX >
RECEPTION > PRINT.
3 Press NUMBER OF COPIES.
This parameter is used to activate duplex printing of
documents received.
To activate duplex printing:
1 Press MENU.
2 Select SETTINGS > COMMUNICATION > FAX >
RECEPTION > PRINT.
3 Press DUPLEX.
4 Select the required option. Press OK to confirm the
new setting.
5 Press MENU to return to the home screen.
Binding
If you have configured duplex printing of documents
received, you can define the type of binding of printed
sheets (see Binding [ 49]).
To configure the type of binding:
1 Press MENU.
2 Select SETTINGS > COMMUNICATION > FAX >
RECEPTION > PRINT.
3 Press BINDING EDGE.
4 Select the required option. Press OK to confirm the
new setting.
5 Press MENU to return to the home screen.
Printing of images
This parameter is used to define the print format of image
files (JPEG) inserted as attachments in received emails.
The print formats are as follows:
- 30 -
Format
Description
PHOTO
Classic 10x15 cm photo printing
FULL PAGE
Print adjusted to page format
used.
4 - Configuring the machine and the services
MF 5990 - Agoris M943
To specify the print format of photos received:
1 Press MENU.
2 Select SETTINGS > COMMUNICATION > FAX >
RECEPTION > PRINT.
3 Press IMAGE SIZE.
4 Select the required option. Press OK to confirm the
new setting.
5 Press MENU to return to the home screen.
Selecting the paper tray
This parameter is used to specify the paper tray to be
used to print out received documents.
To select the paper tray:
1 Press MENU.
2 Select SETTINGS > COMMUNICATION > FAX >
RECEPTION > PRINT.
3 Press PAPER OUTPUT.
4 Select the required option. Press OK to confirm the
new setting.
5 Press MENU to return to the home screen.
Note
This menu is only available if a PC is registered on the machine via the PC Kit.
1 Press PC RECEIVER.
2 Select the reception PC.
3 Press OK to confirm the new setting.
When a fax is received on the machine, it is sent to the
receiving PC and a reception report is printed on the
PC's default printer.
Fax RX forwarding
This function is used to set the terminal so that any
document received is also sent to another recipient. The
recipient should be chosen from the entries in the
machine's address book.
Note
Check that the recipient exists in the
address book (see Address book [ 79]).
Selecting the paper type
This parameter is used to specify the type of paper to be
used to print out received documents, in accordance with
the paper loaded in the paper tray defined as the output
tray (see Selecting the paper tray [ 31]).
To select the type of paper:
1 Press MENU.
2 Select SETTINGS > COMMUNICATION > FAX >
RECEPTION > PRINT.
3 Press PAPER TYPE.
4 Select the required option. Press OK to confirm the
new setting.
5 Press MENU to return to the home screen.
1 Press MENU.
2 Select SETTINGS > COMMUNICATION > FAX >
RECEPTION > COPY.
3 Press ACTIVATION.
4 Select the required status from the list. Press OK to
confirm the new setting.
5 Press RECIPIENT.
6 Select the required recipient from the entries in the
address book. Press OK to confirm the new setting.
7 Press MENU to return to the home screen.
Advanced fax reception settings
Fax or PC reception mode
1 Press MENU.
2 Select SETTINGS > COMMUNICATION > FAX >
RECEPTION > ADVANCED.
3 To configure the advanced fax emission settings,
use the table below:
This menu associated with the PC Kit software installed
on your computer is used to select which device receives
the documents:
• the machine,
• the PC,
• the PC if available, otherwise the machine.
For more information, consult the section PC functions
[ 85].
To select the reception mode:
1 Press MENU.
2 Select SETTINGS > COMMUNICATION > FAX >
RECEPTION > PC MANAGEMENT.
3 Press MODE.
4 Select the required option from the list.
5 Press OK to confirm the new setting.
To select the PC that will receive the documents:
- 31 -
Parameter
Description / Procedure
Reception
heading
If this function is active, all
documents received by the
machine will be printed with a
heading containing the name
and number of the sender (if
available) and the machine
print date and the number of
pages.
To change the setting:
1 Press HEADER.
2 Select the required status from the list.
3 Press OK to confirm the
new setting.
4 - Configuring the machine and the services
MF 5990 - Agoris M943
4. Define the domain name [ 32].
Parameter
Description / Procedure
Reception speed
Reception speed of incoming
documents. If the quality of the
telephone line is good
(suitable, without echo), calls
are usually made at maximum
speed.
However, it may be necessary
to limit the reception speed for
certain communications.
To change the reception
speed:
1 Press SPEED.
2 Select the required value from the list.
3 Press OK to confirm the
new setting.
Number of rings
5. Define the type of emission report [ 33].
Activating the fax server
To activate the fax server:
1 Press ACTIVATION.
2 Select the required option.
Parameter
Description
DIRECT (fax
server activated)
The machine sends
documents to the fax server
over the local network.
DISABLE
The machine sends directly
documents over the telephone
line.
3 Press OK to confirm the new setting.
Number of rings to
automatically trigger your
machine.
To change the number of
rings:
1 Press NUMBER OF
RINGS.
2 Enter the number of
rings using the virtual
keyboard.
3 Press OK to confirm the
new setting.
Defining a reply address
The reply address is used to receive emission and
reception reports for faxes managed by the fax server.
1 Press SENDER ADDRESS.
2 Enter the required email address using the virtual
keyboard. Use the and keys to pass from one
character to the next. In the event of an error, use
the
key to delete a character.
3 Press OK to confirm the new setting.
4 Press MENU to return to the home screen.
Defining the fax server address
Configuring the fax server (optional)
If you have a fax server, this function enables you to
select how faxes will be sent by the machine: direct
transmission via the telephone line (without passing
through a fax server) or transmission to the fax server via
the local network.
Accessing the fax server configuration parameters
1 Press MENU.
2 Select SETTINGS > COMMUNICATION > FAX >
FAX SERVER.
3 Make the required adjustments using the procedures described below.
4 When you have made the modifications, press
MENU to return to the home screen.
If the fax server function is active, proceed as follows:
To prevent any interruptions of service, you can define
two fax servers to be used:
• NETWORK 1 ADDRESS: main fax server.
• NETWORK 2 ADDRESS: backup fax server, to be
used if the connection with the main fax server fails.
To define the main fax server address:
1 Press NETWORK 1 ADDRESS.
2 Enter the IP address for the fax server using the virtual keyboard. Use the and keys to pass from
one character to the next. In the event of an error,
use the
key to delete a character.
3 Press OK to confirm the new setting.
To define the address of the backup fax server, press
NETWORK 2 ADDRESS and enter its IP address.
Defining the domain name
Note
1 Press DOMAIN.
2 Enter the domain name for the machine using the
Activating the fax server function automatically activates the SMTP server (see
Configuring the SMTP server [ 37]).
virtual keyboard. Use the and keys to pass from
one character to the next. In the event of an error,
1. Activate the fax server [ 32].
use the
key to delete a character.
3 Press OK to confirm the new setting.
2. Define a reply address [ 32].
3. Define the fax server address [ 32].
- 32 -
4 - Configuring the machine and the services
MF 5990 - Agoris M943
Defining the type of emission report
You can print out an emission report for communications
made via the fax server.
You can choose between several criteria for printing out
emission reports:
• WITH : a report is printed when the emission was successful or when it is definitively abandoned (but there
is only one report per emission request);
• WITHOUT: no emission report, but the machine records all emissions made in its emissions log;
• ON FAILURE: a report is printed only when the emission attempts have ended in failure and the emission
request is definitively abandoned. A report is also
printed when the fax is sent using the telephone foldback.
To select the type of emission report:
1 Press SENDING REPORT.
2 Select the required report type from the list.
3 Press OK to confirm the new setting.
Advanced fax settings
Line parameters
This parameter is used to adapt the telephone line
according to the type of telephone switchboard to which
your machine is connected.
Two choices are possible:
• DECIMAL: for a digital dialling switchboard (electromechanical switchboards).
• MUSICAL: for a dial tone switchboard (electronic
switchboards).
To define the type of switchboard:
1 Press the MENU key.
2 Select SETTINGS > COMMUNICATION > FAX >
ADVANCED.
3 Press L1 DIALING.
4 Select the type of telephone switchboard for telephone line L1 from the list. Press OK to confirm the
new setting.
5 If you have the dual-line model, press L2 DIALING
to define the type of switchboard for the telephone
line 2 (L2) of the machine, and select the required
option. Press OK to confirm the new setting.
6 Press MENU to return to the home screen.
Type of telephone network
You can connect your machine to a public telephone
network or to a private network built for example using a
private automatic branch exchange (PABX). You must
define the type of network you prefer.
To select the type of network:
1 Press the MENU key.
2 Select SETTINGS > COMMUNICATION > FAX >
ADVANCED.
3 Press L1 NETWORK TYPE.
4 Select the type of network required for telephone
line L1, PRIVATE or PUBLIC. Press OK to confirm
the new setting.
5 If you have the dual-line model, press L2
NETWORK TYPE to define the type of network for
the telephone line 2 (L2) of the machine, and select
the required network type. Press OK to confirm the
new setting.
6 Press MENU to return to the home screen.
Note
If your machine is connected to a private
network, behind a company exchange
(PABX), it may be necessary to specify a local prefix (see Local prefix [ 28]).
ECM (error correction mode)
This function is used to correct communication errors due
to disturbance on the telephone line. This is a useful
function when lines are of a low level or noisy. However,
emission times may be longer.
To activate or deactivate error correction:
1 Press the MENU key.
2 Select SETTINGS > COMMUNICATION > FAX >
ADVANCED.
3 Press ECM LINE 1.
4 Select the required option from the list for telephone line L1. Press OK to confirm the new setting.
5 If you have the dual-line model, press ECM LINE 2
to activate or deactivate the error correction mode
for the telephone line 2 (L2) of the machine, and select the required option. Press OK to confirm the
new setting.
6 Press MENU to return to the home screen.
Service default settings
The machine allows you to define default values for some
Copy, Fax and Scan to parameters.
The default values must be configured depending on the
habits of the people using the machine. The aim is to
reduce the time required to set common functions and
optimize their operation.
Accessing the default settings
1 Press MENU.
2 Select SETTINGS > BY DEFAULT.
3 Define the default parameters for the various functions:
For the Copy function, see Copy function default
settings.
For the Fax function, see Fax emission default
settings.
For the Scan to function, see Scan to default settings.
4 When you have made the modifications, press
MENU to return to the home screen.
- 33 -
4 - Configuring the machine and the services
MF 5990 - Agoris M943
Copy function default settings
Parameter
Available settings
QUALITY
NORMAL, FINE, SUPER FINE or
PHOTO
CONTRAST
-4, -3, -2, -1, 0, +1, +2, +3 or +4
2 Make the required adjustments. The following table
lists the available parameters.
DUPLEX
YES or NO
BINDING
EDGE
LONG or SHORT
Parameter
Available settings
PHONE LINE LINE 1 , LINE 2 or AUTOMATIC
NUMBER OF
COPIES
1 to 99
MULTIPLE
SCAN
QUALITY
SPEED, NORMAL, TEXT, TEXT
AND IMAGE or PHOTO
CONTRAST
-4, -3, -2, -1, 0, +1, +2, +3 or +4
BRIGHTNESS
-4, -3, -2, -1, 0, +1, +2, +3 or +4
TONER SAVE
YES or NO
COLLATE
COPY
YES or NO
DUPLEX
FRONT -> FRONT,
FRONT -> DUPLEX,
DUPLEX -> FRONT or
DUPLEX -> DUPLEX
BINDING
EDGE
LONG or SHORT
PAPER TYPE
NORMAL, TRANSPARENT,
THICK, FINE PAPER,
ENVELOPE or POST CARD
1 Press COPY.
The first settings appear on the screen. Use
OTHER PARAMETERS to access all available
settings.
YES or NO
3 When you have made the adjustments, press:
BY DEFAULT in the navigation path to return to
the previous menu.
MENU to return to the home screen.
Scan to default settings
1 Press SCAN TO.
2 Make the required adjustments. The following table
lists the available parameters.
Parameter
Available settings
DOCUMENT
FORMAT
IMAGE, PDF or SECURED PDF
QUALITY
LIGHT, TEXT, TEXT AND IMAGE
or PHOTO
COLOUR
YES or NO
CONTRAST
-4, -3, -2, -1, 0, +1, +2, +3 or +4
DUPLEX
YES or NO
MULTIPLE
SCAN
YES or NO
SCALE
1:1, ZOOM or FORMAT
CONVERS.
SCAN
FORMAT
A5, A4, or LETTER
PRINTED
PAPER
A5, A4, LETTER, LEGAL-14,
TRAY 1, TRAY 2, TRAY 3 or
TRAY 4
ZOOM
25 to 400% in steps of 1
MOSAIC
WITHOUT, 2 -> 1 or 4 -> 1
BY DEFAULT in the navigation path to return to
the previous menu.
BANNER
WITHOUT, 1 -> 4 or 1 -> 9
MENU to return to the home screen.
IDENTITY
CARD
YES or NO
3 When you have made the adjustments, press:
3 When you have made the adjustments, press:
BY DEFAULT in the navigation path to return to
the previous menu.
MENU to return to the home screen.
Fax emission default settings
1 Press FAX TRANSMISSION.
2 Make the required adjustments. The following table
lists the available parameters.
- 34 -
4 - Configuring the machine and the services
MF 5990 - Agoris M943
Local network settings
Note
You can include your machine in your local network.
If the machine is set to automatic configuration (see Automatic configuration of the
Ethernet network), these addresses may be
filled automatically by some DHCP servers.
Note
Although quite simple, the network settings
sometimes require expert knowledge of
your computer configuration. We recommend you consult the person in your company who administers the network to do the
configuration described in this section.
Depending on the services and security policy
implemented in your local network, other network
parameters are also available:
• network security settings (Secure IP, SSL certificate);
• configuration of the SNTP server;
• configuration of the client FTP port;
• configuration of the SNMP service;
• configuration of the SMTP server;
• Active Directory configuration;
• print server settings (RAW, LPR, IPP);
• configuration of the LDAP server.
Configuring the Ethernet network
We recommend automatic configuration of the
machine's local network settings when your local network
has a DHCP or BOOTP server that can dynamically
allocate addresses to the peripherals present on the LAN,
on the condition that the IP address allocated to the
machine is unique and always identical.
Otherwise, we recommend manual configuration.
Note
The machine is able to operate on IPv4 and
IPv6 networks.
1 Press the MENU key.
2 Select SETTINGS > COMMUNICATION > LOCAL
NETWORK > GENERAL.
3 Press 1st NETBIOS NAME or 2nd NETBIOS
NAME.
4 Enter the name using the virtual keyboard (maximum 15 characters). In the event of an error, use
the
key to delete a character. Press OK to
confirm the new setting.
5 Press MENU to return to the home screen.
Ethernet network communication speed
By default, the machine is configured to adapt its
communication speed automatically to that of the
Ethernet network. However, you can specify the
communication speed to be used on the Ethernet
network.
1 Press the MENU key.
2 Select SETTINGS > COMMUNICATION > LOCAL
NETWORK > GENERAL.
3 Press SPEED.
4 Select the communication speed required from the
options available in the list: AUTOMATIC, 100
FULL DUPLEX, 100 HALF DUPLEX, 10 FULL
DUPLEX and 10 HALF DUPLEX. Use the up and
down arrows to view all available options. Press
OK to confirm the new setting.
5 Press MENU to return to the home screen.
Automatic configuration of the Ethernet network
in IPv4
IEEE (or Ethernet address) or MAC address
The machine's Ethernet interface already contains an
IEEE address that cannot be modified, but only consulted.
1 Press the MENU key.
2 Select SETTINGS > COMMUNICATION > LOCAL
NETWORK > GENERAL.
The machine's IEEE address is displayed in the
network parameter IEEE ADDRESS.
To automatically configure the machine's local network
settings:
1 Press the MENU key.
2 Select SETTINGS > COMMUNICATION > LOCAL
NETWORK > IPV4.
3 Press ADDRESS ALLOCATION.
4 Select AUTOMATIC from the options available in
the list. Press OK to confirm the new setting.
The machine will search for a DHCP or BOOTP
server on the local network that can dynamically
allocate its network settings.
3 Press MENU to return to the home screen.
NetBIOS names
This operation may take a few minutes.
NetBIOS names, which can be used with network options,
are used to identify the machine from a PC connected on
a local network (for example with the name «IMPNETWORK-1»).
- 35 -
5 Check that the parameters IP ADDRESS,
SUBNET MASK, GATEWAY, PRIMARY DNS,
SECONDARY DNS, WINS 1 SERVER and WINS
2 SERVER are correctly entered. If this is not the
case, you will have to configure them manually.
4 - Configuring the machine and the services
MF 5990 - Agoris M943
Manual configuration of the Ethernet network in
IPv4
Automatic configuration of the Ethernet network
in IPv6
To manually configure the machine, you must first avail of
the usual information used to configure a peripheral on
the local network (IP address, subnet mask and gateway
address).
To manually configure the machine's local network
settings:
1 Press the MENU key.
2 Select SETTINGS > COMMUNICATION > LOCAL
NETWORK > IPV4.
To configure the machine on the local IPv6 network,
proceed as follows:
1 Press the MENU key.
2 Select SETTINGS > COMMUNICATION > LOCAL
NETWORK > IPV6.
Then there are several possibilities for configuring
the machine on the local network in IPv6.
3 Select the configuration type required.
The first settings appear on the screen. Use
OTHER PARAMETERS to access all available
settings.
Configuration
3 Press ADDRESS ALLOCATION.
4 Select MANUAL from the options available in the
list. Press OK to confirm the new setting.
5 Press IP ADDRESS.
6 Enter the machine's IP address using the virtual
keyboard or the keypad. Press OK to confirm the
new setting.
7 Press SUBNET MASK.
8 Enter the machine's subnet mask using the virtual
keyboard or the keypad. Press OK to confirm the
new setting.
9 Press GATEWAY.
10 Enter the network gateway IP address using the
virtual keyboard or the keypad. Press OK to confirm the new setting.
11 Press PRIMARY DNS.
12 Enter the IP address of the primary DNS server using the virtual keyboard or the keypad. Press OK to
confirm the new setting.
13 Press SECONDARY DNS.
14 Enter the IP address of the secondary DNS server
using the virtual keyboard or the keypad. Press OK
to confirm the new setting.
15 Press WINS 1 SERVER.
Available settings
AUTOCONFIGU
RATION
YES : Automatic configuration
without router requesting
machine status.
NO: Autoconfiguration on the
local network in IPV6 not
activated.
The default value is "yes".
DHCPV6
YES : Automatic configuration
with status. The machine will
search for a server on the local
network that can dynamically
allocate its network settings.
NO : Autoconfiguration on the
local network in IPV6 by DHCP
not activated.
The default value is "no".
NAME
RESOLUTION
YES : Automatic search for
allocation of an IPv6 address for
the machine, then search for an
IPv4 address.
NO: Search for automatic
allocation of an IPv4 address
only.
The default value is "yes".
4 Press OK to confirm the new setting.
Configuring the SNTP server
Note
The servers WINS1 and WINS2, used with
the network options, are used to access machines on other sub-networks using their
NetBIOS names.
These addresses must be entered for the
Scan to File function.
16 Enter the IP address of the WINS1 server using the
virtual keyboard or the keypad. Press OK to confirm the new setting.
17 Press WINS 2 SERVER.
18 Enter the IP address of the WINS2 server using the
virtual keyboard or the keypad. Press OK to confirm the new setting.
The machine can set its time automatically by connecting
to an SNTP server.
To activate and configure automatic updating of the
machine time via an SNTP server:
Accessing SNTP server configuration
1 Press MENU.
2 Select SETTINGS > COMMUNICATION >
SERVICES > SNTP DATE TIME.
3 Make the required adjustments using the procedures described below.
4 When you have made the modifications, press
MENU to return to the home screen.
Activating / Deactivating automatic updating of the
machine time via an SNTP server
1 Press ACTIVATION.
2 Select the required status from the list.
- 36 -
4 - Configuring the machine and the services
MF 5990 - Agoris M943
3 Press OK to confirm the new setting.
Once the SNTP function has been activated, you can
change the following settings:
• Define the SNTP server address [ 37]
• Define the SNTP server port [ 37]
• Define the time zone
• Configure automatic switchover the summer / winter
time
Defining the SNTP server address
1 Press SERVER ADDRESS.
2 Enter the name of the SNTP server using the virtual
keyboard or the number pad. This name may be in
the form of an IP address, a DNS address or a NetBIOS name. Use the and keys to pass from one
character to the next. In the event of an error, use
the
key to delete a character.
3 Press OK to confirm the new setting.
Defining the SNTP server port
1 Press PORT.
2 Enter the number of the server port using the virtual
keyboard or the number pad. The default port is
123. In the event of an error, use the
delete a character.
3 Press OK to confirm the new setting.
key to
Configuring the client FTP port
The machine uses this setting for the Scan to FTP
function. You can modify it, for example to activate FTPS
(Secure FTP).
To modify the machine's FTP port:
1 Press MENU.
2 Select SETTINGS > COMMUNICATION >
SERVICES > TRANSFER FTP FILE.
3 Press SECURITY.
4 Select the required encryption from the list. Press
OK to confirm the new setting.
5 Press PORT.
6 Enter the number of the server port (from 1 to
65535) using the virtual keyboard or the number
pad. The default port is 21 (990 for a connection
with IMPLICIT encryption). Press OK to confirm the
new setting.
7 Press MENU to return to the home screen.
Configuring the SNMP service
An SNMP (Simple Network Management Protocol) agent
is available on the machine for network administrators
wishing to monitor and manage the device via the local
network using their SNMP network service.
To activate and configure the SNMP service on the
machine:
Accessing SNMP service configuration
1 Press MENU.
2 Select SETTINGS > COMMUNICATION >
SERVICES > SNMP MANAGER.
3 Make the required adjustments using the procedures described below. Press OTHER
PARAMETERS to view all available settings.
4 When you have made the modifications, press
MENU to return to the home screen.
Activating / Deactivating the SNMP service
1 Press ACTIVATION.
2 Select the required status from the list.
3 Press OK to confirm the new setting.
Once the SNMP function has been activated, you can
change the following settings:
• Configure the SNMP agent [ 37]
• Configure the SNMP console [ 37]
Configuring the SNMP agent
To configure the SNMP service on the machine:
1 In COMMUNITY, enter the required name for the
shared read-write community enabling communication between SNMP agents (machine) and management stations (PC with console).
2 In SYSCONTACT, enter the contact information for
the node administrator.
3 In SYSNAME, enter the official name of the node
on the network.
4 In SYSLOCATION, enter the physical location information for the node.
5 In WEB JET ADMIN, select the required compatibility status with the software HP Web JetAdmin:
activated or deactivated.
6 In VERSIONS, select the version of your SNMP
network. If you are using a SNMPv3 network, you
can activate and configure the authentication and
encryption information for network transactions.
7 In TRAPS, activate / deactivate the alerts to be collected and specify for the SNMP version of your
network the community and the IP address of the
management station.
Configuring the SNMP console
The machine is supplied with the following integrated
management information bases (MIBs):
• MIB-II (RFC 1213), sys, udp, tcp, ip, icmp, if, snmp
• PPP (RFC 1471, 1472, 1473)
• MIB Ressource hôte (RFC 2790)
• Imprimante MIB (RFC 3805)
• Moniteur de port d’imprimante (pwg 5107.1)
Configuring the SMTP server
This setting is automatically activated when the fax server
function is active and used during data exchanges
between the machine and the fax server.
To edit this setting:
1 Press MENU.
- 37 -
4 - Configuring the machine and the services
MF 5990 - Agoris M943
2 Select SETTINGS > COMMUNICATION >
SERVICES > SMTP SERVER.
3 To activate / deactivate this function, press
ACTIVATION. Select the required status and press
OK to confirm the new setting.
4 To modify the port number used, press PORT. Enter the number of the server port (from 1 to 65535)
using the virtual keyboard or the number pad. The
default port is 25. Press OK to confirm the new setting.
5 Press MENU to return to the home screen.
Note
To avail of SSL encryption, you need to use
the Companion Suite Pro LH2 software of a
version greater than or equal to v1.2.
For print jobs exchanged between the PC
and the printer to be encrypted via port 443,
the printer must be installed in safe mode
and its certificate accepted, see PC
Functions [ 85].
Configuring the LDAP server
Active Directory configuration
The LDAP server is used to access a directory server for
contacts or lists of contacts (maximum 500 recipients).
1 Press MENU.
2 Select SETTINGS > COMMUNICATION >
SERVICES.
3 Press ACTIVE DIRECTORY.
4 Make the required adjustments.
5 Press MENU to return to the home screen.
Note
The LDAP server must be compatible with
LDAPv2 or earlier versions.
Configuring the print server (RAW, LPR or
IPP)
Depending on your needs and on the architecture of your
print network, you can configure the machine on the
following print servers:
• RAW print server
• LPR print server
• IPP print server
To activate and configure the protocol used by the
machine on the print server:
1 Press the MENU key.
2 Select SETTINGS > COMMUNICATION >
SERVICES.
3 Press the desired setting, RAW PRINT or LPR
PRINT.
4 To activate / deactivate the protocol selected,
press ACTIVATION. Select the required status and
press OK to confirm the new setting.
5 To modify the port number used, press PORT. Enter the number of the server port (from 1 to 65535)
using the virtual keyboard or the number pad. The
default ports are 9100 for RAW, 515 for LPR and
631 for IPP. Press OK to confirm the new setting.
6 Press MENU to return to the home screen.
The LDAP function can only be activated if at least 50
free entries exist in the machine's local address book.
To activate and configure the LDAP function:
Accessing LDAP server configuration
1 Press MENU.
2 Select SETTINGS > COMMUNICATION >
SERVICES > LDAP SERVER.
- 38 -
The first settings appear on the screen. Use
OTHER PARAMETERS to access all available
settings.
3 Press SERVER ADDRESS.
4 Enter the IP address or the name of the LDAP server using the virtual keyboard or the keypad. Press
OK to confirm the new setting.
5 Press LOGIN.
6 Enter the login for the LDAP server using the virtual
keyboard. Press OK to confirm the new setting.
7 Press PASSWORD.
8 Enter the password for the LDAP server using the
virtual keyboard. Press OK to confirm the new setting.
9 Press BASE DN.
10 Enter the database name using the virtual keyboard. Press OK to confirm the new setting.
11 Press PORT.
12 Enter the number of the server port (from 1 to
65535) using the virtual keyboard or the number
pad. The default port is 389 (636 for a connection
with IMPLICIT encryption). Press OK to confirm the
new setting.
13 When you have made the modifications, press
MENU to return to the home screen.
4 - Configuring the machine and the services
MF 5990 - Agoris M943
Internet settings via the telephone
line
You can configure the machine to connect to the internet
via the telephone line, and thus send and receive
electronic messages.
To use this configuration, you must:
• have an internet subscription with an internet service
provider;
• check that all initialisation parameters comply with the
data provided by the service provider;
• adjust the settings for internet access via the telephone line on the machine.
Once these settings are complete, you can configure the
connection settings for email and connect to the internet
via your service provider to send and receive emails.
These two operations will be performed during an internet
connection, the frequency of which you can select.
You must also configure the email service settings. Have
the following connection information to hand:
• email service login
• email service password
• email address
• name or IP address of the SMTP (outgoing) and POP3
(incoming) servers
• SMTP authentication settings
Accessing the email configuration settings
1 Press MENU.
2 Select SETTINGS > COMMUNICATION >
SERVICES > MAIL.
The first settings appear on the screen. Use
OTHER PARAMETERS to access all available
settings.
3 Make the required adjustments using the procedures described below.
4 When you have made the modifications, press
MENU to return to the home screen.
Configuring the internet connection
To configure internet access via the telephone line, have
the information provided by your internet service provider
to hand.
1 Press MENU.
2 Select SETTINGS > COMMUNICATION >
INTERNET / TELEPHONE > MAIL.
Configuring the email service connection
The first settings appear on the screen. Use
OTHER PARAMETERS to view all available settings.
3 Press PHONE NUMBER. Enter the call number
and press OK to confirm.
4 Press LOGIN. Enter the login and press OK to confirm.
5 Press PASSWORD. Enter the password and press
OK to confirm.
6 Press PRIMARY DNS. Enter the name or IP address of the primary DNS server and press OK to
confirm.
7 Press SECONDARY DNS. Enter the name or IP
address of the secondary DNS server and press
OK to confirm.
8 Press MENU to return to the home screen.
You can now configure the email service.
1 Press CONNECTION.
2 Select the type of connection used on the machine.
Press OK to confirm the new setting.
Select...
for a connection...
ETHERNET
via the local network
PHONE
via the telephone line
3 Depending on the type of connection selected,
press BY ETHERNET or BY TELEPHONE.
Note
To print documents sent to the machine by
email, select the connection type BY
ETHERNET.
4 Press POP3 SERVER. Enter the following settings:
Parameter
Description
Email settings
SERVER
ADDRESS
POP3 server name or IP address.
The machine allows you to send and receive documents
by email, via your local network or an internet access via
the telephone line. You may also print TIFF/JPEG/PDF/
TXT documents sent to the machine by email.
To configure and use the email service, you must first
configure your machine to connect to the internet:
• either via your local network (see Local Network
settings);
• or via the telephone line if you have an internet subscription with an internet service provider (see Internet
settings via the telephone line [ 39]).
PORT
Server port number (from 1 to
65535 - 110 by default).
LOGIN
Email login.
PASSWORD
Email password.
EMAIL
ADDRESS
Email address.
- 39 -
5 Press SMTP SERVER. Enter the following settings:
4 - Configuring the machine and the services
MF 5990 - Agoris M943
PC Management
Parameter
Description
SENDER
ADDRESS
Outgoing email address.
SERVER
ADDRESS
SMTP server name or IP address.
PORT
Server port number (from 1 to
65535 - 25 by default).
AUTHENTIC
ATION
Select in TYPE:
WITHOUT to deactivate SMTP
authentication.
AS POP3 to activate SMTP authentication and retain the
same identification settings.
WITH to activate SMTP authentication and enter other
identification settings.
Note
This menu is only available if a PC is registered on the machine via the PC Kit.
Unregistering a PC
6 If you have set SMTP authentication to WITH , enter your identification settings in LOGIN and
PASSWORD.
Defining a reply address
1 Press REPLY ADDRESS.
2 Enter the required email address using the virtual
keyboard.
3 Press OK to confirm the new setting.
Defining the type of emission report
You can print out an emission report for documents sent
via email.
You can choose between several criteria for printing out
emission reports:
• WITH : a report is printed when the emission was successful or when it is definitively abandoned (but there
is only one report per emission request);
• WITHOUT: no emission report, but the machine records all emissions made in its emissions log;
• SYSTEMATIC: a report is printed at each emission attempt;
• ON FAILURE: a report is printed only when the emission attempts have ended in failure and the emission
request is definitively abandoned.
To select the type of report:
1 Press SENDING REPORT.
2 Select the required report type from the list.
3 Press OK to confirm the new setting.
This menu allows you to delete one or more PCs
registered on the machine via the PC Kit.
To unregister a PC from the machine:
1 Press MENU.
2 Select SETTINGS > PC MANAGEMENT.
3 Press UNREGISTER.
4 If several PCs are registered, select the required
PC from the list proposed.
5 Press OK to confirm the new setting.
6 Press MENU to return to the home screen.
Automatic Consumable Ordering
(ACO) and maintenance
Remote reading and maintenance are functions which
are part of a maintenance contract and are activated by
your installer.
The aim of these functions is to communicate to a server
centre the following information which is essential:
• for automatic procurement of consumables;
• for preventive maintenance operations.
You machine will automatically transmit any information
regarding its identification and maintenance to the server
centre.
You can also print out the remote reading / maintenance
information for your machine, or manually send this
information to the server centre.
Connecting to the server centre
The connection to the server centre can be configured on
the machine. This information will be supplied with your
maintenance contract.
To consult / configure the connection to the server centre:
1 Press MENU.
2 Select SETTINGS > COMMUNICATION >
INTERNET / TELEPHONE > TELEMAINTENANCE.
3 Press PHONE NUMBER. Enter the telephone
number of the server centre. Press OK to confirm
the new setting.
4 Press LOGIN. Enter the login for connection to the
server centre. Press OK to confirm the new setting.
5 Press PASSWORD. Enter the password for connection to the server centre. Press OK to confirm
the new setting.
6 Press MENU to return to the home screen.
- 40 -
4 - Configuring the machine and the services
MF 5990 - Agoris M943
Triggering an ACO
4 Select EXPORT.
A file saving window opens.
The remote reading operates according to the following
criteria:
• number of pages printed;
• number of days of operation.
The machine automatically sends all the information
regarding its identification and maintenance to the server
centre at a frequency and threshold defined by the
installer.
You can however trigger the sending of this information to
the server centre.
1 Press MENU.
2 Press CONSUMABLES.
3 Press AUTO COMMAND.
Triggering remote maintenance
5 Enter the name of the file, the destination directory
and confirm.
The machine settings are exported in XML format.
Exporting the settings to a USB key
This function enables you to export the machine's settings
to a USB key:
Note
Before exporting the settings, check that
there is sufficient space on your USB key.
To export the settings to a UBS key, proceed as follows:
Cancelling an operation
Use this function when you want to authorize technical
assistance to take over control of the machine.
1 Press MENU.
2 Select [OTHER COMMANDS] > INTERNET.
3 Press SERVICE/TELEPHONE.
Note
You may cancel an operation at any time by
pressing
.
1 Insert your USB key into the machine respecting
the insertion direction.
Printing / Exporting / Importing
settings
The USB key is analysed. When the analysis is
complete, the USB KEY menu is displayed.
Printing out a list of settings
2 Press ADVANCED FUNCTIONS.
3 Press SAVE to access the settings export function
and/or the machine's address book.
To print out the list of the machine's current settings:
1 Press MENU.
2 Select REPORTS > SETTINGS.
The selection window for files to export is displayed on the screen.
The machine prints out the list of settings.
The left-hand side contains the list of exportable
files: PARAMETERS and ADDRESS BOOK
Printing out a list of fonts
The right-hand pane contains your selection.
4 In the left-hand pane, press PARAMETERS to select it. It becomes blue.
5 Use the keys provided to move the file(s) to the
right-hand pane:
At any time, you can print out a list of the character fonts
installed on your machine.
To print out a list of fonts:
1 Press MENU.
2 Select REPORTS > FONTS.
Key
The machine prints out the list of installed fonts.
Action
All all files for export.
Note
All the selected file for export.
Remove the selected file from the list
of files to export.
You can also access this function via the
PRINT QUEUE menu.
Remove all files from the list of files
to export.
Exporting setting to the integrated website
This function is only available from the integrated website.
To export the machine's current settings:
1 Go to the integrated website (see Remote
configuration [ 21]).
2 Select the SETTINGS tab.
3 Select the menu TRANSFER PC.
- 41 -
6 Press OK to confirm and start the save or Cancel
to return to the previous menu.
7 When the Export successful message appears,
press YES to return to the previous menu.
4 - Configuring the machine and the services
MF 5990 - Agoris M943
The selection window for files to import is displayed on the screen.
Note
4 Use the keys available to filter the file types that
can be seen in the selection window:
The machine's settings are exported in xml
format, to the Root directory
\HFXv2\backup on the USB key under the
name
MachineParams_YYMMDD_HHMMSS.xml
.
Key
Action
All
Importing the settings from the integrated
website
View "settings" files and "address
book" files.
Directory View "address book" files.
Parameter View "settings" files.
s
This function is only available from the integrated website.
5 Browse through the list to select the file you want to
import using the keys available:
Caution
When you import settings, you overwrite the
machine's current settings.
Key
Action
Move the list up 1 file at a time at
each press.
You can only import files exported from the machine.
To import settings:
1 Go to the integrated website (see Remote
configuration [ 21]).
2 Select the SETTINGS tab.
3 Select the PC TRANSFER menu.
4 Select IMPORT.
Move the list up 10 files at a time at
each press.
Move the list down 1 file at a time at
each press.
Move the list down 10 files at a time
at each press.
A file selection window opens.
5 Select the file to import and confirm.
6 Press on the file type
MachineParams_YYMMDD_HHMMSS.xml to select it. It becomes blue.
7 When you have selected the file, press OK to confirm and start the import or Cancel to return to the
previous menu.
8 When the Import successful message appears,
press YES to return to the previous menu.
The settings are imported to the machine.
Importing the settings from a USB key
This function enables you to import and restore machine
settings from a USB key.
Caution
Note
When you import settings, you overwrite the
machine's current settings.
Note
You can only import files exported from the
machine that are in the Root directory
\HFXv2\backup on the USB key.
The settings files are in the format
MachineParams_YYMMDD_HHMMSS.xml
.
To import settings:
1 Insert your USB key into the machine respecting
the insertion direction.
The USB key is analysed. When the analysis is
complete, the USB KEY menu is displayed.
2 Press ADVANCED FUNCTIONS.
3 Press LOAD to access the settings import function
and/or the machine's address book.
When the import is complete, the machine
may request a restart if necessary.
See also
Remote configuration [21]
Machine monitoring and activity
counters
Communications log
The machine saves the last 25 communications made
(emission and reception) in a communications log.
The following communications are saved in the log:
• faxes sent and received
• emails sent and received
• scan to archive operations
- 42 -
4 - Configuring the machine and the services
MF 5990 - Agoris M943
The communications log is automatically printed out
every 25 communications. However, you can request a
print-out at any time.
For each direction of communication (incoming and
outgoing), the log saves the following information:
• date and time the document was sent or received;
• correspondent's identification;
• document resolution;
• number of pages sent or received;
• length of the communication (only for faxes);
• emission or reception result:
–
Correct when the communication was successful;
–
error code in the event of failure.
Counter
Description
Scan to
Archive
Number of pages scanned and
sent to the archive server
Scan to PC
Number of pages scanned and
sent to a PC
PC Scan
Number of pages scanned from a
PC
Total
Total number of pages scanned
To print out the activity counters:
1 Press MENU.
2 Select REPORTS.
3 Press COUNTERS.
• cause of communication failure.
To print out the communications log:
1 Press MENU.
2 Select REPORTS.
3 Press LOG.
The machine prints out the activity counters.
Note
You can also access this function via the
STATUS menu.
The machine prints out the communications log.
Activity counters
Consumable status
At any time, you can consult the machine's activity
counters.
The machine saves information on usage of:
• the printer;
• the scanner.
The usage counter for the printer contains the following
print operations:
Counter
Description
Copy
Number of pages copied
Print
Number of pages printed
Fax
Number of pages received by fax
and printed
Total
Total number of pages printed
You can check the status of consumables at any time.
To view the status of consumables:
1 Press MENU.
2 Select CONSUMABLES > DISPLAY.
For each consumable, the machine displays the remaining capacity, expressed as a percentage.
To print out the status of consumables:
1 Press MENU.
2 Select CONSUMABLES > PRINT.
For each consumable, the machine prints a report indicating the remaining capacity, expressed as a percentage.
Hardware and software information
The usage counter for the scanner contains the following
scan operations:
The STATUS menu contains the machine's hardware and
software information which may be requested in the event
of technical intervention or during a maintenance
operation.
To access this information:
1 Press MENU.
2 Select [OTHER COMMANDS] > STATUS.
The following information can be consulted:
Counter
Description
Copy
Number of scanned pages for
copy
Fax
Number of pages scanned and
faxed
Scan to Mail
Number of pages scanned and
sent by email
Menu
Description
Scan to File
Number of pages scanned and
sent to an FTP or SMB address
MACHINE
TYPE
Machine type
Scan to Key
Number of pages scanned and
saved on a USB key.
SERIAL
NUMBER
Machine's serial number
- 43 -
4 - Configuring the machine and the services
MF 5990 - Agoris M943
Menu
Description
SOFTWARE
VERSION
Software version installed
VERSION
MINIBOOT
Miniboot version installed
OPTIONS
Access to options installed on the
machine (additional paper trays,
etc.)
PRINT
Printing counters:
activities (see Activity counters
[ 43])
consumables (see
Consumable status [ 43])
4 - Configuring the machine and the services
MF 5990 - Agoris M943
- 44 -
Creating and
managing user
accounts
2 Select SETTINGS > [OTHER PARAMETERS] >
RIGHTS MGT. > ACTIVATION.
3 Press ADMINISTRATION. Select the required status from the list. Press OK to confirm the new setting.
Activating user rights management makes the list
of functions to restrict accessible.
By default, the machine is set to free access. The
functions and configuration menus can be used by
everyone with no access restrictions.
However, if you want to rationalize machine resources in
your organization, you can activate management of user
rights and create user accounts.
Thus, you can:
• reserve the use of certain costly functions (copying,
scanning, fax emissions, etc.) to users;
• define monthly use quotas for each user (maximum
number of photocopies, scans, fax emissions, etc.);
• monitor and assess the use of resources by means of
monthly activity counters per user;
• delegate machine administration rights (access to
configuration menus, management of user accounts,
etc.) to certain users;
• preserve the confidentiality of faxes received by defining users authorised to view and print them.
A user account is characterized by a 4-digit user code,
with a fingerprint if the user has recorded one. A restricted
function can only be performed by entering a user code or
reading a fingerprint. The machine authorises or prohibits
the function requested by the user according to the rights
allocated and the quotas defined in the user account.
4 Specify the functions whose access you want to restrict to authorised user accounts, using the following table. Press OTHER COMMANDS to view all
available functions.
Function
Description / Procedure
WEB ACCESS
Select the required status:
NO: any person can access the
machine's integrated website
and remotely configure the machine. No identification is required.
YES: only authorised user accounts can access the integrated website, after logging in.
Press OK to confirm the new
setting.
PRINT
Select the required status:
NO: any person can print on the
machine. No identification is required.
YES: only authorised user accounts can print on the machine. Authorised users must
send their document for printing
with their identification information (secure printing). The machine cancels other print
requests.
Press OK to confirm the new
setting.
COPY
Select the required status:
NO: any person can photocopy
on the machine. No identification is required.
YES: only authorised user accounts can photocopy on the
machine, after logging in.
Press OK to confirm the new
setting.
FAX
TRANSMISSION
Select the required status:
NO: any person can send faxes
from the machine. No identification is required.
YES: only authorised user accounts can send faxes from the
machine, after logging in.
Press OK to confirm the new
setting.
Activating / Deactivating user rights
management
When user rights management is deactivated, the
machine functions are accessible by everyone with no
access restrictions.
When user rights management is activated, the functions
defined as restricted are only accessible to authorised
user accounts.
The "Admin" user account is the machine's default user
account. This account has administrator rights and thus
authorizes access to all machine functions, with no quota
restrictions. Note, if you activate user rights management
and limit access to all machine functions, without creating
user accounts, the machine will only be able to be used
by the "Admin" user account.
Therefore, in order to set up user rights management, you
must:
1. activate user rights management
2. define the restricted functions
3. create user accounts
To activate / deactivate user rights management:
1 Press the MENU key.
- 45 -
5 - Creating and managing user accounts
MF 5990 - Agoris M943
Function
Description / Procedure
FAX RECEPTION When automatic printing of
received faxes is deactivated (see
Secure printing of received faxes
[ 30]), users wishing to retrieve
a received fax saved in the
memory must manually force
printing from the print queue. You
may restrict this right to
authorised user accounts only.
Select the required status:
NO: any person can view and
print faxes received saved in
the memory in the print queue.
No identification is required.
YES: only authorised user accounts can view and print received faxes saved in the
memory in the print queue, after
logging in.
Press OK to confirm the new
setting.
SCAN
Select the required status:
NO: any person can scan and
send documents using the
SCAN function. No identification is required.
YES: only authorised users accounts can scan and send documents using the SCAN
function, after logging in.
Press OK to confirm the new
setting.
Ownership
Description
CODE
4-digit code generated by the
machine. This code is unique
and personal.
The administrator may modify
the user code, and must inform
the user.
SECURITY
LEVEL
Defines the time period during
which the user account remains
active on the machine, before
the user account is automatically
logged off:
LOW: identification of the user
account remains active for
180 seconds.
MODERATE: identification of
the user account remains active for 60 seconds.
HIGH: identification of the
user account remains active
for 15 seconds.
ABSOLUTE: the user must
login each time a restricted
function is used.
ADMINISTR.
RIGHT
Allocates machine
administration rights to a user
account.
WEB ACCESS Allocates the right to access the
integrated website and remotely
RIGHTS
configure the machine to the
user account.
5 When the settings are complete, press RIGHTS
MGT. in the navigation path to return to the previous menu.
You may now create user accounts and allocate
rights and usage quotas.
B&W PRINT
RIGHTS
Allocates the right to print
documents on the machine to
the user account.
B&W COPY
RIGHTS
Allocates the right to photocopy
documents on the machine to
the user account.
FAX TRANSM. Allocates the right to send faxes
from the machine to the user
RIGHTS
account.
Creating a user account
When user rights management is activated, you must
have machine administration rights (by default, "Admin"
user account) to create user accounts. You may create up
to 49 user accounts.
To create a user account:
1 Press the MENU key.
2 Select SETTINGS > [OTHER PARAMETERS] >
RIGHTS MGT. > CREATE USER.
The list of properties of the new user account is
displayed on the screen. Press OTHER
COMMANDS to view all properties.
3 Specify the properties of the user account using the
following table. Press OK to confirm each property
modified.
- 46 -
FAX RECEPT.
RIGHTS
Allocates the right to view and
print faxes received saved in the
memory in the print queue to the
user account.
SCAN RIGHTS Allocates the right to scan and
send documents using the Scan
to function to the user account.
B&W PRINT
QUOTA
Defines the maximum number of
print outs that the user account
is authorised to make per month
(maximum 10000 pages).
B&W COPY
QUOTA
Defines the maximum number of
photocopies that the user
account is authorised to make
per month (maximum 10000
pages).
5 - Creating and managing user accounts
MF 5990 - Agoris M943
Deleting a user account
Ownership
Description
FAX EMISS.
QUOTA
Defines the maximum number of
faxes that the user account is
authorised to send per month
(maximum 10000 pages).
Deleting a user account is immediate and leads to:
• invalid identification (user code and fingerprint no
longer recognized);
• deletion of secure prints in the print queue;
• deletion of usage counters.
The "Admin" user account cannot be deleted.
To delete a user account, proceed as follows:
SCAN QUOTA Defines the maximum number of
scans that the user account is
authorised to make per month
(maximum 10000 pages).
Administrator rights
Note
Note
You must have machine administrator rights
to access this function.
Only the user can specify his name, email
address and record his fingerprint in his
user account (see Personalising your user
account / fingerprint [ 19]).
1 Press the MENU key.
2 Select SETTINGS > [OTHER PARAMETERS] >
RIGHTS MGT. > DELETE USER.
The list of existing user accounts is displayed on
the screen. Use the up and down arrows to view
the whole list.
4 Once the user account is created, press:
RIGHTS MGT. in the navigation path to return to
the previous menu.
3 Select the user account to delete and press OK.
MENU to return to the home screen.
The selected user account is deleted.
The user account created can be used immediately. You
may inform the user of his code.
Printing the list of user accounts
Modifying a user account
For each user account on the machine, the print-out of the
list of user accounts contains the following information:
• 4-digit user code
• personalised name of the user account
• the rights and usage quotas for machine functions
Any modifications made to a user account take effect
immediately.
To change the rights and quotas of a user account,
proceed as follows:
Administrator rights
Administrator rights
Note
Note
You must have machine administrator rights
to access this function.
You must have machine administrator rights
to access this function.
1 Press the MENU key.
2 Select SETTINGS > [OTHER PARAMETERS] >
RIGHTS MGT. > DISPLAY/EDIT.
To print out the list of user accounts:
1 Press the MENU key.
2 Select REPORTS > USER RIGHTS.
The list of existing user accounts is displayed on
the screen. Use the up and down arrows to view
the whole list.
The machine prints out the list of user accounts.
3 Select the user account to modify and press OK.
4 Make the required modifications. Use the procedure for creating a user account for help in modifying the required properties.
5 Once the user account has been modified, press:
RIGHTS MGT. in the navigation path to return to
the previous menu.
MENU to return to the home screen.
User account reports and usage
counters
User rights management allows you to monitor and
assess the use of the machine's functions by means of
monthly usage counters for each user.
The machine records usage counters for each existing
user account:
• when user rights management is activated;
• only for restricted functions (whose use is not free).
At the end of each month, the machine generates a
secure print-out under the "Admin" user account of a
report containing the quotas and usage counters for each
user account. usage counters are then reset to zero.
- 47 -
5 - Creating and managing user accounts
MF 5990 - Agoris M943
5 - Creating and managing user accounts
MF 5990 - Agoris M943
Note
If the "Admin" user account specifies an
email address, the report is also sent by
email.
If you have administrator rights on the machine, you can
perform the following operations at any time:
• print out an interim report
• send an interim report by email
• export an interim report
• reset the usage counters
Printing an interim report
Printing out an interim report does not affect monthly
print-outs of the usage counters.
To print out an interim report of usage counters:
1 Press the MENU key.
2 Select SETTINGS > [OTHER PARAMETERS] >
RIGHTS MGT. > COUNTERS.
3 Press PRINT.
The machine prints out the interim report for the usage counters.
Sending an interim report
Sending an interim report does not affect monthly printouts of the usage counters.
This action sends an interim report of usage counters by
email to the "Admin" user account, on the condition that
this user account specifies an email address.
To send an interim report of usage counters:
1 Press the MENU key.
2 Select SETTINGS > [OTHER PARAMETERS] >
RIGHTS MGT. > COUNTERS.
3 Press SEND.
The machine sends the interim report of usage counters to the email address specified in the "Admin" user
account.
Resetting the usage counters
This action resets the usage counters of all user accounts
for the current month.
To reset the usage counters:
1 Press the MENU key.
2 Select SETTINGS > [OTHER PARAMETERS] >
RIGHTS MGT. > COUNTERS.
3 Press DELETE.
The usage counters for the current month are reset to
zero.
- 48 -
Photocopying
documents
This mode is only available for the autofeed scanner.
Your machine allows you to make one or several
photocopies.
You can also configure numerous settings to make
photocopies according to your needs.
Choosing the photocopy options
correctly
Binding
Binding means the way printed pages are bound together
to make up a book. Two bindings are possible: long edges
and short edges.
Long edge binding
The pages are printed to be bound on the left margin and
turned from right to left.
Poster copy
Short edge binding
The pages are printed to be bound at the top and turned
from bottom to top.
Poster mode allows one page to be photocopied onto
several pages. The possible combinations are WITHOUT
(1 -> 1), 1 -> 4 or 1 -> 9.
This mode is only available for the flatbed scanner.
Mosaic copy
Mosaic copying allows several pages to be photocopied
on 1 page. The possible combinations are WITHOUT (1 > 1), 2 -> 1 or 4 -> 1.
- 49 -
6 - Photocopying documents
MF 5990 - Agoris M943
Zoom
The first settings appear on the screen. Use
OTHER PARAMETERS to access all available
settings.
The zoom parameter is used to enlarge or reduce the
original document. The zoom value is between 25% and
400%.
The configuration of this function depends on two
parameters, SCALE and ZOOM. The following table
summarizes the possibilities available according to the
defined values:
SCALE
4 Press DUPLEX.
5 Select the required option from the list. Press OK to
confirm.
Duplex mode
ZOOM
1:1
Inactive
ZOOM
The zoom value is defined in the
ZOOM parameter. This value
can be entered or selected from
the list of predefined values.
FORMAT
CONVERS.
Scaling is automatic depending
on the paper formats defined in
the SCAN FORMAT and
PRINTED PAPER parameters.
DUPLEX ->
DUPLEX
input document duplex
output document duplex
FRONT ->
DUPLEX
input document reverse side only
output document duplex
DUPLEX ->
FRONT
input document duplex
output document reverse side
only
FRONT ->
FRONT
input document reverse side only
output document reverse side
only
6 To change the binding type, press BINDING
EDGE. Select the required option from the list (see
section Binding [ 49]). Press OK to confirm.
Simple photocopy
In this case, the default settings are applied.
7 Press
Cancelling an operation
to photocopy the document.
User rights
Note
Note
You may cancel an operation at any time by
pressing
Access to functions depends on your user
rights. To know which rights you have, consult your machine administrator.
.
1 Insert the document to photocopy (see section
Inserting original documents [ 18]).
2 Press the COPY key.
3 Enter the number of copies required and press OK.
4 Press
Description
to photocopy the document.
User rights
Note
Photocopy with toner saving
TONER SAVE mode is used to reduce the quantity of
toner consumed on the page and thus reduce printing
costs.
When using this mode, the consumption of toner is
reduced and the print is lighter.
Cancelling an operation
Access to functions depends on your user
rights. To know which rights you have, consult your machine administrator.
Note
You may cancel an operation at any time by
Duplex photocopying
pressing
Cancelling an operation
Note
You may cancel an operation at any time by
pressing
.
1 Insert the document to photocopy (see section
Inserting original documents [ 18]).
2 Press the COPY key.
3 Enter the number of copies required and press OK.
- 50 -
.
1 Insert the document to photocopy (see section
Inserting original documents [ 18]).
2 Press the COPY key.
3 Enter the number of copies required and press OK.
4 Press TONER SAVE.
5 Select the required status from the list.
6 Press OK to confirm the new setting.
7 Press
to photocopy the document.
6 - Photocopying documents
MF 5990 - Agoris M943
User rights
Note
Collated
copy
option
Access to functions depends on your user
rights. To know which rights you have, consult your machine administrator.
Description
NO
The printer does not collate the
copies of the original document.
E.g.: If you make three copies of a
10-page document, page 1 is copied
three times, then page 2, then page
3 and so on.
Elaborated photocopy
Elaborated copies are used to set specific settings for the
current photocopy.
1 Insert the document to photocopy (see section
Inserting original documents [ 18]).
2 Press the COPY key.
3 Enter the number of copies required and press OK.
8 Press PAPER TYPE. Select the paper type used
from the list. Press OK to confirm.
9 To change the size of the photocopied document,
press SCALE.
The first settings appear on the screen. Use
OTHER PARAMETERS to access all available
settings.
Option
4 To change the resolution, press QUALITY. Select
the resolution the best suited to your document
from the options available and press OK to confirm.
Resolution
Description
SPEED
Low resolution.
NORMAL
Resolution suited for documents with
frames (magazines, cover pages,
etc.). Use this resolution to prevent
dithering problems.
TEXT
Resolution suitable for documents
containing text.
TEXT AND
IMAGE
Resolution suitable for documents
containing text and colour images.
PHOTO
Resolution suitable for documents
containing colour images,
photographs.
5 To change the contrast, press CONTRAST. Select
the most suitable contrast for your document from
the available options. Press OK to confirm.
6 To change the luminosity, press BRIGHTNESS.
Select the most suitable luminosity for your document from the available options. Press OK to confirm.
7 To activate / deactivate the collated copy option,
press COLLATE COPY. Select the required option. Press OK to confirm.
Collated
copy
option
YES
Description
1:1
The document is printed in scale 1.
ZOOM
When this option is activated, the
value defined in the ZOOM
parameter is taken into account.
FORMAT
CONVERS.
Scaling is automatic depending on
the paper formats defined in the
SCAN FORMAT and PRINTED
PAPER parameters.
10 To modify the analysis format, press SCAN
FORMAT. Select the paper format of the original
document in the list. Press OK to confirm.
11 To define the output document format, press
PRINTED PAPER. Select the required option in
the list and press OK to confirm.
12 To define the zoom to be applied, press ZOOM.
Enter the required zoom value using the virtual keyboard or select a value from the predefined values
in the list. Press OK to confirm.
13 If you are using the autofeed scanner, you can mosaic print your documents. Press MOSAIC and select the required option from the list (see section
Mosaic copy [ 49]). Press OK to confirm.
14 If you are using the flatbed scanner, you can poster
print your documents. Press BANNER and select
the required option from the list (see section Poster
copy [ 49]). Press OK to confirm.
15 Press
to photocopy the document.
User rights
Note
Access to functions depends on your user
rights. To know which rights you have, consult your machine administrator.
Description
The printer collates the copies of the
original document.
E.g.: If you make three copies of a
10-page document, the document is
copied three times from page 1 to 10.
- 51 -
6 - Photocopying documents
MF 5990 - Agoris M943
Identity card photocopy
8 Place your identity card or other official document
against the flatbed scanner glass, as indicated below:
Cancelling an operation
Note
You may cancel an operation at any time by
pressing
.
The IDENTITY CARD Copy function is used to copy both
sides of an identity card or a document such as a driver's
license on a sheet of A4 format (original document size
< A5) or a sheet in Letter format (original document size
< Statement).
The screen displays the instructions (when the original
document should be placed, when the document should
be turned over, etc.) and asks your confirmation to start
the task.
1 Press the COPY key.
2 Enter the number of copies required and press OK.
The first settings appear on the screen. Use
OTHER PARAMETERS to access all available
settings.
10 Turn the document over and press OK to confirm.
The machine prints out a copy of your document.
User rights
Description
SPEED
Low resolution.
NORMAL
Resolution suited for documents with
frames (magazines, cover pages,
etc.). Use this resolution to prevent
dithering problems.
TEXT
Resolution suitable for documents
containing text.
TEXT AND Resolution suitable for documents
IMAGE
containing text and colour images.
PHOTO
to photocopy the document.
The document is scanned.
3 Press IDENTITY CARD. Select the required status
from the list. Press OK to confirm.
4 To change the resolution, press QUALITY. Select
the resolution the best suited to your document
from the options available and press OK to confirm.
Resolution
9 Press
Resolution suitable for documents
containing colour images,
photographs.
Note
For best results, select PHOTO resolution.
5 To change the contrast, press CONTRAST. Select
the most suitable contrast for your document from
the available options. Press OK to confirm.
6 To change the luminosity, press BRIGHTNESS.
Select the most suitable luminosity for your document from the available options. Press OK to confirm.
7 Press PAPER TYPE. Select the paper type used
from the list. Press OK to confirm.
- 52 -
Note
Access to functions depends on your user
rights. To know which rights you have, consult your machine administrator.
6 - Photocopying documents
MF 5990 - Agoris M943
Faxing
documents
4 To add other recipients, press
and specify the
second recipient (see previous step). Repeat the
operation for each recipient to add (maximum 10
contacts or lists of contacts).
Note
Sending faxes
You can delete the last recipient entered by
pressing the
key. Repeat this until the
first recipient entered if you want to delete
all.
Simple emission
Cancelling an operation
Note
Note
You may cancel an operation at any time by
pressing
You can view the recipient(s) entered by
pressing OTHER PARAMETERS.
.
1 Insert the document to fax (see section Inserting
original documents [ 18]).
2 Press the FAX key.
3 Enter the number of the recipient using the virtual
keyboard or the keypad or select the recipient as
follows:
To select a
recipient...
5 Press
to send the document.
Note
If you are using the flatbed scanner, you can
scan more than one page. Place the next
page on the scanner, select NEXT. Select
SEND when all pages have been scanned.
then...
User rights
from the address
book
from the 10 last
recipients saved.
In the data field Address
book, press
then:
Select the contact or list of
contacts required from the
address book entries. Use
the up and down arrows to
view all entries in the address book.
OR
Enter the first few letters of
the name of your correspondent using the virtual
keyboard, and add letters
until the full name of the required correspondent is
displayed.
OR
Enter the figures of short
number of your correspondent using the virtual
keyboard or the keypad until the full name of the required correspondent is
displayed.
Note
Access to functions depends on your user
rights. To know which rights you have, consult your machine administrator.
Elaborate emission
Cancelling an operation
Note
You may cancel an operation at any time by
pressing
.
1 Insert the document to fax (see section Inserting
original documents [ 18]).
2 Press the FAX key.
3 Enter the number of the recipient using the virtual
keyboard or select the recipient as follows:
Press
.
Select the required recipient.
Use the up and down arrows
to view all recipients in the
memory.
- 53 -
7 - Faxing documents
MF 5990 - Agoris M943
To select a
recipient...
from the address
book
from the 10 last
recipients saved.
Quality
then...
In the data field Address
book, press
then:
Select the contact or list of
contacts required from the
address book entries. Use
the up and down arrows to
view all entries in the address book.
OR
Enter the first few letters of
the name of your correspondent using the virtual
keyboard, and add letters
until the full name of the required correspondent is
displayed.
OR
Enter the figures of short
number of your correspondent using the virtual
keyboard or the keypad until the full name of the required correspondent is
displayed.
Description
NORMAL
Resolution suitable for good quality
documents not containing drawings
and/or small details.
FINE
Resolution suitable for documents
containing drawings or small
characters.
SUPER
FINE
Resolution suitable for documents
containing drawings (with fine lines)
or very small characters (on the
conditions that the receiving fax
machine can process them).
PHOTO
Resolution suitable for documents
containing colour images and/or
photographs.
7 To change the contrast, press CONTRAST. Select
the most suitable contrast for your document from
the available options. Press OK to confirm.
8 If you use the autofeed scanner and your document
is double-sided, press DUPLEX to activate / deactivate double-sided scanning of the document. Select the required option from the list. Press OK to
confirm.
9 If you have the dual-line model, you can select the
telephone line to use to send the document. Press
PHONE LINE to select the telephone line to use
from the available options and press OK to confirm.
Press
.
Select the required recipient.
Use the up and down arrows
to view all recipients in the
memory.
Line
4 To add other recipients, press
and specify the
second recipient (see previous step). Repeat the
operation for each recipient to add (maximum 10
contacts or lists of contacts)..
Note
Description
LINE 1
The document is sent on telephone
line 1 (LINE 1) of the machine.
LINE 2
The document is sent on telephone
line 2 (LINE 2) of the machine.
AUTOMAT The document is sent on telephone
IC
line 1 (LIGNE 1) or 2 (LIGNE 2) of
the machine as per availability.
10 To specify the number of pages in the document
before sending, press NUMBER OF PAGES. Enter
the number of pages using the virtual keyboard or
the number pad. Press OK to confirm.
11 To activate / deactivate the Multiple Scan option,
press MULTIPLE SCAN. Select the option YES to
activate or NO to deactivate it (see Using the
Multiple Scan option correctly [ 18]). Press OK to
confirm.
You can delete the last recipient entered by
pressing the
key. Repeat this until the
first recipient entered if you want to delete
all.
Note
You can view the recipient(s) entered by
pressing OTHER PARAMETERS.
12 Press
5 Press OTHER PARAMETERS to access the parameters you want to change
6 To change the resolution, press QUALITY. Select
the resolution the best suited to your document
from the options available and press OK to confirm.
- 54 -
to send the document.
7 - Faxing documents
MF 5990 - Agoris M943
Note
To select a
recipient...
If you are using the flatbed scanner, you can
scan more than one page. Place the next
page on the scanner, select NEXT. Select
SEND when all pages have been scanned.
from the 10 last
recipients saved.
User rights
Note
Access to functions depends on your user
rights. To know which rights you have, consult your machine administrator.
Note
This function allows you to send a document later.
To plan a deferred emission:
You can delete the last recipient entered by
Cancelling an operation
Note
pressing the
key. Repeat this until the
first recipient entered if you want to delete
all.
You may cancel an operation at any time by
.
Note
1 Insert the document to fax (see section Inserting
original documents [ 18]).
2 Press the FAX key.
3 Enter the number of the recipient using the virtual
keyboard or select the recipient as follows:
To select a
recipient...
from the address
book
You can view the recipient(s) entered by
pressing OTHER PARAMETERS.
5 Press OTHER PARAMETERS to access the parameters you want to change
6 To modify the send date, press DATE. Enter the re-
then...
In the data field Address
book, press
then:
Select the contact or list of
contacts required from the
address book entries. Use
the up and down arrows to
view all entries in the address book.
OR
Enter the first few letters of
the name of your correspondent using the virtual
keyboard, and add letters
until the full name of the required correspondent is
displayed.
OR
Enter the figures of short
number of your correspondent using the virtual
keyboard or the keypad until the full name of the required correspondent is
displayed.
Press
.
Select the required recipient.
Use the up and down arrows
to view all recipients in the
memory.
4 To add other recipients, press
and specify the
second recipient (see previous step). Repeat the
operation for each recipient to add (maximum 10
contacts or lists of contacts)..
Deferred emission
pressing
then...
quired date using the virtual keyboard. Use the
and
keys to pass from one character to the next.
In the event of an error, use the
key to delete
a character. Press OK to confirm.
7 To modify the send time, press TIME. Enter the required time using the virtual keyboard. Use the
and
keys to pass from one character to the next.
In the event of an error, use the
a character. Press OK to confirm.
8 Press
key to delete
to send the document.
Note
If you are using the flatbed scanner, you can
scan more than one page. Place the next
page on the scanner, select NEXT. Select
SEND when all pages have been scanned.
You document is saved and placed on standby in the
send queue. It will be sent at the planned date and time.
User rights
Note
Access to functions depends on your user
rights. To know which rights you have, consult your machine administrator.
- 55 -
7 - Faxing documents
MF 5990 - Agoris M943
Stopping an emission in progress
Monitoring fax emissions
It is possible to stop an emission in progress whatever the
emission type, but it will differ depending on whether the
emission is to one or several recipients.
• For an emission to one recipient, the document is deleted.
• For an emission to several recipients, only the recipient for the document in progress when the emission is
stopped is deleted from the emission queue.
To stop an emission in progress :
The emission queue contains requests:
• currently being sent,
• awaiting emission (preceded by other requests or
awaiting a new emission attempt),
• deferred,
• rejected (stopped or maximum number of attempts
reached).
Accessing the emission queue
1 Press MENU.
2 Press SEND QUEUE.
The emission queue allows you to:
• Force a request (on standby or rejected) to be sent
• Edit the recipient(s) for an emission request (on standby)
• Edit the date / time of an emission request
• Delete an emission request (on standby or rejected)
• Print out a document awaiting emission
1 Press
.
A message asking you to confirm the cancellation
is displayed on the screen.
2 Press OK to confirm cancelling the emission in progress.
For several recipients, you can delete the other recipients
from the emission queue (see Deleting a document
awaiting emission [ 56]).
If the machine is configured to print out an emission report
(see the section Emission report [ 28]), it will be printed
out, indicating that the communication was stopped at the
request of the user.
Receiving faxes
Forcing an emission request
To force sending or resend a fax that is on standby or has
been rejected:
1 Press SEND.
The faxes are identified by FAX.
The reception of faxes depends on the configuration of
your machine.
By default, the machine prints out the faxes as and when
they are received.
If the administrator has activated secure printing of
received faxes, users wishing to retrieve a document
saved in the memory, must manually force printing from
the machine's print queue.
The settings for customizing printing of received faxes are
described in the section Fax reception settings [ 30].
2 Select the required emission request and press
OK.
You emission request becomes the priority. The
corresponding document is sent once the telephone line
is available.
Editing an emission request
To edit an emission request from the emission queue:
1 Press DISPLAY/EDIT.
The faxes are identified by FAX.
Printing received faxes in the memory
2 Select the required emission request and press
OK.
When secure printing of received documents is active, the
machine saves the faxes received in the memory to
preserve confidentiality.
To retrieve a fax received and saved in the memory:
The emission options for the selected request are
displayed.
3 To change the recipient(s), press RECIPIENT. Enter the required modifications and press OK to confirm.
4 To modify the send date, press DATE. Enter the required date and press OK to confirm.
5 To modify the send time, press TIME. Enter the required time and press OK to confirm.
User rights
Note
Access to functions depends on your user
rights. To know which rights you have, consult your machine administrator.
1 Press MENU.
2 Press PRINT QUEUE.
3 Press PRINT.
The faxes received and saved in the memory are
identified by FAX HELD.
Deleting a document awaiting emission
To delete an emission request from the emission queue
and cancel the emission:
4 Select the required fax.
The machine prints out the fax selected.
- 56 -
7 - Faxing documents
MF 5990 - Agoris M943
7 - Faxing documents
MF 5990 - Agoris M943
Note
Deleting an emission request is irreversible.
1 Press DELETE.
The faxes are identified by FAX.
2 Select the required emission request and press
OK.
The selected emission request disappears from the
emission queue.
Print out a document awaiting emission
To print out a document awaiting emission:
1 Press PRINT.
The faxes are identified by FAX.
2 Select the required emission request and press
OK.
- 57 -
Printing
documents from
a PC
•
•
•
Your machine offers numerous printing options.
In particular, you can configure numerous settings to print
documents according to your needs.
to print duplex, define the binding type required: long
edges or short edges (see section Binding [ 49]).
specify the orientation of the document to be printed
(portrait or landscape) or apply a 180° rotation.
print several pages of the document on the same
page (16 maximum), insert a surround, modify the layout.
Printing in booklet mode allows you to print the document on double format paper of the specified document format. In this way you can fold the document in
two to make a booklet.
User rights
Custom sizes tab
Note
This tab allows you to:
• create a personalised paper format. The personalized
paper format will then be available in the list of paper
formats offered by the machine. Before starting, ensure that the paper format you want to create is compatible with the paper formats which can be used on
the machine (see Recommendations for paper
[ 139]).
• edit a personalised paper format.
• delete a personalised paper format.
Access to functions depends on your user
rights. To know which rights you have, consult your machine administrator.
Prerequisites
To be able to print on the machine, you must first have
installed the print drivers available in the PC Kit on your
computer.
For more information, consult the section PC functions
[ 85].
Job security tab
Choosing print options correctly
Note
In this section you will find a description for each tab of the
printing options available in the machine's print driver.
To access these options, launch a print from your
computer, select the machine from the list of available
printers and click on the print options.
A preview allows you to check the print options applied to
your document in real time.
Note
This function is not available for PostScript
print drivers.
This tab allows you to:
• name the print task to be able to identify it more easily
in the machine's print queue. You can allocate a name
and associate a user name to the task.
• activate / deactivate saving of the print task in the
machine's print queue, before and / or after printing:
–
hold before printing: on receiving the print task,
the machine does not automatically print the document. You have to manually launch printing of
the document by forcing it directly from the machine's print queue. Don't hesitate to use this
function if you want to be present when your document is printed.
–
save after printing: once the document is printed, the machine does not delete the print task
from the print queue, but saves it for subsequent
printing. You can then manually launch printing of
the document again by forcing it directly from the
machine's print queue. Don't hesitate to use this
function to make documents available for printing
on demand.
–
job life: the print task is held before printing and /
or saved after printing for a period that you define;
indefinitely or for a specified number of hours.
The availability and access to the print options may vary according to the operating system used and the print drivers installed.
Paper tab
This tab allows you to:
• specify the number of copies of the document to
print. When printing several copies, remember to use
the copy assembly option.
• define the paper format and type to be used to print
the document according to the paper formats and
types loaded in the machine's paper trays, or activate
automatic selection and verification of the paper to be
used by the machine.
• define or not duplex printing. If you select Printer
settings, the printing will depend on the default settings for the printer. Select No (single side) to force
single-sided printing. Select Yes (duplex) to print the
document in duplex.
- 58 -
8 - Printing documents from a PC
MF 5990 - Agoris M943
•
secure printing of the document by associating a 4digit code or a fingerprint. On receiving the print task,
the machine does not automatically print the document. You have to manually launch printing of the document by forcing it directly from the machine's print
queue. You will then be asked for the 4-digit code or
the fingerprint associated with the print task.
However, before using this function, consider the following:
–
if rights management is deactivated or if the print
function is free for all to use, you can enter the
identification information of your choice.
–
if rights management is activated and the print
function is restricted, only authorized user accounts will be able to print on the machine. If you
user account authorizes you to print, you must enter the 4-digit code or use the fingerprint associated with your user account. On receiving the print
task, the machine will check if the identification information correspond to those in the authorized
user account. Otherwise, the machine will delete
the print task from the print queue.
Fonts tab
This tab allows you to:
• select the font usage mode.
• select the font transmission mode.
Device options tab
This tab allows you to consult the options installed on the
machine (duplex module, additional paper tray, etc.).
Settings tab
Advanced tab
This tab allows you to:
• print front and back cover pages, and dividers.
• select the paper tray containing the front and back
cover pages, and the dividers.
• specify the paper format and type on which to print the
front and back cover pages, and the dividers.
• specify the print and binding margins for printing several pages on one page or in booklet mode.
Watermarks tab
This tab allows you to:
• restore the factory settings.
• restore the print options to their default values.
• save your most commonly used print options. Then
you can select them directly in the selection box of settings to apply to document printing. If modifications are
made, you will be able to restore these print options.
Simple printing
In this case, the default settings are applied.
This tab allows you to:
• insert a watermark in a document to be printed, on all
pages of the document or only on the first page.
• create a personalised watermark. The personalised
watermark will then be available in the list of watermarks offered by the machine. Creating a watermark
allows you to personalize the text to insert, specify the
font characteristics and define its position in the document.
• edit a watermark.
• delete a watermark.
Overlays tab
This tab allows you to:
• select an overlay to be used. Ensure that the format
and orientation of the overlay to be used correspond to
the format and orientation of the document to print.
• add or delete overlay files.
• create an overlay.
• define the superposition of an overlay and a document.
• print the overlay on all pages, the first page, even pages and odd pages.
• place the overlay in the foreground or background of
the document to print.
User rights
Note
Access to functions depends on your user
rights. To know which rights you have, consult your machine administrator.
1 Use the command Print in the File menu of the application open on the screen.
2 Select the machine from the list of available printers.
3 Enter the number of copies to print.
4 Click OK to start printing.
You can monitor your print tasks in the print queue (see
the section Monitoring printing [ 61]).
Note
This function is only available for PostScript
print drivers.
- 59 -
8 - Printing documents from a PC
MF 5990 - Agoris M943
Duplex printing
Note
User rights
Note
If you have a user account, you can save
your fingerprint and receive it at your email
address. To do so, personalize your user information (see Personalising your user
account / fingerprint [ 19]).
Access to functions depends on your user
rights. To know which rights you have, consult your machine administrator.
1 Press the MENU key.
2 Select OTHER COMMANDS > IDENTIFICATION
> SEND FINGERPRINT.
3 Press RECIPIENT(S). Enter your email address
using the virtual keyboard. In the event of an error,
1 Use the command Print in the File menu of the application open on the screen.
2 Select the machine from the list of available printers.
3 Click Properties to access the print options.
4 Select the Paper tab.
5 Enter the number of copies to print. When printing
several copies, activate / deactivate the copy assembly option.
6 Activate duplex printing by selecting the required
binding: long edges or short edges.
7 Click OK to start printing.
You can monitor your print tasks in the print queue (see
the section Monitoring printing [ 61]).
use the
key to delete a character. Press
OTHER PARAMETERS to confirm.
4 To copy the email to other recipients, press CC
RECIPIENT(S). Specify the recipient(s) on copy,
and press OTHER PARAMETERS to confirm.
5 Press SUBJECT. Enter the subject of the email using the virtual keyboard (80 characters maximum).
key to delete
In the event of an error, use the
a character. Press OK to confirm.
6 To customize the name of the attachment, press
FILENAME. Enter the file name using the virtual
keyboard (maximum 20 characters). In the event of
Secure printing
In order to guarantee confidentiality of your prints, you
can secure printing of a document by associating a 4-digit
code or a fingerprint.
On receiving the print task, the machine does not
automatically print the document.
You have to manually launch printing of the document by
forcing it directly from the machine's print queue. You will
then be asked for the 4-digit code or the fingerprint
associated with the print task.
However, before using this function, consider the
following:
• if rights management is deactivated or if the print function is free for all to use, you can enter the identification
information of your choice.
• if rights management is activated and the print function
is restricted, only authorized user accounts will be able
to print on the machine. If you user account authorizes
you to print, you must enter the 4-digit code or use the
fingerprint associated with your user account. On receiving the print task, the machine will check if the
identification information correspond to those in the
authorized user account. Otherwise, the machine will
delete the print task from the print queue.
an error, use the
key to delete a character.
Press OK to confirm.
7 Press the
key.
The procedure to save your fingerprint is
launched.
8 Place the finger you will always use, your reference
finger, on the fingerprint reader and slide it slowly
downwards. The machine informs you when the
option is successful.
The fingerprint is scanned and the email message is
saved. Depending on the machine configuration, the
email is sent via the local network or during the next
planned internet connection.
To force the internet connection and send / receive
emails, press MENU then select INTERNET > MAIL /
PHONE.
On receipt of the email, just copy the file containing the
fingerprint to your computer's hard disk.
Launching secure printing
To launch secure printing from your computer:
User rights
Receiving your fingerprint
Note
To save and receive your fingerprint in the form of an
electronic file:
Access to functions depends on your user
rights. To know which rights you have, consult your machine administrator.
1 Use the command Print in the File menu of the application open on the screen.
2 Select the machine from the list of available printers.
- 60 -
8 - Printing documents from a PC
MF 5990 - Agoris M943
3 Click Properties to access the print options.
4 Define the print options required for your document
(number of copies, paper format, etc.).
5 Click on the Job Security tab.
6 To easily identify your secure print, enter a print
task name and a user name.
7 To associate a 4-digit code, check the PIN box and
enter the code.
8 To associate a fingerprint, check the Fingerprint
box, click on Browse and select the file that contains your fingerprint (see Receiving your
fingerprint).
9 Click OK to start printing.
The print task is saved on the machine. To retrieve your
print, you must manually force it from the print queue.
1 Press the MENU key.
2 Press PRINT QUEUE.
To be able to identify documents awaiting printing, the
print queue allocates a type to the various print tasks
managed by the machine:
The type...
PRINT PC
print tasks sent from a
computer.
FAX
faxes received awaiting
printing.
EMAIL
emails received awaiting
printing.
PRINT USB KEY
Retrieving/Releasing secure prints
identifies...
print tasks sent from a USB
memory key.
print tasks automatically
generated by the machine
(emission report,
communication log) or
PRINT REPORT
launched by a user from a
machine menu (printing of
function guide, address book,
settings, etc.).
To retrieve a secure print on the machine:
1 Press MENU.
2 Press PRINT QUEUE.
3 Press PRINT.
Secure prints are identified by PC HELD.
4 Select your print task from the list.
An identification screen is displayed.
5 Identify yourself with the information entered when
you sent your print task:
PC HELD
print tasks sent from a
computer with at least one of
the following properties:
hold before printing
secure printing
FAX HELD
received faxes saved in the
memory (see Receiving faxes
[ 56]).
enter the 4-digit code associated with the print
task.
if you associated your fingerprint with the print
task, place your reference finger in the fingerprint
reader and slide it slowly downwards.
6 When the identification is successfully completed,
the machine prints your document.
If identification fails, the machine displays an explanatory
message (insufficient rights, unknown account, etc.). In all
cases, contact the machine's administrator.
Cancelling a print in progress
The print queue allows you to perform the following
operations:
• Print out the list of saved print tasks
• Force a print task
• Edit the properties of a print task
• Delete a print task
Print out the list of saved print tasks
To cancel a print in progress:
1 Press the
key.
A message asking you to confirm the cancellation
appears on the screen.
2 Press OK to confirm cancellation of the print task in
progress.
Monitoring printing
The print queue contains documents that are:
• currently being printed,
• awaiting printing (preceded by other print tasks),
• saved in the memory for printing,
• secured awaiting to be forced.
Accessing the print queue
To print out the list of print tasks saved in the memory by
the machine for subsequent printing (held after printing):
1 Press PRINT QUEUE.
The machine prints out the list of print tasks with the
property "Keep After".
Force a print task
To force or reprint a document from the print queue:
1 Press PRINT.
2 Select the required print task and press OK.
You print task becomes the priority. The corresponding
document is printed as soon as the machine is available
to print.
- 61 -
8 - Printing documents from a PC
MF 5990 - Agoris M943
Editing a print task
To edit the properties of a print task from the print queue:
1 Press DISPLAY/EDIT.
2 Select the required print task and press OK.
The properties of the selected print task are displayed.
3 Make the required modifications and press OK to
confirm.
Deleting a print task
To delete a print task from the print queue:
Note
Deleting a print task is irreversible.
1 Press DELETE.
2 Select the required print task and press OK.
The selected print task disappears from the print queue.
- 62 -
8 - Printing documents from a PC
MF 5990 - Agoris M943
Printing
documents sent
by email
Note
To print documents sent to the machine by
email, select the connection type BY
ETHERNET.
Printing
Your machine can print documents sent by email.
This function is limited to documents of format TIFF/
JPEG/PDF/TXT.
SMTP/POP3 protocols are used to send the documents
to the machine by email.
Attached documents in TIFF/JPEG/PDF/TXT format sent
by email to the machine will be printed automatically
To guarantee confidentiality, you may also safeguard
printing of your documents by associating a 4-digit code
to your email address. On receiving the print job, the
document will not be printed automatically. Printing of the
document can be launched from the machine's print
queue using this 4-digit code.
You can also manage the configuration of secure
printing from the machine.
User rights
Note
Access to functions depends on your user
rights. To know which rights you have, consult your machine administrator.
Retrieving the machine's email address and
safeguarding printing
Prerequisites
To be able to print documents sent by email on the
machine, you must first configure your machine's
connection and the email service settings. You need:
An operational Ethernet connection with an email account
authorized to send outside your local network.
The following connection information for your email
account:
• email service login
• email service password
• email address
• name or IP address of the SMTP (outgoing) and POP3
(incoming) servers
• SMTP authentication settings (if necessary)
For more information, consult the section Email settings
[ 39].
To send a document to the machine by email for printing,
you must first identify the machine's email address.
To retrieve the machine's email address, proceed as
follows:
1 Press the MENU key.
2 Press MOBILE PRINT > PRINTER ADDR
3 Enter your email address using the virtual key-
Note
board. In the event of an error, use the
key to
delete a character. Press Send.
4 The printer asks if you have associated a 4-digit
code with your email address. Select your print
type by pressing the YES or the NO key.
To select
your print
type
YES
The print is secured using a 4digit code.
An identification screen is
displayed:
Enter the 4-digit code using the
virtual keyboard.
Confirm this 4-digit code.
Press OK to send the machine's email address and the
associated 4-digit code to your
email address.
NO
The machine's email address is
sent to your email and the print is
not secured. There is no 4-digit
code associated with the print
jobs.
Although quite simple, the network settings
sometimes require expert knowledge of
your computer configuration. We suggest
your contact the machine administrator.
See also
PC Functions [85]
Configuring the connection
To configure your machine's email connection, proceed
as follows:
1 Do the operations described in the chapter
Accessing email configuration settings [ 39].
2 Do the operations described in the chapter
Configuring the email connection [ 39].
- 63 -
Description
9 - Printing documents sent by email
MF 5990 - Agoris M943
2 Press MOBILE PRINT > GET DOCUMENTS to retrieve your print.
Note
The document prints automatically if the print is
not secure.
The machine sends an email to your personal email address containing an attachment
named «printer.vcf». This attachment contains the coordinates of the machine to be
saved in your personal address book.
If the print is secured, the machine automatically
sends you to the print queue. In this case, repeat
the operations described in chapter Recovering/
releasing prints from the print queue [ 64].
Note
Note
You may cancel the procedure at any time
by pressing Cancel.
There are two possibilities for retrieving all
your prints (secure or not). Either use the
menu MOBILE PRINT or the menu PRINT
QUEUE. Only secure prints need the document to be selected in the print queue and
the 4-digit code to be entered.
Note
If you have not received the machine's
email address in your personal email, consult the machine's emission queue to
check if the email has been sent. To do so,
press MENU >SEND QUEUE > SEND then
select the email sent to yourself and press
OK.
If the problem persists, contact your machine administrator.
Retrieving/Releasing prints from the print
queue
To retrieve a secure print on the machine from the print
queue, proceed as follows:
1 Press the MENU key.
2 Press PRINT QUEUE.
3 Press PRINT.
Sending documents to the machine by
email for printing
Non secure prints are printed automatically.
To send documents by email to the machine, proceed as
follows:
1 From your email:
Use the reply to command from the email sent by
the machine and add an attachment in format TIFF/
JPEG/PDF/TXT.
or
"Open" or "save" the attachment sent by the machine in VCF format to add the machine's address
to your address book and send the document(s) to
the machine later.
2 After sending the email, go to the machine to retrieve your documents that have been printed or
are awaiting printing.
Secure prints are identified by the type EMAIL.
4 Select your secure print task from the list.
An identification screen is displayed.
5 Identify yourself with the information entered when
you sent your print task:
enter the 4-digit code associated with the user
email address.
6 When the identification is successfully completed,
the machine prints your document.
If identification fails, the machine displays an explanatory
message (insufficient rights, unknown account, etc.). In all
cases, contact the machine's administrator.
Note
Note
For printing in secure mode, the time to receive and display documents for printing
may required additional processing time. To
check if the documents have arrived, you
can consult the print queue as often as necessary by pressing MENU > PRINT
QUEUE. If your documents do not appear
after several minutes, contact the machine
administrator.
In the event of a problem importing the
Gmail/Android contact, check that you are
using the Smartphone's own email client
and not Gmail to be able to import the contact file. If not, save the VCF file locally.
Then click "File" and "Save as" to manually
import from the Gmail interface to avoid this
problem.
Printing from the Mobile Print menu
Managing configuration of secure printing
To retrieve a print on the machine from the MOBILE
PRINT menu, proceed as follows:
1 Press the MENU key.
To manage configuration of secure printing (email with
associated 4-digit code) in the list of users, proceed as
follows:
Access the list of users
- 64 -
9 - Printing documents sent by email
MF 5990 - Agoris M943
1 Press the MENU key.
2 Press MOBILE PRINT > LIST OF USERS.
The list of users with codes appears on the screen and
you can do the following actions:
• Add a new configuration, new email address with associated 4-digit code.
• Edit your configuration, your email address and/or its
associated 4-digit code. Receive your 4-digit code if
you have forgotten it.
• Delete your configuration, email with associated 4-digit code
Editing a user
To edit your user account from the list of users, proceed
as follows:
1 Select the user account you want to edit by pressing the corresponding email address in the list.
2 Press Edit.
3 Identify the user account you want to edit by entering its 4-digit code and press Entry or OK to confirm identification.
Note
Note
If you have forgotten the 4-digit code associated with the user account to edit, press
Lost Code. The machine sends a new
email with your code and you can continue
the procedure.
You may cancel the procedure at any time
by pressing Exit or the
key.
Adding a user
4 Press EMAIL if you want to edit your email address.
5 Enter your new email address using the virtual key-
To add a user from the list of users, proceed as follows:
1 Press Add.
2 Enter your email address using the virtual key-
board. In the event of an error, use the
key to
delete a character. Press OK to return to the previous screen.
6 Press CODE if you want to edit the code associated with your email address. An identification
screen is displayed:
board. In the event of an error, use the
key to
delete a character. Press OK to confirm.
3 The window to enter the 4-digit code opens:
Enter the 4-digit code using the virtual keyboard.
Enter your new 4-digit code using the virtual keyboard.
Confirm this 4-digit code.
Press OK to send the machine's email address
and the associated 4-digit code to your email address.
Confirm this new 4-digit code.
Note
Note
Press OK to return to the previous screen.
The machine sends an email to your personal email address containing an attachment
named «printer.vcf». This attachment contains the coordinates of the machine to be
saved in your personal address book.
You may cancel the procedure at any time
by pressing Cancel or the
key.
7 Press OK to confirm the modification.
Deleting a user
Note
You may cancel the procedure at any time
by pressing Cancel or the
key.
Note
If you have not received the machine's
email address in your personal email, consult the machine's emission queue to
check if the email has been sent. To do so,
press MENU >SEND QUEUE > SEND then
select the email sent to yourself and press
OK.
If the problem persists, contact your machine administrator.
To delete your user account from the list of users,
proceed as follows:
1 Select the user account you want to delete by
pressing the corresponding email address in the
list.
2 Press Delete.
3 Identify the user account you want to delete by entering its 4-digit code and press Entry or OK to delete it. The user account no longer appears in the
list of users.
Caution
When a user is deleted, the machine also
definitively deletes any documents awaiting
printing received from this user.
- 65 -
9 - Printing documents sent by email
MF 5990 - Agoris M943
Note
The type...
If you have forgotten the 4-digit code associated with the user account to delete, press
Lost Code. The machine sends a new
email with your code and you can continue
the procedure.
Note
You may cancel the procedure at any time
by pressing Cancel or the
To cancel a print in progress:
key.
FAX HELD
received faxes saved in the
memory (see Receiving faxes
[ 56]).
Print out the list of saved print tasks
A message asking you to confirm the cancellation
appears on the screen.
2 Press OK to confirm cancellation of the print task in
progress.
To print out the list of print tasks saved in the memory by
the machine for subsequent printing (held after printing):
1 Press PRINT QUEUE.
The machine prints out the list of print tasks with the
property "Keep After".
Monitoring printing
The print queue contains documents that are:
• currently being printed,
• awaiting printing (preceded by other print tasks),
• saved in the memory for printing,
• secured awaiting to be forced.
Accessing the print queue
1 Press the MENU key.
2 Press PRINT QUEUE.
To be able to identify documents awaiting printing, the
print queue allocates a type to the various print tasks
managed by the machine:
The type...
PC HELD
print tasks sent from a
computer with at least one of
the following properties:
hold before printing
secure printing
The print queue allows you to perform the following
operations:
• Print out the list of saved print tasks
• Force a print task
• Edit the properties of a print task
• Delete a print task
key.
Cancelling a print in progress
1 Press the
identifies...
identifies...
Force a print task
To force or reprint a document from the print queue:
1 Press PRINT.
2 Select the required print task and press OK.
You print task becomes the priority. The corresponding
document is printed as soon as the machine is available
to print.
Editing a print task
To edit the properties of a print task from the print queue:
1 Press DISPLAY/EDIT.
2 Select the required print task and press OK.
The properties of the selected print task are displayed.
PRINT PC
print tasks sent from a
computer.
FAX
faxes received awaiting
printing.
EMAIL
emails received awaiting
printing.
Deleting a print task
print tasks sent from a USB
memory key.
To delete a print task from the print queue:
PRINT USB KEY
print tasks automatically
generated by the machine
(emission report,
communication log) or
PRINT REPORT
launched by a user from a
machine menu (printing of
function guide, address book,
settings, etc.).
3 Make the required modifications and press OK to
confirm.
Note
Deleting a print task is irreversible.
1 Press DELETE.
2 Select the required print task and press OK.
The selected print task disappears from the print queue.
- 66 -
9 - Printing documents sent by email
MF 5990 - Agoris M943
Using a USB
memory key
Viewing the content of a USB key
When you insert a USB key into the machine, its content
is immediately analyzed. The number of files present is
displayed and the special menu USB KEY opens.
The USB KEY function offers you methods of display and
selection suited to the types of documents you wish to
print:
You can connect a USB key to the machine. The
compatible files are analyzed and you may perform the
following operations:
• print files from your USB key;
• scan and save a document on your USB key;
• scan the content of your USB key.
Mode
DOCUMENTS Only printable documents on the
USB key are displayed in the form
of a list.
The file names and their
extensions are displayed to
facilitate selection.
Support compatibility
The machine can read the contents of the following USB
peripherals:
IMAGES
Support
Characteristics
Peripheral
Mass storage peripheral 2.0
formatted in FAT 16 or FAT 32
Maximum size 20 Gb
Files
Photo / Image: JPEG
Document: TIFF, TXT, PDF
•
Only printable image files present
on the USB key are displayed.
The images/photos are displayed
as thumbnails to facilitate
selection.
Printable files (documents and images) are displayed
without taking account of their arborescence on the USB
key.
Recommendations for using USB
keys
•
Description
Printing files from a USB key
Before using a USB key, always make a backup of its
contents. Thus, in the event of any data loss, you will
be able to retrieve the contents using the backup copy.
Always insert your USB key in the machine without
forcing and respecting the direction of insertion.
For clarity and to help you select the right printing options
for the type of files to be printed, this section explains the
following operations separately:
• Printing photos from a USB key;
• Printing documents from a USB key.
It is possible to select image and document files to be
printed in the same operation. In this case, common
printing options (paper format, paper type, number of
copies, etc.) will apply to all files selected.
Printing photos from a USB key
To print image files present on your USB key, proceed as
follows:
Cancelling an operation
Note
You may cancel an operation at any time by
pressing
.
1 Insert your USB key into the machine respecting
the insertion direction.
•
•
•
Never disconnect a USB key when a read or save operation is in progress.
Remove the inserted USB key only when the machine
has completed any printing or saving operations.
If the machine cannot read the content of the USB key,
check that the USB key is compatible, that it is correctly inserted, and that the file formats are compatible.
- 67 -
The USB key is analyzed. When the analysis is
complete, the USB KEY menu is displayed.
2 Press PRINT.
The first settings appear on the screen. Use
OTHER PARAMETERS to access all available
settings.
3 Press IMAGES to select the photos to print.
10 - Using a USB memory key
MF 5990 - Agoris M943
The image file selection window is displayed on
the screen.
Cancelling an operation
Note
The left-hand side contains the list of available
files.
You may cancel an operation at any time by
The right-hand side contains the files selected for
printing.
4 Use the up and down arrows to view all available
files. Select the required files in the left-hand side
using the keys:
pressing
.
1 Insert your USB key into the machine respecting
the insertion direction.
The USB key is analyzed. When the analysis is
complete, the USB KEY menu is displayed.
2 Press PRINT.
Key
Action
The first settings appear on the screen. Use
OTHER PARAMETERS to access all available
settings.
Add files to the list of files to print.
Add the selected file to the list of files
to print.
3 Press DOCUMENTS to select the documents to
print.
Remove the selected file from the list
of files to print.
The file selection window is displayed on the
screen.
Remove all files from the list of files
to print.
The left-hand side contains the list of available
files.
5 When you have selected the files, press OK to confirm.
6 To change the number of copies of files to print,
press NUMBER OF COPIES. Enter the required
number of copies using the virtual keyboard or the
number pad. Press OK to confirm.
7 To specify the print format of the photos, press
IMAGE SIZE. Select the print format for image files
and press OK to confirm.
Format
Description
PHOTO
Classic 10x15 cm photo printing
FULL PAGE
Print adjusted to page format
used.
4 Use the up and down arrows to view all available
files. Select the required files in the left-hand side
using the keys:
Key
Action
Add files to the list of files to print.
Add the selected file to the list of files
to print.
Remove the selected file from the list
of files to print.
Remove all files from the list of files
to print.
8 To change the paper type, press PAPER TYPE.
Select the required option in the list and press OK
to confirm.
9 To define the output document format, press
PRINTED PAPER. Select the required option in
the list and press OK to confirm.
10 To activate toner-saving printing, press TONER
SAVE and select the required status. Press OK to
confirm.
11 Press
The right-hand side contains the files selected for
printing.
to print the files.
User rights
Note
Access to functions depends on your user
rights. To know which rights you have, consult your machine administrator.
Printing documents from a USB key
To print document files present on your USB key, proceed
as follows:
- 68 -
5 When you have selected the files, press OK to confirm.
6 To change the number of copies of files to print,
press NUMBER OF COPIES. Enter the required
number of copies using the virtual keyboard or the
number pad. Press OK to confirm.
7 If you have selected documents to print on both
sides, you can use the options DUPLEX and
BINDING EDGE. To activate/deactivate duplex
document printing, press DUPLEX. Select the required option in the list and press OK to confirm.
8 To change the binding type, press BINDING
EDGE. Select the required option from the list (see
section Binding [ 49]). Press OK to confirm.
9 To change the paper type, press PAPER TYPE.
Select the required option in the list and press OK
to confirm.
10 To define the output document format, press
PRINTED PAPER. Select the required option in
the list and press OK to confirm.
10 - Using a USB memory key
MF 5990 - Agoris M943
5 To customize the name of the scanned file, press
FILENAME. Enter the name using the virtual keyboard (maximum 20 characters). In the event of an
11 To activate toner-saving printing, press TONER
SAVE and select the required status. Press OK to
confirm.
12 Press
error, use the
key to delete a character. Press
OK to confirm.
6 To customize the format of the scanned file, press
DOCUMENT FORMAT. Select the format from the
available options and press OK to confirm.
to print the files.
User rights
Note
Access to functions depends on your user
rights. To know which rights you have, consult your machine administrator.
Format
Saving a document on a USB key
This function enables you to scan and save a document
directly to a USB key, in JPEG, PDF or Secure PDF
format.
Note
Before scanning a document, check that
there is sufficient space on your USB key.
To scan a document and save it to a USB key, proceed as
follows:
Cancelling an operation
Note
.
1 Insert the document to scan (see section Inserting
original documents [ 18]).
2 Insert your USB key into the machine respecting
the insertion direction.
The scanned file is in format:
TIFF (black and white document)
JPEG (colour document)
PDF
The file is scanned in PDF format
(black and white or colour
document).
SECURED
PDF
The file is scanned in PDF format
(black and white or colour),
protected by a password which
you can define.
7 If you have selected SECURED PDF format, press
PASSWORD. Enter the password using the virtual
keyboard (maximum 20 characters). In the event of
Resolution
The USB key is analyzed. When the analysis is
complete, the USB KEY menu is displayed.
3 Press SCANNER.
The first settings appear on the screen. Use
OTHER PARAMETERS to access all available
settings.
Note
You can also access this function by pressing SCAN then by selecting USB KEY.
4 To change the destination directory on the USB
key, press DIRECTORY PATH. Enter the file destination directory (maximum 80 characters). In the
event of an error, use the
acter. Press OK to confirm.
IMAGE
an error, use the
key to delete a character.
Press OK to confirm.
8 To change the resolution, press QUALITY. Select
the resolution the best suited to your document
from the options available and press OK to confirm.
You may cancel an operation at any time by
pressing
Description
key to delete a char-
- 69 -
Description
LIGHT
Low resolution.
TEXT
Resolution suitable for documents
containing text.
TEXT AND
IMAGE
Resolution suitable for documents
containing text and colour
images.
PHOTO
Resolution suitable for documents
containing colour images,
photographs.
9 To scan the document in colour, press COLOUR.
Select the required option in the list and press OK
to confirm.
10 To change the contrast, press CONTRAST. Select
the most suitable contrast for your document from
the available options. Press OK to confirm.
11 If you use the autofeed scanner and your document
is double-sided, press DUPLEX to activate / deactivate double-sided scanning of the document. Select the required option in the list and press OK to
confirm.
12 To specify the number of pages in the document
before scanning, press NUMBER OF PAGES. Enter the number of pages using the virtual keyboard
or the number pad. Press OK to confirm.
10 - Using a USB memory key
MF 5990 - Agoris M943
13 To activate / deactivate the Multiple Scan option,
press MULTIPLE ANALYSIS. Select YES to activate it or NO to deactivate it (see Using the Multiple
Scan option correctly [ 18]). Press OK to confirm.
14 Press
Key
to scan the document.
User rights
SAVE
To save the settings, see section
Exporting settings to a USB key
[ 41].
To save the address book, see
section Exporting the address book
to a USB key [ 82].
LOAD
To import the settings, see section
Importing settings from a USB key
[ 42].
To import the address book to the
machine from a USB key, see
section Importing an address book
from a USB key [ 83].
Note
Access to functions depends on your user
rights. To know which rights you have, consult your machine administrator.
The document is scanned and saved to the inserted USB
key.
Analyzing the content of your USB
key
See also
Remote configuration [21]
After prolonged inactivity, the machine exits the USB KEY
menu.
To view the content of your USB key again, proceed as
follows:
1 Press the MENU key.
2 Select [OTHER COMMANDS] > USB KEY.
3 Press ANALYZE THE KEY.
The USB key is analyzed.
Importing and exporting from a USB
key
The menu ADVANCED FUNCTIONS enables the user to
save settings, the address book and to update the
machine easily using a USB key:
• The function UPDATE SOFTWARE enables you to
update one or three machine software components
from a USB key. (BOOT, Software, JFFS2).
• The function SAVE enables you to save the machine's
settings and/or the address book on a USB key.
• The function LOAD enables you to import the machine's settings and/or address book from a USB key.
To access the advanced functions, proceed as follows:
1 Insert your USB key into the machine respecting
the insertion direction.
The USB key is analysed. When the analysis is
complete, the USB KEY menu is displayed.
2 Press ADVANCED FUNCTIONS.
3 Select the required function:
Key
Description / Procedure
Description / Procedure
UPDATE To update, see section Updating
SOFTWARE Firmware by USB key [ 108].
- 70 -
10 - Using a USB memory key
MF 5990 - Agoris M943
Scanning and
sending
documents
Cancelling an operation
Note
You may cancel an operation at any time by
pressing
1 Insert the document to scan (see section Inserting
original documents [ 18]).
2 Press the SCAN key.
3 Select SCAN TO MAIL.
4 Enter the email address of the recipient using the
virtual keyboard or select the recipient as follows:
You machine allows you to scan and send paper
documents in a single operation.
The scan and send function includes several Scan to
actions, depending on the media used:
Function
Description
Scan to Key
Scan a document and save it on a
key connected to the machine.
Scan to Mail
Send an email with the scanned
document as an attachment.
Scan to File
Save a scanned document in a
file and place it directly:
on an FTP server (Scan to
FTP) ;
in a shared directory on a computer connected to the local
network (Scan to SMB).
Scan to PC
Scan a document and save it
directly on a computer via the
document manager associated
with the Companion Suite Pro
software.
Scan to
Archive
Scan a document and save it
directly in the fax server archiving
system.
.
To select a recipient...
from the address
book
You can also configure numerous settings to scan and
send documents according to your needs.
Scan to Key
from the 10 last
recipients saved.
The Scan to Key function allows you to scan a document
and save it on a USB key connected to the machine.
For the detailed procedure, and for information about
compatibility and recommendations for using USB
peripherals, see the section Using a USB memory key
[ 67].
Scan to Mail
The Scan to Mail function allows you to scan a document
and send it as an attachment to an email address, in
JPEG, PDF or Secure PDF format.
To scan a document and send it as an attachment to an
email address:
- 71 -
then...
In the data field Address
book, press
then:
Select the contact or list of
contacts required from the
address book entries. Use
the up and down arrows to
view all entries in the address book.
OR
Enter the first few letters of
the name of your correspondent using the virtual
keyboard, and add letters
until the full name of the required correspondent is
displayed.
OR
Enter the figures of short
number of your correspondent using the virtual
keyboard or the keypad until the full name of the required correspondent is
displayed.
Press
.
Select the required recipient.
Use the up and down arrows
to view all recipients in the
memory.
5 To add other recipients, press
and specify the
second recipient (see previous step). Repeat the
operation for each recipient to add (maximum 10
contacts or lists of contacts)..
Note
You can delete the last recipient entered by
pressing the
key. Repeat this until the
first recipient entered if you want to delete
all.
11 - Scanning and sending documents
MF 5990 - Agoris M943
Note
Resolution
You can view the recipient(s) entered by
pressing OTHER PARAMETERS.
6 Press OTHER PARAMETERS to access the parameters you want to change
7 To copy the email to other recipients, press CC
RECIPIENT. Specify the recipient(s) on copy, and
press OTHER PARAMETERS to confirm.
8 Press SUBJECT. Enter the subject of the email using the virtual keyboard (80 characters maximum).
an error, use the
key to delete a character.
Press OK to confirm.
10 To customize the format of the attachment, press
DOCUMENT FORMAT. Select the format from the
available options and press OK to confirm.
Description
IMAGE
The file is sent in format:
TIFF (black and white document)
JPEG (colour document)
PDF
The file is sent in PDF format
(black and white or colour
document).
SECURED
PDF
The file is sent in PDF format
(black and white or colour),
protected by a password which
you can define.
TEXT
Resolution suitable for documents
containing text.
TEXT AND
IMAGE
Resolution suitable for documents
containing text and colour
images.
PHOTO
Resolution suitable for documents
containing colour images,
photographs.
13 To scan the document in colour, press COLOUR.
Select the required option from the list. Press OK to
confirm.
14 To change the contrast, press CONTRAST. Select
the most suitable contrast for your document from
the available options. Press OK to confirm.
15 If you use the autofeed scanner and your document
is double-sided, press DUPLEX to activate / deactivate double-sided scanning of the document. Select the required option from the list. Press OK to
confirm.
16 To specify the number of pages in the document
before sending, press NUMBER OF PAGES. Enter
the number of pages using the virtual keyboard or
the number pad. Press OK to confirm.
17 To activate / deactivate the Multiple Scan option,
press MULTIPLE SCAN. Select the option YES to
activate or NO to deactivate it (see Using the
Multiple Scan option correctly [ 18]). Press OK to
confirm.
key to delete
In the event of an error, use the
a character. Press OK to confirm.
9 To customize the name of the attachment, press
FILENAME. Enter the file name using the virtual
keyboard (maximum 20 characters). In the event of
Format
Description
18 Press
to send the document.
Note
If you are using the flatbed scanner, you can
scan more than one page. Place the next
page on the scanner, select NEXT. Select
SEND when all pages have been scanned.
11 If you have selected SECURED PDF format, press
PASSWORD. Enter the password using the virtual
keyboard (maximum 20 characters). In the event of
User rights
an error, use the
key to delete a character.
Press OK to confirm.
Note
Access to functions depends on your user
rights. To know which rights you have, consult your machine administrator.
Note
Note the password entered, strictly respecting the characters, upper and lower case
letters. You will need to send it to the recipient(s). On opening the document, the
password will be requested.
12 To change the resolution, press QUALITY. Select
the resolution the best suited to your document
from the options available and press OK to confirm.
Resolution
LIGHT
Description
The document is scanned and the email message is
saved. Depending on the machine configuration, the
email is sent via the local network or during the next
planned internet connection.
To force the internet connection and send / receive
emails, press MENU then select INTERNET > MAIL /
PHONE.
You can monitor document emissions via the emission
queue (see the section Monitoring document emissions
[ 77]).
Low resolution.
- 72 -
11 - Scanning and sending documents
MF 5990 - Agoris M943
Scan to FTP
Note
The Scan to FTP function allows you to scan a document
in JPEG, PDF or Secure PDF format and place it on an
FTP server, for archiving for example.
To connect to the FTP server, you need to know the FTP
user name and the password.
When sending files, the machine connects to the FTP
server using the defined connection settings.
To scan a document and place it on an FTP server:
Cancelling an operation
Note
.
1 Insert the document to scan (see section Inserting
original documents [ 18]).
2 Press the SCAN key.
3 Select SCAN TO FTP.
4 Enter the address of the FTP server using the virtual keyboard or select it as follows:
To select an FTP
address...
defined in an
address book
contact
5 Press OTHER PARAMETERS to access the parameters you want to change
6 Press NETWORK USER. Enter the FTP user
name (80 characters maximum). In the event of an
error, use the
key to delete a character. Press
OK to confirm.
7 Press NETWORK PASSWD. Enter the FTP password. Press OK to confirm.
8 To specify a destination directory on the FTP server, press NETWORK PATH. Enter the file destination directory (for example: server name/John), and
press OK to confirm.
You may cancel an operation at any time by
pressing
If you have selected the FTP address from
the address book, the settings NETWORK
USER, NETWORK PASSWD and
NETWORK PATH are automatically completed with the existing information.
When no directory is entered, the files are stored
directly in the root directory of the FTP server.
9 To customize the name of the attachment, press
FILENAME. Enter the file name using the virtual
keyboard (maximum 20 characters). In the event of
then...
an error, use the
key to delete a character.
Press OK to confirm.
10 To customize the format of the attachment, press
DOCUMENT FORMAT. Select the format from the
available options and press OK to confirm.
In the data field Address
book, press
then:
Select the contact or list of
contacts required from the
address book entries. Use
the up and down arrows to
view all entries in the address book.
OR
Enter the first few letters of
the name of your correspondent using the virtual
keyboard, and add letters
until the full name of the required correspondent is
displayed.
OR
Enter the figures of short
number of your correspondent using the virtual
keyboard or the keypad until the full name of the required correspondent is
displayed.
Format
Description
IMAGE
The file is sent in format:
TIFF (black and white document)
JPEG (colour document)
PDF
The file is sent in PDF format
(black and white or colour
document).
SECURED
PDF
The file is sent in PDF format
(black and white or colour),
protected by a password which
you can define.
11 If you have selected SECURED PDF format, press
PASSWORD. Enter the password using the virtual
keyboard (maximum 20 characters). In the event of
an error, use the
key to delete a character.
Press OK to confirm.
Note
Emission to several recipients is not possible with this function.
- 73 -
11 - Scanning and sending documents
MF 5990 - Agoris M943
The document is scanned and saved. It will be placed on
the FTP server at the next connection to the local
network.
You can monitor document emissions via the emission
queue (see the section Monitoring document emissions
[ 77]).
Note
Note the password entered, strictly respecting the characters, upper and lower case
letters. You will need to send it to the recipient(s). On opening the document, the
password will be requested.
Scan to SMB
12 To change the resolution, press QUALITY. Select
the resolution the best suited to your document
from the options available and press OK to confirm.
Resolution
Description
LIGHT
Low resolution.
TEXT
Resolution suitable for documents
containing text.
TEXT AND
IMAGE
Resolution suitable for documents
containing text and colour
images.
PHOTO
Resolution suitable for documents
containing colour images,
photographs.
The Scan to SMB function allows you to scan a
document in JPEG, PDF or Secure PDF format and place
it directly in a shared directory on a computer connected
to the local network, on your PC for example.
To connect to the destination PC, you must know the
name of the PC, the full path to the destination directory
(shared address), the SMB user and its password.
The SMB address is in the following format:
• smb://Server_name/SharedFolder
• smb://Server_IP_address/SharedFolder
When sending files, the machine connects to the
destination PC using the defined connection settings.
To scan a document and place it in a shared directory on
a PC via the local network:
Cancelling an operation
13 To scan the document in colour, press COLOUR.
Select the required option from the list. Press OK to
confirm.
14 To change the contrast, press CONTRAST. Select
the most suitable contrast for your document from
the available options. Press OK to confirm.
15 If you use the autofeed scanner and your document
is double-sided, press DUPLEX to activate / deactivate double-sided scanning of the document. Select the required option from the list. Press OK to
confirm.
16 To specify the number of pages in the document
before sending, press NUMBER OF PAGES. Enter
the number of pages using the virtual keyboard or
the number pad. Press OK to confirm.
17 To activate / deactivate the Multiple Scan option,
press MULTIPLE SCAN. Select the option YES to
activate or NO to deactivate it (see Using the
Multiple Scan option correctly [ 18]). Press OK to
confirm.
18 Press
to send the document.
Note
If you are using the flatbed scanner, you can
scan more than one page. Place the next
page on the scanner, select NEXT. Select
SEND when all pages have been scanned.
User rights
Note
Access to functions depends on your user
rights. To know which rights you have, consult your machine administrator.
- 74 -
Note
You may cancel an operation at any time by
pressing
.
1 Insert the document to scan (see section Inserting
original documents [ 18]).
2 Press the SCAN key.
3 Select SCAN TO SMB.
4 Enter the SMB address using the virtual keyboard
or select it as follows:
11 - Scanning and sending documents
MF 5990 - Agoris M943
To select an SMB
address...
defined in an
address book
contact
9 To customize the name of the attachment, press
FILENAME. Enter the file name using the virtual
keyboard (maximum 20 characters). In the event of
then...
an error, use the
key to delete a character.
Press OK to confirm.
10 To customize the format of the attachment, press
DOCUMENT FORMAT. Select the format from the
available options and press OK to confirm.
In the data field Address
book, press
then:
Select the contact or list of
contacts required from the
address book entries. Use
the up and down arrows to
view all entries in the address book.
OR
Enter the first few letters of
the name of your correspondent using the virtual
keyboard, and add letters
until the full name of the required correspondent is displayed.
OR
Enter the figures of short
number of your correspondent using the virtual keyboard or the keypad until the
full name of the required correspondent is displayed.
Format
Description
IMAGE
The file is sent in format:
TIFF (black and white document)
JPEG (colour document)
PDF
The file is sent in PDF format
(black and white or colour
document).
SECURED
PDF
The file is sent in PDF format
(black and white or colour),
protected by a password which
you can define.
11 If you have selected SECURED PDF format, press
PASSWORD. Enter the password using the virtual
keyboard (maximum 20 characters). In the event of
an error, use the
key to delete a character.
Press OK to confirm.
Note
Note
Emission to several recipients is not possible with this function.
Note the password entered, strictly respecting the characters, upper and lower case
letters. You will need to send it to the recipient(s). On opening the document, the
password will be requested.
Note
If you have selected the SMB address from
the address book, the settings NETWORK
USER, NETWORK PASSWD and
NETWORK PATH are automatically completed with the existing information.
12 To change the resolution, press QUALITY. Select
the resolution the best suited to your document
from the options available and press OK to confirm.
5 Press OTHER PARAMETERS to access the parameters you want to change
6 Press NETWORK USER. Enter the SMB user
name (80 characters maximum). In the event of an
Resolution
error, use the
key to delete a character. Press
OK to confirm.
7 Press NETWORK PASSWD. Enter the SMB password. Press OK to confirm.
8 To specify a destination directory in the shared directory on the destination PC, press NETWORK
PATH. Enter the file destination directory and
press OK to confirm.
When no directory is entered, the files are stored
directly in the root directory of the shared directory
on the destination PC.
- 75 -
Description
LIGHT
Low resolution.
TEXT
Resolution suitable for documents
containing text.
TEXT AND
IMAGE
Resolution suitable for documents
containing text and colour
images.
PHOTO
Resolution suitable for documents
containing colour images,
photographs.
13 To scan the document in colour, press COLOUR.
Select the required option from the list. Press OK to
confirm.
14 To change the contrast, press CONTRAST. Select
the most suitable contrast for your document from
the available options. Press OK to confirm.
11 - Scanning and sending documents
MF 5990 - Agoris M943
15 If you use the autofeed scanner and your document
is double-sided, press DUPLEX to activate / deactivate double-sided scanning of the document. Select the required option from the list. Press OK to
confirm.
16 To specify the number of pages in the document
before sending, press NUMBER OF PAGES. Enter
the number of pages using the virtual keyboard or
the number pad. Press OK to confirm.
17 To activate / deactivate the Multiple Scan option,
press MULTIPLE SCAN. Select the option YES to
activate or NO to deactivate it (see Using the
Multiple Scan option correctly [ 18]). Press OK to
confirm.
18 Press
to send the document.
Note
4 If more than one computer is registered on the machine, a list of available computers is displayed on
the screen. Select the required computer and press
OK to confirm.
5 Press
to send the document.
User rights
Note
Access to functions depends on your user
rights. To know which rights you have, consult your machine administrator.
The document is scanned and saved on the selected
computer, with the scan settings defined in the peripheral
manager associated with the Companion Suite Pro
software.
Scan to Archive
If you are using the flatbed scanner, you can
scan more than one page. Place the next
page on the scanner, select NEXT. Select
SEND when all pages have been scanned.
The Scan to Archive function allows you to scan a
document and send it on your fax server for archiving.
To use this function, the fax server function must be
activated and configured on the machine (see
Configuring the fax server (optional) [ 32]).
To scan a document and archive it directly on your fax
server:
User rights
Note
Access to functions depends on your user
rights. To know which rights you have, consult your machine administrator.
Cancelling an operation
Note
The document is scanned and saved. It will be placed in
the shared directory on the destination PC during the next
connection to the local network.
You can monitor document emissions via the emission
queue (see the section Monitoring document emissions
[ 77]).
Scan to PC
The Scan to PC function allows you to scan a document
and save it directly to a computer via the document
manager in the Companion Suite Pro software.
For more information on installing and configuring the
Companion Suite Pro software, see the section PC
Functions [ 85].
To scan a document and open it directly on a computer
registered on the machine:
pressing
Note
You may cancel an operation at any time by
.
1 Insert the document to scan (see section Inserting
original documents [ 18]).
2 Press the SCAN key.
3 Select SCAN TO PC.
- 76 -
.
1 Insert the document to scan (see section Inserting
original documents [ 18]).
2 Press the SCAN key.
3 Select SCAN TO ARCHIVE.
4 To modify the user name, press USER. Enter the
required name using the virtual keyboard (80 characters maximum, the default name is PUBLIC).
Press OK to confirm.
5 To change the resolution, press QUALITY. Select
the resolution the best suited to your document
from the options available and press OK to confirm.
Resolution
Cancelling an operation
pressing
You may cancel an operation at any time by
Description
LIGHT
Low resolution.
TEXT
Resolution suitable for documents
containing text.
TEXT AND
IMAGE
Resolution suitable for documents
containing text and colour
images.
PHOTO
Resolution suitable for documents
containing colour images,
photographs.
11 - Scanning and sending documents
MF 5990 - Agoris M943
6 To scan the document in colour, press COLOUR.
Select the required option from the list. Press OK to
confirm.
7 To change the contrast, press CONTRAST. Select
the most suitable contrast for your document from
the available options. Press OK to confirm.
8 If you use the autofeed scanner and your document
is double-sided, press DUPLEX to activate / deactivate double-sided scanning of the document. Select the required option from the list. Press OK to
confirm.
9 To specify the number of pages in the document
before sending, press NUMBER OF PAGES. Enter
the number of pages using the virtual keyboard or
the number pad. Press OK to confirm.
10 To activate / deactivate the Multiple Scan option,
press MULTIPLE SCAN. Select the option YES to
activate or NO to deactivate it (see Using the
Multiple Scan option correctly [ 18]). Press OK to
confirm.
11 Press
Receiving emails
Emails are automatically received via the local network or
at each internet connection, if this is configured on the
machine.
Note
To force the internet connection and send /
receive emails, press MENU then select
INTERNET > MAIL / TELEPHONE.
The machine systematically prints out emails received.
Some email and attachment formats cannot be
processed by the machine. They will be printed out with
an indication of the elements that could not be processed.
You will still be able to consult them directly on your email
client.
The machine can process the following formats:
to send the document.
Element
Format processed
User rights
Message body TXT
Note
Attachment
Access to functions depends on your user
rights. To know which rights you have, consult your machine administrator.
The document is scanned and saved. It will be sent to the
fax server for archiving during the next connection to the
local network.
You can monitor document emissions via the emission
queue (see the section Monitoring document emissions
[ 77]).
Stopping an emission in progress
It is possible to stop an emission in progress whatever the
emission type, but it will differ depending on whether the
emission is to one or several recipients.
• For an emission to one recipient, the document is deleted.
• For an emission to several recipients, only the recipient for the document in progress when the emission is
stopped is deleted from the emission queue.
To stop an emission in progress :
1 Press
.
TXT
TIFF
JPEG
PDF
The settings for customizing printing of received emails
are described in the section Print settings for received
faxes [ 30].
Monitoring document emissions
The emission queue contains requests:
• currently being sent,
• awaiting emission (preceded by other requests or
awaiting a new emission attempt),
• deferred,
• rejected (stopped or maximum number of attempts
reached).
Accessing the emission queue
1 Press MENU.
2 Press SEND QUEUE.
To enable you to identify emissions, the emission queue
allocates a type to the various Scan to emission modes:
A message asking you to confirm the cancellation
is displayed on the screen.
2 Press OK to confirm cancelling the emission in progress.
For several recipients, you can delete the other recipients
from the emission queue (see Deleting a document
awaiting emission [ 78]).
If the machine is configured to print out an emission report
(see the section Emission report [ 40]), it will be printed
out, indicating that the communication was stopped at the
request of the user.
- 77 -
The type...
identifies emissions...
MAIL or Scan to Mail
NETWOR Scan to Archive
K
FILE or Scan to FTP
NETWOR Scan to SMB
K
11 - Scanning and sending documents
MF 5990 - Agoris M943
The emission queue allows you to:
• Force a request (on standby or rejected) to be sent
• Edit the recipient(s) for an emission request (on standby)
• Edit the destination directory for an emission request
• Delete an emission request (on standby or rejected)
• Print the document in an emission request
Print out a document awaiting emission
To print out a document awaiting emission:
1 Press PRINT.
2 Select the required emission request and press
OK.
Forcing an emission request
To force sending or resend a document that is on standby
or has been rejected:
1 Press SEND.
Documents sent by email or for archiving are
identified by MAIL or NETWORK, documents
sent to an FTP or SMB address are identified by
FILE or NETWORK.
2 Select the required emission request and press
OK.
You emission request becomes the priority.
Editing an emission request
To edit an emission request from the emission queue:
1 Press DISPLAY/EDIT.
Documents sent by email or for archiving are
identified by MAIL or NETWORK, documents
sent to an FTP or SMB address are identified by
FILE or NETWORK.
2 Select the required emission request and press
OK.
The emission options for the selected request are
displayed.
3 Enter the required modifications and press OK to
confirm.
Deleting a document awaiting emission
To delete an emission request from the emission queue
and cancel the emission:
Note
Deleting an emission request is irreversible.
1 Press DELETE.
Documents sent by email or for archiving are
identified by MAIL or NETWORK, documents
sent to an FTP or SMB address are identified by
FILE or NETWORK.
2 Select the required emission request and press
OK.
The selected emission request disappears from the
emission queue.
- 78 -
11 - Scanning and sending documents
MF 5990 - Agoris M943
Address book
Creating a contact
You may build up an address book by creating contacts
and lists of contacts. You can create up to 500 contacts,
which can be grouped in 32 contact lists.
For each contact or contact list, you can create, consult,
edit or delete the content. You can also print out the
address book.
If you have installed the PC kit, you can also manage your
address book from your computer. For more information,
consult the section PC functions [ 85].
Finally, you can save and, if necessary, restore the
address book using the import and export functions.
To create a contact:
Cancelling an operation
Note
You may cancel an operation at any time by
pressing
1 Press the MENU key.
2 Select ADDRESS BOOK > CONTACTS >
CREATE.
3 Press NAME.
4 Enter your correspondent's name using the virtual
keyboard (maximum 16 characters). In the event of
Creating and managing contacts
an error, use the
key to delete a character.
Press OK to confirm.
5 To customize the number associated with the contact, press SPEED DIAL. Enter the desired number
using the virtual keyboard or the number pad (from
1 to 500). Press OK to confirm.
6 To change the resolution, press QUALITY. Select
the resolution the best suited to your document
from the options available and press OK to confirm.
Contact properties
Depending on the available contact details for your
correspondents, you can create contacts for sending
faxes, documents via email, to an FTP address or an
SMB address.
A contact must contain the following information:
Property
Name
Speed dial
Contact details
.
Resolution
Description
Description
The name is used to identify
the correspondent.
The name must be unique.
PHOTO
Low resolution.
LIGHT
Resolution suitable for documents
containing text.
Number associated with the
contact, enabling rapid
selection of the
correspondent.
The number must be unique.
QUALITY
Resolution suitable for documents
containing text and colour
images.
TEXT AND
IMAGE
Resolution suitable for documents
containing colour images,
photographs.
At least one of the following
contact details:
Fax number
and / or
Network address, to select
from the following possibilities:
– email address
– FTP address
– SMB address
Note: a contact can only have
one network address (email or
FTP or SMB).
7 To scan the document in colour, press COLOUR.
Select the required option in the list and press OK
to confirm.
You can now enter the contact details, with at least one of
the following:
• Fax number
and / or
•
Network address, to select from the following possibilities:
–
email address
–
FTP address
–
SMB address
Associating a fax number
1 Press FAX NUMBER.
2 Enter your correspondent's fax number using the
virtual keyboard or the number pad (maximum 30
characters). Press OK to confirm.
- 79 -
12 - Address book
MF 5990 - Agoris M943
4 Press DOCUMENT FORMAT. Select the format
for documents sent to the contact: PDF or IMAGE.
Press OK to confirm.
Note
If the machine is connected to a switchboard (PABX), it may be necessary to insert
an outgoing prefix followed by a tone pause.
This operation is not necessary if the local
prefix has already been programmed on the
machine (see Local prefix [ 28]).
To insert a pause after the dial tone, enter
the symbol "/" (slash) using the virtual keyboard.
Editing a contact
To edit a contact:
Cancelling an operation
Note
You may cancel an operation at any time by
pressing
3 If you want to force a fax emission speed for the
contact, press SPEED. Select the required emission speed from the available values (expressed in
bits/second) in the list and press OK to confirm.
.
1 Press the MENU key.
2 Select ADDRESS BOOK > CONTACTS > EDIT.
3 Select the contact to edit from the scroll down list.
You can also enter the contact's name directly using the virtual keyboard. Press OK to confirm the
selection.
Note
For communications on a good quality telephone line, with no echo, the maximum
speed is recommended.
For communications on a bad quality line, it
may be necessary to reduce the transmission speed.
The contact properties appear on the screen.
4 Change the required properties and confirm each
modification by pressing OK.
5 When the modifications are complete, press MENU
to exit the address book.
Associating an email address
1 Press MAIL/FTP/SMB ADD. Enter the email address of your correspondent using the virtual key-
Deleting a contact
To delete a contact from the address book:
board. In the event of an error, use the
key to
delete a character. Press OK to confirm.
2 Press DOCUMENT FORMAT. Select the format
for documents sent to the contact: PDF or IMAGE.
Press OK to confirm.
Associating an FTP address
1 Press MAIL/FTP/SMB ADD. Enter the contact's
FTP address (for example: ftp://134.1.22.9) using
the virtual keyboard or the number pad. In the
Note
Deletion is irreversible.
When a contact is deleted from the address
book, it is automatically deleted from any
lists in which it is included.
event of an error, use the
key to delete a character. Press OK to confirm.
2 Press NETWORK USER. Enter the FTP user
name (for example: John). Press OK to confirm.
3 Press NETWORK PASSWD. Enter the FTP password. Press OK to confirm.
4 Press DOCUMENT FORMAT. Select the format
for documents sent to the contact: PDF or IMAGE.
Press OK to confirm.
Associating an SMB address
1 Press MAIL/FTP/SMB ADD. Enter the contact's
SMB address (for example: smb://Server_name/
SharedFolder or smb://Server_IP_address/
SharedFolder) using the virtual keyboard or the
number pad. The length of the SMB address is limited to 80 characters. In the event of an error, use
the
key to delete a character. Press OK to
confirm.
2 Press NETWORK USER. Enter the SMB user
name (for example: John). Press OK to confirm.
3 Press NETWORK PASSWD. Enter the SMB password. Press OK to confirm.
1 Press the MENU key.
2 Select ADDRESS BOOK > CONTACTS >
DELETE.
3 Select the contact to deleted from the scroll down
list. You can also enter the contact's name directly
using the virtual keyboard. Press OK to confirm the
selection.
A confirmation message is displayed.
4 Press OK to confirm the deletion.
The contact is deleted from the address book. Press
MENU to exit the address book.
Creating and managing contact lists
Properties of a contact list
You can create lists of contact for sending faxes and
documents by email.
A list of contacts contains contacts that already exist in
the address book.
- 80 -
12 - Address book
MF 5990 - Agoris M943
A list of contacts has the following properties:
Key
Property
Description
Name
The name is used to identify the
list of contacts.
The name must be unique.
Speed dial
Number associated with a list of
contacts, used for rapid selection.
The number must be unique.
Content
Add the selected contact to the list.
Remove the selected contact from
the list.
Remove all contacts from the list.
8 When you have comprised the list, press OK to
confirm.
All contacts in the list.
A list can contain correspondents with a fax number and /
or a network address (email, FTP or SMB address).
The machine ignores the contacts in a list that do not have
the appropriate contact details when sending a fax
(contacts without a fax number) or an email (contacts
without an email address).
The same correspondent can be included in several
contact lists. However, it is not possible to include a list of
contacts in another list of contacts.
The list of contacts has been created. Press MENU to
exit the address book.
Editing a list of contacts
To edit a list of contacts:
Cancelling an operation
Note
You may cancel an operation at any time by
Creating a list of contacts
pressing
Cancelling an operation
Note
You may cancel an operation at any time by
1
2
3
4
.
The properties of the list of contacts is displayed
on the screen.
Press the MENU key.
Select ADDRESS BOOK > LISTS > CREATE.
Press NAME.
Enter the name of the list using the virtual keyboard
(maximum 16 characters). In the event of an error,
use the
key to delete a character. Press OK
to confirm.
5 To customize the number associated with the list,
press SPEED DIAL. Enter the desired number using the virtual keyboard or the number pad (from 1
to 1000). Press OK to confirm.
6 Press CONTACTS to select the contacts included
in the list.
4 Change the required properties and confirm each
modification by pressing OK.
5 When the modifications are complete, press MENU
to exit the address book.
Deleting a list of contacts
To delete a list of contacts from the address book:
Note
Deletion is irreversible.
The contact selection window is displayed on the
screen.
1 Press the MENU key.
2 Select ADDRESS BOOK > LISTS > DELETE.
3 Select the list of contacts to delete from the scroll
down list. You can also enter the list's name directly
using the virtual keyboard. Press OK to confirm the
selection.
The left-hand side contains existing contacts.
The right-hand side contains contacts selected for
the list.
7 Use the up and down arrows to view all available
contacts. Select the required contacts in the lefthand side using the keys:
Key
Action
.
1 Press the MENU key.
2 Select ADDRESS BOOK > LISTS > EDIT.
3 Select the list of contacts to edit from the scroll
down list. You can also enter the list's name directly
using the virtual keyboard. Press OK to confirm the
selection.
To create a list of contacts:
pressing
Action
A confirmation message is displayed.
4 Press OK to confirm the deletion.
The list of contacts is deleted from the address book.
Press MENU to exit the address book.
Add all contacts to the list.
- 81 -
12 - Address book
MF 5990 - Agoris M943
Printing the address book
Exporting the address book to a USB key
You can print out all entries saved in the address book,
comprising all existing contacts and lists of contacts.
To print out the address book:
1 Press the MENU key.
2 Select ADDRESS BOOK > PRINT.
This function enables you to export the machine's
address book to a USB key:
Note
The contents of the address book are printed, classified in alphabetical order. Press MENU to exit the address book.
Accessing contacts on the LDAP
server
Before exporting the address book, check
that there is sufficient space on your USB
key.
To export the address book to a UBS key, proceed as
follows:
Cancelling an operation
Note
When the LDAP function is activated and configured on
the machine, you can send documents to contacts
declared in the LDAP server directory.
By default, when a document is sent, the screen for
entering recipients allows you to access entries in the
address book and the BIS function.
When the LDAP function is activated, the contacts on the
LDAP server are directly accessible from the address
book of the machine.
Exporting / Importing the address
book
You may cancel an operation at any time by
pressing
.
1 Insert your USB key into the machine respecting
the insertion direction.
The USB key is analysed. When the analysis is
complete, the USB KEY menu is displayed.
2 Press ADVANCED FUNCTIONS.
3 Press SAVE to access the settings export function
and/or the machine's address book.
The selection window for files to export is displayed on the screen.
The address book export and import functions are
particularly useful if you wish to make a backup copy of
the address book, restore the content of an address book
after accidental modifications, or to configure several
machines with the same address book.
The left-hand side contains the list of exportable
files: PARAMETERS and ADDRESS BOOK
The right-hand pane contains your selection.
Exporting the address book to the
integrated website
4 In the left-hand pane, press ADDRESS BOOK to
select it. It becomes blue.
5 Use the keys provided to move the file(s) to the
right-hand pane:
This function is only available from the integrated website.
Key
Action
User rights
All all files for export.
Note
All the selected file for export.
Access to functions depends on your user
rights. To know which rights you have, consult your machine administrator.
Remove the selected file from the list
of files to export.
Remove all files from the list of files
to export.
To export the machine's address book:
1 Go to the integrated website (see Remote
configuration [ 21]).
2 Select the tab ADDRESS BOOK.
3 Select the menu TRANSFER PC.
4 Select EXPORT.
6 Press OK to confirm.
7 When the Export successful message appears,
press YES to return to the previous menu.
A file saving window opens.
5 Enter the name of the file, the destination directory
and confirm.
The address book is exported.
- 82 -
12 - Address book
MF 5990 - Agoris M943
2 Press ADVANCED FUNCTIONS.
3 Press LOAD to access the settings import function
and/or the machine's address book.
Note
The machine's address book is exported to
the Root directory \HFXv2\backup of the
USB key under the name
Databook_YYMMDD_HHMMSS.dir.
The selection window for files to import is displayed on the screen.
4 Use the keys available to filter the file types that
can be seen in the selection window:
Importing the address book to the
integrated website
Key
This function is only available from the integrated website.
Action
All
User rights
Note
View "settings" files and "address
book" files.
Directory View "address book" files.
Parameter View "settings" files.
s
Access to functions depends on your user
rights. To know which rights you have, consult your machine administrator.
5 Browse through the list to select the file you want to
import using the keys available:
You may only import address books that have been
exported from the machine.
To import the address book:
Key
Action
Move the list up 1 file at a time at
each press.
Note
Move the list up 10 files at a time at
each press.
Importing an address book fully deletes the
existing address book.
Move the list down 1 file at a time at
each press.
1 Go to the integrated website (see Remote
configuration [ 21]).
2 Select the tab ADDRESS BOOK.
3 Select the menu TRANSFER PC.
4 Select IMPORT.
Move the list down 10 files at a time
at each press.
6 Press the file DataBook_YYMMDD_HHMMSS.dir
to select it. It becomes blue.
7 When you have selected the file, press OK to confirm and start the import or Cancel to return to the
previous menu.
8 When the Import successful message appears,
press YES to return to the previous menu.
A file selection window opens.
5 Select the file to import and confirm.
The address book is imported to the machine.
Importing an address book from a USB key
This function enables you to import a machine address
book from a USB key.
Note
Caution
When the import is complete, the machine
may request a restart if necessary.
Importing an address book fully deletes the
existing address book.
Note
You can only import address books exported from the machine that are in the Root directory \HFXv2\backup on the USB key.
The address book files are in the format
Databook_YYMMDD_HHMMSS.dir.
See also
Remote configuration [21]
Restoring the address book
(Directory card option)
This function is used to import the address book from a
previous generation machine.
Note
To import the address book:
1 Insert your USB key into the machine respecting
the insertion direction.
This function is only for technicians.
The USB key is analysed. When the analysis is
complete, the USB KEY menu is displayed.
- 83 -
12 - Address book
MF 5990 - Agoris M943
The import is based on the use of directory cards on which
the content of a previous generation address book has
been saved. Depending on the number of entries, the
content may have been saved on several directory cards.
In this case, you must insert the directory cards in the
order in which they were saved (from the first to the last).
To import the content of an address book saved on a
directory card:
Note
Importing an address book fully deletes the
existing address book.
1 Insert the first directory card into the machine's
smart card reader.
The machine analyzes the directory card contents.
2 If several directory cards are required, a message
asking you to insert the next card is displayed on
the screen. Insert the next directory card.
When the whole address book has been analyzed, the machine displays a restoration confirmation message.
3 Press OK to confirm the restoration on the machine
of the previous generation address book.
We recommend you check the entries in the address
book and correct any contact details that may have been
forced during the restoration (for example: absent fax
number forced to 0).
- 84 -
12 - Address book
MF 5990 - Agoris M943
PC Functions
Installing the software
Introduction
The Companion Suite Pro software allows you to connect
a personal computer to a compatible multifunction
machine.
From the PC you can:
• manage a multifunction machine and configure it according to your needs;
• print your documents on the multifunction machine
from your usual applications;
• scan documents in colour, in grey scale or in black and
white and edit them on your PC;
• convert them into text using the optical character recognition (OCR) application.
This section describes the following installation
procedures:
• complete installation of the Companion Suite Pro software;
• installation of drivers only using the Companion Suite
Pro software;
• installation of drivers only.
Complete installation of the software
Complete installation copies the software required to run
the Companion Suite Pro kit on your hard disk, i.e.:
• Companion Suite Pro LH2 (machine management
software, printer, scanner drivers, etc.) ;
• Adobe Acrobat Reader;
• PaperPort.
Required configuration
Note
Your personal computer must have the minimum
following characteristics:
Operating systems supported:
• Windows 2000 with Service Pack 4 minimum;
• Windows XP x86 (Home and Pro) with Service Pack 2
minimum;
• only for the print driver: Windows Server 2003 x86 with
Service Pack 2 minimum;
• only for the print driver: Windows Server 2008;
• Windows Vista;
• Windows 7;
• only for the print driver: Mac OS 10.3 to 10.5;
• only for the print driver: Red Hat Enterprise Linux (version 4), Debian GNU/Linux version 3.1 and 4.0, SuSE
Linux Enterprise Server (version 10).
Note
Consult the Mac/Linux CD-ROM for more
information and the installation instructions.
A processor of:
• 800 MHz for Windows 2000;
• 1 GHz for Windows XP x86 (Home and Pro);
• 1 GHz for Windows Vista;
• 1 GHz for Windows 7.
A CD-ROM drive.
A USB port or a free local network (LAN) port.
600 Mb of free disk space for the installation.
RAM memory of:
• minimum 256 Mb for Windows 2000;
• minimum 512 Mb for Windows XP x86 (Home and
Pro);
• 2 Gb for Windows Vista;
• 2 Gb for Windows 7.
You may already have a version of one of
the softwares present on the installation
CD-ROM. If this is the case, use customized
installation, select the software you want to
install on your hard drive and confirm your
choice.
Switch on your PC. Open an Administration session.
1 Open the CD-ROM drive, insert the installation CDROM and close the drive.
2 An installation procedure runs automatically (Auto
run). Otherwise, double click on setup.exe in the
CD-ROM root directory.
3 A screen entitled Companion Suite Pro LH2 appears. This screen enables you to install or uninstall software, access the product's user manuals
or explore the CD-ROM content.
4 Click on Install products.
5 The production installation screen appears. Click
on All products.
6 The welcome screen appears. Click on Next to run
the installation of the Companion Suite Pro kit on
your PC.
- 85 -
13 - PC Functions
MF 5990 - Agoris M943
7 To continue the installation, you must read and accept the software license proposed.
Installing drivers using the Companion
Suite Pro software
Switch on your PC. Open an Administration session.
1 Open the CD-ROM drive, insert the installation CDROM and close the drive.
2 An installation procedure runs automatically (Auto
run). Otherwise, double click on setup.exe in the
CD-ROM root directory.
3 A screen entitled Companion Suite Pro LH2 appears. This screen enables you to install or uninstall software, access the product's user manuals
or explore the CD-ROM content.
4 Click on Install products.
5 The production installation screen appears. Click
on Customized.
6 Click on Companion Suite Pro LH2.
7 The welcome screen appears. Click on Next to run
the installation of the Companion Suite Pro kit on
your PC.
8 Click on Next.
9 The final installation is ready to be run. Click on
Install.
10 A screen appears indicating the progress of the installation.
11 When the installation is complete, restart your PC
when necessary to update the system files.
The Companion Suite Pro is now installed on your PC.
8 To continue the installation, you must read and accept the software license proposed.
Note
If a firewall is installed, you will be asked if
you want to authorize the application MFServices to access the network. Click on
Yes or Authorize (depending on your
firewall) to authorize MFService.exe to access the network.
Some firewalls also require the port to be
configured. Check that the ports upf 137
and tcp 26 are open.
Note: Windows XP with Service Pack 2 and
later and Windows Vista and Windows 7
have a default firewall installed.
9 Click on Next.
You can now connect your multifunction machine.
To connect the multifunction machine to the PC via the
local network, consult the section Adding a peripheral
connected to the network.
You can run the management software for your
multifunction machine from the menu Start > All
programmes > Companion Suite > Companion Suite
Pro LH2 > Companion Director or by clicking on the icon
Companion Director on your desktop.
- 86 -
13 - PC Functions
MF 5990 - Agoris M943
10 Select Install Drivers in the list and click on Next.
Note
If you decide to install the drivers manually,
some advanced functions will not be available. To benefit fully from all the functions of
the Companion Suite Pro software, do a
complete installation (see Complete
installation of the software [ 85]).
Note
This installation mode is only possible in
Windows 2000, XP, Vista and 7.
11 Select the destination directory for installation and
click on Next.
LAN (local network) printer and scanner drivers
It is possible to add the LAN (local network) printers
without installing the Companion Suite Pro software.
From the Printers window (Start > Control Panel >
Printers and faxes or Start > Control Panel > Hardware
and sound > Printer, depending on the operating
system), select "Add a printer" and follow the instructions
on the screen.
When the drivers are requested, insert the installation
CD-ROM. The drivers are automatically detected.
Installing PostScript printer drivers
12 The final installation is ready to be run. Click on
Install.
If you wish to install PostScript print drivers on your
multifunction machine:
1 Connect to the Adobe website (http://
www.adobe.com/support/downloads/
product.jsp?product=44&platform=Windows) and
download the appropriate universal driver installer.
2 Run the installation file on your computer and follow the instructions on the screen.
3 When you are asked for the PPD file, insert the installation CD-ROM Companion Suite Pro. The
PPD file is in the Drivers/PPD directory.
The PostScript printer is identified by default as
Companion Suite Pro LH2 PS.
13 A screen indicates the progress of the installation.
14 Click on OK to complete the installation.
When the installation is complete, restart your PC when
necessary to update the system files.
The Companion Suite Pro is now installed on your PC.
You can now connect your multifunction machine.
To connect the multifunction machine to the PC via the
local network, consult the section Adding a peripheral
connected to the network.
Monitoring the multifunction machine
Manual installation of the drivers
You can manually install the drivers for the printer and the
scanner without running the configuration software.
The software you have installed contains two applications
to manage the multifunction machine, Companion
Director and Companion Monitor, that enable you to:
• check that your multifunction machine is properly connected to your PC;
• monitor the activities of your multifunction machine
graphically;
• monitor the status of machine consumables from your
PC;
• rapidly access image editing applications.
To manage the multifunction machine, run the application
Companion Director by clicking on the icon on your
desktop or from the menu Start > All programmes >
Companion Suite > Companion Suite Pro LH2 >
Companion Director.
- 87 -
13 - PC Functions
MF 5990 - Agoris M943
To check that the connection between the PC and the
multifunction machine is OK, run the application
Companion Monitor by clicking on the icon on your
desktop or from the menu Start > All programmes >
Companion Suite > Companion Suite Pro LH2 >
Companion Monitor.
Pro LH2 > Companion Monitor.
Companion Director
This graphic interface enables you to run utilities and
software to manage your multifunction machine.
Graphic presentation
Run the application by clicking on the Companion
Director icon on your desktop or from the menu Start >
All programmes > Companion Suite > Companion
Suite Pro LH2 > Companion Director.
From this screen you can monitor the information or
configure your multifunction machine from the tabs:
• Device selection: Display the list of peripherals managed by the PC.
• Consumables: Display the status of consumables.
• Links: Display the links to the machine parameters
and the address book.
Peripheral management
This tab displays the list of peripherals managed by the
PC.
Adding a peripheral connected to the network
You can connect your multifunction machine to the
network.
Activating utilities and applications
Note
The graphic interface Companion Suite Pro enables you
to run the following utilities and software:
• access the Help in this manual;
• run the PaperPort software (Doc Manager).
To run a utility or a software present in the Companion
Suite Pro kit, place your cursor on it and click on the left
button of the mouse.
The Companion Suite Pro software must be
installed for this operation.
1 Run the application Companion Monitor by clicking on the icon on your desktop or from the menu
Start > All programmes > Companion Suite >
Companion Suite Pro LH2 > Companion
Monitor.
2 Click on the + sign or Add.
Companion Monitor
Graphic presentation
Run the application Companion Monitor by clicking on
the icon on your desktop or from the menu Start > All
programmes > Companion Suite > Companion Suite
- 88 -
13 - PC Functions
MF 5990 - Agoris M943
3 The list of peripherals detected on the network appears. Click on Update to update the list.
7 The following window shows the list of the various
properties of the printer to be installed. Click on
Next.
8 The window indicating that the installation procedure was successful appears. Click on End.
9 Enter the name for your PC and click on OK. The
multifunction machine will use this name to identify
your PC.
Note
The peripherals detected appear with the
following information:
- NetBios name (hardware identifier) or IP
address (network identifier).
- Network name (defined by the user).
To define the name of a peripheral on the local network, see section Local network
settings.
Note
10 Click on OK.
Only peripherals found on the same local
sub-network as the PC are automatically
detected and displayed.
4 Select your multifunction machine and click on
Next.
5 To print with the multifunction machine in encrypted mode (secure IPP print), click on Yes then click
on Next.
6 To define the multifunction machine as the default
printer, click on Yes then click on Next.
11 The window indicating that the installation procedure was successful appears. Click on OK.
Selecting the current peripheral
Only one peripheral can be connected at a time.
You can select the current peripheral by clicking on the
radio button corresponding to the peripheral.
- 89 -
13 - PC Functions
MF 5990 - Agoris M943
Connection status
The status of the connection between the current
peripheral and the PC is indicated by a colour code.
The following table indicates the possible connections
statuses:
Colour
Status
Yellow
Connection in progress.
Green
Connection established.
Red
The PC cannot connect to the
peripheral.
Check the connection between
the peripheral and the PC.
Option
Description
PaperPort
TIFF
When a Scan to PC is done from
the peripheral, the document is
put in TIFF format and saved in
the directory Scan to.
PaperPort
PDF
When a Scan to PC is done from
the peripheral, the document is
put in PDF format and saved in
the directory Scan to.
Mail PDF
When a Scan to PC is done from
the peripheral, your email
application is opened and the
document scanned is attached as
an attachment to a new message.
Important: to use this option, a
client email must be configured
on your PC.
Peripheral parameters
1 Select a peripheral by clicking on the corresponding line in the list and click on Properties to configure the scanning settings to apply to this peripheral
when you use the Scan to function.
5
Select the required Duplex Mode, by pressing the
check box.
6 Click on OK to confirm the new settings.
Deleting a peripheral
1 Select the peripheral from the list and click on the sign or on Remove.
2 To confirm deletion of the peripheral, click on Yes.
To cancel the deletion, click on No.
The peripheral no longer appears in the list.
You can also unregister a PC from the multifunction
machine (see section Unregistering a PC [ 40]).
2 Select the required scan mode from the scroll
down list.
Displaying the status of consumables
The following information is available in the
Consumables tab:
• current status of consumables;
• number of pages printed;
• number of pages scanned;
• number of pages sent and received.
3 Select the required scan resolution from the scroll
down list.
4 Select the required output format from the scroll
down list.
- 90 -
13 - PC Functions
MF 5990 - Agoris M943
Links
2 If you press the SCAN key on your machine, you
will then have to select Scan to PC.
The Links tab allows you to access various configuration
tools from the peripheral's integrated website.
Note
If more than one computer is registered on
the machine, a list of available computers is
displayed on the screen. Select the required
computer and press OK to confirm.
The available computers are identified with
the name of the PC you entered on adding
the peripheral (see Peripheral management
[ 88]).
3 A screen displays the progress of the current scan.
The Settings link opens the page devoted to the
peripheral settings (see section Configuring the machine
and services [ 21] for a detailed description of the
settings available).
The Status link opens the page devoted to the peripheral
status enabling you to consult its activity status.
The Address Book link opens the page for the
peripheral's address book, allowing you to view and
manage all the contact information stored in the
peripheral.
4 When the scan is complete, the scanned image appears in the PaperPort window.
Companion Suite Pro functions
Document analysis
The document can be analyzed in two ways:
• using the Scan to function (application accessible
from the Companion Director window or the machine's
SCAN key);
• or directly from a standard compatible application.
Note
If the PaperPort software is not installed on
your PC, the scanned image will appear on
your desktop in TIFF format.
Analysis using the Scan to function
Run the application by clicking on the Companion
Director icon on your desktop or from the menu Start >
All programmes > Companion Suite > Companion
Suite Pro LH2 > Companion Director.
To scan a document from PaperPort:
1 Click on File > Scan.
2 Select the scanner of your choice: autofeed or flatbed scanner.
1 Click on the Scan to icon or press the SCAN key
on your machine.
- 91 -
13 - PC Functions
MF 5990 - Agoris M943
3 Personalize the advanced scan properties by clicking on the link Adjust the quality of the scanned
picture.
1 Use the Print command in the File menu of the application currently open on the screen.
2 Select the printer Laser HFFv2.
For more information on the print options, see the section
Printing documents from a PC [ 58].
Fax communications
4 Adjust the required settings and click on OK.
5 Click on Scan, you can follow the scan progress on
the screen.
Optical Character Recognition (OCR)
The optical character recognition function allows you to
create a document editable in office software from a
paper document or an image file.
Character recognition can only occur on printed
characters, such as printer outputs or typed text.
1 After scanning a document in the PaperPort workspace, you can covert it into editable text.
2 Drag the view of the scanned document onto the
NotePad icon
Fax communications enables you to:
• send documents by fax, from your machine's scanners, the hard disk or your PC screen;
• receive faxes;
• monitor communications, using various services: the
outbox, the inbox, sent items, the send log and the reception log.
Settings can be used to change how your machine deals
with fax communications. You can change these settings
to adapt fax communications to your needs. To do so, see
the section Fax settings [ 94].
Presentation of the Fax window
.
Marker
Action
1
Create a new fax.
2
Delete a fax from one of the fax
management folders. Except for the
Send log and Reception log folders
for which this command will delete
the whole log.
3
Print a fax from one of the fax
management folders.
4
View a fax in the Viewer.
The Laser HFFv2 print driver is automatically installed on
your PC when you install the Companion Suite Pro
software.
5
Access the address book.
6
Stop sending a fax (active only for
the outbox).
Printing on the multifunction machine
7
View all faxes present in the selected
folder in the fax manager.
The procedure to print a document on the multifunction
machine from your PC is identical to that of a document in
Windows.
8
Preview of faxes.
9
Fax manager folders.
3 The scanned text appears in the NotePad window.
Note
For more details on how to use this software, consult the product's on line help.
Printing
- 92 -
13 - PC Functions
MF 5990 - Agoris M943
Sending a fax
If you wish, you can consult your emission request in the
outbox.
Sending a fax from the hard disk or from the
machine
Sending a fax from an application
This method allows you to send a document created
using an office application directly without printing it first.
1 From your office application, select File > Print.
1 Click on the
icon in the Companion Director
window.
2 Click on New then on FAX.
2 Select the printer Fax HFFv2 and click on OK.
The Fax window opens.
3 In the zone Sources, select Scanner if your document is in paper format or Memory if the document
is a computer file located on your hard disk (this file
must be in TIFF or FAX format).
4 To send your fax to a contact, enter his number in
the Recipients field and click on
or select a contact (or a group) from one of the address books in
the field Address books and click on
.
Repeat this operation as many times as necessary (use the
button to delete a contact from
the list of contacts).
3 To send your fax to a contact, enter his number in
5 If necessary, set the advanced options (deferred
sending and resolution), in the Advanced Options
tab.
the Recipients field and click on
or select a contact (or a group) from one of the address books in
the field Address books and click on
.
Repeat this operation as many times as necessary (use the
button to delete a contact from
the list of contacts).
4 If necessary, set the advanced options (deferred
sending and resolution), in the Advanced Options
tab.
6 To attach a cover page, select the Cover page tab
and check the box With cover page. Select the
cover page you want to include in the drop down
menu or create a new one. For more information,
consult the section Cover page [ 95].
7 Click on OK to send your fax to all the contacts in
your contacts list.
- 93 -
13 - PC Functions
MF 5990 - Agoris M943
The send memory
5 To attach a cover page, select the Cover page tab
and check the box With cover page. Select the
cover page you want to include in the drop down
menu or create a new one. For more information,
consult the section Cover page [ 95].
6 Click on OK to send your fax to all the contacts in
your contacts list.
If you wish, you can consult your emission request in the
outbox.
The send memory allows you to save all the faxes you
have sent.
The following information is contained in the send
memory:
• the fax recipient;
• the date of creation of the fax;
• the date the fax was sent;
• the size of the fax.
Receiving a fax
The send log
The windows Companion FAX Manager and
Companion Director use various messages to indicate
icon appears at the
that a fax is being received. The
bottom of the window Companion FAX Manager and the
icon appears in the task bar.
You can automatically print out faxes once they have
been received. To do so, you must define this setting. See
the section Fax settings [ 94].
The send log saves the history of all fax communications
(successful or rejected) made by the machine. The log is
automatically printed out when its content reaches a full
page.
Note
The Delete button can be used to delete the
whole log, and not just the selected message(s).
Monitoring fax communications
You can monitor fax communications via:
• an outbox;
• an inbox;
• an emission memory (sent items);
• a send log;
• a reception log.
These services enable you to monitor precisely the
machine's communications, both sent and received.
The send and reception logs are automatically printed out
when their content reaches a full page. After the
automatic print-out, the machine creates a new log.
The log contains the following information:
• the fax recipient;
• the date the fax was sent;
• the fax status (sent, rejected, etc.).
The reception log
The reception log saves the history of all faxes received
by the machine. The log is automatically printed out when
its content reaches a full page.
Note
The outbox
The Delete button can be used to delete the
whole log, and not just the selected message(s).
The fax outbox contains:
• requests currently being sent;
• deferred emission requests;
• requests for which several attempts have been made
and which are about to be reattempted;
• requests which have been rejected (failed calls).
The reception log contains the following information:
• the fax sender;
• the date of reception of the fax;
• the type of reception (on the machine or on the PC);
• the fax status.
Fax settings
Accessing the Fax settings
Rejected requests are listed at the end so they are
accessible if you want to resend them or delete them.
The requests are listed in the order they will be dealt with.
- 94 -
1 Click on the
icon in the Companion Director
window.
2 Select Tools > Options > Fax.
3 Adjust the required settings referring to the description of the settings below and confirm by clicking on
OK.
13 - PC Functions
MF 5990 - Agoris M943
Description of the Logs and reports tab
Option
Description
Automatic
printing of a
received
document
The fax is automatically
printed when it is received.
Print a reception
report
A reception report is printed
for each fax received.
Automatic
printing of a
reception log
The log is automatically
printed out when its content
reaches a full page.
Automatic
printing of the
sent document
The fax is automatically
printed when it is sent.
Print the send
report
An emission report is printed
out each time a fax is sent.
Print the send log The log is automatically
printed out when its content
reaches a full page.
Description of the Fax parameters tab
Option
Description
Line number
Number of the telephone line
to which your machine is
connected.
Dialling prefix
This dialling prefix is
automatically inserted in front
of the number before a fax is
sent on this line.
Dialling type
Must be set according to the
type of telephone exchange to
which your machine is
connected.
ECM
Corrects communication
errors due to line disturbance.
This option guarantees the
integrity of documents
received. However,
communication times may be
longer if the link is poor.
Number of tries
Number of attempts to be
made by the machine in the
event of emission failure.
Interval between
tries
Time between two emission
attempts.
Cover page
The cover page is part of a faxed document automatically
generated by your machine in which information
concerning the sender, the recipient, the send date and
time, comments, etc., appear.
This page can be sent alone or as the first page of a fax,
but always in the same communication as the fax. It is
possible to send a document with a cover page from the
multifunction machine or from the hard disk. In the latter
case, part of the information on the cover page can be
entered by the user on the emission request. A cover
page template must be created before sending a
document using it. However, once the cover page is
created, a cover page template can be used for all sent
documents.
Your machine allows you to create and personalize
several cover pages templates that can be selected for an
emission.
Creating a cover page template
Option
Description
Sending speed
Default fax emission speed.
Creating a cover page template creates a template in
which fields (fax number, comment, subject, etc.) will be
completed automatically by the Fax application using the
information provided for each document recipient.
There are two steps to creating the cover page template:
• First step: Create a background image with the required logos and page formatting.
- 95 -
13 - PC Functions
MF 5990 - Agoris M943
•
Second step: Add the field you want to be displayed
on the cover page: fax number, comment, subject, etc.
As mentioned before, these fields will be completed
by the Fax application when the document is sent.
Option (B):
1 Run Companion FAX Manager, select New > Fax
and select the scanner as the source as indicated
below:
Creating a background image
For the first step, there are two ways of creating a
background image.
You can:
• Option (A): Design this background image in another
application (such as Word, Excel, etc.);
OR
• Option (B): Scan a sheet of paper containing the page
formatting of the cover page.
Details concerning option A and option B:
Option (A):
1 Open the application you want to use to edit the
background (Word, Excel, etc.).
2 Design the background image and print this document using the printer called Fax HFFv2.
2 Add the recipients to the list of recipients. Click on
the tab Advanced options and select the resolution Fine as indicated below:
The Send FAX dialogue box opens:
3 Click on
to save the background image.
The background image is created in the folder C:\Program Files\Companion Suite Pro LH2\Documents\FAX\Temporary and has the file extension .fax.
3 Add the recipients to the list of recipients. Click on
the tab Advanced options and select the resolution Fine as indicated below:
Whether you choose option A or B, a background image
with the extension .fax is created in C:\Program
Files\Companion Suite Pro
LH2\Documents\FAX\Temporary.
You can now proceed to the second step described
below.
Adding information fields
4 Click on
to save the background image.
The background image is created in the folder C:\Program Files\Companion Suite Pro LH2\Documents\FAX\Temporary and has the file extension .fax.
Now that the background image is created in C:\Program
Files\Companion Suite Pro
LH2\Documents\FAX\Temporary, you can add the
required fields on the cover page background image:
To do so:
1 Run Companion FAX Manager, select New >
Fax, click on the tab Cover page and click on the
box With cover page.
2 Click on the New button. The cover page Creation
page is displayed.
- 96 -
13 - PC Functions
MF 5990 - Agoris M943
3 Click on Open in the tool bar, switch the file filter to
*.fax and go to the directory C:\Program Files\Companion Suite Pro LH2\Documents\FAX\Temporary
containing the background image you created in
the first step.
4 Click on the button Fields in the tool bar. A window
opens enabling you to add the fields to the background image.
5 Click on Save to save the cover page template and
exit this window.
6 The New Fax window opens. You can now select
the cover page template that you want to use. By
double clicking on the preview in the lower righthand corner, another window opens, displaying a
preview of the cover page with the fields completed
with the recipients contact details.
4 To add a field:
- Select the field you want to insert by checking
the available fields. A stamp appears as the mouse
cursor.
- Click on the location in the template where you
want to insert the field.
- You can move or enlarge the field as required.
Creating a cover page
Note
Adjust the size of your field boxes so that
the text is legible.
Note
A cover page template must be created before sending a fax using it.
1 From the tab Cover page, click on New.
2 Select the cover page template you created from
the menu File.
5 When the fields have been inserted, save the cover
page.
This cover page can then be selected in the tab Cover
page of the fax emission window.
Description of the Cover page tab
A window opens containing the cover page template you created:
3 Click on the
icon to display the fields available.
- 97 -
Option
Description
Name of the
cover page
Name of the page selected by
default or the name of the
page you have chosen to use.
Sender
You can enter information
concerning the sender.
Recipient
You can enter information
concerning the recipient.
If the term Auto appears in one
of the fields, the field is
updated on emission if the
recipient is in the address
book.
13 - PC Functions
MF 5990 - Agoris M943
•
Option
Description
Comments
This is an editing window with
all the basic functions of a text
editor enabling you to enter a
text that will be sent on the
cover page.
•
If you installed the drivers using the Companion Suite
Pro software, consult the section Uninstalling drivers
using the Companion Suite Pro software [ 98].
If you installed the drivers manually, consult the section Manually uninstalling the drivers [ 98].
Uninstalling drivers using the Companion Suite
Pro software
Template preview A preview for viewing the
cover page to be sent.
Run the uninstall programme from the menu Start > All
programmes > Companion Suite > Companion Suite
Pro LH2 > Uninstall.
Uninstalling the software
Note
This section describes the following procedures:
• complete uninstallation of the Companion Suite Pro
software,
• uninstallation of drivers only.
You can also uninstall the Companion
Suite Pro LH2 drivers using the Windows
function Add/Remove programs in the
control panel.
Complete uninstallation of the software
1 A confirmation window appears. Click on Yes to
continue uninstalling the Companion Suite Pro
LH2 drivers.
Switch on your PC. Open an Administration session.
Run the uninstall programme from the menu Start > All
programmes > Companion Suite > Companion Suite
Pro LH2 > Uninstall.
1 A confirmation window appears. Click on Yes to
continue uninstalling the Companion Suite Pro programme.
2 The uninstall programme starts. You can cancel
the uninstall by clicking on Cancel.
2 The uninstall programme starts. You can cancel
the uninstall by clicking on Cancel.
Manually uninstalling the drivers
3 Click on OK.
4 You will need to restart your system when the procedure is complete. Click on Yes.
Uninstalling the drivers
Switch on your PC. Open an Administration session.
Depending on the installation method used, select the
appropriate uninstall mode:
The following drivers must be removed:
• print driver
• scanner driver
To remove the print driver:
1 Open the window Printers (Start > Devices and
Printers , depending on the operating system).
2 Select the Laser HFFv2 printer and click on the
right button of your mouse.
3 Select Remove device in the menu click on the left
button of your mouse.
4 Click on OK to confirm the deletion.
5 Open the window Administrative Tools (Start >
Control panel > System and Security >
Administrative Tools, depending on the operating
system).
6 In the sub-menu Print Management, select the
sub-menu Print Servers then the sub_menu
Drivers.
7 Select the Laser HFFv2 driver and click on the
right button of your mouse.
8 Select Remove driver package in the menu and
click on the left button of your mouse.
- 98 -
13 - PC Functions
MF 5990 - Agoris M943
9 Click on OK to confirm the deletion.
To remove the scanner driver:
1 Open the window Computer (Start > Computer,
depending on the operating system).
2 Select the System Properties tab.
3 Select the Device manager.
4 In the sub-menu Imaging device, selectthe
Scanner HFFv2 driver and click on the right button
of the mouse.
5 Select Uninstall in the menu and click on the left
button of your mouse.
6 A confirmation window appears.
7 Select the deletion, by pressing the check box.
8 Click on OK to confirm the deletion.
- 99 -
13 - PC Functions
MF 5990 - Agoris M943
Maintenance and
incidents
Cleaning
The presence of dust, dirt and paper debris on the
external surfaces and inside the printer may hinder its
operation. We recommend you clean it regularly.
Cleaning the outside of the printer
Maintenance
Clean the outside of the printer using a soft cloth soaked
in mild household detergent.
Use a soft cloth to clean the printer. Never use
abrasives or corrosive detergents.
General information
Cleaning the inside of the printer
Caution
For your safety, you must read the safety instructions in the chapter safety [ 121].
In order to maintain your machine in good working order,
it is recommended to periodically clean the inside.
Normal use of the machine, requires the following rules to
be respected:
After removing a paper jam or replacing a toner cartridge,
inspect the inside of the machine before closing the
access flap to the toner cartridge.
1 Press the On/Off button to switch off the machine
(position 0) and disconnect the mains power cable.
2 Press the toner cartridge access button.
WARNING
Firstly, disconnect the power cable and all
interface cables. Ensure that no water or
detergent enters the printer, or it may be damaged or cause electrocution.
3 Lift up the flatbed scanner and open the access flap
to the toner cartridge.
Caution
The fuser unit is extremely hot. If you open
the access cover to the fuser unit, it takes
about one hour to cool down.
•
•
•
•
•
•
•
•
•
•
•
•
When cleaning the inside of the printer or removing
jams, be careful not to touch the fuser unit or other hot
parts.
To clean the printer, use a soft cloth.
Never spray detergent directly onto the printer as it
may infiltrate the vents and damage internal circuits.
To clean the machine, avoid using abrasive or corrosive solvents or products containing solvents (alcohol
or benzene).
Always start by applying the cleaning product (mild detergent) to a small surface of the printer to check the
result.
Never use abrasive or rough cloths (steel wool or plastic).
Never leave the scanner cover open unnecessarily.
Never try to lubricate the machine.
Close the scanner cover gently and never subject the
machine to vibrations.
Never open the cartridge access cover during printing.
Never try to dismantle the machine.
Never use paper which has remained too long in the
paper tray.
- 100 -
WARNING
The fuser unit may reach very high temperatures during operation. To avoid injury, do
not touch this zone.
14 - Maintenance and incidents
MF 5990 - Agoris M943
4 Remove the toner cartridge.
5 Use a soft, lint-free cloth to dust and clean the inside of the printer.
2 Clean the touch screen using a soft, lint-free cloth,
with one of the authorised cleaning products.
3 Gently wipe the surface with a soft, dry cloth until it
is dry. Exert as little pressure as possible.
4 Connect the power cable to the mains and press
the On/Off button to switch the machine on (position I).
6 Insert the toner cartridge into its compartment,
pushing it fully in until it engages (last movement
downwards).
7 Close the access flap to the toner cartridge and
lower the flatbed scanner.
Cleaning the scanner read devices
If one or several vertical lines appear on copies, clean the
scanner window.
1 Open the flatbed scanner cover by folding it back
until it is maintained in the vertical position.
2 Clean the two transparent analysis windows (A),
the white rollers (B) and the white mats (C), using
a soft, lint-free cloth soaked in isopropyl alcohol.
8 Connect the power cable to the mains and press
the On/Off button to switch the machine on (position I).
Cleaning the touch screen
To clean the touch screen safely, you must follow the
recommendations and procedure described below.
Recommendations
• Use a soft lint-free cloth so as not to scratch the touch
screen.
• Only use the cleaning products listed in this section.
• When using a cleaning product, always apply the solution to the cloth and use the cloth to clean the touch
screen.
If you spray liquid directly onto the touch screen,
you risk damaging it.
List of authorised and prohibited cleaning products
3 Close the cover of the flatbed scanner.
4 Make a copy to check that the symptoms have disappeared.
Cleaning the paper feed rollers
The accumulation of paper dust and other debris on the
paper feed rollers may cause paper feed problems.
You may use...
Water
Vinegar (mixed with
water)
Isopropyl alcohol
Benzene
NEVER USE
Cleaning the paper feed rollers on the automatic
feeder
Acetone
Ethyl alcohol
Ethyl acid
Ammonia
Methyl chloride
1 Press the On/Off button to switch off the machine
(position 0) and disconnect the mains power cable.
Clean the paper feed rollers on the automatic feeder
when:
• one or more vertical lines appear on copies of documents placed in the automatic feeder (presence of debris, ink, glue, etc., in the paper feed mechanism).
- 101 -
14 - Maintenance and incidents
MF 5990 - Agoris M943
•
the message **PLEASE CLEAN THE SCANNER
FEED ROLLER AS DESCRIBED IN THE USER MANUAL, THEN PRESS <STOP>** informs you that the
automatic feeder can no longer feed sheets of paper
(dust, dirt or debris obstructing the rollers). Press OK
to delete the message from the screen.
To clean the paper feed rollers on the automatic feeder:
1 Press the On/Off button to switch off the machine
(position 0) and disconnect the power cable.
2 Open the cover of the autofeed scanner.
To clean them, rotate them in the same direction as
normal paper feed.
3 Replace the paper tray in the machine and push it
in fully.
Replacing consumables
3 Clean the paper feed rollers using a soft, lint-free
cloth soaked in isopropyl alcohol.
To clean the rollers, rotate them in the same direction as normal paper feed.
To access the status of consumables, press MENU and
select CONSUMABLES > DISPLAY (see Consumable
status [ 43]).
After replacing a consumable, you must inform the
machine of its characteristics.
To do so, the smart card, supplied with each toner
cartridge, must be read by the machine after
installing a new consumable.
The replacement of certain consumables must be
declared on the machine, in the menu CONSUMABLES
> DECLARE REPLACE.
Replacing the toner cartridge
4 Wipe the rollers using a soft, lint-free cloth until they
are dry.
5 Close the cover of the autofeed scanner.
6 Connect the power cable to the mains and press
the On/Off button to switch the machine on (position I).
7 Make a copy to check that the symptoms have disappeared.
Cleaning the paper feed rollers in the paper trays
The machine is equipped with a consumable
management system. It indicates when your toner
cartridge is nearing the end of its lifespan. The following
messages will appear on your machine:
• THE TONER CARTRIDGE IS NEARLY EMPTY: the
toner cartridge has reached the critical level (less than
10 % remaining in the toner cartridge);
• THE TONER CARTRIDGE IS EMPTY - REPLACE IT:
the toner cartridge is empty.
You can replace the toner cartridge between the time it
has reached critical threshold and when it is empty.
Note
The procedure for cleaning the paper feed rollers
described in this section applies to all paper trays in the
machine.
1 Remove the paper tray from the machine and place
it on a flat surface.
Always use the smart card provided when
replacing the toner cartridge. The smart
card contains the information required to reset the toner level. If you replace the toner
cartridge without using the smart card provided, the consumable management system
may indicate an error.
To replace the toner cartridge:
1 Stand opposite the machine.
2 Clean the paper feed rollers by wiping them with a
soft, dry cloth.
- 102 -
14 - Maintenance and incidents
MF 5990 - Agoris M943
2 Press the toner cartridge access button.
7 Insert the toner cartridge into its compartment,
pushing it fully in until it engages (last movement
downwards).
3 Lift up the flatbed scanner and open the access flap
to the toner cartridge.
8 Close the access flap to the toner cartridge and
lower the flatbed scanner.
4 Remove the used toner cartridge and place it in the
plastic bag (provided in the toner kit). Dispose of it
in accordance with local regulations in force.
5 Unpack the new toner cartridge and shake it gently
7 to 8 times to distribute the toner evenly through
the cartridge.
Shaking the toner cartridge carefully will guarantee the maximum number of copies per cartridge.
9 Insert the smart card provided with the new toner
cartridge into the smart card reader.
10 The machine detects the smart card and displays a
message asking you to confirm the installation of
the new consumable. Press YES to confirm.
The machine reads the smart card. After reading,
the machine displays a message asking you to remove the smart card.
6 Take hold of the toner cartridge by the handle,
place it on a flat surface and remove the cover by
pulling on it horizontally.
11 Remove the smart card from the reader.
Note
Replacing the perfume cartridge
Make sure you remove the toner cartridge
cover horizontally so as not to break it inside
the toner cartridge.
After removing the cover, do not shake the
toner cartridge. You may risk spilling toner.
Replace the perfume cartridge when the machine
displays the message PERFUME CARTRIDGE END OF
LIFE: REPLACE THE.
The procedure for replacing the consumable is included
with the new cartridge.
After replacing the cartridge, you must declare the
replacement of this consumable.
- 103 -
14 - Maintenance and incidents
MF 5990 - Agoris M943
The machine takes the replacement of this consumable into account.
Administrator rights
Note
Servicing
You must have machine administrator rights
to access this function.
The machine takes the replacement of this consumable into account.
In order to ensure the performance of your machine, the
printer should be serviced (drum change, etc.) every
200,000 pages printed.
The feeder shoe and the loading unit should be replaced
every 50 000 pages scanned on the autofeed scanner.
Contact your retailer to have servicing carried out.
Replacing the feeder shoe
Removing paper jams
1 Press the MENU key.
2 Select CONSUMABLES > DECLARE REPLACE.
3 Press PERFUME.
Replace the feeder shoe on the autofeed scanner when
the machine displays the message scanner SCANNER
PAD END OF LIFE: REPLACE THE. After replacing, you
must declare the replacement of this consumable.
1 Open the cover of the autofeed scanner.
If a paper jam occurs in the paper feed unit, or if no paper
is fed, the message PAPER JAM appears with an
indication of where the jam has occurred. The printer
automatically goes offline when this message appears.
Remove the paper causing the jam. When the jammed
paper has been removed, the printer resumes printing.
Possible paper jam locations
The illustration below shows the path taken by the paper
through the machine, including when additional paper
trays are installed. The locations where paper jams may
occur are indicated. Paper jams may occur at several
places on the same path.
2 Press down on the tab on the feeder shoe and lift
to remove it.
3 Unpack the new feeder shoe, place it in its housing
and clip in into place.
4 Close the cover of the autofeed scanner.
You must now declare the replacement of this
consumable:
Administrator rights
Note
You must have machine administrator rights
to access this function.
1 Press the MENU key.
2 Select CONSUMABLES > DECLARE REPLACE.
3 Press SCANNER PAD.
- 104 -
1
Paper output
5
Additional paper
tray
2
Secondary paper 6
tray
Duplex unit
3
Main paper tray
7
Toner cartridge
4
Additional paper
tray
8
Fuser unit
14 - Maintenance and incidents
MF 5990 - Agoris M943
Considerations for removing paper jams
If necessary, remove all paper trays installed in order to access the jammed paper.
Remember the following indications when you try to
remove a paper jam:
• If paper jams occur frequently, try using another type
of paper, replacing the paper with paper from another
ream, airing the pile before inserting it in the printer or
turning it over. If paper jams persist despite these
measures, it is possible that the problem is due to the
printer.
• Depending on where the jam occurred, jammed pages
may be reprinted when printing resumes.
4 Replace the paper tray in the machine and push it
in fully.
5 Open and close the access flap to the toner cartridge.
Note
When you remove a paper jam, remove the
paper gently so as not to tear it. Torn paper
is difficult to remove and may go unnoticed.
Never reload pages that have been removed from a jam.
Scanner paper jam
In the event of paper jam:
1 Open the cover of the autofeed scanner.
Duplex module paper jam
1 Remove all paper without tearing it from the machine's paper output.
2 Remove the paper causing the jam without tearing
it.
3 Close the cover of the autofeed scanner.
Paper tray paper jam
2 Open the cover of the duplex module by lifting the
latch.
The procedure for removing paper jams described in this
section applies to all paper trays in the machine.
1 Remove the paper tray from the machine and place
it on a flat surface.
2 Remove the paper causing the jam without tearing
it.
3 Remove the paper causing the jam without tearing
it.
3 Remove the paper stuck inside the printer without
tearing it.
- 105 -
14 - Maintenance and incidents
MF 5990 - Agoris M943
4 Close the cover of the duplex module.
4 Open the rear cover.
5 Open and close the access flap to the toner cartridge.
WARNING
The fuser unit may reach very high temperatures during operation. To avoid injury, do
not touch this zone.
Fuser unit paper jam
1 Remove all paper from the machine's paper output.
5 Remove the paper causing the jam without tearing
it.
2 Open the cover of the duplex module by lifting the
latch.
6 Close the rear cover.
3 Lift up the inner lever on the top left of the machine's rear cover.
- 106 -
14 - Maintenance and incidents
MF 5990 - Agoris M943
7 Check that the levers located on the machine's rear
cover have returned to their initial position, as illustrated below:
3 Lift up the flatbed scanner and open the access flap
to the toner cartridge.
8 Close the cover of the duplex module.
WARNING
The fuser unit may reach very high temperatures during operation. To avoid injury, do
not touch this zone.
9 Open and close the access flap to the toner cartridge.
Toner cartridge paper jam
1 Remove all paper from the machine's paper output.
4 Remove the toner cartridge gently by pulling on its
handle and place it on a flat surface.
5 Remove the paper causing the jam without tearing
it. To remove the paper more easily, turn the paper
feed rollers in the same direction as normal paper
transport.
2 Press the toner cartridge access button.
6 Insert the toner cartridge into its compartment,
pushing it fully in until it engages (last movement
downwards).
- 107 -
14 - Maintenance and incidents
MF 5990 - Agoris M943
7 Close the access flap to the toner cartridge and
lower the flatbed scanner.
Administrator rights
Note
You must have machine administrator rights
to access this function.
To install the update from the integrated website:
1 Go to the integrated website (see Remote
configuration [ 21]).
2 Select the SERVICES tab.
3 Select the PC TRANSFER menu.
4 In SOFTWARE UPDATE, press Browse.
5 Select the file to download and run the update.
Do not hesitate to consult the website www.sagemcommunications.com to know whether new versions of
this manual are available once your software has been
updated.
Storage
If you plan not to use the machine for an extended period,
disconnect the power cable.
We recommend you consult your retailer for the
precautions to be taken to avoid damage when the
machine is once again in use.
Packing and transporting the
machine
If you wish to transport the machine, use its original
packaging. If you do not pack the machine correctly, the
warranty may be void.
1 Press the On/Off button to switch off the machine
(position 0) and disconnect the mains power cable.
2 Disconnect all cables connected to the machine.
3 Remove the automatic document feeder and close
the scanner reception stop.
4 Remove the toner cartridge from the printer. Place
the toner cartridge in the plastic bag provided to
prevent any toner spills.
5 Remove the duplex module from the machine.
6 Place the automatic document feeder and the duplex module into their original plastic and cardboard boxes with their documents (hardcopies,
CD-ROMs, etc.).
7 Pack the printer and place it in its original box with
all the original protective spacers.
8 Place all documentation (printed documents, CDRom, etc.) in the box.
9 Close the box using adhesive tape.
Updating the Firmware via USB key
You can update the three components of your machine's
firmware (BOOT, Software and JFFS2 from a USB key.
Consult our website at www.sagemcom.com to know
whether firmware updates are available for your machine
and download the appropriate pack to your USB key.
You can then install it from the USB key.
Caution
To fully update your machine, it is necessary
to update three files (BOOT, Software and
JFFS2 in that order.
Caution
Updating the file JFFS2 overwrites all the
machine's settings and returns the configuration to "factory" settings.
To install your update from a USB key, proceed as
follows:
1 Go to the website www.sagemcom.com and download the update pack for your machine to your USB
key.
2 From the USB key, run the executable file and let
the software decompress the files in the default
folder.
3 Insert your USB key into the machine respecting
the insertion direction.
Updating the Firmware from the
integrated website
The USB key is analysed. When the analysis is
complete, the USB KEY menu is displayed.
Consult our website www.sagem-communications.com to
know whether there are any firmware updates available
for your machine and download the appropriate file to
your PC.
You can then install it from the integrated website.
- 108 -
4 Press ADVANCED FUNCTIONS.
5 Press UPDATE SOFTWARE to access the firmware update function.
The selection window for files available for update
is displayed on the screen.
6 Use the keys available to filter the file types that
can be seen in the selection window:
14 - Maintenance and incidents
MF 5990 - Agoris M943
Key
BOOT
Software
JFFS2
Action
View "BOOT" files.
View "Software" files.
View "JFFS2" files.
7 Browse through the list to select the file you want to
update using the keys available:
Key
Action
Move the list up 1 file at a time at
each press.
Move the list up 10 files at a time at
each press.
Move the list down 1 file at a time at
each press.
Move the list down 10 files at a time
at each press.
8 Press the file to select it. It becomes blue.
9 When you have selected the file, press OK to confirm and start the update or Cancel to return to the
previous menu.
Note
Before downloading, the machine settings
and the address book are automatically saved in the Root directory
\HFXv2\backupAuto of the USB key under
the names
MachineParams_YYMMDD_HHMMSS.xml
and DataBook_YYMMDD_HHMMSS.dir.
10 A download confirmation message is displayed.
Press OK to confirm, the download starts. Import
successful, press YES to return to the previous
menu.
Caution
It is essential not to cut off the power, or
switch off the machine during the
download.
11 When the download is complete, the machine restarts automatically.
Note
Remember to import the settings and the
address book saved on the USB key if you
have downloaded the JFFS2 file, see sections Importing settings from a USB key
[ 42] and Importing an address book from
a USB key [ 83].
See also
Remote configuration [21]
- 109 -
14 - Maintenance and incidents
MF 5990 - Agoris M943
Troubleshooting
The following sections describe problems you may encounter and the corrective actions you can implement to resolve
them.
Some solutions may require cleaning or replacing certain machine components.
If the corrective action suggested does not solve the problem, reboot the terminal before contacting a maintenance
technician.
Troubleshooting
The table in this section exhaustively presents the problems that may occur and the corrective actions you can
implement to solve them.
If the corrective action suggested does not solve the problem, reboot the terminal before contacting a maintenance
technician.
Symptom
Possible cause
Solution
When the machine The mains cable is not correctly
is switched on,
connected to the power plug.
nothing appears
The On/Off button is not in
on the screen
position I.
Check that the mains cable is correctly connected to
the power plug.
Place the switch in the O position (Off), then to the I
position (On).
The plug used for the machine is Connect another electrical appliance to the plug to
defective.
check if it is working.
The machine
resets or switches
off frequently.
The mains cable is not correctly
connected to the power plug.
Switch off the machine, check that the power cable is
connected to the plug and switch the machine on
again.
A system error occurred.
Contact a maintenance technician.
The machine does The document is too thick or
not detect the
incorrectly positioned.
presence of the
document inserted
in the autofeed
scanner
1 Remove the document.
2 Check that the document is not too thick (maximum 70 sheets of paper 80 g/m²).
3 Fan the sheets.
4 Move the sheets close to the limit stop.
The machine does The telephone cable is not
not receive faxes correctly connected to the
telephone line.
1 Check that the telephone cable is correctly connected.
2 Connect a telephone to the line to check that
there is a dial tone on the telephone line.
The machine does The telephone cable is not
not send faxes
correctly connected to the
telephone line.
1 Check that the telephone cable is correctly connected.
2 Connect a telephone to the line to check that
there is a dial tone on the telephone line.
3 Check that the prefix is properly programmed
and used.
The machine
receives a blank
page
Document incorrectly sent or
printer problem
1 Photocopy a document: if it is correct, the machine is working normally.
2 Call your correspondent and ask him to send
the document again. The document may have
been inserted upside down.
The machine will
not print sent data
An error message is displayed
on the machine screen.
Follow the instruction in the screen message.
The print job was cancelled
because you are not authorized
to print.
Contact the machine administrator to know your
rights.
Print rights must be defined in your user account.
- 110 -
15 - Troubleshooting
MF 5990 - Agoris M943
Symptom
Possible cause
Solution
The message
TONER
CARTRIDGE X
NEARLY EMPTY
is displayed more
than is normal
A toner cartridge is defective.
Replace the defective toner cartridge with a new
toner cartridge.
The printed pages are highly
charged with toner.
See the consumable specifications described in
Characteristics.
Impossible to print The USB key is not compatible.
from a USB key
Check the compatibility of the USB key used (see
Using a USB memory key [ 67]).
The file format is not compatible. Check the compatibility of your files (see Using a
USB memory key [ 67]).
The print job was cancelled
because you are not authorized
to print.
Contact the machine administrator to know your
rights.
Print rights must be defined in your user account.
Printing is too slow The printer is configured to print Printing on special media is slower.
If you are using standard paper, ensure that the
in slow mode (e.g. thick or
transparent paper).
appropriate media is defined in the printer driver.
Duplex printing is
causing problems
The energy saving mode is
activated.
In this mode, printing takes a while to start (see
Energy saving).
The print job is very complex.
Please wait. No action required.
Printer memory is insufficient.
If the print jobs dealt with by the machine are mostly
comprised of very complex jobs, and print times are
affected, you can add memory.
Contact your retailer for more information.
An incorrect toner cartridge is
installed.
Only use the correct toner cartridges. See the
consumable specifications described in
Characteristics.
Contact your retailer for more information.
The media used is not correct or Ensure you are printing on media that is compatible
the printing parameters are not with duplex mode (see Recommendations for paper
correctly defined.
[ 139]).
Do not use envelopes, labels, cards, thick or glossy
supports, transparencies.
Check that the paper tray does not contain different
types of media.
Check that your document contains more than one
page.
In the printer driver, check that you have selected
"Duplex" mode.
The printer is
The machine is not resting on a
making an unusual flat and stable surface.
noise
The paper tray is not correctly
installed.
The machine must be placed on a solid, horizontal
surface (see Location conditions [ 123]).
Remove the paper tray you are printing from and reinsert it completely.
An object is caught in the printer. Switch off the machine, disconnect the mains cable
and remove the object.
If you cannot remove it, contact a maintenance
technician.
The display is
disturbed
The display can be disturbed by Move the affected equipment away as far as
interference with radio
possible.
equipment.
Redirect or change the position of the antenna of the
affected radio or TV receiver.
Connect the affected equipment to a mains power
outlet on a different circuit to that of the source.
Reboot the terminal.
- 111 -
15 - Troubleshooting
MF 5990 - Agoris M943
Symptom
Possible cause
Solution
The paper comes
out at the back of
the terminal
The lever located at the back of
the terminal is in the incorrect
position.
Put the lever down.
Troubleshooting paper jams
Frequent paper jams in a specific zone mean that this zone requires cleaning, servicing or repair.
Frequent paper jams may also occur if you are not using a compatible support.
Symptom
Possible cause
Solution
Several sheets
are fed at the
same time into
the printer
Paper is getting
stuck in the
printer.
The media is not correctly
inserted in the paper tray.
Remove the jammed sheets and reload the media
correctly into the paper tray (see Loading media
[ 9]).
The paper tray contains too
many sheets of paper.
Remove the excess sheets and reload the required
quantity of sheets (see Loading media [ 9]).
The paper guides are not
correctly adjusted to the format
used.
Adjust the guides against the pile of paper loaded in
the paper tray according to the format used.
The media loaded is warped or
creased.
Remove the sheets, smooth and reload them.
If the jams persist, use another media.
The media used is damp.
Remove the loaded media and replace it with dry
media.
The media used is not
compatible (format, thickness,
type, etc.).
Only use compatible media supports (see
Recommendations for the paper [ 139]).
The paper tray is not correctly
installed.
Remove the paper tray you are printing from and reinsert it completely.
The machine is not resting on a
flat and stable surface.
The machine must be placed on a solid, horizontal
surface (see Location conditions [ 123]).
Have you just been printing on
postcards?
Clean the paper feed rollers (see Cleaning the paper
feed rollers [ 102]).
Jams in the Duplex The media used is not
module
compatible (format, thickness,
type, etc.).
Only use compatible media supports (see
Recommendations for the paper [ 139]).
Automatic duplex printing is only possible on
standard paper from 60 to 90 g/m² [16 to 24 lb] (see
Recommendations for the paper [ 139]).
Check that the paper tray does not contain different
types of media.
Envelopes, postcards, thick, glossy or transparent
media cannot be duplex printed.
One or several sheets have
remained stuck in duplex
module.
Check once again the paper path in the duplex
module and remove any sheets which may still be
stuck.
- 112 -
15 - Troubleshooting
MF 5990 - Agoris M943
Symptom
Possible cause
Solution
The jam message The access flap to the toner
remains displayed. cartridge must be opened and
closed to reset the printer.
Open and close the access flap to the toner cartridge.
Check once again the paper path and remove any
sheets which may still be stuck.
One or several sheets have
remained stuck in the printer.
Troubleshooting print quality problems
The table and illustrations in this section exhaustively present print quality problems that may occur and the corrective
actions you can implement to solve them.
If the corrective action suggested does not solve the problem, reboot the terminal before contacting a maintenance
technician.
Symptom
Possible cause
Solution
Blank print
The toner cartridge cover has
not been removed.
Remove the toner cartridge and check that the cover
has been removed (see Installing the toner cartridge
[ 8]).
The toner cartridge is defective
or incorrectly installed.
Remove the toner cartridge and check its condition.
Replace the defective toner cartridge.
Correctly reinstall the toner cartridge (see Installing
the toner cartridge [ 8]).
Several sheets are fed at the
same time into the printer
Remove the sheets from the paper tray and check
they are not sticking together.
Fan sheets of paper (not transparencies), and
replace them in the paper tray.
The media used is damp.
Check the ambient humidity in the media storage
room.
Remove the loaded media and replace it with dry
media.
The toner cartridge is defective.
Remove the toner cartridge and check its condition.
Replace the defective toner cartridge.
Black background
- 113 -
15 - Troubleshooting
MF 5990 - Agoris M943
Symptom
Possible cause
Solution
Pale and fuzzy
print
The media used is not
compatible (format, thickness,
type, etc.).
Only use compatible media supports (see
Recommendations for the paper [ 139]).
The media used is damp.
Check the ambient humidity in the media storage
room.
Remove the loaded media and replace it with dry
media.
The toner cartridge is defective.
Remove the toner cartridge and check its condition.
Replace the defective toner cartridge.
The toner cartridge is almost
empty.
Replace the toner cartridge (see Replacing the toner
cartridge [ 102]).
The levers located on either side Open the cover of the duplex module by lifting the
of the fuser unit are not lowered.
latch.
Lift up the inner lever on the top left of the machine's rear cover.
Open the rear cover.
Lower the levers.
The ink saving mode is
activated.
In this mode, the quantity of toner consumed by
printing is reduced.
- 114 -
15 - Troubleshooting
MF 5990 - Agoris M943
Symptom
Possible cause
Solution
Black spots on the The media used is not
printed page
compatible (format, thickness,
type, etc.).
Only use compatible media supports (see
Recommendations for the paper [ 139]).
The toner cartridge is defective.
Remove the toner cartridge and check its condition.
Replace the defective toner cartridge.
Black stripes on
the printed page
The toner cartridge is defective.
Remove the toner cartridge and check its condition.
Replace the defective toner cartridge.
Regularly spaced
residues
There is toner in the paper path. Print out several blank pages to eliminate the toner.
The toner cartridge is defective.
Remove the toner cartridge and check its condition.
Replace the defective toner cartridge.
Traces like hair
The media used has been left in Remove the loaded media and replace it with new
inside and outside an open packet or left unpacked media.
half-shade zones for a long period (in low humidity
conditions).
Shadows around
black areas
The media used has been left in Remove the loaded media and replace it with new
an open packet or left unpacked media.
for a long period (in low humidity
conditions).
White spots in
black areas
The media used is not
compatible (format, thickness,
type, etc.).
Only use compatible media supports (see
Recommendations for the paper [ 139]).
The toner cartridge is defective.
Remove the toner cartridge and check its condition.
Replace the defective toner cartridge.
- 115 -
15 - Troubleshooting
MF 5990 - Agoris M943
Symptom
Possible cause
Solution
Image not sufficiently fixed
Image is easily
smudged
The media used is damp.
Check the ambient humidity in the media storage
room.
Remove the loaded media and replace it with dry
media.
The media used is not
compatible (format, thickness,
type, etc.).
Only use compatible media supports (see
Recommendations for the paper [ 139]).
Irregular printing The media used is damp.
Spotted image
Check the ambient humidity in the media storage
room.
Remove the loaded media and replace it with dry
media.
The media used is not
compatible (format, thickness,
type, etc.).
Only use compatible media supports (see
Recommendations for the paper [ 139]).
Sloping print
The toner cartridge is defective
Printing in unex- or incorrectly installed.
pected places
Remove the toner cartridge and check its condition.
Replace the defective toner cartridge.
Correctly reinstall the toner cartridge (see Installing
the toner cartridge [ 8]).
Vertical white
stripes
The toner cartridge is defective
or incorrectly installed.
Remove the toner cartridge and check its condition.
Replace the defective toner cartridge.
Correctly reinstall the toner cartridge (see Installing
the toner cartridge [ 8]).
Print media
creased
The media used is not
compatible (format, thickness,
type, etc.).
Only use compatible media supports (see
Recommendations for the paper [ 139]).
The media used is damp.
Remove the loaded media and replace it with dry
media.
The media is not correctly
inserted in the paper tray(s).
Remove the sheets from the paper tray and align
their front edges.
Replace them in the paper tray and adjust the guides
against the pile of paper.
- 116 -
15 - Troubleshooting
MF 5990 - Agoris M943
Symptom
Possible cause
Solution
Creased printed
envelopes
Envelopes may be creased
depending on the type used.
Open the cover of the duplex module by lifting the
latch.
Lift up the inner lever on the top left of the machine's rear cover.
Open the rear cover.
Left up the levers to prevent creasing.
Once the envelope printing is complete, remember
to lower the levers again.
Fuzzy printing
The media used is damp.
Remove the loaded media and replace it with dry
media.
The media used is not
compatible (format, thickness,
type, etc.).
Only use compatible media supports (see
Recommendations for the paper [ 139]).
- 117 -
15 - Troubleshooting
MF 5990 - Agoris M943
Symptom
Possible cause
Printing on
transparencies
lacks clarity
The transparencies used are not Only use compatible media supports (see
compatible (format, thickness,
Recommendations for the paper [ 139]).
type, etc.).
Printing on
postcards lacks
clarity
Printing on
envelopes lacks
clarity
Solution
The transparencies are not
correctly loaded in the paper
tray(s).
Remove the transparencies from the paper tray and
align their front edges.
Replace them in the paper tray and adjust the guides
against the stack of transparencies (see Loading
transparencies into the paper tray [ 11]).
The postcards used are not
compatible (format, thickness,
type, etc.).
Only use compatible media supports (see
Recommendations for the paper [ 139]).
The postcards are not correctly
loaded in the paper tray(s).
Remove the postcards from the paper tray and align
their front edges.
Replace them in the paper tray and adjust the guides
against the postcards (see Loading media [ 9]).
The envelopes used are not
compatible (format, thickness,
type, etc.).
Only use compatible media supports (see
Recommendations for the paper [ 139]).
The envelopes are not correctly
loaded in the paper tray(s).
Remove the envelopes from the paper tray and align
their front edges.
Replace them in the paper tray and adjust the guides
against the envelopes (see Loading media [ 9]).
Smart card incidents
The table in this section presents problems that may occur reading smart cards and their causes.
Message
Cause
Unknown card
The smart card is wrong or defective.
Zero smart card capacity
The smart card has already been used.
Operation cancelled
Operator stop.
Operation prohibited
The toner cartridge has not yet reached its critical threshold and may
still be used before being replaced.
Communication failures
Communication failures may occur when scanning or sending a document.
If the communication fails, the machine will automatically reattempt to make the call later.
Scanning failure
You can:
•
resend the document immediately by pressing
•
cancel the operation by pressing
, if the document is still present;
.
Sending failure
You can:
• wait for the machine to attempt to send the document again;
• send the document again immediately via the emission queue (see section Forcing an emission request [ 56]);
- 118 -
15 - Troubleshooting
MF 5990 - Agoris M943
•
cancel the operation by deleting the corresponding request from the emission queue (see section Deleting a
document awaiting emission [ 56]).
The machine will make 5 automatic call-back attempts. The unsent document is automatically deleted and an emission
report is printed with a failure code and the reason why the communication failed.
Communication failure codes
The communication failure codes appear in logs and emission reports.
General codes
Code
Meaning
Reason / Solution
01
Busy or no fax answer
This code appears after 6 unsuccessful attempts. You should
try again later.
02
Busy or no fax answer
This code appears after 6 unsuccessful attempts. You should
try again later.
03
Operator stop
The communication was interrupted by the user by pressing
.
04
Non programmed number
A number saved as a one-touch key or abbreviated number is
not valid, check it. (Example: a delayed transmission was
programmed with a one-touch key and this key has been
deleted in the meantime).
07
Disconnection
The communication was cut off (bad quality link). Check the
number.
08
Quality
The document you sent was not properly received. Contact
your correspondent to see whether it is necessary to resend the
document. It is possible the interference occurred in a useless
part of the document.
12
Document receive error
Ask your correspondent to check the length of the document (it
is too long to be received in full).
13
Document incorrectly sent Ask your caller to send the document again.
15
Incompatible coding
Recipient machine does not match with the send document’s
encoding.
19
Memory saturated
The machine can no longer receive as the memory is full. There
are too many unprinted documents or documents waiting to be
sent.
Print out the documents received and immediately send or
delete documents waiting to be sent.
20
Memory saturated
Received documents memory saturated. Print out received
documents.
25
Caller stop
The communication was stopped by the caller.
26
Disconnection
Sending did not start. The telephone line is too noisy.
27
Document incorrectly sent For emission: send the document again.
For reception: ask your caller to send the document again.
Internet codes
Code
Meaning
Reason / Solution
64
No provider response
Modem cannot connect to the service provider.
If the error is systematic, check the call number for the service
provider and possibly the machine's prefix.
- 119 -
15 - Troubleshooting
MF 5990 - Agoris M943
Code
Meaning
Reason / Solution
67
Cannot connect to SMTP
server
Cannot connect to outgoing SMTP server, the service is
momentarily unavailable.
If the error is systematic, check the internet connection and
server parameters.
68
Cannot connect to POP3
server
Cannot connect to incoming POP3 server, the service is
momentarily unavailable.
If the error is systematic, check the internet connection and
server parameters.
69
Disconnection from
provider
The service is momentarily unavailable. Try again later.
70
SMTP server
disconnection
Disconnection from the outgoing SMTP server, the service is
momentarily unavailable. Try again later.
71
POP3 server disconnection Disconnection from the incoming POP3 server, the service is
momentarily unavailable. Try again later.
72
Internet disconnection
The service is momentarily unavailable. Try again later.
Code
Meaning
Reason / Solution
80
Disk protected or file
already exists
The file could not be archived, either because the directory is
write protected, or because a file with the same name already
exists in the directory.
81
Incorrect authentication
Incorrect "Login" and / or "Password"
82
Unsupported
authentication dialect or
method
Check that the authentication proposed by the Server is NTLM.
83
Invalid password or
directory unknown
Incorrect "Password" and / or "Directory" parameters
Network codes
- 120 -
15 - Troubleshooting
MF 5990 - Agoris M943
Safety
Safety Instructions
Before connecting your machine, check that the mains plug to which you are connecting the machine complies
with the indications on the information label (voltage, current, frequency of electricity network) on the machine. This
machine must be connected to a single-phase mains power supply. The machine should not be installed directly on
the ground.
Batteries, packaging and electrical and electronic equipment (EEE), must be disposed of in accordance with the
instructions in the ENVIRONMENT chapter in this manual.
Depending on the model, the machine's power plug may be the only means of disconnecting from the electricity
supply. As a result, the following precautions must be taken: the machine must be connected to a nearby power plug.
The power plug must remain easily accessible.
The machine is supplied with a mains power cable fitted with an earthed plug. An earthed power plug must be
connected to a wall socket fitted with an earth connected to the building earth protection.
Repair-maintenance: Have any repair and maintenance work carried out by a
qualified technician. It is prohibited for users to repair internal components. To
prevent all risk of electrocution, you should not conduct these operations
yourself, as by opening or removing covers, you are exposed to a double risk:
Irremediable injury may be caused to the human eye if it is exposed to laser
rays.
Contact with powered components may cause electrical shock with extremely serious consequences.
For installation conditions and precautions for use, please consult chapter Installation [ 8].
Laser Safety Information
CAUTION: The use of controls, adjustments or performance of procedures other than those specified in this
guide may result in hazardous light exposure.
This equipment complies with international safety standards and is classified as a Class 1 Laser Product.
With specific reference to lasers, the equipment complies with laser product performance standards set by
governmental, national and international agencies as a Class 1 laser product. It does not emit hazardous radiation as
the beam is totally enclosed during all phases of customer operation and maintenance.
For Europe/Asia
This machine complies with EN 60825-1:2007, is classified as class 1 Product and is safe for office/EDP use. It
contains a laser diode of 10mW power and wavelength 785nm.
Direct (or indirect reflected) eye contact with the laser beam may cause serious eye damage. Safety precautions and
interlock mechanisms have been designed to prevent any possible customer exposure to laser radiation.
- 121 -
16 - Safety
MF 5990 - Agoris M943
Position of safety labels on the machine
For safety, warning labels have been placed on the machine in the positions indicated below. For your safety, never
touch these surfaces when removing a paper jam or replacing the toner cartridge.
Power switch symbols
In accordance with IEC 60417, this machine uses the following symbols for the main power switch:
•
•
means POWER ON.
means POWER OFF.
Regulatory information
Maschinenläminformations - Verordnung - 3.GPSGV
Certifications in Europe
The CE mark applied to this product indicates the declaration of
conformity of Sagemcom Documents SAS with the applicable directions
of the European Union, as per the dates indicated:
21 October 2009: Directive 2009/125/EC establishing a framework for the setting of
ecodesign requirements.
12 December 2006: Directive 2006/95/EC amended. Harmonization of the laws of Member
States relating to low-voltage equipment.
15 December 2004: Directive 2004/108/EC amended. Harmonization of the laws of Member
States relating to electromagnetic compatibility.
- 122 -
16 - Safety
MF 5990 - Agoris M943
9 March 1999: Directive 1999/5/EC on radio and telecommunications terminal
equipment and mutual recognition of conformity.
The declaration of conformity can be consulted online at
www.sagemcom.com in the "support" section or may be requested from
the following address:
Sagemcom Documents SAS - Customer service department
250, route de l’Empereur- 92848 Rueil-Malmaison cedex - France
Location conditions
By choosing an appropriate location, you will preserve the longevity of the machine. Ensure that the selected
location has the following characteristics:
• Do not install the machine directly on the ground.
• Choose a well-ventilation location.
• Ensure that the air vents located on either side of the machine and at the back of the Duplex module, are not obstructed. During installation, ensure that the machine is placed about forty centimetres from any object so as to facilitate opening of covers.
• Ensure that this location does not present any risk of emissions of ammonia or any other organic gases.
• The earthed socket (see safety instructions [ 121]) to which you will be connecting the machine is located nearby
and easily accessible.
• Ensure that the machine is not directly exposed to sunlight.
• Do not place the machine in a zone exposed to drafts of air generated by air conditioning, heating or ventilation
systems, or in a zone subject to significant differences of temperature or humidity.
• Choose a stable, horizontal surface on which the machine will not be exposed to intense vibrations.
• Keep the machine away from any objects that may obstruct the air vents.
• Do not place the machine near drapes or other flammable objects.
• Choose a location where the risks of splashes of water or other liquids are limited.
• Ensure that this location is dry, clean and dust-free.
Precautions for use
Take account of the important precautions below when using the machine.
Operating environment
The following section describes the operating environment required for the machine:
• Temperature: 10 °C to 32 °C [50 °F to 89.6°F] with ambient humidity of between 15 and 80 % (up to 65 % ambient
humidity for a temperature of 32 °C [89.6°F]).
Precautions for using the machine
•
•
•
•
•
•
•
•
The following section describes the precautions to be taken when using the machine:
During printing, never switch the machine off or open its covers.
Never use gas or flammable liquids, or objects which may generate a magnetic field around the machine.
When disconnecting the mains cable, always take hold of the plug without pulling on the cable. A damaged cable
presents a potential risk of fire or electrical discharge.
Never touch the mains cable with wet hands. You risk getting an electric shock.
Always disconnect the power cable before moving the machine; Otherwise, you risk damaging the cable and creating a risk of fire or electric shock.
Always disconnect the mains cable if you do not plan to use the machine for a prolonged period of time.
Never place objects on the mains cable, and never pull on it or fold it. This may cause a risk of fire or electric shock.
Ensure that the machine never lies on the mains cable or the communication cables from any other electrical appliances. Also ensure that no cables are inserted into the machine mechanism. This may prevent the machine from
operating correctly or create a fire hazard.
- 123 -
16 - Safety
MF 5990 - Agoris M943
•
•
•
•
•
•
•
•
•
Never try to remove a fixed panel or cover. The machine contains high voltage circuits. Any contact with these circuits may lead to a risk of electric shock.
Never try to modify the machine. This may cause a risk of fire or electric shock.
Ensure that all paper clips, staples or other small metal parts do not enter the machine through the air vents or other
openings. These objects may generate a risk of fire or electric shock.
Prevent any water or other liquids from being spilled on or near the machine. Any contact of the machine with water
or liquid may cause a risk of fire or electric shock.
If liquid or a metal part accidentally penetrates the machine, switch it off immediately, disconnect the mains cable
and contact your retailer. Otherwise, you may be exposed to a risk of fire or electric shock.
If the machine emits heat, smoke, unusual smells or abnormal noises, switch it off, disconnect it immediately and
contact your retailer. Otherwise, you may be exposed to a risk of fire or electric shock.
Avoid using the machine during a thunder storm, as there may be a risk of electrical shock caused by lightening.
Never move the machine during printing.
If you want to move the machine, lift it. To move the machine, see the section Handling and moving the machine
[ 125].
Place the machine in a well-ventilated room. When the machine is in operation, a small
quantity of ozone is generated. Unpleasant smells may emanate from the machine if it is
operated intensively in a poorly ventilated room. For safe operation, place the machine in a
well-ventilated room.
Precautions for using the touch screen
The following section describes the precautions to be taken when using the touch screen:
• Never use sharp or pointed objects on the touch screen. You risk scratching or breaking the screen.
• Never subject the screen to violent shocks or pressure. You risk breaking the touch screen.
Safety information
When using the machine, the following safety precautions must always be respected.
Safety during operation
To ensure continuous safe operation of your equipment, follow these safety instructions at all times (the list below is
non-exhaustive and may be added to or changed without prior notice).
In this section, the following symbols are used:
CAUTION
Warning
•
•
•
•
•
Indicates a potentially dangerous situation that may lead to death or
serious injury if instructions are not followed.
Indicates a potentially dangerous situation that may lead to minor or moderate
injury, or damage the equipment if instructions are not followed.
CAUTION
Connect the power cable directly to the wall socket and never use an extension flex.
Disconnect the power plug (by pulling on the plug and not the cable) if the power cable or plug show signs of wear
or damage.
To prevent any risk of electric shock or exposure to laser beams, never remove any cover or screws other than
those specified in the instructions.
Switch off the power and disconnect the power plug (by pulling on the plug and not the cable) if any one of the following situations occur:
–
You spill something on the equipment.
–
You suspect the equipment needs maintenance or repair.
–
The equipment cover is damaged.
Never incinerate spilled or waste toner. Toner dust may catch fire if it is exposed to an open flame.
- 124 -
16 - Safety
MF 5990 - Agoris M943
•
•
•
•
•
•
•
•
Warning
Protect the equipment from any humidity (rain, snow, etc.).
Disconnect the mains cable from the wall socket before moving the equipment. When moving the equipment, ensure that the mains cable does not remain under the machine so as not to damage it.
When disconnecting the mains cable from the wall socket, always pull on the plug (and not the cable).
Ensure that paper clips, staples and other small metal parts do not fall into the machine.
Keep toners (used or unused), toner cartridges (or bottles), ink (used or unused) or ink cartridges out of the reach
of children.
Take care not to cut yourself when working inside the machine to remove paper jams.
For environmental reasons, do not dispose of the machine or consumables at a household waste collection point.
The equipment can be disposed of at an authorized dealer's or a suitable collection site.
Our products are designed to meet the highest requirements in terms of quality and functionality. We recommend
you only use consumables purchased from an authorized dealer.
Warning
This product complies with class A regarding radiated emissions (EN55022), and may create interference with other
information technology equipment or radio-TV or radiocommunications receivers placed in proximity, especially if it is
installed in a residential environment.
The installation instructions in this respect are important and must be adhered to. If it is suspected that this installation
is creating electromagnetic interference, switching it on / off may ensure that it is indeed the source of the interference.
If the interference is created by the installation, preventive measures must be taken to reduce interactions, i.e.:
• move the affected equipment away as far as possible,
• redirect or change the position of the antenna of the affected radio or TV receiver,
• connect the affected equipment to a mains power outlet on a different circuit to that of the source.
Power supply
The plug must remain near the appliance and easily accessible.
For the Fax or the Telephone
Warning
Line interfaces are classified TNV-3 in accordance with standard 60950-1.
• Never use this machine near a water source (for example beside a bath, sink or washtub), in a damp basement or
near a swimming pool.
• Avoid using the telephone (other than cordless) during an electrical storm. You may risk exposure to electric shock
due to lightening.
• Do not use a telephone near a gas leak to report the leak.
Handling and moving the machine
Shocks during handling
During printing, the paper tray, paper feeder, trap and other machine parts should not be subjected to any shocks.
Moving the machine
When moving the machine, it should be lifted, not dragged.
• Two people are required to move the machine. Keep the machine horizontal to prevent spilling toner.
• Never lift the machine using the metal scanner frame or you risk damaging it.
- 125 -
16 - Safety
MF 5990 - Agoris M943
•
To lift the machine, close the manual feeder and take hold of the machine as shown opposite.
•
Even when an additional paper tray is installed, lift the machine as shown below. Do not take hold of the additional
paper tray handle, or the side cover, as you risk damaging the lower paper feeder.
Handling toner cartridges
Handle toner cartridges with care, avoiding spilling toner on your hands or in the printer.
• Never place a toner cartridge on its end. Never hold the toner cartridge upside down.
• Never incinerate toner or toner cartridges. The sparks generated may cause burns.
• Never open the toner cartridge or throw away the waste toner bottle.
• Keep cartridges and waste toner bottles away from children.
• Never inhale toner. If your hands are stained with toner, never wipe your eyes or touch your mouth. Ensure that
toner does not come in contact with your skin.
• If you get toner in your eyes, rinse immediately with cold water and consult a doctor.
• Toner on the hands can be cleaned using cold water and a mild soap.
• For the removal of used cartridges and waste toner bottles, consult your retailer; or dispose of toner and toner cartridges at a point specified by the local or national authority.
Keep new toner cartridges:
• In their original packaging.
• In a dry, cool room away from sunlight and heat.
The storage temperature should not exceed 35 °C [95 °F] and 85 % humidity free of condensation.
•
Flat.
Do not store toner cartridges vertically or upside down as the toner risks compacting or becoming unevenly distributed.
•
Away from the sea air or corrosive vapours (aerosols for example).
Environment
Preserving the environment is an essential concern of the manufacturer. The manufacturer wishes to operate
installations that are environmentally-friendly and has chosen to integrate environmental performance in the whole life
cycle of its products, from manufacture to installation, use and elimination.
- 126 -
16 - Safety
MF 5990 - Agoris M943
Packaging
The presence of the logo (green point) means that a contribution has been paid to an approved
national organisation, for improving packaging retrievey and recycling infrastructures.
To facilitate recycling, please respect the sorting rules in place locally for this type of waste.
Batteries and rechargeable batteries
If your product contains batteries or rechargeable batteries, they must be disposed of in
designated collection points.
The product
The crossed bin symbol on the product indicates that it belongs to the electric and electronic
equipment family.
As such, European regulations require that it be collected selectively:
At distribution points in the event an equivalent item of equipment is purchased.
In collection points available locally (household waste facility, selective collection, etc.).
In this way, you participate in the reuse and retrievey of Waste Electrical and Electronic Equipment which may have
potential effects on the environment and human health.
Energy Star
The international ENERGY STAR® programme aims at promoting the development and
awareness of low-consumption office equipment.
As an ENERGY STAR® partner, Sagemcom Documents SAS has determined that this
product meets the ENERGY STAR® directives in terms of energy savings.
Your machine comes with a timer which switches to Energy saving mode after the last
copy/print, configured to 5 or 15 minutes depending on the model. You will find a more
detailed description of this function in the section Configuring the machine in this guide.
Software user license
READ CAREFULLY ALL THE TERMS AND CONDITIONS OF THIS LICENSE BEFORE OPENING THE SEALED
ENVELOPE CONTAINING THE SOFTWARE. OPENING THIS ENVELOPE INDICATES YOUR ACCEPTANCE OF
THESE TERMS AND CONDITIONS.
If you do not accept the terms and conditions of this license, please return the CD-ROM in its unopened packaging to
your retailer, along with the other components of the product. You will be refunded the price you paid for this product.
No refunds will be made for products if the CD-ROM packaging has been opened, if components are missing or if the
refund request is made after a period of ten (10) days following the date of delivery, with your receipt as proof of
purchase.
Definition
The Software means the programs and associated documentation.
License
•
•
•
This license allows you to use the Software on personal computers connected on a local area network. You may
only use the Software to print on one multifunction printer, and you may not lend or transfer Software usage right to
third parties.
You are authorized to make one backup copy.
This license is no exclusive and no transferable.
- 127 -
16 - Safety
MF 5990 - Agoris M943
Ownership
The manufacturer or its suppliers reserve the right of ownership to the Software. You are only the owner of the CDROM. You must not modify, adapt, decompile, translate, create derivative works, rent or sell the Software or
documentation. Any rights not expressly transferred are reserved by the manufacturer or its suppliers.
Duration
This license remains in force until cancellation. You may cancel the license by destroying the program and the
documentation and any copies of them. This license will be automatically cancelled if you fail to respect the terms of
this license. In the event of cancellation, you undertake to destroy all copies of the program and the documentation.
Warranty
The Software is provided "as is" without any express or implied warranty of any kind, including warranties of
merchantability, or fitness for a particular purpose; all risks concerning the results or performance of this Software shall
be borne by the buyer. In the event the program is defective, all costs of repair shall be at the expense of the buyer.
The following guarantee is however applicable to the license holder: the CD-ROM on which the Software is recorded,
is guaranteed to be free from material physical defects, under normal conditions of use and operation, for a period of
ninety (90) days after the date of delivery, with your receipt as proof of purchase. In the event the defect on the CDROM occurs as the result of an accident or improper use, this CD-ROM will not be replaced under this warranty.
Liability
Your retailer's sole liability and your sole recourse is the replacement of this CD-ROM under the terms of the warranty
which should be returned with a copy of your receipt. In no event shall the manufacturer or anyone involved in the
creation, manufacture, sale or delivery of this program be liable for any damages either direct, indirect, incidental,
consequential or otherwise, (including without limitation, lost information, lost time, business interruption, lost income,
lost clients) arising out of the use of or inability to use the Software.
Development
With a view to continuous improvement, the manufacturer reserves the right to modify the characteristics of the
Software without notice. In the event of modifications, your user rights do not give you the right to free updates.
Applicable law
This license is subject to French law. Any disputes arising out of the interpretation or performance of this license shall
be settled by the courts of Paris.
Given the permanent evolution in technology, the manufacturer reserves the right to change the technical
characteristics indicated for this product at any time, without prior notice, and/or to interrupt the production of this
product. All product names and brands which may be registered trade marks by their respective owners are recognized
in this document.
Registered trademarks
Given the permanent evolution in technology, Sagemcom Documents SAS reserves the right to change the technical
characteristics indicated for this product at any time, without prior notice, and/or to interrupt the production of this
product. Companion Suite Pro is a registered trademark of Sagemcom Documents SAS.
Sagemcom is a registered trademark.
PCL® is a registered trademark of Hewlett-Packard Company.
PostScript® is a registered trademark of Adobe Systems Incorporated.
Adobe® and Adobe® products mentions are is registered trademarks of Adobe Systems Incorporated.
PaperPort11SE is a registered trademark of Nuance Communications, Inc.
Microsoft® Windows 2000®, Microsoft® Windows Server 2003®, Microsoft® Windows Server 2008®, Microsoft®
Windows XP®, Microsoft® Windows Vista®, Microsoft® Windows 7® and all other Microsoft® products mentioned are
registered trademarks of Microsoft Corporation registered and/or used in the United States and/or other countries.
All other brands or product names mentioned as examples or for information are the registered trademarks of their
respective owners.
The information contained in this manual is subject to change without notice.
- 128 -
16 - Safety
MF 5990 - Agoris M943
Reproductions prohibited
Never print or copy documents whose reproduction is prohibited by law.
Printing and copying of the following documents are usually prohibited by law:
• bank notes;
• cheques;
• obligations;
• certificates of deposit;
• loan titles.
The above list is provided for information only and is not exhaustive. In the event of a doubt as to the legality of copying
or printing certain documents, consult a legal advisor.
Software licenses
This product comprises software code developed by third parties, including software code subject to the GNU General
Public License ("GPL") or GNU Lesser General Public License ("LGPL").
The terms of the GPL and LGPL, as well as information on obtaining access to the GPL Code and LGPL Code used
in this product, are available at:
www.sc-itportal.com/fs
The GPL Code and LGPL Code used in this product is distributed WITHOUT ANY WARRANTY and is subject to the
copyrights of one or more authors.
For more details, please refer to the GPL Code and LGPL Code for this product and the terms of the GPL and LGPL.
GNU GENERAL PUBLIC LICENSE Version 2, June 1991
GNU GENERAL PUBLIC LICENSE Version 2, June 1991
Copyright (C) 1989, 1991 Free Software Foundation, Inc., 51 Franklin Street, Fifth Floor, Boston, MA 02110-1301 USA.
Everyone is permitted to copy and distribute verbatim copies of this license document, but changing it is not allowed.
Preamble
The licenses for most software are designed to take away your freedom to share and change it. By contrast, the GNU
General Public License is intended to guarantee your freedom to share and change free software--to make sure the
software is free for all its users. This General Public License applies to most of the Free Software Foundation's
software and to any other program whose authors commit to using it. (Some other Free Software Foundation software
is covered by the GNU Lesser General Public License instead.) You can apply it to your programs, too.
When we speak of free software, we are referring to freedom, not price. Our General Public Licenses are designed
to make sure that you have the freedom to distribute copies of free software (and charge for this service if you wish),
that you receive source code or can get it if you want it, that you can change the software or use pieces of it in new
free programs; and that you know you can do these things.
To protect your rights, we need to make restrictions that forbid anyone to deny you these rights or to ask you to
surrender the rights. These restrictions translate to certain responsibilities for you if you distribute copies of the
software, or if you modify it.
For example, if you distribute copies of such a program, whether gratis or for a fee, you must give the recipients all
the rights that you have. You must make sure that they, too, receive or can get the source code. And you must show
them these terms so they know their rights.
We protect your rights with two steps: (1) copyright the software, and (2) offer you this license which gives you legal
permission to copy, distribute and/or modify the software.
Also, for each author's protection and ours, we want to make certain that everyone understands that there is no
warranty for this free software. If the software is modified by someone else and passed on, we want its recipients to
know that what they have is not the original, so that any problems introduced by others will not reflect on the original
authors' reputations.
Finally, any free program is threatened constantly by software patents. We wish to avoid the danger that redistributors
of a free program will individually obtain patent licenses, in effect making the program proprietary. To prevent this, we
have made it clear that any patent must be licensed for everyone's free use or not licensed at all.
The precise terms and conditions for copying, distribution and modification follow.
GNU GENERAL PUBLIC LICENSE
TERMS AND CONDITIONS FOR COPYING, DISTRIBUTION AND MODIFICATION
0. This License applies to any program or other work which contains a notice placed by the copyright holder saying it
may be distributed under the terms of this General Public License. The "Program", below, refers to any such program
- 129 -
16 - Safety
MF 5990 - Agoris M943
or work, and a "work based on the Program" means either the Program or any derivative work under copyright law: that
is to say, a work containing the Program or a portion of it, either verbatim or with modifications and/or translated into
another language. (Hereinafter, translation is included without limitation in the term "modification".) Each licensee is
addressed as "you".
Activities other than copying, distribution and modification are not covered by this License; they are outside its scope.
The act of running the Program is not restricted, and the output from the Program is covered only if its contents
constitute a work based on the Program (independent of having been made by running the Program). Whether that is
true depends on what the Program does.
1. You may copy and distribute verbatim copies of the Program's source code as you receive it, in any medium,
provided that you conspicuously and appropriately publish on each copy an appropriate copyright notice and disclaimer
of warranty; keep intact all the notices that refer to this License and to the absence of any warranty; and give any other
recipients of the Program a copy of this License along with the Program.
You may charge a fee for the physical act of transferring a copy, and you may at your option offer warranty protection
in exchange for a fee.
2. You may modify your copy or copies of the Program or any portion of it, thus forming a work based on the Program,
and copy and distribute such modifications or work under the terms of Section 1 above, provided that you also meet
all of these conditions:
a) You must cause the modified files to carry prominent notices stating that you changed the files and the date of any
change.
b) You must cause any work that you distribute or publish, that in whole or in part contains or is derived from the
Program or any part thereof, to be licensed as a whole at no charge to all third parties under the terms of this License.
c) If the modified program normally reads commands interactively when run, you must cause it, when started running
for such interactive use in the most ordinary way, to print or display an announcement including an appropriate
copyright notice and a notice that there is no warranty (or else, saying that you provide a warranty) and that users may
redistribute the program under these conditions, and telling the user how to view a copy of this License. (Exception: if
the Program itself is interactive but does not normally print such an announcement, your work based on the Program
is not required to print an announcement.)
These requirements apply to the modified work as a whole. If identifiable sections of that work are not derived from
the Program, and can be reasonably considered independent and separate works in themselves, then this License,
and its terms, do not apply to those sections when you distribute them as separate works. But when you distribute the
same sections as part of a whole which is a work based on the Program, the distribution of the whole must be on the
terms of this License, whose permissions for other licensees extend to the entire whole, and thus to each and every
part regardless of who wrote it.
Thus, it is not the intent of this section to claim rights or contest your rights to work written entirely by you; rather, the
intent is to exercise the right to control the distribution of derivative or collective works based on the Program.
In addition, mere aggregation of another work not based on the Program with the Program (or with a work based on
the Program) on a volume of a storage or distribution medium does not bring the other work under the scope of this
License.
3. You may copy and distribute the Program (or a work based on it, under Section 2) in object code or executable
form under the terms of Sections 1 and 2 above provided that you also do one of the following:
a) Accompany it with the complete corresponding machine-readable source code, which must be distributed under the
terms of Sections 1 and 2 above on a medium customarily used for software interchange; or,
b) Accompany it with a written offer, valid for at least three years, to give any third party, for a charge no more than your
cost of physically performing source distribution, a complete machine-readable copy of the corresponding source code,
to be distributed under the terms of Sections 1 and 2 above on a medium customarily used for software interchange; or,
c) Accompany it with the information you received as to the offer to distribute corresponding source code. (This
alternative is allowed only for noncommercial distribution and only if you received the program in object code or
executable form with such an offer, in accord with Subsection b above.)
The source code for a work means the preferred form of the work for making modifications to it. For an executable
work, complete source code means all the source code for all modules it contains, plus any associated interface
definition files, plus the scripts used to control compilation and installation of the executable. However, as a special
exception, the source code distributed need not include anything that is normally distributed (in either source or binary
form) with the major components (compiler, kernel, and so on) of the operating system on which the executable runs,
unless that component itself accompanies the executable.
If distribution of executable or object code is made by offering access to copy from a designated place, then offering
equivalent access to copy the source code from the same place counts as distribution of the source code, even though
third parties are not compelled to copy the source along with the object code.
4. You may not copy, modify, sublicense, or distribute the Program except as expressly provided under this License.
Any attempt otherwise to copy, modify, sublicense or distribute the Program is void, and will automatically terminate
your rights under this License. However, parties who have received copies, or rights, from you under this License will
not have their licenses terminated so long as such parties remain in full compliance.
- 130 -
16 - Safety
MF 5990 - Agoris M943
5. You are not required to accept this License, since you have not signed it. However, nothing else grants you
permission to modify or distribute the Program or its derivative works. These actions are prohibited by law if you do
not accept this License. Therefore, by modifying or distributing the Program (or any work based on the Program), you
indicate your acceptance of this License to do so, and all its terms and conditions for copying, distributing or modifying
the Program or works based on it.
6. Each time you redistribute the Program (or any work based on the Program), the recipient automatically receives
a license from the original licensor to copy, distribute or modify the Program subject to these terms and conditions. You
may not impose any further restrictions on the recipients' exercise of the rights granted herein. You are not responsible
for enforcing compliance by third parties to this License.
7. If, as a consequence of a court judgment or allegation of patent infringement or for any other reason (not limited to
patent issues), conditions are imposed on you (whether by court order, agreement or otherwise) that contradict the
conditions of this License, they do not excuse you from the conditions of this License. If you cannot distribute so as to
satisfy simultaneously your obligations under this License and any other pertinent obligations, then as a consequence
you may not distribute the Program at all. For example, if a patent license would not permit royalty-free redistribution
of the Program by all those who receive copies directly or indirectly through you, then the only way you could satisfy
both it and this License would be to refrain entirely from distribution of the Program.
If any portion of this section is held invalid or unenforceable under any particular circumstance, the balance of the
section is intended to apply and the section as a whole is intended to apply in other circumstances.
It is not the purpose of this section to induce you to infringe any patents or other property right claims or to contest
validity of any such claims; this section has the sole purpose of protecting the integrity of the free software distribution
system, which is implemented by public license practices. Many people have made generous contributions to the wide
range of software distributed through that system in reliance on consistent application of that system; it is up to the
author/donor to decide if he or she is willing to distribute software through any other system and a licensee cannot
impose that choice.
This section is intended to make thoroughly clear what is believed to be a consequence of the rest of this License.
8. If the distribution and/or use of the Program is restricted in certain countries either by patents or by copyrighted
interfaces, the original copyright holder who places the Program under this License may add an explicit geographical
distribution limitation excluding those countries, so that distribution is permitted only in or among countries not thus
excluded. In such case, this License incorporates the limitation as if written in the body of this License.
9. The Free Software Foundation may publish revised and/or new versions of the General Public License from time
to time. Such new versions will be similar in spirit to the present version, but may differ in detail to address new
problems or concerns.
Each version is given a distinguishing version number. If the Program specifies a version number of this License which
applies to it and "any later version", you have the option of following the terms and conditions either of that version or
of any later version published by the Free Software Foundation. If the Program does not specify a version number of
this License, you may choose any version ever published by the Free Software Foundation.
10. If you wish to incorporate parts of the Program into other free programs whose distribution conditions are different,
write to the author to ask for permission. For software which is copyrighted by the Free Software Foundation, write to
the Free Software Foundation; we sometimes make exceptions for this. Our decision will be guided by the two goals
of preserving the free status of all derivatives of our free software and of promoting the sharing and reuse of software
generally.
NO WARRANTY
11. BECAUSE THE PROGRAM IS LICENSED FREE OF CHARGE, THERE IS NO WARRANTY FOR THE
PROGRAM, TO THE EXTENT PERMITTED BY APPLICABLE LAW. EXCEPT WHEN OTHERWISE STATED IN
WRITING THE COPYRIGHT HOLDERS AND/OR OTHER PARTIES PROVIDE THE PROGRAM "AS IS" WITHOUT
WARRANTY OF ANY KIND, EITHER EXPRESSED OR IMPLIED, INCLUDING, BUT NOT LIMITED TO, THE
IMPLIED WARRANTIES OF MERCHANTABILITY AND FITNESS FOR A PARTICULAR PURPOSE. THE ENTIRE
RISK AS TO THE QUALITY AND PERFORMANCE OF THE PROGRAM IS WITH YOU. SHOULD THE PROGRAM
PROVE DEFECTIVE, YOU ASSUME THE COST OF ALL NECESSARY SERVICING, REPAIR OR CORRECTION.
12. IN NO EVENT UNLESS REQUIRED BY APPLICABLE LAW OR AGREED TO IN WRITING WILL ANY
COPYRIGHT HOLDER, OR ANY OTHER PARTY WHO MAY MODIFY AND/OR REDISTRIBUTE THE PROGRAM
AS PERMITTED ABOVE, BE LIABLE TO YOU FOR DAMAGES, INCLUDING ANY GENERAL, SPECIAL,
INCIDENTAL OR CONSEQUENTIAL DAMAGES ARISING OUT OF THE USE OR INABILITY TO USE THE
PROGRAM (INCLUDING BUT NOT LIMITED TO LOSS OF DATA OR DATA BEING RENDERED INACCURATE OR
LOSSES SUSTAINED BY YOU OR THIRD PARTIES OR A FAILURE OF THE PROGRAM TO OPERATE WITH ANY
OTHER PROGRAMS), EVEN IF SUCH HOLDER OR OTHER PARTY HAS BEEN ADVISED OF THE POSSIBILITY
OF SUCH DAMAGES.
END OF TERMS AND CONDITIONS
How to Apply These Terms to Your New Programs
If you develop a new program, and you want it to be of the greatest possible use to the public, the best way to achieve
this is to make it free software which everyone can redistribute and change under these terms.
- 131 -
16 - Safety
MF 5990 - Agoris M943
To do so, attach the following notices to the program. It is safest to attach them to the start of each source file to most
effectively convey the exclusion of warranty; and each file should have at least the "copyright" line and a pointer to
where the full notice is found.
<one line to give the program's name and a brief idea of what it does.> Copyright (C) <year> <name of author>
This program is free software; you can redistribute it and/or modify it under the terms of the GNU General Public
License as published by the Free Software Foundation; either version 2 of the License, or (at your option) any later
version.
This program is distributed in the hope that it will be useful, but WITHOUT ANY WARRANTY; without even the
implied warranty of MERCHANTABILITY or FITNESS FOR A PARTICULAR PURPOSE. See the GNU General Public
License for more details.
You should have received a copy of the GNU General Public License along with this program; if not, write to the Free
Software Foundation, Inc., 51 Franklin Street, Fifth Floor, Boston, MA 02110-1301 USA.
Also add information on how to contact you by electronic and paper mail.
If the program is interactive, make it output a short notice like this when it starts in an interactive mode:
Gnomovision version 69, Copyright (C) year name of author Gnomovision comes with ABSOLUTELY NO
WARRANTY; for details type `show w'. This is free software, and you are welcome to redistribute it under certain
conditions; type `show c' for details.
The hypothetical commands `show w' and `show c' should show the appropriate parts of the General Public License.
Of course, the commands you use may be called something other than `show w' and `show c'; they could even be
mouse-clicks or menu items--whatever suits your program.
You should also get your employer (if you work as a programmer) or your school, if any, to sign a "copyright disclaimer"
for the program, if necessary. Here is a sample; alter the names:
Yoyodyne, Inc., hereby disclaims all copyright interest in the program `Gnomovision' (which makes passes at
compilers) written by James Hacker.
<signature of Ty Coon>, 1 April 1989
Ty Coon, President of Vice
This General Public License does not permit incorporating your program into proprietary programs. If your program is
a subroutine library, you may consider it more useful to permit linking proprietary applications with the library. If this is
what you want to do, use the GNU Lesser General Public License instead of this License.
GNU LESSER GENERAL PUBLIC LICENSE Version 2.1, February 1999
GNU LESSER GENERAL PUBLIC LICENSE Version 2.1, February 1999
Copyright (C) 1991, 1999 Free Software Foundation, Inc., 51 Franklin Street, Fifth Floor, Boston, MA 02110-1301
USA. Everyone is permitted to copy and distribute verbatim copies of this license document, but changing it is not
allowed.
[This is the first released version of the Lesser GPL. It also counts as the successor of the GNU Library Public License,
version 2, hence the version number 2.1.]
Preamble
The licenses for most software are designed to take away your freedom to share and change it. By contrast, the GNU
General Public Licenses are intended to guarantee your freedom to share and change free software--to make sure the
software is free for all its users.
This license, the Lesser General Public License, applies to some specially designated software packages--typically
libraries--of the Free Software Foundation and other authors who decide to use it. You can use it too, but we suggest
you first think carefully about whether this license or the ordinary General Public License is the better strategy to use
in any particular case, based on the explanations below.
When we speak of free software, we are referring to freedom of use, not price. Our General Public Licenses are
designed to make sure that you have the freedom to distribute copies of free software (and charge for this service if
you wish); that you receive source code or can get it if you want it; that you can change the software and use pieces
of it in new free programs; and that you are informed that you can do these things.
To protect your rights, we need to make restrictions that forbid distributors to deny you these rights or to ask you to
surrender these rights. These restrictions translate to certain responsibilities for you if you distribute copies of the
library or if you modify it.
For example, if you distribute copies of the library, whether gratis or for a fee, you must give the recipients all the rights
that we gave you. You must make sure that they, too, receive or can get the source code. If you link other code with
the library, you must provide complete object files to the recipients, so that they can relink them with the library after
making changes to the library and recompiling it. And you must show them these terms so they know their rights.
We protect your rights with a two-step method: (1) we copyright the library, and (2) we offer you this license, which
gives you legal permission to copy, distribute and/or modify the library.
To protect each distributor, we want to make it very clear that there is no warranty for the free library. Also, if the
- 132 -
16 - Safety
MF 5990 - Agoris M943
library is modified by someone else and passed on, the recipients should know that what they have is not the original
version, so that the original author's reputation will not be affected by problems that might be introduced by others.
Finally, software patents pose a constant threat to the existence of any free program. We wish to make sure that a
company cannot effectively restrict the users of a free program by obtaining a restrictive license from a patent holder.
Therefore, we insist that any patent license obtained for a version of the library must be consistent with the full freedom
of use specified in this license.
Most GNU software, including some libraries, is covered by the ordinary GNU General Public License. This license,
the GNU Lesser General Public License, applies to certain designated libraries, and is quite different from the ordinary
General Public License. We use this license for certain libraries in order to permit linking those libraries into non-free
programs.
When a program is linked with a library, whether statically or using a shared library, the combination of the two is
legally speaking a combined work, a derivative of the original library. The ordinary General Public License therefore
permits such linking only if the entire combination fits its criteria of freedom. The Lesser General Public License permits
more lax criteria for linking other code with the library.
We call this license the "Lesser" General Public License because it does Less to protect the user's freedom than the
ordinary General Public License. It also provides other free software developers Less of an advantage over competing
non-free programs. These disadvantages are the reason we use the ordinary General Public License for many
libraries. However, the Lesser license provides advantages in certain special circumstances.
For example, on rare occasions, there may be a special need to encourage the widest possible use of a certain library,
so that it becomes a de-facto standard. To achieve this, non-free programs must be allowed to use the library. A more
frequent case is that a free library does the same job as widely used non-free libraries. In this case, there is little to
gain by limiting the free library to free software only, so we use the Lesser General Public License.
In other cases, permission to use a particular library in non-free programs enables a greater number of people to use
a large body of free software. For example, permission to use the GNU C Library in non-free programs enables many
more people to use the whole GNU operating system, as well as its variant, the GNU/Linux operating system.
Although the Lesser General Public License is Less protective of the users' freedom, it does ensure that the user of
a program that is linked with the Library has the freedom and the wherewithal to run that program using a modified
version of the Library.
The precise terms and conditions for copying, distribution and modification follow. Pay close attention to the difference
between a "work based on the library" and a "work that uses the library". The former contains code derived from the
library, whereas the latter must be combined with the library in order to run.
GNU LESSER GENERAL PUBLIC LICENSE
TERMS AND CONDITIONS FOR COPYING, DISTRIBUTION AND MODIFICATION
0. This License Agreement applies to any software library or other program which contains a notice placed by the
copyright holder or other authorized party saying it may be distributed under the terms of this Lesser General Public
License (also called "this License"). Each licensee is addressed as "you".
A "library" means a collection of software functions and/or data prepared so as to be conveniently linked with
application programs (which use some of those functions and data) to form executables.
The "Library", below, refers to any such software library or work which has been distributed under these terms. A
"work based on the Library" means either the Library or any derivative work under copyright law: that is to say, a work
containing the Library or a portion of it, either verbatim or with modifications and/or translated straightforwardly into
another language. (Hereinafter, translation is included without limitation in the term "modification".)
"Source code" for a work means the preferred form of the work for making modifications to it. For a library, complete
source code means all the source code for all modules it contains, plus any associated interface definition files, plus
the scripts used to control compilation and installation of the library.
Activities other than copying, distribution and modification are not covered by this License; they are outside its scope.
The act of running a program using the Library is not restricted, and output from such a program is covered only if its
contents constitute a work based on the Library (independent of the use of the Library in a tool for writing it). Whether
that is true depends on what the Library does and what the program that uses the Library does.
1. You may copy and distribute verbatim copies of the Library's complete source code as you receive it, in any
medium, provided that you conspicuously and appropriately publish on each copy an appropriate copyright notice and
disclaimer of warranty; keep intact all the notices that refer to this License and to the absence of any warranty; and
distribute a copy of this License along with the Library.
You may charge a fee for the physical act of transferring a copy, and you may at your option offer warranty protection
in exchange for a fee.
2. You may modify your copy or copies of the Library or any portion of it, thus forming a work based on the Library,
and copy and distribute such modifications or work under the terms of Section 1 above, provided that you also meet
all of these conditions:
a) The modified work must itself be a software library.
b) You must cause the files modified to carry prominent notices stating that you changed the files and the date of
- 133 -
16 - Safety
MF 5990 - Agoris M943
any change.
c) You must cause the whole of the work to be licensed at no charge to all third parties under the terms of this License.
d) If a facility in the modified Library refers to a function or a table of data to be supplied by an application program
that uses the facility, other than as an argument passed when the facility is invoked, then you must make a good faith
effort to ensure that, in the event an application does not supply such function or table, the facility still operates, and
performs whatever part of its purpose remains meaningful.
(For example, a function in a library to compute square roots has a purpose that is entirely well-defined independent
of the application. Therefore, Subsection 2d requires that any application-supplied function or table used by this
function must be optional: if the application does not supply it, the square root function must still compute square roots.)
These requirements apply to the modified work as a whole. If identifiable sections of that work are not derived from
the Library, and can be reasonably considered independent and separate works in themselves, then this License, and
its terms, do not apply to those sections when you distribute them as separate works. But when you distribute the same
sections as part of a whole which is a work based on the Library, the distribution of the whole must be on the terms of
this License, whose permissions for other licensees extend to the entire whole, and thus to each and every part
regardless of who wrote it.
Thus, it is not the intent of this section to claim rights or contest your rights to work written entirely by you; rather, the
intent is to exercise the right to control the distribution of derivative or collective works based on the Library.
In addition, mere aggregation of another work not based on the Library with the Library (or with a work based on the
Library) on a volume of a storage or distribution medium does not bring the other work under the scope of this License.
3. You may opt to apply the terms of the ordinary GNU General Public License instead of this License to a given copy
of the Library. To do this, you must alter all the notices that refer to this License, so that they refer to the ordinary GNU
General Public License, version 2, instead of to this License. (If a newer version than version 2 of the ordinary GNU
General Public License has appeared, then you can specify that version instead if you wish.) Do not make any other
change in these notices.
Once this change is made in a given copy, it is irreversible for that copy, so the ordinary GNU General Public License
applies to all subsequent copies and derivative works made from that copy.
This option is useful when you wish to copy part of the code of the Library into a program that is not a library.
4. You may copy and distribute the Library (or a portion or derivative of it, under Section 2) in object code or executable
form under the terms of Sections 1 and 2 above provided that you accompany it with the complete corresponding
machine-readable source code, which must be distributed under the terms of Sections 1 and 2 above on a medium
customarily used for software interchange.
If distribution of object code is made by offering access to copy from a designated place, then offering equivalent
access to copy the source code from the same place satisfies the requirement to distribute the source code, even
though third parties are not compelled to copy the source along with the object code.
5. A program that contains no derivative of any portion of the Library, but is designed to work with the Library by being
compiled or linked with it, is called a "work that uses the Library". Such a work, in isolation, is not a derivative work of
the Library, and therefore falls outside the scope of this License.
However, linking a "work that uses the Library" with the Library creates an executable that is a derivative of the Library
(because it contains portions of the Library), rather than a "work that uses the library". The executable is therefore
covered by this License. Section 6 states terms for distribution of such executables.
When a "work that uses the Library" uses material from a header file that is part of the Library, the object code for the
work may be a derivative work of the Library even though the source code is not. Whether this is true is especially
significant if the work can be linked without the Library, or if the work is itself a library. The threshold for this to be true
is not precisely defined by law.
If such an object file uses only numerical parameters, data structure layouts and accessors, and small macros and
small inline functions (ten lines or less in length), then the use of the object file is unrestricted, regardless of whether it
is legally a derivative work. (Executables containing this object code plus portions of the Library will still fall under
Section 6.)
Otherwise, if the work is a derivative of the Library, you may distribute the object code for the work under the terms
of Section 6. Any executables containing that work also fall under Section 6, whether or not they are linked directly with
the Library itself.
6. As an exception to the Sections above, you may also combine or link a "work that uses the Library" with the Library
to produce a work containing portions of the Library, and distribute that work under terms of your choice, provided that
the terms permit modification of the work for the customer's own use and reverse engineering for debugging such
modifications.
You must give prominent notice with each copy of the work that the Library is used in it and that the Library and its
use are covered by this License. You must supply a copy of this License. If the work during execution displays
copyright notices, you must include the copyright notice for the Library among them, as well as a reference directing
the user to the copy of this License. Also, you must do one of these things:
a) Accompany the work with the complete corresponding machine-readable source code for the Library including
- 134 -
16 - Safety
MF 5990 - Agoris M943
whatever changes were used in the work (which must be distributed under Sections 1 and 2 above); and, if the work
is an executable linked with the Library, with the complete machine-readable "work that uses the Library", as object
code and/or source code, so that the user can modify the Library and then relink to produce a modified executable
containing the modified Library. (It is understood that the user who changes the contents of definitions files in the
Library will not necessarily be able to recompile the application to use the modified definitions.)
b) Use a suitable shared library mechanism for linking with the Library. A suitable mechanism is one that (1) uses
at run time a copy of the library already present on the user's computer system, rather than copying library functions
into the executable, and (2) will operate properly with a modified version of the library, if the user installs one, as long
as the modified version is interface-compatible with the version that the work was made with.
c) Accompany the work with a written offer, valid for at least three years, to give the same user the materials specified
in Subsection 6a, above, for a charge no more than the cost of performing this distribution.
d) If distribution of the work is made by offering access to copy from a designated place, offer equivalent access to
copy the above specified materials from the same place.
e) Verify that the user has already received a copy of these materials or that you have already sent this user a copy.
For an executable, the required form of the "work that uses the Library" must include any data and utility programs
needed for reproducing the executable from it. However, as a special exception, the materials to be distributed need
not include anything that is normally distributed (in either source or binary form) with the major components (compiler,
kernel, and so on) of the operating system on which the executable runs, unless that component itself accompanies
the executable.
It may happen that this requirement contradicts the license restrictions of other proprietary libraries that do not
normally accompany the operating system. Such a contradiction means you cannot use both them and the Library
together in an executable that you distribute.
7. You may place library facilities that are a work based on the Library side-by-side in a single library together with
other library facilities not covered by this License, and distribute such a combined library, provided that the separate
distribution of the work based on the Library and of the other library facilities is otherwise permitted, and provided that
you do these two things:
a) Accompany the combined library with a copy of the same work based on the Library, uncombined with any other
library facilities. This must be distributed under the terms of the Sections above.
b) Give prominent notice with the combined library of the fact that part of it is a work based on the Library, and
explaining where to find the accompanying uncombined form of the same work.
8. You may not copy, modify, sublicense, link with, or distribute the Library except as expressly provided under this
License. Any attempt otherwise to copy, modify, sublicense, link with, or distribute the Library is void, and will
automatically terminate your rights under this License. However, parties who have received copies, or rights, from you
under this License will not have their licenses terminated so long as such parties remain in full compliance.
9. You are not required to accept this License, since you have not signed it. However, nothing else grants you
permission to modify or distribute the Library or its derivative works. These actions are prohibited by law if you do not
accept this License. Therefore, by modifying or distributing the Library (or any work based on the Library), you indicate
your acceptance of this License to do so, and all its terms and conditions for copying, distributing or modifying the
Library or works based on it.
10. Each time you redistribute the Library (or any work based on the Library), the recipient automatically receives a
license from the original licensor to copy, distribute, link with or modify the Library subject to these terms and conditions.
You may not impose any further restrictions on the recipients' exercise of the rights granted herein. You are not
responsible for enforcing compliance by third parties with this License.
11. If, as a consequence of a court judgment or allegation of patent infringement or for any other reason (not limited
to patent issues), conditions are imposed on you (whether by court order, agreement or otherwise) that contradict the
conditions of this License, they do not excuse you from the conditions of this License. If you cannot distribute so as to
satisfy simultaneously your obligations under this License and any other pertinent obligations, then as a consequence
you may not distribute the Library at all. For example, if a patent license would not permit royalty-free redistribution of
the Library by all those who receive copies directly or indirectly through you, then the only way you could satisfy both
it and this License would be to refrain entirely from distribution of the Library.
If any portion of this section is held invalid or unenforceable under any particular circumstance, the balance of the
section is intended to apply, and the section as a whole is intended to apply in other circumstances.
It is not the purpose of this section to induce you to infringe any patents or other property right claims or to contest
validity of any such claims; this section has the sole purpose of protecting the integrity of the free software distribution
system which is implemented by public license practices. Many people have made generous contributions to the wide
range of software distributed through that system in reliance on consistent application of that system; it is up to the
author/donor to decide if he or she is willing to distribute software through any other system and a licensee cannot
impose that choice.
This section is intended to make thoroughly clear what is believed to be a consequence of the rest of this License.
12. If the distribution and/or use of the Library is restricted in certain countries either by patents or by copyrighted
interfaces, the original copyright holder who places the Library under this License may add an explicit geographical
- 135 -
16 - Safety
MF 5990 - Agoris M943
distribution limitation excluding those countries, so that distribution is permitted only in or among countries not thus
excluded. In such case, this License incorporates the limitation as if written in the body of this License.
13. The Free Software Foundation may publish revised and/or new versions of the Lesser General Public License
from time to time. Such new versions will be similar in spirit to the present version, but may differ in detail to address
new problems or concerns.
Each version is given a distinguishing version number. If the Library specifies a version number of this License which
applies to it and "any later version", you have the option of following the terms and conditions either of that version or
of any later version published by the Free Software Foundation. If the Library does not specify a license version
number, you may choose any version ever published by the Free Software Foundation.
14. If you wish to incorporate parts of the Library into other free programs whose distribution conditions are
incompatible with these, write to the author to ask for permission. For software which is copyrighted by the Free
Software Foundation, write to the Free Software Foundation; we sometimes make exceptions for this. Our decision
will be guided by the two goals of preserving the free status of all derivatives of our free software and of promoting the
sharing and reuse of software generally.
NO WARRANTY
15. BECAUSE THE LIBRARY IS LICENSED FREE OF CHARGE, THERE IS NO WARRANTY FOR THE LIBRARY,
TO THE EXTENT PERMITTED BY APPLICABLE LAW. EXCEPT WHEN OTHERWISE STATED IN WRITING THE
COPYRIGHT HOLDERS AND/OR OTHER PARTIES PROVIDE THE LIBRARY "AS IS" WITHOUT WARRANTY OF
ANY KIND, EITHER EXPRESSED OR IMPLIED, INCLUDING, BUT NOT LIMITED TO, THE IMPLIED WARRANTIES
OF MERCHANTABILITY AND FITNESS FOR A PARTICULAR PURPOSE. THE ENTIRE RISK AS TO THE QUALITY
AND PERFORMANCE OF THE LIBRARY IS WITH YOU. SHOULD THE LIBRARY PROVE DEFECTIVE, YOU
ASSUME THE COST OF ALL NECESSARY SERVICING, REPAIR OR CORRECTION.
16. IN NO EVENT UNLESS REQUIRED BY APPLICABLE LAW OR AGREED TO IN WRITING WILL ANY
COPYRIGHT HOLDER, OR ANY OTHER PARTY WHO MAY MODIFY AND/OR REDISTRIBUTE THE LIBRARY AS
PERMITTED ABOVE, BE LIABLE TO YOU FOR DAMAGES, INCLUDING ANY GENERAL, SPECIAL, INCIDENTAL
OR CONSEQUENTIAL DAMAGES ARISING OUT OF THE USE OR INABILITY TO USE THE LIBRARY (INCLUDING
BUT NOT LIMITED TO LOSS OF DATA OR DATA BEING RENDERED INACCURATE OR LOSSES SUSTAINED BY
YOU OR THIRD PARTIES OR A FAILURE OF THE LIBRARY TO OPERATE WITH ANY OTHER SOFTWARE), EVEN
IF SUCH HOLDER OR OTHER PARTY HAS BEEN ADVISED OF THE POSSIBILITY OF SUCH DAMAGES.
END OF TERMS AND CONDITIONS
How to Apply These Terms to Your New Libraries
If you develop a new library, and you want it to be of the greatest possible use to the public, we recommend making
it free software that everyone can redistribute and change. You can do so by permitting redistribution under these
terms (or, alternatively, under the terms of the ordinary General Public License).
To apply these terms, attach the following notices to the library. It is safest to attach them to the start of each source
file to most effectively convey the exclusion of warranty; and each file should have at least the "copyright" line and a
pointer to where the full notice is found.
<one line to give the library's name and a brief idea of what it does.> Copyright (C) <year> <name of author>
This library is free software; you can redistribute it and/or modify it under the terms of the GNU Lesser General Public
License as published by the Free Software Foundation; either version 2.1 of the License, or (at your option) any later
version.
This library is distributed in the hope that it will be useful, but WITHOUT ANY WARRANTY; without even the implied
warranty of MERCHANTABILITY or FITNESS FOR A PARTICULAR PURPOSE. See the GNU Lesser General Public
License for more details.
You should have received a copy of the GNU Lesser General Public License along with this library; if not, write to
the Free Software Foundation, Inc., 51 Franklin Street, Fifth Floor, Boston, MA 02110-1301 USA.
Also add information on how to contact you by electronic and paper mail.
You should also get your employer (if you work as a programmer) or your school, if any, to sign a "copyright disclaimer"
for the library, if necessary. Here is a sample; alter the names:
Yoyodyne, Inc., hereby disclaims all copyright interest in the library `Frob' (a library for tweaking knobs) written by
James Random Hacker.
<signature of Ty Coon>, 1 April 1990
Ty Coon, President of Vice
That's all there is to it!
- 136 -
16 - Safety
MF 5990 - Agoris M943
Characteristics
Device type: professional machine, rapid, operating with all group 3 appliances according to UIT-T recommendations.
Physical characteristics
Machine
Dimensions (excluding options):
Width: 505 mm
Depth: 571 mm
Height: 684 mm
Weight:
Approx. 38 kg
Additional paper tray (2 maximum)
Dimensions:
421 x 510 x 143 mm
Weight:
6.3 kg
Electrical and environmental characteristics
Power (see identification plate):
Single phase 220-240 V - 50/60 Hz - 6 A
consumption:
• ≤ 25 W on standby
• 120 W typically in wait mode
• 800 W on average during printing (peak of 1300 W)
Admissible ambient temperature:
•
•
Admissible humidity:
Operating: 10 °C to 32 °C [50 °F to 89.6 °F] with maximum difference of 10 °C per hour.
Storage: -20 °C to 40 °C [-4 °F to 104 °F] with maximum difference of 10 °C per hour.
15 % to 85 % RH (without condensation) with maximum difference of
20 % per hour.
Peripheral characteristics
Printer
Type:
Laser
Resolution:
1200 dpi
Speed:
43 ppm (A4)
Print speed may vary according to the operating system, computer
specifications, the application, connection method (LAN, USB or
wifi), the paper format and finally on the type and size of the file.
Preheating time:
17 s
Memory:
256 Mb, extendible to 512 Mb
Time to print the first page:
8 s First print (Ready)
25 s First print (Standby)
Copier
Type:
B&W copier
Copy speed:
43 ppm (A4) maximum during multiple copy
Resolution:
600 dpi
Multiple copies:
99 pages maximum
Zoom ranges:
25 % to 400 %
Scanner
Type:
Colour scanner
Autofeed capacity:
70 sheets (80 g/m²)
- 137 -
17 - Characteristics
MF 5990 - Agoris M943
Peripheral characteristics
Colour depth:
48 bits
Optical resolution:
600 dpi
Software compatibility:
TWAIN, WIA
Flatbed scanner format:
• Maximum length: A4
• Maximum width: Letter
Print media
Main paper tray:
• Capacity: maximum 550 sheets of standard paper (80 g/m² [22 lb]).
• Paper format: A4, A5, B5 (ISO), B5 (JIS), Executive, Letter, Legal14, Legal-13, Statement, 1/3 A4, Envelope Com10, Envelope C5,
Envelope DL, Envelope Monarch, A6 postcard, Japanese postcard
• Paper: Standard, Thick, Fine, Transparencies, Envelopes, Labels,
Postcards
• Weight: 64 to 216 g/m² [17.1 to 80 lb]
Secondary paper tray:
• Capacity: 150 sheets maximum
• Paper format: A4, A5, B5 (ISO), B5 (JIS), Executive, Letter, Legal14, Legal-13, Statement, 1/3 A4, Envelope Com10, Envelope C5,
Envelope DL, Envelope Monarch, A6 postcard, Japanese postcard, US postcard, Index card
• Paper: Standard, Thick, Fine, Transparencies, Envelopes, Labels,
Postcards
• Weight: 64 to 216 g/m² [17.1 to 80 lb]
Additional paper tray:
• Capacity: maximum 550 sheets of standard paper (80 g/m² [22 lb]).
• Paper format: A4, A5, B5 (ISO), B5 (JIS), Executive, Letter, Legal14, Legal-13, Statement, 1/3 A4, Envelope Com10, Envelope C5,
Envelope DL, Envelope Monarch, A6 postcard, Japanese postcard
• Paper: Standard, Thick, Fine, Transparencies, Envelopes, Labels,
Postcards
• Weight: 64 to 216 g/m² [17.1 to 80 lb]
Output tray capacity:
500 sheets standard paper (80 g/m² [20 lb]).
Duplex:
• Paper format: A4, A5, B5 (ISO), B5 (JIS), Executive, Letter, Legal14, Legal-13, Statement, 1/3 A4
• Paper: Standard, Thick
• Weight: 64 to 216 g/m² [17.1 to 80 lb]
Print languages
Emulation:
• PCL® 6, PCL® 5
• PostScript® level 3
• PDF 1.4 without transparency or gradient
Communication
Fax Communication
Type:
PSTN, ITU T30, G3
Fax-Modem type:
PSTN-Super G3
Communication speed:
In group 3: 33600 / 14400 / 12000 / 9600 / 7200 / 4800 / 2400 bps
The effective transmission duration for an A4 page varies from a few
seconds to about one minute (depending on the quality of the line,
the modem speed, the quantity of information on the original and the
resolution), without taking into account the exchange initialisation
procedure.
Types of coding:
MH (Modified Huffman), MR (Modified Read), MMR (Modified
Modified Read), JBIG, JPEG
- 138 -
17 - Characteristics
MF 5990 - Agoris M943
17 - Characteristics
MF 5990 - Agoris M943
Communication
Dial type:
DTMF
Internet - general characteristics
Type:
PSTN-V34
Communication speed:
33600 bps maximum (V34Fax)
Protocol:
• TCP/IP/PPP protocols
• PAP & CHAP - MD5 C protocols
• SMTP/POP3/MIME protocols for emails
Connectivity
Network port:
Ethernet 10 BaseT/100 BaseTx
USB port:
• 1 x USB 2.0 slave port (PC connection)
• 3 x USB 2.0 master ports (USB memory key reader)
PC connection:
Operating system: Windows 2000 Š SP4, Windows XP x86 Š
SP2, Windows 7, Windows Vista, Windows 2003 Server x86 Š
SP2 (for printing only), Windows 2008 Server (for printing only)
Consumable specifications
Reference paper:
Xerox 4200 20lb Letter / Xerox 80 A4 (3R91720) / Fuji Xerox P A4
Toner cartridge:
The lifespan of the cartridge toners depends mainly on the type of
document printed and the average number of pages per print.
Contact your retailer for more detailed information.
These specifications may be changed, with a view to their improvement, without notice.
Recommendations for the paper
This paragraph contains information concerning the type of support that can be used for printing.
• Adding paper to the pile may cause double feed.
• When removing the paper tray, always take it in both hands to prevent dropping it.
• Do not use paper that is already printed by your machine or another printer; the ink or toner on the paper may damage your machine's printing system.
• Correct any rippling in the paper before printing.
• Rippling (or curving) should not exceed 10 mm.
• Store the paper carefully to prevent feed problems and image defects due to paper being left in damp conditions.
• Never use damp paper or paper that has been left in an open packet.
• After opening the package, keep the paper in a plastic bag.
• Never use paper with extreme rippling, folded paper or any other damaged paper.
Which paper formats can be used?
Support
Format
Millimetres (inches)
Main tray
and additional
Tray
secondary
Duplex
Letter
215.9 x 279.4 (8.5 x 11.0)
Yes
Yes
Yes
Legal-13
215.9 x 330.2 (8.5 x 13.0)
Yes
Yes
Yes
Legal-14
215.9 x 355.6 (8.5 x 14.0)
Yes
Yes
Yes
Statement
139.7 x 215.9 (5.5 x 8.5)
Yes
Yes
Yes
Executive
184.0 x 266.7 (7.25 x 10.5)
Yes
Yes
Yes
A4
210.0 x 297.0 (8.2 x 11.7)
Yes
Yes
Yes
A5
148.0 x 210.0 (5.9 x 8.3)
Yes
Yes
Yes
- 139 -
Format
Millimetres (inches)
Support
Main tray
and additional
Tray
secondary
Duplex
1/3 A4
99.0 x 210.0 (3.89 x 8.3)
Yes
Yes
Yes
B5 (ISO)
176.0 x 250.0 (6.9 x 9.8)
Yes
Yes
Yes
B5 (JIS)
182.0 x 257.0 (7.1 x 10.1)
Yes
Yes
Yes
Envelope Com10
104.7 x 241.3 (4.09 x 9.5)
Yes
Yes
No
Envelope DL
110.0 x 220.0 (4.3 x 8.7)
Yes
Yes
No
Envelope C5
162.0 x 229.0 (6.4 x 9.0)
Yes
Yes
No
Envelope Monarch
98.4 x 190.5 (3.875 x 7.5)
Yes
Yes
No
A6 postcard
105.0 x 148.5 (4.1 x 5.8)
Yes
Yes
Yes*
Japanese postcard
100.0 x 148.0 (3.9 x 5.9)
Yes
Yes
Yes*
US postcard
88.9 x 139.7 (3.5 x 5.4)
No
Yes
Yes*
No
Yes
No
Index card (3’’ x 5’’) 76.2 x 127.0 (3 x 5)
* Duplex printing on postcards is possible, but print quality on the reverse side is not guaranteed.
Standard / recycled paper
Main and additional paper tray
Secondary paper tray
Capacity
Up to 550 sheets depending on
the weight used.
Maximum height 49.4 mm
Up to 150 sheets depending on
the weight used.
Maximum height 17.5 mm
Orientation
Print side facing up
Print side facing up
Driver
Standard / recycled paper
Weight
64 to 216 g/m² [17.1 to 80 lb]
Duplex
See section Which paper formats can be used? [ 139].
Recommendations for use
Use: media suitable for laser printing such as standard or recycled paper.
Do not use the media listed below:
• Surface-treated media (such as carbon paper or treated colour paper).
• Carbon-backed paper.
• Media not approved for laser (heat-sensitive paper, paper for lamination or filming).
• Cold transfer media.
• Press printing media.
• Specific media for ink jet printers (ultra-fine paper, glossy paper, glossy film, post cards, etc.).
• Paper pre-printed on another machine:
•
•
–
pre-printed on an ink jet printer,
–
pre-printed on a monochrome or colour laser printing and copying system,
–
pre-printed on a thermal printer,
–
pre-printed on another printer or fax machine.
Dusty media.
Wet or damp paper.
- 140 -
17 - Characteristics
MF 5990 - Agoris M943
17 - Characteristics
MF 5990 - Agoris M943
Note
Store media in a room where the temperature is between 10 °C and 30 °C and where
relative humidity is between 35% and 85%.
Toner does not adhere to damp surfaces.
•
•
•
•
•
•
•
•
•
•
•
•
•
•
Coated paper.
Adhesive paper.
Folded, creased, warped, embossed, deformed or crinkled paper.
Cut-out, perforated or torn paper.
Paper that is too supple, too rigid or too fibrous.
Paper with a different texture (roughness) on the front and the back.
Paper too fine or too thick.
Media charged with static electricity.
Laminated, gilded or too bright media.
Media not withstanding the fusing temperature (150 °Ê [302 °F]).
Paper not cut at right angles or of irregular dimensions.
Paper with glue, adhesive, staples, attachments, hooks or eyes.
Acid paper.
Any any other unapproved media.
Thick paper
Paper is considered to be thick when its weight exceeds 90 g/m² (24 lb).
Main and additional paper tray
Secondary paper tray
Capacity
Up to 160 sheets depending on
thickness.
Maximum height 49.4 mm
Up to 60 sheets depending on
thickness.
Maximum height 17.5 mm
Orientation
Print side facing up
Print side facing up
Driver
Thickness 1 (91 to 150 g/m² )
Thickness 2 (151 to 216 g/m² )
Weight
91 to 216 g/m² (25 to 80 lb)
Duplex
See section Which paper formats can be used? [ 139].
Note
Banner paper can be printed if it complies
with the following conditions:
Weight between 127 and 160 g/m²
Maximum width 216 mm
Maximum length 357 mm
Recommendations for use
Avoid placing different types of paper (different weights or formats) in the paper tray as this may risk causing paper
jams.
Fine paper
First test the fine paper to be used to ensure acceptable print quality.
Capacity
Main and additional paper tray
Secondary paper tray
Up to 550 sheets depending on
thickness.
Maximum height 49.4 mm
Up to 150 sheets depending on
thickness.
Maximum height 17.5 mm
- 141 -
Main and additional paper tray
Secondary paper tray
Orientation
Print side facing up
Print side facing up
Driver
Fine
Weight
64 to 67 g/m² (17.1 to 18 lb)
Duplex
See section Which paper formats can be used? [ 139].
Recommendations for use
Avoid placing different types of paper (different weights or formats) in the paper tray as this may risk causing paper
jams.
Envelopes
Main and additional paper tray
Secondary paper tray
Capacity
Up to 80 envelopes depending on Up to 20 envelopes depending on
thickness.
thickness.
Maximum height 49.4 mm
Maximum height 17.5 mm
Orientation
Print side facing up
Driver
Envelope
Weight
91 to 163 g/m² (25 to 43 lb)
Duplex
Not supported
Print side facing up
Recommendations for use
Note
Envelopes must be printed on the address
side. It is recommended to print outside the
three-play zones (front+back+flap) in order
to avoid printing problems (poorly printed
characters, etc.).
Use envelopes:
• For laser printers, with diagonal closure, ordinary pre-glued folds, edges and flaps.
• Approved for laser printing.
• Dry.
Do not use envelopes:
• With self-adhesive flaps.
• With adhesive ribbons, metal attachments, clips or removable strips.
• With transparent windows.
• Of thick texture (example: reinforced envelopes).
• Comprised of fused, volatile, or discolouring material or emitting toxic vapours.
• Pre-sealed.
Labels
A sheet of labels is comprised of a front side (printable surface) and an adhesive back, covered with a protective film:
• The front side must meet standard Paper specifications.
• The front must fully cover the protective side, without allowing any adhesive to show on the surface.
You can print continuous sheets of labels but depending on the media used and the printing environment, paper feed
problems may occur. If so, stop the continuous print and print out sheets one by one.
Before printing on label sheets, it is recommended to print out a test on standard paper to check page formatting. For
more information concerning printing labels, consult your application documentation.
- 142 -
17 - Characteristics
MF 5990 - Agoris M943
Main and additional paper tray
Secondary paper tray
Capacity
Up to 290 sheets of labels
depending on thickness.
Maximum height 49.4 mm
Up to 100 sheets of labels
depending on thickness.
Maximum height 17.5 mm
Orientation
Print side facing up
Print side facing up
Driver
Labels
Weight
64 to 163 g/m² (17.1 to 43 lb)
Duplex
Not supported
Recommendations for use
Using sheets of labels:
• Recommended for laser printers
• Format A4 or Letter (sheets of self-adhesive labels).
Do not use sheets of labels:
• With easily removed labels or protective film that is unstuck.
• Allowing adhesive substances to show on the surface.
• Pre-cut or perforated.
Cards
Before starting printing cards, print out a test on standard paper to check page formatting.
Main and additional paper tray
Secondary paper tray
Capacity
Up to 200 cards depending on
thickness.
Maximum height 49.4 mm
Up to 55 cards depending on
thickness.
Maximum height 17.5 mm
Orientation
Print side facing up
Print side facing up
Driver
Standard paper
Weight
64 to 90 g/m² (17.1 to 24 lb)
Duplex
See section Which paper formats can be used? [ 139].
Recommendations for use
Use cards for laser printers.
Do not use cards:
• Coated.
• For ink-jet printers.
• Pre-cut or perforated.
• Pre-printed or multicoloured.
Note
If the cards are deformed, flatten them before loading them into the paper tray.
Transparencies
It is possible to print continuously on transparencies, but feed problems may occur due to the media quality, the
accumulation of static electricity and the print environment.
Before starting printing transparencies, print out a test on standard paper to check page formatting.
Main and additional paper tray
Secondary paper tray
Capacity
Up to 100 transparencies.
Maximum height 12.4 mm
Up to 100 transparencies.
Maximum height 11.9 mm
Orientation
Print side facing up
Print side facing up
- 143 -
17 - Characteristics
MF 5990 - Agoris M943
Main and additional paper tray
Driver
Transparency
Weight
64 to 90 g/m² (17.1 to 24 lb)
Duplex
Not supported
Secondary paper tray
Recommendations for use:
• Only use transparencies for laser printers.
• Only use transparencies for black and white printing.
• Regularly clean the printer paper path as transparencies are highly sensitive to dirt.
• Remove printed transparencies from the output tray to prevent the accumulation of static electricity.
• Avoid handling transparencies before loading them into the paper tray as fingerprints may affect print quality.
• Do not use transparencies:
–
For colour printing.
–
For ink-jet printers.
Index cards
Before starting printing index cards, print out a test on standard paper to check page formatting.
Main and additional paper tray
Secondary paper tray
Capacity
Not supported
Up to 120 index cards depending
on thickness.
Orientation
Not supported
Print side facing up
Driver
Standard paper
Weight
64 to 90 g/m² (17.1 to 24 lb)
Duplex
Not supported
Printable surface
Each media has its own printable surface, the maximum surface which can be printed clearly without distortion.
This surface is limited by two hardware constraints, the size of the media and the margins required by the printer and
a software constraint, the memory available for the full page frame buffer. Whatever the media, the guaranteed print
surface corresponds to the size of the media minus 4 mm from each edge.
On Banner paper, the bottom margin is 10 mm.
Printable surface for envelopes
Envelopes have a flap zone that is not guaranteed which varies according to type.
- 144 -
17 - Characteristics
MF 5990 - Agoris M943
Marker
Description
1
Non printable surface 4 mm (0.157")
2
Surface not guaranteed
3
Surface guaranteed
Page margins
The margins are defined in the computer application. When the application allows, personalise the margins taking
account of the guaranteed printable surface.
- 145 -
17 - Characteristics
MF 5990 - Agoris M943
253231282D - 20/03/2012
250, route de l'Empereur
92848 Rueil-Malmaison cedex - FRANCE
www.sagemcom.com
All rights reserved. The information and specifications included are subject to change without prior notice. Sagemcom Documents SAS tries to ensure that all information in this document is correct, but does not accept liability for error or omission. Non contractual document. All trademarks are
registered by their respective owners. Simplified joint stock company - Capital 8.479.978 Euros - 509 448 841 RCS Nanterre.
Sagemcom Documents SAS