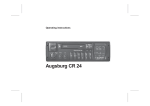
1
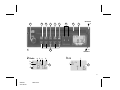
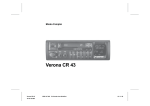
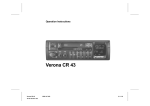
Operation Instructions
ACD 9431
ACD 9431
76 42 758 013
3 D92 147 037
1
2
3
1
4
5
6
7
8
QuickOut
a
9
10
2 Radio
a b c
h
g
b
QuickOut
3 CD
d
9
j
i
9
f
e
3
ACD 9431
76 42 758 013
3 D92 147 037
Front Panel Description
1 ON/OFF
Switch on the set by turning knob 1.
2 AUD button (sound control/broader
interior sound impression)
BAS – Adjustment of the low frequencies via buttons < > 7.
TRE – Adjustment of the high frequencies via buttons < > 7.
BAL – Adjustment of the left/right volume via buttons < > 7.
FAD – Adjustment of the front/rear volume via buttons < > 7.
3 FM•T button (Frequency Modulation)
FM button
This button is used for shifting between
the different individual FM storage levels and T (Travelstore).
4 M•L button (Medium wave - Long
wave)
Use this button to select either the medium wave (MW) or long wave (LW)
frequencies.
Press button again to shift between
MW and LW.
12
ACD 9431
5 MIX•lo•m button
CD:
Use this button to play the CD titles in
an arbitrary order.
Radio:
Button to shift between the normal and
high-sensitivity manual station seek
mode, and mono switch.
6
• SRC button (Source)
To shift between the individual audio
sources, e.g. CD ♦ Radio ♦ CD.
• SRC button 6 for
By pressing the
more than than 3 seconds, the CD is
ejected.
7 < > rocker switch
Radio:
Automatic station selection
CD:
Skipping to next/previous title.
Pressing the rocker switch < > longer
than 1 sec. activates fast forward (cue)
or fast reverse (review).
8 CD slot
Insert the CD with the label side showing to the top.
9 Display
: Preset buttons
Storing a station:
Keep button depressed during radio
operation until the station becomes
audible again.
Recalling a station:
Press button briefly.
Front Panel Description ............... 12
CD Section .................................... 17
What you need to know!
Important information .................. 13
Inserting the Disc .................................. 17
Ejecting the Disc ................................... 17
Title Selection/Cueing and Reviewing .. 17
Mix Function .......................................... 18
Changing the Audio Source with SRC .. 18
Before starting to use your new car radio you
should carefully read through the information
on “Traffic safety” and “Anti-theft coding”.
QuickOut
Selecting the Desired Waveband .......... 16
Tuning in a Station Automatically .......... 16
Manual Tuning ...................................... 16
Adjusting the Station Seek Sensitivity ... 16
Mono/Stereo Operation ......................... 17
Memorizing a Station ............................ 17
Automatically Storing the Strongest
Stations ................................................. 17
Activating a Stored Station .................... 17
Using the QuickOut handle you can easily
pull your radio out of the installation compartment to take it along. The preset stations
remain stored for a longer time.
To take out the radio.
• press knob (a), take the handle (b) and
pull the unit out.
Amplifier Section .......................... 15
Appendix ....................................... 18
Technical Data ...................................... 18
What To Do If Your Car Stereo Needs
Service? ................................................ 18
13
ACD 9431
ITALIANO
Radio Section ............................... 16
Wrong code number entered ................ 14
Switching the code system on .............. 14
Restart following interruption of
power supply ......................................... 15
Switching the code system off .............. 15
Adjusting the seek tuning sensitivity .. 18
PORTUGUES
ON/OFF ................................................ 15
Bass and Treble Control ....................... 15
Balance and Fader Control ................... 16
Traffic safety has always priority. Use your
car radio in such a manner that you are
always able to cope with and react to the
prevailing traffic situation at any given time.
Remember, even at 50 km/h you are still
moving at a speed of 14 m per seconds.
It is also very important that you are able to
hear, and react to, acoustic warning signals
around you, for example from the police or
the firebrigade.
Therefore, adjust the volume reasonably.
Anti-theft coding .......................... 14
FRANÇAIS
Traffic safety
NEDERLAND
Programming with DSC ............... 18
SVENSKA
What you need to know! ....................... 13
Traffic safety ......................................... 13
QuickOut ............................................... 13
Installation/connection .......................... 14
ENGLISH
DEUTSCH
Important information
ESPAGÑOL
Contents
Anti-theft coding
To listen to the radio or cassette again,
• insert the set into the compartment until
it stops and move the handle back to
the front panel.
If the coding system is off, your set will be
ready for operation.
If the coding system is on, proceed as described under “Restart following interruption
of power supply”.
The car radio comes standard with the code
system deactivated.
If the anti-theft coding system is on while the
power supply to the unit is interrupted (e.g.
theft, disconnecting the car battery), the set is
electronically blocked. Then it may only be
used again after the appropriate code number has been entered (see car radio passport).
Installation/connection
Wrong code number entered
The code system can only be switched on
and off, if the radio is connected to permanent power.
If you like to install your new car radio by
yourself or add other audio components to
the existing ones, then please read carefully
the enclosed instructions on installation and
connection.
Do not connect the loudspeaker outputs to
ground!
Only use the accessory and replacement
parts approved by Blaupunkt.
It should not be possible for thieves to ascertain the code number by trial-and-error. This
is why the set will be blocked for a certain
period of time, if an incorrect code number is
entered. In this case, “- - -” will appear in the
display.
This waiting time is 10 seconds after the first
three attempts, and 1 hour following subsequent attempts.
After 19 unsuccessful attempts, “OFF” will
appear in the display and the set can no
longer be restarted.
Note:
Keep you car radio passport with the code
number in a safe place in order to avoid
“unauthorized access” to your car radio.
14
ACD 9431
If the power supply to the radio is interrupted
while the code system is switched on, you
need to know the right code number.
The radio will operate again as soon as you
have entered the right code number.
If you lose your radio passport and have
forgotten your code number, you will not be
able to restart the set after the power supply
has been interrupted. In this case, your radio
can only be reset in our central customer
service workshop or in one of our service
agencies abroad.
Switching the code system on
Precondition:
The radio must be connected to permanent
power.
In order to switch the code system on:
• Turn the radio off.
•
Hold down the preset buttons 1 and 4
simultaneously.
•
Turn the radio on.
“Cod” briefly appears before the radio
begins to operate.
• Release preset buttons 1 and 4.
The code system is on.
“Cod” will be briefly displayed each time the
radio is turned on.
•
Your car radio is now ready for operation.
If three dashes appear again in the display,
you have entered a wrong code number.
ENGLISH
Enter the code number given in the
Blaupunkt car radio passport:
Preset button 1 only allows to choose
“0” or “1”. The first “0” will not be displayed.
Example: the code number is 0521.
- Press preset button 1 until “000” appears in the display.
- Press preset button 2 five times,
“500” appears in the display.
- Press preset button 3 twice, “520”
appears in the display.
- Press preset button 4 once, “521”
appears in the display.
To confirm the code number:
Press the upper part of the rocker
switch .
Bass and Treble Control
Switching the code system off
•
Turn off the radio.
•
Simultaneously press preset buttons 1
and 4 and hold them down.
•
Turn the set on.
“Cod” will appear in the display.
Enter the code number given in the
Blaupunkt car radio passport and confirm: See example “Restart following
interruption …”.
The code system is now deactivated.
Bass Control
To adjust the low frequencies:
• Press the AUD button 2.
Display 9 gives you bas plus a number between -7 and +7.
•
•
Press rocker switch < > 7 on the right
to boost the bass frequencies or on the
left for bass reduction. The number on
the display 9 changes between -7 and
+7.
Treble Control
To adjust the high frequencies:
• Press the AUD button 2 until tre and a
number between -7 and +7 appears on
the display.
•
Press rocker switch < > 7 on the right
to boost the high frequencies or on the
left for treble reduction. The number on
display 9 changes between -7 and +7.
15
ACD 9431
FRANÇAIS
•
ITALIANO
Briefly press preset button 1, “000” will
appear in the display.
NEDERLAND
•
To switch on the set:
• Turn button 1 clockwise.
To switch off the set:
• Turn button 1 counterclockwise.
SVENSKA
Switch on the set.
“Cod” will appear in the display.
ON/OFF
ESPAGÑOL
•
Now it is essential to enter the correct code
after the waiting period has elapsed (Cod in
the display).
If the radio is turned off before the waiting
period has elapsed, then the waiting period
restarts as soon as the radio is turned on
again.
PORTUGUES
Restart following interruption of
power supply
(Code system switched on)
DEUTSCH
Amplifier Section
Radio Section
Balance and Fader Control
Selecting the Desired Waveband
Balance control
To balance the sound level left/right:
• Press the AUD button 2 until bal is
shown on the display.
Press rocker switch < > 7 on the left
or right to adjust the sound impression
according to your personal preferences.
Display 9 gives you a number between -9 and +9.
With this set you have free choice from the
following wavebands:
FM (ultra-short wave; frequency-modulated),
MW (medium wave), and LW (long wave).
Fader control
To balance the front/rear sound level:
• Press the AUD button 2 until fad is
shown on the display.
Press rocker switch < > 7 on the left
or right to adjust the sound impression
according to your personal preferences.
Display 9 gives you a number between -9 and +9.
Note:
If the rocker switch < > is kept depressed (on
the left or right), the set quickly advances to
the final values (+7/+9 or -7/-9) or to the “0”
position.
16
ACD 9431
Selecting FM
• Press the FM•T button 3 briefly. “FM”
lights up on display 9 a.
Selecting MW or LW
• Press the M•L button 4 briefly. Either
“MW” (for medium wave frequencies) or
“LW” (for long wave frequencies) lights
up on display 9 g, c.
For changing between MW and LW:
• Press the M•L button 4 once again.
Tuning in a Station Automatically
Tuning in the following station
• Press the < > rocker switch 7 on the
right. The car stereo automatically
starts searching for the next station.
Tuning in the previous station
• Press the < > rocker switch 7 on the
left. The car stereo automatically starts
searching for the previous station.
If the < > rocker switch 7 is kept depressed on the right or the left, the station seek operation continues to be
carried out quickly in the corresponding
direction.
Manual Tuning
To manually tune in a station,
• press the lo•m button 5 until “m” lights
up on display 9 f.
You can now manually search for the desired
stations via the < > buttons 7.
Adjusting the Station Seek
Sensitivity
With this set you can modify the automatic
station seek sensitivity in all wavebands.
If you want to search for strong stations only
(reduced sensitivity):
• Press the lo button 5 until “lo” lights
up on display 9 e.
If you also want to search for weaker stations
(increased sensitivity):
• Press the lo button 5 once again; the
“lo” indication on display 9 e goes out.
Note:
If you tune to an FM station already stored on
the storing levels FM or Travelstore, the
coresponding storing level and the preset
button will flash in the display.
Activating a Stored Station
If required, the memorized stations can be
activated at a keystroke.
• For this, choose the FM or T storage
level and briefly
•
press the respective preset button :.
Ejecting the Disk
•
To eject the disk, keep the
• SRC
button 6 depressed for at least 2 seconds.
Never block or support the CD mechanism in
any way, since this would damage the set.
Title Selection/Cueing and Reviewing
After the CD has been inserted into the set,
„Cd“ lights up on display 9. The display
indication 9 i changes to “T1” (Track 1) after
approx. 5 seconds. You can skip or repeat
titles by using the < > buttons 7.
Cue (Fast forward):
• Keep depressed the right side of the
rocker switch < > 7 for more than than
1 second.
17
ACD 9431
ENGLISH
FRANÇAIS
Insert the CD (label side up) without
applying force.
The disk is automatically pulled into the unit
to reach the playing position. Once it has
been fed in, reproduction starts.
ITALIANO
•
NEDERLAND
With each of the preset buttons : you can
memorize one MW, one LW, and two FM
stations. Display 9 a, b either indicates the
FM storage level (“FM”) or the Travelstore
level (“T”).
To memorize a station:
Tune in the desired broadcaster (see chapter
Tuning in a Station Automatically/Manual
Tuning) first. Now press one of the preset
buttons : until the radio resumes play (approx. 2 seconds). The station is now
stored.
With this set you can play the normal standard CDs without having to use an adapter:
• Switch the set on.
SVENSKA
Memorizing a Station
(Travelstore)
With Travelstore, you have the opportunity to
automatically store the 5 strongest FM stations of your respective area and have them
sorted according to their signal strength. The
strongest station is then stored on preset
button 1, the second strongest on preset
button 2, etc. This feature is of special use
while travelling.
• Press the FM•T button 3 for at least
two seconds.
The set searches for the strongest FM
stations and memorizes them on the
“T” storage level (Travelstore). Once
the process is finished, the car radio
automatically tunes in to the strongest
station.
If required, it is also possible to manually
store a station on the Travelstore level. If less
than 5 stations can be received, the free
buttons are briefly represented by dashes.
Inserting the Disk
ESPAGÑOL
If the lo•m button 5 is pressed longer than
2 secs. but less than 8 secs., the set switches over to mono and the stereo symbol (h)
goes off.
If the lo•m button 5 is pressed longer than
2 secs. but less than 8 secs., the set switches over to stereo and das Stereo-Symbol
(h) erscheint wieder im Display.
When the car radio is switched on it is always
in stereo mode.
Automatically Storing the Strongest Stations
PORTUGUES
Mono/Stereo Operation
DEUTSCH
CD Section
Programming with DSC
Appendix
Review (Fast backward):
• Keep depressed the left side of the
rocker switch < > 7 for more than
than 1 second.
The car radio’s DSC function (Direct Software Control) allows you to individually adjust the seek tuning sensitivity for FM and
AM.
Technical Data
Mix Function
Adjusting the seek tuning sensitivity:
• Press the lo•m 5 button longer than
8 secs. The display gives you “lo” and a
number between 1 and 3.
Press the Mix button 5 to listen to the titles
in an arbitrary order.
When Mix is on, the “Mix” indication lights up
on display 9 j.
Changing the Audio Source with
SRC
You can shift between the connected audio
sources in the order CD ♦ Radio ♦ CD. To
switch over to another audio source during
CD operation,
• press the SRC button 6.
The set changes to radio operation.
•
Adjust the sensitivity using the rocker
switch < > 7.
1 =^ high sensitivity
3 =^ normal sensitivity
To store the adjustment,
• press th lo•m button once again.
Amplifier:
Output power:
4 x 8 watts acc. to DIN
45324/3.1
FM:
Frequency
response:
50 - 16 000 Hz (-3dB)
CD:
Frequency
response:
20 - 20 000 Hz (-3 dB)
Preamp-Out:
Output impedance
150 Ω
What to Do If Your Car Stereo
Needs Service?
Whenever your car radio fails to operate
properly and therefore requiring repair by an
authorized service centre, please do not forget to take the car radio passport along with
you.
Modifications reserved!
18
ACD 9431