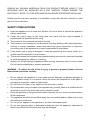
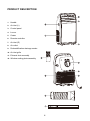
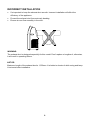
1
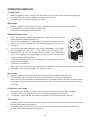
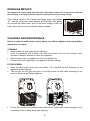
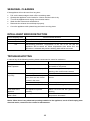
PORTABLE AIR-CONDITIONER
MODEL: EPAC-A4215D(WH)
Owner’s Manual
Please read this manual carefully before
operating your set.
Retain it for future reference.
Record model number and serial number
of the set.
See the label attached on the set and
quote this information to your dealer when
you require service.
For The Warranty Terms & Conditions, Please Refer To Warranty Certificate
CONTENT
SAFETY PRECAUTIONS..............................................................3
PRODUCT DESCRIPTION…………………………….………..4
INSTALLATION........................................................................ 5-6
OPERATION PROCEDURE AND MODULATON.........................7
OPERATING METHOD.................................................................8
DRAINAGE METHOD………………………….…………….……….9
CLEANING AND MAINTENANCE................................................9
INTELLIGENT ERROR DETECTION……………………………10
TROUBLESHOOTING.............................................................…..10
MAIN SPECIFICATION....................................................................11
2
REMOVE ALL PACKING MATERIALS FROM THIS PRODUCT BEFORE USING IT. THIS
APPLIANCE MUST BE INSTALLED ON A FLAT SURFACE. PLEASE ENSURE THE
ELECTRICITY SUPPLY TO THIS APPLIANCE IS DISCONNECTED BEFORE INSTALLING.
Please read this instruction carefully. It is advisable to keep this instruction manual in a safe
place for future reference.
SAFETY PRECAUTIONS
1. Keep this appliance out of reach from children. Do not let them to operate the appliance
without supervision.
2. Check the current rating on the rating plate and make sure the current supplied is
matched with the appliance before using.
3. This product is for household and indoor use only.
4. This product is not intended for use by person (including children) with reduced physical,
sensory or mental capabilities unless they have been given supervision or instruction
concerning use of the appliance by a person responsible for their safety.
5. If the power cord or plug is damaged, it must be replaced by the service centre or a
qualified service technician to avoid hazard.
6. This product should not be placed near possible heating resources or under direct sunlight
to avoid decreasing the efficiency of cooling.
7. Always turn off and unplug the appliance before moving, cleaning or when it is not in used.
Do not leave the appliance to operate unattended.
WARNING – To reduce the risk of fire or injury to person or property, please read and
follow below instruction carefully:
•
Do not operate this appliance if it has malfunctioned, damaged or appears damaged in
any way. Make enquiry to our service centre and return the complete set to the place of
purchase for inspection, repair or replacement.
•
•
Do not insert your finger or any object into the wind inlet or outlet.
Do not attempt to carry out repair on the appliance by yourself. Seek for a qualified service
technician or send to the authorised service centre for repair.
•
Place the appliance on flat ground and install it vertically, so as to ensure normal operation
of the compressor.
•
The appliance should be at least 50cm away from surrounding objects. Make sure air inlet
and outlet are not blocked.
•
•
Do not use the appliance near gasoline or any other flammable liquids.
Do not use spraying agent or flammable substances near the appliance; otherwise its
plastic may deform and electrical parts may be damaged.
3
PRODUCT DESCRIPTION
1.
Handle
2.
Air inlet (L)
3.
Control panel
4.
Louver
5.
Caster
6.
Remote controller
7.
Air inlet (R)
8.
Air outlet
9.
Dehumidification drainage nozzle
10. Air inlet grille
11. Exhaust duct assembly
12. Window sealing plate assembly
4
INSTALLATION
•
Place it on a flat and even place, and keep it at least 50cm away from its surrounding
object.
•
Fix the exhaust duct assembly in the air outlet behind the panel (anticlockwise).
•
Insert the exhaust duct assembly into the window sealing plate; adjust opening width of
window so that the window can match with the sealing plate properly. The length of the
sealing plate is adjustable.
5
INCORRECT INSTALLATION
•
It’s important to keep the exhaust duct smooth. Incorrect installation will affect the
efficiency of the appliance.
•
•
Prevent the exhaust duct from seriously bending.
Ensure air can flow smoothly in the duct.
WARNING:
The exhaust duct is designed especially for this model. Don’t replace or lengthen it; otherwise,
it will result in operating failure.
NOTICE:
Maximum length of the exhaust duct is 1,500mm. It is better to shorten it while using and keep
it horizontal after installation.
6
OPERATION PROCEDURE AND MODULATON
1. ON/OFF key
Press the key to turn ON/OFF the appliance.
4
2. Swing key
Press this key after turning on the appliance to swing the wind louver
automatically.
3. Speed key
Press the key to select High/Low wind speed.
4. Temperature/ time adjusting (Up/Down) key
Press the key at cooling mode to increase/reduce the setting temperature;
Press it at timing mode to adjust timer;
Press Up and Down keys simultaneously to switch Fahrenheit and Centigrade
degree temperature.
5. Mode key
Press the key to choose cooling, wind, dehumidification and automatic mode.
6. Timer key
Press the key at standby mode to set ON time.
Press this key at ON mode to set OFF time.
7. Temperature / time display window
This window displays the adjusted temperature and time.
8. Remote controller receiver
This window is used to receive signal of the remote controller.
9. ºC/ºF switching key
Press the key to switch ℃ and ℉.
10. Continunous key
Press the key at cooling mode to enter continuous cooling mode.
7
3
5
10
2
9
6
1
OPERATING METHOD
Cooling mode
• When the appliance enters cooling mode after power ON, the cooling mode indicator lamp lights up.
• Press Up/Down key to adjust setting temperature (17ºC to 30ºC).
• Press Speed key to choose High/Low wind speed.
Wind mode
• When the appliance enters wind mode after selection, the wind mode indicator lamp lights up.
• Press Speed key to choose High/Low wind speed.
• In this mode the temperature cannot be set.
Dehumidification mode
• When the appliance enters dehumidification mode after selection, the
dehumidification indicator lamp lights up.
•
Remove the dehumidification water wedge, insert water manifold, place the
other end of the water manifold into the drainage passage, as shown in the
right figure.
•
Once entering the dehumidification mode, if room temperature ≥15ºC (59ºF),
the compressor will turn ON. If room temperature ≤13ºC (55ºF), the
compressor will turn OFF. When temperature increases to room temperature
≥15ºC , the compressor will operate again (in order to protect the compressor,
it will be restarted 3 minutes later).
•
In dehumidification mode, the fan is defaulted to run at low speed, and wind
speed cannot be adjusted.
•
Temperature cannot be set.
Note : when use dehumidify function, should remove exit pipe components, otherwise,it will cause worse
dehumidify performance,and appear “FL” water full alarm )
Auto mode
• When the appliance enters auto mode after selection, the auto indicator lamp lights up.
• After choosing auto mode, operation state is determined by environmental temperature:
When environmental temperature is higher than 25ºC, the operation state is the same as that of cooling
mode. When environmental temperature is lower than 25ºC, the operation state is the same as that of
wind mode.
Continuous cool mode
• Press “continuous” button on remote control to enter continuous cool mode under cool mode
• Continuous cool mode, it will be force to run cool mode regardless of temperature.
In continuous cool mode, the A/C blows at high speed, and wind speed can’t be adjusted.
•
Timer mode
• In standby state, press the timer key to set ON timer. Press Up and Down keys to set ON timer (0~24H),
and the timer indicator lamp lights up.
•
In operating state, press the timer key to set OFF time. Press Up and Down keys to set OFF timer
(0~24H), and the timer indicator lamp lights up.
8
DRAINAGE METHOD
This appliance is equipped with automatic water vaporization system. The condenser is cooled with
the circulating of condensing water to improve cooling efficiency and energy saving.
If the internal vessel is full of water, the display screen will display
“FL”, and the compressor stops operate automatically. After power
off, unscrew the water cover, pull out the water wedge to drain off
water, and it will become normal after being restarted.
CLEANING AND MAINTENANCE
Notice: In order to avoid electric shock, please turn off the appliance and unplug before
maintenance or repair.
CLEANING
• Always switch off and unplug before cleaning.
• Clean the appliance with a damp cloth with mild cleaner. Do not use chemical, steel,
wooden or abrasive cleaners to clean the appliance.
• After cleaning, wipe the appliance until it is completely dry.
• Prevent water from spattering in the appliance during cleaning.
FILTER SCREEN
• Wash the filter screen once every two weeks. If it is blocked by dust, efficiency of the
appliance will be reduced.
• Take out the air inlet grille and pull out the filter screen at both sides according to the
direction shown in the following figures.
•
Put the filter screen into lukewarm water (about 40ºC) added with neutral detergent, dry it
completely under a shady place after cleaning.
9
SEASONAL CLEANING
If the appliance will not be used for a long time:
•
•
•
•
•
•
Pull out the water wedge to drain off the remaining water.
Operate the appliance in wind mode for 2 hours until the inside is dry.
Turn off the appliance and unplug from electrical mains.
Wash the filter screen and reassemble it.
Dismantle the exhaust duct and keep it properly.
Cover the appliance with a plastic bag and store it at a dry place.
INTELLIGENT ERROR DETECTION
Error-detecting code
Multi-functional defection
E1
Error of the coil’s temperature sensor
E2
Error of indoor temperature sensor
E4
Anti-freezing protection: Temperature of the coil is too low and the
appliance will be turned off. When temperature rises above 8ºC, the
protection is released and previous working state will be recovered.
TROUBLESHOOTING
In case of any of the following trouble, please contact service centre for assistance.
Trouble
Cause
The appliance
doesn’t operate
Plug not connected
Solution
Connect the plug to the electrical mains
and switch on the power.
The display panel displays “FL” Restart the appliance after power off and
draining, then it will become normal
The appliance starts
frequently
Direct sunlight
Draw the curtain
Doors and windows keep
open; there are lots of heat
sources in the room
Close doors and windows, remove heat
source
Filter screen is very dirty
Clean or replace it
Air inlet or air outlet is blocked
Remove the blocking item
Loud noise of the
appliance
The appliance is placed
unevenly
Place it at even and firm ground, avoid
shaking
The compressor
doesn’t work
Its delay protection is started
Wait for 3 minutes,
temperature decreases
turn
on
after
Notice: When there is any abnormal operating condition to the appliance, turn it off and unplug from
electrical mains, contact service centre for maintenance.
10
MAIN SPECIFICATION
Model No
: EPAC-A4215D(WH)
Cooling Capacity
: 12,000 BTU/h
Thermostat Range
: 17ºC to 35ºC
Max Air Flow
: 420m3/h
Input Power
: 3.5kW
Rated Voltage
: 220-240V
Rated Frequency
: 50Hz
Power Consumption
: 1350W
Refrigerant
: R410a
NOTICE
This product must not be disposed together with domestic waste. It has to be disposed at an
authorized place for recycling of electrical and electronic appliances. By collecting and
recycling waste, you help to save natural resources and make sure the product is disposed in
an environmental friendly and healthy way.
11