1
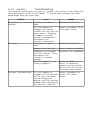
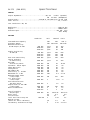
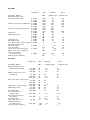
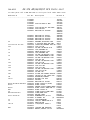
Radio Shack DX 375
Shortwave Radio
User Manual
DX-375
Features
(200-0212)
Your Realistic DX-375 AM/SW/FM-Stereo PLL Synthesized Receiver lets you
choose from a wide variety of broadcasts on FM, AM, and SW (shortwave)
bands. The 12 international SW bands let you tune in to the news and
other programs from such sources as the British Broadcasting Corporation,
Radio Cairo, and Radio Moscow, bring the voices of the world to you. The
lightweight, compact receiver lets you take it almost anywhere you go.
Its special features include:
Phase-Locked Loop (PLL) - ensures accurate tuning.
Synthesized Receiver
Large, Fast-Response Display - shows the band, frequency, wave length
(for SW), memory, battery, and other
indicators.
Memory Tuning - stores up to 30 frequencies in each band)
so you can easily tune to your favorite
stations.
Direct-Access Tuning - directly tunes to the desired frequency
when you enter the frequency on the keypad.
Search Tuning - searches up or down the band for the next
available station.
Memory Scan - scans the stored frequencies in each band's
memory.
LED Tuning Indicator - lights when the receiver tunes to a signal.
Shortwave Quick Select - allows you quick access to any of the 12
shortwave broadcast bands.
Key Lock - prevents you from accidentally turning the
receiver on or off, changing the band or
frequency, or changing other front-panel
controls.
Sleep Timer - lets you set the receiver to turn off after
60 minutes so you can fall asleep as you
listen to the receiver.
DX/Local Control - helps to reduce distortion of broadcasts.
Headphone Jack - lets you connect optional stereo headphones
so you can listen privately and hear FM
broadcasts in stereo.
Three Power Options - let you power the receiver with internal
batteries, standard household AC power
(using an optional AC adapter), or DC
vehicle battery power (using an optional DC
adapter).
Tone Control - lets you set the receiver to accentuate
high or low frequency sounds.
Memory Backup - keeps the programmed stations in your
receiver's memory for up to 1 hour without
batteries.
Frequency Step Switch - lets you set the correct frequency step for
different countries.
Folding Stand - securely positions the receiver at an
angle.
Because this product is so versatile, please take a few minutes to review
this manual before you proceed.
LOCKING THE CONTROLS
The lock feature prevents you from accidentally turning the receiver on or
off, changing the band or frequency, or changing other front-panel
controls. You an still adjust VOLUME, TONE, and SENSITIVITY.
To lock the controls, set LOCK/IN to IN.
LOCK appears on the display.
To unlock the controls, set LOCK/IN away from IN.
the display.
LOCK disappears from
USING THE SLEEP TIMER
The sleep timer sets the receiver to turn off after 60 minutes so you can
fall asleep as you listen to the receiver.
To use the sleep timer, press SLEEP.
SLEEP appears on the display.
After 60 minutes, the receiver turns off.
sooner, press POWER.
To turn off the receiver
USING THE SENSITIVITY SWITCH
If you are listening to a strong FM, AM, or SW station, and the sound is
distorted, set SENS to LOCAL. For normal or weak stations, set SENS to DX
(distant).
(ALL-02/27/95)
DX-375
(200-0212)
Installation
POWER SOURCES
You can power your receiver from:
Internal battery power (two alkaline C batteries).
Standard household AC power (with an optional AC adapter).
Vehicle battery power (with an optional DC adapter).
Internal Battery Power
You can power the receiver with two C batteries. For best performance, we
recommend alkaline batteries, such as Radio Shack Cat. No. 23-551.
CAUTION:
NOTES:
If you disconnect power from the receiver for about 1 hour, all
information stored in memory will be lost. To keep the
frequencies stored in memory, keep the batteries installed.
Replace the batteries when BATTERY appears on the display.
Before you replace the batteries, be sure to turn off the
receiver's power.
Follow these steps to install the batteries.
1.
Push the cover in the direction of the arrow and remove it from the
battery compartment.
2.
Remove the old batteries and discard them immediately.
WARNINGS:
If you do not plan to use the receiver for a month or more,
remove and store the batteries.
Never leave dead, old, or weak batteries in the receiver. they
can leak chemicals and corrode or damage electronic circuits.
Always dispose of them promptly and properly.
Never incinerate batteries.
3.
Place two C batteries in the compartment as indicated by the polarity
symbols (+ or -) marked beside the compartment. For easy removal,
place the batteries on top of the lift-out ribbon.
CAUTIONS:
Use only fresh batteries of the required size and type.
Never mix fresh and old batteries.
4.
Replace the compartment cover.
SETTING THE AM/FM TUNING INCREMENT
The AM/FM frequency increment switch sets the correct frequency increments
for different countries. The switch is located in the battery
compartment.
Set the switch using the following guidelines:
If you are in the United States, Canada, or another north or south
American country, the switch is already set to B for you. In this
setting, the AM frequency increments are 10 KHZ and the FM frequency
increments are 200 kHz.
If you are in a country where the AM frequency increments are 9 kHz,
set the switch to A. In this setting, the FM frequency increments are
100 kHz.
NOTE:
All stored frequencies erase when you change the switch position.
USING STEREO HEADPHONES
For private listening, connect optional stereo headphones into the
receiver's 1/8-inch jack. This disconnects the receiver's internal
speaker. Your local Radio Shack store offers a wide selection of stereo
headphones with the required 1/8-inch plug.
Listening Safely
Do not listen at extremely high volume levels, especially using an
earphone. Extended, high-volume listening can lead to permanent hearing
loss.
To protect your hearing, follow these guidelines when you use headphones.
Always start by setting the volume to the lowest level possible before
you begin listening. Put the earphone or headphones on, then
gradually increase the volume as necessary.
Once you set the volume, do not increase it. Over a period of time,
your ears adapt to the volume level, so a volume level that does not
cause discomfort might still damage your hearing.
USING THE FOLDING STAND
Your receiver has a folding stand on the back. Use it to position the
receiver more securely and for easier viewing of the display.
(ALL-02/27/95)
DX-375
(200-0212)
Alternate Power Sources
STANDARD AC POWER
To power your receiver from an AC outlet, you need an AC adapter (such as
Cat. No. 273-1654).
CAUTIONS:
You must use an AC adapter that supplies 3 volts DC power and
delivers at least 300 milliamps. Its center tip must be set to
negative, and it must have a plug that properly fits your
receiver's DC 3V jack. Using an adapter that does not meet
these specifications could damage your receiver or the adapter.
If you disconnect power from the receiver for about 1 hour, all
information stored in memory will be lost. We recommend you
keep the batteries installed when you use the AC adapter to
protect the memory from a power loss.
Follow these steps to power the receiver AC power.
1.
Set the adapter's voltage switch to 3V.
2.
Connect the adapter's black barrel plug to the adapter's cord with the
TIP set to -NEG.
3.
Insert the barrel plug into the receiver's DC 3V jack.
disconnects the internal batteries.
4.
Plug the adapter into a standard AC outlet.
This
VEHICLE BATTERY POWER
To power your receiver from a vehicle's battery power, you need a DC
adapter (such as Cat. No. 270-1560A).
CAUTIONS:
The vehicle must have a 12-volt, negative-ground electrical
system.
You must use a DC adapter that supplies 3 volts DC adapter that
supplies 3 volts DC power and delivers at least 300 milliamps.
Its center tip must be set to negative, and it must be set to
negative, and it must have a plug that properly fits your
receiver's DC 3V jack. Using an adapter that does not meet
these specifications could damage your receiver or the adapter.
Plug the adapter into your receiver before you plug it into the
cigarette-lighter socket. Also, unplug the adapter from the
cigarette-lighter socket before you unplug it from your
receiver. An unconnected plug might touch a metal object and
damage the adapter or your vehicle's electrical system.
Follow these steps to power your receiver from your vehicle's battery
power.
1.
Set the adapter's voltage switch to 3V.
2.
Connect the adapter's orange barrel-plug to the adapter's cord with
TIP set to -NEG.
3.
Insert the adapter's barrel plug into the receiver's DC 3V jack.
disconnects the internal batteries.
4.
Plug the other end of the adapter into your vehicle's cigarettelighter socket.
(ALL-12/12/94)
this
DX-375
(200-0212)
Operation
Follow these steps to listen to the receiver.
WARNING:
To prevent possible ear injury and hearing loss, set VOLUME to
MIN before you turn on the receiver. After you turn on the
receiver, set VOLUME to a comfortable listening level.
1.
Press POWER to turn on the receiver.
2.
Press BAND until the desired band (FM, AM, or SW) appears on the
display. (See "Selecting the Band.")
3.
Press MANUAL/AUTO or PRESET/DIRECT ACCESS to tune to the desired
station. (See "Tuning to a Radio Station.")
4.
Adjust your receiver's antenna for the best reception.
the Antenna.").
5.
Adjust VOLUME and TONE as desired.
6.
Press POWER to turn off the receiver.
(See "Using
SELECTING THE BAND
You can select the Frequency Modulation (FM), Amplitude Modulation (AM),
or the 12-band Shortwave (SW) band of operation.
Press BAND until the desired band (FM, AM, or SW) appears on the display.
If you select FM, FM, MHz and STEREO (when you tune to a stereo
broadcast) appear on the display.
NOTE:
Your receiver has only one speaker. To listen to a stereo
broadcast, use stereo headphones (not supplied).
If you select AM, AM and kHz appear on the display.
If you select SW, press SW SELECT to access the international radio
frequency bands. As you press SW SELECT, SW BROADCAST BAND and the
lower end of each broadcast band appear on the display.
NOTE:
If you press and hold SW SELECT for more than 2 seconds, the
receiver automatically scans all broadcast bands in sequence and
stops on the same band where you were when you pressed SW SELECT.
To stop the scanning at a desired band, press SW SELECT again or press <DOWN
or UP>.
TUNING TO A RADIO STATION
You can tune to a desired broadcast station using the manual, search,
direct access, preset, or scan tuning methods.
Manual Tuning
To manually tune to a frequency, repeatedly press MANUAL/AUTO <DOWN or UP>
until the display shows the frequency desired.
Search Tuning
To let the receiver find a station, press and hold <DOWN or UP> for more
than 2 seconds. The tuner quickly scans all frequencies. When you
release the button, the receiver automatically tunes to the next strong
station.
Direct Access Tuning
To tune directly to a station's frequency, press ENTER. ENTRY flashes for
about 10 seconds. While it is flashing, press the number buttons to
select the desired station's frequency. Then press ENTER again.
NOTES:
Your receiver automatically rounds the entered frequency to the
nearest valid frequency. For example, if you try to enter a
frequency of 1453 in AM, your receiver accepts it as 1450.
If you make a mistake in entering a frequency, ERROR flashes on
the display. Enter the frequency again.
Preset Tuning
To tune directly to a station that is entered into memory, simply press
the desired preset number (0-9).
NOTE:
You must first store the desired stations into memory.
"Storing Station Frequencies.")
(See
Scan Tuning
To scan the preset memory locations, press SCAN. The receiver stops at
each station for about 5 seconds. To end scanning, press SCAN again, or
press a preset station memory button.
NOTE:
If no frequency is stored in a memory channel or no signal is
received at a memory channel, the receiver stops at the memory
channel for 1 second and then moves to the next memory channel.
STORING STATION FREQUENCIES
For easy selection, you can store up to 30 of your favorite stations'
frequencies in memory (10 frequencies in each band; FM, AM, and SW). Once
you store a station's frequency using a memory button, you can press this
button to select the stored station.
CAUTION:
If you disconnect power from the receiver for about 1 hour, all
information stored in memory will be lost. We recommend you
keep the batteries installed when you use an AC or DC adapter to
protect the memory from a power loss.
Follow these steps to store a frequency in memory.
1.
Follow Steps 1 through 4 in "Basic Operation."
NOTE:
Use manual, search, or direct access tuning to tune to the
station's frequency you want to store.
2.
Press STORE.
3.
While MEMORY flashes, press a number button to select the memory
location.
NOTE:
MEMORY flashes.
If you do not press a number within about 10 seconds, MEMORY stops
flashing and you must repeat steps 2 and 3.
USING THE ANTENNA
Use the following guidelines to adjust your receiver's antenna.
BAND
Wavelength
Antenna adjustments
FM
Fully extend and rotate the telescoping antenna.
AM
Rotate the receiver for best reception, (AM uses
an internal antenna.)
SW
13-41 meters
SW
49-120 meters
NOTE:
Fully extend the telescoping antenna vertically.
Fully extend the telescoping antenna and/or
rotate the receiver for best reception. (Both
internal and external telescoping antennas pick
up signals.)
For better AM and SW reception, you can connect an external
antenna, such as Cat. No. 278-1374, to the telescoping antenna.
(ALL-02/27/95)
DX-375
(200-0212)
Listening Hints
Listening to shortwave radio can be very exciting. Newscasts from a country
where important events are taking place give you a sense of immediacy that
local newscasts seldom deliver.
Although shortwave listening requires no special knowledge, you might enjoy
it more if you read some of the numerous books available on this subject.
There are also several periodicals that give listening hints and seasonal
program schedules.
INTERNATIONAL RADIO FREQUENCIES
International commercial broadcasts are found in the following bands.
Programming (often in English) usually contains news, commentaries, music,
and special features reflecting the culture of the broadcasting country.
You might find it easiest to hear these broadcasts between 6:00 PM and
midnight (your time).
NOTE: European stations often list a frequency by giving its wavelength.
For example, the 19-meter band refers to the range of frequencies
whose waves are about 19 meters long.
BAND
FREQUENCY RANGE
120 meter *
2300 - 2495 kHz
90 meter *
3200 - 3400 kHz
75 meter *
3900 - 4000 kHz
60 meter *
4750 - 5060 kHz
49 meter
5950 - 6200 kHz
41 meter **
7100 - 7300 kHz
31 meter
9500 - 9900 kHz
25 meter
11650 - 12050 kHz
21 meter
13600 - 13800 kHz
19 meter
15100 - 15600 kHz
16 meter
17550 - 17900 kHz
13 meter
21450 - 21850 kHz
* These bands are reserved for stations in tropical areas.
** The 41 meter band is shared by ham operators in the United States and
international stations. Interference is heavy in this band.
FREQUENCY CONVERSION
The tuning location of a station can be expressed in frequency (kHz or kHz)
or in wavelength (meters). The following information can help you make the
necessary conversions.
To convert from kHz to kHz, divide by 1,000.
For example: 15500 kHz / 1000 = 15.5 kHz
To convert from kHz to meters, divide 300 by the same number of kHz.
For example: 300 / 12 kHz = 25 meters
TIME STANDARD FREQUENCIES
The following frequencies announce the exact tine of day at specified
intervals. These signals have many uses in science and technology such as
giving the accurate time, verifying frequency calibration, and gaining
information on radio propagation conditions.
Station
Country
Frequency
WWV
-andWWVH
Fort Collins, Colorado
-andKauai, Hawaii
2,500 kHz
5,000 kHz
10,000 kHz
15,000 kHz
20,000 kHz
CHU
Ontario, Canada
3,330 kHz
7,335 kHz
14,670 kHz
VNG
Sydney, Australia
5,000 kHz
10,000 kHz
15,000 kHz
JJY
Tokyo, Japan
2,500 kHz
5,000 kHz
8,000 kHz
10,000 kHz
15,000 kHz
NOTE: other countries also have time signal stations transmitting over the
same frequencies as WWV or WWVH.
(ALL-12/12/94)
DX-375
(200-0212)
Care and Maintenance
Your Realistic DX-375 Receiver is an example of superior design and
craftsmanship. The following suggestions will help you care for your
receiver so you can enjoy it for years.
Keep the receiver dry. If it gets wet, wipe it dry immediately.
Liquids might contain minerals that can corrode electronic circuits.
Use and store the receiver only in normal temperature environments,
and avoid sudden temperature changes. Temperature extremes can
shorten the life of electronic devices, damage the circuit boards and
cause the receiver to work improperly.
Keep the receiver away from dust and dirt, which can cause premature
wear of parts.
Wipe the receiver with a damp cloth occasionally to keep the product
looking new. Do not use harsh chemicals, cleaning solvents, or strong
detergents to clean the receiver.
Use only fresh batteries of the required size and type. Always remove
old or weak batteries. They can leak chemicals that can destroy
electronic circuits.
Modifying or tampering with the receiver's internal components can cause a
malfunction and might invalidate the warranty and void your FCC
authorization to operate the receiver. If the receiver is not performing
as it should, take it to your local Radio Shack store for assistance.
(ALL-12/12/94)
DX-375 (200-0212)
Troubleshooting
Your receiver should give you years of trouble-free service if you follow the
care instructions given in this manual. If you do have problems, the chart
below might help you solve them.
Problem
No display, or incorrect
display.
Cause
Batteries are weak or
dead.
Remedy
Replace the batteries.
AC or DC adapter is
Connect the adapter to AC
plugged into the the
or DC power source.
receiver but not into the
power source. (Plugging
an adapter into the
receiver automatically
disconnects the
receiver's batteries.)
No sound.
No power from batteries.
Batteries are weak or
dead.
Replace the batteries.
Volume is set too low.
Adjust volume as desired.
Headphones are plugged
into the receiver. (This
disconnects the
receiver's internal
speaker.)
Disconnect the headphones
AC or DC adapter is not
firmly plugged in.
Ensure the adapter's
barrel is connected
properly to the receiver
and the AC or DC plug to
the proper power source.
AC or DC adapter is
Connect the adapter to
plugged into the receiver the AC or DC power
but not into the power
source.
source.(Plugging an
adapter into the receiver
automatically disconnects
the receiver's battery.
DX-375
(200-0212)
Specifications
GENERAL
Output Impedance:..............................AM, SW
8 ohms (Speaker)
FM
32 ohms (Headphone)
Output Power:..........................350 mW at 10% THD with a 8 ohm load
Power Source:..................................................DC, 3 Volts
Test Conditions: AM, SW
Modulation:....................................................1000 Hz 30%
Output:........................................................50mW/8 ohms
Antenna Input:...............................................AM, SW1 Loop
SW2 Dummy
AM BAND
Condition
Intermediate Frequency
Frequency Range
Maximum Sensitivity
50 mW Output /8 ohms
Usable Sensitivity
20 dB S/N
Auto Scan Sensitivity
Tuning Indicator
On Sensitivity
DX-LOCAL
Sensitivity Ratio
S/N Ratio 5mV/m Input
Image Rejection
IF Rejection
AGC FOM-10 dB
Selectivity +/- 10 kHz
Bandwidth at -6 dB
Maximum Output Power
5 mV/m Input
T.H. Distortion
5 mV/m Input
Overload Distortion
100 mV/m Input
Output Power at 10% THD
5 mV/m Input
Whistle Modulation
Overall Fidelity
5mV/m Input
Noise Level
Current Drain
Local Oscillator Drop Out
Backup Current
(Power Off After 5 Minutes)
Low Battery Indication Voltage
Unit
kHz
kHz
Nominal
450
530~1710
Limit
450 +/530~1710
600 kHz
1000 kHz
1450 kHz
µV/m
µV/m
µV/m
63
50
50
150
130
130
600
1000
1450
1000
kHz
kHz
kHz
kHz
µV/m
µV/m
µV/m
µV/m
398
250
250
250
630
630
630
500
1000 kHz
µV/m
79
220
1000
1000
1450
600
1000
1000
1000
dB
dB
dB
dB
dB
dB
kHz
26
45
40
50
69
70
6.2
16~36
40
34
44
60
60
4.5~8
kHz
kHz
kHz
kHz
kHz
kHz
kHz
1000 kHz
mW
1000 kHz
%
1.03
.0
1000 kHz
%
1.2
10
1000 kHz
900 kHz
1350 kHz
mW
%
%
1000 kHz
Hz
mV
mA
V
130~2.8k
0.2
37
1.85
µA
V
1.5
2.25
600 kHz
475
340
2
2
350
300
15
15
160~2.2k
0.4
45
2.1
10
2.0~2.4
SW1 BAND
Condition
Frequency Range
Maximum Sensitivity
50 mW Output/8 ohms
Unit
MHz
Nominal
2.4
4.0
6.0
Usable Sensitivity 20dB S/N 2.4
4.0
6.0
Auto Scan Stop Sensitivity
2.4
4.0
6.0
S/N Ratio
4.0
Image Rejection
2.4
4.0
6.0
IF Rejection
2.4
AGC FOM-10 dB
4.0
T.H. Distortion 5mV/m Input 4.0
Overload Distortion
50 mV/m Input
4.0
Current Drain
Local Oscillator Drop Out
2.4
DC-DC Conv. OSC Frequency
Tuning Indicator
On Sensitivity
4.0
Tuning Step Frequency
2.300~6.250
MHz
MHZ
MHz
MHz
MHz
MHz
MHz
MHz
MHz
MHz
MHz
MHz
MHz
MHz
MHz
MHz
µV/m
µV/m
µV/m
µV/m
µV/m
µV/m
µV/m
µV/m
µV/m
dB
dB
dB
dB
dB
dB
%
MHz
%
m/A
V
MHz
MHz
MHz
Limit
2.300~6.250
50
63
22
224
224
178
280
356
224
46
35
25
25
69
60
1.0
100
126
50
500
500
398
450
42
19
55
50
4.0
1.5
41
1.85
2.77
µV/m
kHz
10
47
2.1
-
100
5
224
5
SW2 Band
Condition
Frequency Range
Maximum Sensitivity
50mw Output/8 ohms
Usable Sensitivity for
20 dB S/N
Unit
Nominal
Limit
MHz
7.100~21.850
7.100~21.850
µV
µV
µV
7.9
1.6
5.6
MHz
MHz
MHz
µV
µV
µV
40
9.0
5.6
80
25
22
MHz
MHz
MHz
MHz
MHz
MHz
MHz
µV
µV
µV
dB
dB
dB
45
10
7.9
42
29
18
72
36
22
12
60
MHz
%
1.5
4.0
MHz
%
mA
V
2.5
46
1.85
10
55
2.1
7.3 MHz
15.0 MHz
21.0 MHz
7.3
15.0
21.0
Auto Scan Stop Sensitivity
7.3
15.0
21.0
S/N Ratio 100 µV Input
15.0
Image Rejection
7.3
15.0
AGC FOM-10dB
15.0
T.H. Distortion
100uV Input
15.0
Overload Distortion
5mV Input
15.0
Current Drain
Local OSC Drop Out
7.3
Tuning Indicator
On Sensitivity
15.0
Tuning Step Frequency
MHz
MHz
µV/m
kHz
3.2
5
16
3.0
22
6.3
5
Test Conditions: FM
Modulation:
Mono:...................................................1000 Hz 75 kHz
Stereo:.............................................(L+R) 45% (L-R) 45%
Pilot:........................................................19kHz 10%
Output:........................................................1mW/32 ohms
Antenna Input:.....................................................75 ohms
FM BAND
Condition
Frequency Range
3% THD Sensitivity 1mW/32 Ohms
90.1
98.1
106.1
Usable Sensitivity 30 dB S/N
90.1
98.1
106.1
Auto Scan Stop Sensitivity
98.1
Tuning Indicator On Sensitivity 98.1
Maximum Output Power 1 mV Input 98.1
S/N Ratio
1 mV Input 98.1
Distortion
1 mV Input 98.1
Output Power
at 10% THD 98.1
AM Suppression
1 mV Input 98.1
-3 dB Limiting
98.1
DX-LOCAL Sensitivity Ratio
(3% THD)
98.1
Tone Control Effect at 10 kHz
98.1
Image Rejection Ratio
106.1
I.F Rejection Ratio
90.1
Spurious Response
98.1
Capture Ratio
100 µV Input 98.1
Alternate Channel Selectivity
at 100 µV Input
98.1
De-emphasis
100
8
Overload
100 mV Input 98.1
Current Drain
Oscillator Drop Out
MHz
MHz
MHz
MHz
MHz
MHz
MHz
MHz
MHz
MHz
MHz
MHz
MHz
MHz
Unit
MHz
µV dB
µV dB
µV dB
µV
µV
µV
µV
µV
mW
dB
%
mW
dB
µV
Nominal
Limit
87.5~108.1 87.5~108.1
4.7
10
2.5
7
4.7
10
3.2
9
2.5
7
3.2
9
4.0
10
2.2
10
40
20
62
50
0.4
3
37
20
48
30
1.6
4.0
MHz
MHz
MHz
MHz
MHz
MHz
kHz
dB
dB
dB
dB
15
13
34
60
74
3.0
MHz
Hz
kHz
MHz
dB
dB
dB
%
mA
V
25
-2
-11
0.6
45
1.8
9~17
22
50
50
6
15
-1~-3
-8~-14
3.0
51
2.1
STEREO
Stereo Separation
1 mV Input 100
1
10
Distortion
at 1 mV Input
1
Stereo Beacon Sensitivity
38 kHz Leakage
1 mV Input
Pilot Modulation
1 mV Input
Hz
kHz
kHz
kHz
dB
dB
dB
%
µV
dB
%
25
38
27
0.3
1.6
34
3
20
30
20
3
7.1
28
7
Note: Nominal Specs represent the design specs. All units should be able
to approximate these - some will exceed and some may drop slightly
below these specs. Limit specs represent the absolute worst
condition that still might be considered acceptable; in no case
should a unit fail to meet limit specs
(RLR/all-02/27/95)
200-0212
DX-375 AM/SW/FM/ST RCV Parts List
To order parts call 1-800-843-7422 or visit your local radio shack store.
Reference #
Cat. No. Description
NP Part #
-----------------------------------------------------------------------11319548
1S1588
11328895
2SA1048
11329190
2SA1297
11332400 XSTR 2SC2668 SI NPN
2SC2668
11332426
2SC2669
11335254 XSTR 2SK118 FET GEN PURP
2SK118
11335460 XSTR 2SK241Y
2SK241Y
10525061 REPLACED BY 2SA1048
2TR0064
2TR0450
2TR0474
10528552 REPLACED BY 2SK118
2TR0886
10531978 REPLACED BY 2SC2669
2TR1450
10531986 REPLACED BY 2SA1297
2TR1451
10532000 REPLACED BY 2SK241Y
2TR1453
25
10540037 ANTENNA,TELESCOPIC ROD
A0411
10540037 5 SECTIONS BASE DIA 6MM
A0411
TC1 TC2 TC3 TC4 TC5
10554798 CAPACITOR,TRIMMER 10PF WH C0217
1T2
10565273 COIL,IFT AM
CA4013
10565273 SILVER CAN BLACK SLUG
CA4013
L1
10565281 COIL,ANTENNA FM
CA4014
10565281 GREEN W/BLACK SLUG
CA4014
L4
10565299 COIL,ANTENNA SW2
CA4015
10565299 SILVER CAN W/BLACK SLUG
CA4015
L5
10565307 COIL,TRANSFORMER RF SW2
CA4016
10565307 SILVER CAN W/BLACK SLUG
CA4016
L6
10565315 COIL,RF SW2
CA4017
10565315 SILVER CAN W/BLACK SLUG
CA4017
L12
10565331 COIL,OSC AM
CA4019
10565331 SILVER CAN W/BLACK SLUG
CA4019
L13
10565349 COIL,OSC SW1
CA4020
L14
10565356 COIL,OSC SW2
CA4021
10565356 SILVER CAN W/BLACK SLUG
CA4021
L16
10565364 COIL,OSC DC/DC
CA4022
10565364 SILVER CAN
CA4022
CF2
10570356 FILTER,CER 450KHZ SFP450I CB0620
11378478 CRYSTAL,DT-381 75KHZ 3X8
CX1010
CR
10596906 RESONATOR,CERAMIC
CX1278
C8 C9
10611978 BATTERY,LID ASSY
DB1128
10611978 60X20X5
DB1128
10622496 REPLACED BY 1S1588
DX0273
D5 D6 D7 D8 D9 D10 D11 10625705 DIODE 1SV149-B (PAIR)
DX1511
D1 D2
10626968 DIODE 1SS238
DX1916
10626968 ORANGE GLASS W/GREEN BAND DX1916
D3 D4
10627438 DIODE 1SV101 VARACTOR SI
DX2065
D20
10634632 DIODE 1SS293 SI
DX3547
15
10675999 STAND,PLASTIC DARK GRAY
HC3267
D10 D11 D12 D13
10704104 STRAP,HAND ASSY
HL0160
10704104 HOLDER,STRAP
HL0160
F1 F2 F3 F4 F5
10714996 HARDWARE KIT,20-212
HW2000212
10714996 E WASHER M2
(1)
HW2000212
J1
10724771 JACK,HEADPHONE
J0711
J2
10724789 JACK,DC INNER PIN 01.3
J0712
10775567 KNOB,VOLUME
K3693
LCD 37
10791614 LCD,DISPLAY 63X35.5
L0226
10791614
L0226
D26
10794436 LED,RED 3MM DIFFUSED
L0963
10823011 MANUAL,SERVICE 20-212
MS2000212
IC7
IC5
IC6
VR
S1 S2
S3 S6
S7 S8 S9 S10 S11 S12
S13 S14 S15 S16 S17
S18 S19 S20 S21 S22
S23
26
A1 A2 A3 A16 A17 A21
B4 B5 B6 B7
14
27
(08/04/2004)
10844991
10868727
10868727
10868735
10883023
10890929
10899011
10922581
10922581
10922599
10922599
10966927
11055308
11055308
11055324
11055324
11055332
11055332
11055332
11055332
11055332
11084571
11392875
11392917
11393089
10868735
11210440
11210440
11212388
11212388
11212396
11212396
11212479
XEROX COPY
IC,305-011 FP 60 S
DIGITAL IC 3 VOLTS
REPLACED BY TD7101F
REPLACED BY TA8132AF
REPLACED BY TA7358
REPLACED BY TA7331
IC,TC74HC155AP CMOS
DECODER 8P DIP
IC,TA8126S LINEAR
DC/DC CONVERTOR
POT,VOLUME 20K OHM AX2
SWITCH,SLIDE 2C-2P
DX/LOCAL HI/LOW
SWITCH,TACT 1C-1P
SLEEP/POWER
SWITCH,TACT 1C-1P
PRESET,DIRECT TUNING,
BAND,ENTER,UP/DOWN TUNING
SHORT WAVE SELECT,
MEMORY STORE, MEMORY SCAN
SPEAKER,77MM 8 OHM
9P SIP
9 PIN SIP
IC,TA8132AF IF AMP 24 PIN
SURFACE MOUNT TYPE
BOARD
CABINET,FRONT ASSY
DIAL PLATE
CABINET,REAR ASSY
6X10X15
PANEL,SIDE PLASTIC
DARK GRAY
CHASSIS,PLASTIC BLACK
MU2000212
MX0074
MX0074
MX0075
MX2234
MX3400
MX4835
MX8875
MX8875
MX8876
MX8876
P0999
S0198
S0198
S0200
S0200
S0201
S0201
S0201
S0201
S0201
SP0380
TA7331
TA7358
TA8132AF
TD7101F
XB0000X
Z5694
Z5694
Z5915
Z5915
Z5916
Z5916
Z5924