1
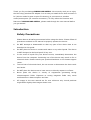
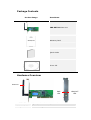
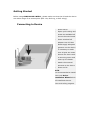
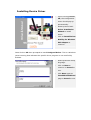
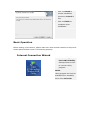
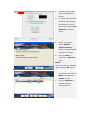
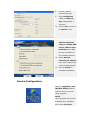
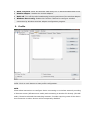
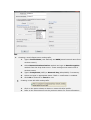
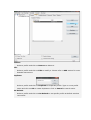
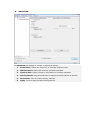
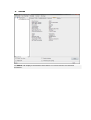
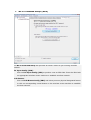
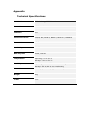
CNP-WF511
Wireless PCI Adapter
User Manual
Table of Contents
INTRODUCTION ..............................................................................................................................3
SAFETY PRECAUTIONS ...................................................................................................................3
PACKAGE CONTENTS .......................................................................................................................4
HARDWARE OVERVIEW ..................................................................................................................4
GETTING STARTED ........................................................................................................................5
CONNECTING TO DEVICE ...............................................................................................................5
INSTALLING DEVICE DRIVER .......................................................................................................6
BASIC OPERATION........................................................................................................................7
INTERNET CONNECTION WIZARD ...............................................................................................7
DEVICE CONFIGURATION ..............................................................................................................9
TROUBLESHOOTING...................................................................................................................19
APPENDIX ........................................................................................................................................20
TECHNICAL SPECIFICATIONS .....................................................................................................20
Thank you for purchasing CANYON CNP-WF511. We sincerely wish you to enjoy
the 802.11b/g wireless PCI adapter. It is an easy-to-install device that connects to
PC (Ad-Hoc mode for peer-to-peer file sharing) or connects to a wireless
router/access point (for internet connection). To fully utilize the functions and
features of CANYON CNP-WF511, please read through the user manual before
you get started.
Introduction
Safety Precautions
Please observe all safety precautions before using the device. Please follow all
procedures outlined in this manual to properly operate the device.
z
Do NOT attempt to disassemble or alter any part of the device that is not
described in this guide.
z
Do NOT place the device in contact with water or any other liquids. The device
is NOT designed to be liquid proof of any sort.
z
In the event of liquid entry into device interior, immediately disconnect the
device from the computer. Continuing use of the device may result in fire or
electrical shock. Please consult your product distributor or the closest support
center.
z
To avoid risk of electrical shock, do not connect or disconnect the device with
wet hands.
z
Do NOT place the device near a heat source or directly expose it to flame.
z
Never place the device in vicinity of equipments generating strong
electromagnetic fields. Exposure to strong magnetic fields may cause
malfunctions or data corruption and loss.
z
All images in the user manual are for user reference only. Actual products
might differ slightly than images shown here.
Package Contents
Product Image
Item Name
CNP-WF511 Main Unit
Warranty Card
Quick Guide
Driver CD
Hardware Overview
Antenna
PWR
LED
PWR LED
Lights up when device is powered
LINK/ACT LED
Flashes during network activities
LINK/ACT
LED
Getting Started
Before using CANYON CNP-WF511, please make sure that the PC and the device
are within range of an access point (802.11b, 802.11g, or 802.11b/g).
Connecting to Device
1.
Power off PC.
2.
Open up PC casing and
locate an available PCI
slot on the main board.
3.
Insert wireless PCI
adapter into PCI slot.
Please apply adequate
pressure on the device
if necessary to make
sure all pins are intact.
4.
Secure the device with
a mounting screw and
close up PC chassis.
5.
Attach the external
antenna to the device.
6.
Power on PC.
NOTE:
It is recommended to install
driver with Driver
Installation Wizard which
will install both device
driver and utility program.
Installing Device Driver
1.
Upon inserting Driver
CD, the configuration
menu should pop up
automatically.
2.
Please proceed with
Driver Installation
Wizard to install
driver.
3.
Click on Install Driver
&Utility for Wireless
PCI Adapter to
continue.
NOTE:
Please click on Ok when prompted to install Unsigned Driver. This is a Windows
system warning that indicates the specific driver program is not certified by
Windows.
4.
Select preferred setup
language.
5.
Click on Next to
continue or Cancel to
exit.
6.
Click Next again at
InstallShield Wizard
page or Cancel to exit.
7.
Click on Install to
initiate installation
process or Cancel to
exit.
8.
Click on Finish to
complete driver
installation.
Basic Operation
Before setting up the device, please make sure that wireless network is setup and
access point/wireless router is functioning properly.
Internet Connection Wizard
1.
Click on 11bg Wireless LAN PCI Utility
desktop shortcut icon
to execute utility
program.
NOTE:
Utility program will only be
available when installing
driver from Drive CD.
2.
The Utility main page
will be displayed as
shown.
3.
To setup basic wireless
network with existing
access point or wireless router, click on Set
Wizard on tool bar
menu.
4.
Select connection
mode. Station
(infrastructure)
mode is recommended
for Internet access.
5.
Click on Next to
continue or Cancel to
exit.
NOTE:
The device will be restarted
upon selecting AP option.
6.
Select desired wireless
connection and click on
Next to continue or
Cancel or exit.
7.
Click on Refresh to
update wireless
connection list.
8.
Review wireless
network settings.
9.
Enter Passphrase
(WEP) or Network
Key (WPA/WPA2) if
required.
10. Click on Ok to continue
or Cancel to exit.
11. Select Obtain an IP
address automatically and Obtain DNS
server address automatically when DNS
service is enabled in
the wireless network.
12. Select Use the
following IP address
only when required by
network administrator.
13. Click on Finish to
complete installation.
Device Configuration
Click on 11bg Wire- less
LAN PCI Utility desktop
shortcut icon to execute
utility program.
NOTE:
Utility program will only be
available when installing
driver from Drive CD.
1. General
The General tab displays current wireless connection information. Click on ReNew IP to
release and renew IP address.
General Information:
z
Status: Wireless network Associated, AD-HOC Mode or Not Associated.
z
Speed: The data transfer rate of the current connection.
z
Type: The type of the current wireless connection, Infrastructure, AD-HOC
z
Encryption: Current data encryption method.
z
SSID: The unique name of the wireless network.
z
Signal Strength: The signal quality of the current wireless connection.
z
Link Quality: The link quality of the current wireless connection.
Internet Protocol (TCP/IP):
z
MAC Address: The MAC Address of the Adapter.
z
IP Address: The IP Address of the Adapter.
z
Subnet Mask: The Subnet Mask of the Adapter.
z
Gateway: The Default Gateway address of the Adapter.
Others:
z
Show Tray Icon: Show PCI Wireless LAN Utility icon in Windows Notification Area.
z
Disable Adapter: Disable the wireless adapter.
z
Radio off: Turn off the radio broadcasting/receiving activities of the wireless adapter.
z
Windows Zero Config: Enable this function if desired to configure wireless
connection by Windows wireless adapter configuration program.
2. Profile
The Profile tab adds, removes, edits, duplicates, and set default a wireless network
profile. Click on each button to start profile configuration.
NOTE:
Follow below instructions to configure device connecting to a wireless network providing
PC Internet access (Infrastructure mode) and connecting to another PC directly (AD-HOC
mode). Please be advised that switching between 2 modes requiring reset of the device
thus connection to other devices will be temporarily disabled.
Add:
1.
Creating a new Infrastructure mode profile
1.
Type in Profile Name (user defined) and SSID(actual network name from
wireless router).
2.
Select Network Authentication method and type in Data Encryption
method from the drop down menu. These settings must match that of
wireless router.
z
3.
Type in Passphrase (WEP) or Network Key (WPA/WPA2) if necessary.
4.
Select and type in appropriate items if 802.1x certification is enabled.
5.
Click OK to continue or Cancel to exit.
Creating a new AD-HOC mode profile
1.
Click on the option shown as above to create AD-HOC profile.
2.
Refer to the instructions from the previous section for more information.
Remove:
Select a profile and click on Remove to delete it.
Edit:
Select a profile and click on Edit to modify it. Please refer to Add section for more
detailed instructions.
Duplicate:
Select a profile and click on Duplicate to duplicate profile. Type in a new profile
name and click on OK to create duplicates. Click on Cancel to cancel action.
Set Default:
Select a profile and click on Set Default to set specific profile as default wireless
connection.
3. Available Network
The Available Network tab displays a list of infrastructure and AD-HOC networks
available for wireless connection.
1.
Select a connection on the list and click on Add to Profile to join network.
2.
Refer to instructions on previous section for more detailed information.
4. Advanced
The Advanced tab displays a number of advanced options.
1.
Power Save: Select the frequency of message response time.
2.
Wireless Mode: Select the wireless operation standard.
3.
Channel Plan: Select channel in accordance to wireless standard.
4.
RTS Threshold: Drag and slide bars to adjust threshold values as desired.
5.
Set Default: Click to restore factory settings.
6.
Apply: Click to apply modified configurations.
5. Status
The Status tab displays the detailed information of current device and wireless
connection.
6. Statistics
The Statistics tab displays the values of current wireless connection Tx and Rx. Click on
Reset button to reset values and to renew to count.
7. Wi-Fi Protected Setup (WPS)
The Wi-Fi Protected Setup tab provides an easier means to join existing wireless
network.
Pin Input Config (PIN):
Click on Pin Input Config (PIN) to produce a set on PIN Code. Enter the PIN Code
on appropriate wireless router machine to establish wireless network.
Push Button:
Click on Push Button Config (PBC) and either press on physical designated button
or click on corresponding virtual button on the wireless router machine to establish
wireless network.
Troubleshooting
Please refer to the following procedures if CNP-WF511 does not function as it
should be. Be advised that the following instructions are only intended for simply
troubleshooting purpose. Please contact your local authorized shops for further
troubleshooting and technical support.
z
The device does not work properly.
1.
Reinsert the wireless PCI adapter as instructed in Connecting to Device
section.
2.
Please make sure the device drivers installed matches the device inserted.
3.
Check on device status under device manager. If an exclamation mark is
displayed next to the device name, please uninstall the driver as
instructed in Installing Device Driver section.
z
Unable to establish connection with other PCs linked via Ethernet with
Infrastructure configuration.
1.
Please make sure that the PC connected with wireless USB adapter is
powered on.
2.
Please also make sure that the device is configured on the same channel
and with the same security options as with the other PCs with
infrastructure connection.
z
Unable to connect to the wireless network/accessing to the Internet
with device installed.
1.
Please examine the broadband modem for normal activity by checking
status LED indicator.
2.
Please also examine the wireless router if it is functioning properly. Check
if the power adapter and network cable is firmly plugged in.
3.
Verify IP address, subnet mask, gateway, and DNS settings are
configured as required by wirless router.
4.
Make sure SSID(Service Set Identifier) on the device is setup in
accordance with wirless router in infrastruture mode.
5.
Make sure that the SSIDs are identical on devices in AD-HOC mode. It is
recommended to establish a BSS(Basic Service Set) and wait for a few
moments before setting up the other device to prevent multiple singular
BSSs being established.
6.
Please make sure that the security settings on the device is matching that
of wireless router/access point.
Appendix
Technical Specifications
Standards
IEEE 802.11g, IEEE802.11b
Channels
13 Channels
Interface
PCI
Network Protocol
TCP/IP, IPX, NDIS 4, NDIS 5, NDIS 5.1, NetBEUI
Transmit Power
15 dBm
Sensitivity
-80 dBm
WEP Key Bits
64 bit, 128 bit
Temperature
Operating: 0° to 40° C
Storage: -20° to 70° C
Humidity
Operating: 10% to 85 % non-condensing
Storage: 5% to 90 % non-condensing
Dimensions
120mm(L) X 45mm(W) (Non-Bracket)
Weight
50g
Power
3.3V