1
V 6.0
USER MANUAL
K6
Order No. 9103 – 0264
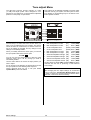
Welcome!
We are delighted that you have purchased a product. The K6 DVD surround receiver forms the basis of a superb
digital AV surround system whose overall design and comprehensive facilities fulfil all the requirements of a high-quality
video and home cinema system.
The highly sophisticated signal processing section has been carefully developed to satisfy all the wishes of the demanding music lover, and is constructed using carefully selected audiophile components of the highest quality.
The latest technology is designed to provide efficient energy exploitation in all modes of operation. The development of the K6 was sponsored by the German Federal Environment Agency (DBU) as a contribution to improving energy efficiency in electronic equipment.
In our equipment production processes we avoid the use of materials which are environmentally harmful such as chlorine-based solvents and CFCs. As far as possible we avoid the use of plastics - especially PVC - in our equipment;
instead we use metals or other non-harmful materials which are easily recycled and also provide effective electrical
shielding. The heavy, all-metal case of the K6 eliminates the possibility of external sources of interference adversely
affecting reproduction quality.
For your own safety please be sure to read right through these operating instructions. It is especially important to observe the instructions regarding setting up and operating the equipment, and the safety notes.
We are grateful to you for placing your faith in us, and hope that you will enjoy many hours of pleasure with your
K6 surround receiver.
elektroakustik
All components used in this device meet the current German and European safety norms and standards.
Manufactured under licence from Dolby Laboratories. "Dolby", "Pro Logic" and the double-D symbol are
trademarks of Dolby Laboratories.
'DTS' and 'DTS Digital Surround' are trademarks of Digital Theater Systems, Inc.
'RDS' Radio Data System
This product complies with the Low Voltage Directive (73/23/EEC), EMV Directives (89/336/EEC, 92/31/EEC) and CE Marking
Directive (93/68/EEC).
IMPORTANT!
CAUTION!
This product contains a laser diode of higher class than 1. To ensure continued safety, do not remove any
covers or attempt to gain access to the inside of the product.
Refer all servicing to qualified personnel.
The following caution label appear on your device:
Rear panel
CLASS 1
LASER PRODUCT
On the inner protective housing of the DVD mechanism
CAUTION:
VORSICHT:
ATTENTION:
DANGER:
VISIBLE AND INVISIBLE LASER RADIATION WHEN OPEN.
AVOID EXPOSURE TO BEAM
SICHTBARE UND UNSICHTBARE LASERSTRAHLUNG,
WENN ABDECKUNG GEÖFFNET NICHT DEM STRAHL AUSSETZEN
RAYONNEMENT LASER VISIBLE ET INVISIBLE EN CAS
D'OUVERTURE EXPOSITION DANGEREUSE AU FAISCEAU
VISIBLE AND INVISIBLE LASER RADIATION WHEN OPEN.
AVOID DIRECT EXPOSURE TO BEAM
Operation
4
Front panel controls and connections
Primary switch / Emergency buttons / Opening and closing the drawer / Headphone socket / Screen
6
F6 remote control handset
Switching On-/Off/Standby / Screen brightness adjustment / Screen angle adjustment /
Source selection / Volume control / Muting A / B / Surround mode / Sound field
7
Menu control system - Main Menu
ProLogic II Mode / Balance / Tone controls / Subwoofer level / Loudness / Dynamic
9
Surround sound - explanatory notes
11
11
12
13
14
17
Using the tuner
18
19
20
21
22
The Disc-Player - Using the Disc-Player to play audio CDs
24
24
25
26
26
27
28
29
30
31
Using the Disc-Players to play DVDs
32
Using the Disc Player to play other media: Video CDs / Photo-CDs / MP3
Listening to radio programmes / Calling up additional tuner information
Program tuning:
Program searching / Fine-tuning / Reception mode
Storing of radio programmes:
Manual storing / Automatic storing
Editing of radio programs:
Clearing (erasing) / Exchanging / Renaming
The tuner as alarm clock
Inserting an audio CD / Calling up additional CD player information
Playing a Track
Creating a playback program for a CD
Playback variants:
Repeat Track, Repeat Disc, Scan and Shuffle / Play A-B
Inserting a DVD
Calling up additional DVD player information
Playing a Title
Selecting a Chapter
Search / Slow motion
Camera angle / Switching audio channels
Sub-title language / Playback variants (Repeat Chapter, Repeat Title, Repeat Disc and Shuffle)
Disc Menu Function
Player Setup (Menu):
Audio language / Sub-title language / Aspect ratio / Autoplay
Basic settings for the K6
33
34
35
36
38
39
40
41
42
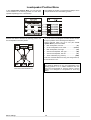
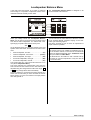
Configuration Menu
Assistant Menu:
Loudspeaker Menu:
• Spk Position Menu:
• Spk Balance Menu:
• Tone adjust Menu:
Video Norm Menu:
Inputs Menu:
Switching On-screen Menu on/off / Selecting On-screen language
Adapting loudspeaker set / Starting speaker calibration (Auto-setup)
Adapting loudspeaker set / Volume controlling A and B split or linked
Entering the distance between listening position and loudspeakers
Setting exact level to all loudspeakers
Adjusting tone values separately for all output channels
Entering Video norm for the TV output
Assigning a digital input to an AV input / Starting input calibration
Setting up, using the K6 the first time
44
44
44
45
45
46
48
53
Approved usage
General notes on setting up and
FCC Information to the user
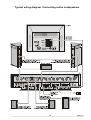
General notes on wiring the system
Safety notes
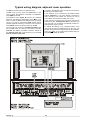
Rear panel connections
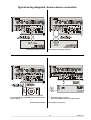
Typical wiring diagrams / Adjustments at the TV set
Device approval and conformity / Care of the K6 / Remote control address / Changing the batteries
Appendix
54
Trouble shooting / Pin assignments / Specification
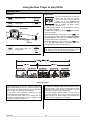
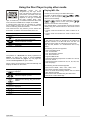
Front panel controls and connections
Primary switch
Emergency buttons
The K6 is normally switched on and off using the
button on the remote control handset.
To the right of the primary switch on the underside of the
K6 you will find three small buttons which can be used to
control the machine in an emergency. These buttons can
be used to operate the essential functions directly.
The K6 also features a primary switch (rocker switch)
located on the left under the front panel. Operating the
primary switch completely disconnects the K6 from the
mains supply, e.g. if you know you will be absent for a
protracted period. The On and Off settings of the switch
are marked on the rocker.
To use the machine you must first switch it on at the
primary switch; it can then be switched on and off using
the button on the remote control handset.
Select
button
Change
button
Press the left Select button to choose the function to be
controlled, then use the two right buttons to alter the
setting. The integral screen always displays the function
which can be changed at any time:
Notes
VOLUME
Volume setting
If you switch off the K6 at the primary switch, it still retains all the settings you have made. The integral clock
continues to run for about two days.
SURND MODE
Select the decoder mode
SOURCE
Select the program source
If the K6 is left switched off for a fairly long period the
clock has to be re-set (manually, or automatically by
RDS: see 'The tuner as alarm clock'). The alarm function and the loop-through function for AV programme
material (set-top box, video recorder) to the TV set are
not available if the unit is turned off at the primary switch.
STOP PLAY
Stop / Start CD/DVD playback
PREV NEXT
Skip track/title (disc mode)
Switch program (tuner mode)
ALARM off
Switch alarm function OFF/ON
STdBY OFF
Switch unit to stand-by /
switch unit off
Note
To leave the emergency control system simply wait for
about 5 seconds after pressing the buttons.
Operation
4
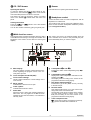
CD / DVD drawer
Sensor
Opening the drawer
Infra-red sensor for opening the CD/DVD drawer.
To open the drawer first select the Disc Player as program source, then hold the button on the remote
control handset pressed in for about 2 seconds.
The drawer can also be opened by moving your hand
close to the sensor located below the unit's front
panel.
Closing the drawer
Press the or button on the RC handset
to close the drawer.
You can also close the drawer by giving it a gentle push.
Headphone socket
3.5 mm Ø barrel socket for stereo headphones with an
impedance of at least 50 Ω.
This socket is also used to connect the calibration microphone for the automatic loudspeaker calibration process
(see 'Configuration Menu').
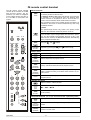
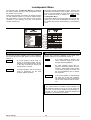
Multi-function screen
The integral screen provides information about the status
of the K6 and all its settings. The angle of inclination and
brightness of the screen can be varied to ensure good
legibility.
The screen runs back to its retracted setting when the
unit is switched off; it reverts to the previously set position automatically when you switch on again.
a Main display
g Loudspeaker A and B
The main display provides context-sensitive information regarding the program source or the currently active process.
b Tuner reception mode FM (VHF)
Indicates the status of the loudspeaker groups A
and B.
h Loudspeaker channels A
Displays the active loudspeaker channels for loudspeaker group A.
The display varies according to the content of the
programme material currently playing..
c Tone control settings
These symbols indicate the current settings of the
tone controls.
d Menu symbol
Disc Player medium display
i
Indicates the type of disc (DVD, CD etc.) currently
in the Disc Player.
Indicates that a device menu is open.
e Timer symbol
Indicates that the timer is active.
f
k Decoder mode
This display field informs you of the current operating mode of the surround decoder.
The decoder mode varies according to the settings
you have made (surround, stereo, mono, sound
field) and according to the sound format of the
programme material currently playing.
Alarm time
When the timer is active this symbol indicates the
alarm time. This only applies if the K6 has been
switched off from the RC handset, or is switched to
stand-by mode.
Tuner reception mode
l
glows when a stereo programme is picked up.
glows if the attenuator is switched on.
5
Operation
F6 remote control handset
The F6 remote control handset
controls all the functions of the K6
DVD surround receiver. The adjustments you make are displayed
on the integral screen and also on
a TV set which is connected to the
system.
Basic functions
press
briefly
The pass-through function only works if the primary mains
switch on the underside of the front panel is set to On.
press
for 2 sec.
A/B
press
for 2 sec.
CD/DVD TUNER
AUX
TV / STB
TAPE
VCR
+
V
O
L
press again
for 2 sec.
Selects the integral tuner as programme source.
press
repeatedly
if necessary
1
2
3
4
5
6
7
8
9
SRND
Switches the loudspeaker outputs in the sequence
A - B - A+B.
T/C
Switches off the loudspeaker outputs A and B
(mute function).
Surround functions (see chapter 'Surround sound - explanatory notes')
Displays the active surround mode on the integral screen.
short
press
press short
repeatedly
press long
repeatedly
Operation
Switches to the VCR input (video recorder) and selects this as
program source.
Adjusts volume in 1dB increments.
press
for 2 sec.
SRC
AMP
Switches to the inputs TAPE 1 (analogue recorder) and
TAPE 2 (digital recorder), and selects these devices as program source.
0
F
U
N
C
T
I
O
N
Switches to inputs TV and STB (= SET TOP BOX, SAT receiver), and selects these devices as program source.
Amplifier functions
short
press
M
E
N
U
Selects the integral CD/DVD player as programme source.
Selects the inputs AUX-A, AUX-PH and AUX-AV in turn and
selects these units as program source.
press
repeatedly
if necessary
OK
Activates screen brightness adjustment. The brightness is
adjusted by pressing the and buttons briefly.
PLAY
Activates screen angle adjustment. The angle is adjusted
using the and buttons.
press
repeatedly
if necessary
STOP
Switches the unit off.
In the Off state only the integral alarm timer remains in operation, and the integral screen displays the time of day. If the
alarm function is active, the K6 switches itself on automatically
at the programmed alarm time.
Source select
PAUSE
In stand-by mode the K6's video pass-through circuit remains
in operation, i.e. the programme from the selected video
source continues to be passed to the TV set and video recorder, and can therefore still be viewed and/or recorded.
The programme source being passed through the machine is
indicated on the screen. It can be switched at any time using
the F6 RC handset.
*) Note
F6
DISP
Switches the K6 on from the Off state *), and switches the unit
to stand-by mode from the On state.
Cycles the current music signal through the possible surround
modes.
Cycles the current music signal through the possible surround
modes in reverse order.
6
Menu control system
A menu control system is used to adjust the tone controls and the surround decoder settings, and also to set
the basic configuration of the K6.
The 'Main Menu' contains all the functions required to
operate the K6 in normal daily use. Press the
button briefly to open this menu.
If the TV set connected to the system is switched on, all
the menus are displayed page by page on its screen.
They are also displayed line by line (using English abbreviations) on the integral screen of the K6.
When you initially install the K6 all the audio and video
components of your surround system must be set up to
suit each other, and the system then has to be adjusted
to suit the acoustic characteristics of your listening room.
All these processes are carried out using the 'Configuration Menu' which is opened by holding the button pressed in for approx. 2 seconds (see 'Configuration Menu').
Main Menu
Operation:
Explanation:
short
press
/
Open Main Menu
e.g.
pp I I matrx
The 'Main Menu' enables you to change settings of the
K6 which are occasionally required for daily listening.
Press the button briefly to open the 'Main Menu'.
All changes take effect immediately.
Select menu point
If the TV set connected to the system is switched on, the
menu appears on the TV screen. At the same time the
integral screen displays the first menu point.
Change menu point
Activate selection
Leave Main Menu
or
Select
menu point
Change
value
Movie
Main Menu
Pro Logic II mode
Matrix
Balance Left/Right
mid
Srnd/Front
mid
Tone
Treble
00
Bass
00
Tone control
off
Subwoofer level
00
Loudness
off
Dynamic range
maximum
STOP / / /
/
/ OK
Music
Matrix
10L
10R
10R
10F
-06
+06
-06
+06
off
on
off
on
-10
off
minimum standard maximum
ProLogic II mode:
Balance left/right and surround/front:
This menu point enables you to set the Dolby ProLogic II
decoder to suit varying programme material.
These two menu points enable you to adjust the balance
between the left/right and front/surround loudspeakers.
Balance can be altered in 1 dB increments.
Movie
for films
Music
for music
Matrix
for mono programme material
10L (left) . . . . . 10R (right)
10R (surround) . . . . . 10F (front)
Mitte (neutral setting)
Note
The unit stores the current ProLogic II mode for each
source and sets this mode again, when the source is
selected next time.
Note
The purpose of this function is to compensate for a temporary problem, e.g. an unusual listening position, or a
poorly produced recording. The basic settings for loudspeaker balance which apply to your listening situation
should always be carried out in the 'Loudspeaker Balance Menu'!
7
Operation
Tone controls - treble and bass:
Loudness:
These two menu points enable you to alter the treble and
bass settings to compensate for tonal differences in
programme material. The settings affect all channels,
and the adjustment range is +/-6 dB in 1 dB increments.
The term Loudness refers to an automatic volumesensitive tone control designed to compensate for the
frequency-dependent sensitivity of the human ear at very
low volumes. You can switch Loudness on and off in this
menu point.
Note
The basic settings for the tone controls should first be
carried out in the 'Tone adjust Menu'. The tone settings
can be made separately for each channel, and compensate for permanently imperfect loudspeaker positioning
and room influences.
on
Loudness switched on
off
Loudness switched off
Dynamic range:
Tone control on / off:
This menu point enables you switch the tone control
on / off to toggle easily between Linear mode and Tone
control mode.
Sound sources encoded using the Dolby Digital process may have a very wide dynamic range. This can be
reduced in three stages to suit your circumstances, i.e.
quiet passages are reproduced slightly louder at low
volume, whereas loud passages are reduced in volume
slightly. You can select any of the following dynamic
ranges:
minimum
Greatly reduced dynamic range, e.g.
for night-time listening.
standard
Standard dynamic
compression.
maximum
Exploits maximum dynamic
provided by the sound source.
Subwoofer level:
If you have switched on the subwoofer in the 'Loudspeaker Menu', you can adjust its volume here within
the range -10 (dB) and + 10 (dB) in order to match the
subwoofer to the acoustic conditions of your listening
room and the volume of the other channels.
If the subwoofer is switched off in the 'Loudspeaker
Menu', this menu point in the 'Main Menu' is also set to
Off , and the subwoofer level cannot be adjusted.
Note
It is essential to set the balance between the other channels (front, surround and center) in the 'Loudspeaker
Balance Menu' before you change this setting.
Operation
8
range,
medium
range
Surround sound - explanatory notes
General information
The following section is not concerned directly with the
operation of your K6, but is rather intended to explain
some of the terms which arise in connection with surround systems. It is intended to help you understand and
exploit the facilities and capabilities of your K6 to the full.
As we all know, a normal stereo recording has two channels - left and right. When stereo material is reproduced
in your listening room, the entire sound event takes place
on an imaginary stage which covers the space between
the two loudspeakers.
The listener is able to locate specific sound events over
the width of the stage; with good recordings there is also
a slight impression of depth, i.e. behind the speakers.
Nevertheless, normal stereophonic reproduction always
leaves the listener isolated from the event.
As a result it is impossible to recreate the excitement of a
live atmosphere, as in a real concert hall, since the
acoustics of the concert hall are crucially influenced by
sound reflections from the side and back walls, the floor,
the ceiling, and from objects inside the hall.
The reflected sound comes from any number of directions - not just from the front. If a sound event is to be
reproduced with real fidelity, it therefore follows that a
proportion of the sound must emanate from all directions
in the room, that the 'reflections' must be timed accurately, and that they must be generated at a realistic
level.
Reproducing television sound via a conventional stereo
system is problematic, because it is often impossible to
locate dialogue on the screen itself.
A further point is that exotic sound effects have been in
use in the cinema since the 1950's, using proper multichannel sound systems. These effects are often crucial
to the overall impact of a film, but they cannot be reproduced at home with a conventional stereo sound system.
Over the last few years surround technologies have been
developed which make it possible to experience all these
effects within the listener's own four walls, with the result
that a far greater simulation of reality is possible than
with conventional stereo.
For an effective surround system we always recommend
the installation of a center loudspeaker, which is installed
below or directly above the TV set. This loudspeaker
helps greatly in locating particular sound events (especially dialogue) on the TV screen itself.
Types of reproduction
The K6 makes available a range of different types of
reproduction: multi-channel mode, mono/stereo mode
and sound fields.
The surround receiver 'remembers' the setting for each
input, and reverts to the mode of operation which was
last used when you switch from one input to another.
Multi-channel mode (surround)
Mode of operation for the reproduction of multi-channel
programmes (e.g. DOLBY Pro Logic, DOLBY DIGITAL,
dts, etc.).
A digital multi-channel signal is detected by its encoding
method, and the K6 automatically sets the correct loudspeaker assignment. The current reproduction mode is
displayed on the front panel screen.
For analogue input signals the correct mode of operation cannot be detected automatically by the decoder.
In this case the decoder always reverts to Dolby Pro
Logic decoding. If the signal is actually in a different form
(stereo, mono - see below), then the mode must be set
manually instead of surround mode.
Dolby Pro Logic II Surround
In this process several independent signal channels are
recorded using two channels and a special encoding
process. Since this process only requires two recording
channels, it is compatible with many picture / sound
systems which are already widely in use (CD, video
recorder, TV etc.).
The information is decoded at playback time and reproduced in the listening room via four (left, right, 2 x surround) loudspeakers, although five speakers (with an
additional front center speaker) are preferable. Dolby
Surround encoded material is currently available mainly
in the film and video arena, recorded on video cassettes
and DVDs, but many television programmes are now
being produced and transmitted using Dolby Surround.
Dolby Digital
Dolby Digital is a digital
multi-channel
surround
system
which
was
developed specifically for
spatial sound reproduction
in connection with cinema
films. The process utilises
five
separate
sound
channels:
three
front
channels
(left,
center,
right) and two surround
channels.
A
sixth
independent bass effect
channel is also present,
catering for low frequency effects (LFE). That is why
such systems are said to offer 5.1 channels.
In comparison with Dolby Pro Logic, Dolby Digital provides two independent surround channels which provide
genuine spatial stereo sound, offering the same realistic
stereo reproduction as provided by the front channels.
The integral Dolby Digital decoder provides the means of
obtaining a genuine digital Dolby stereo cinema presentation in your own living room. The discrete digital recording process and the five playback channels guarantee a very wide dynamic range and accurate spatial
orientation.
The dynamic range is the difference in volume between
the quietest and loudest passages of a recording. The
original soundtrack of a film generally features an extremely wide dynamic range which the K6 can reproduce
in full.
9
Operation
Unfortunately not all listening rooms are suitable for
exploiting the full dynamic range. For example, it may be
necessary to take your neighbours' feelings into account
- especially in the late evening hours.
For this reason it is possible to reduce the dynamic
range of Dolby digital encoded sound sources in such a
way that quiet passages (e.g. whispered conversations)
are reproduced somewhat louder, while loud passages
(e.g. gigantic explosions) are reduced in volume slightly
(see 'Main Menu').
dts Digital Surround
The 'dts' multi-channel film sound system was originally
developed to replace analogue film soundtracks, using
digital soundtracks consisting of six discrete channels.
This system has now been further developed to provide
spatial sound reproduction in the home situation.
The six channels (5.1) are encoded / decoded in original
quality, i.e. with 20-bit resolution, and recorded using
only slight data compression. The 5.1 loudspeaker configuration, currently the standard arrangement for home
cinema systems, is ideal for playback.
STEREO / MONO mode:
Stereo
mode for stereo reproduction
Note
In this mode a multi-channel signal is converted into a
stereo signal (downmix), and reproduced via the main
left and right loudspeakers.
Mono
mode for mono reproduction
All channels are mixed down onto the Center loudspeaker *).
Mono I
mode for two-channel TV sound
Generally Channel I transmits the synchronised sound. The signal from Channel I is
reproduced via the Center loudspeaker *);
Channel II (original sound) is suppressed.
Mono II
mode for two-channel TV sound
Generally Channel II transmits the original
sound. The signal from Channel II is reproduced via the Center loudspeaker *); Channel I (original sound) is suppressed.
Notes
SOUND FIELD SIMULATION
The surround processes already described require programme material which is encoded using the appropriate
system, but the K6 also offers a facility to enhance the
spatial effect available with conventional unencoded
stereo recordings (CD, MC, VHF radio etc.). This it does
by offering a range of artificial sound field simulations,
including theatre, stadium, club etc. These sound fields
are based on a precise analysis of the acoustics found in
typical concert halls.
The digital signal processor of your K6 is capable of
simulating the spatial sound of these halls, and reproducing it via the five channels of your surround system.
For example, if you select the HALL setting while
watching a rock concert on television, you will have the
illusion of sitting in the middle of the audience.
Note
The sound field simulation is not available for true multichannel programs (DOLBY, dts)!
Your K6 can generate the following sound fields:
Disco
This sound field is particularly suitable for providing
an even spread of sound over a dance floor, using
the front and surround loudspeakers. The sound signal is mixed and passed to the front and surround
speakers without reflections and delays, and with
equal power. The strongly concentrated sound reproduction generates an immediate, energy-charged atmosphere which is a great choice for any party.
Hall
A resonant concert hall with reflections from all directions. Ideal for reproducing a large orchestra, or the
live atmosphere of a large rock concert hall - an excellent choice for highly dynamic rock music.
Theatre
This program combines the entire spectrum of clear
voice reproduction with the full sound reproduction of
an orchestra, without any unnatural echo. For better
orientation the room sound is restricted slightly towards the rear.
Stadiun
Sound image with a narrow presence in the front region. Commentators and dialogues are localised on
the screen. The rear resonance provides the impression of the public in the stadium. This sound field is
also suitable for TV shows and music transmissions.
*) If no Center speaker is present (see 'Loudspeaker
Menu'), the Center channel is mixed onto the left and
right main speakers.
Not all signal sources (DVDs, CDs etc.) which are encoded with Dolby Digital or DTS Digital Surround contain
the full 5.1 information. Even if the screen indicates that
a channel is present, that does not necessarily mean that
sound signals will constantly be produced from that loudspeaker.
In every mode of reproduction signals can be made
available on the subwoofer channel, depending on the
loudspeakers selected in the 'Loudspeaker Menu'.
Club
Operation
10
The characteristic cellar jazz club atmosphere, with a
pattern of sound reflection which is dominated by
large floor and wall surfaces. Also good for simulating
small halls.
Church
Simulation of the acoustic conditions of a large
church with a long resonant period. This sound field
is the perfect choice for sacred organ music.
Using the tuner
Listening to radio programmes
Operation:
Explanation:
TUNER
Switch on Tuner mode
Then e.g.
WDR 2
e.g.
Switch to next-lower program
NDR 1
Switch to next-higher program
NDR 2
Optional: enter the program number of the desired program
to
e.g.
e.g.
BR 1
Press the button on the RC handset to switch on
the tuner; it will be set to the program which you last selected. The integral screen initially displays 'TUNER
TUNER',
TUNER then
the current radio program.
The integral screen now displays the RDS station name or
the program number, together with the reception frequency.
Use the / buttons to switch to a different program *); spot memories containing no program are automatically skipped. You can also call up a program by entering the desired program number directly using the numeric buttons.
*) Note
You must first select all your preferred radio stations, tune
them in accurately and store them under their own numbers before you can use this method to select radio programs. This process is described in 'Manual storing of
radio programs' and 'Automatic storing of radio programs'.
Calling up additional tuner information
Explanation:
Operation:
The integral screen can display three different types of
information about the current radio station:
With the tuner selected . . .
press
briefly
Brief display of program
number and reception frequency
e.g.
P01 98-00
1. RDS station name
(standard display)
2. Program info(program number and reception frequency)
3. Radiotext
Switch radio text display
on
RADIOTEXT
Switch radio text display
off
RTEXT OFF
or
RDS station name
If the radio station broadcasts its RDS station name, the
name is displayed on the integral screen.
Program info
The tuner screen can be switched temporarily to this
display so that you can check the program number and
the reception frequency of the current program. Press
the button briefly to do this.
Radiotext
Press the button briefly to switch the Radiotext
display for the current program on or off. The integral
screen displays the message 'RADIOTEXT
RADIOTEXT'
RADIOTEXT until a new message is displayed.
If the tuner cannot pick up Radiotext from the selected
station, the integral screen waits one second before
displaying the message 'NO
NO RTEXT';
RTEXT it then reverts to displaying the current radio program. If you switch programs, the Radiotext display is automatically closed.
11
Operation
Program search
Operation:
Explanation:
With Tuner selected . . .
/
press
for 2 sec
Start program search in
appropriate direction (up or
down)
e.g.
89-00
If you hold one of the tuning buttons (
/ ) pressed
in for about 2 seconds when in Tuner mode, the K6
starts a program search in the downward or upward
direction. It stops automatically at the next high-quality
station, and tunes it in accurately. If you release the
tuning button at this moment, the tuner remains on this
station. If you continue to hold it pressed in, the K6 resumes the search after about 2 seconds.
The search can be stopped at any point by briefly pressing the opposite tuning button.
Briefly pressing any Program Select button activates the
program you last selected.
Fine-tuning radio stations
Operation:
Explanation:
With Tuner selected . . .
Call up the station which
you wish to fine-tune
Optional: enter the proto
gram to be tuned in directly
/
press
briefly
e.g.
P02 85-10
e.g.
Fine-tune in direction of
lower or higher frequency
--+-- 89-00
Under difficult reception conditions it may be necessary
to carry out fine-tuning. With the fine-tune function you
can adjust the tuning in 25 kHz increments, or slightly retune a station which you are picking up with interference.
Press the or button briefly to do this.
The exact setting can be checked with the center display
(Tuning Indicator adjacent to the frequency display).
The station is correctly set and will be received at optimum quality when the cross symbol is in the center.
After carrying out fine-tuning the program must be stored
again manually; see 'Manual storing of radio programs'.
Setting the reception mode
Operation:
Explanation:
The Tuner can be set to any of three different reception
modes using the Tuner Menu.
With Tuner selected . . .
press
Call up Tuner Menu *)
e.g.
MODE NORM
briefly
MODE NORM
or
/
Select reception mode
MODE ATTEN
or
MODE MONO
Confirm selection
close Tuner Menu
and
Leave Tuner Menu without changing reception
mode
e.g.
WDR 2
or
*) The Tuner Menu is also displayed on the screen of a
TV set connected to the system.
The following symbol combinations on the integral
screen indicate the current reception mode:
-
-
Operation
The basic Tuner setting is Normal / Stereo. Under normal conditions this mode of reception produces outstanding sound quality.
If you have tuned to a transmitter which is close to an
unusually powerful local station, you may suffer intermodulation effects (whistling and twittering sounds). In
this case we recommend switching on the aerial attenuator (Attenuator).
If you have tuned to a very weak or very distant station
which can only be picked up with serious hiss, we recommend that you switch to MONO mode as this markedly reduces background noise. The search threshold is
automatically reduced if you select the Mono reception
mode, and the automatic program search now stops at
distant, weak and slightly noisy stations as well as powerful transmitters.
Normal / Stereo
Attenuator switched on
Mono reception
12
Manual storing of radio programs
Operation:
Explanation:
With Tuner selected . . .
/
press
for 2 sec
Starts program search
downwards or upwards
within the frequency band
press
briefly
/
to
Call up Tuner Menu *)
Call up Program Menu *)
Confirm selection
Change Program Number
if necessary
Optional: enter Program
Number directly
Store Program and close
Tuner Menu
Leave Tuner Menu without storing Program
e.g.
--+-- 98-00
e.g.
MODE NORM
PROGRAM
e.g.
If you wish to operate the Tuner as described under 'Listening to radio programs', you must first tune in all your
preferred radio stations accurately and store them under
Program Numbers. You can store up to 60 radio stations
in this way.
In addition to the frequency the K6 also stores the reception mode (see 'Setting the reception mode') and the
RDS station name, provided that the name had been received in its complete form when the program was stored.
The Tuner Menu offers two facilities for storing programs:
P01 98-00
1. Manual storing
2. Automatic storing (Autostore)
e.g.
P02 98-00
e.g.
NDR 1
or
When storing programs manually you use the station
search function initially to locate the desired radio station; if
necessary waiting until the RDS station name appears in
full on the screen.
The radio program can then be stored using the Program
Menu; you can select any Program Number.
*) The Tuner Menu and the Program Menu are also
displayed on the screen of a TV set connected to the
system (see illustrations on next page).
Automatic storing of radio programs (Autostore)
Operation:
Explanation:
With Tuner selected . . .
press
Call up Tuner Menu *)
briefly
Call up Program Menu *)
Confirm selection
Call up Autostore menu
point
/
Change initial Program
Number if necessary
to
Optional: enter Program
Number directly
e.g.
MODE NORM
PROGRAM
e.g.
P01 90-60
e.g.
P01 AUTO
e.g.
P01 90-60
then
Start Autostore and close
Tuner Menu
Leave Tuner Menu without storing Program
e.g.
--+-- 90-60
or
*) The Tuner Menu and the Program Menu are also
displayed on the screen of a TV set connected to the
system (see illustrations on next page).
When you select Autostore function in the Tuner Menu
the tuner automatically searches the entire VHF band for
stations which can be received well in STEREO mode, and
automatically stores the located stations. It carries out the
process twice using different search thresholds.
The next step is to select a Program Number as starting
point, i.e. the number from which the located programs
are to be stored. If you wish to fill the program memory
from the start, select the number 01.
At this point the Autostore function can still be interrupted by pressing the button.
Pressing the button activates the Autostore
function. The frequency display starts to increment (run
upward).
This process may take a considerable time, as the tuner
attempts to pick up the complete RDS station name for
each transmitter it locates, and store the name at the
same time. If necessary you can interrupt the Autostore
process by pressing the - or button.
When the Autostore function is finished, the screen again
displays the Program you last selected.
Note
The K6 stores the radio stations in the order in which they
are located by the Autostore function. You can subsequently re-arrange the sequence to suit your preference
using the 'Exchanging Two Programs' function.
13
Operation
Clearing (erasing) Programs
Operation:
Explanation:
With Tuner selected . . .
press
Call up Tuner Menu *)
briefly
Call up Program Menu *)
Confirm selection
Press repeatedly until the
display shown here appears on the screen
/
Set the Program Number
to be cleared
to
e.g.
MODE NORM
PROGRAM
e.g.
P01 90-60
e.g.
P01 CLEAR
Optional: enter Program P02 CLEAR
Number to be cleared directly
Erase program
(brief display)
followed by
CLEARED
e.g.
P02 CLEAR
and / or
To clear individual Programs call up the Clear function of
the Tuner Menu. The flashing number is the Program
Number to be cleared. You can either change it the
/ buttons, or enter the number directly using the
numeric buttons.
Press the button to clear the Program. Press the
button to close the Tuner menu.
Notes
e.g.
then
Programs containing stations received at poor quality, or
the same stations on different frequencies, should be
erased, or cleared.
Leave Tuner Menu (without erasing program, if
desired)
*) The Tuner Menu and the Program Menu are also
displayed on the screen of a TV set connected to the
system (see illustrations on next page).
If you attempt to clear an invalid Program Number (XX)
the screen will display an appropriate error message:
PXX ERROR. The Tuner Menu then closes.
The tuner is unable to assess the quality at which individual stations are received, and for this reason the
automatically stored Programs can also be adjusted
manually. This also applies to transmitters whose full
RDS station name was not picked up during the Autostore process, or which the station does not transmit in
accordance with the RDS norm. To do this we recommend that you call up each Program and attempt to
improve the reception quality by changing the reception
mode (see 'Setting reception mode').
The Program can then be stored again manually; see
'Manual storing of radio programs'. Programs containing poor-quality stations, or the same stations on
different frequencies, should be cleared. If you carry out
the Autostore process again, it ignores already stored
frequencies. Under certain circumstances, e.g. when you
move house, it may be necessary to clear all the Programs. This procedure is described in the section entitled
'Trouble-Shooting'.
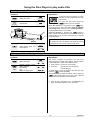
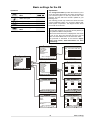
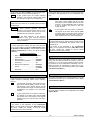
TV screen display of the Tuner Menu and Program Menu
Operation
14
Exchanging two Programs
Operation:
Explanation:
With Tuner selected . . .
press
Call up Tuner Menu *)
briefly
/
Call up Program Menu *)
P07 105-60
Press repeatedly until the
display shown here appears on the integral
screen
first
PROGRAM
e.g.
Confirm selection
Set the
Number
e.g.
MODE NORM
e.g.
P07 EX P07
Program
e.g.
Optional: enter first Program Number directly
P01 EX P01
Continue by entering second Program Number
e.g.
/
Set the second Program
Number
to
to
P01 EX P01
e.g.
Optional: enter second P01 EX P05
Program Number directly
All the Tuner's Programs are stored in the order in which
the Autostore function detected them.
You can re-arrange the order to suit your preference using
the Exchange function. The process involves exchanging
pairs of Programs (Prog. X and Prog. Y).
Call up the function, then select the Program Number
(Prog. X) to which you wish to assign a new program.
Now set the Program Number (Prog. Y) at which the
program in question is currently stored.
In both cases you can set the Program Numbers using
the / buttons, or enter them directly using the
numeric buttons.
At this point you can still interrupt the Exchange function
by pressing the button.
The two Programs are exchanged when you press the
button.
Press the button to close the Tuner menu.
Note
When you enter the first Program Number (Prog. X) the
K6 always sets the second Program Number (Prog. Y) to
the same number. This is intended to avoid you exchanging Programs accidentally.
then
Exchange programs
(brief display)
followed by
EXCHANGEd
e.g.
P01 EX P01
and / or
Leave Tuner Menu (without
exchanging
programs, if desired)
*) The Tuner Menu and the Program Menu are also
displayed on the screen of a TV set connected to the
system (see illustrations on previous page).
15
Operation
Renaming a Program
Operation:
Explanation:
With Tuner selected . . .
press
Call up Tuner Menu *)
briefly
Call up Program Menu *)
Confirm selection
Press repeatedly until the
display shown here appears on the integral
screen
/
Select the Program Number whose name is to be
edited
to
/
Optional: enter Program
Number directly
Activate name input
Change input position
Change the letter at the
input position
e.g.
MODE NORM
PROGRAM
e.g.
P01 105-60
e.g.
RENAME P01
e.g.
RENAME P05
e.g.
WDR 4
e.g.
_ WDR 4
First call up the Rename function, then use the /
buttons or the numeric buttons to enter the Program Number whose name is to be entered or changed.
Press the button, and you are ready to edit the
name.
You will see a flashing pointer, or cursor, on the integral
screen and the screen of a TV set connected to the system. This cursor indicates the input position, and you can
move it using the / buttons.
Use the and buttons to change the letters at the
input position.
You can now enter the name of your choice, between one
and eight letters in length. The new name is stored when
you press the button.
e.g.
M WDR 4
Repeat the last two steps until the desired name is displayed on the screen, then
e.g.
Store name and close
Tuner Menu
MEINNAME
or
Not all radio transmitters broadcast the station name, and
in such cases the integral screen displays the tuning indicator and the reception frequency instead of the station
name. Other transmitters broadcast the station name as a
moving script, which is at variance with the RDS norm.
If you wish to display a 'program name' on the integral
screen in such cases, you can use the K6's Rename
function. This process enables you to assign any name to
each Program Number.
Note
A name you choose yourself takes priority over the RDS
station name which the radio transmitter broadcasts, i.e. it
not over-written by the RDS name. If you wish to erase
your selected name you must clear the Program Number
and store the program again under the same Program
Number.
Leave Tuner Menu without storing the name
*) The Tuner Menu and the Program Menu are also
displayed on the screen of a TV set connected to the
system (see illustrations on previous page).
Operation
16
The Tuner as alarm clock
Operation:
Explanation:
TUNER
Switch on Tuner mode
then e.g.
WDR 2
Open Alarm Menu
press
for 2 sec.
By RDS ON
Select menu point
/
Change menu point
Activate selection
Close Alarm Menu
The K6 includes a timer module which can switch the
unit on at a pre-set time. The 'Alarm Menu' provides
access to all the settings which are required for the alarm
function.
The alarm function only works in Tuner mode. This is to
ensure that a source signal is actually present when the
unit is switched on by the timer!
Hold the button pressed in until the 'Alarm
Menu' opens.
The menu appears on the TV set connected to the system; the integral screen shows the first menu point.
or
Clock:
Alarm time:
This function lets you set the internal clock manually to
the correct time using the / buttons. At first the
time changes slowly, but if you hold the button pressed
in the rate of change increases.
This function lets you set the alarm time manually using
the / buttons. At first the time changes slowly,
but if you hold the button pressed in the rate of change
increases.
Note
Loudspeaker:
Setting the clock manually is only possible if you have
selected manual in the 'Set clock' menu point.
In this menu point you set which loudspeakers
(
A / B) are active when the alarm is triggered.
Setting the clock:
In this menu point you determine how the internal clock
is to be set.
manual
You can set the time of day manually in
the 'Clock' menu point
by RDS
The time of day is read automatically from
the RDS signal, and accepted by the K6;
this only works if a high-quality RDS signal
is present. If you pick this option you cannot change the time of day manually.
Alarm:
The alarm function can be switched on and off in this
menu point.
on
Alarm function switched on
off
Alarm function switched off
A
Loudspeakers A (in main room) switched on
B
Loudspeakers B (in adjacent room) switched on
A+B
Loudspeakers A and B switched on
Alarm volume A / B:
In this menu point you can adjust the alarm volume for
speakers A (main room) and B (adjacent room)
separately. However, this is only possible if you have
already set the Volume A/B menu point to split in the
'Loudspeaker Menu'. When you change the volume
using the and buttons, the system immediately
accepts the indicated level so that you can hear the new
volume.
Program for alarm:
Selects the program which is to be selected when the
alarm is triggered, using the / buttons.
Note
When the timer is switched on, the Timer symbol is
displayed on the integral screen.
17
Operation
The Disc Player
The integral Disc Player is a play-back device for digital
audio and video media which comply with the universal
DVD video standard. The player provides playback of
movies at genuine cinema picture quality, and also offers
stereo or multi-channel sound (according to medium).
All the unique features of DVD video, such as the choice
of sound channel, choice of sub-title language plus different viewing angles (also depending on DVD type) are
available.
You will soon discover that the disc player is amazingly
simple to operate thanks to the On-Screen Display function - i.e. on-screen menus - and the clearly legible integral screen.
Operation
In addition to DVDs you can also play audio CDs (including CD-R and CD/RW) and Photo CDs.
You can recognise the media which can be played by
one or more of the following logos printed on the packaging.
The K6 plays DVDs manufactured to the PAL and NTSC
video norms, but your TV must support NTSC if such
discs are to be played.
18
Using the Disc Player to play audio CDs
Inserting an audio CD
Operation:
Explanation:
Audio CDs contain recordings of music,
and they can be recognised by the logo
shown here.
DISC
Select Disc mode
then e.g.
NO DISC
To select the Disc Player press the
button on the RC handset.
press
for 2 sec.
Open drawer
OPEN
Open the drawer by a long press on the button *) and insert a CD in the drawer with the playable
side facing down. Check that it is centrally located in
the appropriate recess in the drawer.
Insert audio CD
Close the drawer by pressing the button *)
briefly. Initially the K6 gathers the information about the
inserted CD (e.g. No. of tracks, track times etc.), then the
CD starts playing.
*) Notes
Sensor
CLOSING
Close drawer again and
start playback
The drawer can also be opened and closed by moving
your hand close to the sensor under the front panel.
then
READING
then e.g.
CD
16
Calling up additional CD player information
Operation:
Explanation:
DISC
Select Disc mode
then e.g.
CD
press
briefly
Switches integral screen
display between
track display
and
display of playing time
16
The screen *) displays the passage of the CD in the
machine which is currently being played. This information
can be displayed in either of two different ways:
1. Track number (number of current track)
CD
16
CD 3 - 15
2. Track time
(minutes and seconds of track
currently playing)
To switch from one type of display to the other you must
press the button repeatedly.
The display type you select is retained until you press the
button briefly again, even if you insert a different
CD or switch the machine off in the meantime.
*) If the TV set is switched on, the supplementary CD
player information appears on the TV screen.
19
Operation
Playing a track
Operation:
Explanation:
Press the button to start CD playback from the
first track.
Selecting a track
DISC
Select Disc mode
then e.g.
Stop
to
Start playback
Restart the current track,
then play preceding tracks
Play the next track
Optional: enter the number of the desired track
16
e.g.
CD
1
e.g.
CD
Search forward (press repeatedly if necessary)
Search back (press repeatedly if necessary)
End search, switch to play
During playback you can jump from one track to another
using the or buttons. However, you can also
enter the number of the desired track directly using the
numeric buttons.
1
e.g.
CD
2
Search
7
To search forward or back at higher speed press the
or buttons during playback.
e.g.
CD
The search starts with reduced volume.
To switch to the next higher speed press the or
button again. The search increases speed and the sound
is muted.
The search rate and direction of searching are displayed
constantly on the screen. Press one of the buttons
, , or as desired to end the
search.
Search
Selecting a track
Note
If the TV set is switched on, the search rate and direction
are constantly displayed to the right of the top bar of the
screen menu.
Pause function
Interrupt playback
Resume playback
End playback
End playback
Operation
PAUSE
Interrupting playback
To interrupt playback press the button; press the
button to resume playback.
Ending playback
STOP
16
Press the button at any time to end playback.
Playback stops automatically after the last track of the
CD.
20
Creating a playback program for a CD
The track select program enables you to re-arrange the
playing sequence of the tracks of an audio CD. To do
this you must switch to programming mode with a long
press on the button.
It is very easy to assemble the track select program with
the help of the on-screen menu. Ensure that the TV set
is switched on first.
Selecting tracks
Operation:
with CD inserted, but stopped . . .
Switch to programming
press
mode
for 2 sec.
Explanation:
You can program the desired tracks in the desired sequence under the point 'INPUT'.
Note
The machine remembers the track select program you
last created, and activates it automatically if the same
CD is inserted again at a later date.
21
Operation
Playback variants (Repeat Track, Repeat Disc, Scan and Shuffle)
Operation:
Explanation:
The K6 offers several playback variants for the CD in the
drive drawer. You can cycle through the variants on the
integral screen by repeatedly pressing the button.
Press the button to select the displayed variant.
With CD playing . . .
press
repeatedly
Press repeatedly until the
desired playback variant is
displayed on the screen
Activate indicated
back variant
The following playback variants are available:
play-
Integralscreen
Playback variant
OSD
NORM PLAY Normal playback
RPT TRACK Repeat track
RPT
repeat track
ALL Repeat entire CD
SCAN
SHUFFLE
repeat disc
Sample all tracks
Play tracks
order
in
scan
random
shuffle
Play A-B (Repeat passage)
Operation:
Explanation:
In Play A-B mode you set two time markers on the CD
currently playing. The passage between the two markers is then repeated constantly.
The first step is to locate the start point of the passage
using the /
or /
buttons.
With CD playing . . .
/
or
/
Search for start of desired
passage
press
briefly
/
or
/
press
briefly
press
briefly
Set start marker
e.g.
A-
1
If necessary search for the
end of desired passage
Set end marker
Interrupt play A-B and resume normal playback
from current position
e.g.
A-B
1
e.g.
A-B
1
or
Operation
End Play A-B and switch
to Stop mode
Set the start marker by briefly pressing the button. The screen shows 'A
A - '.
Press the button again at the end of the passage. The screen shows 'A
A - B'.
B
When you set the end marker the screen displays e.g.
'A
A-B 16'
16 and the passage between the two markers is
constantly repeated.
You can interrupt the process at any time by pressing the
button briefly. The CD then continues to play
from the current position.
You can also stop the process by pressing the
button briefly; in this case the K6 switches to Stop mode.
e.g.
STOP
1
22
23
Operation
Using the Disc Player to play DVDs
Inserting a DVD
Operation:
Explanation:
DISC
Select Disc mode
then e.g.
No DISC
press
for 2 sec.
Open drawer
OPEN
You can recognise DVDs by the logo
shown here. The DVD may contain
one or more titles, and each title may
contain one or more chapters (see
illustration below); this depends on the
type of material the DVD contains
(films, video clips, TV series etc.).
The K6 provides a simple, convenient means of accessing any titles or chapters.
To select the DVD player press the button briefly
on the RC handset.
Insert DVD
Open the drawer with a long press on the button *) and insert a DVD in the drawer with the playable
side facing down. Check that it is centrally located in
the appropriate recess in the drawer.
Close the drawer by briefly pressing the button *). The K6 initially gathers information about the
inserted DVD, then the DVD starts playing.
Sensor
CLOSING
Close drawer again and
start playback
then
READING
then
INFO
*) Notes
The drawer can also be opened and closed by moving
your hand close to the sensor under the front panel.
Important notes:
All the playing characteristics of the DVD are determined
by the manufacturer of the disc. Different DVDs may
exhibit marked differences from each other in terms of
menu operation and playing behaviour (e.g. resume play,
return to menu, end of play at end of title etc.).
For this reason these operating instructions can only
describe the basic 'normal behaviour'.
If you encounter discs which do not comply with this
description, please follow the on-screen operating notes
provided by the DVD manufacturer.
Operation
Some DVDs feature a regional code implanted by the
manufacturer, designed to limit the use of these discs to
particular regions of the world. The K6 plays all DVDs
intended for the region the unit is intended for and all
DVDs which feature no regional restriction.
If you insert a DVD in the disc drawer, and see a note on
the screen informing you of an incorrect regional code,
please contact your DVD supplier and exchange the
DVD for a version approved for your region.
24
Calling up additional DVD player information
Operation:
Explanation:
With DVD playing . . .
press
briefly
e.g.
Switches integral screen
display
DVD
1
or e.g.
DVD
0 - 10
The integral screen shows which passage of the inserted
DVD is currently being played. The information can be
displayed in two different ways:
1. Title and Chapter number
2. Title time (display of minutes and seconds of the
current title)
Press the button repeatedly to switch from one
type of display to the other.
The selected display mode is retained until you press the
button again, even if you insert another DVD or
switch the K6 off in the meantime.
25
Operation
Playing a title
Operation:
Explanation:
Selecting a title
Under normal circumstances playback starts automatically when you close the drawer.
DISC
Select Disc mode
then e.g.
DVD
Start playback
10
e.g.
DVD
1
or
Move to title which you
would like to select
or
to
Selecting a title
Some DVDs request you to select a particular menu
point.
If the possible selection points are numbered, press the
appropriate numeric button, or use the , , ,
buttons to highlight the selected menu point. Press the
button to make the selection.
During playback the screen displays either tracks and
chapters, or the elapsed playing time.
Enter number of desired
title directly
Static and single pictures
Static and single pictures
Static picture (single picture)
Resume playback
To display a static picture during playback press the
button briefly. Press the button again
briefly to call up the next individual picture. To resume
normal playback press the button.
Next single picture
Ending playback
To end playback press the button at any time.
Ending playback
End playback
Stop mode
A select list appears when you stop playback, with the
last played title rack highlighted. To restart this title press
the button.
You can directly select a title other than the last one
played by entering its number in the title select list using
the numeric buttons (
. . . ).
Selecting a Chapter
Operation:
Explanation:
With DVD playing . . .
to
Play the current chapter
again, then play preceding
chapters
Play the next chapter
Optional: enter the desired Chapter Number
Note
If the number is a multi-digit one, press the buttons
quickly in sequence.
Operation
If a title on a DVD consists of several chapters, you can
select another chapter using the / buttons as
follows:
To select the next chapter press the button during
playback. When you reach the last chapter of a title, the
K6 moves to the first chapter of the next title when you
press the button briefly.
To return to the start of the current chapter, press the
button during playback; press the button again to
select the previous chapter.
You can also enter the number of the chapter you wish to
play using the numeric buttons to select a chapter directly.
26
Search
Operation:
Explanation:
With DVD playing . . .
Search forward (press
repeatedly if necessary)
Search back (press repeatedly if necessary)
Optional: end search by pressing:
Switch playback on
You can invoke a search using the / buttons as
follows:
For a search forward or back at higher speed press the
or button during playback.
The search starts, sound is muted and the corresponding
symbol appears on the screen.
Press the or buttons again to switch to a higher
speed.
Pause mode
The symbol for search speed and direction is displayed
on the screen for 2 seconds every time you press the
or button.
Stop mode
To end the search press one of the buttons ,
or as desired.
or
or
Slow motion
Operation:
Explanation:
With DVD playing . . .
press
for 2 sec.
Switch on slow motion for different playback
speeds press repeatedly
for about 2 seconds
Optional: end slow motion by pressing:
Switch on playback
Pause mode
Slow motion playback speeds can be selected.
To play at reduced speed hold the button
pressed for 2 seconds; the sound is muted.
To switch to the other speeds hold the button
pressed again for about 2 seconds.
The playback speed is indicated on the screen as long
as slow motion is active.
To leave slow motion playback press one of the buttons
, , , or as desired.
or
or
Search
or
Stop mode
27
Operation
Camera angle
Operation:
Explanation:
with the angle symbol superimposed . . .
Enter the number of the
to
desired camera angle
or
press
for 2 sec.
Call up the camera angle
symbol on the screen
then
press
for 2 sec.,
or
/
Select next camera angle
or
If the DVD or VCD contains scenes which were recorded
using different camera angles, the camera angle symbol
appears on the screen.
The numbers above the symbol on the screen indicate
the number of available camera angles together with the
currently selected camera angle.
As long as this symbol with alternative camera angles
appears on the screen, the camera angle can be selected by entering the number directly using the numeric
buttons (
. . . ). The angle symbol then
indicates the new camera angle.
If the angle symbol is not superimposed automatically by
the DVD, the symbol can be brought up on the screen at
any time by a long press (approx. 2 seconds) on the
button. It stays on the screen for about five seconds, allowing you to select the camera angle.
to
Switching audio channels
Operation:
Explanation:
with the DVD playing . . .
Open the audio channel
press
select option
briefly
then
press
briefly
Repeated short presses
switch to the available
audio channels
Generally speaking, the audio channel (e.g. Dolby Digital, DTS, MPEG, Stereo etc.) is selected within the Disc
Menu when you start the DVD. Please follow the operating notes included in the menu.
However, the audio channel and synchronous speech
can also be changed during playback if the DVD contains alternatives.
A short press on the button brings up the symbol on the screen for about five seconds. During this
period each short press on the button selects
the next available audio channel.
Note
Some DVDs do not allow you to switch audio channels
during playback. In this case you must use the 'Disc
Menu Function' to select a different audio channel.
Operation
28
Sub-title language
Operation:
Explanation:
With DVD playing . . .
Open the select sub-title
option
then
Repeated brief presses
switch to the available
sub-titles.
Generally speaking, the sub-title language is selected
within the Disc menu when you start the DVD. Please
follow the operating notes included in the menu.
However, the sub-title language can also be changed
during playback if the DVD contains alternatives.
Press the –button during playback - the sub-title
select point is displayed for about five seconds. During
this period each further short press of the button selects the next available sub-title language.
Note
Some DVDs do not allow you to switch the sub-title language during playback. In this case you must use the
'Disc Menu Function' to select a different sub-title language.
Playback variants (Repeat Chapter, Repeat Title, Repeat Disc and Shuffle)
Operation:
Explanation:
With DVD playing . . .
Press repeatedly until the
press
desired playback variant
repeatedly
appears on the screen.
if required
Activate displayed playback variant
The K6 offers several playback variants for the DVD currently in the drive drawer. During playback you can cycle
through the variants on the integral screen by repeatedly
pressing the button. Press the button to
select the displayed variant.
The following playback variants are available:
Integral
screen
Playback variant
NORM PLAY
Normal playback
RPT CHAPTR
Repeat chapter
RPT
TITLE
Repeat title
RPT
ALL
SHUFFLE
29
Repeat entire DVD
Play titles in random order
Operation
Disc Menu Function
Operation:
Explanation:
A DVD may contain Disc Menus which enable you to
select individual titles and / or chapters. The menu may
also offer alternative camera viewing angles, synchronous languages, sub-titles etc., depending on the DVD.
The Disc Menu Function of the DVD player enables you
to select options from the Disc Menu. The first step is to
press the blue button briefly.
With DVD playing or stopped . . .
press
Call up Disc Menu
briefly
Move to menu point
which you wish to select
Optional: enter the desired menu point directly
If the DVD contains a Select Menu, this will now appear
on the screen.
Use the numeric buttons (
. . . ) or the
cursor buttons , , , to highlight your selection, then press the [ENTER] button.
Activate menu point
Press the blue button again briefly to leave the
Select Menu.
or
to
then
or
press
briefly
Note
Leave Disc Menu
The 'Disc Menu Function' can be accessed at any time
- even during playback - so that you can change settings.
Pressing the button to close the 'Disc Menu
Function' takes you back to the film.
Alternative operation:
press
for 2 sec.
Call up manual
control system
Explanation:
menu
then
operate the Disc Menu as described above.
then
press
for 2 sec.
Terminate manual menu
control system
NAV
Some manufacturers plough their own furrow with Disc
Menus, i.e. their discs refuse to be operated in the usual
manner. These menus can be recognised by the fact that
„INFO“ does not appear on the integral screen. They
may also relate to auxiliary functions such as games, for
which the alternative menu control system must be used.
For such cases a long press on the button selects a manual menu control system which enables you
to control even this type of DVD. After using the menu
control system, this mode must be terminated again by a
further long press (approx. 2 seconds) on the
button, or by pressing the button.
Note
During manual menu control mode, the , ,
and buttons
serve only to operate menu control
functions. The fast forward / rewind and track / chapter
skip functions are not available in this mode.
Operation
30
Player Setup
Operation:
Explanation:
Open menu
The purpose of the 'Player Setup Menu' is to enable you
to adjust the basic settings of the integral Disc Player to
suit your personal preference.
Select menu point
Note
Change menu point
The K6 has to accept any changes which you make to
the basic settings, and for this reason the DVD stops
when you leave the 'Player Setup Menu'. You then need
to re-start playback.
press
for 2 sec.
/
Activate selection
Leave menu
or
Audio language:
The sound is reproduced in your chosen language, provided that it is available on the DVD in the disc drawer. If
not, speech reproduction switches to the first available
synchronous language on the DVD.
Subtitle:
The sub-titles are displayed in your chosen language,
provided that it is available on the DVD in the disc
drawer. If not, the sub-title display switches to the first
available language on the DVD.
Aspect ratio:
Default setting: 16:9 (wide-screen). If you have a conventional TV set (4:3) you can select either of the following settings:
•
Letterbox, giving a wide screen view with black bars
at top and bottom of the screen (recommended setting)
Optimum formats on each screen
Video format
Film format
Original
material
Material
on Disc
Pan-Scan or distorted
(anamorphic)
TV
picture
16 : 9
TV
picture
4:3
Normal
Or Pan-Scan, giving full screen height but with the
left and right edges of the picture cut off.
If a DVD contains picture data in Pan-Scan format, the
picture will move horizontally across the screen in order
to keep the focal point of the action visible on the screen
at all times.
Pan-Scan
•
Letterbox
PBC:
This determines whether or not a VCD is to start automatically when inserted.
31
Operation
Using the Disc Player to play other media
Video-CDs
(VCD)
can
be
recognised by the logo shown
here. The VCD may contain one or
more tracks, and each track may
contain one or more chapters; this
depends on the type of material
the DVD contains (films, video
clips, TV series etc.). For historical reasons a title on the
VCD is known as a track and a chapter as an index.
In general terms video CDs are controlled in a similar
way to DVDs, but they do not offer a convenient disc
menu for selecting tracks and indexes.
This means that the only buttons you are offered are
those which control the drive mechanism, like a CD:
With VCD playing . . .
Start playback
/
Play the next track / index
Play the current track / index again
Search backwards / forwards
Pause mode
Stop mode
The pictures on a Photo CD are usually organised into
albums. An album may consist of several chapters
which are sub-divided into pages. Any one page may
contain individual pictures for you to select.
When a Photo CD is inserted, it starts automatically and
displays the album on the screen.
With Photo CD playing . . .
The album is displayed . . .
/
/
bis
Display first chapter of
Select the chapter / picture
Playing MP3 CDs
An MP3 CD can hold up to 32 album directories.
To select an album directory press the /
buttons on the front panel (
/ buttons on the
remote control handset).
To select a title / track in an album directory, press the
/ buttons on the front panel (
/
buttons on the remote control handset).
The desired album / track number can also be entered
directly using the numeric buttons on the remote control
handset.
• In Stop mode the numbers are used to select an album.
• In Play mode the numbers are used to select music
tracks.
Note:
It may take more than 10 seconds for the machine to
read the contents of an MP3 CD since one disc can
contain a large number of collections of music tracks.
Only the first „session“ of a multi-session disc is supported.
The following formats are supported:
CDs to ISO 9660 format
max. 30 characters
max. file cascading: 8 levels
max. ALB number 32
supports VBR bit rate
supported sampling frequencies for MP3 CD: 32 kHz,
44.1 kHz, 48 kHz
• supported bit rates for MP3 CD: 32, 64, 96, 128, 192,
256, 320 (kbps)
•
•
•
•
•
•
The following formats are not supported:
• Files such as *.WMA, *.AAC, *.DLF, *.M3U, *.PLS
• File names including Chinese characters
• Discs on which the recording session was not closed
(Non Session Closed)
• Discs which were recorded using the UDF format
• Files which contain ID3V2 tags
Optional: enter directly using the numeric
buttons.
Return to album
The picture is displayed . . .
Picture mirror
/
/ Picture rotation
Operation
Return to chapter page
32
Basic settings for the K6
Operation:
press
for 2 sec.
/
Explanation:
Open
Menu
Configuration
The 'Configuration Menu' provides the means for you to
set up and adjust all the audio and video components of
your surround system so that they match each other
perfectly, and also match the acoustic qualities of your
listening room.
The matching process only needs to be carried out when
you first install the system, or if you add or replace individual system components. The diagram below shows
the overall menu structure.
e.g.
M-OSD ON
Select menu point
Change menu point
Activate selected point
Leave
Menu
or
Configuration
Note
You must also configure your TV set correctly before you
can operate the K6 to its full potential.
If the menus shown here are not displayed on the screen
of your TV set, then your first step must be to set the
video norm of the K6 and the TV to match each other.
This procedure is described in the sections 'Adjustments at the TV Set', 'Video Norm Menu' and 'Trouble-Shooting'.
Auto-setup
Assistant
full range
satellite
satellite
on
80 Hz
start
Main speaker
Center speaker
Rear speaker
Subwoofer
Satellite high pass
Auto-setup
Configuration
on
off
english
start
menu
linked
menu
menu
STOP / / /
/
/ OK
Spkr. Level Bass Treble Dist.
OK
FL
Center
FR
SR
SL
OK
OK
OK
Video norm
TV out
RGB/Video
00
0.00 m
00
00
00
0.00 m
0.00 m
0.00 m
Spk position
Loudspeaker
Main speaker
full range
Center speaker
satellite
Rear speaker
satellite
Subwoofer
on
Spk position
menu
Spk balance
menu
Tone adjust
menu
Volume A/B
split
return to Configuration menu
STOP / / /
/
/ OK
00
00
00
00
return to Assistant menu
STOP / OK
return to Configuration menu
STOP / / /
/
/ OK
OK
00
off
00
00
00
FL
2.40 m
OK
OK
SL
1.80 m
OK
Center
2.10 m
FR
2.40 m
SR
1.80 m
SUB
2.40 m
STOP / / /
/
Spk balance
FL
00 dB
FR
00 dB
Center
00 dB
SR
00 dB
SL
00 dB
return to Configuration menu
STOP / / /
/
/ OK
Inputs
STOP / / /
/
/ OK
Tone adjust
dig. Input
Source
DIG opt.
DIG koax.
STB
AUX-AV
FL
TRB 00
BAS 00
For ext. analogue inputs only:
start
Calibration
SL
TRB 00
BAS 00
return to Configuration menu
STOP / / /
/
/ OK
33
/ OK
Center
TRB 00
BAS 00
STOP / / /
FR
TRB 00
BAS 00
00
00
/
/ OK
Basic settings
Configuration Menu
Select
menu point
Change
value
Configuration
on
off
english
start
menu
linked
menu
menu
STOP / / /
/
on
off
on
off
english deutsch
other
languages
OK
OK
linked
split
OK
/ OK
OK
Switch TV output for On-Screen main menu on / off:
Loudspeaker:
If you just wish to adjust the balance or tone controls
temporarily, it is not essential to access the main menu
(see 'Main Menu' menu control system) on the TV
screen, as this would superimpose it on the film you are
watching. In most cases displaying the menu on the
integral screen is perfectly adequate. This menu point
enables you to switch the TV screen display of the Main
Menu on and off.
The purpose of the 'Loudspeaker Menu' is to control the
distribution of the output signals to the loudspeaker system in your room. This menu is also used to adjust the
loudspeakers to suit the spatial and acoustic characteristics of your listening room.
Volume A/B:
Switch on-screen menu for VCR/TV B on / off:
A video recorder (VCR) or a TV set (e.g. in an adjacent
room – room B) can be connected to the VCR / TV B
SCART output. If you use this output for a VCR, any
superimposed menus would be recorded along with the
programme material, so as standard the on-screen
menus are switched off for this output. However, if you
connect a TV set to this output you will want to see the
on-screen menus, and this menu point enables you to
switch them on.
This menu point allows you to decide whether the volume controls for A and B are to work separately or
linked together ( see 'Adjacent Room Operation' ).
Select one of the following settings:
split
if you wish to have independent control
of the volume of A and B (A/B).
linked
if you prefer to control the volume of A
and B (A+B) together.
Video norm:
On-Screen Language:
The on-screen menus can be displayed on the screen in
various languages. In this menu point you select the
language you wish to see.
Setup assistant:
The 'Setup assistant' menu point represents an alternative to the manual 'Loudspeaker Menu' (see below).
Calling up the Assistant invokes an automated routine for
correctly setting up the individual loudspeaker channels
of your surround system.
Basic settings
The 'Video Norm Menu' enables you to set all the video
inputs and outputs of the K6 to the appropriate video
norm to suit the picture sources connected to it.
The 'Video Norm Menu' also allows you to adjust the K6
to suit the characteristics of your TV set.
Inputs:
Some AV source devices supply a digital output signal.
Alternative input sockets on the K6 can be assigned to
these source devices; these inputs are designed specifically for digital signals (coaxial or optical).
If you do this, the assigned digital signal is accepted and
processed by the decoder instead of the analogue stereo
input signal.
The alternative inputs are assigned in the 'Inputs Menu'.
34
Assistant Menu
The purpose of the Setup Assistant is to help you
set up your surround system correctly. If you follow the
steps described below, the K6 will automatically calibrate
your loudspeakers with the help of the measurement
microphone supplied, and under normal listening room
conditions this procedure will deliver optimum results
from your system.
If the automatic calibration system is to work properly the
following conditions must be satisfied: the measurement
microphone must be set up with free space all round it,
close to your preferred listening position (e.g. on the
living room table, or on the arm of an armchair). There
must be straight-line visual contact between the microphone and each loudspeaker.
First connect the supplied microphone to the headphone
socket on the right-hand side of the K6, below the front
panel. Set a normal listening volume.
Call up the Setup Assistant and the menu shown below
appears.
Main speaker:
Center speaker:
Rear speaker:
Subwoofer:
Satellite high pass:
The on-screen 'Auto-setup' display on your TV set
keeps you constantly informed about the settings it has
established. In the Level column you will see the set
corrections (volume compensation), while the Dist.
column lists the measured loudspeaker distances.
The first step is to enter the size of your loudspeakers in
the right-hand column of the menu (see 'Loudspeaker
Menu'), and state whether your system includes a subwoofer or not.
Auto-setup:
Now move to the 'Auto-setup' menu point and press the
button to activate the menu point.
To ensure that the calibration process can be carried out
correctly it is essential to set the volume to the optimum
level beforehand. To help set the correct level the K6
generates a hissing signal on the front left channel. In
the 'Volume' line on the screen you will see the currently
set volume, following by a flashing indicator informing
you which button to press. 'VOL+' means that the volume
is too low. 'VOL-' means that it is too high. The calibration process is initiated by pressing the button,
but this will not work until you see 'OK' on the screen.
The K6 will now carry out the automatic calibration process. During this period you will hear various test signals
from your loudspeakers. The results could be falsified if
any loud noises occur during the duration of the calibration process, so take care to keep the room quiet.
Typical display of measured values
produced by the Auto-setup menu
Notes
If the calibration process was spoiled by extraneous
sounds, or if implausible results are generated for whatever reason, you can re-start the calibration process at
any time.
The distances established by the Assistant are calculated on the basis of acoustic reflection times. They may
vary slightly from the true geometric distances due to
signal delays in your loudspeakers.
If the automatic calibration process supplies invalid results due to difficult acoustic conditions in your listening
room, we recommend that you should first try varying the
microphone position and / or the volume setting in an
attempt to obtain a valid result.
If this does not bring about an improvement, making
automatic calibration impossible, you can still carry out
the loudspeaker set-up procedure manually via the
'Loudspeaker Menu'.
35
Basic settings
Loudspeaker Menu
The purpose of the 'Loudspeaker Menu' is to distribute
the output signals correctly to the loudspeakers which
are present in your system.
This process generally only needs to be carried out when
you first install the system, if you add or replace individual loudspeakers, or if there are changes to the acoustic
conditions in your listening room (e.g. new furniture,
carpets, curtains etc.).
Not all the possible loudspeakers (center, surround and
subwoofer) are present in every system, and to ensure
that no sound information is lost in such cases the absent components must be marked as none in the
'Loudspeaker Menu'.
The Position, Balance and Tone adjust menu points also
enable you to set up the loudspeakers accurately to suit
the spatial and acoustic characteristics of your listening
room.
Main speaker:
Center speaker:
Set the size and bass capability of the main loudspeakers at front left and front right. Select one of the following
settings: *)
Set the size and bass capability of the center loudspeaker. Select one of the following settings: *)
satellite
full range
for small speakers whose bass response is necessarily limited. The lowfrequency bass signals (below 80 Hz)
of the main channels are mixed onto
the subwoofer, if present.
none
if no center speaker is present. The
center channel is mixed onto the left
and right main loudspeakers.
satellite
for small speakers whose bass response is necessarily limited. The lowfrequency bass signals (below 80 Hz)
of the center channel are mixed onto
the main loudspeakers and, if present
the subwoofer.
full range
if the center speaker is approximately
the same size as the main speakers.
The full frequency range is reproduced
via the main channels without restriction.
for larger speakers. The full frequency
range is reproduced via the main
channels without restriction.
Note
If your system does not include a center speaker, the
main speakers should not be set up too far away from
the TV set, and should be positioned symmetrically either side of it. This is essential, otherwise dialogue will
not appear to be centred on the screen.
Basic settings
36
Rear speaker:
Satellite high pass:
Set the size and bass capability of the surround loudspeakers. Select one of the following settings: *)
In this menu point you can set the cross-over frequency
according to the requirements of your loudspeaker system.
none
if your system does not include surround
speakers. The surround channels are mixed
onto the left and right main loudspeakers.
50
Note
Genuine surround sound is not possible without surround
loudspeakers!
satellite for small surround speakers. The lowfrequency bass signals (below 80 Hz) of the
surround channels are mixed onto the main
speakers and the subwoofer, if present.
full range if the bass response of the surround
speakers is very good. The full frequency
range is reproduced via the surround channels
without restriction.
*) Note
To avoid meaningless settings, the menu does not allow
you to set all possible combinations (Main Speaker, Center Speaker and Rear Speaker). The list below shows the
standard combinations, but they can still be modified
individually.
off
60
70
80
90
100
120
150
180
if a subwoofer is present. The signals from the
bass effect channel (LFE), and all the other
low-frequency bass signals below the chosen
frequency of all loudspeakers with a size that
is set to 'satellite', are passed to the subwoofer channel.
if your system does not include a subwoofer.
The signals of the bass effect channel (LFE)
and all the other low-frequency bass signals of
all loudspeakers with a size that is set to 'satellite' are mixed onto the main loudspeakers.
Note
For appropriate frequency setting please consult the user
manual of your loudspeakers. The default value of this
setting is 90 Hz.
If you switch on the subwoofer in the 'Loudspeaker
Menu', you can adjust its level in the 'Main Menu' within
the range -10(dB) and +10(dB), so that its volume
matches that of the other channels.
Standard combinations
1. Main, Center and Rear Speaker: .. satellite
Subwoofer: ................................. on
2. Main Speaker:.............................. full range
Center and Rear Speaker: ........... satellite
Subwoofer: ................................. off
3. Main and Rear Speaker: ..............
Center:.........................................
..................
Subwoofer: ....................................
full range
ful range
or satellite
on
Subwoofer:
In this menu point you can set whether your loudspeaker
system includes a subwoofer. Select one the following
settings:
on
off
if a subwoofer is present. The signals from the
bass effect channel (LFE), and all the other
low-frequency bass signals (below 80 Hz)
which are below the range of normal full-range
loudspeakers, are passed to the subwoofer
channel.
Spk position:
Activating this menu point takes you into a menu in
which you can inform the K6 of the position of the loudspeakers, i.e. you can enter the distance from the listening position for each loudspeaker individually. This enables the system to compensate for delays due to unequal distances from the listening position (see 'Loudspeaker Position Menu').
Spk balance:
This menu point leads you to a menu where you can set
the balance between all the loudspeakers (see 'Loudspeaker Balance Menu').
Tone adjust:
This menu point takes you to a menu where you can set
the tonal balance between the loudspeakers (see 'Tone
mdjust Menu').
if your system does not include a subwoofer.
The signals of the bass effect channel (LFE)
and all the other low-frequency bass signals
(below 80 Hz) are mixed onto the main loudspeakers.
Note
If you switch on the subwoofer in the 'Loudspeaker
Menu', you can adjust its level in the 'Main Menu' within
the range -10(dB) and +10(dB), so that its volume
matches that of the other channels.
37
Basic settings
Loudspeaker Position Menu
In the 'Loudspeaker Position Menu' you can enter the
correct distance to the listening position for each loudspeaker separately (in 0.3 m increments).
This enables the system to compensate for delays due to
unequal distances from the listening position.
Measure the distance between the listening position and
the loudspeakers which are present.
As can be seen in the diagram, the select buttons access
the input positions in the following fixed sequence.
Output channels which are not in use (see 'Loudspeaker Menu') cannot be edited.
•
Main loudspeaker, front left................................. (FL)
•
Center loudspeaker, front center .................. (Center)
•
Main loudspeaker, front right .............................. (FR)
•
Surround loudspeaker, rear right ........................ (SR)
•
Surround loudspeaker, rear left .......................... (SL)
• Active subwoofer (any position) ....................... (SUB)
Enter the measured distances using the change buttons;
the increment is 0.3 m.
Note
Enter the measured distances.
Basic settings
The maximum distance for any one loudspeaker to the
listening position is 12 m. Greater distances than this
cannot be recommended for acoustic reasons, and the
system is not designed to compensate for such long
delays.
38
Loudspeaker Balance Menu
If the DVD surround receiver is to supply a balanced
sound image, it is important to adjust the volume of the
individual channels carefully to each other.
The 'Loudspeaker Balance Menu' is designed to set
the exact levels of all channels.
When you initially activate the 'Loudspeaker Balance
Menu' you will hear a two-second burst of hissing sound
from the left main loudspeaker. You will find the corresponding input position after the first menu point.
You can also use the select buttons to select the channel
to be corrected directly, instead of relying on the automatic cyclic switching system.
Set all the channels to give as close an impression of
equal volume as possible.
'FL: 00 '.
As the diagram shows, the hiss then passes to the next
speaker in the fixed order, and lasts two seconds in each
case:
•
Main loudspeaker, front left ................................ (FL)
•
Center loudspeaker, front center................. (Center)
•
Main loudspeaker, front right............................. (FR)
•
Surround loudspeaker, rear right ...................... (SR)
•
Surround loudspeaker, rear left.......................... (SL)
The system skips any output channels which are not in
use (see 'Loudspeaker Menu').
The menu indicates the corresponding input when the
hiss sounds from each channel in turn. The value can be
adjusted using the change buttons within the range -20
to +10 . Any change takes effect immediately.
Notes
The hissing sound is not suitable for assessing the volume of the bass channel, so the level of the subwoofer
channel is adjusted separately in the 'Subwoofer Level'
menu point within the 'Main Menu'.
The K6 stores the set levels for each channel and applies them for surround reproduction. They are used for
all surround modes.
The hiss continues to sound from the same channel for a
further two seconds after you have corrected the volume
before moving on to the next channel. The input position
then changes with it.
39
Basic settings
Tone adjust Menu
The K6 DVD surround receiver features an active
(+/- 6dB) tone adjust system. This is designed to compensate for room influences or unfavourable loudspeaker
positions on the quality of reproduction.
Tone values can be adjusted separately for all the output
channels used by your system, and the system is therefore capable of compensating fully for the effects of different speaker locations.
The first step is to select the sound source which you
wish to use for adjusting the tone controls. This source
should be active on all channels, so that the sound image is as realistic as possible, and any change in tone
settings is immediately audible.
When you initially activate this menu point you will find
the input position after the first menu point.
•
•
Main loudspeaker front left
Main loudspeaker front left
(FL)
(FL)
•
•
Center loudspeaker front
Center loudspeaker front
(Center) Treble (TRB)
(Center) Bass (BAS)
•
•
Main loudspeaker front right
Main loudspeaker front right
(FR)
(FR)
Treble (TRB)
Bass (BAS)
'FL TRB: 00 '.
•
•
Surround loudspeaker rear right (SR)
Surround loudspeaker rear right (SR)
Treble (TRB)
Bass (BAS)
•
•
Surround loudspeaker rear left (SR)
Surround loudspeaker rear left (SR)
Treble (TRB)
Bass (BAS)
You can now use the change buttons to alter the value
within the range -06 to +06. Any change you make is
immediately audible.
Use the select buttons to choose the input position you
wish to adjust.
As can be seen in the diagram, the select buttons access
the input positions in the following fixed sequence.
Output channels which are not in use (see 'Loudspeaker Menu') cannot be edited.
Basic settings
Treble (TRB)
Bass (BAS)
Set the values for treble (TRB) and bass (BAS) for all the
channels with the aim of producing a well balanced
sound image.
Note
After changing the tone adjust settings we recommend
that you call up the 'Loudspeaker Balance Menu' again
in order to check once more the balance between all the
channels; correct them where necessary.
40
Video Norm Menu
In the world of video a whole series of different video
norms has become established. The most important are
Standard Video (also known as FBAS, CVBS or Composite), S-Video (also known as Y/C or S-VHS), and
RGB (Red/Green/Blue component video). The K6 supports all three of these video norms.
To ensure that you obtain first-class picture quality it is
essential to set the same video norm for the TV set, the
K6 and any source devices (SAT receiver etc.) connected to it. Some TV sets also support the combined
use of several norms (e.g. RGB and CVBS or S-Video
and CVBS).
To avoid compatibility problems, and to ensure that all
source devices and on-screen menus are displayed
correctly on your TV screen, we recommend that you use
one of the following configurations.
3. RGB and Standard Video (CVBS)
This configuration provides the highest quality of all,
but does require a TV set with automatic RGB /
CVBS switching (RGB priority switching - TV
sets include this facility). RGB-capable source devices are switched to RGB mode, and any other
source devices to CVBS. In this case the integral
DVD player and the RGB source devices automatically use the RGB norm, with its inherently high quality.
Var.
TV set
K6
external
source device
1
StandardVideo
RGB/Video
CVBS
2
Automatic
S-Video/CVBSSwitching
S-Video
S-Video (Y/C)
or
CVBS
3
Automatic
RGB/CVBSswitching
RGB/Video
RGB
Or
CVBS
1. Standard Video Configuration
This configuration is supported by practically all AV
devices, and represents the simplest solution (see
table for settings).
2. S-Video (Y/C) and Standard Video (CVBS)
This configuration requires a TV set with automatic SVideo / CVBS switching. Source devices which support S-Video should be set to S-Video, and any other
source devices to CVBS. In this case the integral
DVD player and the S-Video source devices automatically use the S-Video norm, with its inherently
higher quality.
TV out:
RGB / Video
For TV sets with RGB or Video socket
S-Video
For TV sets with S-Video socket
Notes
Some AV source devices generate a signal at this
SCART output which switches the TV set connected to
them from television reception to SCART picture and
sound mode, and in some cases also changes the video
format (4:3 / 16:9). TV sets vary in the way they exploit
this signal, and you will need to consult your TV operating instructions.
In RGB/Video mode the signal produced by the source
device is passed on unchanged to the TV socket of the
DVD surround receiver.
In S-Video mode the K6 always passes the switching
signal to the TV socket of the DVD surround receiver.
If you encounter compatibility problems between the TV
sets and AV source devices connected to the K6, we
always recommend that you use the standard video
norm for all devices, since all video equipment supports
this mode; see also 'Trouble-Shooting'.
41
Basic settings
Inputs Menu
Four AV source devices (providing picture and analogue sound signals) can be connected to the DVD surround receiver; alternative input sockets can be assigned
to these source devices on the K6; these inputs (co-axial
or optical) are suitable for digital signals.
If the K6 is set up in this way the signal from the digital
source device is accepted and processed instead of the
analogue stereo input signal.
The alternative inputs are assigned in the 'Inputs Menu'.
Digital inputs
Calibration:
The on-screen menu lists the digital inputs of the K6 on
the left - DIG opt. and DIG coax.
Each digital input can be assigned to one of the following AV inputs:
When an external source device providing an analogue
sound signal is connected to the K6, the best possible
reproduction quality can only be obtained if the analogue / digital converter of the K6 is matched accurately
to the output level of the source device.
---
TV
VCR/TVB
STB
---
no assignment
STB
set-top box
AUX-AV
The K6 features an automatic calibration function to
carry out this process. This is the calibration procedure:
1. Select the desired analogue audio or AV source
device and play a fortissimo (extremely loud) passage of music.
2. Call up the 'Inputs Menu', move to Calibration
start and press the button.
3. The screen displays the active message as long as
the calibration process continues.
Notes
The automatic calibration function can be used for all
external analogue audio and AV source devices
(TAPE 1, AUX 1, AUX 2 / PHONO, STB, TV,
VCR / TVB and AUX / AV), provided that you have not
assigned a digital input to that socket. We recommend
that you carry out the procedure for all devices connected to these inputs.
The integral tuner is already calibrated correctly; the K6
therefore does not allow you to calibrate this source
device.
If, in spite of calibration, a source device shows signs
of overloading (distortion), you will see the following
message displayed briefly on the integral screen:
'O
O V E R L O A D '.
If this happens, the analogue/digital converter needs to
be re-calibrated to suit the source device in question.
Basic settings
42
Installation
Using the system for the first time
Safety notes
This section describes all those matters which are of fundamental importance when setting up and first using
the equipment. This information is not relevant in daily use, but you should nevertheless read and note it before using the equipment for the first time.
43
Setting up
Approved usage
General notes on setting up the K6:
This device is designed exclusively for reproducing
sound and/or pictures in the domestic environment. It
must be operated in a dry indoor room which meets all
the recommendations stated in these instructions.
Where the equipment is to be used for other purposes,
especially in the medical field or for any purpose where
safety is an issue, it is essential to establish the unit's
suitability for this application with the manufacturer, and
to obtain prior written approval for such usage.
equipment which includes a radio or television
receiving section must be operated within the regulations
laid down by the Post Office and the Telecommunications authorities in the country in which it is used. This
unit may only be used to receive or reproduce those
transmissions which are intended for public consumption.
The reception or reproduction of other transmissions
(e.g. police radio or mobile radio broadcasts) is prohibited.
This device fulfils the currently valid European norms and
German technical regulations, and carries the symbol
as proof of this. Please check that this sticker is in place.
The sticker is your guarantee that the device meets in
full the specification applicable to it in terms of electromagnetic radiation. This means that your device will not
interfere with, nor be interfered by, other receiving
equipment.
If, in spite of these measures, you encounter reception
interference when using your equipment, please contact
your local branch of the German Federal Office for Post
and Telecommunications (or the equivalent in your
country) in the first instance.
Carefully unpack the K6 and store the original packing
materials carefully. The carton and packing are specially
designed for this unit and will be needed again if you
wish to move the equipment at any time. Please be sure
to read the safety notes in these instructions.
If the unit gets very cold (e.g. when being transported),
condensation may form inside it. Please do not switch it
on until it has had plenty of time to warm up to room
temperature, so that any condensation evaporates completely.
Before placing the unit on a sensitive surface, please
check the compatibility of the lacquer and the unit's feet
at a non-visible point.
The K6 should be set up on a rigid, level base. If you are
placing the unit on resonance absorbers or de-coupling
components make sure that they do not compromise its
stability.
The unit should be set up in a dry, well-ventilated site,
out of direct sunlight and away from radiators. It must not
be located close to heat-producing objects or devices, or
anything which is heat-sensitive or highly inflammable.
heat build-up will shorten the life of
Any
the unit and could be a source of danger.
When installing the unit on a shelf or in a cupboard it is
essential to provide an adequate flow of cooling air, to
ensure that the heat produced by the unit is dissipated
effectively. For this reason there must be at least 10 cm
free space to both sides, behind and above the case.
The unit must be set up in such a way that none of the
connections can be touched - especially by children.
Please be sure to read and observe the notes and information contained in the section 'Setting up, using the
K6 for the first time'.
The only permissible method of disposing of
this product is to take it to your local collection centre for electrical waste.
FCC Information
to the user
(for use in the United States of America only)
Class B digital device – instructions:
Note: This equipment has been tested and found to
comply with the limits for a Class B digital device, pursuant to Part 15 of the FCC Rules. These limits are designed to provide reasonable protection against harmful
interference in a residential installation. This equipment
generates, uses and can radiate radio frequency energy
and, if not installed and used in accordance with the
instructions, may cause harmful interference to radio
communications. However, there is no guarantee that
interference will not occur in a particular installation. If
this equipment does cause harmful interference to radio
or television reception, which can be determined by
turning the equipment off and on, the user is encouraged
to try to correct the interference by one or more of the
following measures:
- Reorient or relocate the receiving antenna.
- Increase the separation between the equipment and
receiver.
- Connect the equipment into an outlet on a circuit different form that to which the receiver is connected.
- Consult the dealer or an experienced radio/TV technician for help.
Basic settings
44
Notes on wiring the system:
Safety notes
Be sure to push all plugs firmly into their sockets. Loose
connections can cause hum and other unwanted noises.
Before wiring up the system remove the back panel,
which is simply clipped in place.
Deploy all mains cables, loudspeaker cables and remote
control cables as far as possible from low-level cables
(inter-connects) and aerial cables. Never route them over
or under the receiver. Mains cables must be deployed in
such a way that there is no risk of people tripping over
them, or of furniture causing damage. Particular care is
required with connectors, distribution panels and the
unit's sockets and other connectors.
Please connect the unit to a correctly earthed mains
socket using the mains cable supplied.
When wiring is complete. fit the back panel in the original
position again.
If you encounter problems when setting up and using the
K6 for the first time, please remember that the cause is
often simple, and equally simple to eliminate. Please
refer to the section of these instructions entitled 'Trouble-shooting'.
Please read right through these operating instructions
carefully before you attempt to use your new equipment.
Note in particular the information regarding setting up
and operating the unit, and the safety notes.
The power supply required for this machine is printed on
the mains supply socket. The unit must never be connected to a power supply which does not meet this
specification. If the K6 is not to be used for a long period,
disconnect it from the mains supply at the wall socket.
Liquid or foreign bodies must never be allowed inside the
case. Mains voltage is present inside the unit, and there
is a risk of lethal electric shock. Do not exert undue force
on the mains connectors.
Protect the unit from drips and splashes of water; never
place flower vases or fluid containers on the unit.
This device should never be used without proper supervision. The K6 should be set up well out of the reach of
small children. This applies to all electrical equipment.
The unit should only ever be opened by a qualified specialist technician. Repairs and fuse replacements should
be entrusted to an authorised specialist workshop.
With the exception of the connections and procedures
described in these instructions, no work of any kind may
be carried out on the K6 by unqualified persons.
If the unit is damaged, or if you suspect that it is not
functioning correctly, immediately disconnect the mains
plug at the wall socket, and ask an authorised specialist workshop to check it.
The unit may be damaged by excess voltage in the
power supply, the cable network or in aerial systems, as
may occur during thunderstorms (lightning strikes) or due
to static discharges. Special power supply units and
excess voltage protectors such as the 'Power Bar'
mains distribution panel offer some degree of protection
from damage to equipment due to the hazards described
above.
However, if you require absolute security from damage
due to excess voltage, the only solution is to disconnect
the unit from the mains power supply and any aerial
systems. If you believe there is a danger of excess voltage (e.g. when an electrical storm is building up) disconnect the K6 from the mains and the aerial socket.
All mains power supply and aerial systems to which the
unit is connected must meet the currently valid regulations, and must be installed by an approved electrical
installer.
45
Setting up
Rear panel connections
TAPE 1
(CINCH)
TAPE 2
(DIGITAL)
(CINCH)
Input / output sockets to connect an analogue recorder
(tape, cassette etc.).
Input / output sockets for connecting a digital recorder
(MD, DAT, CD recorder etc.).
AUX 1
RC IN
(CINCH)
Universal analogue stereo sound input.
AUX 2
(PHONO)
(E2000)
Input socket for the E 2000 remote control receiver
(optional accessory) for use in an adjacent room.
(CINCH)
RLINK
Universal analogue stereo sound input. This input can be
upgraded to a Phono input by installing a Phono
MM or Phono MC module.
Control output socket for connecting devices with
the RLINK control system.
DIGITAL INPUT
SUBWOOFER OUTPUT
(OPTISCH and COAXIAL)
Inputs for digital source devices. Both inputs can be
assigned to the AV inputs (VCR / TV B, SET-TOP BOX,
TV or AUX AV) (see 'Inputs Menu').
Basic settings
Output for connecting an active subwoofer.
46
(CINCH)
FM ANT - aerial input
A - FRONT
The K6 features a 75 Ohm VHF aerial input (domestic
aerial or cable).
Terminals for front loudspeakers
STB
1)
(SCART )
Socket for connecting a set-top box (SAT or cable re1)
ceiver) with SCART connection .
B
Terminals for loudspeakers in adjacent room
PRE OUT
MAINS FUSE
It is essential to use a replacement fuse rated exactly as
printed on the case.
2)
(CONTROL)
Connection for active loudspeakers, to be used as
front speakers in the main listening room.
Note
This socket also supplies a switching signal which can
be used to activate other devices (e.g. projectors, projection screens etc.) automatically via the K6 (see 'Appendix B').
MAINS INPUT
The mains cable is connected to this socket. When connecting the unit to the mains it is essential to read and
observe the notes in the sections 'Setting up, using the
K6 for the first time' and 'Safety Notes'.
A - REAR
Terminals for surround loudspeakers
TV
1)
A - CENTER
Terminals for center loudspeaker
2)
1)
(SCART )
Socket for connecting a video recorder.
Alternatively: connection for a TV set in an adjacent
room.
AUX AV
2)
(SCART )
Input / output socket for connecting a TV set with SCART
connector.
VCR / TV B
2)
(STEREO CINCH and VIDEO)
Note:
If the loudspeakers are to be used in countries outside
the EU the red/black stoppers can be removed from the
loudspeaker terminals. The speakers can then be connected using banana plugs.
The stoppers are simply a push-fit in the terminals, and
can be prised out from the rear using a suitable tool such
as a knife blade.
Input for connecting an additional AV source device.
1)
Note
If your AV device does not feature a SCART socket, use
a SCART adaptor cable connected to the VIDEO (Cinch)
or S-VIDEO (Hosiden) input / output socket of your AV
device. Ask your specialist dealer for advice if you
are not sure.
2)
Notes
The impedance of the loudspeakers connected to the K6
should not be less than 4 Ω (DIN rating).
It is essential to check that the screw terminals are firmly
tightened, and that there are no stray strands of cable
which could cause a short-circuit.
The terminals also feature cross-holes into which standard
insulated 'banana plugs' (4mm) can be fitted from the
underside.
The accessory range includes a selection of highquality cables which are an exact match to equipment.
47
Setting up
Typical wiring diagram: Standard arrangement (main room)
Use of banana plugs: see the section entitled 'Rear panel connections'.
Setting up
48
Typical wiring diagram: Connecting active loudspeakers
49
Setting up
Adjustments at the TV set
Your TV set must be correctly configured in order to
operate correctly with the K6. The necessary settings are
as follows:
If you have a TV set of the types TV 720, TV 820 or
TV 920, please carry out the following adjustments:
Configuring the TV 720, TV 820 or TV 920
Selecting the AV input
You must select an AV input on your TV set which
supports the video norm you have set on the K6.
Some 16:9 TV sets use a switching signal (pin 8 of
the SCART socket) to switch the video format. Use
the SCART socket on the TV set which supports this
switching function, and set the TV set appropriately *).
No.
F1
button
1
2
3
4
Decoder mode
Your TV set must pass the signals it receives to the
SCART socket, so that you can view and hear the
terrestrial programmes received by the TV set via the
K6. This will also ensure that you will be able to see
the on-screen menu system of the K6 in TV mode.
You may need to change this setting manually with
some TV sets, i.e. set it to 'Operation with external
decoder' *).
Select the video norm to suit the connected
source devices
If you have a source device which generates different
video norms, but a TV set which is not multi-norm capable, you may have to select the standard video
norm for all devices, as all equipment generally supports this norm.
*) The steps required to configure your TV set in this
way are described in the operating instructions supplied with the set.
5
6
7
8
red
yellow
blue
red
Select / activate
menu point
Call up 'TV' menu
Equipm. configuration
Device connection
Euro 1
Decoder A
Store
Signal type selection
Decoder A controls AV operation
9
Store
10
Return to 'Equipm. configuration' menu
11
12
red
yellow
further
RGB priority
13
yes
14
Store
15
Return to 'Equipm. configuration' menu
16
Return to 'TV' menu
17
18
19
20
21
white
blue
white
blue
Station settings
TV station table
Select program positions
**)
Signal
**)
Aerial
**)
22
Aerial via Decoder A
**)
23
Store
**)
24
Leave menu
**) Steps 19-23 have to be repeated for all program
positions you wish to use!
Setting up
50
Typical wiring diagrams: Source device connection
Connecting a digital recorder
Phono module (type PHE) MM or MC (optional accessory) required.
Connecting a turn table
Connecting an analogue recorder
*) If a digital output is present:
Use a Cinch digital cable or an optical cable
Connecting a set-top box
51
Setting up
Typical wiring diagram: adjacent room operation
The K6 can provide sound in an adjacent room.
The K6 is set up in the main room (Room A), i.e. the
room in which the speakers connected to loudspeaker
output A are located.
The adjacent room (Room B) houses the speakers
which are connected to loudspeaker output B. If you
wish to control the K6 from the adjacent room by remote
control, you need to install an E 2000 remote control
receiver (optional accessory) in Room B, and connect it
to the RC IN remote control input socket on the K6.
You now need to access the 'Loudspeaker Menu' and
set the split mode for volume in the menu point Volume A/B. This makes it possible to alter the volume in
the adjacent room only; in the main room you can only
alter the volume in that room.
Setting up
A TV set in the adjacent room can also be connected to
the K6 (not in S-Video mode).
In this case the TV is connected to the SCART socket
marked VCR/TV B. If you have already connected a
video recorder to this socket, the second TV can be
connected to any unused AV output on the VCR.
In this case the on-screen menu for Room B should be
switched off (see 'Configuration Menu'), otherwise you
may find that your recordings accidentally include superimposed on-screen menus.
To simplify the cabling, or as a superior solution if the
route to the TV set in the adjacent room is very long, it is
possible to transmit the TV signal using an RF modulator
and a 75 Ω cable, or by a radio system. Please ask your
specialist dealer for details.
52
Device approval and conformity with EC directives
In its original condition the unit meets all currently valid
German and European regulations. It is approved for use
as stipulated within the EC.
By attaching the symbol to the machine, declares its conformity with the EC directives 89/336/EEC,
amended by 91/263/EEC and 93/68/EEC, and
73/23/EEC, amended by 93/68/EEC and the national
laws based on those directives.
The original, unaltered factory serial number must be present on the outside of the unit, and must be clearly legible.
The serial number is a constituent part of our conformity
declaration and therefore of the approval for operation of
the device. The serial numbers on the device and in the
original documentation supplied with it (in particular
the inspection and guarantee certificates), must not be
removed or modified, and must match exactly.
Infringing any of these conditions invalidates conformity and approval, and the unit may not then be operated within the EC. Improper use of the equipment renders the user liable to penalty under current EC and
national laws.
Any modifications or repairs to the unit, or any other
intervention by a workshop or other third party not
authorised by , invalidates the approval and operational permit for the equipment.
Only genuine accessories may be connected to the
decoder, or such auxiliary equipment which is itself approved, and fulfils all currently valid legal requirements.
When used in conjunction with auxiliary devices or as
part of a system, this unit may only be used for the purposes stated in the section entitled 'Approved usage'.
Care of the K6
Always disconnect the unit from the mains supply before
cleaning it. The surfaces of the case should be wiped
clean with a soft, dry cloth only. Never use abrasive or
solvent-based cleaners! Before switching the unit on
again check carefully that no short-circuits exist at the
terminals, and that you have not disturbed any connections.
Switching the remote control address
Switching the K6
Switching the remote control address
If the K6 responds to the remote control commands intended for another piece of equipment (TV or video recorder),it can be switched to an alternative remote control
address. This is the procedure:
Now you must set up the address of the F6 RC handset
to match the K6:
Hold the button and the numeric button
pressed in simultaneously. After about 10 seconds the
LED will flash. Now press the numeric button or
.
Switch the K6 off, and then on again. Immediately after
switching on, press the left-hand select button under
the machine’s front panel, and hold it pressed in until a
running script appears on the integral screen.
Select
Change
button
buttons
Pressing the numeric button sets the remote
control system to the standard RC address
( RC-ADR 1 ), whereas button sets the alternative address ( RC-ADR 2 ). The LED goes out to confirm
that you have switched the setting.
Release the switch, and hold the left select button
pressed in again until the K6 switches to the next remote
control address. The message on the integral screen
('RC-ADR 1' or 'RC-ADR 2') tells you the address
(RC-ADR) to which the K6 has now switched.
Changing the batteries
To open the
battery compartment
disconnect
the latch by
pressing in,
then lift the
cover out.
Remove the
old cells and fit three new dry cells of the LR 03 (MICRO)
type in the battery compartment, taking care to fit them
with correct polarity. Please remember that all the cells
must be replaced at the same time.
Note
If you have already re-set the remote control system to
Address 2 (see above), you will need to repeat the
change procedure after fitting new batteries.
Disposing of exhausted batteries
Exhausted batteries must never be thrown into the
household waste! They should be returned to the battery
vendor (specialist dealer) or your local toxic waste
collection point, so that they can be recycled or disposed
in a proper way. Most local authorities provide collection
centres for such waste, and some provide pick-up
vehicles for old batteries.
53
Setting up
Appendix A
Trouble-shooting
Many problems have a simple cause and a correspondingly simple solution. The following section describes a
few difficulties you may encounter, and the measures
you need to take to cure them.
If you find it impossible to solve a problem with the help
of these notes please disconnect the unit from the mains
and ask your authorised specialist dealer for advice.
General problems:
Problem:
Machine does not switch on.
Cause:
Mains cable not plugged in correctly.
Remedy:
Check connections, push plugs in firmly.
Problem:
Machine does not respond when
buttons are pressed.
Cause:
Static discharge or powerful interference (e.g. lightning) have corrupted the
processor memory.
Remedy:
Reset machine: disconnect mains
plug, wait about 1 minute and reconnect. Switch unit on again.
Problem:
Machine responds correctly to manual operation of the buttons, but
does not respond to remote control
commands.
Cause 1:
Incorrectly inserted batteries or flat
batteries in the remote control handset.
Remedy:
Re-install batteries correctly or fit new
ones.
Cause 2:
No visual contact between remote control transmitter and the K6's remote
control receiver.
Remedy:
Ensure direct line-of-sight contact between remote control transmitter and
receiver. Note that glass doors may
prevent the system working properly.
Maximum range between transmitter
and receiver approx. 8 metres. Position
the receiver in such a way that it is not
subjected to direct sunlight or strong
artificial lighting. Fluorescent and energy-saving lamps are powerful sources
of interference.
Cause 2:
Short-circuit in the speaker cables, e.g.
stray wire ends touching at the speaker
terminals, or mechanical damage to the
cables.
Remedy:
Check speaker cables and terminals,
twist wire ends together neatly, replace
damaged cables.
Problem:
The device switches itself off automatically.
Cause:
The Protection circuit has tripped, typically due to long-term overheating.
Remedy:
Leave the unit switched off for several
minutes and improve the ventilation.
Sound problems:
Problem:
Loud humming noise from the loudspeakers.
Cause:
Poor contact between the Cinch plugs
and sockets, or a faulty Cinch cable.
Remedy:
Please check all connections and cables thoroughly.
Problem:
No sound signal via the digital output.
Cause:
Digital plug not connected correctly to
the digital output socket of the device.
Remedy:
Check connections against wiring diagram; push all connectors in firmly.
Problem:
No sound from center, or center
sound signal too quiet.
Cause:
Center speaker not connected, but
activated in 'Loudspeaker Menu'.
Remedy:
Connect center loudspeaker, or disable
center speaker in 'Loudspeaker
Menu'.
Problem:
No sound
speaker..
Cause 1:
Loudspeaker not activated in 'Loudspeaker Menu'.
from
individual
loud-
Remedy:
No output signal at the loudspeakers; the speaker indicators A
B on
the integral screen flash.
Call up 'Loudspeaker Menu' and enter
the type of loudspeaker connected.
Cause 2:
Loudspeaker cable not connected correctly, or short-circuit in speaker cable.
Cause 1:
The unit is overheating, and the protection circuit has tripped.
Remedy:
Check connection and speaker cable,
correct if necessary.
Remedy:
Reduce volume and wait for about 20
seconds. If the unit does not switch on
again automatically, it has become too
hot and should be left switched off for a
few minutes to cool down.
Problem:
Appendix
54
Cause 3:
K6 not set to surround mode.
Remedy:
Set to surround mode, or select one of
the sound fields.
Cause 4:
Programme contains no information on
the auxiliary channels (e.g. stereo material).
Remedy:
If you wish, call up the 'Main Menu' and
select a sound field.
Cause 5:
The level for the channel affected is set
too low.
Remedy:
Call up 'Loudspeaker Balance Menu'
and raise the level.
Problem:
Neither on-screen menu nor other
external programs appear on the TV
screen. TV only shows those stations which are received via its own
aerial.
Cause 1:
Video cable not connected properly.
Remedy:
Push in all connectors firmly.
Cause 2:
The TV set does not switch automatically to the AV input.
Remedy:
Set the TV to 'AV mode'.
Problem:
Picture unstable.
Cause:
Synchronisation signal absent.
Remedy:
Push connector in firmly, or set TV to
'AV mode'.
Problem:
Monochrome picture only.
Problem:
No bass, or inadequate bass.
Cause 1:
No subwoofer connected, but activated
in 'Loudspeaker Menu'.
Remedy:
Connect subwoofer, or disable subwoofer in 'Loudspeaker Menu'.
Cause 2:
Size of loudspeakers entered incorrectly in 'Loudspeaker Menu'.
Cause:
Incompatible video norms set on the
TV, the K6 and the source device.
Remedy:
Call up 'Loudspeaker Menu' and
check that settings match the loudspeakers in your system; correct if
necessary.
Remedy:
Set TV, K6 and source device to the
same video norm.
Note:
If problems persist, set the K6 to the
'RGB / Video' norm; select the video
norm 'Video' (occasionally also termed
'CVBS' or 'Composite') on the TV set
and the source device.
Problem:
Nothing appears on the integral
screen.
Cause:
The screen is switched off.
Remedy:
Switch the screen on again (see
button).
Problem:
The automatic 4:3 / 16:9 format
switch does not work.
Cause 1:
The TV set is not exploiting the switching signal supplied through the SCART
cable.
Remedy:
Switch TV set to 'controlled AV operation' mode, or switch TV set manually.
Cause 2:
The source device is not supplying the
requisite switching signal.
Remedy:
Switch TV set manually.
Cause 3:
You are using the wrong cables. The
switching signals are only passed via
SCART cables.
Remedy:
Use SCART cables.
Problem:
The signal from an analogue source
device occasionally suffers distortion during very loud passages. The
integral screen shows
'OVERLOAD'
Cause:
The analogue/digital converter is overloading.
Remedy:
Re-calibrate the analogue/digital converter
to this source device. See 'Inputs Menu'.
Picture problems:
Problem:
'Main Menu' not displayed on the
television screen.
Cause:
On-screen display of 'Main Menu'
switched off in 'Configuration Menu'.
Remedy:
Call up 'Configuration Menu' and
switch on 'On-screen Menu'.
Problem:
No picture from some or all source
devices.
Cause:
Source devices not supplying the
switching signal which the TV set requires to switch over to AV mode.
Remedy:
Set television to 'constant AV operation' mode.
55
Appendix
Problem:
When playing an NTSC-DVD the onscreen menu is distorted.
Cause:
The TV set does not feature automatic
format detection for NTSC, and has
been set manually to NTSC. The K6's
on-screen menus are only generated in
PAL format, so this operation is not
possible.
Remedy:
Use a TV set with automatic PAL /
NTSC format switching, or use the K6's
integral screen.
Problem:
No OSD menus (screen stays dark
when a menu is called up)
Cause:
The TV set has no automatic RGB /
CVBS switching, and is configured for
RGB.
Remedy:
Set the TV set to CVBS mode (see also
'Adjustments at the TV set').
Problems in DVD / CD mode:
Problem:
The disc does not play after the
drawer is closed.
Cause 1:
Disc not correctly inserted.
Remedy:
Insert disc centrally, printed face up.
Cause 2:
Disc dirty.
Remedy:
Carefully wipe disc with a soft cloth,
working from the center to the edge.
Insert and try again.
Cause 3:
Disc damaged in Table of Contents
area (TOC).
Remedy:
Disc is unusable.
Cause 4:
Device has cooled down severely (e.g.
after being transported), and condensation has formed on the laser pick-up
optics.
Remedy:
Leave the unit in a warm, well ventilated place for about 1 hour to warm up.
Problem:
OSD menu black / white only
Cause:
The TV set has no automatic S-Video /
CVBS switching, and is configured for
S-Video.
Problem:
Disc stops playing or 'skips'.
Cause:
Disc is dirty or damaged.
Remedy:
Set the TV set to CVBS mode (see also
'Adjustments at the TV set').
Remedy:
Clean the disc. Damage cannot be
repaired.
Problem:
Picture from an external source device correct, but no sound audible
through the K6.
Problem:
Black / white or distorted image
when playing a DVD or VCD.
Cause:
The TV set is not set to the same video
norm (PAL / NTSC) as the disc, or
cannot process its video norm.
Remedy:
Use a multi-norm TV set. These units
switch to the current video norm automatically, or can be switched manually.
Problem:
Distorted picture.
Cause:
The disc is soiled, e.g. by finger marks.
Remedy:
Clean disc with a soft cloth, wiping in
straight lines from center to edge.
Problem:
The device does not return to the
start screen after removing the disc.
Cause:
The program may be waiting for insertion of a further disc.
Remedy:
Insert next disc.
Cause 1:
No sound connection between source
device and K6.
Remedy:
Complete the sound connection (analogue or digital depending on mode);
see section entitled 'Setting up, using
the K6 for the first time'.
Cause 2:
No sound input, or the wrong sound
input, has been assigned to the video
input in the 'Inputs Menu'.
Remedy:
Check the sound input to which the
source device is connected. Call up the
'Inputs Menu' and carry out the correct
assignment.
Cause 3:
The loudspeakers are switched off.
Remedy:
Switch on the speakers using the
button.
Appendix
56
Problem:
The picture is too small, or not
shown completely (cut off).
Cause 1:
The DVD in the drawer is not set to the
video format (4:3 or 16:9) of the connected TV set.
Remedy:
Set the correct video format in the
'Player Setup Menu'.
Cause 2:
Many DVDs contain film versions in
different video formats on the front and
back faces.
Remedy:
Turn the DVD over, or set the correct
video format in the 'Player Setup
Menu'.
Cause 3:
TV is set to the wrong picture format.
Remedy:
Set TV to correct video format, i.e. the
format matching the DVD.
Problem:
Some functions are not carried out
by the K6.
Cause 1:
Function not available for this DVD.
Cause 2:
Function (e.g. camera angle, sub-titles
etc.) not present on this DVD.
Problem:
After a house move the integral
screen still displays the old program
names - but the stations can no
longer be picked up.
Cause:
Programs with station names and reception frequencies are still stored in
the K6, but they can no longer be received in the new locality.
Remedy 1: Clear the programs which cannot be
received individually (see 'Clearing
Programs').
Remedy 2: Clear all stored programs:
Switch the K6 off, then on again. After
switching on press the Select button
below the unit's front panel until a running script appears on the screen.
Select
Button
Change
buttons
Now hold the left change button
pressed in until the integral screen
displays the message:
'PRES - CLEAR'
Finally press the button on the
remote control handset for about three
seconds, until the screen reverts to the
normal display. All the stored programs
have now been cleared.
Remedy:
No remedy.
Problem:
After inserting a DVD a note on incorrect regional code appears.
Cause:
The DVD is not approved for use in
Europe.
Problem:
The RDS station name does not appear on the integral screen.
Remedy:
Return disc to your DVD dealer and
exchange it for a European version.
Cause 1:
The station does not broadcast RDS
information, or the station is not correctly tuned.
Problem:
In rare cases the disc menu function
of the DVD cannot be operated if the
video format is set to 'Pan Scan'.
Remedy:
Tune in the station so that the tuning
indicator is central.
Cause 2:
The station is received with interference, or the field strength is too low.
Remedy:
Select stations which can be picked up
without background hiss and interference.
Problem:
When you switch programs, the RDS
station name is not displayed correctly.
Cause:
The transmitter is broadcasting the
RDS station name as a running script,
which is contrary to the norm.
Remedy:
Rename program (see 'Renaming a
program').
Remedy:
Change picture format to 'Letterbox';
then call up the disc menu function
again.
Problems in Tuner mode:
Problem:
Very few stations, or even none at
all, can be received.
Cause:
The aerial system or aerial cable is
defective.
Remedy:
Check the aerial cable for good contact in
the aerial socket and on the K6 itself.
There must be no damage, and no kinks
in the cable. If necessary fit a new aerial
cable.
57
Appendix
Appendix B
Pin assignments
SCART
View from outside
VCR / TB B
Pin
1
2
3
4
5
6
7
8
9
10
11
12
13
14
15
16
17
18
19
20
21
RGB / Video
Audio Out (R)
Audio In (R)
Audio Out (L)
Audio Gnd.
Gnd.
Audio In (L)
--Switch voltage
Gnd.
Control signal
----Gnd.
Gnd.
----Video Out Gnd.
Video In Gnd.
Video Out
Video In
Gnd.
S-Video
Audio Out (R)
Audio In (R)
Audio Out (L)
Audio Gnd.
Chroma Out Gnd.
Audio In (L)
Chroma Out
Switch voltage
Gnd.
Control signal
----Chroma In Gnd.
Gnd.
Chroma In
--Lumin. Out Gnd.
Lumin. In Gnd.
Luminance Out
Luminance In
Gnd.
SET TOP BOX
RGB / Video
S-Video
----Audio In (R)
Audio In (R)
----Audio Gnd.
Audio Gnd.
Blue In Gnd.
Gnd.
Audio In (L)
Audio In (L)
Blue In
--Switch voltage
Switch voltage
Green In Gnd.
Gnd.
Control signal
Control signal
Green In
------Red In Gnd.
Gnd.
Blanking Gnd.
Gnd.
Red In
Chroma In
Blanking
--Gnd.
Gnd.
Video In Gnd.
Lumin. In Gnd.
----Video In
Luminance In
Gnd.
Gnd.
TV
RGB / Video
Audio Out (R)
Audio In (R)
Audio Out (L)
Audio Gnd.
Blue Out Gnd.
Audio In (L)
Blue Out
Switch voltage
Green Out Gnd.
Control signal
Green Out
--Red Out Gnd.
Blanking Gnd.
Red Out
Blanking
Video Out Gnd.
Video In Gnd.
Video Out
Video In
Gnd.
S-Video
Audio Out (R)
Audio In (R)
Audio Out (L)
Audio Gnd.
Chroma In Gnd.
Audio In (L)
Chroma In
Switch voltage
Gnd.
Control signal
----Chroma Out Gnd.
Gnd.
Chroma Out
--Lumin. Out Gnd.
Lumin. In Gnd.
Luminance Out
Luminance In
Gnd.
PRE OUT CONTROL
View from outside
Pin
1
2
3
4
5
6
7
8
Appendix
Signal
Pre out Gnd.
Pre out Front left
Speaker mute control signal (0 / +8V)
Pre out Front right
Control Gnd.
'On control' signal (0 / +5V)
58
Appendix C
Specification
Connections
AV sockets
AV sockets
Audio inputs
Digital inputs
Audio recorder outputs
SCART
Cinch
Cinch
optical
coaxial
digital
analogue
Active subwoofer output
Loudspeaker output
5-ch. surround
2-ch. stereo
DIN 8-pin.
Headphone socket
3
1
2
1
2
1
1
1
1
1
1
1
Video: RGB, S-VIDEO, CVBS
Audio: Stereo
Video: CVBS
Audio: Stereo
Analogue Stereo
1 x phono (optional)
Multi-channel and Stereo-PCM (SP/DIF), 44.1 kHz and 48 kHz
Multi-channel and Stereo-PCM (SP/DIF), 44.1 kHz and 48 kHz
Stereo-PCM SP/DIF
Stereo analogue
für Passivlautsprecher 4 Ω - 8 Ω
für Passivlautsprecher 4 Ω - 8 Ω
für Aktivlautsprecher
für Stereokopfhörer >32 Ω
Decoder / pre-amplifier
A/D converter
D/A converter
Decoder type
Operational modes
Frequency response
Total harmonic distortion
Signal : noise ratio (A- / unweighted)
Channel separation
Volume control
Tone controls
2 channel, 20 Bit, 48 kHz
192 kHz / 24 Bit
56 Bit signal processor
Dolby Pro Logic II, Dolby Digital, dts, Stereo, Mono,
two-channel TV sound, sound fields
1 Hz ... 22 kHz
< 0.008 %
> 102 dB / > 97 dB
> 80 dB
analogue, in 1.0 dB increments
Fully digital, channel-separate
Output stages
5 for main room 2 for adjacent room
Nominal output / channel
4Ω/8Ω
Peak output
4Ω/8Ω
Frequency response (+0 -3dB)
Slew rate
Damping factor
Total harmonic distortion
80 W / 45 W
90 W / 50 W
2 Hz - 150 kHz
30 V / µs
> 300
< 0.015 %
15 W / 10 W
20 W / 15 W
Tuner
Sensitivity, mono / stereo
Signal : noise ratio (A-w.), St/Mo
Frequency response
Total harmonic distortion, St/Mo
RDS functions
1.5 µV / 45 µV
68 / 73 dB
5 Hz - 15 kHz
0.2 / 0.15 %
Station name, Radiotext, automatic time adjust
DVD
Mechanism
Playable media
Frequency response
Effective system dynamic range
Close-tolerance linear mechanism, 2 separate GaA/As semi-conductor lasers
(785 nm / 10 mW CD, 650 nm / 7 mW DVD)
DVD-Video, CD, CD-R, CD/RW, VCD, MP3 CD; PAL and NTSC
20 Hz - 20 kHz
98 dB
Miscellaneous
Mains power supply
Dimensions (H x W x D)
Available finishes
Accessories
Optional accessories
230 V / 50-60 Hz, 550 VA
Timer with alarm function, automatic calibration function for analogue inputs,
automatic volume calibration for loudspeakers
on-screen menus in PAL
12.5 x 56.0 x 33.0 cm
(screen retracted)
15.0 x 56.0 x 33.0 cm
(screen extended)
Silver eloxided aluminium / black eloxided aluminium
F6 remote control handset, calibration microphone, mains cable, headphone adaptor, wire aerial, SCART cable, operating instructions, quality
control and guarantee certificates
Type PHE phono module, MM or MC
We reserve the right to alter specifications.
59
Appendix
elektroakustik GmbH & Co KG
Herford
Deutschland * Germany * Allemagne