1
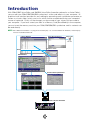
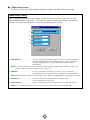
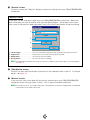
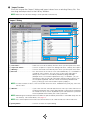
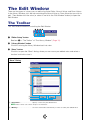
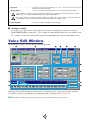
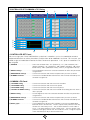
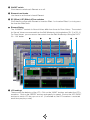
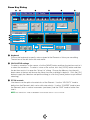
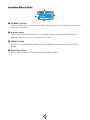
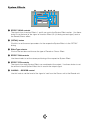
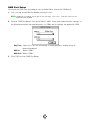
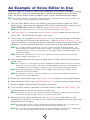
Contents
Introduction ..................................................2
Starting Up ..................................................3
Menu Bar ......................................................3
The Library Window ....................................6
The Toolbar ......................................................8
The Edit Window ........................................14
The Toolbar ....................................................14
Voice Edit Window..........................................15
OMS Settings (Macintosh) ................................27
An Example of Voice Editor in Use ..................29
Troubleshooting ........................................30
•
Click on the red-colored text to jump to the related item in this manual.
•
The software and this owner’s manual are exclusive copyrights of Yamaha Corporation.
•
Copying of the software or reproduction of this manual in whole or in part by any means is expressly
forbidden without the written consent of the manufacturer.
•
Yamaha makes no representations or warranties with regard to the use of the software and
documentation and cannot be held responsible for the results of the use of this manual and the
software.
•
Copying of the commercially available music sequence data and/or digital audio files is strictly
prohibited except for your personal use.
•
The company names and product names in this Owner’s Manual are the trademarks or registered
trademarks of their respective companies.
•
The screen displays as illustrated in this Owner’s Manual are for instructional purposes, and may
appear somewhat different from the screens which appear on your computer.
This owner’s manual is applicable to both the CS6x/CS6R Voice Editor and the S80/S30 Voice Editor (for both
Windows and Macintosh).
The screen illustrations are mainly taken from the CS6x/CS6R Voice Editor for Windows, although and
differences between versions are explained.
This owner’s manual assumes that you are already familiar with basic Windows/Macintosh operation. If you
are not,please refer to the owner’s manual which came with your Windows/Mac OS software before using
Voice Editor.
For information about hardware requirements, the interconnection of devices and the installation of the Voice
Editor software, refer to the separate “Installation Guide” as well as the Owner’s Manual for the respective
MIDI device.
© 2000 Yamaha Corporation. All rights reserved.
1
Introduction
With CS6x/CS6R Voice Editor and S80/S30 Voice Editor (hereafter referred to as Voice Editor),
you can edit your CS6x/CS6R/S80/S30 synthesizer’s voices and effects via your computer. Its
graphical user interface provides for easy editing by presenting each synthesizer parameter on
screen as a knob, slider, switch, and so on, which can be manipulated using your computer’s
mouse or keyboard. Finally, all the changes you have made to your voices can be saved to
your computer. If you have saved your edits to a Memory Card (SmartMedia) in the computer,
you can insert the memory card into your CS6x/CS6R/S80/S30 synthesizer and its contents can
be read directly.
n Voice Editor for Windows is a plug-in for XGworks(lite). To use Voice Editor for Windows, XGworks(lite)
must be installed beforehand.
Library Window
Save the Library file
Import a voice
Voice
Edit Window
Set the effects parameters
Element
dialog
Transmit / Receive bulk data
GAIN
LINE 1 MIC/LINE 2
A / D INPUT
L/MONO
PHONES
R
OUTPUT
1
2
FOOT
FOOT
FOOT
INDIVIDUAL OUTPUT VOLUME CONTROLLER SUSTAIN SWITCH
IN
BREATH
TO HOST
OUT
HOST SELECT
THRU
MIDI
mLAN
CARD
POWER
MUSIC SYNTHESIZER
Realtime Control
Extended Plug-in System
VOLUME
FILTER
EFFECT
MODE
PORTAMENTO
CUTOFF
RESONANCE
REVERB
CHORUS
ATTACK
DECAY
SUSTAIN
RELEASE
PHRASE CLIP
UP
JOB
EF
BYPASS
EXIT
SEQ PLAY
OCTAVE
PERFORM
CARD
EDIT
MASTER
KEYBOARD
PRE1
PRE2
SCENE
1
MIXER
PAN
A
B
C
1
VEL RATE
ENTER
PLAY/
STOP
ON/
OFF
TEMPO
INT
1
EXT
B
C
2
3
ELEMENT SELECT
D
4
E
1
F
G
2
3
ELEMENT ON/OFF
1
2
3
4
5
6
GENERAL
QED
ARPEGGIO
CONTROL
COM LFO
EFFECT
H
DRUM
8
PLG1
PLG2
16
9
10
11
12
13
14
15
OSC
PITCH
FILTER
AMPLITUDE
LFO
EQ
PLG
COMPARE
STORE
SHIFT
PAGE
PART/ELEMENT
DATA
CS6x/CS6R/S80/S30
2
4
7
2
DEC/NO INC/YES
HOLD
CONTROL
SYSTEM
ARPEGGIO
2
A
BANK
REC
PITCH
ON/
OFF
DOWN
MEMORY
VOICE
UTILITY
DRUM
EG
PROGRAM
PART
Library file
Starting Up
Windows 95/98
If you have a CS6x or CS6R, you can start Voice Editor by starting XGworks and choosing
“CS6x/CS6R VoiceEditor” from the “Plug-in” menu. If you have an S80 or S30, choose
“S80/S30 VoiceEditor” instead.
Macintosh
n If you are using Voice Editor on a Macintosh computer, open the “Chooser” from the Apple menu and
turn off “Apple Talk.”
If you have a CS6x or CS6R, open the “CS6x/CS6R Voice Editor” folder in the “YAMAHA Voice
Editor” folder and double-click the “CS6x/CS6R Voice Editor” icon.
If you have an S80 or S30, open the “S80/S30 Voice Editor” folder in the “YAMAHA Voice
Editor” folder and double-click the “S80/S30 Voice Editor” icon.
Menu Bar
The Menu Bar holds various editing and setup functions/commands in its menus. Click each of
the menu names to open their pull-down menu, and choose the function/command you wish to
apply. Those functions/commands which are unavailable are grayed out.
n The most commonly-used menus in the Menu Bar are available as buttons in Voice Editor's toolbar.
n To use Voice Editor for Windows, refer to the documentation that came with XGworks(lite).
File
Windows
Macintosh
CS6x/CS6R(S80/S30)Voice Editor New (New)
Creates and opens a new Library file.
CS6x/CS6R(S80/S30)Voice Editor Open Library (Open)
This is the same as the “Open” button in the Toolbar (Page 8).
3
CS6x/CS6R(S80/S30)Voice Editor Save Library (Save)
This is the same as the “Save” button in the Toolbar (Page 9).
CS6x/CS6R(S80/S30)Voice Editor Save Library As (Save As)
Lets you save the Library file under a new or different name.
Close (Macintosh only)
Close the window. This is the same as the “Close” box in the Title Bar.
Edit
Windows
Macintosh
Copy
Copies the selected voice to the clipboard. If nothing is selected, this item is grayed out.
Paste
Copies the voice from the clipboard to Voice Editor.
CS6x/CS6R(S80/S30)Voice Editor Edit (Edit)
This is the same as the “Edit Window” button in the toolbar (Page 12).
CS6x/CS6R(S80/S30)Voice Editor Library (Library)
This is the same as the “Library Window” button in the toolbar (Page 14).
CS6x/CS6R(S80/S30)Voice Editor Store (Store)
This is the same as the “Store” button in the toolbar (Page 14).
CS6x/CS6R(S80/S30)Voice Editor Import (Import)
This is the same as the “Import” button in the toolbar (Page 13).
CS6x/CS6R(S80/S30)Voice Editor Compare (Compare)
This is the same as the “Compare” button in the toolbar (Page 15).
4
Setup (Windows) / MIDI (Macintosh)
Windows
Macintosh
CS6x/CS6R(S80/S30)Voice Editor Setup (Editor Setup)
This is the same as the “Editor Setup” button in the toolbar (Page 10).
CS6x/CS6R(S80/S30)Voice Editor Transmit Bulk (Transmit)
This is the same as the “Transmit Bulk” button in the toolbar (Page 11).
CS6x/CS6R(S80/S30)Voice Editor Receive Bulk (Receive)
This is the same as the “Receive Bulk” button in the toolbar (Page 12).
CS6x/CS6R(S80/S30)Voice Editor Monitor (Monitor)
This is the same as the “Monitor” button in the toolbar (Page 12).
OMS Port Setup (Macintosh only)
Opens the OMS Port Setup window for Voice Editor. Refer to the section “OMS Port Setup”
(Page 28) for further details.
OMS MIDI Setup (Macintosh only)
Opens the OMS MIDI Setup window. Refer to the documentation that came with OMS for
further details.
OMS Studio Setup (Macintosh only)
Opens the OMS Studio Setup window. Refer to the documentation that came with OMS for
further details.
5
The Library Window
When you start Voice Editor, you will first see the Library Window consisting of tabs, each
representing a Memory in your CS6x/CS6R/S80/S30 synthesizer. Each tab lists all the names,
numbers and categories of voices in the selected Memory. When you choose to edit a voice
from the Library Window by double-clicking it, the Edit Window for that voice will be opened.
n You can save your settings as a Library file (*.S2V).
1
2
3
1 Toolbar
This area holds the buttons controlling Voice Editor (Page 8).
2 Tabs
Click any of these to view the voice list for that Memory.
3 Voice list
This area shows all the voices in the selected Memory as a scrollable list. The name,
number and Category of each voice are shown. You can rearrange the voices by
dragging-and-dropping their voice numbers to a new location. You can rename a voice in
Windows by selecting the voice name, then clicking on it again to enter a new name. On
the Macintosh, you click on the voice name while holding down [Control], choose “Edit
Voice Name” from the pull-down menu and enter the new name in the dialog.
n To select a continuous block of voices, click the number of the first voice, hold down the [Shift] key,
then click the last number.
n Voice names can consist of up to 10 characters.
6
Viewing Just the Voice Names (Windows)
You can view just the names of all voices in the Memory without their “Number” and
“Category” information. To do this, right-click on any part of the voice list and choose “List.”
This may be useful when choosing voices quickly, since you will have less scrolling to do.
n To switch back to the full Voice Name/Number/Category list, right-click on any part of the voice list
and choose “Details.”
7
The Toolbar
1 2
3 4 5 6 7 8
1 “Open” button
Click this to open the “Open File” dialog and select a Library file to open.
“Open File” Dialog
1
2
5
3
6
4
n If you are using a Macintosh, the typical Macintosh “Open” dialog will appear.
1 “Look in:” ....................................Click this and choose the folder containing the Voice Editor files.
2 List box ......................................Shows the contents of the current folder .
3 [Open] button ..............................Click this to open the file selected from the List.
4 [Cancel] button ..........................Click this to cancel the operation.
5 “File name:” ................................Shows the name of the files selected from the List.
6 “Files of type:” ............................Click this and choose the file type.
8
2 “Save” button
Click this to save the existing Library file with your new settings. If you are working on a
new file, this button will open the “Save As” dialog, where you can name and save your
settings as a new Library file (*.S2V).
“Save As…” Dialog
n Library file names can consist of up to 8 characters plus a 3-character extension.
1
2
4
3
5
n If you are using a Macintosh, the typical Macintosh “Save As” dialog will appear.
1 “Save in:” ....................................Click this and choose the folder in which to save the Library file.
2 List box ......................................Shows the contents of the folder you wish to save to.
3 [Save] button ..............................Click this to save the Library file with the name specified in the “File
name:” .
4 “File name:” ................................Specify the name of the Library file to be saved here.
5 “Files of type:” ............................Click this and choose the file type.
9
3 “Editor Setup” button
Click this to open the “Editor Setup” dialog and specify the MIDI Out port settings.
“Editor Setup” Dialog
This is where you set up the Voice Editor to allow the transmission of voice data to your
CS6x/CS6R/S80/S30 synthesizer. Click the [OK] button to apply the settings and quit the
dialog. Click the [Cancel] button to quit without applying the settings.
1
2
3
4
1 “MIDI Out Port:” ..........................Click this and choose the MIDI Out port. You can use the Voice Editor to
control and edit the device connected to this port. Select the port which
has been assigned to your CS6x/CS6R/S80/S30 synthesizer within
XGworks(lite).
n If you are using a Macintosh, the MIDI Out Port setting is assigned in the OMS Port Setup. For
further details, see section “OMS Settings.” (Page 27)
2 “MIDI Ch:” ..................................Click this and choose the MIDI Out channel. This is used when
monitoring sounds using the on-screen keyboard in the Edit Windows.
n Slider and knob values are sent by MIDI System Exclusive, independently of the MIDI Out channel.
3 “Device No.:” ..............................Click this and choose the MIDI device number of your
CS6x/CS6R/S80/S30 synthesizer.
4 “Dump Interval:” ..........................Click this and choose the interval between successive MIDI dumps.
n If you set too short an interval, you may encounter errors when transmitting MIDI data.
10
4 “Transmit” button
Click this to open the “Transmit” dialog to transmit all settings to your CS6x/CS6R/S80/S30
synthesizer
“Transmit” Dialog
Voice data can be transmitted in bulk to your CS6x/CS6R/S80/S30 synthesizer. Click the
[Start] button to begin transmitting the data. The progress bar shows how much of the data
has been transmitted. Finally, click the [Close] button to quit the dialog.
n It is not possible to directly send bulk Voice data to the CS6x/CS6R/S80/S30 External.
n To send the External Voice data in the Library Window to the CS6x/CS6R/S80/S30, you must first
temporarily copy the External Voice data to the Internal within Voice Editor.
1
2
3
4
1 “Transmit Type” ..........................Shows the voice data to be transmitted (This is fixed to internal only).
2 Progress bar ..............................Shows how much of the data has been transmitted.
3 [Start] button ..............................Click this to transmit the data.
4 [Close] button ............................Click this to close this dialog.
n The MIDI Device Number has to be set correctly in order to transmit bulk data. For further details,
see page 10.
11
5 “Receive” button
Click this to open the “Receive” dialog to receive all settings from your CS6x/CS6R/S80/S30
synthesizer.
“Receive” Dialog
Voice data can be received in bulk from your CS6x/CS6R/S80/S30 synthesizer. Select the
bulk voice data you wish to receive, then click the [Start] button. The progress bar shows
how much of the data has been received. Finally, click the [Close] button to quit the dialog.
1
2
3
4
1 “Receive Type” ............................Click this and choose the Voice data (internal/external/all) to receive.
2 Progress bar ..............................Shows how much of the data has been received.
3 [Start] button ..............................Click this to receive the data.
4 [Close] button ............................Click this to close this dialog.
n The MIDI Device Number has to be set correctly in order to receive bulk data. For further details,
see page 10.
6 “Edit Window” button
Click this to open the Edit Window (Common) for the selected voice in the list. For further
details, see page 14.
7 “Monitor” switch
If you click this, bulk voice data will be sent for monitoring on your CS6x/CS6R/S80/S30
synthesizer each time you select a voice. Click it again to disable monitoring.
n To monitor the voice, you need to play your CS6x/S80/S30 synthesizer’s keyboard or the keyboard
connected to your CS6R Synthesizer.
12
8 “Import” button
Click this to open the “Import” dialog and import voices from an existing Library file. You
can drag-and-drop voices to the Library Window .
n More than one of these dialogs can be opened simultaneously.
“Import” Dialog
1
2
3
4
5
6
1 “File name:” ................................Shows the name of the Library file from which you will import voice data.
2 “Open File” button ......................Click this to open the “Open File” dialog and select a Library file to open.
3 “Memory:” ..................................Click this and choose the Memory from which you will import voice data.
4 Voice list ......................................This area shows all the voices in the selected Memory as a scrollable list,
in order of voice number. You can select a voice here and import it
directly to the voice list in the Library Window by drag-and-drop.
(Multiple voices can also be imported this way.) In Windows, you can
alternatively copy the voice by selecting it and pressing [CTRL]+[C] on
the computer keyboard, and then switch to the Library Window and
press [CTRL]+[V] at the new location to paste (import) it.
n To select a block of voices, click the number of the first voice, hold down the [Shift] key, then click
the last voice .
5 “Monitor” ....................................If you check this box, the bulk data for each voice you select from the list
will be transferred to your CS6x/CS6R/S80/S30 synthesizer for monitoring.
To monitor the voice, use the keyboard of your CS6x/S80/S30 synthesizer
or the keyboard connected to your CS6R synthesizer.
n Monitoring will not be possible if the MIDI Out port and other parameters in the Editor Setup are not
set correctly. For further details, see page 10.
n You cannot import a Drum Voice to a Normal Voice list or a Normal Voice to a Drum Voice list.
6 [Close] button ............................Click this to close the Import dialog.
13
The Edit Window
There are two types of voices you can edit using Voice Editor: Normal Voices and Drum Voices.
In the Library Window, click the tab containing the Normal Voice or Drum Voice that you wish to
edit. Then double-click the voice (or select it and click the “Edit Window” button) to open the
Edit Window.
The Toolbar
This area holds the buttons controlling the Edit Window.
1 2 3 4
1 “Editor Setup” button
See item 3 in “The Toolbar” of “The Library Window” (Page 10).
2 “Library Window” button
Click this to bring the Library Window back into view.
3 “Store” button
Click this to open the “Store” dialog, where you can name your edited voice and select a
location in which to store it.
“Store” Dialog
1
2
3
4
5
1 “Voice Name:” ............................Specify a name for your edited voice.
n Voice names can consist of up to 10 characters.
2 “Memory:” ..................................Click this and choose the Memory in which to store your edited voice.
14
3 Voice list ......................................Shows the contents of the Memory as a list. Click the voice in which your
edited voice will be stored.
4 [Store] button ..............................Click this to store your edited voice in the location specified above.
After storing to a Library file, the data for the original voice will be overwritten when you save the
Library file. It is recommended that you back up important data.
The “Store” dialog is used to temporarily store your Library file. After storing, save your Library file.
If you do not save your Library file after storing, your edits will not be saved.
5 [Cancel] button ..........................Click this to quit the dialog without storing.
4 “Compare” switch
If you click this, bulk data for the original voice (prior to editing) will be sent to on your
CS6x/CS6R/S80/S30 synthesizer. Click it again to send the bulk data for your edited voice.
This switch is useful for making A/B comparisons between the original and edited voices.
Voice Edit Window
When editing a voice, you will see the following screen:
1
2
3
4
5
6
8
7
9
#
!
@
)
The Drum Voice Edit Window is similar to this. However, it has a few less controls and the
“ELEMENT” controls are different, as explained later in “Element Unit” (Page 18).
n For details about each parameter, refer to the CS6x/CS6R/S80/S30 Owner’s Manual.
15
1 VOICE panel
This shows the name and instrument category of the voice. You can also rename your
edited voice and change the instrument category from the “Voice Category” pull-down
menu.
n Voice names can consist of up to 10 characters.
2 QUICK EDIT panel
This gives you access to the volume, pan, filter and envelope generator controls. The
specific parameters for these controls can be found in the “QUICK EDIT/SCENE
CONTROL” dialog, opened by clicking the [DETAIL] button above the Keyboard area at the
bottom of the window.
n The “SUSTAIN” and “RELEASE” knobs are not available for Drum Voices.
3 PITCH BEND settings
Use these “LOWER” knob to set the lowest point in the pitch bend wheel’s range and the
“UPPER” knob to set the highest point.
4 PORTAMENTO unit
Use the switch to enable/disable portamento and the “TIME” knob to specify the
portamento time. Click on the text box and select the portamento mode.
n The “PORTAMENTO” unit is not available for Drum Voices.
5 ARPEGGIO unit
Use the switch to enable/disable the arpeggiator and the “TEMPO” knob to specify the
arpeggiator speed. Click on the text box below the switch to select the arpeggiator mode .
Click on the text box to the left of the switch to select the arpeggio type. The specific
parameters for the arpeggiator can be found in the “ARPEGGIO” dialog, opened by
clicking the [DETAIL] button.
6 [CTRL SET/COM LFO] button
Click this to open the “CONTROLLER SET /COMMON LFO” dialog. In the top panel, you
can specify the parameters for all controllers such as the pitch bend and modulation
wheels. The bottom panel lets you specify the parameters for the Common LFO.
n The “COMMON LFO” panel is not available for Drum Voices. Also, the “ELEMENT” switches in the
“CONTROLLER SET” panel are not available for Drum Voices.
16
“CONTROLLER SET/COMMON LFO” Dialog
1
2
3
4
9
)
!
5
6
7
8
@
• CONTROLLER SET Panel
You can assign your CS6x/CS6R/S80/S30 synthesizer’s controllers such as the modulation wheel or
keyboard aftertouch to various parameters to allow them to be modified in real-time. For instance, you
could assign the modulation wheel to the filter’s Resonance parameter. In all, up to six controllers can
be assigned.
1 SOURCE ......................................Select the controller from “FS” (footswitch), “FC” (foot controller), “BC”
(breath controller), “AT” (aftertouch), “RB” (ribbon controller), “PB” (pitch
bend wheel), “MW” (modulation wheel), “KN1/2” (Assignable Knob 1/2) .
2 DEPTH settings ..........................Sets the degree to which the selected controller will affect the parameter
assigned to it.
3 DESTINATION settings ................Click on the text box and choose the parameter you wish to control.
4 ELEMENT switches ....................Click these to enable/disable the Elements which will be effected by the
controller assignments.
• COMMON LFO Panel
5 LFO WAVE setting ......................Click on the text box and select the LFO waveform.
6 LFO SPEED setting ....................Click on the text box and set the LFO speed.
7 LFO PHASE setting ....................Click on the text box and select the LFO phase.
8 LFO KEY ON RESET setting ......Click on the text box and select the method of restarting the LFO when a
note is played.
9 DEPTH setting ............................Set the degree to which the selected controller will affect the parameter
assigned to it.
) DESTINATION settings ................Click on the text box and choose the parameter you wish to control.
! ELEMENT switches ....................Click these to enable/disable the Elements which will be effected by the
controller assignments.
@ Editor graph ................................Click and drag the square marks (handles) to set the time-dependent
behavior of the Common LFO. The first square mark (furthest to the left)
controls the “LFO Delay Time.” The second controls the “LFO Fade In
Time.” The third controls the “LFO Control Time.” The last square mark
(furthest to the right) controls the “LFO Fade Out Time.” Drag the square
marks horizontally to adjust the transition times.
17
7 ELEMENT unit
This section is explained in more detail in “Element Unit” (Page 18).
8 INSERTION EFFECT units
This section is explained in more detail in “Insertion Effect” (Page 25).
9 SYSTEM EFFECT settings
This section is explained in more detail in “System Effects” (Page 26).
) Keyboard
Click any key on the keyboard to monitor your edited voice in that key.
! KEY ASSIGN settings
Click on the left text box to select a Key Assign setting. Click on the right text box to select
Monophonic or Polyphonic.
n The “KEY ASSIGN” settings are not available for Drum Voices.
@ MICRO TUNE settings
Click on the text box to select a Micro Tuning preset.
n The “MICRO TUNE” settings are not available for Drum Voices.
# SCENE CONTROL Knob
Use the knob to set the Scene Control (CS6x/CS6R only). Click the [DETAIL] button to
open the “QUICK EDIT/SCENE CONTROL” dialog and specify the Quick Edit/Scene
Control parameters in the “Scene Control” panel.
Element Unit
1
2
3
4
1 EL (Element) 1 to 4 buttons
Click these to open their “ELEMENT” dialogs.
n For Drum Voices, you will see the following panel. Click [KEY C0...C6] to open the “Drum Key”
dialog (Page 22).
18
2 ON/OFF switch
Click these to switch each Element on or off.
3 Element Level knobs
Use these to set the level of each Element.
4 EF (Effect) 1/EF (Effect) 2/Thru switches
Click these to assign each Element to Insertion Effect 1 or Insertion Effect 2, or to by-pass
the Insertion Effect units.
● Element Dialog
The “ELEMENT” controls for Normal Voices differ from those for Drum Voices. The controls
for Normal Voices are accessed from the Edit Window by clicking buttons [EL 1] to [EL 4].
For Drum Voices, you can access the controls from the Edit Window by clicking the “KEY
C0 …C6” button.
1
2
3
4
5
6
1 LFO settings
These control the behavior of the LFO. Click on the “WAVE” text box and select the LFO’s
waveform. Click on the “SPEED” text box and specify its speed. Click on the “KEY SYNC”
text box to switch LFO key sync on or off. (If switched on, the LFO waveform is restarted
each time you play a note.)
19
2 LFO PITCH knob
Use this to set the pitch modulation depth of the LFO. You can also enter a value directly
in the text box to the left of the knob.
3 LFO FILTER knob
Use this to set the filter modulation depth of the LFO. You can also enter a value directly in
the text box to the left of the knob.
4 LFO AMPLITUDE knob
Use this to set the amplitude modulation depth of the LFO. You can also enter a value
directly in the text box to the left of the knob.
5 [DETAIL] button
Click this to open the “EL DETAIL” dialog and enter the parameters for each Element. You
have wider and more accurate control over the parameters than with the editor graphs.
6 Editor graphs
Within these graphs, click and drag the square marks (handles) to visually adjust the
parameters for each Element.
n Sometimes, not all the square marks are visible as they may be layered on top of each other at the
same position. In which case, click the visible square mark and drag it away to reveal the next
square mark.
OSCILLATOR Settings
Click on the “WAVE” text box and choose the source waveform. One of the square marks is
used to set “VEL LIMIT LOW” and “NOTE LIMIT LOW.” Set the lowest note velocity
response by dragging this the square mark horizontally. Set the lowest note in the key range
by dragging it vertically. Similarly, set the highest note velocity (“VEL LIMIT HIGH”) and key
range note (“NOTE LIMIT HIGH”) using the other square mark.
n When dragging the square marks, values are given as (X,Y) co-ordinates, where X is the NOTE LIMIT
(given as a MIDI note number) and Y is the VEL LIMIT. To view the note name instead of the note
number, select the “OSCILLATOR” tab of the “EL DETAIL” dialog.
FILTER Settings
Click on the text box and choose the filter type. The graph shows pre-defined settings
initially, but you can edit these. Using the LPF type as an example, drag the left square
mark vertically to set the Filter Gain. Drag the right square mark horizontally to set the Filter
Cutoff frequency.
n Parameter values are shown when dragging the square marks. To set these values directly, select
the “FILTER EG” tab of the “EL DETAIL” dialog.
20
EQ Settings
Click on the text box and choose the equalizer type. Using the EQ/LH type as an example,
the left square mark controls the bass frequencies and the right square mark controls the
treble frequencies. Drag the square marks vertically to adjust gain, and horizontally to
adjust the frequency.
n To set these values directly, select the “OSCILLATOR” tab of the “EL DETAIL” dialog.
PITCH EG Settings
The PITCH EG (Envelope Generator) determines the transition in pitch while the key is being
held down. There are five square marks, each controlling a different stage in the envelope.
The first square mark (furthest to the left) controls the “Hold Time/Level.” The second
controls the “Attack Time/Level.” The third controls the “Decay 1 Time/Level.” The fourth
controls the “Decay 2 Time/Sustain Level.” The last square mark (furthest to the right)
controls the “Release Time/Level.” Drag the square marks vertically to adjust levels, and
horizontally to adjust the transition times.
n To set these values directly, select the “PITCH” tab of the “EL DETAIL” dialog.
FILTER EG Settings
The FILTER EG (Envelope Generator) determines the transition in timbre while the key is
being held down. There are five square marks, each controlling a different stage in the
envelope. The first square mark (furthest to the left) controls the “Hold Time/Level.” The
second controls the “Attack Time/Level.” The third controls the “Decay 1 Time/Level.” The
fourth controls the “Decay 2 Time/Sustain Level.” The last square mark (furthest to the right)
controls the “Release Time/Level.” Drag the square marks vertically to adjust levels, and
horizontally to adjust the transition times.
n To set these values directly, select the “FILTER EG” tab of the “EL DETAIL” dialog.
AMPLITUDE EG Settings
The AMPLITUDE EG (Envelope Generator) determines the transition in amplitude over time.
There are five the square marks, each controlling a different stage in the envelope. The first
square mark (furthest to the left) controls the “Init Level.” The second controls the “EG
Attack Time.” The third controls the “EG Decay 1 Time/Level.” The fourth controls the
“Decay 2 Time/Sustain Level.” The last square mark (furthest to the right) controls the “EG
Release Time.” Drag the square marks vertically to adjust levels, and horizontally to adjust
the transition times.
n To set these values directly, select the “AMP EG” tab of the “EL DETAIL” dialog.
21
Drum Key Dialog
1
2
3
4
5
6
7
!
8
9
)
@
#
$
%
^
&
1 Keyboard
Click on the keyboard to specify note assigned to the Element or Voice you are editing.
The text box to the left shows the note name.
2 OSCILLATOR settings
To select a waveform as the source, click the [WAVE] button and then the text box next to it
to select the waveform. To select a voice as the source, click the [VOICE] button and then
the text box next to it to open the “Voice List” dialog. Choose the Memory from the pulldown menu at the top and choose the Voice from the scrollable list below it. Click the [OK]
button to apply the selection and quit the dialog (or click the [Cancel] button to quit without
selecting).
3 PITCH controls
Use these to set the pitch characteristics of the Element. Use the “VELOCITY” knob to
define how the Element’s pitch varies with note velocity. Use the “COARSE” knob to tune
the Element’s pitch in coarse increments (semitones) and the “FINE” knob to further finetune it.
n The “VELOCITY” knob is disabled if the oscillator source is set to “VOICE.”
22
4 FILTER controls
Use these to set the filter characteristics of the Element. Use the “VELOCITY” knob to
define how the Element’s filter opens/closes in response to note velocity. Use the “RESO”
knob to set the LPF Resonance level and the “CUTOFF” knob to set its LPF Cutoff
Frequency. Use the “HPF” knob to set the HPF Frequency.
n The FILTER controls are disabled if the oscillator source is set to “VOICE.”
5 AMPLITUDE control
Use the “VELOCITY” knob to define how the Element’s output level varies with note velocity.
n This knob is disabled if the oscillator source is set to “VOICE.”
6 [DETAIL] button
Click this to open the “DRUM KEY DETAIL” dialog and input all Element values directly
(except the Keyboard note assignment).
7 RECEIVE NOTE switch
Click on the text box and select whether or not to receive notes.
n This switch is disabled if the oscillator source is set to “VOICE.”
8 KEY ASSIGN switch
Click on the text box and select Single key assignment or Multi key assignment.
9 ALTERNATE GROUP selector
Click on the text box and select an alternate group number. This is used to prevent a pair
of drum sounds, such as an open and closed hi-hat, from sounding simultaneously.
n This selector is disabled if the oscillator source is set to “VOICE.”
) FILTER settings
Drag one of the square marks horizontally to adjust the Element’s “HPF Cutoff Frequency.”
Drag the other square mark vertically to adjust its “LPF Resonance,” and horizontally to
adjust its “LPF Cutoff Frequency.”
n To set these values directly, select the “OSCILLATOR” tab of the DRUM KEY DETAIL Dialog.
! AMPLITUDE EG settings
Drag the first square mark (furthest to the left) horizontally to adjust the Element’s “Attack
Time.” Drag the second horizontally to adjust its “Decay 1 Time,” and horizontally to adjust
its “Decay 1 Level.” Drag the last square mark (furthest to the right) horizontally to adjust
its “Decay 2 Time.”
n To set these values directly, select the “PARAMETER” tab of the DRUM KEY DETAIL Dialog .
23
@ EQ settings
Click on the text box and select the EQ type. With the “EQ L/H” and “P.EQ” types, you can
adjust some EQ parameters using the square marks in the graphs. Drag one of the square
marks horizontally to adjust the Element’s “EQ Low Frequency,” and vertically to adjust its
“EQ Low Gain.” Drag the other square mark horizontally to adjust the Element’s “EQ High
Frequency” (or “EQ Resonance” if the P.EQ type has been chosen) and vertically to adjust
its “EQ High Gain.”
n Sometimes, not all the square marks are visible as they may be layered on top of each other at the
same position. In which case, click the visible square mark and drag it away to reveal the next
square mark.
n To set these values directly, select the “OSCILLATOR” tab of the DRUM KEY DETAIL Dialog.
n All graphs are disabled if the oscillator source is set to “VOICE.”
# LEVEL control
Use this knob to set the level of the Element.
$ PAN controls
Use the “PAN” knob to set the stereo position of the Element. Use the “RNDM PAN” knob
to set the Element’s “Random Pan” depth. Use the “ALTER PAN” knob to set the “Alternate
Pan” depth.
n The “RNDM PAN” and “ALTER PAN” knobs are disabled if the oscillator source is set to “VOICE.”
% Output Assignment selector
Click on the text box and select the output(s) to which the Element will be sent.
^ Insertion Effect switches
Click the [EF 1] switch to pass the signal through Insertion Effect 1. Click [EF 2] to pass it
through Insertion Effect 2. Click [THRU] to bypass the Insertion Effects.
& REVERB & CHORUS controls
Use the “REVERB” and “CHORUS” knobs to set the level of the signal from Insertion Effect
1/2 (or the by-passed signal) sent to the Reverb/Chorus unit.
24
Insertion Effect Units
1
3
2
4
1 CONNECT selector
Click on the text box and choose the order in which signals are passed from one insertion
effect unit to the other.
2 Indicator lamps
These show which of the Elements are assigned to the respective Insertion Effect unit.
n The Indicator lamps are not available for Drum Voices.
3 [DETAIL] button
Click this to set the exact parameters for the respective Insertion Effect via the “DETAIL”
dialog.
4 Effect Type selector
Click on the text box and choose the type of Insertion Effect.
25
System Effects
1
2
3 4
5
6
1 EFFECT SEND controls
The signals from Insertion Effects 1 and 2 are sent to the System Effect section. Use these
knobs to set the level of the signal of Insertion Effect 1/2 (or the by-passed signal) sent to
the Reverb/Chorus effect.
2 [DETAIL] button
Click this to set the exact parameters for the respective System Effect via the “DETAIL”
dialog.
3 Effect Type selector
Click on the text box and choose the type of Reverb or Chorus Effect.
4 EFFECT PAN controls
Use these knobs to set the stereo positioning of the respective System Effect.
5 EFFECT RTN controls
The signals from both System Effects are combined at the output. Use these knobs to set
the amount of each System Effect that is used in the output signal.
6 CHORUS ➝ REVERB control
Use this knob to set the level of the signal of sent from the Chorus unit to the Reverb unit.
26
OMS Settings (Macintosh)
The Voice Editor software uses OMS (Open Music System) for MIDI input/output. To use the
Voice Editor software, OMS must be installed beforehand.
n For information about installing OMS, refer to the separate Installation Guide.
About OMS
Voice Editor uses the OMS (Open Music System) to transfer MIDI data to an external MIDI
device. OMS is a system extension that goes in the Mac OS System folder, designed to
manage the MIDI data stream (input & output) in a computer, to enable MIDI data transfer
between MIDI software and hardware attached to the computer. OMS is a de facto standard of
the MIDI environment under the Mac OS, and various music software manufacturers have
released OMS-compatible sequencer and other software.
OMS has the following merits:
• As OMS-compatible MIDI applications communicate with various MIDI devices via OMS, it
is no longer necessary for you to set up multiple MIDI drivers for those applications. Thus,
you can avoid conflicts between different drivers with the same purpose (MIDI control).
•
Once a Studio Setup is read in OMS, any OMS-compatible application will be aware of it,
even if you need to reconfigure the routing of the MIDI data stream or change the current
Studio Setup. OMS-compatible applications will commonly recognize the new
configuration.
•
You can have different Studio Setups to choose one from,to switch to a different MIDI
routing (patches between MIDI devices and software) fast and easily.
•
Every time the OMS Setup application is opened, any MIDI device connected to the
computer is automatically detected, and its icon appears with a current MIDI status
(channel number, port number, patches, etc.). Once devices are configured with OMS
Setup, however, you need not care too much about the status.
•
OMS can drive various MIDI interfaces, including the standard type (16 channels) and the
multi-port type (16 channels per port). If you use a multi-port type, you can control over 16
channels simultaneously via OMS.
n For more information about OMS features, see the READ ME file included with OMS.
Setting up OMS
Setup files for the CS6x, CS6R , S80 and S30 have already been created for use with Voice
Editor; please use the appropriate file for your device. The following example is for the CS6x.
1. First, interconnect the “TO HOST” terminal of the CS6x and the Macintosh serial port, then
set the “Host Select” switch of the CS6x to “Mac.”
2. Double-click the “OMS Setup” icon in the “OMS Application” folder.
3. Choose “Open” from the “File” menu and select “CS6x-Modem” from within the “OMS
setup for YAMAHA” folder.
n If you are using a computer with no modem port (such as the Performa series), look in the “CS6xPrinter” folder instead.
4. Choose “Make Current” from the “File” menu. The setup for your CS6x is now saved as the
current studio setup.
5. Choose “Quit” from the “File” menu to close OMS Setup.
n Voice Editor is not compatible with versions of OMS earlier than 2.0.
27
OMS Port Setup
Having set up OMS, you now need to start up Voice Editor and set the OMS ports.
1. First, start up Voice Editor by double-clicking its icon.
n If AppleTalk is enabled, you will get an alert message. Click “OFF.” It will take some time for
AppleTalk to be disabled.
2. Choose “OMS Port Setup” from Voice Editor’s “MIDI” menu, then select the port settings. In
the following example, the tone generator is a CS6x and its settings are applied to OMS.
Key Thru: Check this if you are monitoring a sound generator module using an
external keyboard.
MIDI In:
Select “CS6x.”
MIDI Out: Select “CS6x.”
3. Click [OK] to close OMS Port Setup.
28
An Example of Voice Editor in Use
There is no single way in which to use the many components in Voice Editor. Although your editing
needs may differ, in any case, the following gives a step-by-step example of how to use Voice
Editor. The Library Window is the first window to open, so that’s where the explanation begins.
n In the Library Window, you can open existing Library files containing the Voices you wish to edit, and
specific voices can be imported to the Library Window.
1. Click the “Editor Setup” button in the toolbar of the Library Window to open the “Editor
Setup” dialog. Then select the appropriate MIDI Out Port and Device No. settings for your
CS6x/CS6R/S80/S30 synthesizer (See the section “Editor Setup” Dialog).
n If you are using a Macintosh, you will also need to make settings in OMS (Page 27).
2. Open the Library file. In the Voice List of the Library Window, double-click the voice you
wish to edit. The Edit Window will open for the voice.
3. Various units are arranged in the Edit Window. First, let’s set the parameters for Elements 1
to 4 on the Element Unit which make up the voice. Open the dialogs for Elements 1 to 4,
select the waveforms, and adjust the tonal characteristics of the voice using the filters and
equalizers. You can use the graph editors in each dialog to visually edit the parameters.
n You can edit the Element parameters in much finer detail within the “EL DETAIL” dialogs. The
Element dialogs are linked to the “EL DETAIL” dialogs, so changes in one dialog are immediately
reflected in the other. You can simultaneously view the graphs and the “EL DETAIL” dialogs sideby-side while editing.
n Also within the Element Unit, you can set the output level for each Element and the route their
outputs through Insertion Effects 1/2.
4. Use the Volume/Sound Control knobs to adjust the all the levels and tonal characteristics
for the voices.
n You can open the “Quick Edit/Scene Control” dialog from the Edit Window, where you can edit the
parameters in much finer detail. The knobs in the Edit Windows are linked to the parameters in the
“Quick Edit/Scene Control” dialog, so changes in either are immediately reflected in the other.
n By clicking or dragging on the buttons of the keyboard at the bottom of the window, you can
monitor the voice you are editing.
n By enabling the “Compare” switch in the toolbar, you can make A/B comparisons between the
original voice and the edited voice.
5. Select the Insertion Effect Type in the Insertion 1/2 Unit and set the remaining parameters.
6. Select the System Effect Type in the Reverb/Chorus Unit and set the remaining parameters.
7. Set the Arpeggio and Portamento parameters if necessary.
8. Click the “Store” button in the toolbar of the Edit Window to open the “Store” dialog. This
will store the edits for the current voice in the Library file.
n The edits for the voice are only stored in the Library file temporarily. Beware that if you proceed
further without saving the Library file itself, you will lose all your edits.
9. Switch back to the Library Window and click the “Save” button in the toolbar to save
(overwrite) the Library file. The edits for your voice will be saved with the voice itself in the
designated voice list location.
n The Library file you have saved can be opened in the Library Window at any time. Voices in the
Library Window can be transmitted to your CS6x/CS6R/S80/S30 synthesizer.
n You can create a variety of different Library files, each tailored for live performances, recording, etc.
Thus, you can conveniently modify voices to suit different situations and needs.
29
Troubleshooting
If you encounter problems such as no sound output or abnormal behavior, verify the connections before
checking the following. If you are using Voice Editor for Windows, refer to the XGworks(lite) owner's
manual too.
<Macintosh>
<Windows>
The printer port is not recognized.
•
The printer port will not be recognized if AppleTalk
is ON. Note that with some Macintosh models,
AppleTalk is automatically enabled when starting
up.
Voice Editor is not available in the Plug-in menu.
•
Is the Voice Editor installed in the same folder as
XGworks(lite)? If not, reinstall Voice Editor.
•
Bulk data is not received.
•
Is the MIDI In set correctly in the System Setup of
XGworks?
Verify that the “Printer” checkbox has been checked
in the OMS MIDI Setup window.
•
The modem port is not recognized.
•
On some Macintosh models such as the Performa
series, the modem port cannot be used and only the
printer port is available.
•
MIDI Out port is not available in Editor Setup.
•
The MIDI Out port in Editor Setup can be chosen
from the MIDI Out ports in the System Setup of
XGworks(lite). Check the MIDI Out settings in the
System Setup of XGworks(lite).
Verify that the “Modem” checkbox has been
checked in the OMS MIDI Setup window.
No MIDI In/Out data
Is the MIDI device’s HOST SELECT switch set correctly?
•
Make the correct setting according to the
instructions in the CS6x/CS6R/S80/S30 Owner's
Manual.
•
•
•
<Windows / Macintosh>
Sound does not change when using knobs or
sliders.
• Are the MIDI Out port and Device Number set
correctly in the Editor Setup? (Page 10)
In the OMS Port Setup, is MIDI In/Out set to
“unknown”? If you change the OMS ports or setup,
the OMS output ports have to be set accordingly in
Voice Editor's OMS Port Setup window. Choose the
appropriate receiving device.
Bulk data is not transmitted.
• Are the MIDI Out port and Device Number set
correctly in the Editor Setup? (Page 10)
Is OMS using the same port as that connected to
the cable? Open the OMS MIDI Setup window and
verify that the checkbox for the relevant port has
been checked.
•
If the port and setup assignments are frequently
altered, OMS may be unable to easily recognize the
serial port. Reboot the Macintosh, set up OMS
correctly, then start up Voice Editor.
No sound heard when clicking on-screen
keyboard in Edit Window.
• Is the MIDI Ch. set correctly in the Editor
Setup? (Page 10)
Open the Editor Setup Dialog and check that the
Device No. has been properly assigned (Page 10).
Sound does not change when Monitor button is
pressed.
• Are the MIDI Out port and Device No. set
correctly in the Editor Setup (OMS Port Setup)?
(Pages 10 and 28)
Voice Editor does not start up when Library File
(extension .S2V) is double-clicked.
•
Change the Type/Creator settings for Library Files
as follows, then try double-clicking the file again.
CS6x/CS6R
Type:
Creator:
S2VX
YXC6
S80/S30
Type:
Creator:
S2VX
YXS8
Is the Dump Interval in the Editor Setup too
short? Make sure the Dump Interval is at least
10 ms.
Sound is doubled when playing keyboard.
• On your CS6x/CS6R/S80/S30 synthesizer,
switch Local to OFF.
Bulk data are not received.
•
Open the OMS Port Setup window and check that
the MIDI In has been properly assigned (Page 28).
•
Open the Editor Setup Dialog and check that the
Device No. has been properly assigned (Page 10).
Library files created in Voice Editor cannot be
read directly by CS6x/CS6R/S80/S30.
• Set the file extension to “S2V” in order to read
Voice Editor's Library files directly on your
CS6x/CS6R/S80/S30 synthesizer.
30