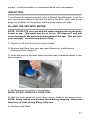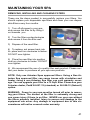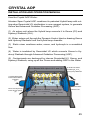
1
CERTIFICATE OF
AUTHENTICITY
Thank you for your purchase. This certificate hereby
verifies that the spa you have purchased from an
Artesian Spas (May Manufacturing, LLC) authorized
dealer is authentic, brand new and original. The spa has
been crafted and built in the U.S.A in accordance with
industry quality standards.
WARRANTY REGISTRATION
Please activate your warranty and register your spa at
www.ArtesianSpas.com click on owner login or mail
the registration card in the back of the owner’s manual.
Spa Serial #________________________
Spa Model:________________________
Date Purchased:_____________________
Installation Date:____________________
Dealer Name:_______________________
Telephone #:_______________________
TABLE OF CONTENTS
Certificate of Authenticity..........................................
Important Safety Instructions....................................
Electrical Requirements and Installation.................
Codes and Compliance.....................................
Electrical Wiring................................................
60 Hz GFCI Wiring Schematic..........................
50 Hz Residential Wiring Schematic.................
Spa Start Up................................................................
Selecting a Location..........................................
Inspection...........................................................
Filling the Spa with Water...................................
Turning the Power On........................................
Verifying Water Circulation.................................
Testing the GFCI Breaker...................................
Danger Risk of Electrical Shock.........................
Priming the Pump..............................................
Water Preparation..............................................
Topside Controller Instructions................................
The Main Screen.........................................................
Spa Operation.............................................................
Temperature Operation..............................................
The Settings Screen ..................................................
Temp Range......................................................
Heat Mode.........................................................
Ready Mode......................................................
Rest Mode.........................................................
Time of Day.......................................................
Setting Filter Cycle............................................
Invert Display.....................................................
Restricting Operations (Lock)............................
Hold...................................................................
Utilities...............................................................
Preference.........................................................
Time Display.......................................................
Reminder...........................................................
Dolphin (Not Used)............................................
Color..................................................................
Language...........................................................
1
6
6
6
8
9
10
10
11
11
12
12
12
13
13
13
14
14
15
20
21
21
22
22
22
23
25
28
29
30
31
32
32
32
33
33
33
TABLE OF CONTENTS
General Messages.......................................................... 34
Heater-Related Messages.............................................. 35
Sensor Related Messages............................................. 36
Miscellaneous Messages............................................... 36
System Related Messages............................................. 37
Reminder Messages....................................................... 38
Maintaining Your Spa..................................................... 39
Draining Your Spa................................................. 39
Pillow Care............................................................ 39
Jet Care................................................................. 40
Removing, Installing, and Cleaning Filters............ 41
Winterizing Your Spa..............................................42
Spa Cabinet Care.................................................. 42
Cleaning Your Spa Interior..................................... 42
Cover Care............................................................. 43
Chemical Treatment of Water................................. 43
Crystal AOP..................................................................... 45
Installation and Operation Manual......................... 45
Preparing for Installation........................................ 46
Artesian Spas Island Warranty..................................... 47
Artesian Spas Island Parts List & Diagram................. 53
IMPORTANT SAFETY INSTRUCTIONS
PLEASE TAKE THE TIME TO READ ALL OF THESE WARNINGS
AND CAUTIONS PRIOR TO USING YOUR SPA.
PLEASE, be a responsible spa owner. When installing and using this
spa, always adhere to basic safety precautions. Be sure to list emergency
telephone numbers at the telephone nearest the spa, including physician,
hospital, ambulance, police, and the fire department. Be certain to explain
safety precautions to all new or occasional users of your spa. Remember,
they may not be aware of the possible risks associated with the spa water
temperature. Have at least one family member learn CPR (cardiopulmonary resuscitation). IT COULD SAVE A LIFE!
READ AND FOLLOW ALL INSTRUCTIONS
1. WARNING - To reduce the risk of injury, do not permit children to use
this product unless they are closely supervised at all times.
2. A wire connector is provided on this unit to connect a minimum 8 AWG
(8.4 mm) solid copper conductor between this unit and any metal equipment, metal enclosures of electrical equipment, metal water pipe, or
conduit within 5 feet (1.5 m) of the unit.
3. For cord connected/convertible units. DANGER - Risk of Injury a) Replace damaged cord immediately.
b) Do not bury cord.
c) Connect to a grounded, grounding type receptacle only.
4. DANGER - Risk of Accidental Drowning - Extreme caution must
be exercised to prevent unauthorized access by children. To avoid accidents, ensure that children cannot use this spa unless they are supervised at all times.
5. DANGER - Risk of Injury - The suction fittings in this area are sized
to match the specific water flow created by the pump. Should the need
arise to replace the suction fittings or the pump, be sure the flow rates
are compatible.
Never operate spa if the suction fittings are broken or missing. Never
replace a suction fitting with one rated less than the flow rate marked on
the original suction fitting.
6. DANGER - Risk of Electrical Shock - Install at least 5 feet (1.5 m) from all metal surfaces. As an alternative, a spa may be within 5 feet
of metal surfaces if each metal surface is permanently connected by a
minimum 8 AWG (8.4 mm) solid copper conductor to the wire connector
on the terminal box that is provided for this purpose.
1
IMPORTANT SAFETY INSTRUCTIONS
7. DANGER - Risk of Electric Shock - Do not permit any electrical
appliance such as a light, telephone, radio, or television, within 5 feet
(1.5m) of a spa.
8. WARNING - To reduce the risk of injury:
a) The water in a spa should never exceed 40ºC (104ºF). Water temperatures between 38ºC (100ºF) and 40ºC are considered safe for a
healthy adult. Lower water temperatures are recommended for young
children and when spa use exceeds 10 minutes.
b) Since excessive water temperatures have a high potential for causing fetal damage during the early months of pregnancy, pregnant or
possibly pregnant women should limit spa water temperatures to 38ºC
(100ºF).
c) Before entering a spa, the user should measure the water temperature.
d) The use of alcohol, drugs, or medication before or during spa use
may lead to unconsciousness with the possibility of drowning.
e) Obese persons and persons with a history of heart disease, low
or high blood pressure, circulatory system problems, or diabetes should consult a physician before using a spa.
f) Persons using medication should consult a physician before using a
spa since some medication may induce drowsiness while other medication may affect heart rate, blood pressure, and circulation.
SAVE THESE INSTRUCTIONS
EQUIPMENT ASSEMBLIES
An equipment assembly shall be additionally provided with the following
important safety instructions
1. WARNING - Risk of accidental drowning. Extreme caution must be exercised to prevent unauthorized access by children, to avoid accidents,
ensure that children cannot use a spa or hot tub unless they are closely
supervised at all times.
2. DANGER - To reduce the risk of drowning from hair and body entrapment, install a suction fitting(s) with a marked flow rate that equals or
exceeds the flow rate marked on the equipment assembly.
3. DANGER - To reduce the risk of injury, do not remove the suction fittings. Never operate a spa or hot tub if the suction fittings are broken or
missing. Never replace a suction fitting with one rated less than the flow
rate marked on the equipment assembly.
2
IMPORTANT SAFETY INSTRUCTIONS
4. DANGER- Risk of Electric Shock. Do not permit any electric appliance,
such as a light, telephone, radio, or television, within 5 feet (1.5m) of a spa
or hot tub.
5. WARNING - Risk of Electric Shock. Install at least 5 feet (1.5m) from
inside wall of hot tub or spa using non metallic plumbing.
6. WARNING - To `reduce the risk of injury:
a) The water in a spa should never exceed 40oC (104oF) Water temperatures between 38oC (100oF) and 40oC are considered safe for a healthy
adult. Lower water temperatures are recommended for young children and
when spa use exceeds 10 minutes.
b) Since excessive water temperatures have a high potential for causing
fetal damage during the early months of pregnancy, pregnant or possibly
pregnant women should limit spa water temperatures to 38oC (100oF).
c) Before entering a spa or hot tub, the user should measure the water
temperature since the tolerance of water temperature regulating devices
varies.
d) The use of alcohol, drugs or medication before or during spa or hot tub
use may lead to unconsciousness with the possibility of drowning.
e) Obese persons and persons with a history of heart disease, low or high
blood pressure, circulatory system problems, or diabetes should consult a
physician before using a spa.
f) Persons using medication should consult a physician before using a spa
or hot tub since some medication may induce drowsiness while other medication may affect heart rate, blood pressure and circulation.
7. For equipment assemblies with a gas heater
WARNING - Risk of suffocation. This equipment assembly uses a gas heater and is intended for outdoor use only unless proper ventilation can be
provided for an indoor installation.
8. For equipment assemblies with a blower
WARNING - Install blower no less than 1 foot (305mm) above the maximum water level to prevent water from contacting electrical equipment.
SAVE THESE INSTRUCTIONS
3
IMPORTANT SAFETY INSTRUCTIONS
Marking for equipment assemblies
WARNING
REDUCE THE RISK OF ELECTROCUTION
1. Install at least 5 feet from water using nonmetallic plumbing.
2. Do not install under spa skirt or within an enclosure that would restrict ventilation.
3. If blower is included, install at least 1 foot above maximum water level.
REDUCE THE RISK OF CHILD DROWNING
1. Supervise children at all times.
2. Attach spa cover after each use.
3. Install a suction guard with marked flow rate no less than 170 GPM to avoid hair and body
entrapment.
REDUCE THE RISK OF OVERHEATING
1. Check with a doctor before use if pregnant, diabetic, in poor health, or under medical care.
2. Exit immediately if uncomfortable, dizzy or sleepy. Spa heat can cause hyperthermia and
unconsciousness.
3. Spa heat in conjunction with alcohol, drugs, or medication can cause unconsciousness.
WHEN PREGNANT, soaking in hot water for long periods can harm your fetus. Measure water
temperature before entering.
1. Do not enter spa if water is hotter than 100oF (38oC).
2. Do not stay in spa for longer than 10 minutes.
AUDIO COMPONENT WARNINGS
Spas equipped with the Audio system should follow these guidelines for safety:
1. CAUTION - Risk of Electrical Shock - Do not leave compartment door
open.
2. CAUTION - Risk of Electrical Shock - Replace components only with
identical components.
3. Do not operate the audio controls while inside the spa.
4. WARNING - Prevent Electrocution - Do not connect any auxiliary
components (for example cable, additional speakers, headphones, additional audio/video components, etc.) to the system.
5. These units are not provided with an outdoor antennae; when provided,
it should be installed in accordance with Article 810 of the National Electrical Code, ANSI/NFPA 70.
6. Do not service this product yourself as opening or removing covers
may expose you to dangerous voltage or other risk of injury. Refer all servicing to qualified service personnel.
4
IMPORTANT SAFETY INSTRUCTIONS
7. When the power supply connections or power supply cord(s) are damaged: if water is entering the audio/video compartment or any electrical
equipment compartment area; if the protective shields or barriers are
showing signs of deterioration; or if there are signs of other potential damage to the unit, turn off the unit and refer serviceing to qualified service
personnel.
8. This unit should be subjected to periodic routine maintenance (for example, once every 3 months) to make sure that the unit is operating properly.
KEEP THESE SAFETY INSTRUCTIONS IN A CONVENIENT AND
READILY ACCESSIBLE LOCATION!!
5
ELECTRICAL REQUIREMENTS AND
INSTALLATION
The following information is provided for hooking up electrical supply to
your new spa. A qualified, licensed, electrician must perform this work.
Failure to follow these instructions will terminate all warranty coverage
and can cause serious injury or death.
Codes and Compliance
North American 60 Hz
Voltage
Max Current Draw
Number of Wires
GFCI
3X JETS, 2 PUMP 4X/5X/6X JETS 2/3 PUMPS
240VAC
240VAC
37A
48A
4
4
50A
60A
Your export 50 Hz Artesian spa is preset out of factory to run 230V 3wires
30 amp max input. This product must always be connected to residual current device (RCD) having a trip current of not more than 30mA.
Electrical Wiring
WARNING: Your spa must be wired by a certified electrician and
according to these instructions. Failure to do so will terminate all
warranties and all listings from the independent listing facility.
1) The Island Spa requires a 240 VAC dedicated system. The spa must
be hard wired to the power supply, with no plug-in connections, extension cords, or sharing of service.
2) The spa requires that you run 6 (10 mm²) or 8 (8.4 mm²) AWG copper
wire, depending on the GFCI size. Do Not Use Aluminum Wire.
3) The power supply must have a suitable Ground Fault Circuit Interrupter (GFCI), according to Section 422-20 of the National Electrical
Code, ANSI/NFPA 70-7987 or other national installation requirement
with a residual current device (RCD) having a trip current of not more
than 30 mA. This could be used as the shut-off switch, which must be
installed in plain view of the spa. This electrical service must be readily
accessible to the spa occupants, but must not be within 5 feet of the spa.
4) Use only non-metallic conduit and fittings when installing power to
the spa.
5) After your spa has been positioned, route lines through the knockout on the left or right front corner of the spa.
6
6) Connect the power to the spa
Connect each color to its respective terminal block location. The Ground
(green) wire must be connected to the grounding terminal which is outside
of the System box. The Grounding wire must first enter the system box
and then access the grounding terminal via a hole on the side of the box
adjacent to the grounding terminal as shown in the picture above.
7
60 Hz GFCI WIRING SCHEMATIC
Neutral
120 VAC
120 VAC
240 Volt Residential Wiring Schematic with G.F.C.I.
House Breaker Box
G.F.C.I. Breaker Box
Red (Hot)
10
11
9
White
8
7
15
Spa System Box
Green
6
13 Red
Hot
12
Green
White
Black
14
5
Red Hot
White
Green
Red Hot
Black
Outside Ground Rod
Red Hot
1
Green Ground Wire to Ground Bar
3
Black
Correct
Voltage
0v
White
Bottom View
of G.F.C.I.
When Probes Are Placed Across
[3-4] [5-8] [5-9] [12-13]
108V-132V
[1-3] [5-6] [5-10] [12-14] [13-14]
[2-3] [5-7] [5-11] [12-15] [13-15]
216V-264V
[1-2] [6-7] [10-11] [14-15]
8
2
Green
4
Red
Black
White
Test for Voltages by placing
probes on these locations
Black Hot
Red Hot
White
50 Hz RESIDENTIAL WIRING SCHEMATIC
230 Volt/50 Hz Residential Wiring Schematic with 2 Pole RCD Breaker Box
Neutral
+
Ground
230 VAC
“Live Wire”
230 VAC House Breaker Box
9
RCD Breaker Box
Blue (Neutral)
8
7
6
12
Brown
(Hot)
11
10
5
Blue (Neutral)
4
Green
Yellow
(Ground)
Green
Yellow
(Ground)
Spa System Box
Brown
Green
Blue
(Neutral)
Outside Ground Rod
3
Blue (Nuetral)
Brown (Hot)
Green
1
2
Brown
(Hot)
Test for Voltages by placing
probes on these locations
9
SPA START-UP
Please read each step of the Start-up section prior to doing the step.
SELECTING A LOCATION
In preparation for installing your new Island spa, you should ensure that
your chosen location meets some minimum guidelines:
1) Place your spa on a surface that is large enough for the entire spa to
fit. Consider the space needed to easily access equipment compartments
and circuit breakers. Remember, all electronics must be kept dry.
2) The spa must be on a solid, level foundation. Recommended: 4-inch cement slab that has cured for at least 72 hours. Your warranty will be voided
if the spa is not properly installed. Structural damage due to an improper
foundation is not covered under warranty.
3) To avoid potential water damage to the skirt and frame, your spa should
be placed on a site where it will not be in the way of water sprinklers.
4) OUTDOOR SPAS: Consider building codes, electrical and plumbing
codes, desired proximity to house, wind and sun exposure, location of
trees (falling leaves, shade), dressing area, landscaping and lighting when
selecting a location.
5) INDOOR SPAS: Floor surface must have traction to prevent slipping
when wet. A floor drain is optimum. As room humidity will increase because of the spa, provide ample ventilation to prevent dry rot, mildew and
mold. Use materials that will withstand humidity. There may be a need for
cross-ventilation fans and/or dehumidifiers. The spa chemicals may corrode some household metals. Provide ample room if servicing should be
needed. Strong foundational support is vital, particularly if a second-story
site is selected.
6) Ensure the equipment compartment is in a location where it will not
be damaged by water drainage. Cover the equipment compartment with
a heavy screen if rodents are a problem. Damage due to rodents is not
covered under warranty.
7) Have the spa deck installed by a knowledgeable contractor to ensure
proper support.
8). If the spa is placed on the ground, even for a short period of time, it
must be supported by stones that are at least 2 inches thick and 12 inches
10
square. A solid foundation is recommended as soon as possible.
INSPECTION
You will want to inspect your spa, prior to filling it up with water. Look for
and remove any debris in the spa tub and in the filter. Verify that pump
plugs are installed on the pumps and the pump unions are tight.
FILLING THE SPA WITH WATER
NOTE: DO NOT fill your spa with hot water straight out of your water
heater or tap. This water may be as hot as 180 degrees F and will
cause damage to the surface and plumbing of the spa. This will void
your warranty. Level the spa before filling.
1) Prepare to fill the tub by removing all debris.
2) Remove the filters from your spa (see Removing, Installing and Cleaning Filters, page 41)
3) Insert the hose in the area where the filter was located as shown in the
picture below.
4) Fill the spa to the bottom of the pillows.
NOTE: DO NOT OVER-FILL YOUR TUB!
5) With the front panel off, verify there are no leaks at the pump union.
NOTE: Pump unions can become loose during shipping. Verify that
there are no leaks during filling of the spa.
6) Replace both filters.
11
SPA START-UP
TURNING THE POWER ON
Turn the power to the spa on at the main circuit breaker. Verify that your
spa has no messages.Verify that there is good water circulation in the spa.
The pump will initially come on for 5 minutes and cycle through each pump
for one minute on each pump at start up.
VERIFYING WATER CIRCULATION
1) Open all the jets.
2) Press the Jets 1/2/3 button to turn the pumps on or off.
3) Make sure each seat has water flow.
TESTING THE GFCI BREAKER
NOTE: The electrical service panel for your spa should be
equipped with a GFCI breaker. To avoid the risk of electrical
shock, perform the following safety test before each use of your
spa.
1) Make sure the power is turned on at the electrical service panel.
2) Turn on the GFCI breaker. If the breaker stays on, it is functioning
properly.
NOTE: The spa system will automatically trip the GFCI 24 hours after
power up. This is a safety feature and can not be disabled.
12
DANGER RISK OF ELECTRICAL SHOCK
If the GFCI breaker fails to
operate as described, there is
a possibility of an electric shock
if the spa is used. Shut off the
power at the main electrical
service panel until the source of
the problem has been identified
and corrected by a licensed
electrician or qualified spa
technician.
PRIMING THE PUMP
1) Turn off power at electrical service panel.
2) Locate and loosen the pump union by turning it counterclockwise one
half of one turn.
3) Allow air to escape from the fitting. When a steady stream of water flows
from the pump union, close it by turning it clockwise until tight.
4) Turn on power at electrical service panel.
5) Check once more to make sure that water is flowing from the jets during
auto purge. If so, continue. If no water is coming from your spa jets, please
call your Island Spas dealer for further assistance.
WATER PREPARATION
NOTE: Before putting your new spa into operation, understand that
preparing your new water is an important part of maintenance. Failure to properly prepare your water can result in substantially decreasing the life of the components and may void your warranty in
severe cases. Your Island Spas dealer should have a start-up and
maintenance kit available for you when you purchase your spa.
13
TOPSIDE CONTROLLER INSTRUCTIONS
Spa Operation
Main Screen
Navigation Buttons
Island Spas 3 Pump Topside
Spa Operation
Main Screen
Navigation Buttons
Island Spas 2 Pump Topside
THE MAIN SCREEN
Water Temperature Temperature Range
Desired Temperature
Important information about spa
operation can be seen quickly from
the Main Screen.
Pump and Heat
Status
The actual water temperature can
be seen in large text and the desired or set temperature is shown
in smaller text.
Messages
14
Menus
Lock Indicator
The time-of-day, ozone/uv, filter
operation, messages, heat range,
menu option and panel lock are
also displayed on the main screen.
SPA OPERATION
There are three ways to operate the spa functions from the topside. You
can turn the spa pumps and lights from the topside though the buttons
on the left hand side of the control panel, or you can use the spa menu
using the navigation buttons or you can use the short cut setting. Certain functions (optional wave control) can only be controlled from the
individual wave control buttons or through the menu option.
Using the spa function buttons:
Jets 1 Button: The jets 1 button will operate pump number 1. First press of the Jets 1 button will activate pump 1. A second press of the Jets 1 button will deactivate pump 1. If pump1 is not manually turned off by pressing the Jets 1 button it will
automatically timeout after 15 minutes.
Jets 2 Button: The jets 2 button will operate pump number 2. First press of the Jets 2 button will activate pump 2. A second press of the Jets 2 button will deactivate pump 2. If pump 2 t is not manually turned off by pressing the Jets 2 button it will automatically timeout after 15 minutes.
Jets 3 Button: (If your Island Spa is equipped with a third pump.) The jets 3 button will operate pump number 3. First press of the Jets 3 button will activate pump 3. A second
press of the Jets 3 button will deactivate pump 3. If pump 3
is not manually turned off by pressing the Jets 3 button it will automatically timeout after 15 minutes.
Light Button: The light button operates the L.E.D. Lights. First Press of the light button will turn on the lights. A second
press of the light button will turn the lights off.
The Island Spas lighting systems have different modes. To cycle through
the different modes you must turn the light on and off, once the desired
mode is selected, leave the light on. If the light is not manually turned off
it will automatically timeout after 240 minutes.
Using the Spa Menu and navigation buttons:
Use the Right button and highlight SPA in the menu.
15
SPA OPERATION
Press the select button
when the SPA option is highlighted.
The main screen will change to spa operation screen.
The main screen will change to spa operation screen.
16
SPA OPERATION
Use the navigation buttons to highlight the operation you would like
to perform.
Once the operation is highlighted press the
gage the highlighted item.
Select button, to en-
Back button: Will return you to the main menu.
Back
Jets 1: First press of the Select button will activate pump 1
(if pump is not currently on). A second press of the Select button will deactivate pump 1. If pump 1 is not manually turned off
Jets 1 by pressing the Select button it will automatically timeout after
15 minutes.
Jets 2: First press of the Select button will activate pump 2 (if
pump is not currently on). A second press of the Select button
will deactivate pump 2. If pump1 is not manually turned off by
Jets 2 pressing the Select button it will automatically timeout after 15
minutes.
Jets 3: (If applicable) First press of the Select button will activate pump 3 (if pump is not currently on). A second press of
the Select button will deactivate pump 3. If pump 3 is not manuJets 3 ally turned off by pressing the Select button it will automatically
timeout after 15 minutes.
Light: First Press of the select will turn on the lights. A second
press of the select button will turn the lights off. The Island
Spas lighting systems have different modes. To cycle through
the different modes you must turn the light on and off, once
the desired mode is selected, leave the light on. If the light is
not manually turned off it will automatically timeout after 240
minutes.
17
SPA OPERATION
Invert
Invert: Inverts the display to be viewed from outside the spa or
inside the spa.
Using the Shortcut Menu and navigation buttons:
Use the Right button and highlight SPA in the menu.
Use the Down button and highlight Shortcuts in the menu.
Press the select button
highlighted.
The main screen will change
to shortcut operation screen.
The shortcut menu assigns the
operation to the navigation
buttons.
18
when the SHORTCUT option is
SPA OPERATION
Up Button: The UP button will operate pump 1. First press of
the UP button will activate pump 1. A second press of
the UP button will deactivate pump1. If pump1 is not manually
turned off by pressing the UP button it will automatically timeout after 15
minutes.
Left Button: The Left button will operate pump 2. First press of
the Left button will activate pump 2. A second press of the
Left button will deactivate pump 2. If pump 2 is not manually
turned off by pressing the UP button it will automatically timeout after 15
minutes.
Right Button: The RIGHT button operates the L.E.D. Lights. First Press of the RIGHT button will turn on the lights.
A second press of the Right button will turn the lights off. The
Island Spas lighting systems have different modes. To cycle through the
different modes you must turn the light on and off, once the desired mode
is selected, leave the light on. If the light is not manually turned off it will
automatically timeout after 240 minutes.
Down Button: The Down button will operate pump 3
(if applicable). First press of the Down button will activate pump 3. A second press of the Down button will deactivate pump 3.
If pump 3 is not manually turned off by pressing the Down button it will
automatically timeout after 15 minutes.
Select Button: Will return operation back to the main menu.
The only item that can be changed on the left side of the Main Screen is the Set Temperature.
Left Button: Press the left arrow button to highlight the set temperature.
19
TEMPERATURE OPERATION
Up Button: Use the Up Button to raise the set temperature.
Down Button: Use the Down Button to lower the set
temperature.
Select Button: Press the Select Button to save the Set
Temperature Range: The Temperature Range is displayed in
the upper Right Hand corner of the display. This indicates what
the range of the set point can be. Please see the section on adjusting
setting to change the Temperature Range
High Range: Set point can be set between 80°F and 104°F
Low Range: Set Point can be set between 50°F and 99°F
20
THE SETTINGS SCREEN
The Settings Screen is where all programming and other spa behaviors
are controlled. This screen is where all programming and other spa behaviors are controlled.
Right Button: Press the Right button to go to the Menu section.
Down Button: Press the Down Button until Settings is
highlighted, you will need to press it twice.
Select Button: Press the Select Button to enter the Settings screen.
The screen will change to the Settings Menu
Settings
Temp Range High
Heat Mode
Ready
Time of Day
Filter Cycles
Light Cycle
Invert Panel Normal
Lock
TEMP RANGE
The first setting available to change is Temp Range. This system incorporates two temperature range settings. The specific range that is selected
(High or Low) will be displayed in the upper right hand corner of the main
screen.
High range can be set between 80°F and 104°F.
Low range can be set between 50°F and 99°F.
Select Button: When the temp range is highlighted in the
Settings Menu pressing the Select Button will change from High to low or Low to high.
21
THE SETTINGS SCREEN
Left Button: Press the left button to high light the Back Icon.
Select Button: Press the select button to return to the main Menu
OR
Down Button: Press the down button to go to Heat Mode.
HEAT MODE
Heat Mode indicates if the spa is Ready mode or Rest Mode. The heat
mode will be displayed in the bottom right screen of the main screen
display.
READY MODE:
In ready mode the heater will maintain the set temperature. If your Island
spa is not programmed for 24 hours Filter it will turn on the circulation
pump every half an hour to test the water temperature. If the water temperature is one degree below the set point the circulation pump will continue to run to bring the water temperature to the set point temperature.
If the water temperature is at the set point temperature the circulation
pump will turn off after 5 minutes. If your filtration cycle is set for 24 hours,
the circulation pump will continue to run.
REST MODE:
Will only allow the spa to heat during a filtration cycle. If the spa is not in
a filtration cycle, you can press the pump 1 pump to activate the heater.
The spa will go into Ready mode for 1 hour and then go back to rest
mode.
Select Button: When the heat mode is highlighted in the
Settings Menu pressing the Select Button will change from Ready to Rest or Rest to Ready.
Left Button: Press the left button to highlight the Back
22
Back Icon.
THE SETTINGS SCREEN
Select Button: Press the select button to return to the main Menu. OR
Down Button: Press the down button to go to Time of Day.
TIME OF DAY
When the time of day is highlighted.
Right Button: Press the Right button to go to the Time of Day Menu.
Time of Day
12:00 PM
12HR
The screen will change to Time of Day settings.
Right Button: Press the Right button to Highlight the hours.
Up Button: To increase the hours.
Down Button: To decrease the hours
NOTE: To change from AM to PM you will need to adjust the hours past 12.
Right Button: Press the Right button to High Light the minutes.
23
THE SETTINGS SCREEN
Up Button: To increase the minutes.
Down Button: To decrease the minutes.
Right Button: Press the Right button to Highlight the time format.
12HR: 12 hour format will be displayed.
24HR 24 hour format will be displayed.
Up Button: To change the time format.
Down Button: To change the time format.
Save
Select Button:
Press the select Icon to save and return to the main Menu.
OR
Left Button: Press the left button to high light. Save Icon (you will need to press it three times to high light the save button.)
Down Button: Press the down button to highlight Cancel Icon.
Cancel
Select Button: Press the select button to cancel changes and
return to the main Menu.
When you are back on the Settings Menu.
24
THE SETTINGS SCREEN
Down Button: Press the down button to go to Filter Cycle.
SETTING FILTER CYCLE
When the Filter Cycle is highlighted.
Right Button: Press the Right button to go to the Filter Cycle Menu.
The Screen will change to Filter Cycle menu.
Filter Cycles
Filter Cycle 1
Starts at 12:00 AM
Runs 0 HR 0 Min
Ends at 12:00 AM
Filter Cycle 2 NO
Starts at 12:00 AM
Runs 0 HR 0 Min
Ends at 12:00 AM
Right Button: Press the Right button to highlight Filter Cycle 1 Start time Hour.
Up Button: To Increase the Filter Cycle 1 Start time hours.
Down Button: To decrease the Filter Cycle 1 Start time hours
(NOTE: to change AM and PM you will need to cycle the hours past 12).
Right Button: Press the Right button to high light Filter Cycle 1 Start time minutes.
(NOTE: Changing the minutes goes by 15 minute intervals).
25
THE SETTINGS SCREEN
Up Button:To increase the Filter Cycle 1 Start time Minutes.
Down Button: To decrease the Filter Cycle 1 Start time Minutes.
Right Button: To highlight the Run Time Hours.
Up Button: To increase the Run Time Hours.
Down Button: To decrease the Run Time Hours.
Right Button: Press the Right button to high light Run Time
Minutes
(NOTE: Changing the minutes goes by 15 minute intervals).
Up Button: To increase the Run Time Minutes.
Down Button: To decrease the Run Time Minutes. The panel
calculates the end time and displays it automatically.
Right Button: Press the Right button to highlight Filter Cycle 2.
OR
Up Button: To Filter Cycle 2 on or off.
26
Down Button: To Filter Cycle 2 on or off.
Right Button: Press the Right button to high light Filter Cycle 1 Start time Hour.
THE SETTINGS SCREEN
Up Button: To Increase the Filter Cycle 2 Start time hours.
(NOTE: to change AM and PM you will need to cycle the hours past 12).
Down Button: To decrease the Filter Cycle 2 Start time hours
(NOTE: to change AM and PM you will need to cycle the hours past 12).
Right Button: Press the Right button to high light Filter Cycle 2 Start time minutes.
(NOTE: Changing the minutes goes by 15 minute intervals).
Up Button: To increase the Filter Cycle 2 Start time Minutes.
Down Button: To decrease the Filter Cycle 2 Start time Minutes.
Right Button: To highlight the Run Time Hours.
Up Button: To increase the Run Time Hours.
Down Button: To decrease the Run Time Hours.
Right Button: Press the Right button to high light Run Time Minutes.
(NOTE: Changing the minutes goes by 15 minute intervals).
Up Button: To increase the Run Time Minutes.
27
THE SETTINGS SCREEN
Down Button:To decrease the Run Time Minutes. The panel
calculates the end time and displays it automatically. In order to maintain sanitary conditions, as well as protect against freezing, the system will purge water from their respective plumbing by briefly
running the pumps at the beginning of each filter cycle. If Filter Cycle is
set to off, or filter cycle 1 is set to 24 hours. The second purge cycle will
start at the time that is set for filtration cycle 2 start time.
Right Button: Press the Right button to highlight Save Save Icon.
Select Button:Press the select button to save and
return to the Setting Menu.
OR
Down Button:
Press the down button to highlight Cancel Cancel
Select Button: Press the Select button to cancel changes
and return to the setting Menu.
When you are back on the Setting menu.
Down Button: Press the down button until Invert
display is highlighted.
Invert
INVERT DISPLAY
Select Button: Press the select button to Change the
display from Normal to Inverted.
Normal: Display will be towards the inside of the spa.
Inverted; Display will be towards the outside of the spa.
28
THE SETTINGS SCREEN
When the display is inverted, the navigation buttons will also be inverted
to work with the display.
Down Button: Press the down button until Lock is highlighted.
RESTRICTING OPERATIONS (LOCK)
The controller can be restricted to prevent unwanted use or changes.
There are two lock options.
Settings: Will lock out anyone from changing the Set Temperature and
other programming features all jet operations will work.
Panels: Prevent the topside from being used.
Select Button: Press the select button to enter the lock menu. The screen will change to Lock Menu.
Lock
Settings
Panel
OFF
OFF
Right Button: Press the Right button to highlight Settings
OFF/ON.
Select Button: Press the select button to turn Setting lock on.
Down Button: Press the down button until Panel is highlighted.
Select Button:Press the Select button to turn Panel lock on.
29
THE SETTINGS SCREEN
The screen will change and go back to the main display.
102OF
Set: 104oF
8:32 PM
Ozone
Filter 1
High Range
Unlock
Ready in Rest Mode
Heating
To unlock the system:
Right Button: Press the Right button to highlight Settings
OFF/ON.
Then press the following buttons:
Select
Select
Down
Follow the above steps to unlock the panel.
Left Button: Press the left button to highlight Back Icon Back
Select button: Press the select button to go back to the
setting menu.
.
Down Button: Press the down button until Hold is highlighted.
HOLD
Hold mode is used to disable the pump during service functions, cleaning
or replacing the filters. The hold will last for 1 hour unless the mode is
exited manually.
30
THE SETTINGS SCREEN
.
Select Button: Press the select button to activate the hold
mode
Left Button: Press the left button to highlight Back Icon Back
Select Button: Press the select button to activate the hold mode.
Down Button:Press the Down Button until Utilities is high
lighted.
UTILITIES
The Utilities menu is used for trouble shooting and for technicians. As
this is for service personnel we will just explain what each subject is. We
do not recommend to change anything unless walked through the setting
with a technician.
A/B Temps:
This will display the temperature on sensor A and B on the main display.
Fault Log:
This is a log of the last 24 actions on the spa. It is not necessary errors.
GFCI Test:This will cause the GFCI to trip to verify that is working correctly.
Down Button: Press the down button to go to the Preference menu.
31
THE SETTINGS SCREEN
PREFERENCE
The screen will change to the Preferences Menu.
Preferences
Temp Display
Time Display
Reminders
Cleanup
Dolphin
Color
Language
F
12HR
On
0.5 HR
5
Blue
English
o
TEMP DISPLAY
Right button: Press the right button to highlight temp Display.
Select button: Press the select button to change from F°
(Fahrenheit) to C° (Celsius) or from C° (Celsius) to F°
(Fahrenheit).
Down Button: Press the Down Button until Time Display is
highlighted.
TIME DISPLAY
Select Button: Press the select button to change from 12HR to
24HR or 24HR to 12HR time display.
Down Button: Press the Down Button until Reminders is highlighted.
REMINDER
Select Button: Press the select button to change The Reminders
from On to Off.
NOTE: The Reminders are messages that will appear in the bottom
left hand corner of the main display, They are maintenance reminders for clean filter, check PH etc.
32
THE SETTINGS SCREEN
DOLPHIN (NOT USED)
Down Button: Press the Down Button until Dolphin is highlighted.
This option is not available.
COLOR
Down Button: Press the Down Button until Color is highlighted.
Select Button: Press the select button to change background color on the display. Color options are: Blue, Red, Purple, Grey, and Green.
LANGUAGE
This will change the language displayed on the screen to the language
you choose.
Down Button:Press the Down Button until Language is
highlighted.
Select Button: Press the select button to open the Language
menu.
Down Button: Press the Down Button until the Language you desire is highlighted. Language options are; English, French, Spanish, and German.
Select Button: Press the select button to choose highlighted
language.
Left Button: Press the left button to highlight Back Icon
Select Button: Press the select button to go back to the setting menu.
Back
Down Button: Press the Down Button until the Information is
highlighted. Used for Technical and service personnel.
33
GENERAL MESSAGES
Most messages and alerts will appear at the bottom of the normally used
screens.
Several alerts and messages may be displayed in sequence.
Some messages can be reset from the panel. Message that can be reset will appear with a “right arrow” at the end of the message. This message can be selected by navigating to it and pressing the select button.
– – –°F – – –°C
Water Temperature is Unknown
After the pump has been running for 1 minute the water temperature will
be displayed.
Possible freezing condition
A potential freeze condition has been detected. All water devices are
activated. In some cases the pump may turn on and off and the heater
may operate during Freeze Protection. This is an operational message,
not an error code.
The water is too hot – M029
The system has detected a spa water temperature of 110°F (43.3°C)
or more, and spa functions are disabled. System will auto reset when
the spa water temperature is below 108°F (42.2°C). Check for extended
pump operation or high ambient temperature.
34
HEATER-RELATED MESSAGES
During the warmer month it is recommended to change the filter cycle
duration to keep the spa overheating with the high ambient temperature.
The water flow is low – M016
There may not be enough water flow through the heater to carry the heat
away from the heating elements. Heater start up will begin again after
about 1 minute.
Flow-Related Checks
Check for low water level, suction flow restriction (filters) closed valves or
trapped air.
The water flow has failed* – M017
There is not enough water flow through the heater to carry the heat away
from the heating element and the heater has been disabled. After the
flow problem has been resolved you must press any button to reset and
begin the heater start up.
Flow-Related Checks
Check for low water level, suction flow restriction (filters) closed valved, or
trapped air.
The heater may be dry* – M028
Possible dry heater or not enough water in the heater to start it. The spa
is shut down for 15 minutes. Press any button to reset the heater startup.
Flow-Related Checks
Check for low water level, suction flow restriction (filters) closed valved, or
trapped air.
The heater is dry* – M027
There is not enough water in the heater to start it. The spa is shut down.
After the problem has been resolved, you must clear the message to
restart the heater.
35
SENSOR-RELATED/MISC. MESSAGES Flow-Related Checks
Check for low water level, suction flow restriction (filters) closed valved,
or trapped air.
The heater is too hot* – M030
One of the water temperature has detected 118°F (47.8°C) in the heater
and the spa is shut down. You must clear the message when water is
below 108°F (42.2°C).
Flow-Related Checks
Check for low water level, suction flow restriction (filters) closed valved,
or trapped air.
SENSOR RELATED MESSAGES
Sensors are out of sync – M015
The temperature sensors may be out of sync. Call you dealer for service.
Sensors are out of sync -- Call for service – M026
The temperature sensors are out of sync. Call you dealer for service.
Sensor A Fault, Senor B Fault – Sensor A: M031, Sensor B: M032
The temperature sensors or sensor circuit has failed. Call you dealer for
service.
MISCELLANEOUS MESSAGES
Communications error
The control panel is not receiving communication from the system. Call
your dealer for service.
Test software installed
The Control System is operating with test software. Call your dealer for
service.
°F or °C is replaced by °T
The Control System is in Test Mode. Call your dealer for service.
36
SYSTEM RELATED/ MESSAGES Program memory failure – M022
Call you dealer for service.
The settings have been reset– M021
Call you dealer for service if this message appears on more than one
power-up.
The clock has failed –M020
Call you dealer for service.
Configuration error (Spa will not Start Up)
Call you dealer for service.
The GFCI test failed (System Could Not Test the GFCI) – M036
(North America Only) May indicate an unsafe installation. Call you
dealer for service.
A pump may be stuck on – M034
Water may be overheated.
NOTE: POWER DOWN THE SPA! DO NOT ENTER THE
WATER!
Call you dealer for service.
Hot fault – M035
A pump appears to have been stuck on wirh the spa was last powered
on. Water may be overheated.
NOTE: POWER DOWN THE SPA! DO NOT ENTER THE
WATER!
Call you dealer for service.
37
REMINDER MESSAGES Not all messages may display.
Check the pH
May appear on a regular schedule, i.e. every 7 days. Check pH with a
test kit and adjust pH with the appropriate chemicals.
Check the sanitizer
May appear on a regular schedule, i.e. every 7 days. Check sanitizer
level and other water chemistry with a test kit and adjust with the
appropriate chemicals.
Clean the filter
May appear on a regular schedule, i.e. every 30 days. Clean the filter
media as instructed by the manufacturer.
Test the GFCI (or RCD)
May appear on a regular schedule, i.e. every 30 days. The GFCI or RCD
is an important safety device and must be tested on a regular basis to
verify its reliability. Every user should be trained to safely test the GFCI or
RCD associated with the hot tub installation.
Change the water
May appear on a regular schedule, i.e. every 90 days. Change the water
in the spa on regular basis to maintain proper chemical balance and
sanitary conditions.
Clean the cover
May appear on a regular schedule, i.e. every 180 days. Vinyl covers
should be cleaned and conditioned for maximum life.
Change the filter
May appear on a regular schedule, i.e. every 365 days. Filters should be
replaced occasionally to maintain proper spa function and sanitary
condition.
38
MAINTAINING YOUR SPA
DRAINING YOUR SPA
Your spa needs to be drained, cleaned, waxed, and refilled about every
six months. More frequent water changes may be necessary if bather
load is heavy. A hose bib has been provided to assist you in draining
your spa.
1) Turn off the power to your spa.
If you fail to turn the power off, vital
components could be damaged.
Do not leave an empty spa exposed for
long periods of time in hot, sunny weather.
2) Pull tab and then turn counter
clockwise till cap is removed.
3) Connect the hose to hose bib.
SPACE
4) Pull hose bib out to ensure opening
of nozzle/drain plug.
5) Check the garden hose end to see if water is flowing. If water is not
flowing, check the hose for kinks. Also check to see if valve is in the full
open position.
CAUTION: The chemical content and temperature of the water will
cause damage to certain vegetation. We do not recommend that
you drain your spa onto plants or lawns. If you choose to do this,
please remove your spa cover and allow spa to cool for a minimum
of 24 hours with the spa turned off.
PILLOW CARE
Remove and clean the pillows with soapy water and a soft cloth when
needed. Use a vinyl conditioner once a month. Remove pillows when
doing chemical shock treatment.
39
MAINTAINING YOUR SPA
JET CARE
We recommend that you clean your jets when you drain your spa.
1) Spray jet inserts with a mixture of 1 part vinegar to two parts warm
water and let soak for 10 - 15 minutes. Periodically rotate the spinner
nozzle to break up residue in the jets.
2) Rinse the jet inserts with a standard garden hose.
40
MAINTAINING YOUR SPA
REMOVING, INSTALLING AND CLEANING FILTERS
These are the steps needed to successfully replace your filters. You
should replace your disposable spa filters and clean your non disposable filters every four months.
1) Turn off all power to your spa
and remove the filter lid by lifting it
out towards you.
2) Turn the filter counterclockwise
and remove it from the filter well.
3) Dispose of the used filter.
4) To replace, set screen back into
its place and turn clockwise to fasten.
DO NOT over-tighten.
5) Place the new filter into position
and turn clockwise to fasten. DO NOT
over-tighten.
6) We recommend the use of a quality filter soak product. Please contact your dealer to purchase all your spa care products.
NOTE: Only use Artesian Spas approved filters. Using a Non Artesian Spa approved filter can cause issues with circulation and
heater, using a non Artesian Spa filter can void warranty coverage. You can upgrade your filter to a 75 Sqft. filter. Please see your
Artesian dealer, Part# 06-007-12 (standard) or 06-008-12 (Nature2)
option.
WARNING: Power to your spa must be turned off prior to removing your filters. The suction at the filter is extremely strong and
can cause injury if there is no filter. NEVER run your spa without
the filters properly installed. Injury to person and damage to the
equipment can occur. Any damage to equipment due to this circumstance will not be covered under warranty.
41
MAINTAINING YOUR SPA
WINTERIZING YOUR SPA
It is not recommended that you drain your spa completely during freezing conditions. We recommend that you leave your spa full of water with
the power on to keep the tub from freezing. If you decide to drain your
spa during freezing conditions, contact your dealer for help.
Contact your Island Spas dealer before refilling a drained spa in freezing
temperature.
WARNING: Damage to your spa caused by freezing is NOT covered under warranty. Please contact your local Island Spas dealer
to assist you in winterizing your spa.
SPA CABINET CARE
Your spa comes standard with a Kingwood, or faux wood, cabinet. This
cabinet requires no maintenance. You may wish to clean the cabinet
with mild soap and water from time to time.
1) Gently wash the cabinet with mild soap and water and allow to dry
completely.
NOTE: Do not apply any solid type finish such as shellac or varnish. After weathering, these types of finishes will crack and/or
turn yellow.
CLEANING YOUR SPA INTERIOR
It is important to clean the interior of your spa every time it is drained to
help preserve the sheen of your spa’s surface. However, it is important
that you do not use any abrasive cleaners or strong chemicals. Your
Island Spas authorized dealer will be able to supply you with the proper
cleaning solution for your spa. After cleaning, make sure all residues
are removed prior to filling the spa. This will help prevent sudsing and
improper chemical balance.
42
MAINTAINING YOUR SPA
COVER CARE
Cleaning of your spa cover is an important part of routine maintenance.
Dirt acts as an abrasive to the vinyl topcoat, and can also cause wear
to folds, seams and stitching. Mildew growing on damp, dirty vinyl will
begin to actually rot in the fabric, accelerating failure.
Follow this simple routine for cleaning, prior to application of vinyl.
1) Rinse with cool water using a garden hose.
2) Spray with a gentle, non-foaming cleaner and wipe clean. Never use
laundry detergent, abrasives, alcohols, dish soaps or harsh cleaners.
These can actually remove some of the topcoat and cause premature
vinyl failure.
3) For stubborn dirt, use a non-abrasive sponge.
4) Rinse again thoroughly with water and allow to dry.
5) Repeat monthly, or as needed.
Your vinyl cover is affected by the UV in sunlight. Periodic protection
with a liquid protectant will extend the life of your spa cover. The wrong
kind of protectant can be more harmful than no protectant at all. Keep
any product away from your spa that is labeled “flammable,” that contains any type of oil, or that leaves a waxy coating on your cover.
Never stand or sit on the cover and never drag it over abrasive surfaces.
Lift cover only by the handles provided.
CHEMICAL TREATMENT OF WATER
Water from your tap is fine for showers, bathing and drinking. However,
in a contained recirculating system such as in a spa, water must be
treated with chemicals. The main purpose of chemical treatment is to
keep the water sanitary and to maintain a specific ph balance of the
water. Proper ph balance ensures that the water will not cause irritation
to the users or harm the spa’s components. Chemical treatment does
have its limitations. When water evaporates, chemical residues are left
behind.
43
MAINTAINING YOUR SPA
CHEMICAL TREATMENT OF WATER
As the levels of the residues combine with other types of residue, such
as body oil and detergents, your water becomes increasingly difficult
to maintain. Because of this residual effect, at some point it becomes
easier and more cost-effective to drain, clean and refill your spa with
new water. We recommend that the water be changed at least every
six months. At this time you should also clean or replace your filters. If
your spa has a frequent and/or heavy bather load, it may be necessary
to drain and fill your spa more often. Refer to the section titled “Draining
your spa” for instructions (page 38).
WARNING: Spa damage due to improper chemicals use is not covered under warranty.
44
CRYSTAL AOP
INSTALLATION AND OPERATION MANUAL
How the Crystal AOP Works:
Artesian Spas Crystal AOP combines its patented Hybrid lamp with cutting edge Germicidal UV sterilization in one compact system, to generate
Ozone and Advanced Oxidation Processing (AOP).
(1) Air enters unit where the Hybrid lamp converts it to Ozone (O3) and
Hydroxyl Radicals (OH-).
(2) Water enters unit through the Dynamic Venturi Injector drawing Ozone
and Hydroxyl Radicals from the Hybrid lamp chamber.
(3) Static mixer combines water, ozone, and hydroxyls in a scrambled
flow.
(4) Water is irradiated by Germicidal UV which converts Ozone to Hydroxyl Radicals through Advanced Oxidation Processing (AOP).
(5) Contaminants are destroyed by intense Germicidal UV, Ozone, and
Hydroxyl Radicals, using up all the Ozone and adding ORP to the Water
Air is Blasted With Hybrid UV-C and VUV
Air Enters Chamber
converting O2 to O3
and Hydroxyl Radicals
Contaminated Water
Enters Quartz Mixing
Chamber
(3)
Ozone and Hydroxyls
Enter Venturi Injector
(2)
(1)
Sanitized Water
Ozone Mixes
Ozone is Irradiated
Water Is Irradiated By
With Water
In Water By UV
UV-C (UV Sanitation)
(Oxidation)
(Advanced Oxidation)
(4)
(3)
(5)
Exits the Unit
45
CRYSTAL AOP
PREPARING FOR INSTALLATION
1. For best results, drain the spa and fill with fresh water. If not, refer to
chart for recommended levels.
2. Check for and correct all leaks in the plumbing.
3. Check electrical system. Verify voltage is the same as prescribed on
the side of the Crystal AOP.
4. Check filters. Clean or replace as necessary.
5. Balance the pH.
6. Shock the spa. The use of Calcium Hypochlorite is recommended.
7. Crystal AOP contains an ozonator, injector, and check valve. Remove
any vacuum source (such as an injector) already installed on the spa.
pH
Alkalinity
TDS
Cyanuric Acid
Free Chlorine
Calcium Hardness
Metals
Nitrates/Phosphates
46
7.2-7.6
80-120 ppm
<1,000
30-70 ppm
0.5-1.5 ppm
60-400 ppm
0 ppm
< 30 ppm
ARTESIAN SPAS ISLAND WARRANTY
This section is a description of your warranty. Here you will find descriptions of what is covered under your Island Class Spa warranty and
what can void your warranty. PLEASE READ THE WARRANTY THOROUGHLY. Please take a moment to register your warranty. You can
register on line at http://www.artesianspas.com, click on owner login or
you mail in the warranty registration card attached to this manual. For
warranty outside USA and Canada, please refer to your countries Artesian Distributor.
LIFETIME STRUCTURE WARRANTY
Island Class Spas carry a lifetime structure warranty. The structure is
defined as the fiberglass vessel below the exposed material finish. The
manufacturer warrants the spa against loss of water due to a defect in
the spa structure, for the lifetime of the spa. In the event of a defect in
the material and/or workmanship, the spa structure will be repaired or
replaced at the discretion of the manufacturer. THIS WARRANTY IS
GIVEN ONLY TO THE ORIGINAL OWNER, AND TERMINATES UPON
TRANSFER OF OWNERSHIP. COMMERCIAL APPLICATIONS ARE
EXCLUDED FROM THIS AND ALL WARRANTIES.
If the spa structure is defective and must be replaced, it will be returned
to the factory. The original, installed equipment (this includes the frame,
skirt, and all equipment) will be reinstalled. If new equipment is desired,
there will be additional charges to the customer. If the frame and/or skirt
of the spa has been badly damaged, there will be additional charges
to the spa owner for repairs or replacement. When a spa needs to be
returned to the factory for repair, the cost of one way freight to the company will be at the spa owner’s expense. The manufacturer will not pay
for removal, installation, cranes, construction, de-construction, or any
other cost associated with access, egress, or ingress, of the spa at the
customer’s home. The manufacturer reserves the right to an on-site inspection by its authorized representative. In the unlikely event a shell
or spa must be replaced, all warranties (shell, surface, electrical and
plumbing) date back to the original start date of the warranty. The warranty period starts either the day of delivery to the customer or eighteen
(18) months from the date of manufacturing, whichever date comes first.
47
ARTESIAN SPAS ISLAND WARRANTY
FIVE YEAR SURFACE WARRANTY
The spa surface is described as the exposed acrylic material finish. The
manufacturer warrants the spa surface to be free from defects in the
material and workmanship, such as blistering, cracking, or delaminating, this does not cover micro-crazing, under normal use and maintenance for a period of five years from the original date of the warranty.
The warranty period starts either the day of delivery to the customer or
eighteen (18) month from the date of manufacturing, whichever date
comes first. THIS WARRANTY IS ONLY TO THE ORIGINAL OWNER,
AND TERMINATES UPON TRANSFER OF OWNERSHIP. COMMERCIAL APPLICATIONS ARE EXCLUDED FROM THIS AND ALL WARRANTIES.
The spa must be set on a level solid surface that is sufficient to support
the entire length and width of the spa. Standard building practices must
be followed. Damage caused by failure to have a leveled and supported
foundation under the spa is not covered under warranty. The manufacturer does not warrant problems associated with prolonged exposure
to the sun and/or use of any sanitization or ozone system not approved
by the manufacturer. Damage to the spa surface caused by leaving the
spa uncovered and empty of water with direct sunlight exposure will
terminate this warranty. Any alteration to any system, either electrical,
plumbing, or mechanical, or over use of chemicals, or any other problems caused by external source are not covered under warranty. Other
exclusions may apply.
Normally problems associated with material and workmanship can and
will be repaired. If the spa surface is repaired, the repair is limited to
the affected area only, and there is no guarantee against discoloration
of fading. The decision to repair will be made by the manufacturer and
its field representative after a review of the facts, pictures, or any other
data presented by the dealer or customer. In all cases, pictures of the
affected area and foundation of the spa must be provided before any
decisions to repair or replace can be made. In the unlikely event a shell
or spa must be replaced, all warranties (shell, surface, electrical and
plumbing) date back to the original date of installation. If it is determined
that the surface is to be replaced, the same conditions and terms as
outlined in the shell warranty will apply.
48
.
ARTESIAN
SPAS ISLAND WARRANTY
THREE-YEAR ELECTRICAL WARRANTY
(i.e., pumps, equipment packs, heaters, topside, etc.)
The MANUFACTURER warrants all electrical equipment to be free from
defect in material and workmanship for three-years from the original
start date of the warranty. The warranty period starts either the day of
delivery to the customer or eighteen (18) month from the date of manufacturing, whichever date comes first. THIS WARRANTY IS GIVEN
ONLY TO THE ORIGINAL CONSUMER AND TERMINATES UPON
TRANSFER OF OWNERSHIP. COMMERCIAL APPLICATIONS ARE
EXCLUDED FROM THIS AND ALL WARRANTIES.
The stereo, speakers, L.E.D. lighting, and Ozone are not included in this
warranty but are covered under a separate warranty. Damage caused
by acts of nature, poor water chemistry, and/or improper maintenance
will not be covered under this warranty. Alterations or replacements of
components installed in the spa that are not purchased and/or approved
by the MANUFACTURER, including incorrect wiring, will terminate the
complete spa warranty.
THREE YEAR PLUMBING WARRANTY
The plumbing is described as all piping, jet bodies, valve bodies and air
controls. The manufacturer warrants all plumbing for a period of three
years from the original start date of the warranty. The warranty period
starts either the day of delivery to the customer or eighteen (18) month
from the date of manufacturing, whichever date comes first. THIS WARRANTY IS GIVEN ONLY TO THE ORIGINAL OWNER, AND TERMINATES UPON TRANSFER OF OWNERSHIP. COMMERCIAL APPLICATIONS ARE EXCLUDED FROM THIS AND ALL WARRANTIES. Jet
internals, valve handles, and other such items are regular maintenance
items. They are covered for the item only, labor is not covered for these
items. Damage caused by acts of nature, poor water chemistry, and/or
improper maintenance will not be covered under this warranty.
TWO YEAR KINGWOOD CABINET WARRANTY
The spa cabinet is described as the outer material encasing the spa
structure. The manufacturer warrants it to be free from defects in material and/or workmanship from the original start date of the warranty. The
warranty period starts either the day of delivery to the customer or eighteen (18) month from the date of manufacturing, whichever date comes
first. THIS WARRANTY IS GIVEN ONLY TO THE ORIGINAL OWNER,
AND TERMINATES UPON TRANSFER OR OWNERSHIP.
49
ARTESIAN SPAS ISLAND WARRANTY
COMMERCIAL APPLICATIONS ARE EXCLUDED FROM THIS AND
ALL WARRANTIES. This warranty does not cover normal darkening,
staining, or aging. The spa cabinet requires care and maintenance by the
consumer. Damage caused by acts of nature, poor water chemistry, and/
or improper maintenance will not be covered under this warranty.
OTHER ITEMS NOT COVERED IN THIS WARRANTY
Some items are not covered in this warranty. These items either have a
different warranty, or are warranted through the manufacturer of that item.
STEREO AND STEREO COMPONENTS
The stereo and stereo components, including speakers, bluetooth, sub
woofer, stereo power supply, wire harness and remote control are covered for 30 days from the original start date of the warranty. The warranty period starts either the day of delivery to the custome or eighteen
(18) month from the date of manufacturing, whichever date comes first.
Please note: Warranty coverage for both parts and labor is covered for
30 days only. Parts, not labor, will be covered for one year from date of
installation. This warranty does not cover damage to a stereo or stereo
component from abuse, poor reception, or damage caused by putting
a wet CD into the stereo. If a stereo is replaced under this warranty,
the manufacturer reserves the right to replace the unit with another like
unit, but not necessarily the same stereo manufacturer. No spa will be
replaced for a failed stereo. The stereo does not affect the performance
of the spa.
NOTE: For all operating instructions see the stereo manufacturer’s owner’s manual included with the spa.
OZONATOR
The ozonator is covered for one year from the original start date of
the warranty. The warranty period starts either the day of delivery to
the customer or eighteen (18) month from the date of manufacturing,
whichever date comes first.
SPA COVER
The spa cover manufacturer warrants the spa cover skin for one year
from the original start date of the warranty. The warranty period starts
either the day of delivery to the customer or eighteen (18) month from
the date of manufacturing whichever date comes first.
50
ARTESIAN SPAS ISLAND WARRANTY
Do not return the spa cover to the manufacturer. This will delay the
replacement or repair of the cover. The spa manufacturer is not responsible for lost covers.
LIGHTING
The lighting is guaranteed to work upon delivery. There is no warranty
covering the lighting.
PERFORMANCE
In the event of any defect covered by this LIMITED warranty, a May
Manufacturing LLC, authorized agent will correct such defect within the
terms and conditions contained herein. There will be no charge for parts
or labor within the above terms. However, travel charges that occur will
not be covered under terms and conditions by the warranty. If it is determined by May Manufacturing LLC that the repair of the product is not
feasible, a replacement spa equal to the value of the original purchase
price will be provided. Cost for removal of the defective spa and delivery and installation of the replacement spa is the responsibility of the
homeowner and will not under any circumstances be covered by May
Manufacturing LLC.
LIMITATIONS
This warranty is void if this Island Spa has been subjected to alteration,
misuse, or repairs have been performed by anyone other than an authorized agent of May Manufacturing LLC. Misuse or abuse is defined as:
use of the spa in a nonresidential application, water temperature outside
the range of 32 degrees F to 110 degrees F, damage caused by clogged
or dirty filter cartridges, damage to the spa from an absence of a hard
cover, damage to components from improper pH, use of any type of
acid, or from chemical imbalance. ACTS OF NATURE are not covered
under this warranty.
NOTE: Warranty on 50Hz spas excludes labor.
(Outside US and Canada)
DISCLAIMER
May Manufacturing LLC, or its agent shall not be liable for any injury,
cost or other damage, whether incidental or consequential, arising out
of any defect covered by the LIMITED WARRANTY. The liability of May
Manufacturing LLC under this LIMITED WARRANTY shall not exceed
the original amount paid for the spa.
51
ARTESIAN SPAS ISLAND WARRANTY
LEGAL REMEDIES
This LIMITED WARRANTY gives specific rights, and other rights that
may apply and will vary from state to state.
WHAT IS NOT COVERED UNDER YOUR WARRANTY
The following is a general overview of non-warranty items and work.
This is not an all-inclusive list.
Diagnosis of Spa Problems
Fuses
Light Bulbs of Any Kind
Removing a Spa from a Structure
Pillows
Filters
Chemical Misuse/ Damage
Filter Lids
Any Part not Purchased from Artesian Spas
Jet Inserts
Valve Handles
Pump Seals
Draining and filling the Spa
Acts of Nature
Travel Charges
Cabinet Screws
Incorrect Wiring
Shipping Charges
By Using Non-Artesian Parts
THIS WARRANTY IS GIVEN ONLY TO THE ORIGINAL OWNER,
AND TERMINATES UPON TRANSFER OF OWNERSHIP. COMMERCIAL APPLICATIONS ARE EXCLUDED FROM THIS AND
ALL WARRANTIES.
Any alteration of the spa that has not been pre-authorized by the
manufacturer will void all warranties. If the manufacturer approves an
alteration, verify that this alteration is covered under warranty. Damage caused by moving a spa that is blocked in or that has been recessed, along with additional charges for labor, is not covered by this
warranty.
52
ARTESIAN SPAS ISLAND PARTS LIST & DIAGRAM
ITEM #
PART #
DESCRIPTION
ITEM #
PART #
DESCRIPTION
(1)
33-1310-08
33-1312-08
3 PUMP SPA PACK
2 PUMP SPA PACK
(8)
08-1360-52
2’’ DIVERTER VALVE
(2)
OP24-0216-08
HEATER
(9)
08-1370-52
01-0017-30
ON/OFF VALVE
AIR CONTROL
(3)
33-1314-08
11-1304-08
11-1303-08
TP 800 TOPSIDE
2-PUMP OVERLAY
3-PUMP OVERLAY
(10)
(4)
21-0053-81
21-0050-81
21-0049-81
21-0048-81
21-0025-81
21-0008-19
6.0 HP 2-SPEED PUMP
6.0 HP 1-SPEED PUMP
4.8 HP 2-SPEED PUMP
4.8 HP 1-SPEED PUMP
3.0 HP 1-SPEED PUMP
LAING CIRC PUMP
03-3501-52
03-3401-52
03-3301-52
03-3304-52
03-3307-52
03-3201-52
03-0764-30
03-3601-52
5’’ HELIX ROTO JET
4.5’’ HELIX ROTO JET
3’’ HELIX ROTO JET
3’’ HELIX DIRECT JET
3’’ HELIX MASSAGE JET
2.75’’ HELIX JET
7’’ ULTRA BLASTER JET
5’’ WHIRLPOOL JET
(5)
06-0006-12
06-0055-12
06-0050-48
OP96-0017-00P
BLUE FILTER
PURPLE FILTER
FILTER CAP
NATURE 2
(6)
25-0012-51
25-0031-40
OP25-0030-00A
OP25-0030-00C
OP25-0030-00F
OP25-0030-00R
OZONE
AOP
UVC LAMP
QUARTZ SLEEVE
BALLAST
CRYSTAL TUBE O-RING
26-1303-85
26-1304-85
26-1305-85
LOUNGE PILLOW
NECK PILLOW
WATERFALL PILLOW
(7)
(11)
SPA SERIAL NUMBER
STEREO
ITEMS
33-1315-08
33-0257-16
33-0001-17
33-0190-07
33-0193-07
33-0090-98
33-0242-16
33-0085-56
33-0191-07
33-0246-16
33-0243-16
33-0102-55
WI-FI MODULE
AQUATIC AV STEREO
BLUETOOTH STEREO
INFINITY BLUETOOTH
STEREO
INFINITY BLUETOOTH
STEREO REMOTE
POWER SUPPLY
BLACK SPEAKER
GRAY SPEAKER
INFINITY SPEAKER
SPEAKER COVER
SUBWOOFER BOX
BASS TUBE
(7) PILLOWS
(7) PILLOWS
(9) AIR CONTROL
(3) TOPSIDE
(10) JETS
(8) DIVERTER VALVE
(5) FILTER
(11) SPA S/N
(6) OZONE
(2) HEATER
(8) DIVERTER VALVE
(1) SPA PACK
(7) PILLOWS
(9) AIR CONTROL
(4) PUMP
© 2015 Artesian Spas (May Manufacturing, LLC) | Last Revised 03/13/2015| Subject to change without notice.
53
Please do not send products or
other correspondence to the
address below.
__________________________
__________________________
__________________________
ARTESIAN SPAS
Attn: Customer Care Department
4720 N. Lamb Blvd.
Las Vegas, NV 89115
Place
Stamp
Here
25-30
31-40
Health Benefits
41-50
Stress
51-60 Relief
61-70
71+
Relaxation
Other: __________________________________________________________________________________
What is your reason for purchasing a spa?
What is your age bracket?
How many people are in your household?______________________________________________________
What other spa brands did you consider buying?_________________________________________________
Optional Questions:
Your Dealers Name and Location_____________________________________________________________
Spa Model ______________________________________________________________________________
Date of Installation___________________________ Spa Serial Number (required)_____________________
Phone Number___________________________________________________________________________
City_____________________________________________ State _____________________ Zip__________
Address_________________________________________________________________________________
Name__________________________________________________________________________________
SPA & WARRANTY REGISTRATION
Activate Product Warranty & Download Owner’s Manuals
Please activate your warranty and register your spa by mailing in this reply card, or go online at
www.ArtesianSpas.com and click on owner login.
(Serial # is required below and can be located on the bottom kick plate of the spa, or can be found within the
cabinet next to the equipment on a white placard attached to the frame.)