1
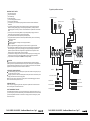
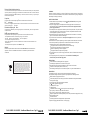
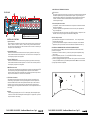
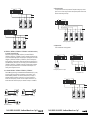
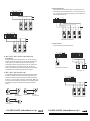
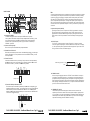
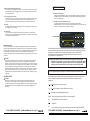
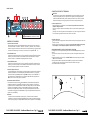
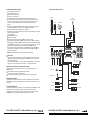
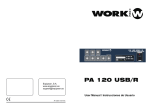
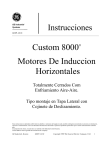
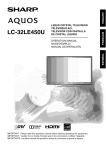
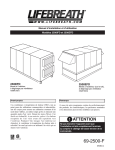
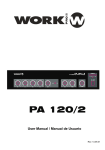
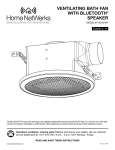
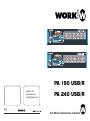
PA 190 USB/R
Equipson, S.A.
www.equipson.es
[email protected]
PA 240 USB/R
User Manual / Instrucciones de Usuario
PUBLIC ADDRESS AMPLIFIER
W/ USB-SD INTERFACE
AMPLIFICADOR DE MEGAFONIA
CON INTERFAZ USB-SD
ENGLISH
Page 1
ESPAÑOL
Página 15
This symbol on the product or on its packaging indicates that this product
shall not be trated as household waste. Instead it shall be handed over to
the applicable collection point for the recycling of electrical an electronic
equipment. By ensuring this product is disposed of correctly, you will help
prevent potential negative consequences for the environment and human
health, which could otherwise be caused by inappropriate waste handling
of this product. The recycling of amterials will help to conserve natural
resources. For more detailed information sabout recycling of this product,
please contact your local city office, your household waste disposal service
or the shop where you purchased the product.
Este símbolo en su equipo o embalaje, indica que el presente producto
no puede ser tratado como residuos domésticos normales, sino que deben
entregarse en el correspondiente punto de recogida de equipos electrónicos
y eléctricos. Asegurándose de que este producto es desechado
correctamente, Ud. está ayudando a prevenir las consecuencias negativas
para el medio ambiente y la salud humana que podrían derivarse de la
incorrecta manipulación de este producto. EL reciclaje de materiales
ayuda a conservar las reservas naturales. Para recibir más información,
sobre el reciclaje de este producto, contacte con su ayuntamiento, su
punto de recogida más cercano o el distribuidor donde adquirió el producto.
SAFETY INSTRUCTIONS
Datos Técnicos
CAUTION
RISK OF ELECTRIC SHOCK
DO NOT OPEN
Sección Amplificador
Tipo
180W-Mono (180W)
240W-Mono (240W)
PA 190 USB/R
PA 240 USB/R
PA 190 USB/R
PA 240 USB/R
Nominal: 180W- maxima:240W
Nominal: 240W- maxima:300W
Distorsión Harmónica
Relación señal/ruido
Entradas Impedancia/Sensibilidad
Salida de Altavoces/ Ohms
user serviceableparts inside; refer servicing to qualified personnel.
WARNING: To reduce the risk of fire or electrical shock, do not expose this appliance to
Capacidad de Potencia de salida
Respuesta de frecuencia
CAUTION: To reduce the risk of electrical shock, do not remove the cover ( or back ) .No
30-20,000Hz ( 3dB)
0.5%(1KHz- capacidad de potencia nominal)
INPUT 1-4: 60dB AUX IN: 70dB MAIN IN: 80dB
INPUT 1-4 / XLR and 6.3mm conector Combi :bal./des bal.
Mic: -55/-52dB (2.3/2.7mV)-600 , bal./desbal.
Line: -25/-20dB (50/100mV)-47K , bal./desbal.
AUX IN / RCA estéreo /des bal
CD: -5dB (570mV)-80K
TUNER : -10dB (300mV)-56K
ATPE: -15dB (200mV)-20K
AUX1:-20dB(100mV)-20k
MAIN IN / mono RC A / 0dB(1V)-10K /desbal
25V-70V-100V (3.5 , 27 , 55.6 ) (180W)
25V-70V-100V (2.6 , 20.5 , 41.7 ) (240W)
PA 190 USB/R
PA 240 USB/R
Salidas Adicionales/
Voltaje-Impedancia
PREAMP OUT / mono RCA / 1V-600 /desbal
1W -8
Tone controls
Bass 10dB-100Hz
Treble 10dB-10KHz
Controles
7 controles de volumen para INPUT 1-4, AUX IN, 1W 8 y Tel. paging
1control de volumen Master
1 Control de agudos
1 Control de graves
Selector de 5 zonas
Alimentación / Consumo
PA 190 USB/R
PA 240 USB/R
115/230 Vac ( 5%)-60 /50Hz 360W
115/230 Vac ( 5%)-60/50Hz 480W
435
335
100mm/(17.13)"
This symbol, wherever it appears, alerts you to important operating and
maintenance instructions in the accompanying literature. Read the manual.
DETAILED SAFETY INSTRUCTIONS:
All the safety and operation instructions shouldbe read before the appliance is operated.
Retain Instructions:
The safety and operating instructions should be retained for futurereference.
Heed Warnings:
All warnings on the appliance and in the operating instructions should be adhered to.
Follow instructions:
All operation and user instructions should be followed.
4ohms 8ohms 16ohms
Salida de altavoces/ Voltios
Dimensiones ( L x An x Al)
rain or moisture.
This symbol, wherever it appear, alerts you to the presence of uninsulated
dangerous voltage inside the enclosure - voltage that may be sufficient to
constitute a risk of shock.
(13.19)"
(3.34)"
Water and Moisture:
The appliance should not be used near water ( e.g. near a bathtub,washbowl,kitchen sink,
laundry tub,in a wet basement,or near a swimming pool etc. )
Ventilation :
The appliance should be situated so that its location or position does not interfere with its
proper ventilaton. For example,the appliance should not be situated on a bed,sofe rug,or
similar surface that may block the ventilation openings:or placed in a built - in installation,
such as bookcase or cabinet that may impede the flow of air through the ventilation
openings.
Heat:
The appliance should be situated away from heat sources such as radiators, heat registers,
stoves, or other appliance ( including amplifiers ) that produce heat.
Power source:
The appliance should be connected to a power supply only of the type described in the
operating instructions or as maked on the appliance.
Grounding or Polarization:
Precautions should be taken so that the grounding or polarization means of an appliance is
not defeated.
Power-Cord Protection:
Power supply cords should be routed so that they are not likely to be walked on or pinched
by items placed upon or against them, paying particular attention to cords and plugs,
convenience receptacles and the point where they exit from the appliance.
PA 190 USB/R - PA 240 USB/R User Manual/Manual de uso Pag 28
PA 190 USB/R - PA 240 USB/R User Manual/Manual de uso Pag 1
Ejemplo de posibles conexiones
IMPORTANT SAFETY NOTES
Read these instructions.
Keep these instructions.
Heed all warnings..
Follow all instructions.
Do not use this apparatus near water.
Clean only with a damp cloth.
Do not block any of the ventilation openings. Install in accordance with the manufacturers
instructions.
Do not defeat the safety purpose of the grounding-type plug. A grounding type plug has two
blades and a third grounding prong. The third prong are provided for your safety. When the
provided plug does not fit Into your outlet, consult an electrician for replacement of the obsolete
outlet.
Protect the power cord from being walked on or pinched particularly at plugs, convenience
receptacles, and the point where they exit from the apparatus.
Only use attachments/accessories specified by the manufacturer.
The apparatus should be placed in a metal rack(see INSTALLATION), and not in the following
environments of cases:
Moist place;
Under direct radiation of sunlight or other strong heat radiation;
No air ventilation.
Unplug this apparatus during lightning storms or when unused for long periods of time.
Refer all servicing to qualified service personnel. Servicing is required when the apparatus has
been Damaged in any way, such as power-supply cord or plug is damaged, liquid has been
spilled or objects have fallen into the apparatus, the apparatus has been exposed to rain or
moisture, does not operate normally, or has been dropped.
This handbook is an integral part of the product and must accompany it when changing owner,
to allow the new owner to get to know the installation, operating, and safety instructions.
Faulty installation of the amplifier frees WORK from all responsibility.
Columna de sonorizacion
Contacto
"VOICE PRIORITY"
Altavoz exponencial
Altavoz
Altavoz
Señal AUX
1W
+
1 2 3 4
HANDLING THIS UNIT
Check if the power supply is being shut down, the power line is pulled out from outlet and other
lines connecting this unit are also disconnected.
DON'T DISASSEMBLE THIS UNIT
Don't disassemble and repair the unit by yourself, otherwise it may induce electric shock or fires. If
you can't remedy any occurred trouble according to the methods described in the list of this manual,
you must call a qualified technician or consult with our company, and a forced using it may cause
electric shock or fires.
PA 190 USB/R - PA 240 USB/R User Manual/Manual de uso Pag 2
-
T
Tel
R
Paging
G
Monitor TEL.
VOL. VOL.
COM
LINE MIC
PHANTOM
24V
PUSH
LINE MIC
PHANTOM
24V
PUSH
LINE MIC
PHANTOM
24V
PUSH
LINE MIC
PHANTOM
24V
PUSH
1: for CD
2: for Tuner
3: for Tape
4: for AUX IN
Z4
Z3
Z2
Z1
25V
70V
100V
PRE
OUT
R
Use only with a 250V fuse
COM
4
8
16
GND
L
INPUT 1
INPUT 2
INPUT 3
INPUT 4
MAIN
IN
BALANCED
CAUTION
To prevent the risk of fire or electrical shock, the apparatus shall not be exposed to dripping or
splashing and that no objects filled with liquids, such as vases, shall be placed on the apparatus. If
connecting interference takes place in source circuit, THD will be more than 10%;Don't install this
equipment in a confined space such as a bookcase or similar unit.
CAUTION FOR USING POWER LINE
You shall hold the plug firmly to avoid the pull-out of power line and risk occurring when you pull
the power line out from AC outlet.
The plug of power line for this unit should be pulled out from power outlet to cut down the power
supply, when this unit isn't used for a long period.
Don't force any matter on the power line of this system to avoid the damaging power line and
don't insert the knotted power line into unit.
Priority
8
CHIME SW
Alimetnación
Amplificador
Micrófono
Ecualizador
Micrófono de sobremesa
Reproductor CD
Reproductor CD
Sintonizador AM/FM
Sintonizador AM/FM
Grabador de cassette
Grabador de cassette
PA 190 USB/R - PA 240 USB/R User Manual/Manual de uso Pag 27
Proteccion del cable de potencia:
Los cables de suministro de potencia deben ser colocados de tal modo que no sea probable
que sean pisados o pinchados por los elementos colocados sobre ellos o contra los mismos,
prestando especial atencion a los cables y enchufes, tomas de corriente y los puntos por
donde salen del aparato.
Limpieza:
El aparato solo se debe limpiar segun las recomendaciones del fabricante.
Periodos sin uso:
El cable de energia del aparato debe ser desconectado del enchufe cuando no se utiliza
durante un largo periodo de tiempo.
Entrada de objetos y liquidos:
Se debe tener cuidado de que no caigan objetos ni se derramen liquidos en la caja a traves
de las aberturas.
Danos que requieran servicio:
El aparato debe ser reparado por el personal de servicio cualificado cuando:
-se ha danado el cable de suministro de energia o el enchufe;o
-han caido objetos o se ha derramado liquido en el aparato;o
-se ha expuesto el aparato a al lluvia;o
-parece que el aparato no funciona normalmente o muestra un cambio marcado en el
rendimiento;o
-se ha dejado caer el aparato o se ha danado la caja.
Servicio:
El usuario no debe tratar de realizar un servicio mas alla de lo descrito en las lnstrucciones
operativas . Todos los demas servicios deben ser remitidos al personal de servicio
cualificado.
This symbol on the product or on its packaging indicates that this product
shall not be trated as household waste. Instead it shall be handed over to
the applicable collection point for the recycling of electrical an electronic
equipment. By ensuring this product is disposed of correctly, you will help
prevent potential negative consequences for the environment and human
health, which could otherwise be caused by inappropriate waste handling
of this product. The recycling of amterials will help to conserve natural
resources. For more detailed information sabout recycling of this product,
please contact your local city office, your household waste disposal service
or the shop where you purchased the product.
PA 190 USB/R - PA 240 USB/R User Manual/Manual de uso Pag 26
CLEANING
When the unit needs a cleaning, you can blow off dust from the unit with a blower of clean with rag
etc Don't use solvents such as benzol, thinner, alcohol or other fluids with very strong volatility and
flammability for cleaning the unit body.
SAFETY PRECAUTIONS
1. Please read the notes proceeded by the symbol
with special attention, as they provide
Important safety information.
2. The power supply voltage of the amplifier has a sufficiently high value to involve the risk of
electrical shock; therefore, never install, connect, or disconnect the equipment with the
power supply switched on.
3. The metal parts of the equipment are earthed by means of the power cable. If the power socket
used to supply power does not have an earth connection, call a qualified electrician who will
earth the equipment by means of the terminal.
4. Make sure that the power supply cable of the equipment cannot be trodden on or crushed by
objects, to ensure that the cable is not damaged.
5. To prevent the risk of electrical shock, never open the equipment: there are no parts inside
that the user can use.
6. Make sure that no objects or liquids can get into the speaker, as this could cause a short circuit.
7. Never attempt to make any repairs that are not described in this manual. Contact your
authorized service centers or highly qualified personnel when:
The equipment does not function (or functions in an anomalous way).
The power supply cable has been seriously damaged.
Objects or liquids have got into the equipment.
The equipment has been subject to heavy impact.
8. If the equipment is not to be used for long periods of time, switch it off and disconnect the power
supply cable.
9. If the equipment gives off any strange odor or smoke switch it off immediately and
disconnect the power from the supply cable.
PRECAUTIONS
Do not obstruct the ventilation grilles of the equipment.
Avoid having the amplifier work on overload for a long time.
Fully tighten the screw terminals for speakers in order to ensure a safe contact.
Do not force command parts (buttons, controls, etc.).
When cleaning external parts, do not use thinners, spirits, or any other volatile substances.
DESCRIPTION
The amplifiers in the PA series have been expressly designed for transmitting
announcements through all PA sound systems. They incorporate the following functions:
USB/SD interface for play/record functions
4 combination jack (XLR and 6.3mm) inputs, line/micro switchable sensitivity with excludable
24V dc phantom supply.
1 stereo RCA input, three stage sensitivity selectable.
600 teliliary signal(Tel. Paging) input.
1 "PREAMP OUT" output.
1 "MAIN IN" input
1 "MONITOR OUTPUT 1W/8 " slave output for monitor music signal.
Input 1 priority on the other inputs with vocal activation.
Input 1 priority on the other inputs, activation with contact.
Outputs for speakers with constant impedance (4-8-16 ohm) and constant voltage (25-70-100 V).
Treble and bass controls.
VU-meter with LEDs.
Protection against short-circuiting between output terminals.
Option zone paging selectable function, four zone paging .
PA 190 USB/R - PA 240 USB/R User Manual/Manual de uso Pag 3
CONECTANDO LOS TERMINALES DE SALIDA
FRONT PANEL
6
8
5
4
3
2
1
PRECAUCION
Para prevenir el riesgo de un electroshock, no toque nunca los conductores hacia los terminales
de salida del amplificador cuando se esta funcionando el aparato. Las figuras abajo (ver 16,
terminal de salida en CONTROLES Y FUNCIONES), muestran las posibles conexiones de la
"SALIDA", terminales de altavoz accesibles retirando la cobertura protectora. Tenga en
cuenta las siguientes reglas:
Cables de impedimento constante
La impedancia total de conexiones del altavoz debe corresponder a los terminales de salida
elegida en el amplificador.
La suma de capacidades de energia del altavoz no debe ser menor que la capacidad de la
energia del amplificador.
La longitud de los cables que conectan deben ser lo mas largo posible, en cualquier caso, si la
distancia a cubrir es mayor, la logitud de los cables debe ser mas grande.
7
9
PA 240 USB/R has the same controls
CONTROL AND FUNCTIONS
1. Input level control
These controls let you individually set the volume of the sound source that are connected to the
"INPUT 1","INPUT 2", "INPUT 3", "INPUT 4", "INPUT 5" Turning a control clockwise increases
the volume of the corresponding source. We recommend to leave the control of momentarily not
used inputs at their minimal setting "0".
2. Common BASS-control
When turned clockwise this control enhances the low frequency reproduction, while turning it
counterclockwise attenuates the bass frequencies. If the control is set to its center position, the
overall frequencyresponse is not being altered.
3. Common TREBLE-control
When turned clockwise this control enhances the high frequency reproduction, while turning it
counterclockwise attenuates the treble frequencies. If the control is set to its center position, the
overall frequency response is not being altered.
Cables de voltaje constante
Cada altavoz debe estar equipado con un transformador de linea con un voltaje de entrada
igual al del cable (20,70,100V)
La suma de las capacidades de energia de los altavoces no debe pasar a la de la salida del
amplificador (o sea, la potencia total enw atios de los altavoces instalados en las zona1 a 4)
AJUSTANDO LA SENSIBILIDAD PARA LA FUNCION "PRIORIDAD DE VOZ"
Para cambiar el nivel de la senal que determina la activacion de la funcion "Prioridad de Voz",
proceda como lo siguente:
1) Destornille los 4 tornillos en cada lado, y los dos en la parte superior del amplificador, luego
retirar la tapa.
2) Dentro del amplificador, encuentre "F" en la TARJETA DE ENTRADA, la cual permite
actuar en el trimmer "VR 6" debajo de la tarjeta.
3) Usando un pequeno destornillador, ajuste el recortador "VR 6": girando el control en el sentido
de reloj, la sensibilidad aumenta y la funcion de prioridad sera una senal de voz menos intensa.
4) Ponga la tapa devuelta al a mplificador.
4. MASTER volume control
The setting of this control determines the output level that is present at the loudspeaker OUTPUT.
We recommend to generally adjust the MASTER and the input level controls at mediocre
positions. Extreme setting, where the MASTER is set to maximum output and the input controls
nearly set to their minimum or vice versa are not recommendable.
VR 6
5. LED VU-meter instruments
This instrument shows the signal's output level. For proper operation of the amplifier correct
volume setting of major importance. The first eight LED-segments on the down represent the
area between-20dB and 0dB, in which the outputted level should be kept. In case the last two
segments on the up are lit for a longer period of time, this means that the outgoing signal is
driven into clipping, which mostly results in audible distortion. You have to adjust the volume at a
lower setting.
F
6. Indicator
When switching the amplifier's power on, the "PL" indicator lights. When the amplifier's output
overload, the "OVER LOAD" indicator lights and interrupt output. For equipment life, you have to
adjust the volume at a lower setting.
PA 190 USB/R - PA 240 USB/R User Manual/Manual de uso Pag 4
PA 190 USB/R - PA 240 USB/R User Manual/Manual de uso Pag 25
26. Controles de nivel de salida de senal musical del monitor
Este control le permite configurar individualmente el volumen dela fuente del sonido que se
conecta a la "SALIDA DE MONITOR 1W/8 " (14). Girando los controles en sentido del reloj
aumenta el volumen de la fuente correspondiente.
27. Control de nivel de entrada de anuncio telefonico.
Este control le permite configurar el volumen del sonido que se conecta al "Anuncio telefonico"
(12). Girar el control en sentido del reloj incrementa el volumen de la fuente correspondiente.
Se recomienda dejar el control de la entrada que no se usa por el momento en su
configuracion minima "0".
28. Fusible AC
El fusible proteje el circuito de las corrientes alternatives (AC) del equipo. El fusible se puede
cambiar solo en el caso de que se funda .
7. "POWER" switch
Using the POWER switch lets you turn the main power on or off. The power is on when the
switch is on its "ON" position, and it it off when the switch is on its "OFF" position.
8. Zone paging select switch
Speaker lines of each zone can be connected or disconnected independently "Z1~Z4". To
connect the speaker lines, turn the switch on. To disconnect the speaker lines, turn the switch
off.
9. USB/SD interface
Digital MP3 Player / Recorder
29. Tornillo "Tierra"
En caso de que la toma principal que se usa que tiene un conductor a tierra, este tornillo
ofrece la posibilidad de conectar a tierra las partes metalicas del amplificador. Sin embargo,
Ud. debe dejar este procedimiento a un electricista experimentado y calificado.
VOL
SD MMC
NOTAS DE INSTALACION
En todo momento, el amplificador se debe operar bajo condiciones apropiadas. Este incluye la
localizacion de la operacion, , la cual provee ventilacion suficiente y el dispositivo no
debe estar expuesta a sol directo o cualquier otra fuente de radiacion directa o de reflejo de
cualquier otra fuente de calor. Cuando se instala los sistemas de altavoces, elija un lugar que
no sea afectado por vibracion o oscilacion mecanica extrrema y/o constante. Tambien asegurese
de que los altavoces esten instalados eb lugares que esten libres de polvo o de humedad.
PRECAUCION
Se recomienda que deje la conexion del aparato a un tecnico de servicio calificado y
experimentado que se especializa en conectar equipos electricos y electronicos. No tome el
riesgo de ser electrocutado. Para reducir el riesgo de ser electrocutado, todas las conexiones
deben estar hechas antes de que se conecte el amplificador a la toma de energia. Antes de
conectar el aparato a la toma, asegurese de nuevo de que todas las conexiones han sido
hechas correctamente y que no hayan cortocircuito. La instalacion total de refuerzo de sonido
debe estar de acuerdo a las leyes, regulaciones, estandares y reglas relevantes y aplicables en
el pais donde el equipo se pondra en funcionamiento.
SUMINISTRO DE ENERGIA DE AC
PRECAUCION
Antes de usar el amplificador por primera vez, asegurese de que el voltaje del aparato este de
acuerdo con la toma de energia.
REC
RPT
VOL
SD USB
This interface allows to play MP3 files from USB port or SD card slot. Changing the source only
pushing one button. The information is showed in the LCD display, allowing to navigate through
folders ans files. It incorporates volume control and REPEAT function.
The interface includes a recorder function, allowing to save the mixing information into SD
card or USB driver.
NOTE: It is only allows to do play or record application over one of USB/SD devices, by
this way, it is not possible to play a file from the USB port and to record the mix in
the SD card. So, first select the operation (PLAY or REC) and after select the source
where this application will occur (SD or USB).
NOTE: The maximum capacity of SD card or USB driver is 32 GB.
One common application is to use the record fuction as message recording with microphone
into a SD card, being very easy to select the adequeate message and to play it.
To navigate between folders and files
VOL
VOL
Allows to setup the volume of the played file
Switch on /off the interface
SD USB
Select the audio source (USB port or SD card slot)
RPT
Repeat function of played file
Play/Pause
REC
PA 190 USB/R - PA 240 USB/R User Manual/Manual de uso Pag 24
E
Record function. Allows to record the mix information into USB/SD device
PA 190 USB/R - PA 240 USB/R User Manual/Manual de uso Pag 5
REAR PANEL
20
18
19
17
1W
16
Priority
8
+
-
15
T
Tel
14
G
R
Paging
CHIME SW
1 2 3 4
Monitor TEL.
VOL. VOL.
COM
LINE MIC
PHANTOM
24V
PUSH
LINE MIC
PHANTOM
24V
PUSH
LINE MIC
PHANTOM
24V
PUSH
LINE MIC
PHANTOM
24V
PUSH
1: for CD
2: for Tuner
3: for Tape
4: for AUX IN
Z4
Z3
Z2
Z1
25V
70V
100V
PRE
OUT
R
Use only with a 250V fuse
COM
4
8
16
GND
L
INPUT 1
INPUT 2
INPUT 3
MAIN
IN
INPUT 4
BALANCED
21
28
22 23 24 25 26 27
29
13. CHIME switch
Chime is OFF when the CHIME switch at the middle position, as co it is at working status
when the switch at downside, and when push the switch to upside then produce a chime.
When chime is working, it has priority function it's volume is controlled by INPUT1 and
MASTER.
Notas
Conectando micrafonos desbalanceados al aparato cuando esta con el suministro de
phantom causaria danos severos al microfono y por lo tanto no se permite esta practica. Es
absolutamente obligatorio enchufar o desenchufar los cables de microfono solo cuando se
haya apagado la energia phantom . Asegurese de que la energia phantom este apagada
cuando se utiliza los microfonos, que no se deben usar con la energia fantasma. El voltaje
presente en el pi n 2 y pin 3 del conector XLR podria causar danos severos a los microfonos.
Cualquier duda que tenga, por favor consulte al manual del microfono en cuestion o contacte
su vendedor antes de hacer cualquier conexion.
22. Interruptor de sensibilidad de las entradas (ENTRADA AUXILIAR)
Girando estos interruptores a la posicion "CD", las entradas de "ENTRADA AUX" son las
indicadas para conectarse a la salida de senal de equipo de CD. Girando estos interruptores a
la posicion "TUNER (SINTONIZADOR)", las entradas de "ENTRADA AUX" son indicadas para
conectarse a la salida de senal de radio AM/FM. Girando estos interruptores a la posicion
"TAPE (CASSETTES)" , las entradas de "ENTRADA AUX" son indicadas para conectarse a la
salida de senal de salida de cassettes.
14. Main cord connector
This connector is meant for the connection of the supplied mains cord.
15. Input "Tel. paging"
The terminals input lets you connect to a telephone signal (600 ohms). The input features the
"Voice Priority" function, which overrides all other input signals once, a telephone message is
sent. If you want to have this function disabled forever, please contact a SHOW SERVICE
CENTER.
16. "Priority" terminal
When short-circuiting these terminals (i.e. by means of using an electrical switch), the audio
signals coming from "AUX IN", are attenuated while the signals coming from "IN2", "IN3" and
"IN4" are gaining priority.
1W
+
Tel. paging
R
T
-
G
RCA
Auxiliary conctat
17. Output terminal for auxiliary loudspeaker
The terminal is meant for the connection of a small external loudspeaker that gets driven by an
internal auxiliary power amplifier, providing a nominal output 1 watt. Only the mixed audio
signal coming from "AUX IN" are included in the outputted signal. In addition, the output signal
is controlled only by the Volume control of the "AUX IN", music signal level control (23).
1W
+
Priority
8
-
Señal desbalanceada (canal L o R )
Masa
Priority
8
23. Entradas de "Entrada AUX"
Los enchufes "R" y "L" le permite hacer entradas de los canales derecho ("R") e izquierda ('L")
de una fuente de audio con una senal de salida de alto nivel, tal como un sintonizador de
AM/FM, un cassette, un equipo de CD,etc. Usando el interruptor de sensibilidad de entrada
(19), las senales van para difierentes equipos. Son capaces de usar conectores coaxiales de
tipo RCA, y senales desbalanceadas.
Tel. paging
R
T
G
24. Terminal "ENTRADA PRINCIPAL"
Luego de sacar la cinta entre los terminales de "PRE OUT (SALIDA PRE)" Y "MAIN IN
(ENTRADA PRINCIPAL)", puede asignar un procesador externo de senal (por ejemplo, un
ecualizador) en la cadena de audio entre el pre-amplificador y la base de salida de energia de
amplificador de energia. Esta oportunidad le provee una solucion apropiada cuando es
necesario modificar o mejorar la senal de audio (ajustar el tiepo de demora, equalizar,
eliminar el efecto Larsen, etc.) La entrada esta desbalanceada, afectada por los controles de
tono y el control de volumen principal.
25. Terminal "SALIDA PREAMP"
Este termina provee senales de audio mezclada de todas las fuentes que se conectan con las
entradas del amplificador y puede ser utilizado para alimentar un amplificador de energia
externo, un procesador de senal (Por ejemplo, un ecualizador), o cualquier aparato externo.
La senal desbalanceada es afectada por el control de entrada individual. Antes de usar
"SALIDA PREAMP", la cinta entre este enchufe y el terminal "ENTRADA PRINCIPAL" se debe
sacar.
+
1
8 ohm
-
PA 190 USB/R - PA 240 USB/R User Manual/Manual de uso Pag 6
PA 190 USB/R - PA 240 USB/R User Manual/Manual de uso Pag 23
S
COM
4
8
16
25V
70V
18. Zone output terminal
This output terminal connects to the speaker lines. Total speaker wattage is up to nominal
power for zones 1-4. When using a zone selector low-impedance speakers cannot be used,
default is constant voltage 100V output.
100V
0
70V
0
70V
0
70V
COM
Z4
Z3
Z2
Z1
Connecting the speakers to 70V output
COM
4
8
16
25V
70V
100V
0
0
100V
0
100V
0
100V
0
100V
0
100V
0
100V
100V
Connecting the speakers to 100V output
19. Output terminals
These 5 terminals allow connecting speakers.
Connecting the speakers to 100V output
20. "ENTRADA 1',"ENTRADA 2", "ENTRADA 3" Y "ENTRADA 4" Sensibilidad de entradas y
el interruptor phantom XLR de 24V
Girando estos interruptores a la posicion "LINE (Cable)", las entradas "ENTRADA 1"
"ENTRADA 2" "ENTRADA 3" y "ENTRADA 4" pueden ser conectadas a una fuente de audio
con alto nivel de salida de senal. Girando estos interruptores a la posicion "MIC", las entradas
"ENTRADA 1" "ENTRADA 2" "ENTRADA 3" y "ENTRADA 4" pueden ser conectadas a un
microfono dinamico con baja impedancia . Girando estos interruptores a la posicion "24V", se
conectara el suministro phantom de "24V: en XLR de pin 2 y pin 3 de entradas "ENTRADA 1"
"ENTRADA 2" "ENTRADA 3" y "ENTRADA 4" deben usar un microfono de tipo condensador
que requiere este tipo de suministro externo. Se recomienda usar este interruptor con un
volumen general configurado a un minimo.
COM
4
8
16
25V
70V
4
COM
100V
8
16
25V
70V
100V
+
+
-
+
-
4 ohm
Connecting the speakers to 4 ohm output
21. Las Entradas "ENTRADA 1" "ENTRADA 2" "ENTRADA 3" y "ENTRADA 4"
Estas 4 senales de terminal de tipo combinacion balanceadas/desbalancedas (XLR y 6.3 mm)
son para la conexion de un microfono de tipo condensador, y acepta phantom de 24V,
microfono dinamico (30-600ohms) o una fuente de sonido de alto nivel. (Por ejemplo, el
sintonizador de AM/FM, un cassette o un equipo de CD, etc.) Para su conveniencia, es
necesario usar el interruptor (20). "Entrada 1" tiene una funcion de "Prioridad de Voz", que
exclude todas las otras entradas tan pronto que se transmita un mensaje con un microfono;
8 ohm
COM
4
8
16
25V
70V
100V
0
Micrófono balanceado
3-pin XLR plug
Micrófono desbalanceado
8 ohm
Total impedance 4 ohm
25V
0
25V
0
3-pin XLR plug
Connecting the speakers to 25V output
Micrófono desbalanceado
Mono jack
PA 190 USB/R - PA 240 USB/R User Manual/Manual de uso Pag 22
PA 190 USB/R - PA 240 USB/R User Manual/Manual de uso Pag 7
25V
COM
4
8
16
25V
70V
18. Terminal de Salida de Zona
El terminal de salida conecta a los cables del altavoz. La cantidad total de W de un
altavoz depende de la potencia nominal para zona 1_4. Cuando se usa un selector de
zona, no se pueden usar los altavoces de baja impedancia. La preconfiguracion es de
salida de voltaje constante de 100 V.
100V
COM
0
70V
0
70V
0
Z4
Z3
Z2
70V
0
Connecting the speakers to 70V output
COM
4
8
16
25V
70V
Z1
100V
0
100V
0
100V
0
100V
100V
Conectando altavoces a la salida de 100V
0
100V
0
100V
0
19. Terminales de Salida
Estos 5 terminales permiten conectar a los altavoces.
100V
Connecting the speakers to 100V output
COM
20. "INPUT 1","INPUT 2", "INPUT 3" and "INPUT 4" Inputs sensitivity and XLR
Phantom 24V switch
By turning these switch onto the "LINE" position the"IN1", "IN2", "IN3", "IN4" input can be
connected to an audio source with high level signal output. By turning these switches onto
the "MIC" position the "IN1","IN2","IN3", "IN4" input can be connected to a dynamic
microphone with low impedance. By turning these switch onto the "24V" opsition connects
the "24V" phantom supply on XLR of pin2 and pin3 of inputs "IN1","IN2","IN3","IN4",
necessary to operate condenser type microphone which require this type of external supply.
It is recommended to use this switch with the general volume set on minimum.
21. "INPUT 1", "INPUT 2", "INPUT 3"and "INPUT 4" Inputs
These three balanced/unbalanced combination type jack (XLR and 6.3mm) inputs, meant for
the connection of condenser type microphone that accepts 24V phantom power, dynamic
microphone (30- 600 ohms) or a high level sound source (e.g. AM/FM tuner, cassette desk,
CD player, etc.). In case you are using, it is necessary to use the switch (20). "Input 1" has a
"Voice Priority" function that excludes all the other inputs as soon as a message is transmitted
with a microphone; it is possible to exclude this function by calling a SHOW SERVICE
CENTER.
4
8
16
25V
70V
Unbalanced microphone
3-pin XLR plug
(seen from welded side)
Unbalanced microphone
3-pin XLR plug
(seen from welded side)
8
16
25V
70V
+
-
+
-
4 ohm
Conectando altavoces a la salida de 4 ohm
8 ohm
8 ohm
Impedancia total 4 ohm
COM
4
8
16
25V
70V
100V
25V
0
25V
0
25V
Conectando altavoces a la salida de 25V
Mono jack
PA 190 USB/R - PA 240 USB/R User Manual/Manual de uso Pag 8
100V
+
0
Balanced microphone
4
COM
100V
PA 190 USB/R - PA 240 USB/R User Manual/Manual de uso Pag 21
PANEL TRASERO
Note
20
18
19
17
1W
16
Priority
8
+
-
15
T
Tel
14
R
Paging
G
CHIME SW
1 2 3 4
Monitor TEL.
VOL. VOL.
COM
LINE MIC
PHANTOM
24V
PUSH
LINE MIC
PHANTOM
24V
PUSH
LINE MIC
PHANTOM
24V
PUSH
LINE MIC
PHANTOM
24V
PUSH
1: for CD
2: for Tuner
3: for Tape
4: for AUX IN
Z4
Z3
Z2
Z1
25V
70V
100V
PRE
OUT
R
Use only with a 250V fuse
COM
4
8
16
GND
L
INPUT 1
INPUT 2
INPUT 3
INPUT 4
MAIN
IN
BALANCED
21
Connecting unbalanced microphones to the appliance when the phantom is switched on could lead
to severe damage on the microphones and is therefore not permissible. It is absolutely mandatory
to perform any plugging or unplugging of microphone cables with the phantom power turned off.
Also make sure, that the phantom power is turned off when utilizing microphones that are not
meant to be operated with phantom power. The voltage that is present on pin2 and pin3 of the
XLR-connector could lead to severe damages on the microphones. When in doubt, please consult
the owner's manual of the questionable microphone or contact your dealer before you perform any
connections.
28
22 23 24 25 26 27
29
13. Interruptor de SIRENA
La SIRENA esta apagada cuando el interruptor de SIRENA esta en la posicion
media, y esta en funcionamiento cuando el interruptor esta presionado hacia abajo., cuando
se le presiona hacia arriba se producira una campanada. Cuando la campanada esta
funcionando, tiene un funcionamiento prioritario, ya que el volumen es controlado por
ENTRADA 1 y MASTER.
14. Conector de cable principal
Este conector es para la conexion del cable principal suministrado .
22. Input sensitivity switch (AUX IN)
By turning these switch onto the "CD" position the "AUX IN" input suitable for connected to
CD player signal output. By turning these switch onto the "TUNER" position the "AUX IN"
input suitable for connected to AM/FM radio signal output. By turning these switch onto the
"TAPE" position the "AUX IN" input suitable for connected to desktop cassette player signal
output.
23. "AUX IN" inputs
The "R" and "L" sockets permit input of the right ("R")and left ("L") channels of an audio
source with a high-level output signal , such as an AM/FM tuner, a cassette deck, a CD player,
etc.. Use input sensitivity switch (19),suitable for difference appliances. They are able to take
RCA-type coaxial connectors, and unbalanced signals.
15. Entrada "Anuncio Telefonico"
Esta entrada de terminales le permite conectar a una senal telefonica (600 ). La entrada tiene
la funcion "Prioridad de Voz", la cual predomina sobre las otras senales de entrada, y se envia
un mensaje telefonico.
16. Terminal "Prioridad"
Cuando estos terminales tienen un cortocircuito (O sea por medio de un interruptor electrico)
las senales de audio que viene de "Entrada AUX" son atenuadas; cuando las senales vienen
de "Entrada 2" "Entrada 3" y "Entrada 4", las senales tienen prioridad.
1W
+
Priority
8
G
Auxiliary conctat
17. Terminal de Salida para Altoaltavoz auxiliar
Este terminal es para la conexion de un altoaltavoz pequeno externo, suministrado por un
amplificador auxiliar interno de energia, con una salida normal de 1 watt. Solo las senales de
audio mezcladas que vienen de "ENTRADA AUX" estan incluidas en la sanal de salida.
Ademas, la senal de salida esta controlada solo por el control volumen de "ENTRADA AUX",
control de nivel de senal musical (23)
1W
+
Priority
8
-
Earth
RCA plug
Tel. paging
T
R
-
Unbalanced signal (channel L or R)
Tel. paging
R
T
G
24. "MAIN IN" terminal
After removing the bridging-strip between the "PRE OUT" and the "MAIN IN" terminals you
can include an external signal processor (e.g. an equalizer) in the audio-chain between the
pre-amplifier and the power output stage of the power amplifier. This opportunity provides a
proper solution whenever shaping or improving the audio signal is necessary (adjusting delay
times, equalizing, eliminating the Larseneffect, etc.). The input is unbalanced, which affected
by the tone controls and the master volume control.
25. "PREAMP OUT" terminal
This terminal output the mixed audio signals of all sources that are connected to the
amplifier's inputs and can be utilized to feed an external power amplifier, a signal processor
(e.g. an equalizer), or any other external appliance. The unbalanced signal is affected by the
individual input controls. Before using the PREAMP OUT you have to remove the bridgingstrip between this binding post and the "MAIN IN" terminal (21).
+
1
8 ohm
-
PA 190 USB/R - PA 240 USB/R User Manual/Manual de uso Pag 20
PA 190 USB/R - PA 240 USB/R User Manual/Manual de uso Pag 9
INTERFAZ USB/SD
26. Music signal monitor output level control
The control lets you individually set the volume of the sound source output that is connected
to the"MONITOR OUTPUT 1W/8 "(14) Turning controls clockwise increases the volume of
the corresponding source.
7. Interruptor de "Encendido"
El Interruptor de ENCENDIDO le permite encender la maquina o apagarla. Se activa cuando
el botoon ha sido presionado hacia abajo, y se apaga cuando lo vuelve a presionar para que
suba a su posicion original.
27. Tel. paging input level control
This control lets you set the volume of the sound source that is connected to the "Tel. Paging"
(12). Turning control clockwise increases the volume of the corresponding source. We
recommend to leave the control of monetarily not used input at their minimal setting "0".
8. Interruptor seleccionado de anuncio de zona
Los cables de altavoz para cada zona puede ser conectados o desconectados
independientemente "Z1~Z4". Para conectar los cables de altavozs, active el interruptor. Para
desconectar los cables de altavozs, apague el interruptor.
28. AC fuse
The fuse protects the alternating currents supply circuit of the equipment. The fuse can only
be changed in the event of a fault.
29. "GND" screw
In case the used mains outlet does not provide a ground conductor, this screw offers the
possibility to ground the amplifiers metal parts. Nevertheless, you should leave this procedure
to the experienced, qualified electrician.
Digital MP3 Player / Recorder
9. Interfaz USB/SD
VOL
SD MMC
INSTALLATION NOTES
At all times, the amplifier has to be operated under appropriate conditions. This includes that the
operation location provided sufficient ventilation and the device is not exposed to direct sunlight or
the direct radiation or reflection from any heat source. Installing the loudspeaker systems choose a
location that gets not affected by extreme and / or constant vibration or other mechanical
oscillation. Also make sure that the speakers are installed at locations that are free from dust and /
or moisture.
CAUTION
We strongly recommend that you leave the connection of the appliance to the qualified and
experienced service technician who is specialized in connecting electrical and electronic
equipment. Do not take the risk of Electro-shock or shock hazard. To reduce the risk of Electroshock, all connections have to be accomplished before it is permissible to connect the amplifier
to the main supply, Before connecting the appliance to the mains supply, once again make
certain that all connections are carried out correctly and that no short-circuit exist. The overall
sound reinforcement installation has to be in accordance to the laws, requlations, standards,
and guidelines that are relevant and applicable in the country where the equipment is going to
be operated.
AC POWER SUPPLY
CAUTION
Before using the amplifier for the first time, make sure that the appliance's voltage is in
accordance to your mains supply. Connect the amplifier only to grounded mains outlets.
Connecting the amplifier to the mains supply(115/230Vac) has to be accomplished by inserting
the supplied mains cord into the corresponding socket (11) and afterward plugging it into a
mains outlet.
REC
RPT
VOL
SD USB
Este interfaz permite ejecutar ficheros MP3 desde el puerto USB o el slot para tarjeta SD, cambiando
la fuente, simplemente pulsando un botón. La información es mostrada en la pantalla LCD, facilitando
la navegación entre carpetas y ficheros. Incorpora controles de volumen y función REPEAT.
El interfaz incluye función de grabación, permitiendo almacenar la información de la mezcla
en una tarjeta SD o un dispositivo USB.
NOTA: Sólo puede realizarse la aplicación de reproducción o grabación sobre uno de los
dispositivos, de esta manera no se puede ejecutar un fichero por el puerto USB y grabar
la mezcla en la tarjeta SD. Así, primero se selecciona la función a realizar (PLAY o REC),
y luego se selecciona la fuente donde va a tener lugar esa aplicación (SD o USB).
NOTA: La capacidad máxima de la tarjeta SD o el dispositivo USB a conectar es de 32 GB.
Una aplicación común es utilizar la función record para la grabación de mensajes con el micrófono
dentro de la tarjeta SD, siendo muy fácil seleccionar posteriormente el mensaje adecuado y
reproducirlo.
Para navegar entre carpetas y ficheros.
VOL
VOL
Permite configurar el volumen del fichero en ejecución.
Pulsador para el encendido/apagado del interfaz.
SD USB
Selecciona la fuente de audio (USB port o slot para tarjeta SD)
RPT
Función REPEAT del fichero en ejecución.
Play/Pause
REC
PA 190 USB/R - PA 240 USB/R User Manual/Manual de uso Pag 10
Función grabación. Permite grabar la información de la mezcla en el dispositivo USB/SD.
PA 190 USB/R - PA 240 USB/R User Manual/Manual de uso Pag 19
PANEL FRONTAL
CONNECTING THE OUTPUT TERMINALS
8
6
5
4
3
2
1
CAUTION
To avoid the risk of electrical shock, never touch the bare conductors leading to the output
terminals of the amplifier when it is in operation. Under figures(see 16.Output terminal in
CONTROLS AND FUNCTIONS), show the possible connections of the "OUTPUT" speaker
terminals accessible by removing the protective cover. Bear in mind the following rules:
Constant impedance lines
The total impedance of the speakers connected must correspond to that selected on the
Amplifier's output terminals.
The sum of the power capacities of the speakers must be no lower than the amplifier's power
capacity.
The length of the connecting cables must be as possible; in any case, the longer the distance to
be covered and the greater must be the cross-section of the cables.
7
9
PA 240 USB/R tiene los mismos controles
CONTROLES Y FUNCIONES
1. Control de Nivel de Entrada.
Estos controles le permite configurar individualmente el volumen de la fuente de sonido que
conecta las "Entrada 1", "Entrada 2", "Entrada 3", "Entrada 4" y "Entrada 5". Gire un control en
sentido de reloj para incrementar el volumen de la fuente correspondiente. Se recomienda dejar
el control de las entradas que no se usan por el momento en su configuracion minimo "0".
2. Control BASS Comun
Cuando gire en sentido de reloj este control, se aumentara la reproducccion de baja frecuencia;
cuando lo gire en sentido contrario, se atenuara la frecuencia de sonido bass. Si se deja el
control en el medio, no se alternara la respuesta general de frecuencia.
3. Control TREBLE Comun
Cuando gire en sentido de reloj este control, se aumentara la reproduccion de alta frecuencia;
cuando lo gire en sentido contrario, se atenuara las frecuencias triples. Si se deja el control en
el medio, la respuesta general de frecuencia no se alternara.
4. Control de Volumen Principal
La configuracion de este control determina el nivel de la salida, la cual ha sido preconfigurado a
la SALIDA de altoaltavoz. Se recomienda ajusta generalmente el MASTER y los controles
de nivel de entrada en posicion del medio. Configuracion al extremo, en que el MASTER ha
sido configurado a una salida maxima y los controles de salida estan casi configurados a su
minimo o vice versa, no es algo que se recomienda.
5. Instrumento medidor LED de VU
Este instrumento muestra el nivel de salida de senal. Para el funcionamiento apropiado del
amplificador, modifique la configuracion del volumen de mayor impedancia. Los primeros 8
segmentos de LED en el boton representan el area entre -20dB y 0 dB, en la cual se deberia
mantener el nivel de salida. En caso de que los dos ultimos segmentos en el tope esten
iluminados por un periodo largo de tiempo, esto indica que la senal saliente se entrecorta, lo
cual resultaria casi siempre en distorsion audible. Luego la configuracion del volumen debe ser
ajustado a un nivel mas bajo.
Constant voltage lines
Each speaker must be equipped with a line transformer with an input voltage equal to that of the
line (25, 70, 100V).
The sum of the power capacities of the speakers must not exceed the output power capacity
of the amplifier (i.e. total wattage of speakers installed in zones 1 through 4).
ADJUSTING SENSITIVITY FOR THE "VOICE PRIORITY" FUNCTION
To change the level of the signal determining activation of the" Voice Priority"function,proceed as
followes:
1) Unscrew the 4 screws on each side and 2 screws top on side of the amplifier and take off the
Cover.
2) Inside the amplifier, find the hole " F"on the INPUT CARD which permits acting on the trimmer
"VR 6" on the card beneath.
3) Using a small screwdriver, adjust the trimmer "VR 6":by turning the control clockwise the
Sensitivity increases, and the priority function will be a less intense voice signal.
4) Fit the bottom back onto the amplifier.
VR 6
F
6. Indicador
Cuando se enciende el amplificador, el indicador "PL" se ilumina. Cuando la salida del
amplificador se sobrecarga, el indicador "SOBRECARGA" se ilumina y la salida se interrumpe.
Para uso por largo tiempo, la configuracion del volumen debe ser ajustado a un nivel mas bajo.
PA 190 USB/R - PA 240 USB/R User Manual/Manual de uso Pag 18
PA 190 USB/R - PA 240 USB/R User Manual/Manual de uso Pag 11
LIMPIEZA
Cuando esta unidad requiera limpieza, desempolve la unidad con una aspiradora o un trapo,
etc. No limpie el cuerpo de esta unidad con disolventes, tal como benzol, alcohol, liquido de alta
volatilidad o cualquier otro liquido inflamable.
Cleaning:
The appliance should be cleaned only as recommended by the manufacturer.
Non-use Periods:
The power cord of the appliance should be unplugged from the outlet when left unused for
a long period of time.
Object and Liquid Entry:
Care should be taken so that objects do not fall and liquids are not spilled into the enclosure
through openings.
Damage Requiring Service:
The appliance should be serviced by qualified service personnel when:
-The power supply cord or the plug has been damaged; or
-Objects have fallen,or liquid has been spilled into the appliance; or
-The appliance has been exposed to rain; or
-The appliance dose not appear to operate normally or exhibits a marked change in
performance; or
-The appliance has been dropped, or the enclosure damaged.
Servicing:
The user should not attempt to service the appliance beyond that is describedin the
Operating Instructions.All other servicing should be referred to qualifield service personnel.
PRECAUCION DE SEGURIDAD
1. Lea por favor las notas con el simbolo
con atencion especial, porque proveen informaciones
importantes sobre seguridad.
2. El voltaje del suministro de energia del amplificador (implica un alto riesgo de shock electrico),
Por lo tanto por favor evitar instalar, conectar o desconectar el aparato cuando este encendido.
3. Las partes metalicas estan conectadas a tierra a traves de los cables de energia. Si la toma
usado para el suministro de energia no tiene una conexion a tierra, llame a un electricista
calificada para conectar el aparato a tierra a traves de un terminal.
4. Asegurese de que el cable de suministro de energia del aparato no sea pisado o aplastado por
cualquier objetos, para asegurarse de que el cable no este danado.
5. No abra o desarme el aparato porque ninguna parte adentro puede ser utilizasa por el usuario.
6. Asegurese de que ningun objeto o liquido entre al altavoz, porque esto cuasaria un cortocircuito.
7. Nunca intente reparar por su propia cuenta bajo las circunstancias no descriptas en el manual.
Contacte a su centro de servicio autorizado o personal altamente calificado cuando:
El aparato no funciona o funciona en forma anormal.
El cable de alimentacion esta seriamente danado.
Se han entrado objetos o liquido en el aparato.
El aparado ha sufrido un impacto grande.
8. Apagar el aparato y desconectar cable de suministro de energia cuando no se usa el aparato.
9. Si cualquier olor extrano o humo sale del aparato, apaguelo de inmediato y desconecte el
suministro de energia.
PRECAUCION
No obstruya las parrillas de ventilacion del aparato
Evite sobrecargar el amplificador de trabajos por un largo tiempo.
Ajustar bien los terminales de tornillo para los altavoces a fin de asegurar el contacto seguro.
No fuerce los mandos , tales como botones y controles, etc.
No use disolventes, alcohol o cualquier sustancia volatil cuando limpie las partes externas.
DESCRIPCION
Los amplificadores de la serie estan disenados expresivamente para transmitir anuncios por todos
los sistemas de sonido PA. Ellos incorporan las siguientes funciones:
Interfaz USB/SD para funciones de reproducción y grabación
4 terminales de entrada de combinacion (XLR y 6.3mm), linea/microfono con sensibilidad
cambiable y suministro phantom de24V DC
Una entrada estereo RCA y 3 tipo de sensibilidades de escenario elegibles.
Entrada senal teliliario de 600 (Anuncio Telefonico)
1 salida "PREAMP OUT (Salida)"
1 Entrada "MAIN IN "
1 salida auxiliar a la senal de musica de monitor de "MONITOR OUTPUT (Salida de
Monitor)1W/8 "
Entrada 1 de prioridad en las otras entradas con activacion vocal.
Entrada 1 de prioridad en las otras entradas, activacion con contacto.
Salida para altavoces con impedancia constante (4-8-16 ) y voltaje constante (25-70-100 V)
Controles Treble y Bass
Medidor VU con LED.
Proteccion anti-cortocircuito entre los terminals de salida.
Anuncio de zona opcional con funcion elegible, 4 anuncios de zona .
PA 190 USB/R - PA 240 USB/R User Manual/Manual de uso Pag 12
PA 190 USB/R - PA 240 USB/R User Manual/Manual de uso Pag 17
NOTAS IMPORTANTES DE SEGURIDAD
Lea y siga las siguientes instrucciones
Escuche todas las advertencias
Mantenga el aparato lejos del agua
Limpie solo con un trapo mojado
No bloquea cualquier apertura de ventilacion. Instalar de acuerdo a las instrucciones.
No modifique el enchufe de tierra por razones de seguridad. Un enchufe de tierra tiene dos
patas comunes y otra de tierra. La pata de tierra es por su seguridad. Cuando el enchufe
no entra en su toma de electricidad, consulte a un electricista para cambia la toma
obsoleta.
Prevenga que el cable de alimentacion sea pisado o golpeado, especialmente en la parte de
los enchufes, receptaculos de conveniencia y en la salida de cable del aparato.
Use solo los anexos /accesorios especificados por el fabricante.
El aparato debe ser colocado en una estante de parrilla de metal (Ver Instalacion), y mantengalo
lejos de los siguientes ambientes:
Lugares humedos
Radiacion directa del calor
Lugares sin ventilacion
Desenchufar este aparato durante tormentas electricas o cuando no se usa.
Para cualquier tipo de reparaciones, referierase a personal de service calificado. Se requieren
reparaciones cuando el aparato se dana en cualquier forma, tal como el cable de alimentacion o
enchufe danados, haber salpicado liquido o hacer caer objetos sobre el aparato. Asi como estar
expuesto a la lluvia /humedad u operaciones anormales y haberse caido el aparato.
Este manual es una parte integral del producto y debe acompanar al aparato cuando este se
cambie del usuario, permitiendo que el nuevo usuario sepa de la instalacion, operacion y las
instrucciones de seguridad.
WORK no se responsabiliza por la instalacion equivocada del amplificador.
Example of possible connections
Sound column
Contact
"VOICE PRIORITY"
Horn speaker
Speaker
Speaker
Aux.signal
1W
+
1 2 3 4
-
T
Tel
R
Paging
G
Monitor TEL.
VOL. VOL.
COM
LINE MIC
PHANTOM
24V
PUSH
LINE MIC
PHANTOM
24V
PUSH
LINE MIC
PHANTOM
24V
PUSH
LINE MIC
PHANTOM
24V
PUSH
1: for CD
2: for Tuner
3: for Tape
4: for AUX IN
Z4
Z3
Z2
Z1
25V
70V
100V
PRE
OUT
R
Use only with a 250V fuse
COM
PRECAUCION
Para prevenir el riesgo de incendio o de shock electrico, el aparato no debe estar expuesto a
cualquier goteo o salpicadura. Ningun objeto que contiene liquidos, tales como casos, debe
colocarse cerca del aparato.
Si las interferencias tiene lugar en el circuito de fuente, THD sera mas de 10%. No instale este
aparato en un espacio confinado tal como una estanteria o cualquier mueble similar.
Priority
8
CHIME SW
4
8
16
GND
L
INPUT 1
INPUT 2
INPUT 3
INPUT 4
MAIN
IN
BALANCED
Mains
PRECAUCION CUANDO SE USA LA LINEA DE ELECTRICIDAD
Sostenga el enchufe firmemente para evitar roturas y otros riesgos cuando se lo tira
desde la toma.
Retire el cable desde la toma mural para desconectar la unidad.
suministro de energia cuando no se usa la unidad.
No tire d el cable de alimentacion bajo ninguna circunstancia para evitar danos a este,
MANEJANDO ESTA UNIDAD
Chequear antes de manejar esta unidad si el suministro de energia ha sido cortado. El cable de
alimentacion debe ser desenchufado desde la toma, asi como las conexiones entre otras lineas y
esta unidad.
NO DESARME ESTA UNIDAD
No desarme la unidad o por su propia cuenta, de otra forma causaria un shock electrico o incendio.
Cualquier problema que tenga que no puede ser resolvido de acuerdo a las soluciones
especificadas en este manual, por favor llame a un tecnico calificado o consulte con nuestra
compania. Cualquier uso inapropiado causaria un chock electrico o un incendio.
PA 190 USB/R - PA 240 USB/R User Manual/Manual de uso Pag 16
Power amplifier
Microphone
Equalizer
Microphone stand
CD player
CD player
AM/FM tuner
AM/FM tuner
Cassette recorder
Cassette player
PA 190 USB/R - PA 240 USB/R User Manual/Manual de uso Pag 13
INSTRUCCIONES DE SEGURIDAD
Technical data
CAUTION
Amplifier section
E
RISK OF ELECTRIC SHOCK
DO NOT OPEN
Type
180W-Mono-tabletop (180W)
240W-Mono-tabletop (240W)
PA 190 USB/R
PA 240 USB/R
Output power capacity
Nominal: 180W- maximum:240W
Nominal: 240W- maximum:300W
Frequency response
PRECAUCION:
ADVERTENCIA:
PA 190 USB/R
PA 240 USB/R
Este simbolo, siempre que aparece , le advierte de la presencia de voltaje
peligroso sin aislar dentro de la caja que puede ser suficiente para consti tuir un riesgo de descarga.
30-20,000Hz ( 3dB)
Total harmonic distortion
Signnal / noise ratio
Inputs / sensitivity-impedance
Outputs for speakers / Ohms
Para reducir el riesgo de descargas electricas,no quite la tapa(o parte
posterior ). No hay piezas que puedan ser reparadas por el usuario en
el interior; remita el servicio al personal cualificado.
Para reducir el riesgo de incendios o descargaselectricas, no exponga
este aparato a la lluvia o a la humedad.
0.5%(1KHz-nominal power capacity)
INPUT 1-4: 60dB AUX IN: 70dB MAIN IN: 80dB
INPUT 1-4 / XLR and 6.3mm combination socket :bal./ unbal.
Mic: -55/-52dB (2.3/2.7mV)-600 , bal./unbal.
Line: -25/-20dB (50/100mV)-47K , bal./unbal.
AUX IN / stereo RCA jack / unbalanced
CD: -5dB (570mV)-80K
TUNER : -10dB (300mV)-56K
ATPE: -15dB (200mV)-20K
AUX1:-20dB(100mV)-20k
MAIN IN / mono RCA jack / 0dB(1V)-10K / unbalanced
Este simbolo,siempre que aparece, le advierte sobre instrucciones operativas
y de mantenimiento importantes publicado adjunto. Lea el manual.
INSTRUCCIONES DETALLADAS DE SEGURIDAD:
Se deben leer todas las instrucciones de seguridad y operacion antes de manejar el
aparato.
S
Retain Instructions:
Las instrucciones de seguridad y operacion deben ser conservadas para futuras
referencias.
Cuidado con las advertencias:
4ohms 8ohms 16ohms
Outputs for speakers / Volts
25V-70V-100V (3.5 , 27 , 55.6 ) (180W)
25V-70V-100V (2.6 , 20.5 , 41.7 ) (240W)
PA 190 USB/R
PA 240 USB/R
Se deben observar todas las advertencias sobre el aparato y de las instrucciones
operativas.
Seguir las instrucciones:
Se deben seguir todas las instrucciones de operacion y del usuario.
Additional outputs /
voltage-impedance
PREAMP OUT / mono RCA jack / 1V-600 / unbalanced
Loudspeaker / on terminal board / 1 watt-8
Tone controls
Bass 10dB-100Hz
Treble 10dB-10KHz
Controls
7 volume controls for INPUT 1-4, AUX IN, 1W 8 and Tel. Paging.
1 master volume control
1 treble control
1 bass control
5 zone paging select switch
H)
El aparato se debe colocar de tal manera,que su ubicacion o posicion no interfiera con una
ventilacion correcta. Por ejemplo,el aparato no se debe colocar en una cama,funda de sofa
o superficie similar que pueda bloquear las aberturas de la ventilacion o colocarse en una
instalacion empotrada , tal como una libreria o armario que pueda impedir el flujo de aire
a traves de las aberturas de la ventilacion.
Calor:
PA 190 USB/R
PA 240 USB/R
115/230 Vac ( 5%)-60 /50Hz 360W
115/230 Vac ( 5%)-60/50Hz 480W
W
El aparato no se debe utilizar cerca del agua( p.ej. cerca de la banera, lavabo, fregadero,
lavadero,en un suelo mojado o cerca de la piscina,etc.).
Ventilacion:
Power supply / Consumption
Dimensions(L
Agua y humedad:
435
335
100mm/(17.13)"
(13.19)"
(3.34)"
El aparato se debe colocar lejos de las fuentes de calor como radiadores , instrumentos
medidores de tempe - ratura , cocinas u otros aparatos ( incluyendo amplificadores ) que
puedan producir calor.
Alimentación:
El aparato solo se debe conectar a una fuente de energia del tipo descrito en las
instrucciones operativas o segun este marcado en el aparato.
Puesta a tierra o polarizacion:
Se deben tomar precauciones de modo que no se anulen los medios de puesta a tierra o
polarizacion.
PA 190 USB/R - PA 240 USB/R User Manual/Manual de uso Pag 14
PA 190 USB/R - PA 240 USB/R User Manual/Manual de uso Pag 15