1
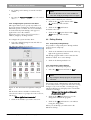
DCN Next Generation
Startup
en Software User Manual
LBB 4190/00
About this manual
This user manual is divided into three chapters.
Chapters 1 and 2 provide background information;
chapter 3 provides detailed user information:
•
•
•
Manual conventions
For clarity this user manual uses consistent styles,
symbols and typographical conventions. They are:
i
Chapter 1 - Startup - containing an overview of
the functionality of the Startup application, a
brief overview of the Digital Congress Network
Next Generation, and a summary of the
application modules.
Chapter 2 - Getting Started - containing details of
how to start the Startup application and a
description of the Help facility.
Chapter 3 - Using Startup - containing details
about the global settings, instructions about
starting applications, and how to exit the software.
Note
General notes are contained within rules and
indicated with this symbol at the left margin.
Notes are used to draw attention to special
actions or information.
i
Caution
A caution is contained within rules and
indicated with this symbol at the left margin.
Cautions are used to draw attention to actions
or commands that could lead to a loss of
information or damage to equipment
i
Tip
A tip is contained within a box and indicated
with this symbol at the left margin. Tips are
used to provide supplementary information that
may make an action quicker or easier to carry
out.
•
An action (to be carried out by the user) is shown
with a larger round bullet mark.
Typographical conventions
The following typographical conventions (text styles)
are used in this manual:
•
Typed input - information to be typed in using
the keyboard is shown as:
Filename
•
Single key - input via a single key (or keys) on
the keyboard is shown as:
<enter>, <shift>, etc.
•
Multiple keys - input via a combination of keys
pressed together is shown as:
<ctrl>+<p>, <alt>+<f4>
•
Screen text - information that appears on screen
is shown as:
‘Choose Startup Modules:’
Hyperlinks
This manual is also available as a digital document in
the Adobe Portable Document Format (PDF). All
references to pages, figures, tables, etc. in this digital
document contain hyperlinks to the referenced location.
DCN Next Generation System Startup
en | 3
Table of contents
1
1.1
1.1.1
1.2
1.3
1.3.1
1.3.2
1.3.3
1.3.4
1.3.5
1.3.6
1.4
1.5
2
2.1
2.1.1
2.1.2
2.1.3
2.1.4
2.1.5
2.1.6
2.2
2.2.1
2.3
2.3.1
2.3.2
2.3.3
2.3.4
2.3.5
2.3.6
2.3.7
2.3.8
3
3.1
3.1.1
3.1.2
Startup............................................................................ 4
About Startup .......................................................... 4
What is Startup? .................................................... 4
System requirements............................................. 4
Digital Congress Network Next Generation..... 4
Introducing the Digital Congress Network
Next Generation...................................................... 4
Contribution equipment ........................................ 4
Simultaneous interpretation equipment ............ 5
Central control equipment.................................... 5
Information displays ............................................... 5
Installation equipment............................................ 5
Displaying text ......................................................... 5
The application software....................................... 5
Getting Started........................................................... 8
Using windows........................................................ 8
Running the software in Windows ..................... 8
Learning about Windows ..................................... 8
Understanding icons.............................................. 8
Moving around an application ............................. 8
Working with menus.............................................. 9
Working with dialogue boxes ............................10
Initiating startup.....................................................11
Locating the software..........................................11
Loading the application.......................................11
Using Help .............................................................13
The Help menu......................................................13
Index ........................................................................13
Keyboard ................................................................13
Commands.............................................................13
Procedures.............................................................13
Glossary..................................................................13
Using Help .............................................................13
About .......................................................................14
Using startup............................................................ 15
Specifying global settings ..................................15
The menu bar.........................................................15
Master volume control .........................................15
Removing the master volume ............................15
Altering the master volume control...................15
Muting .....................................................................15
3.1.3 Error messages..................................................... 16
‘Error Messages’ list box .................................... 16
Clearing error messages.................................... 16
Automatic acknowledgement of error
messages............................................................... 16
Sending error messages to an auxiliary output..
............................................................................. 16
Printing error messages ..................................... 17
3.1.4 Accessing System Configuration information17
3.1.5 Multi PC Settings................................................. 18
3.1.6 Master/Slave functionality of modules ............ 19
System Installation............................................... 19
Microphone Management .................................. 20
Synoptic Microphone Control........................... 20
Layout files and background bitmaps ............. 20
Simultaneous Interpretation............................... 21
Delegate Database.............................................. 21
Parliamentary Voting and Multi Voting ............ 21
Intercom ................................................................. 21
Attendance Registration..................................... 21
Text/Status Display.............................................. 22
Message Distribution .......................................... 22
Video Display ........................................................ 22
Automatic Camera Control................................ 22
3.1.7 Entering a license................................................. 22
3.2
Starting up other software modules ................ 22
3.2.1 Selecting an installation- and a names file ..... 22
Opening an installation file................................. 23
Opening a names file .......................................... 23
Closing files........................................................... 23
Deleting an installation file ................................. 23
Deleting a names file........................................... 24
3.2.2 Opening other modules from Startup ............. 24
3.2.3 Choosing one or more software modules...... 24
3.2.4 Configuring the system for Auto Start ............ 25
3.3
Exiting Startup....................................................... 25
3.3.1 Temporarily exiting Startup ................................ 25
3.3.2 Permanently exiting Startup............................... 25
3.4
Suppress unit display.......................................... 26
Bosch Security Systems B.V. | 2005 January | 9922 141 70512
DCN Next Generation System Startup
1
Startup
en | 4
i
Note
A PC with at least four serial ports is
recommended if a card encoder is used.
1.1 About Startup
1.1.1 What is Startup?
The Startup software module is one of a family of
modules designed for controlling and monitoring
conferences and discussions using the contribution
equipment. The Startup module is different from the
other modules because it is primarily used as a
platform from which the other modules are started.
None of the other applications can run without first
loading Startup. However, this is only one of several
functions of Startup. The following can also be
carried out:
•
Setting master volume level
•
Opening, closing and deleting installation files
and names files
•
Configuring the Startup program to automatically
load selected modules
•
Accessing, acknowledging and printing error
messages
Once you become familiar with Startup, it is possible
to configure it so all starting of software modules is
carried out automatically. And once the global
settings have been defined, you only have to access
them if you wish to alter them. As this can actually
be from other software modules, it means that after
setting up Startup to serve your needs best, you will
rarely have to use it again.
1.2 System requirements
For Startup to run successfully on your computer,
you need the following software:
•
Microsoft Windows 2000 Professional or XP
Professional
The minimum PC configuration is the same as
recommended by Microsoft for Windows 2000
Professional and XP Professional.
The hardware requirements are:
Ethernet for multi-PC systems
•
Serial ports (RS232) for connection of:
− Card encoder/reader
− CCU, recommended baud rate 115,200
− Label printer
− Error logging
− Microphone activity printing
− Real-time microphone activity (for nonBosch camera control system)
•
i
Note
For more information about connecting
peripheral equipment, please refer to the DCN
Next Generation Installation and User
Instructions.
1.3 Digital Congress Network Next
Generation
1.3.1 Introducing the Digital Congress Network
Next Generation
The Bosch Digital Congress Network Next
Generation provides flexible conference facilities
using an integrated system of fully compatible
hardware and software modules. The contribution,
interpretation and control equipment communicates
via a simple trunk bus comprising two coaxial cables
and two supply wires, so hardware installation is both
quick and easy. Special contribution and distribution
equipment like audio expanders are connected to the
system via a redundant optical fiber network, which
gives the possibility to travel signal and data over a
great distance without the loss of performance and
quality The central control unit allows fully automatic
operation. For increased operator control and
conference management facilities, application
software can be used.
1.3.2 Contribution equipment
•
Delegate Conference Units, with:
− Graphic LCD and ID card reader
− Channel selector
− Intercom handset
− Headphone/headset connections and
headphone volume controls
•
Chairman Conference Units, with:
− Graphic LCD and ID card reader
− Channel selector
− Intercom handset
− Headphone/headset connections and
headphone volume controls
•
Pluggable microphones with standard and
extended stem length
•
Flush-mounted units, with:
− Hand-held, Gooseneck and Lavaliere
Microphones
− Loudspeaker Panel
− Delegate Voting Control Panel with/without
ID card reader
Bosch Security Systems B.V. | 2005 January | 9922 141 70512
DCN Next Generation System Startup
•
•
Table-top Discussion Units, with:
− Channel selector
− Voting keys
Table-top Chairman Discussion Units, with:
− Channel selector
− Voting keys
1.3.3 Simultaneous interpretation equipment
Interpreter Desks with graphical LCD Display,
with:
− Interpreter’s Headset/Headphone
•
Language Distribution Systems, with:
− Flush-mounting Channel Selector Panel
− Headphones
en | 5
The Allegiant Video Switcher used with the Camera
Control software cannot display graphic characters in
the video pictures it generates on monitors.
i
Most languages that use non-European or nonUS characters have to have special font sets
downloaded using the System Installation
software.
•
1.3.4 Central control equipment
Central Control Units
•
Optional Control equipment:
− Extension Power Supply Unit
− Audio Expander
− Data Distribution Board
− Personal Computer
− Printer
− ID Card Encoder
•
1.3.5 Information displays
Hall Displays, available as:
− Numeric, Alphanumeric and Individual
Voting Results
•
Video displays, available as:
− Rear Projectors, Front Projectors and
Personal Displays
•
1.3.6 Installation equipment
A full range of accessories for installation,
including:
− Cable assemblies, Tap-off units and Trunk
Splitters, Optical fibers, Optical network
splitters and fiber interfaces.
Note
1.5 The application software
The Bosch DCN Next Generation application
software range comprises a number of software
modules that run in Windows. They integrate
conference preparation, management and control
into this versatile graphical computer environment.
The modules can be loaded according to specific user
requirements.
i
Note
Although not all application modules have to be
loaded, the Startup and System Installation
software are essential for all applications.
i
Note
The asterix (*) shown at the end of the user
manual numbers, refers to a number, which
changes each time the manual is updated.
The application software modules are:
•
1.4 Displaying text
It is possible to display text in languages such as
Chinese using graphic characters on units equipped
with a graphic display. Messages using these graphic
characters can also be prepared using the Message
Distribution software, and names composed of these
graphic characters can be entered in the Delegate
Database software. It is not possible to display such
characters on alphanumeric LED displays using the
Text/Status Display software. However, they can be
shown on video displays using the Video Display
software.
Startup Screen (LBB 4190) - for providing the
opening screen and selection window from which all
other applications software modules are opened and
started. Applications are represented as icons. Some
global settings and master controls are also part of
this application.
•
Covered in this manual.
Microphone Management (LBB 4170) - for
configuring and controlling delegate microphones
connected to the system. Full on-screen microphone
control is provided.
•
Refer to user manual no. 9922 141 7034*.
Bosch Security Systems B.V. | 2005 January | 9922 141 70512
DCN Next Generation System Startup
Synoptic Microphone Control (LBB 4171) - for
configuring and controlling delegate microphones
connected to the system. This module uses icons on a
graphical layout to provide a highly visual pushbutton conference control facility. It can be used
together with Microphone Management.
•
Refer to user manual no. 9922 141 7035*.
Simultaneous Interpretation (LBB 4172) - for
configuring and controlling multi-language
conferences using interpreter desks. All functions and
facilities are provided for managing international
congress venues with up to 31 simultaneous
languages.
•
Refer to user manual no. 9922 141 7036*.
en | 6
Attendance Registration (LBB 4178) - for
controlling registering and identifying of conference
participants using PIN-codes, ID cards or present key.
Includes facilities for current and historical data recall,
and listing of present and absent participants.
•
Refer to user manual no. 9922 141 7041*.
Delegate Database (LBB 4180) - for entering and
displaying personal data (name, country, language,
title, etc) for all participants. Includes facilities for file
import and export, and for printing of reports, labels
and lists. Required for Microphone Management
software and ID Card-encoder software.
•
Refer to user manual no. 9922 141 7042*.
ID-Card encoder (LBB 4181) - for production of
participants ID cards. Requires the Delegate
Database software.
Intercom (LBB 4173) - for controlling the intercom
facility for private two-way communication between
delegates, chairman, operator or interpreters.
Communication links are defined and controlled via
simple on-screen windows.
•
Refer to user manual no. 9922 141 7037*.
Parliamentary Voting (LBB 4175) - for selecting
voting procedure and majority voting figure setting
for parliamentary voting sessions. The results can be
processed, displayed and printed as absolute values,
percentages, including individual report printing. A
voting script editor is included.
•
Refer to user manual no. 9922 141 7038*.
Multi Voting (LBB 4176) - for selecting voting
procedure and type for voting sessions. There are six
types of voting possible: Parliamentary, Multiple
Choice, Audience Response, Opinion Poll, Rating
and For/Against. The results can be processed,
displayed and printed, including individual report
printing. A voting script-editor is included.
•
Refer to user manual no. 9922 141 7039*.
i
Message Distribution (LBB 4182) - for originating,
editing and distributing messages to individual
delegates or groups of delegates for viewing on the
Delegate Unit LCD display. When used with
Text/Status Display or Video Display software,
messages can also be sent to a hall display for general
viewing.
•
Refer to user manual no. 9922 141 7043*.
Text/Status Display (LBB 4183) - for organizing
and controlling the transfer of display information to
alphanumeric, geographic or synoptic hall displays
(voting results, motion number, time, etc.).
•
Refer to user manual no. 9922 141 7044*.
Video Display (LBB 4184) - for organizing and
controlling the transfer of detailed information to
video-oriented displays such as monitors, Vidiwalls
and video projectors. Includes facilities to import
background pictures (logos, etc.).
•
Refer to user manual no. 9922 141 7045*.
Note
It is not possible to run Parliamentary Voting
and Multi Voting simultaneously.
System Installation (LBB 4185) - for assigning seat
numbers to installed microphones, and for allocating
audio channels (languages, floor and/or intercom).
Required for all other software modules.
•
Refer to user manual no. 9922 141 7046*.
Bosch Security Systems B.V. | 2005 January | 9922 141 70512
DCN Next Generation System Startup
i
Caution
Once you start using the software, it is
extremely important that you make regular
back-ups of the files generated by the software.
These files are stored as default in the directory
‘\DCNNG\DBS’. The software does not carry
out any automatic back up.
Automatic Camera Control (LBB 4188) - for
assigning cameras to seat numbers, and configuring
the cameras to display active delegates on hall
monitors. Camera Control is also available in a
stand-alone version (LBB 3562).
•
Refer to user manual no. 9922 141 7049*.
Bosch Security Systems B.V. | 2005 January | 9922 141 70512
en | 7
DCN Next Generation System Startup
2
Getting Started
en | 8
2.1.3 Understanding icons
Windows uses graphical symbols, known as ‘icons’,
for representing various elements, including the
following:
2.1 Using windows
•
2.1.1 Running the software in Windows
Bosch Digital Congress Network software needs
Microsoft Windows 2000 Professional or XP
Professional before it can run.
Windows allows you to run more than one
application at a time and transfer information
between applications. As the software comprises a
number of modules, many of which interact with
each other, the multitasking aspect of Windows is an
important feature.
Application icon - a representation of an
application that has been started. Application
icons appear on the taskbar.
The software uses application icons to show which
applications are currently running. You can restore
an application by clicking on it.
2.1.4 Moving around an application
Each application opens as a separate window. Every
window has some common elements - although not
every window uses all the elements. A typical
window configuration is shown below:xx
The Windows graphical user interface is highly visual,
and the software also makes full use of this capability
to control conferences using icons, menus and the
many other standard Windows features.
i
Note
Running the software does not prevent you
running other Windows applications at the
same time, and any number of application
windows can be run simultaneously. However,
the internal memory capacity of your PC and
how it is configured may affect the speed at
which some applications run if too many are
running at the same time.
i
Note
It is recommended that screen savers and
power management systems be turned off.
Figure 1 A typical windows configuration.
2.1.2 Learning about Windows
The software user manuals assume a basic
understanding of Windows. Although some of the
important Windows conventions are covered in this
section, it is strongly recommended that you read the
user guide supplied with Windows before attempting
to use the software.
The various parts of the screen are:
xx
Title bar - is located along the top of the window and
shows the name of the application and the name of
the document currently open (if applicable). If more
than one window is open, the title bar for the active
window is a different color or density (usually darker)
than others. A window can be moved about the
desktop by dragging on the title bar.
Bosch Security Systems B.V. | 2005 January | 9922 141 70512
DCN Next Generation System Startup
en | 9
Control-menu box - is located in the upper left-hand
corner of each window (and some dialogue boxes).
The control menu, activated by clicking on this box,
lists commands for resizing, moving, maximizing,
minimizing, restoring and closing windows. Double
clicking on this box is a short cut for closing the
window.
Minimize button - is the first of the three buttons
located in the upper right-hand corner of each
window. Clicking on this button shrinks the window
to an application icon.
Maximize button - is the second of the three buttons
located in the upper right-hand corner of each
window. Clicking on this button expands the window
to fill the entire desktop. After expanding a window,
the maximize button changes to the restore button
(see below).
Restore button - is the second of the three buttons
located in the upper right-hand corner of a window
after it has been expanded to fill the desktop.
Clicking on this button returns the application to a
window. After restoring a window, the restore button
changes back to the maximize button.
Close button - is the third of the three buttons
located in the upper right hand corner of each
window. Clicking on this button will close the
window. Clicking on the close button of the main
window of an application will close the entire
application.
Scroll bars - are located along the bottom (for
horizontal scroll) and the right-hand side (for vertical
scroll) of some windows and dialogue boxes if the
document or application does not fit in it. They allow
you to view unseen portions of lists or other
information that does not fit the allocated space. The
viewed area is moved by:
•
Clicking on the up and down (or left and right)
scroll arrow buttons to move the viewed area a
small step at a time.
•
Clicking on the gray background of the scroll bar
to move the viewed area in larger steps.
•
Dragging the scroll box along the bar to move
the viewed area as required.
Window border - is situated around the outside edge
of the window. You can resize a window by dragging
these borders. The corners of the Window border
can be used to shorten or lengthen two sides of the
window at the same time.
2.1.5 Working with menus
Windows functions (and therefore also DCN Next
Generation functions) are accessed through menus.
Each application has its own specific menus, plus a
standard Windows control menu, which is common
to all applications. The control menu opens from the
control-menu box in the top left-hand corner of the
desktop. All specific functions are accessed via the
menu bar located at the top of each application.
Menu bar - is situated at the top of the window just
below the title bar. It lists all available menus for the
application. Most items on the menu bar will activate
a pull-down menu (a list of items or commands
available).
Control menu - is accessed by clicking on the
control-menu box (or the document icon, if the
window is minimized). The control menu contains
the following commands:
•
‘Restore’ - restores the Window to its former size
after enlarging to full screen or shrinking to an
icon (see also ‘Restore button’).
•
‘Move’ - allows you to use the keyboard arrow
keys to move the window
Bosch Security Systems B.V. | 2005 January | 9922 141 70512
DCN Next Generation System Startup
•
‘Size’ - allows you to use the keyboard arrow
keys to resize the window.
‘Minimize’ - shrinks the window to an icon.
‘Maximize’ - enlarges the window to its maximum
size.
‘Close’ - terminates the application.
•
•
•
i
Typing this letter is a short cut that selects the
item without clicking on it.
Reduced intensity - if an item or command is
not available, it appears ‘gray’ in the menu.
Ellipsis (‘...’) - three dots after an item or
command indicates that a dialogue box will
appear when the item is selected.
Tick (√) - this symbol before an item or
command indicates that the item is currently
active (clicking on the item again toggles it to
non-active and removes the tick).
Triangle mark (►) this symbol after an item or
command indicates that a cascading menu
(listing additional commands) will appear when
the item is selected.
Key combination - if displayed after an item or
command, the keys are a short cut for selecting
the item without opening the menu. For example,
pressing <ALT> and <F4> simultaneously will
close an application.
•
•
•
Note
Not every control menu (sometimes also known
as ‘System menu’) contains all the above
commands. A dialogue box, for example, may
only includes ‘Move’ and ‘Close’.
Selecting menus - to select a menu from the menu
bar:
•
Point to the name of the menu and click to open
it. The menu remains displayed until an item is
selected by clicking on it. To access an item
quickly, point to the menu and drag directly to
the item to be selected while holding the mouse
button down. Releasing the mouse button will
select the item.
i
en | 10
•
•
i
The short-cut key combinations (also known as
accelerator keys) are used in the software.
Where appropriate, the accelerator key or key
combinations are given in paragraph Error!
Reference source not found.
Note
After opening one menu, moving the mouse
pointer to another menu will automatically open
it. There is no need to click again with the
mouse button.
Note
2.1.6 Working with dialogue boxes
•
If the menu names have underlined letters, you
can also press the <alt> key then the underlined
letter key. For example, for the ‘File’ menu press
<alt> and then <f>.
To cancel a menu without selecting an item:
•
Click the menu name again, or click anywhere
on the desktop outside the menu (or release the
mouse button with the pointer outside the menu
if dragging directly to an item).
•
Press <alt> or <f10> to cancel the menu
(<esc> will cancel the menu but remain on the
menu bar ready to select another menu).
i
Figure 2 typical Windows dialogue box.
Note
Windows uses dialogue boxes to request information,
and also to provide you with extra information. If the
software requires information to carry out a
command, a dialogue box is usually used.
If an exclamation mark (‘!’) appears after an
item on the menu bar, this indicates that the
command will be carried out without a dropdown menu or dialogue box appearing.
A dialogue box looks very much like an application
window and can be moved around the desktop area
by dragging on the box’s title bar.
Menu conventions - certain display conventions are
followed for listing items on a Windows menu. They
are:
•
Underlined letter - most items or commands
have an underlined letter in the menu list.
Most dialogue boxes contain options, each asking for
a different kind of information. After your supply the
requested information, a push button in the box will
initiate the command. There are several methods
available for selecting options and entering
information.
Bosch Security Systems B.V. | 2005 January | 9922 141 70512
DCN Next Generation System Startup
en | 11
i
Push buttons - these initiate immediate action. The
button includes a text to describe its action, for
example, ‘Start’ or ‘Cancel’. Some push button
descriptions have an ellipsis (...), and will open a
further dialogue box for more information. To
activate a push button, click on it with the mouse
button.
i
Note
If a list contains more choices than fit in the list
box or drop-down list box, scroll bars are
provided to help you move quickly up and
down the list.
Note
Push buttons that are unavailable are ‘grayed’
(displayed with reduced contrast). The
currently selected push button has a darker
outline than all others.
Text boxes - are rectangular boxes into which you
type information. When an empty text box is
selected by clicking on it, an insertion point (a
flashing vertical bar also known as a cursor) appears
on the left-hand side of the box. As you type, the text
starts at the insertion point. Text already in a text
box can also be edited. This text is highlighted when
it is selected, and any new text typed in automatically
replaces it.
Radio buttons - appear in dialogue boxes for
selecting mutually exclusive items. You can only
select one option from the list at a time, and selecting
a new item will automatically cancel the currently
selected button.
Check boxes - appear in dialogue boxes for selecting
any number of nonexclusive options that each can be
switched on and off. You can select as few or as
many check box options as are appropriate. When a
check box is selected it contains a ‘√’, otherwise it is
empty. To clear a selected check box, click on it
again.
List boxes - contain a column of available choices.
To select an item, simply click on it. Normally only
one item can be selected from a list box, but for
certain applications, more than one item can be
selected using the <CTRL> key plus mouse button.
2.2 Initiating startup
Drop-down list boxes - appear initially as a
rectangular box with the current choice. The arrow
in a square box at the right opens the list of available
choices. Drop-down list boxes are often used in
dialogue boxes that are too small or crowded to
contain normal list boxes.
At your Windows desktop there may be a shortcut
representing the software. You should be able to
recognize this shortcut, i.e. you should know its
name.
2.2.1 Locating the software
The procedure for initiating Startup is always the
same, whether it is being used for setting global
parameters or for accessing other software modules.
Loading the application
To load the application:
•
Bosch Security Systems B.V. | 2005 January | 9922 141 70512
Double-click on the shortcut, which is located at
the desktop.
DCN Next Generation System Startup
en | 12
The will start.
If there is no shortcut at the Windows desktop, the
software can be loaded as follows:
•
Select ‘Programs’ option of the ‘Start’ menu,
select ‘Digital Congress Network Next Generation’
at last select ‘The DCN’ shortcut.
The Startup program will then be started. A general
information window about will appear, which gives
the software release number, and copyright
information.
Figure 4 The Startup screen.
This window contains icons representing the different
software modules in an icon box, the ‘Current
Installation File’ name and the ‘Current Names File’
name. Although icons for all modules are displayed,
this does not mean that all are available on your
system. Those, which are available, are represented
by colored icons. Those, which are not available, are
represented by purely gray icons.
i
Figure 3 The information window..
If the CCU is not connected, all the icons will
be grayed except Synoptic Microphone,
Delegate Database, Parliamentary and Multi
voting. A line of text is present at the top of the
Startup screen indicating whether the CCU is
connected or not. In multi PC systems, this text
only appears on the server PC.
To remove this dialogue box and gain access to the
main Startup window:
•
Note
Click on the ‘OK’ push button.
The following dialogue box appears:
i
Note
If there are no channels specified for Intercom
in the System Installation module, then it will
not be possible to open the Intercom module,
and the Intercom icon will be grayed even if the
Intercom module is available.
From this window you can now carry out your tasks.
These will fall under one of two categories:
•
Defining global settings
•
Starting other software modules
Each of these categories is covered in chapter 3. It is
assumed that most first time users will begin with
setting global parameters (master volume, error
Bosch Security Systems B.V. | 2005 January | 9922 141 70512
DCN Next Generation System Startup
messages...), and then select software to start. The
manual has been structured accordingly.
2.3 Using Help
2.3.1 The Help menu
The ‘Help’ menu in the title bar contains commands
for an on-screen help facility. This help facility
contains information on all commands in the ‘File’
menu, on which keyboard keys are functional, a
description of how to use the software, information
on how to use the help facility itself, plus an index
and a glossary of terms. All information contained in
this user manual is also found in the ‘Help’ facility.
The ‘Help’ facility contains the following options:
•
Index
•
Keyboard
•
Commands
•
Procedures
•
Glossary
•
Using Help
•
About Synoptic Microphone Control.
en | 13
•
Select the ‘Help’ menu and click on ‘Commands’.
A list of menu groups is given. For more information
on any menu group contained in the list:
•
Click on the required menu group in the list.
A list of options in the selected menu group is given.
For more information on any option contained in the
list:
•
Click on the required option in the list.
An on-screen page with the requested information
will appear.
2.3.5 Procedures
This gives information on how to use the software.
To access the ‘Procedures’ help facility:
•
Select the ‘Help’ menu and click on ‘Procedures’.
A list of topics is given. For more information on any
topic contained in the list:
•
Click on the required topic in the list.
A list of options for the selected topic is given. For
more information on any option contained in the list:
2.3.2 Index
To access the index:
•
•
An on-screen page with the requested information
will appear.
Select the ‘Help’ menu and click on ‘Index’.
Click on the required option in the list.
A full list of subjects covered by the help facility is
given in alphabetical order. For more information on
any subject contained in the index:
2.3.6 Glossary
To access the glossary:
•
•
Click on the required subject in the index.
Select the ‘Help’ menu and click on ‘Glossary’.
An on-screen page with the requested information
will appear.
A list of terms used in the help facility is given in
alphabetical order. For more information on any
term contained in the glossary:
2.3.3 Keyboard
This gives information on which keys on your
keyboard can be used with the software. This
includes using keys to activate menu items, to move
around in dialogue boxes, for short cuts, and to select
options from the main window. To access the
‘Keyboard’ help facility:
•
•
•
Select the ‘Help’ menu and click on ‘Keyboard’.
Click on the required subject in the index.
A window with the requested information will appear.
2.3.7 Using Help
This gives information on how to use the help facility.
To access the ‘Using Help’ facility:
Select the ‘Help’ menu and click on ‘Using Help’.
A list of different key types is given. For more
information on any key type contained in the list:
A list of topics is given. For more information on any
topic contained in the list:
•
•
Click on the required key type in the list.
An on-screen page with the requested information
will appear.
2.3.4 Commands
This gives information on all menu options, covering
the ‘File’, ‘Edit’, ‘View’, ‘Settings’ and ‘Help’ menus.
To access the ‘Commands’ help facility:
Click on the required topic in the list.
A list of options for the selected topic is given. For
more information on any option contained in the list:
•
Click on the required option in the list.
An on-screen page with the requested information
will appear.
Bosch Security Systems B.V. | 2005 January | 9922 141 70512
DCN Next Generation System Startup
2.3.8 About
This provides software release information. To
display the ‘About...’ window:
•
Select the ‘Help’ menu and click on ‘About...’.
The following window appears:
Figure 5 The ‘About...’ window
To remove this window:
Click on the ‘OK’ push button.
Bosch Security Systems B.V. | 2005 January | 9922 141 70512
en | 14
DCN Next Generation System Startup
3
en | 15
Removing the master volume
To remove the master volume:
Using startup
•
Select the ‘Global Settings’ menu on the main
menu bar.
•
Click ‘Master Volume Control’ to remove this
function.
3.1 Specifying global settings
3.1.1 The menu bar
All menu options referred to in this user manual are
contained within the menu bar, located underneath
the title bar at the top of the main window. Access to
drop-down menus is gained by clicking on the menu
title, displayed in the menu bar.
The full list of menu options is as follows:
File
Global Settings
System
Config!
Open Installation
file…
Error Messages…
Index…
Auto Start Config…
Keyboard
Master Volume
Control
Commands
Altering the master volume control
This option allows you to adjust the volume of all
unit loudspeakers in the system.
Help
Open Names File…
Close
Procedures
Delete Installation
File…
Multi PC Setting…
Glossary
Enter License…
Delete Names File…
Using Help
Figure 6 The ‘Master Volume Control’ window
Exit
About…
To alter the volume:
3.1.2 Master volume control
The ‘Master Volume Control’ window is displayed on
the Windows desktop regardless of which software
module you are running or intend to run. It is
situated in the left side of the screen alongside the
main Startup window. It appears as default when the
Startup module is loaded, but does not disappear
(unless intentionally removed) when you open
another module. You may remove this function so it
disappears from the screen and cannot therefore be
altered.
i
Note
The ‘Master Volume Control’ window can be
moved around the desktop by clicking on the
window with the left mouse button and
dragging it to another position.
i
Note
The ‘Master Volume Control’ is not always on
top of the other windows. When using
maximized windows, the control is not visible
anymore.
It can be always on top by adding the following
section to the DCNNG.INI file:
•
Click on the up or down arrow, as required.
The slider box will move up or down corresponding
to the change in volume.
i
Note
The volume can also be altered by dragging the
slider box up or down, as required. It is also
possible to click on the area above or below
the slider box. This causes the slider box to
move towards the pointer.
Muting
It is possible to cut off all delegate unit loudspeaker
output. To do so:
•
Click on the ‘Mute’ push button situated
underneath the master control volume box at the
bottom left of the screen.
The button will turn red, indicating the ‘Mute’
function has been activated. The slider box will move
to its lowest possible position.
i
[Startup]
MasterVolOnTop=Yes.
Bosch Security Systems B.V. | 2005 January | 9922 141 70512
Note
Muting the output signal only temporarily
reduces the output volume to zero. When the
muting is disabled, the output volume returns to
the level it had before being muted.
DCN Next Generation System Startup
To end the muting:
•
Click on the ‘Mute’ push button again.
The button will turn from red to gray, indicating that
muting has ended.
i
Note
The master volume can be adjusted at any time
while you are in Startup. It can also be adjusted
while you are using one of the other software
modules. The procedure is identical to the one
described in this user manual.
i
Note
The master volume controls the delegate
loudspeakers and both the line outputs at the
CCU.
The volume control at the CCU only controls
the delegate loudspeakers.
en | 16
‘Error Messages’ list box
This box contains a list of all the hardware error
messages generated by the system since the last
‘Clear’ action. Each entry consists of the seat number
of the unit with error (if applicable), the type of error
that has occurred, and the date and time of the error.
If the list is longer than the window, you can scroll to
see the rest of the list contents.
Clearing error messages
It is possible to delete all error messages on the error
messages list. To do so:
•
Click on the ‘Clear’ push button.
This will clear the ‘Error Messages’ list box. The ‘Total
Number of Errors’ field will be reset to zero. The
‘Clear’ and ‘Print’ push buttons are disabled.
Automatic acknowledgement of error messages
This facility notifies the user every time an error
message occurs. The default state is disabled. If you
wish to select this facility:
•
3.1.3 Error messages
When hardware errors occur the system
automatically generates error messages. The ‘Error
Messages’ dialogue box provides information on the
error messages and allows you to specify what you
wish to do with it.
The following information is provided:
•
The total number of error messages generated
•
A list of all error messages generated
The following options are available:
•
To provide automatic notification when any
error messages occur
•
To print out the error messages
•
To send error messages to an auxiliary output
•
To clear (delete) all existing error messages
Click on the ‘Auto Show When New Errors’
check box.
An ‘√’ will appear, indicating you have enabled this
function. To de-select this facility, repeat the above.
Sending error messages to an auxiliary output
This facility allows you to automatically send error
messages in real time to the serial port of the PC,
thus enabling external data logging. To do so:
•
Click on the ‘Send to Auxiliary’ check box.
An ‘√’ will appear, indicating you have enabled this
function. To de-select this facility, repeat the above.
i
To access the ‘Error Messages’ dialogue box:
•
Select the ‘Global Settings’ menu on the main
menu bar and click on ‘Error Messages...’.
The following dialogue box appears:
Note
By default is comport 2 used on the local PC,
but it can be routed to any comport or even to
a different PC by adding the following section
to the DCNNG.INI file:
[Errorlogging]
Comport=X
ComPortPCID=NR
where:
‘X’ is the comport number (1-4)
‘NR’ is always 1 in a single PC
system. In case of a multi-PC
system, ‘NR’ is the number of
the PC on which the output
must be produced. Server PC
=1, Client PC is from 2 until 10
The port settings can be changed in the
Windows Device Manager.
ComPort
ComPortPCID
Figure 7 The ‘Error Messages’ dialogue box.
Bosch Security Systems B.V. | 2005 January | 9922 141 70512
DCN Next Generation System Startup
i
en | 17
i
Note
The data layout is identical to the Microphone
activity logging in Synoptic Microphone control
and Microphone Management, to make
processing easier when both loggings are
routed to the same comport. The data layout is
defined as follows:
<action code><state><seatnumber><CR><LF>
where:
action code
% error
state
1 default
error code
The error code is a 4 digit hexadecimal number that indicates
which error has occurred and
can have the following values:
1701 CCU not available
3208 Unit disconnected
Examples:
%13208<CR><LF> Unit disconnected
If you are inserting a header more than 20
characters long, the text box scrolls
horizontally. To view a header longer than 20
characters, use the left and right arrow buttons
on the keyboard.
To define the number of copies:
•
Select the ‘Number of Copies’ field and type in the
required number.
i
•
Tip
The up and down arrow buttons on the righthand side of this field can be used to scroll to
the required number. The maximum number of
copies that can be printed is nine.
When you have specified all relevant print
parameters:
•
Printing error messages
If you wish to have a permanent record of all error
messages, there is a facility, which allows all error
messages to print out. You can also specify
parameters relating to the printing of the error
message. To do so:
Tip
Click on the ‘Print’ push button.
The appropriate information will be printed.
i
Note
Clicking on the ‘Cancel’ push button removes
the dialogue box without carrying out the
dialogue box function. This applies to all
‘Cancel’ options in Startup.
Click on the ‘Print’ push button.
The following dialogue box appears:
i
Note
Although ‘Auto Start Config...’ is a Global
Setting, it is not dealt with in this section. The
‘Auto Start Config...’ Information is in
paragraph 3.2.4
3.1.4 Accessing System Configuration information
This function provides you with a list of the number
and type of every unit connected to the Central
Control Unit (CCU). To access the list:
Figure 8 The ‘Print Error Messages’ dialogue box.
•
This dialogue box contains a text box for entering a
page header and a field for entering the number of
copies required. To enter a header:
•
Select the ‘Page Header’ text box.
An appropriate title for the error messages list may
be entered up to 80 characters long (although only 20
characters are displayed in the text box). This text
box may also be left blank.
Bosch Security Systems B.V. | 2005 January | 9922 141 70512
Select the ‘System Config!’ option from the main
menu bar.
DCN Next Generation System Startup
The following dialogue box appears:
en | 18
i
Note
The maximum number of PCs that can be
present is 10. However, with this number of
PCs present, only a few applications can be
used. A maximum of four PCs can be used with
all applications running. CCU and optical units
software can only be downloaded from the
server PC.
Figure 9 The ‘System Configuration’ dialogue box.
The dialogue box contains a scrollable list of all units
connected to the system. Each unit is represented by
a number and a description of the type of unit. The
different types of units are:
•
Delegate Unit
•
Delegate Unit with LCD
•
Chairman Unit
•
DDI Dual Delegate Unit
•
DDI Single Delegate Unit
•
DDI Chairman Unit
•
Ambient Microphone
•
Entrance Unit
•
Exit Unit
•
Interpreter desk
•
Voting unit
•
Data Distribution Board
•
Audio Expander
•
Digital Audio Expander
•
Cobranet Interface
•
Transmitter 4 channels
•
Transmitter 8 channels
•
Transmitter 16 channels
•
Transmitter 32 channels
If any of these units are not present in the system
they will not be included in the list.
3.1.5 Multi PC Settings
The software can run on a single PC or in a multi-PC
environment, where the PCs are interconnected by a
local area network (LAN). For such a system to work
properly, there must be a server PC that controls and
distributes information and prevents data being
modified from more than one PC simultaneously.
The other PCs in the system are called client PCs.
i
Note
An Ethernet card and software must be present
before software can run in a multi-PC
environment.
In a multi-PC system, it is necessary to determine for
each PC what its functionality will be for each
software module. There are three possible levels of
functionality:
•
Master - the software module has full
functionality on the PC designated ‘Master’. If
the master PC is closed down, any slave
applications present will be iconized and the text
‘offline’ will appear under the icon.
•
Slave - the software module has limited
functionality on ‘Slave’ PCs. The software can be
started, but does not run (and cannot be restored
from an icon) until it is started on the PC where
it has master functionality. It can then be used to
view settings and to monitor the congress, but it
cannot be used to alter settings.
•
None - the application has no functionality (for
example, there is no license for an application).
i
Note
Every application should be ‘Master’ on at least
one PC.
The following restrictions apply:
•
Startup and System Installation can only have
master functionality on the server PC. With other
applications, any PC can be used.
•
There can only be one instance of an application
with master functionality, except in the case of
Message Distribution and Video Display, where
master functionality can exist on any number of
PCs in the system.
•
System Installation, Delegate Database, Intercom,
Message Distribution and Video Display cannot
have slave functionality.
•
Microphone Management, Synoptic Microphone
Control, Simultaneous Interpretation,
Parliamentary Voting, Multi Voting, Attendance
Registration and Text/Status Display can have
slave functionality on any PC (up to a total of
nine).
•
Startup can have slave functionality on all PCs
except the server.
Bosch Security Systems B.V. | 2005 January | 9922 141 70512
DCN Next Generation System Startup
It is possible to alter these settings using the ‘Multi
PC Settings...’ option in the ‘Global Settings’ menu.
When one user is altering the settings, any other user
can view them but not alter them.
i
en | 19
To change the setting to ‘Master’:
•
Click on the ‘Master’ radio button.
i
Note
If an application is given master functionality on
another PC, its setting will automatically
change to either ‘Slave’ (if this functionality is
possible) or ‘Off’ on any PC where it previously
had master functionality.
Settings can only be changed if there are no
applications (except Startup) running on any
PC, and no other ‘Application Configuration’
screen is opened. Otherwise, you can view the
settings but not change them.
i
i
Note
Settings can only be changed on the master
application.
Select the ‘Multi PC Settings...’ option from the
‘Global Settings’ menu.
The following window appears:
Note
For Message Distribution and Video Display,
both radio buttons are always inactive and the
‘Master’ radio button enabled, as these
applications can run on more than one PC as
master.
To alter the settings:
•
Note
When you have finished altering the settings:
•
Click on the ‘Ok’ push button.
The following warning message appears:
‘Application settings will be changed. Are
you sure?’
•
Click on the ‘Ok’ push button to save the
changes.
•
Click on the ‘Cancel’ push button to remove the
message, without saving any changes.
3.1.6 Master/Slave functionality of modules
This section describes the differences in functionality
when modules are running as master or slave
applications.
Figure 10 The ‘Application Configuration’ window.
Each application is represented by an icon with two
radio buttons underneath. One button is labeled
‘Master’, and the other is labeled ‘Slave’ or ‘Off’,
depending on whether slave functionality is possible
with that application. If there is no license for an
application, the icon and radio buttons will not be
active.
i
Note
An application cannot be directly changed from
‘Master’ to ‘Slave’ or from ‘Master’ to ‘Off’.
This alteration is only possible indirectly, by
changing the setting on another PC to ‘Master’
for the application.
System Installation
System Installation can only run in master mode and
can only be started on the server PC. The installation
mode can only be entered if there are no applications
apart from Startup running on client PCs. On client
PCs, you can only enter installation mode if there are
no applications apart from Startup running.
Otherwise it is only possible to start the module.
However, it is possible to enter installation mode on
the server PC if there are other applications running
on it. In this case the other applications are stopped
and restarted after leaving installation mode.
Furthermore, entering installation mode on the server
PC prevents any application (apart from Startup)
being started on any PC. If you try to start an
application on a client PC a warning message will
appear. If you try to start an application on the server
Bosch Security Systems B.V. | 2005 January | 9922 141 70512
DCN Next Generation System Startup
PC, there will be no warning message, but the
application will not start until leaving installation
mode, when it will start automatically. However, it is
always possible to start applications when not in
installation mode.
i
Microphone Management
This module can run in master mode and in slave
mode.
Note
In Microphone Management, slave functionality
is not restricted to monitoring. You also have
microphone control, such as switching a
microphone on or off.
When Microphone Management is running in slave
mode, the following restrictions apply:
•
Only the ‘Exit’ and ‘Print Activity’ options can be
selected from the ‘File’ menu. Creating, opening,
saving and deleting files is not possible.
•
Only ‘Mic Activity’ can be selected from the
‘Settings’ menu. Setting the system microphone
mode, attention tone, ambient microphone
control, microphones off after shift and testing
the microphones is not possible.
•
The ‘Speech Time’ menu is not available. This
means that setting a speech time limit is not
possible.
i
Note
In either master or slave mode, request lists,
notebooks and the speakers’ list can only be
changed by one Microphone Management
application at a time.
i
Synoptic Microphone Control
This module can operate in master mode and in
slave mode.
i
Note
Note
In Synoptic Microphone Control, slave
functionality is not restricted to monitoring. You
can also control microphones e.g. switching
them on/off.
Note
If seats have to be assigned to delegate units
during a conference, this can be done from the
server PC using System Installation or limited
installation (i.e. assigning free seat numbers to
units.)
i
en | 20
When Synoptic Microphone is running in slave
mode, the following restrictions apply:
•
Only the ‘Exit’ and ‘Print Activity’ options can be
selected from the ‘File’ menu. Creating, opening,
saving and deleting layout files and importing a
bitmap are not possible.
•
The module can only function in control mode.
This means that the ‘Edit’ menu is disabled and
it is not possible to create a layout file.
•
It is not possible to set the system microphone
mode, attention tone, ambient microphone
control, microphones off after shift function or
test the microphones.
With respect to activity logging, the module has the
same functionality as Microphone Management.
i
Note
Altering the system microphone mode or
testing microphones is not possible if this is
simultaneously being done by a Microphone
Management module in master mode on
another PC.
Layout files and background bitmaps
The layout file that is used by the master application
is used by slave applications. When a slave
application is started and no layout file has been
opened by the master application, the slave
application will not have a layout. When the master
application is editing a layout, a slave application will
show the layout file as it was last saved. But when the
master application returns to control mode, the
layout file will be saved and all slave applications will
automatically show the new layout file.
i
Altering the system microphone mode or
testing microphones is not possible if this is
simultaneously being done by a Synoptic
Microphone module in master mode on another
PC.
For each PC in a multi-PC system, you can specify
whether the microphone activity logging is sent to
file, printer and/or an auxiliary destination.
Bosch Security Systems B.V. | 2005 January | 9922 141 70512
Note
If the master application is editing the layout file
for the first time, the slave applications can
have no layout file.
DCN Next Generation System Startup
i
Note
If a background bitmap is imported by the
master application, the same bitmap filename is
used to load the bitmap from the /bitmap
directory. If the bitmap is not present, it is not
shown on the slave application. It is up to the
operator to copy the bitmaps.
The ‘Rotate Image’ function is active for every
Synoptic Microphone application.
The rotation angle for each layout file of the master
application is stored in the database. The rotation
angles of the slave applications will be. When a slave
application is started for the first time, its rotation
setting will be the same as that specified in the master
application. If a slave application changes the
rotation angle, it will be stored and will be applied
the next time the application is started.
i
However, it is not possible to run both Parliamentary
Voting (PV) and Multi Voting (MV) in a multi PC
configuration at the same time. So, when PV is
running on a PC, MV cannot be started on that PC
and vice versa. When you click on the PV or MV
icon in the Startup main window, the other voting
icon will be disabled. When the ‘Start’ button is
pressed and one of the voting applications is started,
the icon of the other voting application will be
disabled on all other PCs. If a voting application
cannot be started for a different reason, such as the
PV and MV applications being started at exactly the
same time on two different PCs, a message box will
appear and the start up will not proceed.
In slave mode, these applications only have a
monitoring function.
i
Simultaneous Interpretation
This module can run in master and slave mode.
However, in slave mode applications only have a
monitoring function.
The following restrictions apply:
•
Only the ‘Print’ and ‘Exit’ options can be
selected from the ‘File’ menu. Creating, opening,
saving and deleting interpretation files is not
possible.
•
The ‘Edit’ menu is disabled, so it is not possible
to edit channel language assignment and desk
language assignment.
•
The ‘Settings’ menu is disabled, so it is not
possible to test microphones or change the
microphone interlock mode.
Delegate Database
This module can only run in master mode and it can
only be started once on the PC where it is configured
to run. The DCNNG API can be used as a substitute
for Delegate Database. For more information see
chapter Error! Reference source not found..
Note
There are no restrictions concerning which
application is used, Delegate Database or
DCNNG API, but it is possible that the
database made, using the different
applications, may be mixed.
Parliamentary Voting and Multi Voting
These modules can run in master and slave mode.
Note
In slave mode, only the ‘Results’ window can
be seen.
Note
Rotation angle applies only to the layout file.
Bitmap files are never rotated.
i
en | 21
The following restrictions apply:
•
Only the ‘Exit’ option can be selected from the
‘File’ menu. Creating, opening, saving, deleting
or printing voting scripts is not possible.
•
You cannot prepare a voting script.
•
You cannot edit votings.
•
You cannot control voting in any way, such as
starting, stopping, holding and restarting a voting
round.
•
Voting settings cannot be changed.
i
Note
For more information about the settings and
parameters used in Parliamentary Voting and
Multi Voting, please refer to the User Manuals.
i
Note
Both master and slave applications can
independently select which group results are
shown in the ‘Results’ window.
Intercom
This module can only run in master mode and can
only be started once on the PC where it is configured
to run. This application of Intercom automatically
becomes the master application.
Attendance Registration
This module can run in master and slave mode.
However, in slave mode applications only have a
monitoring function. The following restrictions apply:
•
You cannot specify whether ‘Access’ or
‘Attendance’ is on.
Bosch Security Systems B.V. | 2005 January | 9922 141 70512
DCN Next Generation System Startup
•
Only the ‘Att. Reg. Activity’ option can be
selected from the ‘Settings’ menu.
Setting modes, such as registration at seats or at
entrance/exit units, fixed or free seating and
registration by present key, pin code only, ID
card or ID card and PIN code is not possible.
•
Text/Status Display
This module can run in master and slave mode.
However, in slave mode applications only have a
monitoring function. The following restrictions apply:
•
You cannot set the display configuration, such as
specifying whether the hall displays should show
voting results, messages or microphone
information.
•
The ‘Settings’ menu is disabled, so you cannot
specify whether information should be sent to
geographic displays.
•
The ‘Clear Display’ option is disabled.
Message Distribution
There is no master/slave functionality for Message
Distribution. This means that every Message
Distribution application has full functionality. This
application can also run on more than one PC at a
time.
Video Display
There is no master/slave functionality for Video
Display. This means that every Video Display
application has full functionality. This application can
also run on more than one PC at a time and on every
PC it is possible to run a DDE client with different
information.
i
Note
For more information about what can be
displayed using this module and about the
format of the information displayed, please refer
to the Video Display Reference Manual.
i
Note
If more than one PC is connected to the same
video display, it is not possible to specify how
much longer it takes one DDE client to show its
results than another..
Automatic Camera Control
This application can only run on the server PC, and
can only run in master mode.
3.1.7 Entering a license
The software is protected with a license. To use the
software applications modules they must be licensed.
To enter the license:
en | 22
•
Select the ‘Global Settings’ menu on the main
menu bar and click on ‘Enter License...’.
The following windows appears:
Figure 11 The 'Enter License' window
•
Fill out the license key and click ‘OK’
i
Note
A license is dedicated to a CCU. This means
that each CCU must have its own license.
3.2 Starting up other software modules
Before selecting applications to be started, it is
important to first open an installation file and a
names file, as certain modules will not run unless an
installation and/or names file has been specified.
Even if you do not intend to immediately use
modules that use information from these files, it is
advisable to open them anyway, as this information
may be required later. You cannot create these files
in Startup, only specify them.
3.2.1 Selecting an installation- and a names file
The software uses two user-created files that contain
important information about the installed hardware
configuration and about delegates’ names. These files
are:
•
Installation file - containing information about
channel assignments and the seat numbers that
have been assigned to all active contribution
units connected to the system. These seat
numbers and channels are assigned using the
System Installation module (LBB 4185).
•
Names file - containing information about the
names of and details of participating delegates,
and which seat number they occupy. These
names are assigned using the Delegate Database
module (LBB 4180).
Applications may be started without specifying
either an installation or names files. However, some
applications will not open without the appropriate
installation or names file.
Bosch Security Systems B.V. | 2005 January | 9922 141 70512
DCN Next Generation System Startup
Opening an installation file
When the Startup screen is opened, the last-used
installation file (and names file) is automatically
opened and displayed in the window as follows:
‘Current Installation File: <FILENAME>’
‘Current Names File: <FILENAME>’
i
Note
If the Startup screen is being opened for the
first time (or installation and names files have
not been generated) no file names will be
given.
i
Note
Installation files can only be opened if there are
no software modules active other than System
Installation.
en | 23
The ‘Open’ dialogue box shown on the previous page
appears. The procedure for opening a names file is
exactly the same as opening an installation file.
Please refer to the previous page for more details.
Closing files
This option allows you to close the currently open
installation file and names file. This is only possible if
there are no other active modules. To close:
•
The current installation file and names file will be
closed.
Deleting an installation file
If you wish to delete a redundant installation
file:
•
Select the ‘File’ menu and click on ‘Open
Installation File’.
Select the ‘File’ menu and click on ‘Delete
Installation File’.
i
To open an installation file:
•
Select the ‘File’ menu and click on ‘Close’.
Note
You cannot delete the current installation file.
The following dialogue box appears:
The following dialogue box appears:
Figure 13 The ‘Delete’ dialogue box.
Figure 12 The ‘Open’ dialogue box.
This dialogue box contains a list box for selecting the
installation file. It contains all installation files
currently available. If the list contains more names
than can be displayed, a scroll bar is provided.
This dialogue box contains a list box for selecting the
installation file to be deleted. If the list contains more
names than can be displayed, a scroll bar is provided.
To delete an installation file:
•
Click on the name in the list.
Click on the ‘Delete’ push button.
•
Click on the name in the list.
•
•
Click on the ‘Ok’ push button.
Another dialogue box will appear, with the text:
‘Are you sure you want to delete file
<filename>’
If you still want to delete <filename>:
The selected installation file will be opened and you
will return to the Startup main window.
Opening a names file
You can only open a names file if an installation file
has already been opened. To open a names file:
•
Select the ‘File’ menu and click on ‘Open Names
File’.
•
Click on the ‘OK’ push button.
The file is deleted and you return to the Startup main
window.
Bosch Security Systems B.V. | 2005 January | 9922 141 70512
DCN Next Generation System Startup
en | 24
Deleting a names file
To delete a redundant names file:
The icon box displays icons for all modules. To load
the required module(s):
•
•
Select the ‘File’ menu and click on ‘Delete Names
File’.
The ‘Delete’ dialogue box shown on the previous
page appears. The procedure for deleting a names
file is exactly the same as deleting an installation file.
Please refer to the previous page for more details.
i
Select the icon representing the module you wish
to load, and click on it.
The icon will become darker, and the text
underneath the icon will change to white-on-black,
indicating that module has been selected.
i
Note
Note
To de-select an icon, simply click on it again.
You cannot delete the current names file.
3.2.2 Opening other modules from Startup
The Startup program is the means of access to the
other software modules. An overview of these
modules is contained in chapter 1. These modules
can only be started from Startup. There are two
methods of starting up these modules:
•
Select the module(s) you wish to start from the
main Startup window, and then click on ‘Start’.
You can select as many (licensed) modules as
you wish.
•
If there are modules that you use on a regular
basis, you can configure the system to
automatically start these modules every time
Startup is started from the Windows desktop.
Additional modules can be selected from the
main icon box and also started if required.
Details of the automatic start up configuration
facility are contained on paragraph 3.2.4.
i
Note
Only modules that have been licensed on your
system can be started. The modules that have
been licensed are represented by colored
icons. Those not licensed are represented by
purely gray icons. Clicking on the gray icons
will have no effect.
i
Note
Parliamentary Voting or Multi Voting can be
started but not both at the same time.
3.2.3 Choosing one or more software modules
At this point you should know which modules you
wish to use for your conference. The operating
procedures for each module are contained in
separate user manuals, and are therefore not included
in this manual. If you intend to start a particular
module, you should have the user manual for that
module to hand.
You may choose as many available modules as you
wish.
i
Note
It is not possible to run Parliamentary Voting
and Multi Voting simultaneously.
i
Note
If there are no channels specified for Intercom
in the System Installation module, then it will
not be possible to open the Intercom module,
and the Intercom icon will be grayed out.
Once you have selected the desired number of
modules:
•
Click on the ‘Start’ push button.
These modules will then be started and will appear as
application icons underneath the main window.
You can check which applications have been started
by looking for application icons at the Taskbar.
To open an application icon on the Windows
desktop:
•
Click on the icon.
Alternatively, press <ALT+TAB> to display a list of
icons representing currently open applications, which
have been minimized. By using the <TAB> key
while holding the <ALT> key down, you can
highlight any icon. Releasing both keys will now
open the highlighted application.
i
Note
When other modules are started from Startup,
the Startup program itself becomes minimized.
If you wish to re-open Startup, this can be done in
two ways:
Bosch Security Systems B.V. | 2005 January | 9922 141 70512
DCN Next Generation System Startup
•
en | 25
By clicking on the Startup icon in the windows
taskbar.
i
You can de-select one or more modules for
auto start simply by clicking on the icon again.
or
•
Note
By using the <ALT>+<TAB> keys as described
above.
When you have finished your selection:
•
Click on the ‘On’ option button under ‘Auto
Start’ at the top of the window.
•
Click on the ‘Ok’ push button.
3.2.4 Configuring the system for Auto Start
This option allows you to specify any number of
(licensed) software modules for automatic start up.
When this option is enabled, the selected modules
are loaded directly from Startup, and appear as
application icons at the Taskbar.
Application icons can be opened (restored to a
window) simply by clicking on them.
To disable auto start:
To configure the system for Auto Start:
3.3 Exiting Startup
•
Select the ‘Global Settings’ menu and click on
‘Auto Start Config...’.
The following dialogue box appears:
•
Click on the ‘Off’ option button under ‘Auto
Start’ at the top of the window.
3.3.1 Temporarily exiting Startup
It is possible to temporarily leave Startup without
closing it down completely.
To do so:
•
Click on the minimize button situated at the top
right of the application window.
The Startup program will become iconized in the
Windows taskbar. To re-enter Startup:
•
Click on the Startup module icon.
3.3.2 Permanently exiting Startup
If you wish to exit Startup completely:
•
Select the ‘File’ menu and click on ‘Exit’.
i
Note
By closing the Startup program, all applications
will close.
Figure 14 The ‘Auto Start Configuration’ dialogue
box.
The licensed software modules are indicated by
colored icons. There is a prompt above the icon box,
which says,
‘Choose applications to auto start’
•
Any changes made within Startup will automatically
be saved. If you have requested to exit before saving
changes to any active module, a warning message
with the following text is displayed for each module
with unsaved changes:
‘Changes have been made to <filename>.
Do you want to save?’
•
Click on the ‘Yes’ push button to save the
changed file and exit the program.
•
Click on the ‘No’ push button to exit without
saving the changed file.
Click on the modules you wish to auto start.
When you exit Startup you will return to the
Windows desktop.
Bosch Security Systems B.V. | 2005 January | 9922 141 70512
DCN Next Generation System Startup
i
Tip
You can also exit the Startup program by
clicking on the ‘close’ button in the far top right
corner of the window.
3.4 Suppress unit display
The DCNNG.INI file, located in the Windows
directory, can contain an entry, which suppresses the
display of user configurable texts (screenlines, voting
subject etc.) on LCD screens of the delegate units. If
this entry is present, these texts will only appear on
hall displays.
[Startup]
DisableUserText=No
Bosch Security Systems B.V. | 2005 January | 9922 141 70512
en | 26
For more information please visit www.boschsecuritysystems.com
© 2005 Bosch Security Systems B.V.
Data subject to change without notice
January 2005 | 9922 141 70512