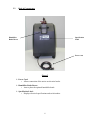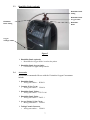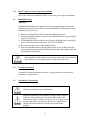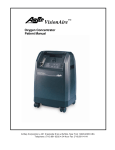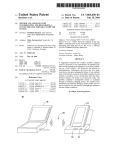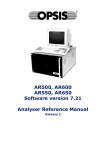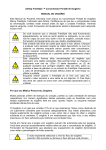
1
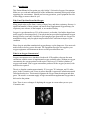
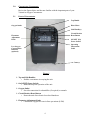
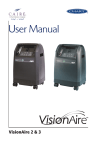
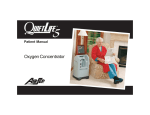
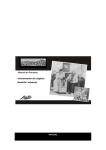
VisionAire™
Oxygen Concentrator
Patient Manual
AirSep Corporation • 401 Creekside Drive • Buffalo, New York 14228-2085 USA
Telephone: (716) 691-0202 • 24-Hour Fax (716) 691-4141
Table of Contents
Important Safety Rules
Page 1
Section 1
Introduction
Page 2
Section 2
Concentrator Components
2.1
Front of Concentrator
2.2
Back of Concentrator
2.3
Humidifier Bottle
2.4
Accessories
Page 4
Page 4
Page 6
Page 7
Page 7
Section 3
How to Operate Your Oxygen Concentrator
3.1
Humidifier Bottle Connection
3.2
Cannula Connection
3.3
Starting the Concentrator
3.4
Turning the Concentrator Off
Page 8
Page 8
Page 8
Page 8
Page 9
Section 4
Care and Cleaning
4.1
Humidifier Bottle
4.2
Outside Cabinet
Page 10
Page 10
Page 10
Section 5
Troubleshooting
Page 11
Section 6
Product Specifications
Page 13
Section 7
Symbols/Abbreviations
Page 15
English: A multilingual version of the manual is available through your equipment provider.
Español: Una versión multilingüe del manual está disponible a través de su proveedor de equipo.
Français: Une version multilingue du manuel est disponible par l'intermédiaire de votre fournisseur
de matériel.
Deutsche: Eine mehrsprachige Version des Handbuchs ist in Ihrer Geräte-Anbieter.
i
Important Safety Rules
In the event of an alarm or if you are experiencing any signs of discomfort,
consult your Equipment Provider and /or your physician immediately.
This unit is not a life-support device. Geriatric, pediatric, or any other
patient unable to communicate discomfort while using this oxygen
concentrator may require additional monitoring. Patients with hearing
and/or sight impairments may need assistance with monitoring the alarms.
Consult your physician immediately if you are experiencing any signs of
discomfort.
This device manufactures high concentration oxygen, which promotes
rapid burning. Do not allow smoking or open flames within 5 feet (1.5
meters) of: (1) this device or (2) any oxygen-carrying accessory. Use no
oil, grease, or petroleum-based products on or near the unit. Disconnect the
power cord from the electrical outlet before cleaning or servicing the unit.
Electrical shock hazard. Do not remove covers while the unit is plugged
in. Only your Equipment Provider or a qualified service technician should
remove the covers or service the unit.
Do not leave a nasal cannula under bed coverings or chair cushions. If the
unit is turned on but not in use, the oxygen will make the material
flammable. Set the I/0 power switch to the 0 (off) position when the
VisionAire™ unit is not in use.
Do not use extension cords with this unit or connect too many plugs into
the same electrical outlet.
Use only voltage specified on back panel label.
Do not use your oxygen concentrator in the presence of flammable gases.
1
1.0
Introduction
This Patient Manual will acquaint you with AirSep’s VisionAire Oxygen Concentrator.
Make sure you read and understand all of the information contained in this guide before
operating your concentrator. Should you have any questions, your Equipment Provider
will be happy to answer them for you.
Why Your Physician Prescribed Oxygen
Many people today suffer from a variety of heart, lung, and other respiratory diseases. A
significant number of these patients can benefit from supplemental oxygen therapy for
respiratory care at home, in the hospital, or at a medical facility.
Oxygen is a gas that makes up 21% of the room air we breathe. Our bodies depend on a
steady supply to function properly. Your physician has prescribed supplemental oxygen
therapy because your body is not able to get enough oxygen from room air. Oxygen is a
non-addictive drug, and your physician prescribed a flow sufficient to improve your
condition.
Please keep in mind that unauthorized oxygen therapy can be dangerous. You must seek
medical advice before you use this unit. The Equipment Provider who supplies your
oxygen equipment will demonstrate how to set the prescribed flow rate.
What is an Oxygen Concentrator?
Oxygen concentrators were introduced in the mid-1970s and have become the most
convenient, reliable source of supplemental oxygen available today. Without an oxygen
concentrator, the average patient would require a delivery of 12 bottles/cylinders of
oxygen each month. Your oxygen concentrator produces all the oxygen you need, with
no deliveries required.
The air we breathe contains approximately 21% oxygen, 78% nitrogen, and 1% other
gases. In the VisionAire unit, room air passes through a regenerative adsorbent material
called molecular sieve. This material separates the oxygen from the nitrogen and other
gases. The result is a constant supply of high concentration supplemental oxygen that is
delivered to the patient.
Note: There is never a danger of depleting the oxygen in a room when you use your
VisionAire unit.
2
AirSep recommends an alternate source of supplemental oxygen in the
event of a power outage, alarm condition, or mechanical failure. Consult
your physician or Equipment Provider for the type of reserve system
required.
U.S. Federal law restricts this device to sale by or on order of a physician.
Use unit in accordance with the manufacturer’s Patient Manual.
It is very important to follow the prescribed level of oxygen flow. Do not
increase or decrease the flow until you first consult your physician.
3
2.0
Concentrator Components
Review the figures below and become familiar with the important parts of your
VisionAire Oxygen Concentrator.
2.1
Front of Concentrator
Top Handle
Hour Meter
Oxygen Outlet
Side Handle(s)
Circuit Breaker
Reset Button
Flowmeter
Adjustment
Knob
ON/OFF (I/0)
Power Switch
Operating
Instructions
Label
Low Oxygen
Concentration
Indicator
(optional)
Caster(s)
Figure 1
¾ Top and Side Handles:
o Enables convenience in carrying the unit.
¾ On/Off (I/0) Power Switch:
o Starts and stops the operation of the unit.
¾ Oxygen Outlet
o Provides connection for a humidifier (if required) or cannula.
¾ Circuit Breaker Reset Button:
o Resets the unit after electrical overload shutdown.
¾ Flowmeter Adjustment Knob:
o Controls the oxygen flow rate in liters per minute (LPM).
4
¾ Low Oxygen Concentration Indicator (optional):
o Illuminates (amber) if the unit is equipped with optional Oxygen Monitor
and detects low oxygen concentration.
¾ Hour Meter:
o Records the concentrator’s hours of operation.
¾ Operating Instructions Label:
o Directs usage of the unit.
¾ Casters:
o Four casters enable unit to be easily moved, as needed.
5
2.2
Back of Concentrator
Humidifier
Bottle Recess
Specification
Label
Power Cord
Figure 2
¾ Power Cord:
o Allows connection of the unit to an electrical outlet.
¾ Humidifier Bottle Recess:
o Area to place the optional humidifier bottle.
¾ Specification Label:
o Displays electrical specifications and serial number.
6
2.3
Humidifier Bottle (optional)
Humidifier Bottle
Fitting
Humidifier Bottle
Oxygen Outlet
Humidifier
Bottle Tubing
Humidifier
Bottle
Oxygen
Tubing/Cannula
Figure 3
¾ Humidifier Bottle (optional):
o Humidifies the oxygen before it reaches the patient.
¾ Humidifier Bottle Oxygen Outlet:
o Connection for oxygen tubing/cannula.
2.4
Accessories
Accessories recommended for use with the VisionAire Oxygen Concentrator
include:
¾ Humidifier Bottle
o AirSep part number – HU003-1
¾ Cannula, 25 feet (7.6 m)
o AirSep part number – CU002-4
¾ Humidifier Bottle Tubing
o AirSep part number – TU176-160
¾ Humidifier Bottle Fitting
o AirSep part number – F0655-1
¾ Oxygen Tubing, 25 feet (7.6 m)
o AirSep part number – CU004-3
¾ Tubing/Cannula Connector
o AirSep part number – CU009-1
7
3.0
How To Operate Your Oxygen Concentrator
Review the following information before you operate your oxygen concentrator.
3.1
Humidifier Bottle
(Optional)
If additional humidification is required with your oxygen therapy, perform the
following steps each time you fill or clean the humidifier, which may have been
initially set up for your use.
1. Remove the humidifier bottle from the humidifier bottle recess.
2. Open the humidifier bottle. If you have a pre-filled bottle, do not perform this
step. Proceed to step 5.
3. Fill the humidifier bottle with cool or cold water (distilled water is preferred)
to the fill line indicated on the bottle. DO NOT OVERFILL.
4. Re-connect the top cover to the humidifier bottle.
5. Place the humidifier bottle in the humidifier bottle recess on the back of the
concentrator and connect the humidifier bottle tubing to the oxygen outlet and
the humidifier bottle fitting.
If the humidifier bottle tubing is not properly connected to the humidifier
bottle fitting or to the oxygen outlet, an oxygen leak can occur.
3.2
Cannula Connection
Connect the tubing and cannula to the unit’s oxygen outlet, or to the optional
humidifier’s oxygen outlet.
3.3
Starting the Concentrator
Do not use extension cords with this unit.
Position the unit away from curtains or drapes, hot air registers
or heaters. Be certain to place the unit on a flat surface and
make sure all sides are at least 1 foot (30 cm) away from a wall
or other obstruction. Do not place the unit in a confined area.
Choose a dust and smoke free-location away from direct
sunlight.
8
1. Locate the unit near the electrical outlet in the room where you spend most of
your time.
2. Insert the power cord plug into the electrical outlet.
3. Set the I/0 power switch to the “I” position to turn the unit on. An audible
alarm will loudly sound for approximately 5 seconds.
4. The low oxygen concentration indicator remains on for a few minutes and
until the oxygen concentration reaches minimum concentration requirements,
(only pertains to unit equipped with an Oxygen Monitor)
5. To set the flow of supplemental oxygen, turn the flowmeter adjustment knob
left or right until the ball inside the flowmeter centers on the flow line number
prescribed by your physician. To view the flowmeter at the proper angle, note
that the back line and the front number line must give appearance of one line.
6. The concentrator is now ready for use.
It is very important to follow the prescribed level of oxygen flow. Do not
increase or decrease the flow until you first consult your physician.
Normally, you should not need to adjust the flowmeter on your unit. If you turn the
flowmeter adjustment knob clockwise, you will decrease and can shut off the flow of
oxygen from your unit.
If oxygen does not seem to flow, first verify that the flowmeter ball is
registering a flow. Then, place the tip of the cannula into a glass of water;
if bubbles come out of the cannula, oxygen is flowing. If bubbles do not
appear, refer to Section 5.0. Troubleshooting.
Ensure concentrator is operated in an upright position.
3.4
Turning the Concentrator Off
•
Set the I/0 power switch to the “0” position to turn off the unit.
9
4.0
Care and Cleaning
Disconnect the power cord from the electrical outlet before you clean
the cabinet or control panel.
Do not use liquid directly on the unit. Do not use any petroleum-based
solvents or cleaning agents.
Clean the cabinet, control panel, and power cord only with a mild
household cleaner applied with a damp cloth or sponge, and then wipe
all surfaces dry.
4.1
Humidifier Bottle (optional)
•
•
4.2
Check water level daily and add water as needed
To clean and disinfect the humidifier, follow your Equipment Provider’s
instructions, or the instructions included with the humidifier bottle.
Outside Cabinet
Use a mild household cleaner applied with a damp cloth or sponge to clean the
exterior of the concentrator, and then wipe all surfaces dry.
10
5.0
Troubleshooting
If your concentrator fails to operate properly, consult your Equipment Provider, and refer
to the troubleshooting chart on the following pages for probable causes and solutions.
Do not attempt any maintenance other than the possible solutions listed
below.
If the unit has not been used for an extended time period, it needs to
operate for several minutes before power failure alarm can become
activated.
Problem
Unit does not operate. Power
failure condition causes an
alarm to sound.
Probable Cause
The power cord is not
connected to the
electrical outlet.
Solution
Check power cord at
the electrical outlet for a
proper connection.
No power at the
electrical outlet.
Check power source,
wall switch, in-house
fuse or circuit breaker.
Circuit breaker on
concentrator unit is
activated.
Press (do not hold in)
the circuit breaker reset
button in the front of the
unit.
If the circuit breaker
trips again or the alarm
continues to sound after
the unit is turned on,
contact your Equipment
Provider.
Limited or no oxygen flow.
Dirty or obstructed
Remove the humidifier
humidifier bottle, or leak bottle, and if flow is
present.
restored, clean or
replace the humidifier
bottle.
Defective nasal cannula,
or other oxygen
accessories, i.e. oxygen
tubing.
Remove and check
accessories for kinks or
obstructions. Replace if
needed.
Cannula tubing loose.
Check cannula tubing
connection at control
panel.
11
Problem
Probable Cause
Condensation collects in the
oxygen tubing when you use
a humidifier bottle
Unit not properly
ventilated.
Elevated operating
temperatures.
Intermittent alarm sounds at one
second intervals.
Equipment malfunction.
All other problems.
12
Solution
Make sure unit is
positioned away from
curtains or drapes, hot
air registers or heaters,
Be certain to place the
unit so all sides are at
least 1 foot (30 cm)
away from a wall or
other obstruction. Do
not place the unit in a
confined area.
Refill humidifier bottle
with COLD water.
DO NOT OVERFILL.
Allow oxygen tubing to
dry out, or replace with
new tubing.
Set I/0 power switch to
0 position, use your
reserve oxygen supply
(if provided), and
consult your Equipment
Provider immediately.
Set I/0 power switch to
the 0 position, use your
reserve oxygen supply
(if provided), and
consult your Equipment
Provider immediately.
6.0
Product Specifications
VisionAire Oxygen Concentrator
Oxygen
Concentration
Electrical
Requirements
Flow Rate
O2 Concentration
1 – 5 lpm
90% + 5.5% / - 3%
Based on an atmospheric pressure of
14.7 psia (101 kPa) at 70°F (21°C)
115 VAC / 60 Hz
220 -240 VAC / 50 Hz
220 VAC / 60 Hz
Power Consumption
Dimensions
290Watts
14.1 in. W x 11.5 in. D x 20.8 in. H
(35.8 cm W x 29.2 cm D x 52.8 cm H)
Weight
Alarms
30 lbs (13.6 kg)
Power Failure
Low Pressure
High Pressure
High Temperature
Low Oxygen Concentration (with
optional Oxygen Monitor)
Electrical Shock
Protection
Class II, Type B
Operating
Temperature Range
41 to 105 oF (5 to 40 oC)
Storage Temperature
Range
-4 to 140 oF (-20 to 60 oC)
13
Conformity with EN 60-601 (§
§ 6.8.2 b):
“The manufacturer, assembler, installer or importer are not considered to be responsible themselves for the
consequences on the safety, reliability and characteristics of a device unless:
- The assembly, fitting, extensions, adjustments, modifications or repairs have been performed by persons
authorized by the party in question,
- The electrical installation of the corresponding premises complies with IEC regulations.
- The device is used in accordance with the instructions for use. “If the replacement parts used for the
periodic servicing by an approved technician do not comply with the manufacturer’s specifications, the
latter is absolved from all responsibility in the event of an accident. Do not open the device while in
operation: risk of electrical shock. This device complies with the requirements of the 93/42/EEC European
directive but its operation may be affected by other devices being used close by, such as diathermy and
high frequency electro-surgical equipment, defibrillators, short wave therapy equipment, mobile
telephones, CB and other portable devices, microwave ovens, induction plates or even remote control toys
and more generally electromagnetic interferences which exceed the levels specified by the ECN 60601-1-2
standard.
Classification
Type of protection against electric shock:
Class II
Protection from electric shock is achieved by DOUBLE INSULATION.
Protective earthing or reliance upon installation conditions are not required.
Degree of protection against electric shock:
Type B
Equipment providing a particular degree of protection against electric shock, particularly
regarding:
1) Allowable leakage current;
2) Reliability of protective earth connection (if present).
Not intended for direct cardiac application.
Method of cleaning and infection control allowed:
Please refer to your Equipment Provider and the VisionAire Service Manual.
Degree of safety of application in the presence of flammable gases:
Equipment not suitable for such application.
Mode of operation: Continuous duty.
14
7.0
Symbols/Abbreviations
Symbols are frequently used on equipment in preference to words with the intention of
lessening any possibility of misunderstanding caused by language differences. Symbols
can also permit easier comprehension of a concept within a restricted space.
The following table is a list of symbols and definitions that may be used with AirSep’s
VisionAire Oxygen Concentrator. These symbols are referenced from the appropriate
International Electro-technical Commission (IEC) standards:
Method of disposing of waste: All waste from AirSep’s VisionAire Oxygen
Concentrator must be disposed of using the appropriate methods.
Method for disposing of the device: In order to preserve the environment, the
concentrator must be disposed of using the appropriate methods.
Cet appareil produit de l’oxygène à concentration élevée, favorisant une
combustion rapide. Ne pas permettre de fumer ou des flammes nues dans
un rayon de 5 pieds (1,5 mètre) de : (1) cet appareil ou (2) tout accessoire
contenant de l’oxygène. Ne pas utiliser de produits à base d’huile, de
graisse ou de pétrole sur ou à proximité de l’unité. Déconnecter le cordon
d’alimentation de la prise électrique avant de nettoyer ou de faire
l’entretien de l’unité.
Risque de choc électrique. Ne pas enlever les couvercles lorsque l’unité est
branchée. Seuls votre fournisseur d’équipement ou un technicien de service
qualifié devrait enlever les couvercles ou faire l’entretien de l’unité.
15
|MN136-1_BK~
MN136-1 Rev B
12/08