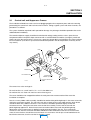
1
430 SERIES
BACKGROUND NOISE
SUPPRESSOR SYSTEM
Installation and
Operating Instructions
MAIN
INSTALLATION AND
OPERATING INSTRUCTIONS
FOR
430 SERIES BACKGROUND
NOISE SUPPRESSOR SYSTEM
Dolby Laboratories Incorporated
U.S.A. 100 Potrero Avenue, San Francisco, CA 94103
Tel: 415-558-0200; Fax: 415-863-1373
U.K. Wootton Bassett, Wiltshire, SN4 8QJ, England
Tel: 0793-842100; Fax: 0793-842101; Telex: 44849
WARRANTY INFORMATION: warranty on the product covered by this manual is subject to the limitations and disclaimers set forth in the
warranty disclaimer originally shipped with the product and also printed on the back of the invoice.
Dolby and the double-D are registered trademarks of Dolby Laboratories Licensing Corporation.
©1994 Dolby Laboratories
ISSUE 3
S94/9359/10081
Part No. 91262
MAIN
DOLBY 430
BACKGROUND NOISE SUPPRESSOR
DOLBY 430 BACKGROUND NOISE SUPRESSOR
he Dolby 430 Series is a background
noise suppressor system for reducing the
broadband noises such as wind or traffic rumble that often mar location recordings. Many
mixers in film and television postproduction
already rely on Dolby Laboratories’
Cat. No. 43, a background noise suppression
unit based on a modified version of Dolby
A-type noise reduction. The 430 Series takes
this concept further by using a modified version of Dolby SR’s patented combination of
fixed and sliding bands to give more stable
signal handling and a significantly reduced
chance of audible side effects.
While superior in performance to the
Cat. No. 43, the 430 Series uses fewer controls. Low- and high-frequency faders adjust
the amount of noise suppression above and
below dominant mid-frequency signals such
as dialogue. A pull-to-engage control permits
varying the preset operating level for recordings at unusually high or low levels (overall
gain of the unit remains fixed).
T
The 430 Series is a modular system providing from one to six channels of background
noise suppression. A single control unit provides power and control signals for up to three
single-rackspace frames, each with one or two
channels of processing. All operating controls
are mounted in a remote control module
which may be located up to 15 meters (50
feet) from the control unit. These remote controls have been specifically designed for easy
console mounting. Alternatively, a housing is
available to allow for standalone operation.
100 Potrero Avenue
San Francisco, CA 94103-4813
Telephone 415-558-0200
Fax 415-863-1373
[email protected]
Wootton Bassett
Wiltshire SN4 8QJ, England
Telephone (44) 1793-842100
Fax (44) 1793-842101
[email protected]
MAIN
www.dolby.com
MAIN
430 SPECIFICATIONS
DOLBY NOISE REDUCTION
Dolby noise reduction is a family of
signal processes that reduce the noise
inherent in analog recording media,
without affecting the sound being
recorded. While they differ in performance and details of operation, all
Dolby NR systems are complementary
processes that first encode the music
when it is recorded, then decode it
when it is played back. They also treat
soft signals separately from loud ones,
and vary the NR action with frequency
to avoid the side effects typical of other
systems.
Dolby A-type noise reduction, introduced in 1965, was originally intended
for use by professional recording studios
to make quieter master tape recordings.
In the early 1970s its use was extended
to film studios and motion picture
release prints to make films sound
better.
Dolby SR (spectral recording), introduced in 1986, was designed not only to
provide more noise reduction than
A-type, but also to enable analog master
recordings that equal or surpass 16-bit
digital recordings with respect to overall
dynamic range. Today, analog with
Dolby SR is still a preferred format for
some musicians, producers, and recording and mastering facilities, and is the
standard format for the analog soundtracks of virtually all feature films.
Signal Processing
Accessories
Independent low- and high-frequency stages with
maximum noise suppression of approximately
16 and 18 dB, respectively
430SU1: single-channel upgrade package with
one channel module, one remote control and rack
mounting frame with blanking plate.
430SU2: two-channel upgrade package with two
channel modules, two remote controls and rack
mounting frame.
430SK1: single-channel upgrade package with one
processing module and one remote control only (no
frame included).
Cat. No. 428: remote housing for up to three
Cat. No. 429 remote controls.
Signal Connection
3-pin XLR connectors for audio; 34-way ribbon
connector links processing module frames to power
supply/control unit; one 15-way D-connector connects remote controls for all channels
Operating Controls
Operating controls for each channel of processing
are mounted on Cat. No. 429 Remote Control
module
Level: rotary control varies signal level in processing
circuitry over a ±6 dB range without changing
overall gain of unit
In/out: push-button with LED indicator switches
processing in and out of circuit
HF & LF: fader controls set attenuation of
unwanted low-level signals
Regulatory Notices
US: This unit is UL listed.
Europe: The 230 Volt unit complies with the
requirements of Low Voltage Directive 73/23/EEC.
Warranty
One-year limited, parts and labor
DISCLAIMER OF WARRANTIES:
Equipment manufactured by Dolby
Laboratories is warranted against
defects in materials and workmanship
for a period of one year from the date of
purchase. There are no other express
or implied warranties and no warranty
of merchantability or fitness for a particular purpose.
Signal Levels
Nominal input and output level +4 dBr 1
Input Circuits
Electronically balanced, 20 kΩ input impedance,
substantially resistive; common mode rejection
better than 55 dB, 50 Hz to 10 kHz; maximum
input level +27 dBr balanced, +21 dBr unbalanced
Output Circuits
LIMITATION OF LIABILITY: It is
understood and agreed that Dolby
Laboratories’ liability whether in contract, in tort, under any warranty, in negligence or otherwise shall not exceed the
cost of repair or replacement of the
defective components and under no circumstances shall Dolby Laboratories be
liable for incidental, special, direct, indirect or consequential damages (including but not limited to damage to software or recorded audio or visual material), or loss of use,revenue or profit even
if Dolby Laboratories or its agents have
been advised, orally or in writing, of the
possibility of such damages.
Electronically balanced, approximately 20Ω
output impedance; output balance better than 1 dB
into a symmetrical 600Ω load; output float 2
better than –40 dB, 50 Hz to 1 kHz; maximum
signal level into 600Ω or greater: +26 dBr balanced,
+20 dBr unbalanced; either leg of the output can be
grounded for unbalanced operation with no change
in level
Frequency Response
±1 dB 20 Hz to 20 kHz with LF and HF controls
set to 0
Crosstalk
Channel to channel within a single frame: better than
–94 dB 20 Hz to 20 kHz
Power Line Input
User-selected voltage ranges (50–60 Hz, singlephase); nominally 100 V (85–110 V), 110 V
(102–132 V), 220 V (187–242 V),
240 V (204–264 V)
Size
Processor and power supply/control units: 44 × 483
mm (standard 1.75 × 19 inches rack mounting );
maximum projection behind mounting surface:
330 mm (13 inches) including connectors; remote
control panels: 150 mm x 39.5 mm (5.91 × 1.56
inches ); maximum projection behind control
surface: 100 mm (3.94 inches) including connectors; may be console-mounted, mounting holes on
142.9 mm (5.63 inches) centers.
Weight
Model Weights (including remotes): 430-S1, 8 kg
(17.5 lb); 430-S2, 9 kg (19.6 lb); 430-S3, 12.9 kg
(28.3 lb); 430-S4, 14 kg (30.6 lb); 430-S5,
17.8 kg (39.2 lb); 430-S6, 18.8 kg (41.4 lb)
MAIN
1
0 dBr = 0.775 mV
2
Output float is the level across a balanced load relative to an interfering
signal injected at one end of the load
Specifications subject to change without notice.
Dolby and the double-D symbol are trademarks of Dolby Laboratories.
© 2000 Dolby Laboratories, Inc. S00/00000
i
TABLE OF CONTENTS
INTRODUCTION
SECTION 1 UNIT CONFIGURATIONS
1.1
1.2
The Model 430 System .................................................................................................. 1-1
Accessories .................................................................................................................... 1-1
SECTION 2 OPERATION
2.1
2.2
2.3
Controls .......................................................................................................................... 2-1
Practical Operation ......................................................................................................... 2-2
Console Signal Path Insertion Guide ............................................................................. 2-3
SECTION 3 INSTALLATION
3.1
3.2
3.3
3.4
3.5
Control unit and Suppressor Frames .............................................................................
Console Mounting of Remotes .......................................................................................
Channel Number Assignment ........................................................................................
Panel Cut-Out Templates for Cat. No. 428 Remotes .....................................................
Regulatory Notices .........................................................................................................
3-1
3-3
3-3
3-4
3-5
SECTION 4 THEORY OF OPERATION
SECTION 5 SCHEMATIC DIAGRAMS
APPENDIX
A1
Plugging Precautions ..................................................................................................... A-1
MAIN
ii
INTRODUCTION
The Model 430 Series is a playback-only noise reduction system intended primarily to reduce unwanted
ambient noise from location recordings. Typically, this noise is generated by broadband sources such as
generators, wind, or traffic.
The Model 430 Series is a second-generation design, following from the Cat. No. 43 unit—a successful
background noise suppressor in widespread use in post-production facilities throughout the world. The
Model 430 unit offers several benefits over the earlier design, including improved ease of operation, and a
reduced risk of side effects.
The earlier design was based on Dolby A-type noise reduction techniques, and incorporated user control of
each of its four fixed bands to accomplish playback noise reduction. The Model 430 design is based on
Dolby spectral recording techniques, with a multiple combination of low- and high-frequency fixed and
sliding bands. Basic user controls have been reduced to two, controlling the amount of playback noise
reduction above and below the dominant signal of interest, typically above and below mid-frequency dialog
components. The use of Dolby SR fixed and sliding bands in combination results in much more stable
signal handling with a significantly reduced chance of audible background signal pumping. Nevertheless,
the user is cautioned that, as with all non-complementary playback-only noise reduction devices, excessive
use and certain signal combinations can lead to audible side-effects.
The Model 430 Series is not intended for suppression of spot-tone signals, such as camera noise or power
line hum interference. Noise sources such as this may well be better treated with a dip filter.
In typical applications, the Model 430 Series unit is placed in the signal path of a sound mixing console
where nominal line levels are present. It is intended to operate at a level around +4 dBr (Ref: 0.775 Vrms).
MAIN
1-1
SECTION 1
UNIT CONFIGURATIONS
1.1
The Model 430 System
The Model 430 is a modular system which has a control unit containing the power supply and
microprocessor. The control unit links to one or more enclosures each of which contains one or two noise
suppression modules and also links to one or more remote control modules. The 40mm wide format of the
remote control modules makes them easily mountable in spare sections of many mixing consoles.
Alternatively, they may be mounted in an optional housing which can mount up to three remote control
modules.
Linking of the units is accomplished by a short ribbon cable bus between the control unit and the suppressor
module enclosures and a 15-meter shielded cable between the control unit and remote control modules.
Where the remotes are console mounted, there are 15-way ribbon cable assemblies which allow flexible
use of the spare space in the console.
The figure below shows a complete 6-channel system along with the various component part numbers.
430PS
POWER SUPPLY AND CONTROL UNIT
Dolby
430 Series Control Unit
430SU2
430SU2
430SU2
PART NO. 83121
430 SERIES
CHASSIS GROUND
LINK
Channels
Remote
Error
Channel
Error
1
3
2
4
5
6
2 CHANNEL SUPPRESSOR UNIT
Dolby
Cat. No. 413
430 Series Noise Suppressor Module
Normal
Bypass
Dolby
Cat. No. 413
430 Series Noise Suppressor Module
Normal
Bypass
PART NO. 83128
430 SERIES
15 METER
REMOTE CABLE
PART NO. 83093
430 SERIES
6 CHANNEL
FLAT CABLE
2 CHANNEL SUPPRESSOR UNIT
Dolby
Cat. No. 413
430 Series Noise Suppressor Module
Normal
Bypass
Dolby
Cat. No. 413
430 Series Noise Suppressor Module
Normal
Bypass
2 CHANNEL SUPPRESSOR UNIT
Dolby
Cat. No. 413
430 Series Noise Suppressor Module
Normal
Bypass
Dolby
Cat. No. 413
430 Series Noise Suppressor Module
Normal
Bypass
PART NO. 83131
430 SERIES
REMOTE EXTENSION CABLE
(ALSO USED FOR 4 REMOTES)
PART NO.83127
430 SERIES
3 REMOTES CABLE
Clip
Clip
Pull to
Pull to
Adjust
Adjust
Level
Level
LF
Level
Clip
CAT. NO. 429
REMOTE CONTROLS
Clip
Clip
Pull to
Pull to
Pull to
Adjust
Adjust
Adjust
Level
Level
Level
0
0
0
0
0
0
1
1
1
1
1
1
2
2
2
2
2
2
3
3
3
3
3
4
4
4
4
4
4
5
5
5
5
5
5
LF
HF
Dolby
430
Series
Remote
Clip
Pull to
Adjust
LF
HF
Dolby
in
430
Series
Remote
LF
HF
Dolby
in
430
Series
Remote
LF
HF
Dolby
in
430
Series
Remote
A1F4356B REV2
MAIN
3
LF
HF
Dolby
in
430
Series
Remote
HF
Dolby
in
430
Series
Remote
in
1-2
1.2
Accessories
The figure below shows the various 430 Series accessories available. These items can be ordered to
expand an existing system.
430SK1
1 CHANNEL SUPPRESSOR KIT
Clip
CAT. NO. 429 REMOTE CONTROL
Pull to
Adjust
Level
CAT. NO. 413 NOISE SUPPRESSOR BOARD
0
1
Dolby
Cat. No. 413
430 Series Noise Suppressor Module
Normal
Bypass
2
3
4
5
LF
HF
Dolby
430
Series
Remote
in
Clip
Clip
Pull to
Pull to
Adjust
Adjust
Level
Level
430SU2
2 CHANNEL SUPPRESSOR UNIT
CAT. NO. 429 REMOTE CONTROLS
Dolby
Cat. No. 413
430 Series Noise Suppressor Module
Normal
Dolby
Cat. No. 413
430 Series Noise Suppressor Module
Normal
0
0
1
1
2
2
3
3
Bypass
Bypass
4
4
5
5
LF
LF
HF
Dolby
430
Series
Remote
430SU1
HF
Dolby
in
430
Series
Remote
in
Clip
1 CHANNEL SUPPRESSOR UNIT
Pull to
Adjust
Level
Dolby
Cat. No. 413
430 Series Noise Suppressor Module
Normal
Bypass
0
1
2
3
4
5
LF
PART NO. 63413
BLANK PANEL
HF
Dolby
430
Series
Remote
in
CAT. NO. 429 REMOTE CONTROL
CAT. No. 428
3 CHANNEL REMOTE HOUSING
PART NO. 83031
EXTENSION CABLE FOR CAT. NO. 428
(FOR ADDING A SECOND REMOTE HOUSING)
REMOTE HOUSING
Dolby
Dolby
430 Series Remote Pod
430 Series Remote Pod
Clip
Pull to
Adjust
Level
PART NO. 63415
BLANK PANELS
LF
MAIN
Level
0
0
0
1
1
1
2
2
2
3
3
3
4
4
4
5
5
5
LF
HF
Dolby
430
Series
Remote
Clip
Pull to
Adjust
Level
A1F4356A
Clip
Pull to
Adjust
LF
HF
Dolby
in
430
Series
Remote
HF
Dolby
in
430
Series
Remote
in
2-1
SECTION 2
OPERATION
2.1
CONTROLS
Operation of the Model 430 is very simple. The basic controls and indicators mounted on the Cat. No. 429
remote for each channel are described below.
3
Clip
Pull to
Adjust
4
2
Level
0
1
2
3
4
5
LF
HF
Dolby
430
Series
Remote
in
1
A1F4356F
1
In/Out Switch and Indicator
This push-button switches all processing in and out so that the effect can be checked against the original
track. An LED indicator on the remote unit confirms switch action. The NORMAL and BYPASS LEDs on
each Cat. No. 413 suppressor module also change state when this button is pushed which is useful for
checking which remote is controlling which channel.
2
Level Indicating Meter
This LED meter array indicates signal present, normal level, high-level and clip. The meter array allows the
user to trim the normal dialog level to bring it into the optimum range using the level setting control
described below. The lower LED acts as a “signal present” indicator and comes on for an output level of
about –30 dB and above. The metering circuit is located after processing but before output level
normalizing so the “signal present” LED particularly will respond to movements of the sliders where there is
a fairly dominant noise component. The rotary level control will directly affect the meter indication. The
upper “clip” LED starts to flash when peaks of about 6 dB below actual clipping are occurring internally and
stays on if full clipping is encountered.
3
Level Control
This rotary control, when pulled out, is a trim on the internal level applied to the two processing bands. It
does not, of itself, change the gain of the unit. Loss at the input is made up by gain at the output and vice
versa. As it is moved the meter shows that the internal level is changing. Ideally, the level control should
be set so that normal voice is lighting the three central LEDs more or less equally.
MAIN
2-2
4
High-frequency and Low-frequency Suppression Controls
The left-hand slider controls the amount of low level LF attenuation the unit applies; the right-hand slider
controls the low level HF attenuation. When the controls are at the top there is no processing, and at the
bottom there is maximum processing. The effect is gradual with about half scale giving enough processing
for most applications; only on severely noisy tracks will more than half scale be needed. Maximum
attenuation is approximately 16 dB at low-frequencies, and 18 dB at high-frequencies.
2.2
PRACTICAL OPERATION
If the amount of noise that needs to be suppressed is small, i.e., the noise itself is at a low level, then the
amount of processing needed will be small, and the change from expansion to linear (no processing) will be
so gentle and gradual that the default setting of the rotary level control (pushed in) will give good results on
virtually all types of dialog and interference. In fact, for small amounts of processing, the effect of the control
is almost inaudible.
On the other hand, if the unwanted background noise is relatively loud and there is only a small difference
between speech level and the background noise, then maximum or near maximum processing may be
required. The rotary level control should be pulled out and set so that normal voice is lighting the three
central LEDs more or less equally (there is little or no processing at ±10 dB of nominal level). This gives a
visual indication that the dialog lies in the linear (no processing) band and the noise can then be suppressed
by drawing down the sliders.
If the level of the track is too high or the rotary level control too far clockwise, then noise can start to enter
the linear band and processing will be partially lost. If the track level is too low or the level control too far
counterclockwise, then the voice will take on an expanded character with poorly controlled dynamics. Noise
will be modulated by the voice more and the voice will be dulled by the HF control and dried by the LF
control.
In situations where there is too much reverberation, a combination of HF and LF processing increases
intelligibility and reduces the perceived reverberation time. Similar treatment is also useful in situations
where dialog has been overcompressed by ALC circuits in portable camcorders or similar recording
equipment. If the interference is broadband, clearly both the LF and HF bands can be used in varying
amounts. The expander sections are in series so their effects tend to sum. For this reason, the amount of
processing used can often be reduced when both bands are brought into play since they broadly overlap in
the range of 200 Hz to 2kHz.
2.3
CONSOLE SIGNAL PATH INSERTION GUIDE
The choice of Model 430 insertion point in the console chain is very important for best results. Where the
dialog already lacks presence, HF processing will tend to accentuate the problem and sibilants will become
more muffled except when they occasionally come through clearly giving an impression of poorer vocal
control than the original track. Under these circumstances, an equalizer should precede the unit to bring the
sibilants up into the linear region of operation in the Model 430.
As with other playback-only devices, a large amount of high-frequency low level attenuation may
subjectively lower the HF speech content. This effect can be compensated by judicious use of console
equalization after the Model 430 unit.
When there is a strong interfering tone such as AC power buzz or generator hum, this is best reduced by
high pass filtering before Model 430 processing so that the level difference between noise and dialog can be
maximized, reducing the amount of processing required. If intrusive noise includes spot tonal signals along
with ‘noise blanket’ components, the spot tones should be attenuated prior to suppression of the wide-band
noise components, e.g., dip filters should precede the Model 430 in the signal chain.
On the other hand, owing to the filtering nature of the treatment, it may be more pleasing to lightly equalize
the output of the Model 430 processor at the opposite end of the spectrum to that at which treatment has
been selected so that the effective passband is more balanced about the 200 to 2 kHz decade.
MAIN
2-3
It is usually better to locate the console channel fader after the Model 430 unit. Gain riding the Model 430
input can allow dialog to move into the expansion band resulting in unexpectedly increased dynamic range.
Also, when the Model 430 is being used to reduce reverberation the process can change the perceived
loudness of the track (even though levels around nominal are virtually untouched). The fader can then be
used to restore the perceived loudness without affecting the noise suppression thresholds.
If a track has been recorded at much lower than nominal level, (i.e., not riding around the level of the three
center LEDs on the meter with the uncal pot out and fully clockwise), it is important to bring up the send
signal to the Model 430 with the console’s line gain control rather than raising the fader to bring up the
processed level.
The use of compression in the chain containing the Model 430 is to be avoided wherever possible.
Compression will counteract the effect of the suppressor by raising background noise.
If the level of suppression is high, peaks can sometimes sound objectionable. The use of a peak limiter after
the suppressor can be useful in this case. Its threshold should be set about 6 to 10 dB above nominal level.
This will trim back the peaks of dialog and give a more balanced track. Attack and release times should be
set to roughly syllabic rate (around 10 ms attack and 150-300 ms release) to minimize the audible effect of
the limiter.
MAIN
3-1
SECTION 3
INSTALLATION
3.1
Control unit and Suppressor Frames
The installation of Model 430 series consists of plugging together the component parts and rack mounting
(prefereably) the control unit and each two-channel frame. Taking a typical system with three channels, the
procedure is as follows:
The system should be unpacked and inspected for damage. Any damage should be reported to the carrier
and distributor immediately.
The control unit/power supply should be checked for AC voltage setting and fuse value. Open the fuse
compartment door in the power input connector with a small flat-blade screwdriver (see figure), and check
that the fuse has the correct rating. If necessary, rotate the selector drum until it displays the correct voltage
for the installation. (The drum may also be removed and replaced in the desired position; it will only fit one
way round.)
FUSE
FUSE
OPEN THE
DOOR
ROUND PEG
OCTAGONAL PEG
A2F4038
SPARE FUSE
CARRIER (LOWER)
VOLTAGE SELECTOR
WHEEL
ACTIVE
FUSE CARRIER
(UPPER)
The correct fuse value and type is:
For 100/120 Vac use 1.25A / 250V 1/4" x 1-1/4" slow-blow fuse
For 220/240 Vac use T630 mA / 250V 5 x 20mm time-lag fuse
The cover should then be snapped closed but the main power left unconnected until the rest of the
installation is complete.
Next, the 34-way ribbon cable assembly should be located and the polarizing bumps in the center of one flat
side of the connectors located. The slot in the rear of the control unit has two cable retainers which locate
around the back of the ribbon connector. These retainers should be separated slightly to allow the
connector to enter. Taking the connector at one end of the assembly, insert it into the slot with the
polarising bump uppermost. Note the connector cannot be made to mate with the polarizing bump
downwards unless extreme force is applied, enough to break the plug in the slot. If any substantial
resistance is felt, then the connector should be withdrawn and its orientation checked. As the connector
mates, the two retainers should close over the back as it seats home. If their tips are not hooked over the
back of the connector, check to see that it is properly seated.
MAIN
3-2
Similarly there is a slot in the back of each two-channel frame and the other connectors should be mated,
(bump upwards) with these observing the warning about excessive force. The channel frames can be
stacked with the control unit at the top or bottom.
Next, the 15 meter shielded cable should be located and plugged into the 15-way D connector on the back
of the control unit. The other end of this cable connects directly to the rear of an optional Cat. No. 428
three-channel remote housing or to the flat cable which links three freestanding remote control units for
console mounting.
Next, the audio in/out connections should be made. The connectors for this are standard XLR type 3-pin
audio connectors. Connect audio cables to the inputs and outputs using two-conductor shielded cable.
Connect shields at one end only to avoid ground loop problems.
The XLR connectors are wired with pin 1 as ground and pins 2 and 3 as an electronically balanced pair.
Phase continuity is preserved with the same pin numbers used for input and output. In an installation where
the source and/or load are unbalanced, avoid ground loops by using two-conductor shielded cable exactly
as for balanced circuits and ensure that the unbalancing (connecting one of the two balanced signals to
ground) occurs only at the end remote from the Model 430. Both audio signals must be connected; neither
may be left open. In the interests of maintaining international standardization, we suggest that you follow
the IEC convention: XLR pin 2 signal is “high/hot” and pin 3 signal is “low/cold.”
GROUNDING–To ensure conductivity between all the cases of the modules making up the system,
the green/yellow jumper links should be attached to the lugs provided in the middle of the back of
each module in a daisy chain fashion. This should be done even in rack mounted installations since
paint and anodizing can prevent a low impedance path from existing between the modules.
It is normal practice to connect program (audio) ground to power line ground for many reasons,
including safety. On occasion (particularly with long signal lines or incorrect wiring of the cable
shields) induced hum can sometimes be reduced by separating the two grounds. A link behind the
front panel of the control unit provides this feature. There is always a 1 k ohm resistor across the
link so that the audio ground is never totally isolated from the chassis ground.
Verify that all connectors are securely mated and read the safety information on page 3-5. When you are
confident that you have observed its provisions, connect the power cable between the control unit and a
power outlet.
Power up the unit. The LEDs on the front of the control unit should indicate that channels 1 to 3 are present
and that there are no errors. Errors are channels which have no remote addressed to them or remotes with
no channels to control. As shipped, the frame with a pair of modules installed will have the addresses set to
channels 1 & 2 and the frame with a single module will have its module address set to channel 3. (If errors
are found at this stage, see Channel Number Assignment in Section 3.3.)
The unit powers up with processing off. To verify which remote unit controls which channel, the button on
the bottom of the remote unit should be pressed to see which channel responds by changing the state of its
front panel LEDs. An audio signal should be applied to each channel in turn and the effect of moving the
various controls verified.
MAIN
3-3
3.2
Console Mounting of Remotes.
If optional Cat. No. 428 remote housings (holding up to three remote control units each) are not used, the
remote controls can be placed in spare sections of the console. The size of each remote unit is 150 mm x
39 mm with a maximum projection behind the control surface of 100 mm. The shielded cable connecting
them to the main control unit can run in any convenient trunking to the console although trunking which
carries high level signals is preferred. The short link between the remote contol units is unshielded ribbon
cable and carries a low level waveform which can radiate interference into mixing busses and microphone
inputs if held very close to them. These facts should be kept in mind when selecting suitable sites for the
remotes. If blanking panels are available, these can be cut with a slot to mount the remote control modules.
3.3mm DIA
(1/8" DIA)
DRILL TWO HOLES
FOR M3 SCREWS
m
0m
10
RS
TO
)
"
4
(
EC
N
N
CO
G
DIN
LU
INC
Pu
ll to
Ad
jus
t
143 mm
Cli
p
m
2m
13 ")
2
.
5
(
(5-5/8")
Le
ve
132 mm
l
15
0m
m
(5.
9")
(5-3/16")
2
3
4
5
LF
16.5mm
5.5mm
(21/32")
(7/32")
HF
Do
43
0
Se
rie
Re s
mo
te
lby
in
33 mm
(1-5/16")
TAPPED FOR
M3 SCREWS
39
mm
(1.
5")
A1F4356D
3.3
Channel Number Assignment
As in any bussed system each element of the system has an address. To determine its address, the Cat.
No. 413 suppressor module has to be withdrawn from the chassis. The two front panel knurled screws
which hold the module in the frame should be loosened and the module withdrawn using the handle. At the
back right-hand side of the printed circuit board is a rotary switch with either a pointer pointing towards a
number printed on the switch or a slot in the top with a number showing. This number is the address of the
module. Normally the upper module in the rack is given the lowest address so the switch in this module
should be set to “1”; the next module’s switch should be set to “2” and so on. Similarly the remote control
modules have addresses. The rotary switch which sets it can be seen through a hole in the back cover of
each remote module. The positions of the switches should match the addresses of the Cat. No. 413’s they
control so channel 1’s remote should have the address switch pointing to channel 1, etc. Selection requires
a small screwdriver to rotate the switch to the required channel. Note switch positions 0, 7, 8 and 9 are not
used.
If the optional Cat. No. 428 remote control housing is used, the base must be removed by unscrewing the
six screws on either side of the housing. When the base is slid off, the backs of the remote modules are
exposed.
MAIN
3-4
3.4
Panel Cut-Out Templates for Cat. No. 428 Remotes
The templates below can be removed from this manual and used to cut/drill blank console panels.
A1F4356C
MAIN
3-5
3.5
Regulatory Notices
WARNING:
Check that the unit has been set to the correct supply voltage and that the correct
fuse is installed. To reduce the risk of fire, replace the fuse only with the same
type and rating.
For 100/120 Vac, use 1.25A/250 V 1/4" x 1-1/4" slow-blow fuse.
For 220/240 Vac, use T630 mA/250 V 5 x 20mm time-lag fuse.
The power supply input connector has positions for two fuses and will accept carriers for either 20 mm or
1.25" fuses; only the upper fuse position is electrically connected. Select the appropriate fuse and carrier,
and insert the assembly into the upper position with the arrow on the carrier in the same direction (upwards)
as the arrows inside the compartment door (Note: a spare fuse of the same rating and type can be put in
the lower position). When closing compartment door, make sure that it clicks firmly into place.
To ensure proper operation and guard against potential shock hazard, the unit must be connected only to a
properly wired, grounded (earthed) power outlet. If you are uncertain about the wiring of your outlet do not
use it. Consult a qualified electrician. The power cable is furnished either with a standard U.S.A. threeprong plug or with unterminated leads for use in other countries. The wires are colored as follows.
live or hot
neutral
earth
International
brown
blue
green/yellow
U.S.
black
white
green or
green/yellow
Before the power cable is connected to the unit, ensure that a qualified electrician has wired it as above.
Troubleshooting must be performed by trained technicians. Do not attempt to service the unit unless you
are qualified to do so.
U.S. Style Plugs
The ground terminal of the plug is connected directly to the chassis of the unit. For continued protection against
electric shock, a three-pin power receptacle MUST be used, and the ground wire MUST always be connected. DO
NOT use a ground-lifting adaptor and NEVER cut the ground pin on a three-prong plug.
Connections for United Kingdom
WARNING: THIS APPARATUS MUST BE EARTHED.
As the colours of the cores in the mains lead may not correspond with the coloured markings identifying the
terminals in your plug, proceed as follows:
- the core which is coloured green and yellow must be connected to the terminal in the plug which is marked with
the letter E or by the earth symbol
, or coloured green or green and yellow.
- the core which is coloured blue must be connected to the terminal which is marked with the letter N or coloured
black.
- the core which is coloured brown must be connected to the terminal which is marked with the letter L or
coloured red.
MAIN
3-6
IEC NOTICES
IMPORTANT SAFETY NOTICE
This unit complies with the safety standard IEC65. To ensure safe operation and to guard
against potential shock hazard or risk of fire, the following must be observed:
• Ensure the voltage selector is set to the correct mains voltage for your supply.
• Ensure fuses fitted are the correct rating and type as marked on the unit.
• The unit must be earthed by connecting to a correctly wired and earthed power outlet.
• The power cord supplied with this unit must be wired as follows:
Live—Brown
Neutral—Blue
Earth—Green/Yellow
GB
IMPORTANT – NOTE DE SECURITE
Ce materiel est conforme à la norme IEC65. Pour vous assurer d'un fonctionnement sans danger et de prévenir
tout choc électrique ou tout risque d'incendie, veillez à observer les recommandations suivantes.
• Le selecteur de tension doit être placé sur la valeur correspondante à votre alimentation réseau.
• Les fusibles doivent correspondre à la valeur indiquée sur le materiel.
• Le materiel doit être correctement relié à la terre.
• Le cordon secteur livré avec le materiel doit être cablé de la manière suivante:
Phase—Brun
Neutre—Bleu
Terre—Vert/Jaune
F
WICHTIGER SICHERHEITSHINWEIS
Dieses Gerät entspricht der Sicherheitsnorm IEC65. Für das sichere Funktionieren des Gerätes und zur
Unfallverhütung (elektrischer Schlag, Feuer) sind die folgenden Regeln unbedingt einzuhalten:
• Der Spannungswähler muß auf Ihre Netzspannung eingestellt sein.
• Die Sicherungen müssen in Type und Stromwert mit den Angaben auf dem Gerät übereinstimmen.
• Die Erdung des Gerätes muß über eine geerdete Steckdose gewährleistet sein.
• Das mitgelieferte Netzkabel muß wie folgt verdrahtet werden:
Phase—braun
Nulleiter—blau
Erde—grün/gelb
D
NORME DI SICUREZZA – IMPORTANTE
Questa apparecchiatura è stata costruita in accordo alle norme di sicurezza IEC 65. Per una perfetta sicurezza
ed al fine di evitare eventuali rischi di scossa êlettrica o d'incendio vanno osservate le seguenti misure di
sicurezza:
• Assicurarsi che il selettore di cambio tensione sia posizionato sul valore corretto.
• Assicurarsi che la portata ed il tipo di fusibili siano quelli prescritti dalla casa costruttrice.
• L'apparecchiatura deve avere un collegamento di messa a terra ben eseguito; anche la connessione rete
deve avere un collegamento a terra.
• Il cavo di alimentazione a corredo dell'apparecchiatura deve essere collegato come segue:
Filo tensione—Marrone
Neutro—Blu
Massa—Verde/Giallo
I
AVISO IMPORTANTE DE SEGURIDAD
Esta unidad cumple con la norma de seguridad IEC65. Para asegurarse un funcionamiento
seguro y prevenir cualquier posible peligro de descarga o riesgo de incendio, se han de observar
las siguientes precauciones:
• Asegúrese que el selector de tensión esté ajustado a la tensión correcta para su alimentación.
• Asegúrese que los fusibles colocados son del tipo y valor correctos, tal como se marca en la unidad.
• La unidad debe ser puesta a tierra, conectándola a un conector de red correctamente cableado y puesto a
tierra.
• El cable de red suministrado con esta unidad, debe ser cableado como sigue:
Vivo—Marrón
Neutro—Azul
Tierra—Verde/Amarillo
E
VIKTIGA SÄKERHETSÅTGÄRDER!
Denna enhet uppfyller säkerhetsstandard IEC65. För att garantera säkerheten och gardera mot
eventuell elchock eller brandrisk, måste följande observeras:
• Kontrollera att spänningsväljaren är inställd på korrekt nätspänning.
• Konrollera att säkringarna är av rätt typ och för rätt strömstyrka så som anvisningarna på enheten föreskriver.
• Enheten måste vara jordad genom anslutning till ett korrekt kopplat och jordat el-uttag.
• El-sladden som medföljer denna enhet måste kopplas enligt foljande:
Fas—Brun
Neutral—Blå
Jord—Grön/Gul
S
BELANGRIJK VEILIGHEIDS-VOORSCHRIFT:
Deze unit voldoet aan de IEC65 veiligheids-standaards. Voor een veilig gebruik en om het gevaar van electrische
schokken en het risico van brand te vermijden, dienen de volgende regels in acht te worden genomen:
• Controleer of de spanningscaroussel op het juiste Voltage staat.
• Gebruik alleen zekeringen van de aangegeven typen en waarden.
• Aansluiting van de unit alleen aan een geaarde wandcontactdoos.
• De netkabel die met de unit wordt geleverd, moet als volgt worden aangesloten:
Fase—Bruin
Nul—Blauw
Aarde—Groen/Geel
MAIN
NL
4-1
SECTION 4
THEORY OF OPERATION
Based on the Dolby SR spectral recording system, the Model 430 series design incorporates two separate
noise reducing bands; one for low and the other for high frequencies. Unlike SR, however, the degree to
which the signal is treated can be controlled by two slider controls and the level at which the expanders
work is adjustable by a rotary control which has a nominal “cal” position.
In typical applications, the Model 430 is placed in the signal path of a sound mixing console where nominal
line levels are present. It is intended to work at a level around +4 dBr (Ref: 0.775 Vrms = 0 VU = 0 dBr).
With maximum processing selected, the two noise reduction paths form level dependent shelves in their
responses whose depth increases with decreasing input signal level. For the LF section where control of
rumble, hum, generator noise, fan or wind noise is required, the response at low levels is a shelf which is
flat for high frequencies and, starting at around 2 kHz, falls to a maximum attenuation of about 18 dB at
30 Hz. As the level of low frequencies increases the response flattens out so that around 10 dB either side
of the nominal level there is little or no processing. See the figure below.
+10 VU
(+4 dB)0 VU
–10
–20
–30
–40
–50
–60
–70 VU
20 Hz
100 Hz
1 kHz
10 kHz
20 kHz
Similarly for the HF band, where control of amplifier hiss and noise, tape noise, rain noise, script rustle or
lighting “sing” is required, the response at low levels is a shelf which is flat at low frequencies and from
about 200 Hz, starts to fall so that, at 8 kHz the response is around 16 dB down from flat. Again, as the
level rises the curve flattens out so that around 10 dB below and above the nominal level there is little or no
processing. See the figure below.
(+4 dB) 0 VU
–10
–20
–30
–40
–50
–60
–70
–80 VU
20 Hz
100 Hz
1 kHz
MAIN
10 kHz
20 kHz
4-2
In situations where the interference is broadband, both the LF and HF bands can be used in varying
amounts. The two expander sections are in series therefore their effects tend to sum. For this reason, it will
be found that the amount of processing used can often be reduced when both bands are brought into play
since they broadly overlap in the band 200 Hz to 2 kHz.
}
(+4 dB) 0 VU
Dialog
Range
–10
–20
–30
–40
–50
–60
–70
–80 VU
20 Hz
100 Hz
1 kHz
10 kHz
20 kHz
For each band, there is an untreated path which is mixed with the treated path in variable amounts
determined by the position of two controls on the remote unit in such a way that, for nominal level signals,
the change from untreated path to treated path causes no audible change in level. This is useful because it
allows the sound engineer to treat the noise rather than having to juggle with the predominant signal. As
the amount of untreated signal increases, it progressively dilutes the effect of the processing without
changing thresholds, forming a natural progression from processed to linear effect.
MAIN
5-1
SECTION 5
SCHEMATIC DIAGRAMS- Contact Dolby Laboratories
Figure 5-1
Figure 5-2
Figure 5-3
Figure 5-4
Figure 5-5
Figure 5-6
Power Supply ......................................................................................................................... 5-2
Control Circuit ........................................................................................................................ 5-3
Cat. No. 413 Voltage Regulation/Smoothing ......................................................................... 5-4
Cat. No. 413 Signal I/O .......................................................................................................... 5-5
Cat. No. 413 Interface Logic/Metering ................................................................................... 5-6
Cat. No. 429 Remote Control ................................................................................................. 5-7
MAIN
A-1
APPENDIX
A1
Plugging Precautions
Any Cat. No. 413 suppressor module can be removed and replaced with the power applied. However it will
only take on the settings determined by its remote contol unit after every control on the remote has been
exercised.
Similarly, the remote controls can be plugged and unplugged with the power on although it has been found
that the normal bypass indicator can occasionally get out of sync with the front panel LEDs if the
reconnection is not made smoothly.
The 34-way ribbon cable between the 430 control unit and the supressor module frames should NEVER be
plugged or unplugged with the power on (from either the control unit end or any of the module frame ends).
At best the unit will stop responding to controls and need to be powered down and back up to reset the
processor and at worst SERIOUS DAMAGE can be caused.
MAIN