1
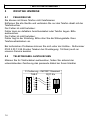
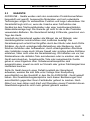
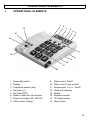
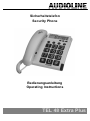
Sicherheitstelefon
Security Phone
Bedienungsanleitung
Operating Instructions
TEL 48 Extra Plus
2
TEL 48 Extra Plus
Bedienungsanleitung____3
Operating Instructions__17
2
− INHALTSVERZEICHNIS−
SICHERHEITSHINWEISE . . . . . . . . . . . . . . . . . . . . . . . . . . . . . . . . . . . . . . . . . . . . . .
4
1
BEDIENELEMENTE . . . . . . . . . . . . . . . . . . . . . . . . . . . . . . . . . . . . . . . . . . .
5
2
INSTALLATION . . . . . . . . . . . . . . . . . . . . . . . . . . . . . . . . . . . . . . . . . . . . . . .
6
2.1
2.2
2.3
2.4
2.5
2.6
2.7
TELEFONHÖRER ANSCHLIEßEN . . . . . . . . . . . . . . . . . . . . . . . . . . . . . . . . . . . . . .
BATTERIE EINSETZEN . . . . . . . . . . . . . . . . . . . . . . . . . . . . . . . . . . . . . . . . . . . . . . .
TELEFON ANSCHLIEßEN . . . . . . . . . . . . . . . . . . . . . . . . . . . . . . . . . . . . . . . . . . . . .
WANDMONTAGE . . . . . . . . . . . . . . . . . . . . . . . . . . . . . . . . . . . . . . . . . . . . . . . . . . . . .
HÖRGERÄTE KOMPATIBEL . . . . . . . . . . . . . . . . . . . . . . . . . . . . . . . . . . . . . . . . . . .
T−NET ANPASSUNG . . . . . . . . . . . . . . . . . . . . . . . . . . . . . . . . . . . . . . . . . . . . . . . . . .
UHRZEIT EINSTELLEN . . . . . . . . . . . . . . . . . . . . . . . . . . . . . . . . . . . . . . . . . . . . . . .
6
6
6
7
7
7
8
3
BEDIENUNG . . . . . . . . . . . . . . . . . . . . . . . . . . . . . . . . . . . . . . . . . . . . . . . . .
9
3.1
3.2
3.3
3.4
3.5
3.6
3.7
3.8
3.8.1
3.8.2
TELEFONIEREN . . . . . . . . . . . . . . . . . . . . . . . . . . . . . . . . . . . . . . . . . . . . . . . . . . . . .
ANRUFE ENTGEGENNEHMEN . . . . . . . . . . . . . . . . . . . . . . . . . . . . . . . . . . . . . . . .
LAUTSTÄRKE DES HÖRERS EINSTELLEN . . . . . . . . . . . . . . . . . . . . . . . . . . . . .
WAHLWIEDERHOLUNG . . . . . . . . . . . . . . . . . . . . . . . . . . . . . . . . . . . . . . . . . . . . . . .
ANZEIGE DER GESPRÄCHSDAUER . . . . . . . . . . . . . . . . . . . . . . . . . . . . . . . . . . .
EINSTELLBARER TONRUF . . . . . . . . . . . . . . . . . . . . . . . . . . . . . . . . . . . . . . . . . . . .
KLANGREGELUNG . . . . . . . . . . . . . . . . . . . . . . . . . . . . . . . . . . . . . . . . . . . . . . . . . . .
DIREKT− UND KURZWAHLTASTEN SPEICHERN . . . . . . . . . . . . . . . . . . . . . . . . .
WÄHLEN MIT DEN DIREKTWAHLTASTEN . . . . . . . . . . . . . . . . . . . . . . . . . . . . . . .
WÄHLEN MIT DEN KURZWAHLTASTEN . . . . . . . . . . . . . . . . . . . . . . . . . . . . . . . .
9
9
9
10
10
10
10
11
11
11
4
DIE "R"−SIGNALTASTE . . . . . . . . . . . . . . . . . . . . . . . . . . . . . . . . . . . . . . . 12
4.1
4.2
"R"−SIGNALTASTE AN NEBENSTELLENANLAGEN . . . . . . . . . . . . . . . . . . . . . . . 12
"R"−SIGNALTASTE UND DIE T−NET−FUNKTIONEN DER
DEUTSCHEN TELEKOM . . . . . . . . . . . . . . . . . . . . . . . . . . . . . . . . . . . . . . . . . . . . . . 12
TELEFONNUMMERN WÄHLEN UND SPEICHERN BEI DEM BETRIEB
AN NEBENSTELLENANLAGEN . . . . . . . . . . . . . . . . . . . . . . . . . . . . . . . . . . . . . . . . 13
4.3
5
WICHTIGE HINWEISE . . . . . . . . . . . . . . . . . . . . . . . . . . . . . . . . . . . . . . . . . 14
5.1
5.2
5.3
5.4
FEHLERSUCHE . . . . . . . . . . . . . . . . . . . . . . . . . . . . . . . . . . . . . . . . . . . . . . . . . . . . . .
TELEFONKABEL AUSTAUSCHEN . . . . . . . . . . . . . . . . . . . . . . . . . . . . . . . . . . . . . .
GARANTIE . . . . . . . . . . . . . . . . . . . . . . . . . . . . . . . . . . . . . . . . . . . . . . . . . . . . . . . . . .
KONFORMITÄTSERKLÄRUNG . . . . . . . . . . . . . . . . . . . . . . . . . . . . . . . . . . . . . . . .
14
14
15
16
OPERATING INSTRUCTIONS . . . . . . . . . . . . . . . . . . . . . . . . . . . . . . . . . . . . . . . . . . 17
3
− SICHERHEITSHINWEISE −
SICHERHEITSHINWEISE
Bedienungsanleitung: Bitte lesen Sie diese Bedienungsanleitung
sorgfältig durch. Bei auftretenden Fragen wenden Sie sich bitte an unseren
Service unter der Service−Hotline 0180 5 00 13 88 (Kosten Telekom bei
Drucklegung: 12 ct/min). Öffnen Sie das Gerät in keinem Fall selbst und
führen Sie keine eigenen Reparaturversuche durch. Bei
Gewährleistungsansprüchen wenden Sie sich bitte an Ihren Fachhändler.
Hinweise zur Entsorgung:
Die Umsetzung europäischen Rechtes in nationale Gesetze und
Verordnungen verpflichtet Sie zur sachgerechten Entsorgung von
Gebrauchsgütern. Dies dient dem Schutz von Personen und Umwelt.
Das nebenstehende Symbol bedeutet, dass elektrische und
elektronische Altgeräte und Batterien getrennt vom Hausmüll
zu entsorgen sind.
Alte oder ausgediente Geräte entsorgen Sie bei einer Sammelstelle eines geeigneten Entsorgungsträgers.
Batterien und Akkumulatoren entsorgen Sie beim batterievertreibenden Handel sowie zuständigen Sammelstellen, die
entsprechende Behälter bereitstellen.
Pflege: Die Gehäuseoberflächen können mit einem trockenen, weichen
und fusselfreien Tuch gereinigt werden. Niemals Reinigungsmittel oder
Lösungsmittel verwenden.
Temperatur und Umgebungsbedingungen: Das Gerät ist für den Betrieb
in geschützten Räumen mit einem Temperaturbereich von +5 °C bis +45 °C
ausgelegt. Stellen Sie das Gerät nicht in Feuchträumen wie Bad oder
Waschküche auf. Vermeiden Sie die Nähe zu Wärmequellen wie
Heizkörpern und setzen Sie das Gerät keiner direkten Sonnenbestrahlung
aus. Stellen Sie das Telefon nicht auf antike Möbel, Furniere oder
empfindliche Oberflächen, da es Abdrücke hinterlassen kann.
Anschlusshinweise: Schließen Sie das AUDIOLINE Telefon 48 Extra Plus
an einer TAE−Anschlussdose mit F Codierung an. Es kann gemeinsam mit
anderen Geräten wie Fax, Anrufbeantworter oder Modem benutzt werden,
wenn Sie über eine TAE−Anschlußdose mt F/N Codierung verfügen.
Zulassung und CE−Zeichen: Das Gerät ist für den Einsatz im
europäischen Telefonnetz freigegeben. Dieses Gerät erfüllt die
Anforderungen der EU−Richtlinien. Die Konformität des Gerätes mit den
Richtlinien wird durch das CE−Kennzeichen bestätigt.
Die Konformitätserklärung finden Sie am Ende dieser Anleitung.
4
− BEDIENELEMENTE −
1
BEDIENELEMENTE
1
2
16
3
4
5
6
15
14
7
13
8
9
10
11
12
1.
2.
3.
4.
5.
6.
Kurzwahltaste
Display
Telefonanschluss (hinten)
Einstellen der Uhrzeit (+/−)
Einstellen der Uhrzeit (SET)
Zurücksetzen oder starten der
Gesprächsdauer
7. Direktwahltasten M1, M2, M3
8. Schieberegler Klingel"
9.
10.
11.
12.
13.
14.
Schieberegler Flash"
Schieberegler Klangregelung"
Zahlenfeld, 1−9, 0, * und #
Optische Rufanzeige
Wahlwiederholung
Hörerlautstärke
15. R"−Signaltaste
16. Speichertaste
5
− INSTALLATION −
2
INSTALLATION
2.1
TELEFONHÖRER ANSCHLIEßEN
Packen Sie Ihr Telefon aus. Verbinden Sie den Hörer mit dem Grundgerät.
Die Anschlüsse an dem dazu benötigten Spiralkabel sind gleich. Nehmen
Sie das eine Ende des Spiralkabels und stecken Sie es in die Buchse am
unteren Ende des Hörers. Das andere Ende stecken Sie in die Buchse auf
der linken Seite des Grundgerätes.
2.2
BATTERIE EINSETZEN
Setzen Sie die mitgelieferte Batterie ein, bevor Sie Ihr neues Telefon mit
dem Telefonnetz verbinden. Verwenden Sie den Typ AAA 1,5 V Alkaline.
Die Batterie wird für die Displayanzeige und für weitere Funktionen des
Telefons benötigt. Achten Sie immer darauf, dass das Telefon nicht mit dem
Telefonnetz verbunden ist, wenn Sie die Batterie einbauen oder wechseln.
Das Batteriefach befindet sich auf der Unterseite Ihres Telefons.
1. Öffnen Sie das Batteriefach mit einem kleinen Schraubenzieher oder
einem spitzen Gegenstand.
2. Legen Sie die Batterie ein und achten Sie dabei auf die richtige Polung.
Schieben Sie den "−" Pol auf die kleine Feder und drücken Sie dann den
"+" Pol nach unten.
3. Schließen Sie das Batteriefach.
Tauschen Sie die Batterie aus, wenn die Displayanzeige zu schwach ist
oder erloschen ist.
2.3
TELEFON ANSCHLIEßEN
Verbinden Sie das beiliegende Telefonkabel mit der Telefonsteckdose und
der Telefonbuchse auf der Rückseite des Telefons. Das AUDIOLINE
Telefon 48 Extra Plus arbeitet mit dem MFV−Wählverfahren (Tonwahl).
6
− INSTALLATION −
2.4
WANDMONTAGE
Ihr AUDIOLINE Telefon 48 Extra Plus ist auch zur Wandmontage geeignet.
Benutzen Sie zur Befestigung zwei Schrauben, bohren Sie zwei Löcher im
vertikalen Abstand von 83 mm und lassen Sie die Schrauben 5 mm aus der
Wand herausstehen. Stecken Sie nun das Telefon auf die Schrauben und
schieben Sie es etwas nach unten.
Hinweis: Unter den zu bohrenden Löchern dürfen sich keine Leitungen
befinden.
Wenn Sie das Telefon auf einem Tisch benutzen, muss sich der
Einhängehaken des Hörers in der versenkten Position befinden, wie es in
der Abbildung A dargestellt ist (Werkseinstellung). Bei einer Wandmontage
wird der Einhängehaken des Telefonhörers herausgezogen und umgedreht.
Siehe dazu die Abbildung B.
2.5
HÖRGERÄTE KOMPATIBEL
Das Telefon ist mit den meisten am Markt befindlichen Hörgeräten
kompatibel. Durch die Vielzahl der angebotenen Modelle kann keine
einwandfreie Funktion mit jedem Hörgerät garantiert werden.
2.6
T−NET ANPASSUNG
Ihr AUDIOLINE Telefon 48 Extra Plus unterstützt die wichtigsten
Mehrwertdienste der DEUTSCHEN TELEKOM (z. B.: Makeln, Anklopfen,
Dreier−Konferenz, u. a.). Dazu benötigen Sie die Einstellung "FLASH" an
Ihrem Telefon. Weitere Informationen erhalten Sie unter Punkt 4. Zur
Freischaltung Ihrer Leitung für diese Funktionen (die z. T. gebührenpflichtig
sind) wenden Sie sich bitte an die DEUTSCHE TELEKOM.
7
− INSTALLATION −
2.7
UHRZEIT EINSTELLEN
Im Display wird die aktuelle Uhrzeit angezeigt. Um die Uhr zu stellen, gehen
Sie bitte wie folgt vor:
1. Drücken Sie einmal die Taste SET unter dem Display. Die
Stundenanzeige im Display beginnt zu blinken.
2. Nun können Sie mit der Taste +/− die aktuelle Stunde eingeben. Drücken
Sie dazu die Taste +/− so oft, bis Sie die aktuelle Stunde im Display
sehen.
3. Drücken Sie nun erneut die Taste SET und die Minutenanzeige im
Display beginnt zu blinken.
4. Nun können Sie durch mehrmaliges Drücken der Taste +/− die aktuelle
Minutenzahl eingeben.
5. Drücken Sie die Taste SET. Die Uhrzeit ist eingestellt.
8
− BEDIENUNG −
3
BEDIENUNG
3.1
TELEFONIEREN
Das AUDIOLINE Telefon 48 Extra Plus kann wie jedes konventionelle
Telefon benutzt werden.
BITTE DEN ANWEISUNGEN FOLGEN:
Nehmen Sie den Telefonhörer ab und warten Sie auf das
Freizeichen.
Wählen Sie nun die gewünschte Telefonnummer. Die gewählte
Rufnummer wird im Display angezeigt. Das Display zeigt maximal
16 Zahlen an. Ist die gewählte Telefonnummer länger, werden nur
die letzten 16 Zahlen angezeigt.
Um das Gespräch zu beenden, legen Sie den Hörer wieder auf.
3.2
ANRUFE ENTGEGENNEHMEN
Heben Sie den Hörer ab und führen Sie das Gespräch.
Um das Gespräch zu beenden, legen Sie den Hörer wieder auf.
3.3
LAUTSTÄRKE DES HÖRERS EINSTELLEN
Sollte die Stimme des Gesprächspartners einmal zu leise oder zu laut sein,
können Sie die Lautstärke des Hörers vergrößern oder verringern.
Drehen Sie während eines Gesprächs den Knopf b (unter dem Hörer).
Warnung: Wenn die größtmögliche Lautstärke eingestellt ist, kann
dies Ihr Gehör schädigen. Stellen Sie daher nach jedem Gespräch die
Lautstärke wieder auf 0" ein.
9
− BEDIENUNG −
3.4
WAHLWIEDERHOLUNG
Ist ein Anschluss, den Sie gewählt haben, besetzt oder konnten Sie
niemanden erreichen, legen Sie den Telefonhörer wieder auf. Die zuletzt
gewählte Rufnummer bleibt automatisch im Telefon gespeichert.
Um die Wahlwiederholung zu nutzen, gehen Sie wie folgt vor:
Heben Sie den Hörer ab und drücken Sie die Wahlwiederholungstaste d.
Die gespeicherte Rufnummer wird erneut gewählt.
3.5
ANZEIGE DER GESPRÄCHSDAUER
Nach dem Wählen der Rufnummer wird im Display nach einigen Sekunden
die aktuelle Gesprächsdauer in Minuten und Sekunden angezeigt.
Die interne Uhr können Sie auch als Stoppuhr verwenden. Drücken Sie
dazu während eines Gesprächs oder auch bei aufgelegtem Hörer die
Taste f. Mit der gleichen Taste f wird die Zeitmessung wieder gestoppt.
Die gemessene Zeit wird noch für einige Sekunden im Display angezeigt.
Danach springt das Display zur aktuellen Uhrzeit zurück.
3.6
EINSTELLBARER TONRUF
Mit dem Schiebeschalter "KLINGEL" an der rechten Gehäuseseite können
Sie die Stellungen "LEISE" (i) oder "LAUT" auswählen, um die Lautstärke
des Tonrufes Ihren Bedürfnissen anzupassen. Möchten Sie einmal nicht
gestört werden, benutzen Sie die Stellung "AUS".
3.7
KLANGREGELUNG
Mit dem Schiebeschalter g an der rechten Gehäuseseite können Sie
den Klang im Hörer Ihres Telefons verändern.
Hinweis: Die Klangregelung funktioniert nicht, wenn die Hörerlautstärke auf
Minimum eingestellt ist.
10
− BEDIENUNG −
3.8
DIREKT− UND KURZWAHLTASTEN SPEICHERN
Mit Ihrem AUDIOLINE Telefon 48 Extra Plus können Sie auf den Tasten
M1, M2 und M3 jeweils eine Rufnummer zur Direktwahl speichern. Die
Direktwahltaste M3 ist rot gekennzeichnet und somit als Notruftaste
geeignet. Zehn weitere Rufnummern können zur Kurzwahl gespeichert
werden.
BITTE DEN ANWEISUNGEN FOLGEN:
Heben Sie den Telefonhörer ab.
Drücken Sie die Speichertaste c.
Geben Sie nun die gewünschte Rufnummer über das Zahlenfeld
ein. Die maximale Länge beträgt 16 Zahlen.
Drücken Sie erneut die Speichertaste c.
Drücken Sie nun die gewünschte Direktwahltaste M1, M2 oder M3
oder eine Taste auf dem Zahlenfeld zwischen 1 bis 9 oder 0, um
die Rufnummer als Kurzwahlnummer zu speichern.
Legen Sie den Telefonhörer auf.
Schon belegte Speicherplätze werden automatisch überschrieben, wenn
Sie eine neue Rufnummer auf diesem Speicherplatz speichern.
Die gespeicherten Rufnummern können auf dem Index unter dem
Telefonhörer notiert werden. Schieben Sie mit festem Fingerdruck die
Abdeckung nach unten und entnehmen Sie den Notizzettel. Notieren Sie
die Rufnummern. Setzen Sie Notizzettel und Abdeckung wieder ein.
3.8.1
WÄHLEN MIT DEN DIREKTWAHLTASTEN
BITTE DEN ANWEISUNGEN FOLGEN:
Heben Sie den Telefonhörer ab und drücken Sie die gewünschte
Direktwahltaste M1, M2 oder M3.
3.8.2
WÄHLEN MIT DEN KURZWAHLTASTEN
BITTE DEN ANWEISUNGEN FOLGEN:
Heben Sie den Telefonhörer ab und drücken Sie die Kurzwahltaste
e und den gewünschten Speicherplatz von 1 bis 9 oder 0.
11
− DIE R"−SIGNALTASTE −
4
DIE "R"−SIGNALTASTE
Die "R"−Signaltaste Ihres Telefons können Sie an Nebenstellenanlagen und
bei der Verwendung der T−NET Funktionen der DEUTSCHEN TELEKOM
nutzen.
4.1
"R"−SIGNALTASTE AN NEBENSTELLENANLAGEN
Haben Sie Ihr Telefon mit einer Nebenstellenanlage verbunden, können Sie
alle Möglichkeiten, wie z. B. Anrufe weiterleiten, automatischen Rückruf
usw. nutzen. Die "R"−Signaltaste verschafft Ihnen den Zugang zu diesen
Möglichkeiten. An einer Nebenstellenanlage wird die FLASH−Zeit "100ms"
benötigt.
Stellen Sie dazu den Schalter "FLASH" (auf der rechten Geräteseite) auf
die Einstellung "100ms".
Ob Ihr Telefon an Ihrer Nebenstellenanlage einwandfrei funktioniert und
welche weiteren Möglichkeiten Sie dadurch erhalten, erfahren Sie bei dem
Händler, bei dem die Anlage gekauft wurde.
4.2
"R"−SIGNALTASTE UND DIE T−NET−FUNKTIONEN DER
DEUTSCHEN TELEKOM
Ihr AUDIOLINE Telefon 48 Extra Plus unterstützt die wichtigsten
Mehrwertdienste der DEUTSCHEN TELEKOM (z. B.: Makeln, Anklopfen,
Dreier−Konferenz u. a.). Das T−NET arbeitet mit der Einstellung "FLASH
300ms".
Stellen Sie dazu den Schalter "FLASH" (auf der rechten Geräteseite) auf
die Einstellung "300ms".
Zur Freischaltung der T−NET Funktionen (die z. T. gebührenpflichtig sind)
wenden Sie sich bitte an die DEUTSCHE TELEKOM.
12
− DIE R"−SIGNALTASTE −
4.3
TELEFONNUMMERN WÄHLEN UND SPEICHERN BEI DEM
BETRIEB AN NEBENSTELLENANLAGEN
Hinweis!
Die in diesem Kapitel erklärte Pausenfunktion zwischen der Kennziffer für
die Amtsholung (meistens 0 oder 9) ist nur bei älteren Nebenstellenanlagen erforderlich.
Einige Nebenstellenanlagen benötigen eine kurze Pause zwischen der
Amtskennziffer (meistens 0 oder 9) und dem Freizeichen. Beim manuellen
Wählen und dem Wählen über die Direkt− und Kurzwahltasten kann
diese Pause mit eingegeben werden, damit die weiteren Zahlen nicht zu
schnell gewählt werden.
Pause beim manuellen Wählen eingeben
Drücken Sie zwischen der Kennziffer für die Amtsholung und der
eigentlichen Telefonnummer einmal die Taste d. Im Display wird die Pause
mit "P" angezeigt. Nach der Amtsholung wartet Ihr Telefon für drei
Sekunden mit dem Wählen der eigentlichen Telefonnummer.
Pause mitspeichern
Drücken Sie während des Speicherns nach der Kennziffer für die
Amtsholung und vor der eigentlichen Rufnummer die Taste d. Im Display
wird die Pause mit "P" angezeigt. Beim Wählen über die Direkt− oder
Kurzwahltasten wird dann nach der Kennziffer für die Amtsholung
automatisch eine Pause von drei Sekunden eingefügt.
13
− WICHTIGE HINWEISE −
5
WICHTIGE HINWEISE
5.1
FEHLERSUCHE
Sie können mit Ihrem Telefon nicht telefonieren:
Entfernen Sie alle Geräte und verbinden Sie nur das Telefon direkt mit der
Telefonbuchse.
Der Fehler ist nicht behoben:
Fehler kann an defektem Anschlusskabel oder Telefon liegen. Bitte
austauschen.
Der Fehler ist nicht behoben:
Fehler liegt in der Zuleitung. Bitte rufen Sie die Störungsstelle Ihres
Telefonnetzanbieters an.
Bei technischen Problemen können Sie sich unter der Hotline − Rufnummer
0180 5 00 13 88 (Kosten Telekom bei Drucklegung: 12ct/min) auch an
unseren Service wenden.
5.2
TELEFONKABEL AUSTAUSCHEN
Müssen Sie Ihr Telefonkabel austauschen, finden Sie anhand der
untenstehenden Zeichnung das passende Kabel bei Ihrem Händler.
F−Codierung − IMPORT Standard
TAE−F
4
3
5 2
6 1
14
1
2
3
4
5
6
Rj11 6/x
1
2
3
4
5
6
1 2 34 5 6
− WICHTIGE HINWEISE −
5.3
GARANTIE
AUDIOLINE − Geräte werden nach den modernsten Produktionsverfahren
hergestellt und geprüft. Ausgesuchte Materialien und hoch entwickelte
Technologien sorgen für einwandfreie Funktion und lange Lebensdauer. Ein
Garantiefall liegt nicht vor, wenn die Ursache einer Fehlfunktion des
Gerätes bei dem Telefonnetzbetreiber oder einer zwischengeschalteten
Nebenstellenanlage liegt. Die Garantie gilt nicht für die in den Produkten
verwendeten Batterien. Die Garantiezeit beträgt 24 Monate, gerechnet vom
Tage des Kaufs.
Innerhalb der Garantiezeit werden alle Mängel, die auf Material− oder
Herstellungsfehler zurückzuführen sind, kostenlos beseitigt. Der
Garantieanspruch erlischt bei Eingriffen durch den Käufer oder durch Dritte.
Schäden, die durch unsachgemäße Behandlung oder Bedienung, durch
falsches Aufstellen oder Aufbewahren, durch unsachgemäßen Anschluss
oder Installation sowie durch höhere Gewalt oder sonstige äußere Einflüsse
entstehen, fallen nicht unter die Garantieleistung. Wir behalten uns vor, bei
Reklamationen die defekten Teile auszubessern oder zu ersetzen oder das
Gerät auszutauschen. Ausgetauschte Teile oder ausgetauschte Geräte
gehen in unser Eigentum über. Schadenersatzansprüche sind
ausgeschlossen, soweit sie nicht auf Vorsatz oder grober Fahrlässigkeit des
Herstellers beruhen.
Sollte Ihr Gerät dennoch einen Defekt innerhalb der Garantiezeit
aufweisen, wenden Sie sich bitte unter Vorlage Ihrer Kaufquittung
ausschließlich an das Geschäft, in dem Sie Ihr AUDIOLINE − Gerät gekauft
haben. Alle Gewährleistungsansprüche nach diesen Bestimmungen sind
ausschließlich gegenüber Ihrem Fachhändler geltend zu machen. Nach
Ablauf von zwei Jahren nach Kauf und Übergabe unserer Produkte können
Gewährleistungsrechte nicht mehr geltend gemacht werden.
15
− WICHTIGE HINWEISE −
5.4
KONFORMITÄTSERKLÄRUNG
Dieses Gerät erfüllt die Anforderungen der EU−Richtlinie:
1999/5/EG Richtlinie über Funkanlagen und
Telekommunikationsendeinrichtungen und die gegenseitige Anerkennung
ihrer Konformität. Die Konformität mit der o. a. Richtlinie wird durch das
CE−Zeichen auf dem Gerät bestätigt.
Für die komplette Konformitätserklärung nutzen Sie bitte den kostenlosen
Download von unserer Website www.audioline.de.
16
− CONTENTS−
SAFETY INFORMATION . . . . . . . . . . . . . . . . . . . . . . . . . . . . . . . . . . . . . . . . . . . . . . . 18
1
OPERATIONAL ELEMENTS . . . . . . . . . . . . . . . . . . . . . . . . . . . . . . . . . . . 19
2
INSTALLATION . . . . . . . . . . . . . . . . . . . . . . . . . . . . . . . . . . . . . . . . . . . . . . . 20
2.1
2.2
2.3
2.4
2.5
2.6
2.7
CONNECTING THE RECEIVER . . . . . . . . . . . . . . . . . . . . . . . . . . . . . . . . . . . . . . . .
INSERT BATTERY . . . . . . . . . . . . . . . . . . . . . . . . . . . . . . . . . . . . . . . . . . . . . . . . . . . .
CONNECTING THE TELEPHONE . . . . . . . . . . . . . . . . . . . . . . . . . . . . . . . . . . . . . .
WALL MOUNTING . . . . . . . . . . . . . . . . . . . . . . . . . . . . . . . . . . . . . . . . . . . . . . . . . . . .
HEARING AID COMPATIBLE . . . . . . . . . . . . . . . . . . . . . . . . . . . . . . . . . . . . . . . . . . .
T−NET SET−UP . . . . . . . . . . . . . . . . . . . . . . . . . . . . . . . . . . . . . . . . . . . . . . . . . . . . . . .
SETTING THE CLOCK . . . . . . . . . . . . . . . . . . . . . . . . . . . . . . . . . . . . . . . . . . . . . . . .
3
OPERATION . . . . . . . . . . . . . . . . . . . . . . . . . . . . . . . . . . . . . . . . . . . . . . . . . 23
3.1
3.2
3.3
3.4
3.5
3.6
3.7
3.8
3.8.1
3.8.2
USING THE TELEPHONE . . . . . . . . . . . . . . . . . . . . . . . . . . . . . . . . . . . . . . . . . . . . .
RECEIVING CALLS . . . . . . . . . . . . . . . . . . . . . . . . . . . . . . . . . . . . . . . . . . . . . . . . . . .
ADJUSTING THE VOLUME OF THE RECEIVER . . . . . . . . . . . . . . . . . . . . . . . . . .
REDIAL . . . . . . . . . . . . . . . . . . . . . . . . . . . . . . . . . . . . . . . . . . . . . . . . . . . . . . . . . . . . .
CALL DURATION DISPLAY . . . . . . . . . . . . . . . . . . . . . . . . . . . . . . . . . . . . . . . . . . . .
ADJUSTABLE RINGING TONE . . . . . . . . . . . . . . . . . . . . . . . . . . . . . . . . . . . . . . . . .
TONE ADJUSTMENT . . . . . . . . . . . . . . . . . . . . . . . . . . . . . . . . . . . . . . . . . . . . . . . . .
STORING DIRECT AND SPEED DIAL NUMBERS . . . . . . . . . . . . . . . . . . . . . . . .
DIALLING USING THE DIRECT DIAL BUTTONS . . . . . . . . . . . . . . . . . . . . . . . . . .
DIALLING USING THE SPEED DIAL BUTTONS . . . . . . . . . . . . . . . . . . . . . . . . . .
20
20
20
21
21
21
22
23
23
23
24
24
24
24
25
25
25
4
THE "R" SIGNAL BUTTON . . . . . . . . . . . . . . . . . . . . . . . . . . . . . . . . . . . . 26
4.1
4.2
4.3
"R"SIGNAL BUTTON ON PRIVATE EXCHANGES . . . . . . . . . . . . . . . . . . . . . . . . . 26
"R" SIGNAL BUTTON AND THE DEUTSCHE TELEKOM T−NET FUNCTIONS . 26
DIALLING AND STORING TELEPHONE NUMBERS WHEN USING ON
PRIVATE EXCHANGES . . . . . . . . . . . . . . . . . . . . . . . . . . . . . . . . . . . . . . . . . . . . . . . 27
5
IMPORTANT INFORMATION . . . . . . . . . . . . . . . . . . . . . . . . . . . . . . . . . . . 28
5.1
5.2
5.3
5.4
FAULT FINDING . . . . . . . . . . . . . . . . . . . . . . . . . . . . . . . . . . . . . . . . . . . . . . . . . . . . . .
REPLACING THE TELEPHONE CABLE . . . . . . . . . . . . . . . . . . . . . . . . . . . . . . . . .
GUARANTEE . . . . . . . . . . . . . . . . . . . . . . . . . . . . . . . . . . . . . . . . . . . . . . . . . . . . . . . .
DECLARATION OF CONFORMITY . . . . . . . . . . . . . . . . . . . . . . . . . . . . . . . . . . . . . .
6
IMPORTANT NOTES ON THE GUARANTEE . . . . . . . . . . . . . . . . . . . . . 31
28
28
29
30
17
− SAFETY INFORMATION −
SAFETY INFORMATION
Operating Instructions: Please read this operating instruction manual
thoroughly. In the case of any questions, please contact our Service Hotline
0180 5 00 13 88 (cost via Telekom at time of going to print: 12 ct/min).
Under no circumstances open the device or complete any repair work
yourself. In the case of claims under the terms of guarantee, contact your
sales outlet.
Notes on disposal:
The adjacent symbol indicates that old electrical and electronic
devices and batteries must be disposed of separately from
domestic waste.
Equipment which is old or no longer in service must be
disposed of at the collection point provided by the appropriate
public waste disposal authority.
Batteries and power packs must be disposed of at the sales
outlet or the appropriate pubic waste authority collection point
who provide the necessary container.
Care: The surface of the case can be cleaned with a soft, dry, lint−free cloth.
Never use cleaning agents or solvents.
The implementation of European law in national laws and directives obliges
you to dispose of consumer goods appropriately. This serves to protect
persons and the environment.
Temperature and Ambient Conditions: The unit is designed for use in
protected rooms with a temperature range of +5 °C to 45 °C. The unit must
not be installed in damp rooms such as a bathroom or laundry room. Avoid
proximity to sources of heat such as radiators and do not expose the unit to
direct sunlight. We therefore recommend that this product should not be
used on antique furniture, veneers or other wooden surfaces.
Connection Information: Connect the AUDIOLINE Telephone 48 Extra
Plus to a TAE connection socket with F coding. It can be connected
together with other units, such as facsimile unit, answering machine or
modem, if a TAE connection socket is available with F/N coding.
Approval and CE Marking: The unit is approved for use on the European
telephone network. This unit fulfils the requirements of the EU Directives.
Conformity of the unit to the directives is confirmed by the CE mark. You will
find the Declaration of Conformity at the end of this manual.
18
− OPERATIONAL ELEMENTS −
1
OPERATIONAL ELEMENTS
1
2
16
3
4
5
6
15
14
7
13
8
9
10
11
12
1.
2.
3.
4.
5.
6.
7.
8.
Speed dial button
Display
Telephone socket (rear)
Set time (+/−)
Set time (SET)
Reset or start the call duration
Direct call buttons M1, M2, M3
Slide control Ringer
9.
10.
11.
12.
13.
14
15.
16
Slide control Flash"
Slide control tone control"
Number pad, 1−9, 0, * and #
Visual call indicator
Redial
Receiver volume
R" Signal button
Store button
19
− INSTALLATION −
2
INSTALLATION
2.1
CONNECTING THE RECEIVER
After unpacking your telephone, you must first connect the telephone
receiver to the base unit. The spiral cable needed for this has two identical
connections. First take one end of the spiral cable and plug it into the
socket at the bottom of the receiver. Now plug the other end into the socket
on the left−hand side of the base unit.
2.2
INSERT BATTERY
Before connecting your new telephone to the telephone network, install the
battery enclosed with the telephone. Please always use type AAA 1.5 V
alkaline batteries. The batteries are required for the display and other
features of the telephone. Make sure that the telephone is not connected to
the telephone network, before installing or changing the batteries. The
battery compartment is to be found on the underside of your telephone.
1. Open the battery compartment with a small screwdriver or a pointed
object.
2. Insert the battery. Ensure that the polarity is correct. Push the "−" pole
onto the small spring and then press the "+" pole downwards.
3. Close the battery compartment
Change the battery when the display is no longer visible.
2.3
CONNECTING THE TELEPHONE
Connect the telephone cable provided to the telephone jack and the
telephone socket on the rear of the telephone. The AUDIOLINE Telephone
48 Extra Plus works using the TTD system (Touch−Tone Dialling).
20
− INSTALLATION −
2.4
WALL MOUNTING
Your AUDIOLINE Telephone 48 Extra Plus is also suitable for wall
mounting. Use two screws for fixing it to the wall. Drill two holes with a
vertical distance of 83 mm between them and leave the screws protruding 5
mm from the wall. Now place the telephone over the screws and push down
slightly.
Note: There must be no lines or pipes under the area where the holes are
to be drilled.
When the telephone is used on a table, the receiver hanging hook must be
in the flush position as shown in diagram A (factory setting). When
mounting on the wall, the telephone receiver hanging hook is pulled out and
rotated. See diagram B.
2.5
HEARING AID COMPATIBLE
The telephone is compatible with all the most common hearing aids on the
market. However, due to the numerous models available, there is no
guarantee that the telephone will operate perfectly with all hearing aids.
2.6
T−NET SET−UP
Your AUDIOLINE Telephone 48 Extra Plus supports the most important
DEUTSCHE TELEKOM added value functions (e.g. brokering, call waiting,
three−way conference, etc.). For these, you will need the "FLASH" setting
on your telephone. More information can be found in item 4. Please contact
DEUTSCHE TELEKOM to gain access to these functions (some of which
are subject to charge).
21
− INSTALLATION −
2.7
SETTING THE CLOCK
The present time is shown in the display. To set the clock, please proceed
as follows:
1. Press the SET button beneath the display once. The hours figure in the
display starts to flash.
2. You can now enter the present time using the +/− button. To do this,
press the +/− button until you see the present hour in the display.
3. Now press the SET button again and the minutes figure in the display
starts to flash.
4. You can now enter the present number of minutes by repeatedly
pressing the +/− button.
5. Press the SET button. The time is set.
22
− OPERATION −
3
OPERATION
3.1
USING THE TELEPHONE
The AUDIOLINE Telephone 48 Extra Plus can be used like any
conventional telephone.
PLEASE FOLLOW THE INSTRUCTIONS:
Lift the receiver and wait until you hear the dialling tone.
Now dial the required telephone number. The number dialled will
be shown in the display. The display shows a telephone number
with a maximum of 16 digits. If the number dialled is longer, only
the last 16 digits will be displayed.
To end the call simply replace the receiver.
3.2
RECEIVING CALLS
Lift the receiver and carry out the conversation.
Replace the receiver to end the call.
3.3
ADJUSTING THE VOLUME OF THE RECEIVER
If the caller’s voice should ever be too quiet or too loud, you can increase or
reduce the volume of the receiver.
Turn the b knob (beneath receiver) during the call.
Warning: Setting the volume to its loudest volume may cause ear damage. Therefore, reset the volume to 0" after each call.
23
− OPERATION −
3.4
REDIAL
If a connection that you have dialled is engaged or you were unable to get
through to anybody, replace the receiver. The last number dialled remains
stored in the telephone automatically.
To use the redial facility, proceed as follows:
Lift the receiver and press the redial button d. The stored redial number
will be dialled again.
3.5
CALL DURATION DISPLAY
After dialling the telephone number, the current call duration in minutes and
seconds will be shown in the display after a few seconds.
You can also use the internal clock as a stopwatch. To do this, press the f
button during a call or even with the receiver on the hook. The time
measurement can be stopped using the same button f. The measured
time will still be shown in the display for a few seconds. The display then
jumps back to showing the present time.
3.6
ADJUSTABLE RINGING TONE
By means of the "KLINGEL" slide switch on the right−hand side of your
telephone you can choose the settings "LEISE" (i), or "LAUT" to match the
volume of the ringing tone to your requirements. If at any time you do not
want to be disturbed, use the "AUS" setting.
3.7
TONE ADJUSTMENT
Use the sliding switch g on the right−hand side of the telephone to adjust
the tone.
Note: The tone adjustment function will not be affective when the reveiver
volume has been set to minimum level.
24
− OPERATION −
3.8
STORING DIRECT AND SPEED DIAL NUMBERS
You can store a telephone number for direct dialling on each of the buttons
M1, M2 and M3 with your AUDIOLINE Telephone 48 Extra Plus. The direct
dial button M3 is coloured red and is thus suitable for use as an emergency
call button. An additional ten numbers can be stored as speed dial
numbers.
PLEASE FOLLOW THE INSTRUCTIONS:
Lift the receiver.
Press the store button c.
Now enter the required telephone number using the number pad.
The maximum length is 16 digits.
Press the store button c again.
Now press the required direct dial button M1, M2 or M3 or a button
on the number pad between 1 to 9 or 0 to save the telephone
number as a speed dial number.
Replace the receiver.
Storage locations already used are automatically overwritten when you
store a new telephone number in this location.
The numbers stored can be recorded on the index underneath the receiver.
Press down firmly on the cover, slide it downwards and remove the note.
Write down the phone number. Replace the note and cover.
3.8.1
DIALLING USING THE DIRECT DIAL BUTTONS
PLEASE FOLLOW THE INSTRUCTIONS:
Lift the receiver and press the required direct dial button M1, M2 or
M3.
3.8.2
DIALLING USING THE SPEED DIAL BUTTONS
PLEASE FOLLOW THE INSTRUCTIONS:
Lift the receiver and press the speed dial button e and the required storage location from 1 to 9 or 0.
25
− THE R" SIGNAL BUTTON −
4
THE "R" SIGNAL BUTTON
You can use the "R" signal button on your telephone on private exchanges
and when using DEUTSCHE TELEKOM’s T−Net functions.
4.1
"R" SIGNAL BUTTON ON PRIVATE EXCHANGES
If you have connected your telephone to a private exchange, you can use
all the facilities such as call transfer, automatic recall, etc. The "R" signal
button gives you access to these facilities. The FLASH time "100ms" will be
required on a private exchange.
For this purpose, set the "FLASH" switch, located on the right side of the
telephone, to the "100ms" setting.
You can find out from the dealer from whom the equipment was purchased
whether your telephone will work on your private exchange without any
problems and what further facilities you will receive from this.
4.2
"R" SIGNAL BUTTON AND THE DEUTSCHE TELEKOM T−NET
FUNCTIONS
Your AUDIOLINE Telephone 48 Extra Plus supports the most important
DEUTSCHE TELEKOM added value functions (e.g. brokering, call waiting,
three−way conference, etc.). The T−NET works using the "FLASH 300ms"
setting.
For this purpose, set the "FLASH" switch, located on the right side of the
telephone, to the "300ms" setting.
Please contact DEUTSCHE TELEKOM to gain access to the T−NET
functions (some of which are subject to charge).
26
− THE R" SIGNAL BUTTON −
4.3
DIALLING AND STORING TELEPHONE NUMBERS WHEN
USING ON PRIVATE EXCHANGES
Note!
The pause function after an outside line code (usually 0 or 9) described in
this chapter is only required on older private exchanges.
Some private exchanges use a short pause between the code for the
outside line (usually 0 or 9) and the dialling tone. When dialling manually
and when dialling using the direct dial and speed dial buttons, this pause
can be entered along with the number so that the following digits are not
dialled too quickly.
Entering the pause when dialling manually
Press the d button once between the number for the outside line and the
actual telephone number. The pause will be shown by a "P" in the display.
After connecting to an outside line your telephone will wait for three
seconds before dialling the actual telephone number.
Storing the pause
When storing a number, press the d button after the number for the
outside line and before the actual telephone number. The pause will be
shown by a "P" in the display. When dialling using the direct dial or speed
dial buttons a pause of three seconds will automatically be inserted after the
number for the outside line.
27
− IMPORTANT INFORMATION −
5
IMPORTANT INFORMATION
5.1
FAULT FINDING
You cannot make calls with your phone:
Remove all devices and connect only the telephone directly to the
telephone socket.
The fault has not been cleared:
The fault may be due to a defect connection cable or telephone. Please
replace.
The fault has not been cleared:
The fault lies in the power supply cable. Please call telephone network
provider’s service department.
In the case of technical problems you can also contact our Service
Department on the Hotline number 0180 5 00 13 88 (cost via Telekom at
time of going to print: 12 ct/min)..
5.2
REPLACING THE TELEPHONE CABLE
If you have to replace your telephone cable, you can locate the appropriate
cable at your dealer’s with the help of the diagram below.
F−Codierung − IMPORT Standard
TAE−F
4
3
5 2
6 1
28
1
2
3
4
5
6
Rj11 6/x
1
2
3
4
5
6
1 2 34 5 6
− GUARANTEE −
5.3
GUARANTEE
AUDIOLINE equipment is produced and tested according to the latest
production methods. The implementation of carefully chosen materials and
highly developed technologies ensure trouble−free functioning and a long
service life. The terms of guarantee do not apply where the cause of
equipment malfunction is the fault of the telephone network operator or any
interposed private branch extension system. The terms of guarantee do not
apply to the batteries used in the products. The period of guarantee is 24
months from the date of purchase.
All deficiencies resulting from material or production faults which occur
during the period of guarantee will be eliminated free of charge. Rights to
claims under the terms of guarantee are annulled following intervention by
the purchaser or third parties. Damage caused as a result of improper
handling or operation, incorrect positioning or storing, improper connection
or installation, Acts of God or other external influence are not covered by
the terms of guarantee. In the case of complaints, we reserve the right to
repair or replace defect parts or provide a replacement device.
Replacement parts or devices become our property. Rights to compensation
in the case of damage are excluded where there is no evidence of intent or
gross negligence by the manufacturer.
If your device shows signs of defect during the period of guarantee, please
return it to the sales outlet in which you purchased the AUDIOLINE device
together with the purchase receipt. All rights to claims under the terms of
guarantee in accordance with this agreement must be asserted exclusively
with regard to your sales outlet. Two years after the purchase and transfer
of our products, claims under the terms of guarantee can no longer be
asserted.
29
− GUARANTEE −
5.4
DECLARATION OF CONFORMITY
This device fulfils the requirements stipulated in the EU directive:
1999/5/EU directive on radio equipment and telecommunications terminal
equipment and the mutual recognition of their conformity. Conformity with
the above mentioned directive is confirmed by the CE symbol on the
device.
To view the complete Declaration of Conformity, please refer to the free
download available on our web site www.audioline.de.
30
− GUARANTEE −
6
IMPORTANT NOTES ON THE GUARANTEE
The period of guarantee for the AUDIOLINE product begins on the date of
purchase. Rights to claims under the terms of guarantee relate to
deficiencies resulting from material or production faults. Rights to claims
under the terms of guarantee are annulled following intervention by the
purchaser or third parties. Damage caused as a result of improper handling
or operation, normal wear and tear, incorrect positioning or storing,
improper connection or installation, Acts of God or other external influence
are not covered by the terms of guarantee.
CLAIMS UNDER THE TERMS OF GUARANTEE MAY ONLY BE
ASSERTED TO THE RETAILER WHERE THE EQUIPMENT WAS
PURCHASED, WHEREBY THE PURCHASE RECEIPT MUST ALSO BE
SUBMITTED.
TO PREVENT UNNECESSARY LONG DELAYS, PLEASE DO NOT
SEND EQUIPMENT UNDER COMPLAINT TO OUR OFFICE ADDRESS.
IN THE CASE OF QUESTIONS CONCERNING OPERATION OR THE
TERMS OF GUARANTEE, PLEASE REFER TO THE OPERATING
MANUAL OR CONTACT OUR HOTLINE:
0180 500 13 88 (Telekom cost at time of going to print: 12 ct/min)
AUDIOLINE GmbH
Neuss
Service Hotline 0180 500 13 88
(Telekom cost at time of going to print: 12 ct/min)
Internet: www.audioline.de − E−mail: [email protected]
31
− WICHTIGE GARANTIEHINWEISE −
Die Garantiezeit für Ihr AUDIOLINE − Produkt beginnt mit dem Kaufdatum.
Ein Garantieanspruch besteht bei Mängeln, die auf Material− oder
Herstellungsfehler zurückzuführen sind. Der Garantieanspruch erlischt bei
Eingriffen durch den Käufer oder durch Dritte. Schäden, die durch
unsachgemäße Behandlung oder Bedienung, natürliche Abnutzung, durch
falsches Aufstellen oder Aufbewahren, durch unsachgemäßen Anschluss
oder Installation sowie durch höhere Gewalt oder sonstige äußere Einflüsse
entstehen, fallen nicht unter die Garantieleistung.
BITTE WENDEN SIE SICH IM GARANTIEFALL AUSSCHLIESSLICH AN DEN
HÄNDLER, BEI DEM SIE DAS GERÄT GEKAUFT HABEN UND VERGESSEN SIE
NICHT, DEN KAUFBELEG VORZULEGEN.
UM UNNÖTIG LANGE WARTEZEITEN ZU VERMEIDEN, SENDEN SIE
REKLAMATIONSGERÄTE BITTE NICHT AN UNSERE BÜROADRESSE.
BEI FRAGEN ZUR BEDIENUNG UND GARANTIELEISTUNG LESEN SIE BITTE DIE
BEDIENUNGSANLEITUNG ODER WENDEN SIE SICH AN UNSERE HOTLINE:
0180 500 13 88 (Kosten Telekom bei Drucklegung: 12ct/min)
AUDIOLINE GmbH
Neuss
Service Hotline 0180 500 13 88
(Kosten Telekom bei Drucklegung: 12ct/min)
Internet: www.audioline.de − E−mail: [email protected]
Version 1.4 − 10.10.2005