1
9600
ADVANCED FUNCTIONS
FUNCIONES AVANZADAS
• Read this User’s Guide before you start using your P-touch.
• Keep this User’s Guide in a handy place for future reference.
• Antes de usar su equipo por primera vez, lea cuidadosamente esta guía de usuario.
• Guarde esta guía de usuario para futuras referencias.
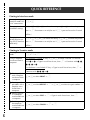
QUICK REFERENCE
Printing in Interface mode
Entering/exiting
Interface mode (RS- d + 0
232C connection)
Changing interface
parameter settings
d + 2 → m or g to select the setting → j or k to select the parameter → n (Parameters can only be set if e is pressed to set the P-touch
offline.)
Changing interface
d + 1 → m or g to select the setting → j or k to select the paramformat function settings (ESC/P Interface eter → n (Parameters can only be set if e is pressed to set the P-touch
mode only)
offline.)
Printing in Transfer mode
Entering Transfer
mode
Using a template
transferred from a
computer
d+(→n
If a database is linked: PF key → m or g to select a record → Continue
with 7 or 8 → Type in each line of text, then n → Continue with 1, 2,
3, 4, 5 or 6
If a database is not linked: PF key → Type in each line of text, then n →
Continue with 1, 2, 3 or 4
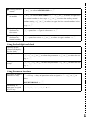
1 Printing a label
with a template
transferred from
a computer
2 Printing multiple labels with a
template transferred from a
computer
m or g to select PRINT → n
m or g to select REPEAT → n → m or g to select (or type) number →
n
3 Editing the text
in a template
transferred from
a computer
m or g to select EDIT → n → Type in each line of text, then n
4 Finishing using
the template
transferred from
a computer
m or g to select FINISH → n → n
5 Printing the next
m or g to select NEXT RECORD → n
record
6 Printing a range
of records
m or g to select CONT. PRINT → n → m or g to select (or type) the
first record number in the range → j or k to select the ending record
number setting → m or g to select (or type) the last record number in the
range → n
7 Searching the
database for
characters
d + space bar → Type in characters → n
8 Searching the
database for
record number
d + space bar twice → m or g to select (or type) number → n
Using the backlight and clock
Lighting up the
screen and display- )
ing the clock
Setting the clock
d + ) → j or k to select the parameter → m or g to select the setting → n
Adding a time
stamp
d + t → j or k to select the parameter → m or g to select the setting → n
Using the macro functions
Assigning an opera( → PF key → Keys of operation to be assigned → ( → m or g to
tion to a PF key
select
SAVE RECORDING → n
Performing an
operation assigned
to a PF key
!, @, #, $, %, ^, & or *
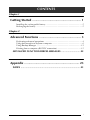
CONTENTS
Chapter 1
Getting Started ........................................................ 1
,QVWDOOLQJWKHUHFKDUJHDEOHEDWWHU\ 5HFKDUJLQJWKHEDWWHU\ Chapter 2
Advanced Functions ................................................ 3
3HUIRUPLQJDGYDQFHGRSHUDWLRQV 8VLQJGDWDWUDQVIHUUHGWRIURPDFRPSXWHU 8VLQJ%DFNXS0DQDJHU 3ULQWLQJIURPDFRPSXWHU56&FRQQHFWLRQ ADVANCED FUNCTION ERROR MESSAGES ............................22
Appendix ............................................................... 23
INDEX ........................................................................................25
i
ii
&K*HWWLQJ6WDUWHG
&KDSWHU
*HWWLQJ6WDUWHG
*HWWLQJ6WDUWHG
1
&K*HWWLQJ6WDUWHG
Installing the rechargeable battery
●
●
●
●
●
●
●
●
●
●
●
●
●
●
●
●
●
●
●
●
●
●
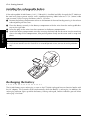
If the rechargeable Ni-MH battery (9.6 V, 1500 mAh) is installed and fully charged, the PT-9600 can
be used away from a power source, and is capable of printing labels from two 1 1/2" (36mm) wide
tape cassettes. Fully charging the battery takes 2 1/2 hours.
1 Remove the battery compartment cover on the bottom of the machine by pressing in the release
tab and pulling off the cover.
2 Place the battery securely in the battery compartment with the wires from the rechargeable battery on the right side.
3 Insert the plug on the wires into the connector in the battery compartment.
*HWWLQJ6WDUWHG
4 Attach the battery compartment cover by inserting the three tabs on the cover into the matching
slots at the edge of the compartment, then pushing down firmly on the cover until it snaps into
place.
NOTE
☞ Only use the rechargeable battery designed exclusively for this machine.
☞ If you do not intend to use this machine for an extended period of time, remove the rechargeable battery.
Recharging the battery
●
●
●
●
●
●
●
●
●
●
●
●
●
●
●
●
●
●
●
●
●
●
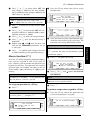
The Ni-MH battery starts recharging as soon as the PT-9600 is plugged into an electrical outlet with
the AC adaptor. The P-touch can be used normally while the battery is recharging. In addition, the
recharging indicator lights up while the battery is being recharged, and the indicator goes off when
recharging is finished.
2
&K$GYDQFHG)XQFWLRQV
&KDSWHU
$GYDQFHG)XQFWLRQV
$GYDQFHG)XQFWLRQV
3
Ch. 2 Advanced Functions
Performing advanced
operations
●
●
●
●
●
●
●
●
●
●
●
●
●
●
●
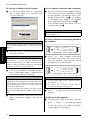
2 Press m or g until the desired setting is
displayed, or use the number keys to type in
the setting.
●
●
●
●
●
●
NOTE
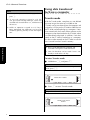
Screen backlight key/clock key
())
The PT-9600 is equipped with a screen backlight that allows you to view the screen, even in
the dark. In addition, the clock allows you to
see the current time.
To light up the screen:
●
Press ). The screen is lit.
NOTE
If the PT-9600 is plugged in using the AC adaptor,
the screen backlight remains on. If the PT-9600 is
Advanced Functions
running on the rechargeable battery, the screen
To return to the text without changing the clock settings, press e(OR hold down dand press )).
3 Press j or k to select the next parameter.
4 Repeat steps 2 and 3 until the date, time
and format are set as you wish.
NOTE
The following settings for the date and time formats
are available:
y4/m2/d2 (2002/04/01), y2/m2/d2 (02/04/01),
m1/d1/y2 (4/1/02), m2/d2/y2 (04/01/02), m3 d1,
y4 (Apr. 1, 2002), m4 d2, y4 (April 01, 2002), d2
m4 ’y2 (01 April ’02), d2 m3 ’y2 (01 Apr. ’02),
h2:m2 n1 (08:53 PM), H2:m2 (20:53)
5 Press n to apply the settings.
backlight automatically goes off if no key is pressed
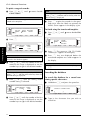
Date/Time function (d + t)
for 30 seconds.
To display the clock:
●
Hold down ). The clock appears.
Q
R1 2 3 4 5 6 7 8 9 A B C D E F K Q
Q
Q
RG
Q
Q
03/30/2002
Q
RH ON
Q
Q
R
Q
L
Q
Q
RI M
RJ
16:30
AUTO
1.10
HELSINKI
A
AUTO
Length
Margin
Font
Width
Size
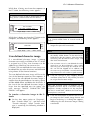
Clock Setting function
(d + ))
The Date/Time function allows you to add a
time stamp to your label. In addition, you can
specify if the time stamp will be added to the
text or added to the label when it is printed and
whether a specified date and time or the current
date and time will be used.
To print a time stamp on the label:
1 Press j, k, m or g to position the cursor at the point in the text where you want
to add the time stamp.
2 Hold down d and press t.
The Clock Setting function enables you to set the
clock so that the most accurate date and time can be
added to your label using the Date/Time function.
NOTE
To return to the text without adding a time stamp,
press e(OR hold down dand press t).
To set the time:
1 Hold down d and press ). The current clock
settings are shown with the month setting flashing.
Q
R1 2 3 4 5 6 7 8 9 A B C D E F K Q
Q
Q
RG 01/08
Q
Q
Q
RH
Q
Q
NO AT PRINTING
Q
R
Q
L
Q
RI M OFF
R
J
Q
R1 2 3 4 5 6 7 8 9 A B C D E F K Q
Q
Q
RG 01/06
Q
Q
CURRENT
Q
R
Q
Q
H
NO MM/DD/YYYY
R
hh:mm
Q
Q
Q
RI L
M
04/01/2002
00:00
RJ
4
AUTO
1.10
HELSINKI
A
AUTO
Length
Margin
Font
Width
Size
AUTO
1.10
HELSINKI
A
AUTO
Length
Margin
Font
Width
Size
&K$GYDQFHG)XQFWLRQV
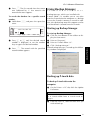
2 Press the PF key where you wish to assign
the operation.
Q
R1 2 3 4 5 6 7 8 9 A B C D E F K Q
Q
Q
RG
Q
Q
KEY ASSIGN
Q
R
Q
Q
RH NOL
START RECORDING NOW
Q
Q
I
Q
R
M
MACRO
KEY
TO
FINISH
R
NOTE
If ON is selected, the time stamp mark (d
J
) is added to the text at the cursor’s position.
4 Press k to select the next parameter (FORWARD).
6 Press j or k to select the next parameter.
8 Repeat steps 6 and 7 until the date and
time for the FORWARD parameter are set
as you wish.
9 Press n to add the time stamp to the text
or label according to the specified settings.
1.10
HELSINKI
A
AUTO
Margin
Font
Width
Size
Q
R1 2 3 4 5 6 7 8 9 A B C D E F K Q
Q
Q
RG
Q
Q
Q
RH NO <<< P-touch >>>
Q
Q
R
Q
L
Q
Q
RI 1:_
M
RJ
5 Press m or g to select either OFF (the current date and time is added) or ON (a specified date and time is added).
7 Press m or g until the desired setting is
displayed.
AUTO
Length
AUTO
1.10
HELSINKI
A
AUTO
Length
Margin
Font
Width
Size
3 Press the necessary keys to perform the operation that you wish to assign to the key. The
character size setting indicator bar flashes.
NOTE
If p or f is pressed or if d is held down and
9 is pressed, the END OF RECORDING screen
immediately appears.
Macro function (()
4 Press ( (OR press the PF key).
With the PT-9600, frequently performed operations can be assigned to one of the eight PF
keys, allowing you to execute the operation just
by pressing one key. The operation can contain
up to 64 steps, for example, for typing in text (in
Insert mode), apply formatting or applying formatting.
NOTE
Q
R1 2 3 4 5 6 7 8 9 A B C D E F K Q
Q
Q
RG END OF KEY ASSIGN
Q
Q
Q
RH NO
Q
Q
R
Q
SAVE
RECORDING
!
Q
M
Q
RI
!
CANCEL
RECORDING
R
J
Length
Margin
Font
Width
Size
5 Press m or g until ! moves beside SAVE
RECORDING.
No operation is recorded if ) or any other key that
NOTE
does not perform a function is pressed.
If ! is moved beside CANCEL RECORDING, the
operation is not assigned to the key.
To assign an operation to a PF key:
1 Press (.
6 Press n.
To perform an operation assigned to a PF key:
NOTE
To return to the text without assigning an operation
to a PF key, press e(OR press ().
Q
R1 2 3 4 5 6 7 8 9 A B C D E F K Q
Q
Q
RG
Q
Q
KEY ASSIGN
Q
R
Q
O
N
Q
H
R
SELECT ONE OF THE
Q
L
Q
Q
RI M
RJ PF KEYS
AUTO
1.10
HELSINKI
A
AUTO
Length
Margin
Font
Width
Size
●
Press the PF key where the operation that
you wish to perform is assigned.
Q
R1 2 3 4 5 6 7 8 9 A B C D E F K Q
Q
Q
RG OK TO OPERATE MACRO?
Q
Q
Q
RH NO
Q
Q
R
Q
L
Q
RI M
Q
RJ
Length
Margin
Font
Width
Size
5
$GYDQFHG)XQFWLRQV
3 Press m or g to select either OFF (the
time stamp is added to the text immediately) or ON (the time stamp is added to the
label when it is printed).
&K$GYDQFHG)XQFWLRQV
NOTE
☞ To stop the operation from being performed,
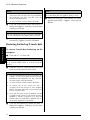
Using data transferred
to/from a computer
●
●
●
●
●
●
●
●
●
●
●
●
●
●
●
●
●
●
●
●
●
●
press o.
☞ To erase the operation assigned to a PF key,
start up P-touch Backup Manager, which was
installed with P-touch Editor 3.2, and then erase
the macro.
☞ While an operation assigned to a PF key is
being performed, the operation can be overwritten by pressing the keys of the new operation.
Transfer mode
With the Transfer mode, a template or a user-defined
character image (character not available on the
PT-9600) can be transferred from the computer and
assigned to a PF key on the PT-9600 or label data on
the PT-9600 can be backed up to a computer. A template created with the P-touch Editor software on the
computer can be downloaded to the PT-9600, where
it can be edited and printed. In addition, if text data
stored on the PT-9600 is backed up to a computer,
that data can be restored on the PT-9600 in case the
data is erased from the P-touch’s memory.
NOTE
☞ Data transfer between the computer and
$GYDQFHG)XQFWLRQV
PT-9600 is through the USB connection.
☞ One CSV database can be saved if one is not
already transferred to a PF key.
To enter Transfer mode:
1 Hold down d and press (.
NOTE
To return to the text without entering Transfer
mode, press e.
Q
R1 2 3 4 5 6 7 8 9 A B C D E F K Q
Q
Q
RG TRANSFER MODE?
Q
Q
Q
R
Q
O
N
Q
H
Q
R
Q
L
Q
RI M
RJ
AUTO
1.10
HELSINKI
A
AUTO
Length
Margin
Font
Width
Size
2 Press n to enter Transfer mode.
NOTE
To quit Transfer mode after it is entered, press o.
Q
R1 2 3 4 5 6 7 8 9 A B C D E F K Q
Q
Q
RG
Q
Q
TRANSFER MODE
Q
RH ON
Q
Q
R
READY
Q
L
Q
Q
RI M
RJ
6
AUTO
1.10
HELSINKI
A
AUTO
Length
Margin
Font
Width
Size
&K$GYDQFHG)XQFWLRQV
While data is being sent from the computer to
the PT-9600, the following screen appears.
NOTE
Be sure not to turn off the PT-9600 while data is
being sent to it, otherwise the data will be lost.
Q
R1 2 3 4 5 6 7 8 9 A B C D E F K Q
Q
Q
RG
Q
Q
RECEIVING
Q
R
Q
O
N
Q
H
R
DO NOT POWER OFF
Q
L
Q
RI M
Q
RJ
AUTO
0.4
HELSINKI
A
AUTO
Length
Margin
Font
Width
Size
Before transferring data, make sure that the P-touch
is in Transfer Mode. Refer to Transfer mode on
page 6.
Q
R1 2 3 4 5 6 7 8 9 A B C D E F K Q
Q
Q
RG
Q
Q
SENDING
Q
R
Q
Q
Q
RH NOL
Q
Q
RI M
RJ
2 From the File List, select the character
image that you wish to transfer.
AUTO
0.4
HELSINKI
A
AUTO
Length
Margin
Font
Width
Size
NOTE
☞ If the desired character image is not listed, click
User-defined character image
If a user-defined character image (a bitmap
character not usually available on the PT-9600)
is assigned to a PF key, that character can be
added to any label that you create on the
PT-9600. The user-defined character image can
be edited like any other character and formatted
using almost all text format functions.
The user-defined character image will have the
size of the bitmap created on the computer. If
the size of the user-defined character image is
smaller than the specified text size setting, space
will be added above and below the character. If
the size of the user-defined character image is
larger than the specified text size setting, the
error message “IMAGE CHARACTER SIZE
ERROR!” will appear.
To transfer a character image to the Ptouch:
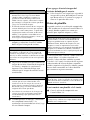
1 On the Start menu, point to “Programs”,
then “P-touch Editor 3.2”, and then click
“Transfer Manager”. When Transfer Manager is started up, the following window is
displayed.
the Modify Folder button. In the Browse For
Folder dialog box that appears, select the folder
containing the desired character image, and
then click the OK button.
☞ The maximum size of a user-defined character
image that can be transferred is 380 × 2048
dots. Any part of the image that extends out of
this size will be clipped off. In addition, the
character image should be a monochrome bitmap, otherwise it will not be assigned correctly.
3 Click the Change PF Key Mapping button,
and then select the PF key where you wish
to assign the character image.
NOTE
Only one character image or template can be
assigned to each PF key. If a character image or
template is already assigned to a PF key, the previous data is erased when a different character image
or template is transferred.
4 Click the Start button to convert the character image to the P-touch image format and
begin transferring it. A dialog box appears,
indicating that the character image is being
transferred.
7
$GYDQFHG)XQFWLRQV
NOTE
While data is being sent from the PT-9600 to the
computer, the following screen appears.
&K$GYDQFHG)XQFWLRQV
NOTE
NOTE
☞ Only the character image files that are selected
The PT-9600 can only contain one database. All
templates are linked to the single transferred database. The database can be replaced or updated.
will be transferred. To transfer more than one
character image at the same time, hold down
the keyboard’s Ctrl key, and then click the
names of the desired character images.
☞ To stop transferring the character image, click
the Cancel button in the dialog box that appears
during transfer.
5 When the message “The transfer was completed successfully.” appears, click the OK
button.
To add a user-defined character image to
the text:
●
$GYDQFHG)XQFWLRQV
Press the PF key where the user-defined
character image that you wish to use is
assigned. The character is added to the text
at the cursor’s position.
To transfer a template to the P-touch:
1 Create the layout file in P-touch Editor 3.2.
NOTE
To link a database to a layout file, merge fields from
a database into the layout.
2 With the layout file displayed, open the
[File] menu, and then click the [Transfer
Template] command. The layout file is converted to a P-touch template format and
Transfer Manager starts up.
Q
R1 2 3 4 5 6 7 8 9 A B C D E F K Q
Q
Q
RG
Q
Q
<<< P-touch >>>
Q
RH NO
Q
Q
R
Q
L
Q
Q
RI M
1:ABC _
R
J
AUTO
1.10
HELSINKI
A
AUTO
Length
Margin
Font
Width
Size
Template data
A layout file (*.lbl) created with P-touch Editor
can be transferred to the P-touch, where it can
be used as a template for printing labels and
stamps.
NOTE
Since data saved with and transferred from P-touch
Editor may appear slightly different (font, detailed
layout, etc.) than if it was printed from P-touch Editor, try printing a test label first. For more details,
refer to Readme96.txt (in the main folder) on the
enclosed CD-ROM.
If a database (*.mdb file created with P-touch
Editor 3.2) was linked to the template, the database can also be transferred to the P-touch. Data
from selected records of the database can then
be added to and printed in the template. In
addition, the database data can be searched to
find specific records.
8
NOTE
Before transferring data, make sure that the P-touch
is in Transfer Mode. Refer to Transfer mode on
page 6.
3 From the File List, select the template file
that you wish to transfer.
NOTE
To select a different template that has already been
converted to the P-touch template format, click the
Modify Folder button. In the Browse For Folder dialog box that appears, select the folder containing
the desired template, and then click the OK button.
4 Click the Change PF Key Mapping button,
and then select the PF key where you wish
to assign the template.
●
Only the first 9999 lines of a database
linked to a template is read by the P-touch.
●
Only the first line of text typed into a database field is read by the P-touch.Therefore,
if you wish to print labels that seem to have
more than one line of text, create the template and database with separate fields for
each line of text.
●
Some characters available with P-touch Editor are not available with the P-touch.
●
Barcodes specified with settings not compatible with the P-touch barcodes settings
will not be printed correctly.
●
A template created with P-touch Editor
should have a fixed length with a maximum
of 39" (1 m).
●
The template and database should be created so that no more than 1000 characters
per label will be printed.
●
Fields that extend out of the print area will
not be printed either partially or completely.
●
A numbering field specified with P-touch
Editor is not compatible with the Numbering function on the P-touch.
●
Backgrounds specified with P-touch Editor
are not compatible with the P-touch.
●
If text or a barcode are positioned overlapping other objects, the text or barcode will
normally be printed on top of the other
object.
●
The printed label may differ from the image
that appears in the Preview area of Transfer
Manager.
●
If the number or order of fields in a database are changed and only the database
(*.csv file) is transferred to update it, the
database may not link correctly with the
template. In addition, the first line of data in
the file must be recognized by the P-touch
as the field names, otherwise the database
cannot be used to print.
●
A layout using the split printing function
(enlarging the label and printing it on 2 or
more labels) cannot be transferred.
NOTE
Only one character image or template can be
assigned to each PF key. If a character image or
template is already assigned to a PF key, the previous data is erased when a different character image
or template is transferred.
5 Click the Start button to transfer the template. A dialog box appears, indicating that
the template is being transferred.
NOTE
☞ Only the template and database files that are
selected will be transferred. To transfer more
than one template and a database at the same
time, hold down the keyboard’s Ctrl key, and
then click the names of the desired files.
☞ To stop transferring the template and database,
click the Cancel button in the dialog box that
appears during transfer.
6 When the message “The transfer was completed successfully.” appears, click the OK
button.
Notes on creating templates
Since some P-touch Editor 3.2 functions are not
available with the P-touch, keep the following
points in mind when using P-touch Editor 3.2 to
create templates. In addition, after creating the
template, try using the P-touch to print a sample
of the label to check that the label is printed correctly.
●
Select only the “Landscape” (horizontal)
printing orientation.
●
Since some fonts available with P-touch
Editor may not be available on the P-touch,
the font used to print text may be different
from the font selected for the template. In
addition, since the size of all text on the
P-touch is set to “AUTO”, the text size may
automatically be reduced.
●
●
Although character styles can be applied to
individual characters with P-touch Editor,
the text line is the smallest string of characters that a style can be applied to with the
P-touch. In addition, some character styles
are not available with the P-touch.
The P-touch can only print an underline
with one line and a strikeout with two lines.
9
$GYDQFHG)XQFWLRQV
&K$GYDQFHG)XQFWLRQV
&K$GYDQFHG)XQFWLRQV
To transfer a database to the P-touch:
To use a template transferred from a computer:
1 On the Start menu, point to “Programs”,
then “P-touch Editor 3.2”, and then click
“Transfer Manager”.
1 Press the PF key where the template that you
wish to use is assigned. If a database is linked
to the template, the database data is displayed (Continue with step 2). If a database
is not linked to the template, the template
data is displayed (Continue with step 4).
If the database does not contain any text,
continue with step 5.
NOTE
To return to the text without using the transferred
template, press e.
NOTE
To select a database record to be printed in
the template:
$GYDQFHG)XQFWLRQV
Before transferring data, make sure that the P-touch
is in Transfer Mode. Refer to Transfer mode on
page 6.
Q
R1 2 3 4 5 6 7 8 9 A B C D E F K Q
Q
Q
RG
Q
Q
[NO. ]:[TITLE
]
Q
RH
Q
Q
NO
R
Q
1:Sales Manag
!
Q
RI M
!
2:Product Mana Q
R
J
2 From the File List, select the database that
you wish to transfer.
NOTE
To select a different database that has already been
converted to a *.csv file, click the Modify Folder
button. In the Browse For Folder dialog box that
appears, select the folder containing the desired
template, and then click the OK button.
Only the template and database files that are
selected will be transferred. To transfer more than
one template and a database at the same time, hold
down the keyboard’s Ctrl key, and then click the
names of the desired files.
To stop transferring the database, click the Cancel
button in the dialog box that appears during transfer.
4 When the message “The transfer was completed successfully.” appears, click the OK
button.
0.4
HELSINKI
A
AUTO
Margin
Font
Width
Size
2 Press m or g until ! appears to the left of
the record whose data you want to print
with the template. Only the one record
marked with ! will be printed.
Q
R1 2 3 4 5 6 7 8 9 A B C D E F K Q
Q
Q
RG
Q
Q
1:Sales Manag
Q
RH
Q
Q
NO
R
Q
2:Product Man
!
Q
L
Q
RI M
!
3:Merchandise
RJ
3 Click the Start button to transfer the database. A dialog box appears, indicating that
the database is being transferred.
NOTE
AUTO
Length
AUTO
0.4
HELSINKI
A
AUTO
Length
Margin
Font
Width
Size
NOTE
☞ To view other fields in the currently selected
record, press j or k.
☞ To search for a specific record, refer to
Searching the database on page 12.
3 Press n to specify the currently selected
record.
To edit text in the template:
4 For each field, type in the text, and then
press n. When n is pressed after typing
in the text for the last field, the MENU
screen appears in the display.
10
&K$GYDQFHG)XQFWLRQV
NOTE
☞ To quit editing text in a template, press e,
press m or g until ! moves beside CANCEL
EDITING?, and then press n.
9 Press n to begin printing the set number
of copies. The number of each copy is displayed while it is being printed. The MENU
screen appears in the display again.
To change the text entered in the template:
☞ Accented characters (Refer to the User’s Guide),
symbols (Refer to the User’s Guide), barcodes
(Refer to the User’s Guide), time stamps (page 4)
and user-defined character images (page 7) can be
entered in the fields.
0 Press m or g until ! moves beside EDIT.
NOTE
With templates that do not contain any text, only
PRINT and FINISH appear in the MENU screen.
☞ To select a different field, press m or g until
the desired field is displayed.
☞ If a PF key with an operation assigned to it is pressed,
To print a label using the selected template:
5 Press m or g until ! moves beside PRINT
(or just press p).
0.4
HELSINKI
A
AUTO
Margin
Font
Width
Size
A Press n. The first field for the transferred
template appears in the display.
B Repeat step 4 until the text is edited as you
Q
R1 2 3 4 5 6 7 8 9 A B C D E F K Q
Q
Q
RG 01/06
Q
Q
Q
RH NO
Q
Q
R
Q
MENU
PRINT
!
Q
Q
RI L
M
!
FINISH
R
J
AUTO
Length
AUTO
0.4
HELSINKI
A
AUTO
Length
Margin
Font
Width
Size
6 Press n to print the label. The message
“COPIES 1/ 1” appears in the display while
the label is being printed. The MENU
screen appears in the display again.
To print multiple labels using the selected
template:
wish. The MENU screen appears again
when n is pressed after editing the last
field in the template.
To print the record after the one that has
just been printed:
C Press m or g until ! moves beside NEXT
RECORD.
NOTE
NEXT RECORD does not appear if a database is not
linked to the template.
7 Press m or g until ! moves beside
REPEAT.
Q
R1 2 3 4 5 6 7 8 9 A B C D E F K Q
Q
Q
RG 03/06
Q
Q
FINISH
Q
RH NO
Q
Q
R
MENU
!REPEAT
Q
L
Q
RI M
Q
!
EDIT
RJ
AUTO
0.4
HELSINKI
A
AUTO
Length
Margin
Font
Width
Size
8 Press m or g until the desired setting is
displayed, or use the number keys to type in
the desired number of copies.
Q
R1 2 3 4 5 6 7 8 9 A B C D E F K Q
Q
Q
RG 05/06
Q
Q
EDIT
Q
R
Q
Q
Q
RH NOL
MENU
NEXT
RECORD
!
Q
Q
RI
!
CONT.
PRINT
RJ
AUTO
0.4
HELSINKI
A
AUTO
Length
Margin
Font
Width
Size
D Press n to print the next record. After the
label is printed, the MENU screen appears
in the display again.
11
$GYDQFHG)XQFWLRQV
Q
R1 2 3 4 5 6 7 8 9 A B C D E F K Q
Q
Q
RG 04/06
Q
Q
REPEAT
Q
RH NO
Q
Q
R
Q
MENU
EDIT
!
Q
L
Q
RI M
!
NEXT
RECORD
RJ
the message “OK TO FINISH TEMPLATE?” appears.
&K$GYDQFHG)XQFWLRQV
To print a range of records:
E Press m or g until ! moves beside
CONT. PRINT.
NOTE
CONT. PRINT does not appear if a database is not
linked to the template.
Q
R1 2 3 4 5 6 7 8 9 A B C D E F K Q
Q
Q
RG 06/06
Q
Q
NEXT RECORD
Q
RH NO
Q
Q
R
MENU
!CONT. PRINT
Q
L
Q
Q
RI M
!
R
J
AUTO
0.4
HELSINKI
A
AUTO
Length
Margin
Font
Width
Size
NOTE
To change the setting in steps of 5, hold down
either m or g, and then release the key when the
desired setting is displayed.
J Press n to print the records in the specified range. After the labels are printed, the
MENU screen appears in the display again.
To finish using the transferred template:
K Press m or g until ! moves beside FINISH.
Q
R1 2 3 4 5 6 7 8 9 A B C D E F K Q
Q
Q
RG 02/06
Q
Q
PRINT
Q
R
Q
O
N
Q
H
R
MENU
!FINISH
Q
L
Q
RI M
Q
!REPEAT
R
F Press n.
$GYDQFHG)XQFWLRQV
Q
R1 2 3 4 5 6 7 8 9 A B C D E F K Q
Q
Q
RG CONTINUOUS PRINT
Q
Q
Q
R
Q
Q
RH NO
Q
START
END
Q
L
Q
RI M
1
100
R
J
AUTO
0.4
HELSINKI
A
AUTO
Length
Margin
Font
Width
Size
NOTE
As a default, the numbers of the first and last
records in the database appear.
G Press m or g until the number of the first
record in the range is displayed, or use the
number keys to type in the desired number.
J
AUTO
0.4
HELSINKI
A
AUTO
Length
Margin
Font
Width
Size
L Press n. The message “OK TO FINISH
TEMPLATE?” appears in the display.
M Press n. Any text displayed before the
transferred template was used reappears in
the display.
NOTE
☞ To go back to the transferred template, press
e.
NOTE
To change the setting in steps of 5, hold down
either m or g, and then release the key when the
desired setting is displayed.
H Press j or k until the ending record
number setting is selected.
Q
R1 2 3 4 5 6 7 8 9 A B C D E F K Q
Q
Q
RG CONTINUOUS PRINT
Q
Q
Q
RH
Q
Q
NO
R
Q
START
END
Q
L
Q
RI M
1
100
R
J
AUTO
0.4
HELSINKI
A
AUTO
Length
Margin
Font
Width
Size
I Press m or g until the number of the last
record in the range is displayed, or use the
number keys to type in the desired number.
12
Searching the database
To search the database for a record containing specific characters:
1 Hold down d and press the space bar.
Q
R1 2 3 4 5 6 7 8 9 A B C D E F K Q
Q
Q
RG SEARCH CHARACTERS
Q
Q
Q
RH ON
Q
Q
Q
R
Q
L
Q
RI M
[_
]
RJ
AUTO
0.4
HELSINKI
A
AUTO
Length
Margin
Font
Width
Size
2 Type in the characters that you wish to
search for.
&K$GYDQFHG)XQFWLRQV
To search the database for a specific record
number:
1 Hold down d and press the space bar
twice.
Q
R1 2 3 4 5 6 7 8 9 A B C D E F K Q
Q
Q
RG JUMP RECORD NO.
Q
Q
Q
R
Q
Q
Q
RH NOL
Q
Q
RI M
1
RJ
AUTO
0.4
HELSINKI
A
AUTO
Length
Margin
Font
Width
Size
Using Backup Manager
●
●
●
●
●
●
●
●
●
●
●
●
●
●
●
●
●
●
●
●
●
●
●
Backup Manager, which was installed with
P-touch Editor 3.2, enables you to save data
from the P-touch onto the computer as a backup
in case the P-touch’s memory is erased. In addition, data backed up onto the computer can be
transferred back (restored) onto the P-touch.
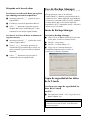
Starting up Backup Manager
To start up Backup Manager:
1 Click the Start button in the taskbar to display the Start menu.
2 Press m or g until the desired record
number is displayed, or use the number
keys to type in the desired number.
2 Point to “Programs”.
3 Press n. The record with the specified
record number appears.
When Backup Manager is started up, the following window is displayed.
3 Point to “P-touch Editor 3.2”.
4 Click “Backup Manager”.
Backing up P-touch data
To back up P-touch data onto the
computer:
1 On the Printer → PC tab, click the Update
List button.
NOTE
Before transferring data, make sure that the P-touch
is in Transfer Mode. Refer to Transfer mode on
page 6.
2 From the File List, select the data that you
wish to back up.
13
$GYDQFHG)XQFWLRQV
3 Press n. The first record after the current
one (indicated by !) that contains the
entered characters appears.
&K$GYDQFHG)XQFWLRQV
NOTE
NOTE
☞ Only the selected data will be backed up. To
To stop transferring the data, click the Cancel button in the dialog box that appears during transfer.
select more than one file to back up, hold down
the keyboard’s Ctrl key, and then click the
names of the desired files.
☞ To select all data, click the Select All button.
3 Click the Start button to back up the data. A
dialog box appears, indicating that the data
is being transferred.
NOTE
To stop transferring the data, click the Cancel button in the dialog box that appears during transfer.
4 When the message “The transfer was completed
successfully.” appears, click the OK button.
Restoring backed up P-touch data
$GYDQFHG)XQFWLRQV
To restore P-touch data backed up on the
computer:
1 Click the PC → Printer tab.
NOTE
Before transferring data, make sure that the P-touch
is in Transfer Mode. Refer to Transfer mode on
page 6.
2 From the File List, select the data that you
wish to transfer back to the P-touch.
NOTE
☞ Only the selected data will be transferred to the
P-touch. To select more than one file to restore,
hold down the keyboard’s Ctrl key, and then
click the names of the desired files.
☞ To select all data, click the Select All button.
☞ To change the PF key where the data is
assigned, click the Change PF Key Mapping
button, and then select the PF key where you
wish to assign the data.
☞ Only one character image or template can be
assigned to each PF key. If a character image or
template is already assigned to a PF key, the
previous data is erased when a different character image or template is transferred.
3 Click the Start button to restore the data. A
dialog box appears, indicating that the data
is being transferred.
14
4 When the message “The transfer was completed successfully.” appears, click the OK
button.
&K$GYDQFHG)XQFWLRQV
●
●
●
●
●
●
●
●
●
●
●
●
●
●
●
●
●
●
●
Pin
No.
●
●
●
The PT-9600 is also equipped with a serial port,
allowing you to use an RS-232C cable to connect the P-touch to a computer running Windows®.
To connect a computer to the PT-9600
though the RS-232C port:
1 Turn off both the P-touch and the computer.
2 Attach the enclosed core to a serial (RS232C) interface cable, and then connect the
9-pin or 25-pin plug on the cable to the
serial (COM) port of your computer and
tighten the screws to lock it in place.
NOTE
The core reduces electromagnetic interference to
other equipment.
3 Insert the 9-pin plug on the interface cable
into the RS-232C port of the PT-9600 and
tighten the screws to lock it in place.
4 Turn on the P-touch, and then start up the
computer.
NOTE
☞ Consult your computer supplies dealer when
purchasing the serial (RS-232C) interface cable.
☞ We recommend that the interface cable have a
length of 3 m or less. In addition, the cable
should be a shielded cross cable.
Signal
Name
INPUT/
OUTPUT
1
2
Explanation
Not connected
RD
INPUT
Receive Data
Receives data transmitted from the computer
3
TD
OUTPUT
Send signal Xon/Xoff
when Busy is set to
Xon/Xoff
Only in the ESC/P interface mode: Sends X-off
when the printer is busy,
X-on when not busy
4
DTR
OUTPUT
Data Terminal Ready
5
SG
Signal Ground
6
7
Not connected
RTS
OUTPUT
Request To Send
8
Not connected
9
Not connected
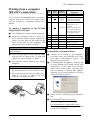
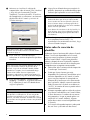
To install the serial printer driver:
1 Connect the PT-9600 to the computer’s
serial port using the enclosed serial interface cable as described on page 15, and
then turn on the P-touch.
2 In the dialog box that appears, allowing you
to select whether the P-touch will be connected with a USB cable or an RS-232C
cable, select “Serial cable”, and then click
the OK button. A dialog box appears,
allowing you to select whether to install or
uninstall the printer driver.
3 Select “Install”, and then click the Next button.
®
4 For Windows 98 and 98 SE users:
Skip to step 5.
For Windows® Me, 2000 and XP users:
A dialog box appears, allowing you to add a
P-touch (PTCOM) port.
15
$GYDQFHG)XQFWLRQV
Printing from a computer
(RS-232C connection)
&K$GYDQFHG)XQFWLRQV
If a P-touch (PTCOM) port is already
installed, click the Next button and continue with step 5 below.
6 Check that the installation will be carried
out as desired, and then click the Next button. A dialog box appears, indicating that
the printer driver has been installed.
If a P-touch (PTCOM) port is not already
installed, click the Add button. The Port
Name dialog box appears.
$GYDQFHG)XQFWLRQV
From the list of PTCOM ports, select the
port where the PT-9600 is connected
(“PTCOM1:” if the PT-9600 is connected to
the COM1 port, or “PTCOM2:” if the
PT-9600 is connected to the COM2 port),
and then click the OK button. In the Driver
Setup dialog box, click the Next button.
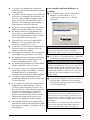
5 A dialog box appears, allowing you to
select the PTCOM port where the PT-9600
is connected.
Select “PTCOM1:” if the PT-9600 is connected to the COM1 port, or “PTCOM2:” if
the PT-9600 is connected to the COM2
port, and then click the Next button. (On
Windows® Me, 2000 and XP, select the
port added in step 4.) A dialog box
appears, allowing you to check how the
installation will be carried out.
16
7 If the port where the PT-9600 is connected
supports a baud rate of 9600 bps, click the
Next button.
If the port where the PT-9600 is connected
does not support a baud rate of 9600 bps,
or if you wish to check the connection
between the P-touch and the computer,
select “Start up the Change Baud Rate Wizard.”, and then click the Next button. The
Change Baud Rate Wizard starts up.
To change the baud rate:
8 Select the serial port where the PT-9600 is
connected, and then click the Next button.
A dialog box appears, allowing you to
select the desired baud rate.
&K$GYDQFHG)XQFWLRQV
A Click the Finish button. A dialog box
appears, showing that installation is finished.
9 Select the desired baud rate, and then click
the Next button.
NOTE
Normally “9600 bps” is selected; however, your
computer may not be able to support a baud rate of
9600 bps. If this is the case, refer to the computer’s
instruction manual, and select the maximum possible baud rate.
B Click the Finish button.
NOTE
If a dialog box appears, explaining that the computer should be restarted, select the option for
restarting the computer, click the Finish button to
restart the computer, and then remove the CDROM from the computer.
0 Check that the baud rate will be changed as
desired, and then click the Next button.
NOTE
To change the settings, click the Back button, and
return to step 9.
A dialog box appears, showing that the
baud rate has been changed as specified.
Serial (RS-232C) mode
After the PT-9600 is connected to a computer
using an RS-232C cable, the P-touch must be set
to Interface mode in order for it to be able to
communicate with the computer.
To enter/exit Interface mode
(RS-232C connection):
●
Hold down d and press 0.
Q
R1 2 3 4 5 6 7 8 9 A B C D E F K Q
Q
Q
RG
Q
Q
INTERFACE
Q
RH
Q
Q
Q
R
RS ONLINE
Q
Q
RI
RJ
AUTO
1.10
HELSINKI
A
AUTO
Length
Margin
Font
Width
Size
17
$GYDQFHG)XQFWLRQV
A dialog box confirming the settings
appears.
&K$GYDQFHG)XQFWLRQV
NOTE
To change the settings for the standard
serial (RS-232C) interface parameters:
☞ To exit Interface mode and return to the text,
1 Hold down d and press 2.
☞ To go offline, press e.
2 Press j or k until the desired parameter
is displayed. The current setting is shown.
hold down d and press 0.
☞ To go back online, press the space bar.
☞ Before using the USB connection, exit Interface
mode (hold down d and press 0.)
☞ The baud rate of the PT-9600 does not change
automatically. If a baud rate of 9600 bps can
be used, the P-touch can be left at its default
baud rate setting. If the baud rate of the Ptouch must be changed, refer to To change the
settings for the standard serial (RS-232C) interface parameters: on page 18, and then change
the baud rate setting of the P-touch.
$GYDQFHG)XQFWLRQV
With an RS-232C connection, there are two different print data formats for the Interface mode:
standard and ESC/P.
NOTE
Before using the Interface mode, select the print
data format (standard or ESC/P).
1 Press e to go offline.
2 Hold down d and press 2.
3 Press j or k until INTERFACE MODE is displayed.
4 Press m or g until the desired setting is displayed.
5 Press n.
Standard Interface mode (Mode that
enables printing from P-touch Editor
using an original P-touch driver)
With the standard Interface mode, the PT-9600
starts printing automatically when it receives a
print command from the computer. If no data is
received for 5 seconds, the PT-9600 automatically exits Interface mode.
In the standard Interface mode, various interface
parameters can be selected to specify how the
data is sent from the computer.
18
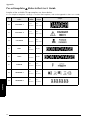
Parameter
Settings
BAUDRATE
19200, 9600 (default), 2400, 1200,
600, 300
BIT LENGTH
8 (default), 7
PARITY
NONE (default), ODD, EVEN
BUSY
DTR (default), XonXoff
3 Press m or g until the desired setting is
displayed.
NOTE
☞ To return the parameter to its default setting,
press the space bar.
☞ To quit without changing any settings, press
e(OR hold down dand press 2).
4 Repeat steps 2 and 3 until all parameters
are set as you wish.
5 Press n to apply the settings.
ESC/P Interface mode (Mode that enables printing from a program created
by the user)
In the ESC/P Interface mode, various interface
parameters and text formats can be selected to
specify how the data sent from the computer
will be printed.
NOTE
Before changing any interface settings or text formats, press e to go offline.
To change the settings for the ESC/P interface parameters:
1 Hold down d and press 2.
2 Press j or k until the desired parameter
is displayed. The current setting is shown.
Parameter
Settings
LINES OF TEXT
1 (default), 2, 3, 4, 5, 6, 7
A. CUT
(Auto Cut function)
1 (default), 2, 7, 8
(For details on the available settings,
refer to the User’s Guide.)
&K$GYDQFHG)XQFWLRQV
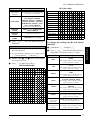
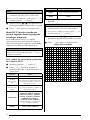
ASCII hex codes
Settings
T. MARGIN
(Tape Margin
function)
(For details on the available settings,
refer to the User’s Guide.)
CODE TABLE
IBM EXTENDED (default), AMERICAN, FRENCH, GERMAN,
ENGLISH, DANISH 1, SWEDISH,
ITALIAN, SPANISH 1, JAPANESE,
NORWEGIAN, DANISH 2, SPANISH 2, LATIN AMERICAN
(Refer to the code tables below.)
BARCODE
WIDTH
SMALL (default), EXTRA SMALL,
LARGE, MEDIUM
BARCODE
RATIO
3:1 (default), 2.5:1, 2:1
INTERFACE
MODE
STANDARD (default), ESC/P
23 24 40 5B 5C 5D 5E 60 7B 7C 7D 7E
USA
# $ @ [
\
]
'
{
France
# $ à
ç
§
'
é ù è
Germany
# $ § Ä Ö Ü
'
ä ö ü ß
UK
£ $ @ [
'
{
Denmark I
# $ @ Æ Ø Å
Sweden
#
Italy
# $ @ °
Spain I
3 Press m or g until the desired setting is
displayed.
NOTE
☞ To return the parameter to its default setting,
press the space bar.
☞ To quit without changing any settings, press
e(OR hold down dand press 2).
SP 0 @ P
'
p Ç É
á
1
!
1 A Q a q ü æ í
2
"
2 B R b
3
# 3 C S
c
s
â ô ú
4
$ 4 D T d
t
ä ö ñ
r
§ % 5 E U e u à ò Ñ
6
.
å û
ª
7
& 6 F V
'
7 G W g w ç ù
º
8
(
8 H X h x
ê
¿
9
)
9
I
Y
f
v
ÿ
i
y
ë Ö
FONT
WIDTH
µ ÷
*
:
J
Z
j
z
è Ü
Ω
+
;
K
[
k
{
ï
¢ ½
δ
C
,
< L
\
l
î
£ ¼
¥
STYLE2
°
B
D
– = M } m }
ì
E
.
> N
n
Ä Pts «
¡
F
/
? O
o
Å ƒ »
UNDERLINE
FRAME
ø
]
'
Ü
Ü
é
é
ñ
{
ì
}
}
é æ ø å ü
é æ ø å ü
' í ñ ó ú
ü í ñ ó ú
1 Hold down d and press 1.
STYLE1
A
'
2 Press j or k until the desired function is
displayed. The current setting is shown.
F
·
ä ö å ü
ù à ò è
Pts $ @ ¡ Ñ ¿
¥
}
To change the settings for the text format
function:
é Æ ó
5
é
#
É Æ Ø Å
# $ É Æ Ø Å
# $ á ¡ Ñ ¿
# $ á ¡ Ñ ¿
α
β ±
\
}
' æ ø å
É Ä Ö Å Ü é
Norway
Denmark II
Spain II
Latin America
SIZE
0 1 2 3 4 5 6 7 8 9 A B C D E
0
]
# $ @ [
5 Press n to apply the settings.
IBM extended codes
\
Japan
Function
4 Repeat steps 2 and 3 until all parameters
are set as you wish.
°
2
T. LENGTH
(Tape Length
function)
H. ALIGN
(Text Alignment
function)
Settings
HELSINKI (default), BRUSSELS, BERMUDA
(For samples of the available settings,
refer to the User’s Guide.)
AUTO (default), 72, 44, 38, 26, 19,
13, 10
(For samples of the available settings,
refer to the User’s Guide.)
NARROW (default), NARROWEST,
WIDE
(For samples of the available settings,
refer to the User’s Guide.)
NORMAL (default), BOLD,
OUTLINE, SHADOW, STRIPE
(For samples of the available settings,
refer to the User’s Guide.)
NORMAL (default), ITALIC,
VERTICAL
(For samples of the available settings,
refer to the User’s Guide.)
OFF (default), ON
OFF (default), 1, 2
(For samples of the available settings,
refer to the User’s Guide.)
AUTO (default), 2.0" to 9.0" (5.0 cm
to 23.0 cm) (in units of 0.1")
LEFT (default), CENTER, RIGHT, JUSTIFY
(For samples of the available settings,
refer to the User’s Guide.)
19
$GYDQFHG)XQFWLRQV
Parameter
&K$GYDQFHG)XQFWLRQV
Function
ROTATE
(Text Rotation
function)
MIRROR
(Mirror Printing
function)
Settings
Control code
Command
OFF (default), ON
(For details on the available settings,
refer to the User’s Guide.)
SEC 5
Italic off
ESC i
Bar Code
OFF (default), ON
(For details on the available settings,
refer to the User’s Guide.)
CAN
Clear all text
DEL
Backspace
3 Press m or g until the desired setting is
displayed.
NOTE
☞ Other ESCAPE sequences are ignored.
NOTE
☞ To return the function to its default setting, press
* Only applicable when bit image data exists.
the space bar.
☞ To return to the text without changing any settings,
press e(OR hold down dand press 1).
BIT IMAGE correspondences
BIT IMAGE
$GYDQFHG)XQFWLRQV
HORIZONTAL
VERTICAL
DPI
DPI
60
60
8DOTS Wdpi
120
60
8DOTS
Wdpi Wspeed
120
60
8DOTS 4times DPI
240
60
8DOTS
CRT GRAPHICS
80
60
8DOTS
CRT GRAPHICS II
90
60
4 Repeat steps 2 and 3 until all functions
are set as you wish.
8DOTS STD
5 Press n to apply the setting.
With the ESC/P Interface mode, various keyboard commands can be used to control the
operation of the PT-9600. All commands other
than those listed below are ignored.
Control code
Command
CR
LF
(CR + LF)
(LF + CR)
Interpreted as a “Return” or “Print
when data reaches the number of
lines of the LINES OF TEXT setting”
FF
24DOTS STD
60
180
24DOTS Wdpi
120
180
Print start.
ESC 0
ESC 2
ESC 3
ESC A
24DOTS
CRT GRAPHICS II
90
180
Line spacing commands.*
24DOTS 3times DPI
180
180
24DOTS 6times DPI
360
180
ESC $
Absolute location control*
ESC \
Relative location control*
ESC @
Printer initialization.
ESC K
ESC L
ESC Y
ESC Z
ESC *
Bit Image data commands.
Please refer to “Bit Image Correspondences” below.
SEC J
Perform n/180 inch Line Feed
ESC !
Master Select
Bold, Italic, underline only.
SEC E
Bold on
SEC F
Bold off
SEC G
Bold on
SEC H
Bold off
SEC –
Underline on/off
SEC 4
Italic on
20
As for the Bar Code printing, P-touch 9600 has a
subset of BROTHER 4318 DOT MATRIX
PRINTER BARCODE CONTROL PROTOCOL.
Please contact BROTHER LOCAL OFFICES FOR
MORE DETAILED INFORMATION.
&K$GYDQFHG)XQFWLRQV
Effective commands
ESC i [PARAMETERS] B [BAR CODE DATA]
[TERMIANTOR]
• i
SMALL LETTER i
• [PARAMTERS]
TYPE
t0
CODE 39 (DEFAULT)
t1
INTERLEAVED 2 OF 5
t5
EAN 8/13, UPC-A
t6
UPC-E
t9
CODABAR (NW-7)
s
STYLE
WILL BE IGNORED
p
NUMBER OF PASSES
r
CHARACTER
u
UNITS OF MEASUREMENT
WILL BE IGNORED
x
HORIZONTAL POSITION
WILL BE IGNORED
Y
VERTICAL OFFSET
WILL BE IGNORED
h
HEIGHT OF BAR-CODE
WILL BE IGNORED
r0
OFF
r1
ON
WILL BE IGNORED
$GYDQFHG)XQFWLRQV
t
HEAD CODE OF BAR-CODE DATA
• B OR b
• [BAR-CODE DATA]
SERIES OF DATA CORRESPONDING TO EACH TYPE
(STANDARD)
• ?
A check digit will be generated if a “?” is added at
the end of the data string.
• [TERMINATOR]
\
(FIXED)
NOTE
Interface Setting
Connect to an IBM PC (or compatible), with RS232C cable, and select EPSON LQ850 from the PC
software’s list of printers.
21
$'9$1&(')81&7,21(55250(66$*(6
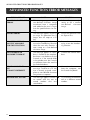
ADVANCED FUNCTION ERROR MESSAGES
ERROR MESSAGE
CAUSE
SOLUTION
IMAGE CHARACTER SIZE
ERROR!
●
This message appears if the
user-defined character image
transferred from a computer
and added to the text is larger
than the specified text size setting.
●
Select a larger text size
setting or use a smaller
user-defined
character
image.
MACRO ERROR!
●
This message appears if you try
to assign an operation that is
longer than 64 steps to a PF
key.
●
Assign the operation with
64 steps or less.
NUMBERING ERROR!
NO TEXT AVAILABLE
FOR THIS FUNCTION.
●
This message appears if you try
to use the Numbering function
when the text only contains a
time stamp or a user-defined
character image.
●
Enter other text before
trying to use the Numbering function.
NO DATABASE OR
INCORRECT FORMAT!
●
This message appears if a database is linked to the template,
but there is no database on the
P-touch or if the record fields
in the database on the P-touch
are different from that used in
the linked database.
●
Transfer the correct database.
PF KEY ASSIGNED TO
PC!
CANNOT OVERWRITE
●
This message appears if you try
to assign a macro to a PF key
that is already assigned a template or user-defined character
image from a computer.
●
Overwrite the macro
from the computer, not
the P-touch keyboard.
RECORD NOT FOUND!
●
This message appears if there is
no record with the text or
record number that was
searched for.
●
Try searching for different
text or a different record
number.
22
$SSHQGL[
$SSHQGL[
$SSHQGL[
23
$SSHQGL[
Pre-set templates ➩ Refer to the User’s Guide.
Samples of the available TZ tape templates are shown below.
☞ For samples of templates 1 through 31 and AV label templates, refer to the Appendix in the User’s Guide.
No.
Template
Name
32
CAUTION1-1
1 1/2"
(36 mm)
4.0"
(102 mm)
33
CAUTION1-2
1 1/2"
(36 mm)
4.0"
(102 mm)
34
CAUTION2
1"
(24 mm)
4.0"
(102 mm)
35
PIPE-1
3/4"
(18 mm)
AUTO
36
PIPE-2
1"
(24 mm)
AUTO
37
BIN BOX
3/4"
(18 mm)
2.8"
(70 mm)
38
NETWORK-1
1/2"
(12 mm)
2.8"
(70 mm)
39
NETWORK-2
3/4"
(18 mm)
1.5"
(38 mm)
$SSHQGL[
24
Tape
Width
Label
Length
Sample
INDEX
A
F
A. CUT parameter 18
Advanced functions 3
Appendix 23
Assigning operations to PF keys 5
Frequently performed operations 5
Functions
Clock Setting 4
Date/Time 4
Macro 5
B
Backing up data 13
Backing up data from PT-9600 6
Backlight 4
Backup Manager
Starting 13
BARCODE RATIO parameter 19
BARCODE WIDTH parameter 19
Battery 2
BAUDRATE parameter 18
BIT LENGTH parameter 18
BUSY parameter 18
C
Changing
ESC/P Interface parameters 18
Format function settings 19
Standard Interface parameters 18
Text in transferred template 11
Character image transfer 7
Clock Setting function 4
CODE TABLE parameter 19
D
Data backup 6
Data transfer 6
Database data 8
Database search 12
Date & time formats 4
Date/Time function 4
Downloading data to PT-9600 6
E
Editing
Text in template 10
Entering
Transfer mode 6
Error messages 22
I
Interface mode 17
INTERFACE MODE parameter 19
Interface parameters 18
L
Lighting up screen 4
LINES OF TEXT parameter 18
M
Macro function 5
Modes
Interface 17
Transfer 6
P
PARITY parameter 18
Performing assigned operations 5
PF keys 5
Printing
Database data 10
From computer 15
Label using template 11
Range of records 12
Time stamps 4
R
Rechargeable battery 2
Recharging 2
Record range printing 12
Record search 12
Restoring data 14
RS-232C connection 17
RS-232C port 15
S
Screen backlight key 4
Searching database 12
25
Setting clock 4
T
T. MARGIN parameter 19
Template text
Editing 10, 11
Printing 11
Templates from computer 8
Time & date formats 4
Time stamps 4
Transfer mode 6
Transferring
Character image from computer 7
Data to/from computer 6
U
User-defined character image 7
Using computer data 6
26
GUÍA DE USUARIO
ÌNDICES
,QVWDODFLyQGHODSLODUHFDUJDEOH 5HFDUJDGHODSLOD (MHFXFLyQGHRSHUDFLRQHVDYDQ]DGDV
8VRGHGDWRVWUDQVIHULGRVDGHVGHXQ3& 8VRGH%DFNXS0DQDJHU ,PSUHVLyQGHVGHXQ3&FRQH[LyQ56& i
Instalación de la pila recargable
●
●
●
●
●
●
●
●
●
●
●
●
●
●
●
●
●
●
●
●
●
●
Si la pila recargable de Ni-MH (9,6 V, 1500 mAh) está instalada y completamente cargada, la
PT-9600 se puede usar sin otra fuente de alimentación y puede imprimir etiquetas con dos casetes
de cinta de 1 1/2 pulgadas (36 mm) de ancho. La carga completa de la pila tarda 2 1/2 horas.
1 Retire la tapa del compartimento para pilas ubicado en la parte inferior de la máquina
presionando la lengüeta de liberación y tirando de la tapa.
2 Inserte la pila en el compartimento, con los hilos conductores de la pila recargable en el lado
derecho.
3 Inserte la clavija acoplada a los hilos conductores en el conector ubicado en el compartimento.
4 Para volver a colocar la tapa del compartimento, inserte las tres lengüetas de la tapa en las
ranuras correspondientes ubicadas en el borde del compartimento, y luego presione la tapa con
firmeza hasta que quede acoplada.
NOTA
☞ Utilice sólo la pila recargable diseñada exclusivamente para esta máquina.
☞ Si no va a usar la máquina durante un período de tiempo prolongado, extraiga la pila recargable.
Recarga de la pila
●
●
●
●
●
●
●
●
●
●
●
●
●
●
●
●
●
●
●
●
●
●
La pila de Ni-MH se empieza a recargar en cuanto se enchufa la impresora PT-9600 en una toma de
corriente eléctrica mediante el adaptador de CA. Puede utilizar su impresora P-touch con toda
normalidad mientras la pila se recarga. Además, el indicador de recarga se ilumina durante la carga
y se apaga cuando la recarga termina.
1
Ejecución de operaciones
avanzadas
●
●
●
●
●
●
●
●
●
●
●
●
●
●
●
●
●
●
3 Pulse j o k para seleccionar el
parámetro siguiente.
●
●
●
Tecla de retroiluminación de la
pantalla/Tecla del reloj ())
La impresora PT-9600 está dotada de una
retroiluminación para la pantalla que le permite
ver la pantalla incluso en la oscuridad. Además,
el reloj le permite ver la hora actual.
Para iluminar la pantalla:
●
Pulse ). La pantalla se ilumina.
NOTA
Si enchufa la impresora PT-9600 mediante el
adaptador de CA, la pantalla permanece
retroiluminada. Si la impresora PT-9600 recibe la
alimentación eléctrica de la pila recargable, la
iluminación de la pantalla se desactiva por sí sola
si, transcurridos 30 segundos, no se ha pulsado
4 Repita los pasos 2 y 3 hasta que la fecha,
la hora y el formato estén configurados
como desee.
NOTA
Dispone de los siguientes ajustes para los formatos
de fecha y hora:
y4/m2/d2 (2002/04/01), y2/m2/d2 (02/04/01),
m1/d1/y2 (4/1/02), m2/d2/y2 (04/01/02), m3 d1,
y4 (Abr. 1, 2002), m4 d2, y4 (Abril 01, 2002), d2
m4 ’y2 (01 Abril ’02), d2 m3 ’y2 (01 Abr. ’02),
h2:m2 n1 (08:53 PM), H2:m2 (20:53)
5 Pulse n para aplicar la configuración.
Función Date/Time (d + t)
La función Date/Time permite agregar un sello
con la fecha a sus etiquetas. Además, le permite
especificar si el sello con la fecha debe
agregarse al texto o a la etiqueta cuando ésta se
imprima, y si debe utilizarse una fecha y hora
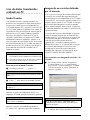
especificadas o la fecha y hora actuales.
ninguna tecla.
Para ver el reloj:
●
Mantenga pulsada ). Aparecerá el reloj.
Función Clock Setting
(d + ))
La función Clock setting permite ajustar el reloj para
poder agregar la fecha y hora más exactas a sus
etiquetas mediante la función Date/Time.
Para ajustar la hora:
1 Mantenga pulsada d y pulse ). Aparece el
ajuste actual del reloj con el valor del mes
parpadeando.
2 Pulse m o g hasta que se visualice el
valor deseado o use las teclas numéricas
para introducir el valor.
NOTA
Para volver al texto sin cambiar los ajustes del reloj,
pulse e (O mantenga pulsada d y pulse )).
2
Para imprimir un sello con la fecha en la
etiqueta:
1 Pulse j, k, m o g para ubicar el
cursor en el lugar del texto en el que desee
que se agregue el sello con la fecha.
2 Mantenga pulsada d y pulse t.
NOTA
Para volver al texto sin añadir un sello con la fecha,
pulse e (O mantenga pulsada d y pulse t).
3 Pulse m o g para seleccionar OFF (el
sello con la fecha se agrega al texto
inmediatamente) u ON (el sello con la
fecha se agrega a la etiqueta cuando se
imprime ésta).
NOTA
Si selecciona ON, el sello con la fecha (d
) se agrega al texto en la posición del cursor.
4 Pulse k para seleccionar el siguiente
parámetro (FORWARD).
5 Pulse m o g para seleccionar OFF (se
agregan la fecha y la hora actuales) u ON
(se agregan una fecha y una hora
específicas).
6 Pulse j o k para seleccionar el
parámetro siguiente.
7 Pulse m o g hasta que aparezca el valor
deseado.
8 Repita los pasos 6 y 7 hasta que la fecha y
la hora correspondientes al parámetro
FORWARD queden configurados a su
gusto.
9 Pulse n para agregar el sello con la fecha
al texto o a la etiqueta según los ajustes
especificados.
Función Macro (()
Con la impresora PT-9600, puede asignar
operaciones que se ejecutan con frecuencia a
las ocho teclas PF, lo que le permitirá ejecutar la
operación con sólo pulsar una tecla. La
operación puede contener un máximo de 64
pasos y puede estar destinada, por ejemplo, a
escribir texto (en modo Insert) o a aplicar
formatos.
NOTA
No se registra ninguna operación si se pulsa ) o
cualquier otra tecla que no realiza ninguna
función.
Para asignar una operación a una tecla PF:
NOTA
Si pulsa p o f, o si mantiene pulsada d y
pulsa 9, aparece inmediatamente la pantalla END
OF RECORDING.
4 Pulse ( (O pulse la tecla PF).
5 Pulse m o g hasta que ! se desplace
junto a SAVE RECORDING.
NOTA
Si ! se desplaza junto a CANCEL RECORDING, la
operación no se asignará a la tecla.
6 Pulse n.
Para ejecutar una operación asignada a una
tecla PF:
●
Pulse la tecla PF a la cual está asignada la
operación que desee ejecutar.
NOTA
☞ Para detener la ejecución de la operación,
pulse o.
☞ Para eliminar la operación asignada a la tecla
PF, inicie el P-touch Backup Manager, que se
instaló con el software P-touch Editor 3.2, y
borre la macro.
☞ Mientras se lleva a cabo una operación
asignada a una tecla PF, la operación se puede
sobreescribir al pulsar las teclas de la nueva.
1 Pulse (.
NOTA
Para volver al texto sin asignar ninguna operación a
la tecla PF, pulse e (O pulse ().
2 Pulse la tecla PF a la que desee asignar la
operación.
3 Pulse las teclas necesarias para ejecutar la
operación que desea asignar a la tecla. La
barra indicadora del ajuste del tamaño de los
caracteres parpadea.
3
Uso de datos transferidos
a/desde un PC
●
●
●
●
●
●
●
●
●
●
●
●
●
●
●
●
●
●
●
Imagen de un carácter definido
por el usuario
●
●
●
Modo Transfer
Con el modo Transfer, se puede transferir una
plantilla o una imagen de carácter definida por el
usuario (un carácter que no está disponible en
la PT-9600) desde el PC y asignarlas a una tecla PF
en la PT-9600; también se pueden hacer copias de
seguridad en el PC de los datos de etiqueta que se
encuentran en la PT-9600. También es posible
descargar una plantilla creada en el PC con el
software P-touch Editor a la impresora PT-9600,
donde podrá editarla e imprimirla. Además, si se
hace una copia de seguridad en un PC de los datos
de texto almacenados en la PT-9600, esos datos se
pueden restaurar en la PT-9600 en caso de que se
hayan borrado los datos de la memoria de la
impresora P-touch.
NOTA
☞ La transferencia de datos entre un PC y
la PT-9600 se realiza mediante la conexión USB.
☞ Se puede guardar una base de datos CSV si todavía
no se ha transferido ninguna a una tecla PF.
Para entrar en el modo Transfer:
1 Mantenga pulsada d y pulse (.
●
Si se asigna una imagen de carácter definida por
el usuario (un carácter de mapa de bits que
normalmente no está disponible en la PT-9600)
a una tecla PF, ese carácter se podrá añadir a las
etiquetas que se creen en la PT-9600. La imagen
de carácter definida por el usuario se puede
editar como cualquier otro carácter y aplicarle
un formato mediante casi todas las funciones de
formato de texto.
La imagen del carácter definido por el usuario
tendrá el mismo tamaño que el mapa de bits
creado en el PC. Si el tamaño de la imagen del
carácter definido por el usuario es inferior al
valor del ajuste del tamaño de texto
especificado, se añadirá espacio encima y
debajo del carácter. Si el tamaño de la imagen
de carácter definida por el usuario es más
grande que el ajuste de tamaño del texto
especificado, aparecerá el mensaje de error
“IMAGE CHARACTER SIZE ERROR!”.
Para transferir una imagen de carácter a la
P-touch:
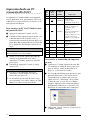
1 En el menú Inicio, señale “Programas”,
“P-touch Editor 3.2” y, a continuación,
haga clic en “Transfer Manager”. Cuando
Transfer Manager se inicie, aparecerá la
ventana siguiente.
NOTA
Para volver al texto sin entrar en el modo Transfer,
pulse e.
.
2 Pulse n para entrar en el modo Transfer.
NOTA
Si ha entrado en el modo Transfer y desea salir de
él, pulse o.
Mientras se están enviando datos del PC a la
impresora PT-9600, aparece la pantalla siguiente.
NOTA
No apague la PT-9600 mientras está recibiendo
datos o éstos se perderán.
Mientras se están enviando datos desde la
PT-9600 al PC, aparece la pantalla siguiente.
4
NOTA
Antes de transferir datos, compruebe que la
P-touch está en modo Transfer. Consulte Modo
Transfer on page 4.
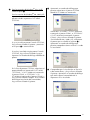
2 En “File List” (Lista de archivos), seleccione
la imagen de carácter que desea transferir.
NOTA
Para agregar al texto la imagen del
carácter definido por el usuario:
☞ Si la imagen de carácter que desea no se
●
enumera en la lista, haga clic en el botón
“Modify Folder” (modificar la carpeta). Si
aparece el cuadro de diálogo “Browse For
Fólder” (Buscar carpeta), seleccione la carpeta
que contenga la imagen de carácter que desee
y haga clic en el botón Aceptar.
☞ El límite de tamaño máximo de una imagen de
carácter definida por el usuario que se puede
transferir es 380 × 2048 puntos. La parte de la
imagen que exceda ese tamaño se descartará.
Además, la imagen de carácter debe ser un
mapa de bits monocromo porque, si no es así,
no se asignará correctamente.
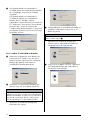
3 Haga clic en el botón Change PF Key
Mapping y seleccione la tecla PF donde
desea asignar la imagen de carácter.
NOTA
Sólo se puede asignar una imagen de carácter o
una plantilla a cada tecla PF. Si una imagen de
carácter o una plantilla ya se ha asignado a una
tecla PF, los datos anteriores se eliminarán cuando
se transfiera una imagen de carácter o una plantilla
diferente.
4 Haga clic en el botón Start, para convertir la
imagen de carácter al formato de imagen de
la P-touch, y empiece la transferencia.
Aparecerá un cuadro de diálogo, que
indicará que la imagen de carácter se está
transfiriendo.
Pulse la tecla PF en la que haya asignado la
imagen del carácter definido por el usuario
que desee utilizar. El carácter se agrega al
texto en la posición del cursor.
Datos de plantilla
Se puede transferir un archivo de composición
(*.lbl) creado con el software P-touch Editor a la
P-touch, donde se podrá usar como una
plantilla para imprimir etiquetas y sellos.
NOTA
Puesto que los datos que se han guardado con
P-touch Editor, o se han transferido desde este
programa, pueden tener un aspecto un poco
diferente (fuente, detalles de composición, etc.)
respecto a como se imprimieron con P-touch
Editor, primero haga una impresión de prueba de la
etiqueta. Para obtener más detalles, consulte el
archivo Readme96.txt (en la carpeta principal) del
CD-ROM que se incluye.
Si una base de datos (archivo *.mdb creado con
P-touch Editor 3.2) estaba vinculada a la
plantilla, la base de datos también se puede
transferir a la P-touch. Los datos de los registros
seleccionados de la base de datos se podrán
añadir e imprimir en la plantilla. Además, puede
buscar datos contenidos en la base de datos
para encontrar registros concretos.
NOTA
NOTA
☞ Sólo se transferirán los archivos de imágenes de
carácter que se hayan seleccionado. Para
transferir más de una imagen de carácter al
mismo tiempo, mantenga pulsada la tecla Ctrl
del teclado y haga clic en los nombres de las
imágenes de carácter que desee.
☞ Para detener la transferencia de la imagen de
carácter, haga clic en el botón Cancelar del
cuadro de diálogo que aparece durante la
transferencia.
5 Cuando aparezca el mensaje “The transfer
was completed successfully.” (La
transferencia ha terminado con éxito), haga
clic en el botón Aceptar.
La impresora PT-9600 sólo puede contener una
base de datos. Todas las plantillas se vinculan a esa
única base de datos transferida. La base de datos se
puede sustituir o actualizar.
Para transferir una plantilla a la P-touch:
1 Cree el archivo de composición con
P-touch Editor 3.2.
NOTA
Para vincular una base de datos a un archivo de
composición, combine los campos desde la base
de datos en la composición.
5
2 Mientras se visualiza el archivo de
composición, abra el menú [File] (Archivo)
y haga clic en el comando [Transfer
Template] (Transferir plantilla). El archivo
de composición se convierte a un formato
de plantilla de la P-touch y se inicia el
Transfer Manager.
5 Haga clic en el botón Start para transferir la
plantilla. Aparecerá un cuadro de diálogo que
indicará que la plantilla se está transfiriendo.
NOTA
☞ Sólo se transferirán los archivos de plantilla y
de base de datos que se hayan seleccionado.
Para transferir más de una plantilla y base de
datos al mismo tiempo, mantenga pulsada la
tecla Ctrl del teclado y haga clic en los nombres
de los archivos que desee.
☞ Para detener la transferencia de la plantilla y la
base de datos, haga clic en el botón Cancelar
del cuadro de diálogo que aparece durante la
transferencia.
6 Cuando aparezca el mensaje “The transfer
was completed successfully.” (La
transferencia ha terminado con éxito), haga
clic en el botón Aceptar.
NOTA
Antes de transferir datos, compruebe que la
P-touch está en modo Transfer. Consulte Modo
Transfer on page 4.
3 En la “File List” (Lista de archivos),
seleccione el archivo de plantilla que desea
transferir.
NOTA
Para seleccionar una plantilla diferente que ya se
haya convertido al formato de plantilla de la
P-touch , haga clic en el botón “Modify Folder”
(Modificar la carpeta). En el cuadro de diálogo
“Browse For Folder” (Buscar carpeta) que
aparecerá, seleccione la carpeta que contenga la
plantilla que desee y haga clic en el botón Aceptar.
Notas sobre la creación de
plantillas
Dado que algunas funciones del software P-touch
Editor 3.2 no están disponibles en la P-touch,
tenga en cuenta los puntos siguientes cuando
utilice P-touch Editor 3.2 para crear plantillas.
Además, después de crear la plantilla, imprima
desde la P-touch una muestra de la etiqueta para
comprobar que se imprime correctamente.
●
Seleccione sólo la orientación de impresión
“Landscape” (horizontal).
●
Dado que algunas fuentes que están
disponibles en el software P-touch Editor quizá
no estén disponibles en la P-touch, la fuente
que se use para imprimir el texto puede ser
diferente de la fuente que se ha seleccionado
para la plantilla. Además, como el tamaño de
todos los textos de la P-touch se establece en
“AUTO”, el tamaño del texto se puede reducir
automáticamente.
●
Aunque se pueden aplicar estilos de carácter
a caracteres individuales con P-touch Editor,
la línea de texto es la cadena de caracteres
más pequeña a la que se puede aplicar un
estilo con la P-touch. Además, algunos
estilos de carácter no están disponibles con
la P-touch.
●
La P-touch sólo puede imprimir subrayado
de una línea y tachado con dos líneas.
4 Haga clic en el botón “Change PF Key
Mapping” (Cambiar la asignación de teclas
PF) y seleccione la tecla PF donde desee
asignar la plantilla.
NOTA
Sólo se puede asignar una imagen de carácter o
una plantilla a cada tecla PF. Si una imagen de
carácter o una plantilla ya se ha asignado a una
tecla PF, los datos anteriores se eliminarán cuando
se transfiera una imagen de carácter o una plantilla
diferente.
6
●
La P-touch sólo puede leer las primeras
9999 líneas de una base de datos vinculada
a una plantilla.
●
La P-touch sólo lee la primera línea del texto
escrito en un campo de la base de datos. Por
lo tanto, si quiere imprimir etiquetas que
tienen más de una línea de texto, cree la
plantilla y la base de datos con campos
separados para cada línea de texto.
●
Algunos caracteres disponibles con P-touch
Editor no están disponibles con P-touch.
●
Los códigos de barras especificados con
ajustes que no son compatibles con los
ajustes de códigos de barras de la P-touch
no se imprimirán correctamente.
●
Una plantilla creada con P-touch Editor
debe tener una longitud fija de como
máximo 39 pulgadas 39” (1 m).
●
La plantilla y la base de datos deben crearse
de manera que no se impriman más de
1000 caracteres por etiqueta.
●
Los campos que excedan el área de impresión
no se imprimirán, parcialmente o del todo.
●
El campo de numeración especificado con
P-touch Editor no es compatible con la
función Numbering de la P-touch.
●
Los fondos especificados con P-touch Editor
no son compatibles con la P-touch.
●
Si se sitúa un texto o un código de barras de
manera que solapa otros objetos, el texto o
el código de barras se imprimirán
normalmente encima de los demás objetos.
●
La etiqueta impresa puede diferir de la
imagen que aparece en el área Preview de
Transfer Manager.
●
Si se cambian el número o el orden de los
campos de una base de datos y sólo se
transfiere la base de datos (archivo *.csv)
para actualizarla, la base de datos quizá no
se vincule correctamente a la plantilla.
Además, la P-touch debe reconocer la
primera línea de datos del archivo como
nombres de campo, de lo contrario no
podrá usar o imprimir la base de datos.
●
No se puede transferir una composición
que utilice la función de impresión dividida
(que amplía la etiqueta y la imprime en 2 o
más etiquetas).
Para transferir una base de datos a la
P-touch:
1 En el menú Inicio, señale “Programas”,
después “P-touch Editor 3.2” y, a
continuación, haga clic en “Transfer
Manager”.
NOTA
Antes de transferir datos, compruebe que la
P-touch está en modo Transfer. Consulte la
información sobre el modo Transfer en la page 4.
2 En “File List” (Lista de archivos), seleccione
la base de datos que desea transferir.
NOTA
Para seleccionar una base de datos diferente que ya
se haya convertido a un archivo *.csv, haga clic en
el botón “Modify Folder” (Modificar la carpeta). En
el cuadro de diálogo “Browse For Folder” (Buscar
carpeta) que aparecerá, seleccione la carpeta que
contenga la plantilla que desee y haga clic en el
botón Aceptar.
3 Haga clic en el botón Start para transferir la
base de datos. Aparecerá un cuadro de
diálogo que indicará que la base de datos
se está transfiriendo.
NOTA
Sólo se transferirán los archivos de plantilla y de
base de datos que se hayan seleccionado. Para
transferir más de una plantilla y base de datos al
mismo tiempo, mantenga pulsada la tecla Ctrl del
teclado y haga clic en los nombres de los archivos
que desee.
Para detener la transferencia de la base de datos,
haga clic en el botón Cancelar del cuadro de
diálogo que aparece durante la transferencia.
7
4 Cuando aparezca el mensaje “The transfer
was completed successfully.” (La
transferencia ha terminado con éxito) haga
clic en el botón Aceptar.
NOTA
☞ Para salir de la edición del texto en una
plantilla, pulse e, pulse m o g hasta que
Para utilizar una plantilla transferida desde un
PC:
1 Pulse la tecla PF en la que esté asignada la
plantilla que desee utilizar. Si hay una base
de datos vinculada a la plantilla, se
visualizarán los datos de la base (continúa
en el paso 2). Si no hay una base de datos
vinculada a la plantilla, aparecerán los datos
de la plantilla (continúa en el paso 4).
Si la base de datos no contiene texto,
continúe en el paso 5.
NOTA
Para volver al texto sin utilizar la plantilla
transferida, pulse e.
Para seleccionar un registro de una base de
datos e imprimirlo en la plantilla:
2 Pulse m o g hasta que ! aparezca a la
izquierda del registro cuyos datos desee
imprimir con la plantilla. Sólo se imprimirá
el registro marcado con !.
NOTA
☞ Para ver otros campos del registro seleccionado
actualmente, pulse j o k.
☞ Para buscar un registro específico, consulte
Búsqueda en la base de datos on page 10.
! se desplace junto a CANCEL EDICITING? y,
a continuación, pulse n.
☞ En los campos se pueden escribir caracteres
acentuados (consulte el Manual del usuario),
símbolos (consulte el Manual del usuario), códigos
de barras (consulte el Manual del usuario), sellos
con la fecha (page 2) e imágenes de carácter
definidas por el usuario (page 4).
☞ Para seleccionar un campo diferente, pulse m
o g hasta que aparezca el campo deseado.
☞ Si se pulsa una tecla PF que tiene asignada una
operación, aparecerá el mensaje “OK TO FINISH
TEMPLATE?”.
Para imprimir una etiqueta mediante la
plantilla seleccionada:
5 Pulse m o g hasta que ! se desplace
junto a PRINT (o pulse p).
6 Pulse n para imprimir la etiqueta. En la
pantalla aparecerá el mensaje “COPIES
1/ 1” mientras la etiqueta se imprime.
Luego, la pantalla MENU vuelve a aparecer
en el monitor.
Para imprimir varias etiquetas mediante la
plantilla seleccionada:
3 Pulse n para especificar el registro
seleccionado actualmente.
7 Pulse m o g hasta que ! se desplace
junto a REPEAT.
Para editar el texto de la plantilla:
8 Pulse m o g hasta que aparezca el ajuste
que desee o utilice las teclas numéricas
para escribir el número de copias.
4 Escriba el texto que desee para cada campo
y luego pulse n. Tras pulsar n después
de haber escrito el texto para el último
campo, en el monitor aparece la pantalla
MENU.
8
9 Pulse n para empezar a imprimir el
número de copias que ha seleccionado.
Durante la impresión, aparece en pantalla
el número correspondiente a cada copia.
Luego, la pantalla MENU vuelve a aparecer
en el monitor.
Para cambiar el texto que se ha
introducido en la plantilla:
0 Pulse m o g hasta que ! se desplace
junto a EDIT.
NOTA
Con plantillas que no contienen texto, en la
pantalla MENU sólo aparecen PRINT y FINISH.
A Pulse n. En la pantalla aparece el primer
campo de la plantilla transferida.
B Repita el paso 4 hasta que el texto quede
editado a su gusto. Cuando se pulsa n tras
editar el último campo de la plantilla,
vuelve a aparecer la pantalla MENU.
Para imprimir el registro que sigue al que
se acaba de imprimir:
C Pulse m o g hasta que ! se desplace
junto a NEXT RECORD.
G Pulse m o g hasta que aparezca el
número del primer registro del intervalo, o
utilice las teclas numéricas para escribir el
número deseado.
NOTA
Para cambiar el ajuste en intervalos de 5, mantenga
pulsada m o g y suelte la tecla cuando aparezca
el ajuste deseado.
H Pulse j o k hasta que quede
seleccionado el número del último registro.
I Pulse m o g hasta que aparezca el
número del último registro del intervalo, o
utilice las teclas numéricas para escribir el
número deseado.
NOTA
Para cambiar el ajuste en intervalos de 5, mantenga
pulsada m o g y suelte la tecla cuando aparezca
el ajuste deseado.
J Pulse n para imprimir los registros del
intervalo especificado. Una vez impresas
las etiquetas, la pantalla MENU vuelve a
aparecer en el monitor.
NOTA
NEXT RECORD no aparecerá si no hay una base de
datos vinculada a la plantilla.
D Pulse n para imprimir el registro
siguiente. Una vez impresa la etiqueta, la
pantalla MENU vuelve a aparecer en el
monitor.
Para dejar de utilizar la plantilla
transferida:
K Pulse m o g hasta que ! se desplace
junto a FINISH.
L Pulse n. El mensaje “OK TO FINISH
TEMPLATE?” aparecerá en la pantalla.
Para imprimir un intervalo de registros:
E Pulse m o g hasta que ! se desplace
junto a CONT. PRINT.
NOTA
CONT. PRINT no aparecerá si no hay una base de
datos vinculada a la plantilla.
M Pulse n. Vuelve a aparecer el texto que
aparecía en la pantalla antes de empezar a
utilizar la plantilla transferida.
NOTA
☞ Para volver a la plantilla transferida, pulse
e.
F Pulse n.
NOTA
Por defecto, aparecen los números del primer y del
último registro de la base de datos.
9
Búsqueda en la base de datos
Uso de Backup Manager
●
Para buscar en la base de datos un registro
que contenga caracteres específicos:
1 Mantenga pulsada d y pulse la barra
espaciadora.
2 Escriba los caracteres que desee buscar.
3 Pulse n. Aparecerá el primer registro
después del actual (indicado por !) que
contiene los caracteres especificados.
Para buscar en la base de datos un número de
registro concreto:
1 Mantenga pulsada d y pulse dos veces
la barra espaciadora.
2 Pulse m o g hasta que aparezca el
número de registro deseado, o utilice las
teclas numéricas para escribir el número
deseado.
●
●
●
●
●
●
●
●
●
●
●
●
●
●
●
●
●
●
●
●
●
Backup Manager, que se instaló con
P-touch Editor 3.2 permite guardar datos de la
P-touch en el PC como copia de seguridad por
si se borrara la memoria de la P-touch. Además,
los datos de los que se ha hecho copia de
seguridad en el PC se pueden volver a transferir
(restaurar) en la P-touch.
Inicio de Backup Manager
Para iniciar Backup Manager:
1 Haga clic en el botón Inicio de la barra de
tareas para visualizar el menú Inicio.
2 Señale a “Programas”.
3 Señale a “P-touch Editor 3.2”.
4 Haga clic en “Backup Manager”.
Cuando Backup Manager se inicie, se
visualizará la ventana siguiente.
3 Pulse n. Aparece el registro con el
número de registro especificado.
Copia de seguridad de los datos
de la P-touch
Para hacer una copia de seguridad de los
datos de la P-touch
en el PC:
1 En la pestaña Printer → PC, haga clic en el
botón Update List.
NOTA
Antes de transferir datos, compruebe que la
P-touch está en modo Transfer. Consulte Modo
Transfer on page 4.
10
2 En “File List” (Lista de archivos), seleccione
los datos de los que desea hacer una copia
de seguridad.
NOTA
☞ Sólo se hará copia de seguridad de los datos
seleccionados. Para seleccionar más de un
archivo para hacer una copia de seguridad,
mantenga pulsada la tecla Ctrl del teclado y
haga clic en los nombres de los archivos que
desee.
☞ Para seleccionar todos los datos, haga clic en el
botón Select All (Seleccionar todo).
3 Haga clic en el botón Start para hacer la
copia de seguridad de los datos. Aparecerá
un cuadro de diálogo que indicará que los
datos se están transfiriendo.
NOTA
Para detener la transferencia de los datos, haga clic
en el botón Cancelar del cuadro de diálogo que
aparecerá durante la transferencia.
4 Cuando aparezca el mensaje “The transfer was
completed successfully.” (La transferencia ha
terminado con éxito), haga clic en el botón
Aceptar.
Cómo restaurar los datos de
copia de seguridad de la P-touch
Para restaurar los datos de la P-touch de
los que se ha hecho copia de seguridad en
el PC:
2 En “File List” (Lista de archivos), seleccione
los datos que desea transferir a la P-touch.
NOTA
☞ Sólo se transferirán a la P-touch los datos
seleccionados. Para seleccionar más de un
archivo para que se restaure, mantenga pulsada
la tecla Ctrl del teclado y haga clic en los
nombres de los archivos que desee.
☞ Para seleccionar todos los datos, haga clic en el
botón Select All (Seleccionar todo).
☞ Para cambiar la tecla PF en la que se han
asignado los datos, haga clic en el botón
Change PF Key Mapping y seleccione la tecla
PF donde desee asignar los datos.
☞ Sólo se puede asignar una imagen de carácter o
una plantilla a cada tecla PF. Si una imagen de
carácter o una plantilla ya se ha asignado a una
tecla PF, los datos anteriores se eliminarán
cuando se transfiera una imagen de carácter o
una plantilla diferente.
3 Haga clic en el botón Start para restaurar
los datos. Aparecerá un cuadro de diálogo
que indicará que los datos se están
transfiriendo.
NOTA
Para detener la transferencia de los datos, haga clic
en el botón Cancelar del cuadro de diálogo que
aparecerá durante la transferencia.
4 Cuando aparezca el mensaje “The transfer
was completed successfully.” (La
transferencia ha terminado con éxito), haga
clic en el botón Aceptar.
1 Haga clic en la pestaña PC → Printer.
NOTA
Antes de transferir datos, compruebe que la
P-touch está en modo Transfer. Consulte Modo
Transfer on page 4.
11
Impresión desde un PC
(conexión RS-232C)
●
●
●
●
●
●
●
●
●
●
●
●
●
●
●
●
●
●
●
●
●
●
La impresora PT-9600 también está equipada
con un puerto de serie, que permite utilizar un
cable RS-232C para conectar la P-touch a un PC
que ejecute Windows®.
Para conectar un PC a la PT-9600 a través
del puerto RS-232C:
●
N.º
de
pin
Nombre
de la
señal
ENTRADA
/
SALIDA
1
2
RD
ENTRADA
Recibir datos
Recibe los datos
transmitidos desde el PC
3
TD
SALIDA
Enviar la señal Xon/Xoff
cuando se establece el
estado Busy para
Xon/Xoff
Sólo en el modo Interface
ESC/P: Envía X-off
cuando la impresora está
ocupada; envía X-on
cuando no está ocupada
4
DTR
SALIDA
Terminal de datos
preparado
5
SG
1 Apague la impresora P-touch y el PC.
2 Conecte el filtro supresor suministrado a un
cable de interfaz de serie (RS-232C) y, a
continuación, conecte el enchufe de 9 o 25
pines del cable al puerto de serie (COM) del
PC y apriete los tornillos para fijarlo en su
lugar.
NOTA
El filtro supresor reduce la interferencia
electromagnética con otros equipos.
3 Inserte la clavija de 9 pines del cable de
interfaz en el puerto RS-232C de la
impresora PT-9600 y apriete los tornillos
para fijarla.
4 Encienda la impresora P-touch, y luego
inicie el PC.
NOTA
☞ Consulte a su proveedor de suministros
informáticos cuando adquiera el cable de
interfaz de serie (RS-232C).
☞ Se recomienda que el cable de interfaz tenga
una longitud de 3 m o menos. Además, el cable
debe ser un cable cruzado apantallado.
Explicación
No conectado
Toma de tierra para la
señal
6
7
No conectado
RTS
SALIDA
Solicitud de envío
8
No conectado
9
No conectado
Para instalar el controlador de impresora
en serie:
1 Conecte la PT-9600 al puerto de serie del
PC mediante el cable de interfaz de serie
que se incluye, como se describe en la
page 12, y encienda la P-touch.
2 En el cuadro de diálogo que aparecerá, que
permite seleccionar si la P-touch estará
conectada con un cable USB o con un
cable RS-232C, seleccione “Serial cable”
(Cable de serie) y haga clic en el botón
Aceptar. Aparecerá un cuadro de diálogo
que permite seleccionar si se instala o se
desinstala el controlador de la impresora.
3 Seleccione “Install” (Instalar) y haga clic en
el botón Siguiente.
12
®
4 Para los usuarios de Windows 98 y 98 SE:
Omita el paso 5.
5 Aparecerá un cuadro de diálogo que
permite seleccionar el puerto PTCOM
donde la PT-9600 está conectada.
Para los usuarios de Windows® Me, 2000 y XP:
Aparecerá un cuadro de diálogo que
permite añadir un puerto a la P-touch
(PTCOM).
Si ya se instaló un puerto P-touch (PTCOM),
haga clic en el botón Siguiente y continúe
en el paso 5 a continuación.
Seleccione “PTCOM1:” si la PT-9600 está
conectada al puerto COM1, o “PTCOM2:”
si la PT-9600 está conectada al puerto
COM2, y haga clic en el botón Siguiente.
(En Windows® Me, 2000 y XP, seleccione
el puerto que se añadió en el paso 4.)
Aparecerá un cuadro de diálogo que
permite comprobar cómo se llevará a cabo
la instalación.
Si no hay instalado ningún puerto P-touch
(PTCOM), haga clic en el botón Agregar.
Aparecerá el cuadro de diálogo Nombre de
puerto.
En la lista de puertos PTCOM, seleccione el
puerto donde está conectada la PT-9600
(“PTCOM1:” si la PT-9600 está conectada
al puerto COM1, o “PTCOM2:” si la
PT-9600 está conectada al puerto COM2), y
haga clic en el botón Aceptar. En el cuadro
de diálogo Instalación del controlador,
haga clic en el botón Siguiente.
6 Compruebe que la instalación se llevará a
cabo como desea, y haga clic en el botón
Siguiente. Aparecerá un cuadro de diálogo
que indica que el controlador de la
impresora se ha instalado.
13
7 Si el puerto donde está conectada la
PT-9600 admite una velocidad en baudios
de 115,200 bps, haga clic en el botón
Siguiente.
Si el puerto donde está conectada la
PT-9600 no admite una velocidad en
baudios de 115,200 bps, o desea
comprobar la conexión entre la P-touch y el
PC, seleccione “Start up the Change Baud
Rate Wizard.” (Iniciar el asistente de
Cambiar velocidad en baudios.) y haga clic
en el botón Siguiente. Se iniciará el Change
Baud Rate Wizard.
0 Compruebe que la velocidad en baudios se
cambiará como desea y haga clic en el
botón Siguiente.
NOTA
Para cambiar los ajustes, haga clic en el botón
Atrás y vuelva al paso 9.
Aparecerá un cuadro de diálogo que
muestra que la velocidad en baudios ha
cambiado según lo especificado.
Para cambiar la velocidad en baudios:
8 Seleccione el puerto de serie donde está
conectada la PT-9600 y haga clic en el
botón Siguiente. Aparecerá un cuadro de
diálogo que permite seleccionar la
velocidad en baudios que desee.
9 Seleccione la velocidad en baudios que
desee y haga clic en el botón Siguiente.
NOTA
Normalmente se selecciona “115,200 bps”; no
obstante, su PC quizá no admita una velocidad en
baudios de 9600 bps. Si ese es el caso, consulte el
manual de instrucciones del PC y seleccione el
máximo posible para la velocidad en baudios.
Aparecerá un cuadro de diálogo que
confirmará los ajustes.
14
A Haga clic en el botón Finalizar. Aparecerá
un cuadro de diálogo que indica que la
instalación ha terminado.
B Haga clic en el botón Finalizar.
NOTA
NOTA
Antes de usar el modo Interface, seleccione el
formato de los datos de impresión (estándar o
ESC/P).
1 Pulse e para desconectar.
2 Mantenga pulsada d y pulse 2.
3 Pulse j o k hasta que se visualice
INTERFACE MODE.
4 Pulse m o g hasta que aparezca el ajuste
Si aparece un cuadro de diálogo, que explica que
debe reiniciar el PC, seleccione la opción para
reiniciar el PC, haga clic en el botón Finalizar para
reiniciar el PC y extraiga el CD-ROM del PC.
Modo Serial (RS-232C)
Una vez que se ha conectado la impresora
PT-9600 a un PC mediante un cable RS-232C,
tendrá que configurar la impresora P-touch en el
modo Interface para que pueda comunicarse
con el PC.
Para entrar/salir del modo Interface
(conexión RS-232C):
●
Mantenga pulsada d y pulse 0.
NOTA
☞ Para salir del modo Interface y volver al texto,
mantenga pulsada d y pulse 0.
☞ Para desconectar, pulse e.
☞ Para volver a conectar en línea, pulse la barra
espaciadora.
☞ Para poder utilizar la conexión USB, salga
primero del modo Interface (mantenga pulsada
d y pulse 0).
☞ La velocidad en baudios de la PT-9600 no
cambia automáticamente. Si no se puede
utilizar la velocidad en baudios de 9600 bps, la
P-touch se puede dejar con el ajuste del valor
de velocidad en baudios predeterminado. Si
tiene que cambiar la velocidad en baudios de
la P-touch, consulte Para cambiar los ajustes
de los parámetros de interfaz de serie estándar
(RS-232C) en la and 15, y cambie el ajuste de
la velocidad en baudios de la P-touch.
Con una conexión RS-232C, dispone de dos
formatos de datos de impresión diferentes para
el modo Interface: estándar y ESC/P.
deseado.
5 Pulse n.
Modo Standard Interface (modo que
permite imprimir desde el P-touch
Editor mediante un controlador
original de la P-touch)
En el modo Interface estándar, la impresora
PT-9600 empieza a imprimir en cuanto recibe
un comando de impresión del PC. Si,
transcurridos 5 segundos, no recibe ningún
dato, la impresora PT-9600 sale
automáticamente del modo Interface.
En el modo Interface estándar es posible
seleccionar diversos parámetros de interfaz para
especificar cómo se deben enviar los datos
desde el PC.
Para cambiar los ajustes de los parámetros
de interfaz de serie estándar (RS-232C):
1 Mantenga pulsada d y pulse 2.
2 Pulse j o k hasta que aparezca el
parámetro deseado. La pantalla muestra el
ajuste actual.
Parámetro
Ajustes
BAUDRATE
19200, 9600 (predeterminado),
2400, 1200, 600, 300
BIT LENGTH
8 (predeterminado), 7
PARITY
NONE (predeterminado), ODD,
EVEN
BUSY
DTR (predeterminado), XonXoff
3 Pulse m o g hasta que aparezca el ajuste
deseado.
15
NOTA
☞ Para devolver el parámetro a su ajuste
predeterminado, pulse la barra espaciadora.
☞ Para salir sin cambiar los ajustes, pulse e (O
mantenga pulsada d y pulse 2).
4 Repita los pasos 2 y 3 hasta que todos los
parámetros queden configurados a su gusto.
5 Pulse n para aplicar la configuración.
Modo ESC/P Interface (modo que
permite imprimir desde un programa
creado por el usuario)
En el modo Interface ESC/P, es posible
seleccionar diversos parámetros de interfaz y
formatos de texto para especificar cómo deben
imprimirse los datos enviados desde el PC.
Parámetro
Ajustes
BARCODE
RATIO
3:1 (predeterminado), 2.5:1, 2:1
INTERFACE
MODE
STANDARD (predeterminado),
ESC/P
3 Pulse m o g hasta que aparezca el ajuste
deseado.
NOTA
☞ Para devolver el parámetro a su ajuste
predeterminado, pulse la barra espaciadora.
☞ Para salir sin cambiar los ajustes, pulse e (O
mantenga pulsada d y pulse 2).
4 Repita los pasos 2 y 3 hasta que todos los
parámetros queden configurados a su gusto.
5 Pulse n para aplicar la configuración.
Códigos IBM extendidos
0 1 2 3 4 5 6 7 8 9 A B C D E
NOTA
Antes de proceder a cambiar cualquier ajuste de la
interfaz o los formatos de texto, pulse e para
trabajar sin conexión.
0
SP 0 @ P
'
p Ç É
á
1
!
1 A Q a q ü æ í
2
"
2 B R b
3
# 3 C S
4
r
é Æ ó
c
s
â ô ú
$ 4 D T d
t
ä ö ñ
Para cambiar los ajustes de los parámetros
de la interfaz ESC/P:
5
§ % 5 E U e u à ò Ñ
6
.
å û
ª
1 Mantenga pulsada d y pulse 2.
7
'
7 G W g w ç ù
º
8
(
8 H X h x
ê
¿
9
)
9
2 Pulse j o k hasta que aparezca el
parámetro deseado. La pantalla muestra el
ajuste actual.
& 6 F V
I
Y
f
v
ÿ
i
y
ë Ö
β ±
µ ÷
·
°
A
*
:
J
Z
j
z
è Ü
Ω
B
+
;
K
[
k
{
ï
¢ ½
δ
< L
\
l
î
£ ¼
¥
Parámetro
Ajustes
C
,
LINES OF TEXT
1 (predeterminado), 2, 3, 4, 5, 6, 7
D
– = M } m }
ì
1 (predeterminado), 2, 7, 8
(Para obtener más información sobre
los ajustes disponibles, consulte el
Manual del usuario.)
E
.
> N
n
Ä Pts «
A. CUT
(Función Auto
Cut)
F
/
? O
o
Å ƒ »
T. MARGIN
(Function Tape
Margin)
(Para obtener más información sobre
los ajustes disponibles, consulte el
Manual del usuario.)
CODE TABLE
IBM EXTENDED (predeterminado),
AMERICAN, FRENCH, GERMAN,
ENGLISH, DANISH 1, SWEDISH,
ITALIAN, SPANISH 1, JAPANESE,
NORWEGIAN, DANISH 2,
SPANISH 2, LATIN AMERICAN
(Consulte las tablas de códigos que
se presentan más adelante).
BARCODE
WIDTH
SMALL (predeterminado), EXTRA
SMALL, LARGE, MEDIUM
16
F
α
¡
ø
2
Códigos ASCII hexadecimales
23 24 40 5B 5C 5D 5E 60 7B 7C 7D 7E
USA
# $ @ [
\
]
France
# $ à
ç
§
'
é ù è
Germany
# $ § Ä Ö Ü
'
ä ö ü ß
UK
£ $ @ [
'
{
Denmark I
# $ @ Æ Ø Å
Sweden
#
Italy
# $ @ °
Spain I
°
\
'
]
é
# $ @ [
¥
Norway
Denmark II
Spain II
Latin America
#
É Æ Ø Å
# $ É Æ Ø Å
# $ á ¡ Ñ ¿
# $ á ¡ Ñ ¿
}
'
]
'
Ü
Ü
é
é
ñ
{
}
é æ ø å ü
é æ ø å ü
' í ñ ó ú
ü í ñ ó ú
1 Mantenga pulsada d y pulse 1.
2 Pulse j o k hasta que aparezca la
función deseada. La pantalla muestra el
ajuste actual.
FONT
SIZE
WIDTH
STYLE1
STYLE2
UNDERLINE
FRAME
ì
}
Para cambiar los ajustes de la función de
formato de texto:
Función
H. ALIGN
(Función Text
Alignment)
ä ö å ü
ù à ò è
Pts $ @ ¡ Ñ ¿
Japan
}
' æ ø å
É Ä Ö Å Ü é
\
{
Función
T. LENGTH
(Función Tape
Length)
Ajustes
HELSINKI (predeterminado),
BRUSSELS, BERMUDA
(Para ver ejemplos de los ajustes
disponibles, consulte el Manual del
usuario.)
AUTO (predeterminado), 72, 44, 38,
26, 19, 13, 10
(Para ver ejemplos de los ajustes
disponibles, consulte el Manual del
usuario.)
NARROW (predeterminado),
NARROWEST, WIDE
(Para ver ejemplos de los ajustes
disponibles, consulte el Manual del
usuario.)
NORMAL (predeterminado), BOLD,
OUTLINE, SHADOW, STRIPE
(Para ver ejemplos de los ajustes
disponibles, consulte el Manual del
usuario.)
NORMAL (predeterminado), ITALIC,
VERTICAL
(Para ver ejemplos de los ajustes
disponibles, consulte el Manual del
usuario.)
OFF (predeterminado), ON
OFF (predeterminado), 1, 2
(Para ver ejemplos de los ajustes
disponibles, consulte el Manual del
usuario.)
ROTATE
(Función Text
Rotation)
MIRROR
(Función Mirror
Printing)
Ajustes
AUTO (predeterminado), de 2,0 a
9,0 pulgadas (de 5,0 cm a 23,0 cm)
(en unidades de 0,1 pulgadas)
LEFT (predeterminado), CENTER,
RIGHT, JUSTIFY
(Para ver ejemplos de los ajustes
disponibles, consulte el Manual del
usuario.)
OFF (predeterminado), ON
(Para obtener más información sobre
los ajustes disponibles, consulte el
Manual del usuario.)
OFF (predeterminado), ON
(Para obtener más información sobre
los ajustes disponibles, consulte el
Manual del usuario.)
3 Pulse m o g hasta que se visualice el
valor deseado.
NOTA
☞ Para devolver la función a su ajuste
predeterminado, pulse la barra espaciadora.
☞ Para volver al texto sin cambiar los ajustes, pulse
e (O mantenga pulsada d y pulse 1).
4 Repita los pasos 2 y 3 hasta que todas las
funciones queden configuradas a su gusto.
5 Pulse n para aplicar el ajuste.
En el modo Interface ESC/P, es posible utilizar
diversos comandos de teclado para controlar el
funcionamiento de la impresora PT-9600. Se
ignorará cualquier comando que no aparezca
enumerado a continuación.
Código de
control
Comando
CR
LF
(CR + LF)
(LF + CR)
Se interpreta como un “retorno” o
como “imprimir cuando los datos
lleguen al número de líneas del
ajuste LINES OF TEXT”
FF
Se inicia la impresión.
ESC 0
ESC 2
ESC 3
ESC A
Comandos de espaciado de línea.*
ESC $
Control de ubicación absoluta*
ESC \
Control de ubicación relativa*
ESC @
Inicialización de la impresora.
ESC K
ESC L
ESC Y
ESC Z
ESC *
Comandos de datos de imagen de
bits.
Consulte “Correspondencias Bit
Image” a continuación.
17
Código de
control
Comando
SEC J
Ejecutar un avance de línea de n/180
pulgadas
ESC !
Selección maestra
Sólo negrita, cursiva, subrayado.
SEC E
Negrita activada
SEC F
Negrita desactivada
SEC G
Negrita activada
SEC H
Negrita desactivada
SEC –
Subrayado activado/desactivado
SEC 4
Cursiva activada
SEC 5
Cursiva desactivada
ESC i
Código de barras
CAN
Borrar todo el texto
DEL
Retroceso
Para la impresión de códigos de barras, la
P-touch 9600 contiene un subconjunto del
protocolo BROTHER 4318 DOT MATRIX
PRINTER BARCODE CONTROL PROTOCOL.
Póngase en contacto con las OFICINAS
LOCALES DE BROTHER PARA OBTENER
INFORMACIÓN MÁS DETALLADA.
Comandos efectivos
ESC i [PARAMETERS] B [BAR CODE DATA]
[TERMIANTOR]
i
i MINÚSCULA
• [PARAMTERS]
t0
CODE 39
(PREDETERMINADO)
t1
INTERPAGINADO 2
DE 5
NOTA
t5
EAN 8/13, UPC-A
☞ No se tienen en cuenta otras secuencias
t6
UPC-E
t9
CÓDIGO DE BARRAS
(NW-7)
t
ESCAPE.
* Sólo se aplica si existen los datos de la imagen
de bits.
Correspondencias Imagen de bits
IMAGEN DE BITS
ESCRIBIR
s
ESTILO
SE IGNORARÁ
p
NÚMERO DE PASOS
SE IGNORARÁ
r
CARÁCTER
r0
DESACTIVADO
r1
ACTIVADO
HORIZONTAL
VERTICAL
u
UNIDADES DE MEDIDA
SE IGNORARÁ
PPP
PPP
x
POSICIÓN HORIZONTAL
SE IGNORARÁ
8DOTS STD
60
60
Y
OFFSET VERTICAL
SE IGNORARÁ
8DOTS Wdpi
120
60
h
8DOTS
Wdpi Wspeed
120
60
ALTURA DEL CÓDIGO
DE BARRAS
8DOTS 4 veces PPP
240
60
8DOTS
CRT GRAPHICS
80
60
8DOTS
CRT GRAPHICS II
90
60
24DOTS STD
60
180
24DOTS Wdpi
120
180
• [TERMINATOR]
24DOTS
CRT GRAPHICS II
90
180
NOTA
24DOTS 3 veces
PPP
180
180
24DOTS 6 veces
PPP
360
180
18
• Bob
SE IGNORARÁ
CÓDIGO DE ENCABEZADO DE LOS
DATOS DEL CÓDIGO DE BARRAS
• [BAR-CODE DATA]
SERIES DE DATOS CORRESPONDIENTES A CADA
TIPO (ESTÁNDAR)
• ?
Se generará un dígito de control si se añade un “?”
al final de la cadena de datos.
\
(FIJO)
Ajuste Interface
Conecte mediante el cable RS-232C a un PC tipo
IBM (o compatible) y seleccione EPSON LQ850 en
la lista de impresoras del software del PC.
Printed in China
LA8870001A