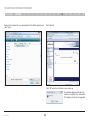
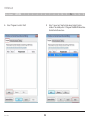
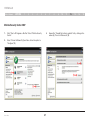
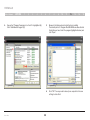
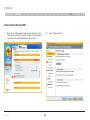
1
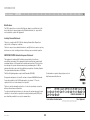
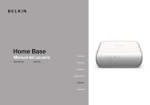
Home Base
User Manual
8820-00115ea
F5L049ea
English
Français
Deutsch
Nederl ands
Español
Italiano
Table of Contents
Table of Contents
sections
1
2
3
4
5
6
7
8
9
10
11
12
13
14
15
1 Introduction . . . . . . . . . . . . . . . . . . . . . . . . . . . . . . . . . . . . . . . . . . . . 1
9 Media Server . . . . . . . . . . . . . . . . . . . . . . . . . . . . . . . . . . . . . . . . . . 26
2 Getting Started . . . . . . . . . . . . . . . . . . . . . . . . . . . . . . . . . . . . . . . . . 3
10 Upgrading Home Base Firmware . . . . . . . . . . . . . . . . . . . . . . . . 27
3 Wireless Setup . . . . . . . . . . . . . . . . . . . . . . . . . . . . . . . . . . . . . . . . . 5
11 Troubleshooting . . . . . . . . . . . . . . . . . . . . . . . . . . . . . . . . . . . . . . 30
4 Available Devices List . . . . . . . . . . . . . . . . . . . . . . . . . . . . . . . . . . . 8
12 Firewalls . . . . . . . . . . . . . . . . . . . . . . . . . . . . . . . . . . . . . . . . . . . . 32
5 Device Properties . . . . . . . . . . . . . . . . . . . . . . . . . . . . . . . . . . . . . . . 9
13 FAQs . . . . . . . . . . . . . . . . . . . . . . . . . . . . . . . . . . . . . . . . . . . . . . . . 48
6 Local Backup . . . . . . . . . . . . . . . . . . . . . . . . . . . . . . . . . . . . . . . . . . 12
14 Technical Support . . . . . . . . . . . . . . . . . . . . . . . . . . . . . . . . . . . . . 51
7 Picture Sharing . . . . . . . . . . . . . . . . . . . . . . . . . . . . . . . . . . . . . . . . 15
15 Information . . . . . . . . . . . . . . . . . . . . . . . . . . . . . . . . . . . . . . . . . . . 52
8 Control Center Options . . . . . . . . . . . . . . . . . . . . . . . . . . . . . . . . . 24
Home Base
i
Introduction
Table of Contents
sections
1
2
3
4
5
6
7
8
9
10
11
12
13
14
15
Thank you for purchasing the Belkin Home Base. By following these simple setup instructions, your Belkin Home Base will allow you
to share your USB printer and hard drives, with any computer or laptop on your home network. The Control Center software offers a
convenient central location to configure the Home Base and the USB devices you attach to it.
Home Base Capabilities
•
Share and control printers and scanners among all the networked
computers in your home
•
Share external drives with all the networked computers in your
home
•
Back up critical and precious content from all your networked
computers to an external drive for safekeeping
•
Schedule automatic backups to regularly archive new content and
changes
•
Automatically share pictures on Flickr ® and Picasa®
•
Set up an external drive to act as a DLNA server for your media
•
(A) (B) (C) (D)
content
(A) Wireless Security – Indicates wireless security is enabled when lit
Media files served through Home Base’s drive can be accessed
(B) WPS Connect Button – Automatically establishes secure wireless connection to routers with similar WPS connect button feature
directly from Xbox 360™, PlayStation® 3, and other DLNA client
devices
(C) Wireless Connection – Indicates wireless LAN connection when lit
(D) Power – On/Off
Home Base
1
Introduction
Table of Contents
sections
1
2
3
4
5
6
7
8
9
10
11
12
Benefits of Home Base
Package Contents
•
Share – Easily pass files back and forth across the network. Share
•
Belkin Home Base
music, photos, video, documents, or any content you want by
•
Quick Installation Guide
placing it on the external drive attached to Home Base.
•
Belkin Setup Assistant Software CD
Peace of Mind – All your critical content can be backed up to the
•
RJ45 Ethernet Networking Cable
drive(s) attached to Home Base. All your family photos and critical
•
Power Supply
documents will be safe from computer crashes.
•
User Manual on the Setup Assistant CD
•
•
Mobility – Print and scan from anywhere in the home. You are no
System Requirements
longer tethered to the computer, nor do you need to email print
jobs to a computer physically connected to the printer.
•
Freedom – Hide your printers, scanners, and external drives out of
sight.
•
Flexibility – Any USB peripheral can be shared among all your
networked computers simply by attaching it to Home Base.
Home Base
2
•
Windows® XP, or Vista® 32- or 64-bit
•
Mac OS® X v10.4 or v10.5
•
Minimum 1GHz processor and 128MB RAM
13
14
15
GETTING STARTED
Table of Contents
1
sections
1
2
3
4
5
6
7
8
9
10
11
12
13
14
15
Connect Home Base to your network
First, connect Home Base to your router with a network
If you’d like to use Home Base wirelessly, plug it
cable. Next, plug the included power supply into Home
into your router for now. The setup software will
Base and into a power outlet.
help you make Home Base operate on your wireless network. You can also use WPS to wirelessly
set up Home Base. See the help file on the CD for
details.
2
Run the setup software
Setup CD
Run the setup software to make Home Base a member of your network.
Insert the CD, and the setup software will run*. Choose “Set Up Home
Base”. If you don’t already have it installed, the setup software will also
install Control Center on your machine.
Home Base
3
GETTING STARTED
Table of Contents
3
4
sections
1
2
3
4
5
6
8
9
10
11
12
13
14
15
Install Control Center on other computers
You will need to install Control Center on each additional
*If the setup software does
computer that will use Home Base. Insert the CD and the
not run automatically, browse
setup software will run*. Choose “Install Control Center”.
the CD and run “Setup”.
Connect USB devices
Once Home Base is a member of your network, you’re ready
You can manage these devices via the Control
to plug in printers, hard drives, and other USB devices to
Center, the icon of which appears in your system
share among your computers. Simply plug each device into
tray (Windows®) or menu bar (Mac OS® X). It is
an open USB port on the back of Home Base.
also accessible via the Start menu (Windows) or
Applications folder (Mac OS X).
Note: If you plug a printer into Home Base, each computer
will ask you to install the printer’s driver if it hasn’t been
done already. You’ll only have to do this once.
Home Base
7
4
wireless setup
Table of Contents
sections
1
2
3
4
5
6
Wired Setup of Wireless Mode
•
WPS Push Button Configuration
•
WPS PIN Configuration
Home Base
8
9
10
11
12
13
14
15
Wired Setup of Wireless Mode
There are three ways to attach your Home Base to your wireless
network:
•
7
Note: If Home Base is powered on while plugged into a router, it will
operate as a wired device. To enable Wireless mode, follow instructions
below.
The setup software will help you make Home Base operate as a member
of your wireless network.
5
1.
Start by connecting your Home Base to your router. (You’ll unplug
it later.)
2.
Connect the AC adapter.
3.
Run the setup software and follow the software’s instructions to set
up the Home Base.
4.
When offered wireless setup, select a wireless network.
5.
The setup software will tell Home Base what network you chose.
Follow the software’s instructions to unplug your Home Base from
the router and turn it off and on.
6.
Your Home Base will then operate as a member of your wireless
network.
wireless setup
Table of Contents
sections
1
2
3
4
5
6
7
8
9
10
11
12
13
14
15
WPS Push Button Configuration
If your router supports WPS, the WPS Push Button Configuration (PBC) is the quickest way to get Home Base onto your wireless
network.
1.
Make sure Home Base is NOT plugged into your router.
2.
Connect the AC adapter.
Off
Wireless security is off
3.
Push the WPS button on your router. (Refer to your router’s
instruction manual.)
Blinking Blue
WPS handshaking in process
4.
Push and hold the WPS button on Home Base. Release the WPS
button when the blue security LED on the Home Base and the LED
start blinking. Once the LED starts blinking in longer intervals for
approximately three seconds, release the button.
Solid Blue
Wireless security is on
5.
Status of WPS Wireless Security:
If a connection is established, Home Base’s security LED will come on
in solid blue.
If a connection is not established after more than two minutes, the
security LED will flash quickly and continuously for 10 seconds, then
stop, and you’ll need to try again.
Home Base and your router will negotiate a connection.
If Home Base couldn’t determine to which router to connect, the
security LED will flash in bursts of five for 10 seconds, then stop, and
you’ll need to try again.
Home Base
6
wireless setup
Table of Contents
sections
1
2
3
4
5
6
7
8
9
10
11
12
13
14
15
WPS PIN Configuration
If your router does not support the WPS Push Button Configuration, the alternative is to apply the WPS security using the PIN
Configuration. Locate the 8-digit PIN code on the bottom of Home Base and enter this pin into your router to manually initiate a
WPS connection.
1.
Read the PIN code from the bottom of Home Base.
2.
Make sure Home Base is NOT plugged into your router.
3.
Connect the AC adapter.
If a connection is not established after more than two minutes, the
security LED will flash quickly and continuously for 10 seconds, then
stop, and you’ll need to try again.
4.
Push and hold the WPS button on Home Base. Release the WPS
button when the security LED on Home Base starts blinking short
blinks after about 10 seconds.
For more information on wireless setup, see the “Troubleshooting” and
“FAQs” sections in this manual.
5.
Enter the PIN code into your router’s interface. (Refer to your
router’s instruction manual.)
6.
Home Base and your router will negotiate a connection.
Home Base
If a connection is established, Home Base’s security LED will come on
in solid blue.
7
AVAILABLE DEVICES LIST
Table of Contents
sections
1
2
3
4
5
6
7
8
9
10
11
12
13
14
15
The “Available Devices” tab displays a list of USB devices connected to Home Base and allows you to select devices and specify
connection settings for them. For more information, see the “Device Properties” section below.
The “Available Devices” tab displays a list of USB devices connected
to Home Base and allows you to select devices and specify connection
settings for them. For more information, see the “Device Properties”
section on the next page.
To connect to a USB device, select it and click “Connect”. Alternatively,
you can double-click on a device to connect to it. If you double-click
on a disk drive, you can access the contents of the disk drive.
By default, disks attached to Home Base are shared with all computers
on the network. A disk can be unmounted safely by selecting it and
clicking “Disconnect”. A disk that is not mounted can be mounted again
by unplugging and plugging its USB cable back into Home Base.
If someone is using a device you’d like to use, select the device and
click “Request Use”. A message will appear on the user’s computer
notifying him or her that you wish to use this device. They can elect to
make the device available to you, or not.
Home Base
8
device properties
Table of Contents
sections
1
2
3
4
5
6
7
8
9
10
11
12
13
14
15
To access the properties sheet for an individual device, select the device in Control Center and click “Properties”. The properties
sheet allows you to specify general settings such as the name that the device will appear as in the Control Center, whether the
device should automatically connect with a computer via the Home Base as soon as the computer starts, and more.
General Properties
The “General” tab of the “Device Properties” screen enables you to
change the name the device appears as in the Control Center and
displays various reference information about the device.
In the “Display Name” field, enter the name of the device as you want
it to appear in the Control Center. The default name is gathered by the
Control Center from the device itself. This default name will always
appear as the USB device name, even if you change the “Display
Name”.
“Device speed” is shown as reported by the particular device. Actual
performance is also affected by other factors such as your network
configuration.
1.
Hi-Speed: USB products that carry the “Hi-Speed USB” logo and
support a speed of 480Mbps.
2.Full Speed: USB products that carry the basic “Certified USB” logo
and support a speed of up to 12Mbps.
3.Low Speed: Supports up to 1.5Mbps.
The “General” tab also contains reference information about the device.
Home Base
9
device properties
Table of Contents
sections
1
2
3
4
5
6
Device Connection Properties
7
8
9
10
11
12
13
14
15
The “Connection” tab of the “Device Properties” screen enables you
to specify if the device should connect automatically to this computer
when the computer is started, and if any software should start
automatically when the device connects. The information in this topic
applies to all devices except printers and disks that are shared via NAS
mode. To learn about connection properties for printers, see the “Printer
Connection Properties” section.
Check the “Automatically connect this device when the Home Base
Control Center starts” check box if you want to this computer to
automatically connect to this device each time Control Center starts. If
you mark this check box along with the box that specifies if the Control
Center should start, the device will automatically connect each time you
start the computer.
Connections to devices may occasionally be lost due to network
failures or other factors. If you want the Control Center to automatically
reconnect with the device should this occur, check “Attempt to
reconnect the device if the connection is lost”. The Control Center will
try to reconnect with the device until the connection is reestablished or
the computer is shut down.
Use the “Launch Program” field to specify settings for any software
associated with this device. For example, a webcam probably has
software that captures video. By checking “Launch a program when this
device connects”, you can specify that the software starts automatically
when the webcam is available. You can also check “Disconnect device
when the program is closed” if you want to free up the device for use by
other computers when you close the software.
In the “Program” field, browse to find the software you want to associate
with the device. You can also enter the path to the program directly into
the field. Once your settings are saved, only the name of the program
appears in the “Program” field.
Home Base
10
device properties
Table of Contents
sections
1
2
3
4
5
6
Printer Connection Properties
7
8
9
10
11
12
13
14
15
If the printer is being shared among multiple computers, we recommend
selecting “This is a shared printer, automatically connect and disconnect
only when printing”. With this option, the printer is automatically
connected when a print job is sent to it, then is disconnected as soon as
the job completes so the printer is then available for other computers.
Check “Automatically connect this device when the Home Base Control
Center starts” if you want this computer to automatically connect to
this printer each time the computer starts, preventing other users from
connecting to the printer automatically.
You can force users to manually connect to the printer with the “Never
automatically connect, I will always connect manually” option.
The “Printer” field is enabled if you select one of the automatic
connection options. From the drop-down list, select the printer driver
associated with this printer.
Connections to devices may occasionally be lost due to network
failures or other factors. If you want the Control Center to automatically
reconnect with the device should this occur, check “Attempt to
reconnect the device if a connection is lost”. The Control Center will try
to reconnect with the device until the connection is reestablished or the
computer is shut down.
Use the “Program” field to specify settings for any software associated
with this printer. You can also check “Disconnect this device when the
program is closed” if you want to free up the device for use by other
computers when you close the software.
In the “Program” field, browse to find the software you want to associate
with the printer. You can also enter the path to the software directly into
the field. Once your settings are saved, only the name of the program
appears in the “Program” field.
When a printer is selected, the “Connection” tab of the “Device
Properties” screen offers additional functionality specific to printers.
In particular, you can select one of three options for automatically
connecting the device.
Home Base
11
LOCAL BACKUP
Table of Contents
sections
1
2
3
4
5
6
7
8
9
10
11
12
13
14
15
The Belkin Home Base Control Center Local Backup tab enables you to easily back up the files from your computer to USB drives
connected to Home Base.
To set up a backup from your computer, select the volume to which you
want to back up and click “Choose Disk”.
If you want to change the disk volume used for backup, click “Change
Disk”.
Your backup will begin when indicated by “Next Backup”, or you can
start backing up immediately by clicking “Backup Now”. The status of
your backup will be shown via a progress bar. The first backup can take
a while as it copies all of the files on your computer. Once the initial
backup is complete, the Control Center will monitor your computer and
only back up new and changed files.
The backup job screen will appear. The name of the disk, and its free
space, will be shown, as well as the date and time of the next backup.
Home Base
12
LOCAL BACKUP
Table of Contents
sections
1
2
3
4
5
6
Click “Options” to exclude files from the backup. This can help your
backup happen faster. You can choose to exclude “Log files and
caches”, “Operating system files”, and “Applications”, and elect to
exclude one or more “Specific folders”. To exclude specific folders, click
“Set Folders” and choose which ones you don’t need to back up.
Home Base
7
8
9
10
11
12
13
14
15
To restore files back to your computer, you can right-click on a file or
folder you wish to restore and choose “History” to bring up the history
browser, which will list all versions of the file/folder existing in the backup.
Select an item from the list and click the “Restore” button, which will allow
you to choose a restore destination. You may also drag an item from the
history browser to a location of your choice. You can also browse to the
“Local Backup” folder on the backup disk to find a version of the file.
13
LOCAL BACKUP
Table of Contents
sections
1
2
3
4
5
6
If you want to perform a full restore of your computer, launch the
“Restore Utility” found in the “Local Backup” folder of the drive that
received the backup.
Home Base
7
8
9
10
11
12
13
14
If you want to perform a restore of your computer after you have
reinstalled the Operating System and/or the Control Centre, make
sure to restore your old data before setting up the Local Backup
feature on the computer again.
14
15
picture sharing
Table of Contents
sections
1
2
3
4
5
6
7
8
9
10
11
12
13
14
The “Picture Sharing” tab enables you to automatically upload pictures from USB disks connected to the Home Base to
picture-sharing sites like Flickr and Picasa.
If you want to change the time that Home Base performs the picture
uploads to the online services, click “Options”.
To enable this feature, click “Add a share” and select a folder from the
disk(s) connected to the Home Base. Home Base will monitor this folder
for pictures.
Home Base
15
15
picture sharing
Table of Contents
sections
1
2
3
4
5
6
Now select the photo-sharing site you want to use and follow the
prompts. If you don’t have a Flickr or Picasa account, you will need to
sign up for one, which you can do for free.
Home Base
7
8
9
10
11
12
13
14
15
The “Picture Sharing” configuration wizard will ask you for your online
photo-sharing account information; you will need to authorize your
Home Base product so it can access your account and automatically
upload your pictures. The wizard will also ask you how often you want to
check for pictures to upload them.
16
picture sharing
Table of Contents
sections
1
2
3
4
5
6
7
8
9
10
11
12
13
14
15
Flickr Account Selection
A Flickr account is selected here. Next to “User Name”, the user names
stored in Home Base are displayed in a combo box.
Home Base
If a new user name is entered, Flickr tool authorization is necessary. In
this case, clicking “Next” will bring up the following message.
17
picture sharing
Table of Contents
sections
1
2
3
4
5
6
7
8
9
10
11
12
13
14
15
If “OK” is clicked, the default web browser will launch and the Flickr
authorization page will be displayed. Control Center will display a
message telling the user to dismiss it when authorization is complete.
After authorization is complete, the user clicks the message box’s “OK”
button. The new user account information is stored to Home Base and
the wizard continues.
Home Base
18
picture sharing
Table of Contents
sections
1
2
3
4
5
6
7
8
9
10
11
12
13
14
15
Flickr Optional Settings
Begin Upload
Optional settings are configured here.
After adding a picture job, the user will choose whether to perform the
upload immediately, or wait until the configured time. When “Finish” is
clicked, the upload will be performed according to the user’s selection.
If an upload time was not already configured for Home Base, it can be
configured before clicking “Finish” (see bottom right image). If a time is
configured for one folder, it will be used for all other folders as well.
Item
Description
Tags
Sets tag information. Up to 64
tags can be entered, with each
tag separated by a space.
Anyone (Public)
All users can view the pictures.
Only You (Private)
Home Base
And Your
Friends
Friends can also view the
pictures.
And Your
Family
Family members can also view
the pictures.
19
picture sharing
Table of Contents
sections
1
2
3
4
5
6
Picasa Account Selection
7
8
9
10
11
12
13
14
15
If “Sign up for Web Albums” is clicked, the sign-up page for Picasa
Web Albums will open in a web browser. The user can create a Google
Account there if he or she does not already have one.
A Picasa account is selected here. Next to “User Name”, the user names
stored in Home Base are displayed in a combo box. If a new user name
is entered, Home Base will automatically store the account information.
A login error will be displayed if user authentication failed. If the
user forgot his or her password, he or she can click the “Forget your
Password?” link to open the Google Account password confirmation
page in a web browser.
If user authentication fails several times, the user may have to enter a
CAPTCHA (see bottom right image).
Home Base
20
picture sharing
Table of Contents
sections
1
2
3
4
5
6
7
8
9
10
11
12
13
14
15
Album Configuration
Begin Upload
The album to upload pictures is selected here. An existing album can
be selected, or a new album can be created. If there are no albums for
the Picasa account, a new album must be created, and “Select album”
cannot be chosen.
After adding a picture folder, the user will choose whether to perform the
upload immediately, or wait until the configured time. When “Finish” is
clicked, the upload will be performed according to the user’s selection.
If an upload time was not already configured for Home Base, it can be
configured before clicking “Finish” (see bottom right image). If a time is
configured for one folder, it will be used for all other folders as well.
Item
Description
Select Album
Choose album to upload pictures
to.
Create new Album
Home Base
Album Title
Title of the new album.
Public
Allow all users to view the
pictures in this album.
Private
Allow only users with authority to
view the pictures.
21
picture sharing
Table of Contents
sections
1
2
3
4
5
6
7
8
9
Error Notification
11
12
13
14
15
In the folder list, an
error status message
will be displayed for
items where an error
occurred. When the
message is clicked,
the Error Information
Dialog will pop up.
If an error occurs while Picture Sharing is in progress, the user will be
notified via an icon (or balloon help) in the task tray on Windows, or an
icon on the system status bar on Mac OS X.
The Error Information
Dialog displays
detailed information
about the error. Also,
the user can configure
whether he or she
wants newer pictures
uploaded first, or older
pictures uploaded first.
When the icon is clicked, the Picture Sharing screen in Control Center
will open.
If “View Error Log” is
clicked, a log of errors
for the selected folder
will be displayed.
Home Base
10
22
picture sharing
Table of Contents
sections
1
2
3
4
5
6
Once you have configured Home Base to upload pictures to a photo-sharing
site, a list of folders and their associated sites will be shown on the “Picture
Sharing” tab. Each list item will show its status and the time of last upload. If
you want to share additional folders, click “Add a share”.
7
8
9
10
11
12
13
14
15
If you want to change the time that Home Base performs the picture uploads
to the online services, click “Options”.
To disable a share, uncheck its check box. To delete a sharing job
permanently, click “Remove”.
To access your pictures, log in to your account at www.flickr.com or www.
picasa.com to view your pictures online.
Home Base
23
control center options
Table of Contents
sections
1
2
3
4
5
6
7
8
9
10
11
12
13
14
15
You can specify general settings such as whether you want the Control Center software to start when you start your computer, how
you want to update Control Center software, and more.
To access “Control Center Settings” properties, click “Tools > General” or “Tools > Connected Home Bases” in Control Center.
General Settings
If you check “Start Home Base Control Center when Windows Starts”,
any devices to which you choose to automatically connect will be ready
for use when you start your computer. For more information, see the
“Device Properties” section.
On the “General” tab, you can specify when you want Control Center to
start and the types of notifications you want to see.
The “Show the Home Base Control Center” check box makes Control
Center appear each time you start the computer.
Under “Notification” you can specify which notifications you want to
see. Mark check boxes to:
1.Notify me when the device connection is lost – to inform you when
the connection to a USB device is lost. This is enabled by default.
2.
Remind me that devices should not be in use whenever I
disconnect a device – to remind you that you should ensure
a device is not in use before disconnecting. For example,
disconnecting a storage device while files are open could result in
data loss. This is disabled by default.
You may also specify how often you want the device list to be refreshed.
This rate determines how often Control Center updates the status of
attached devices.
Home Base
24
control center options
Table of Contents
sections
1
2
3
4
5
6
7
8
9
10
11
12
13
14
15
Connected Home Bases
On the “Connected Home Bases” tab you can view all Home Bases
available on your network and set properties for them.
Network administrators who are administering a network containing
subnetworks can click “Refresh options” to specify broadcast IP
addresses to be used when the Control Center searches the network for
Home Base.
All connected Home Bases are listed in the box. Select one and click
“Properties” to view its settings. This will open the web browser
configuration of Home Base. It consists of status, configuration,
maintenance, and help pages.
Home Base
For more information on Home Base web browser interface, you can
click on “Help” on any of the web pages.
25
MEDIA SERVER
Table of Contents
sections
1
2
3
4
5
6
7
8
9
10
11
12
13
14
15
Overview
In addition, the following files may be showed on file lists that the media
player displays:
Home Base can distribute pictures, movies, and music (called media
files) to UPnP media players by using UPnP.
Table 1 File Formats
Function Features
Media Type
File Extension
Image
.bmp .ico .gih .jpe .pnm .ppm .qti .qtf .qtif .tif .tiff
Movie
asf .avc .avi .dv .divx .wmv .mjpg .mjpeg .mpe .mp2p .vob .mp2t .m1v .m2v
.mpg2 .mpeg2 .mp4ps .ts .ogm .mkv .rmvb .mov .hdmov .qt .bin .iso .asx
This Media Server distributes media files in USB storage to media
players. It makes virtual directories, “Image,” “Music,” and “Movie.”
These virtual directories consist of sub-directories and each kind of
media file.
Music
3gp .aac .aif .aiff .at3p .au .snd .dts .rmi .mid .mp1 .mp2 .ogg .pcm .lpcm
.l16 .wma .mka .ra .rm .ram .flac .pls .m3u
Supported Media Formats
Supported Media Players
This Media Server supports the following file types:
•
Sony® PlayStation®
•
Microsoft® Xbox 360™
Media Type
Format (File Extension)
Image
JPEG (.jpg) PNG (.png)
Movie
MPEG-1 (.mpg) MPEG-2 (.mpg .mpeg) MPEG-4 (.m4v .m4p .mp4)
Music
AC3 (.ac3) LPCM (.wav) MP3 (.mp3) MPEG-4 (.m4a) WMA (.wma)
Home Base
About
The “About” tab shows which version of Control Center you are running
and software support contact information. Should you need to send an
email support request, please include the software version number in
your description.
26
UPGRADING HOME BASE FIRMWARE
Table of Contents
sections
1
2
3
4
5
6
7
8
9
10
11
12
13
14
13
Firmware Update Instructions
From the Home Base Control Center software, click on “Tools”,
then “Connected Home Bases”.
Home Base
Choose your Home Base from the list (check the MAC address on the
label of the bottom of Home Base with the MAC address in the list) and
select “Properties”.
27
UPGRADING HOME BASE FIRMWARE
Table of Contents
sections
1
2
3
4
5
6
Your web browser should open to the Home Base configuration page.
Click on “Upgrade Firmware”.
Home Base
7
8
9
10
11
12
13
14
13
Type in your Home Base password (there is no password by default),
and click “Login”.
28
UPGRADING HOME BASE FIRMWARE
Table of Contents
sections
1
2
3
4
5
6
Browse to the firmware file you downloaded from the Belkin website and
click “Open”.
7
8
9
10
11
12
13
14
13
Click “Upload”.
Click “OK” when the verification screen comes up.
Your firmware upgrade will take a few
minutes to complete after confirmation.
The firmware should now be upgraded.
Home Base
29
TROUBLESHOOTING
Table of Contents
sections
1
2
3
4
5
6
General Troubleshooting
7
8
9
10
11
12
13
14
15
5.
Is the network cable connected properly? The network (LAN)
cable may be unplugged or have bad contacts. Verify the cable
connections.
Make sure the Home Base Control Center Software is the latest version,
and the Home Base Firmware is the latest version. Software and
Firmware updates are available on Belkin’s website at http://www.belkin.
com.
6.
Is your computer on the network? If your computer is networked,
try to see if you can connect to other network computers or if
you can browse the Internet. Verify that the network is working
properly.
Control Center can’t find a Home Base
Disks not appearing in Windows Explorer or Mac OS X Finder, other
devices not appearing in Control Center
If you are having issues, be sure to try these general tips first:
1.
2.
3.
4.
Is the product turned on? The AC adapter may be unplugged.
Check that the Power LED is lit.
1.
Is the Link LED lit? If the Link LED is not turned on, it may not be
connected properly. Try rerunning the Home Base Setup Wizard
and configuring the wireless settings again (or try another network
cable if you are using a wired connection).
Is the USB cable connected properly? The USB cable may be
unplugged or have bad contacts. Verify the cable connections.
2.
Make sure your computer’s wireless adapter and/or access point
is configured properly and note the configuration settings, paying
special attention to the wireless mode, SSID or network name, and
WEP/WPA/WPA2 security, so you can configure your Home Base
product to the same wireless settings.
Is the USB disk-drive format supported? Home Base supports
FAT16-, FAT32-, and NTFS-formatted disk drives only. If you have
a disk you want to connect that has a different file format, you can
still connect to it in Network USB Mode, or you can reformat the
disk to FAT32 or NTFS and use it in Network Storage Mode.
Note: Refer to the FAQ page of this manual for more information.
Make sure you have a good wireless signal from the wireless
access point or router to your computer and to Home Base, that
Home Base is within range, and that it is away from metal objects
and devices that generate radio interference (like Bluetooth®
devices, cordless phones, and microwave ovens).
Home Base
30
TROUBLESHOOTING
Table of Contents
sections
1
2
3
4
5
6
7
8
9
10
11
12
13
14
15
Unable to select a disk for backup
Device Troubleshooting
1.
If a device is visible in Control Center, but you cannot connect to it, your
firewall may be blocking the connection. During installation, Control
Center configures the Windows firewall to enable Home Base to operate
properly. But if you are running a third-party firewall, you may need to
specify settings to open a port and enable operation of the Home Base
and Control Center. For information on how to do this with several types
of popular firewalls, see the “Firewalls” section.
The backup function of Home Base supports FAT16-, FAT32-, and
NTFS-formatted disk drives only.
Unreliable operation
1.
2.
Did you install any software just before your trouble occurred? The
software may be causing a problem. Remove the software you
installed and reinstall it.
Printer Troubleshooting
When sharing a printer, the correct driver must be selected in the Device
Properties’ “Connections” tab. For more information, see the “Printer
Connection Properties” section.
Does the same problem occur after rebooting your PC? Rebooting
the PC may solve the problem.
Resetting Home Base to Factory Defaults
VPN Troubleshooting
You can often resolve issues by resetting Home Base to factory-default
settings and running the setup software again. To reset Home Base to
factory defaults, unplug the power, and push and hold the reset button
down (you will need to use a paper clip or something small to hold it
down) on the bottom side of Home Base. Plug the power back into
Home Base while you are still holding down the reset button. When all of
the LEDs light up on Home Base (after about 4–5 seconds), let go of the
button. Home Base is reset to factory defaults.
Home Base may not work with VPN (Virtual Private Network) as VPN
filters the connection between the computer and other network devices.
If you have VPN enabled and Home Base does not work, please turn off
the VPN connection.
Home Base
31
firewalls
Table of Contents
sections
1
2
3
4
5
6
7
8
9
10
11
12
13
14
15
This topic shows you how to create an exception for Control Center in several popular firewall programs. Because firewalls are
designed to block unwanted intrusions into your network, you must specify settings that tell the firewall that Control Center should
be allowed to communicate with the Home Base on your network.
The instructions are for the versions of the firewall programs that appear below. If you have a different version of a given firewall, the
locations of some options may differ from those provided here.
•
Windows Live™ OneCare™
•
McAfee ® Security Center 2007
•
Norton™ Internet Security 2007
•
Trend Micro® PC-cillin Internet Security 2007
•
ZoneAlarm®
Home Base
32
firewalls
Table of Contents
sections
1
2
3
4
5
6
Windows Live OneCare
1.
Right-click on the Windows Live OneCare icon in the task bar.
2.
Click “Change OneCare settings”.
Home Base
7
3.
33
8
9
10
11
12
13
Select “Firewall” and click “Advanced settings”.
14
15
firewalls
Table of Contents
4.
sections
1
2
3
4
5
6
5.
Select “Programs” and click “Add”.
Home Base
7
34
8
9
10
11
12
13
14
15
Select “connect.exe” from the folder where Control Center is
installed. The default path is: C:\Program Files\BELKIN\Home Base
Control Center\Connect.exe.
firewalls
Table of Contents
6.
sections
1
2
3
4
5
6
7.
Check that the software is set to “Allow”. Click “Apply”.
Home Base
7
35
8
9
10
11
12
13
Now go to “Ports and protocols” and click “Add”.
14
15
firewalls
Table of Contents
sections
1
2
3
4
5
6
7
8
9
10
11
12
13
8. Add a new exception, one for outgoing data.
9. Add another new exception, one for incoming data.
Name
Home Base (Out)
TCP or UDP
TCP
Port Range
19540 to 19540
For Connections
Outbound [remote ports]
Scope
Internet
14
15
Name
Home Base (In)
TCP or UDP
UDP
Port Range
19540 to 19540
For Connections
Inbound [local ports]
Scope
Internet
10. Check the new exceptions you just created. Make sure that both
exceptions are enabled.
11. Finish the configuration. You must reboot your computer for the
changes to take effect.
Home Base
36
firewalls
Table of Contents
sections
1
2
3
4
5
6
7
8
9
10
11
12
13
14
15
McAfee Security Center 2007
1.
Click “Start > All Programs > McAfee”. Select “McAfee Security
Center”.
2.
Select “Internet & Network” (A) and then click on the option to
“Configure” (B).
Home Base
3.
37
Expand the “Firewall Protection is enabled” list by clicking on the
arrows (A). Then click “Advanced” (B).
firewalls
Table of Contents
4.
sections
1
2
3
4
5
6
Ensure that “Program Permissions” on the left is highlighted (A).
Click “Add Allowed Program” (B).
Home Base
38
7
8
9
10
11
12
13
14
15
5.
Browse to the folder where Control Center is installed.
The default path is C:\Program Files\BELKIN\Home Base Control
Center\Connect.exe. Select the program (highlighted below) and
click “Open”.
6.
Click “OK”. You may need to reboot your computer for the new
settings to take effect.
firewalls
Table of Contents
sections
1
2
3
4
5
6
7
8
9
10
Norton Internet Security 2007
1.
2.
Go to “Start > All Programs > Norton Internet Security”. Select
“Norton Internet Security”. Expand “Settings” (A), scroll down to
“Internet Security and Firewall Options” (B) and click it.
Home Base
39
Select “Program Control”.
11
12
13
14
15
firewalls
Table of Contents
3.
sections
1
2
3
4
5
6
4.
Click “Add”.
Home Base
7
40
8
9
10
11
12
13
14
15
Browse to the folder where Control Center is installed. The default
path is C:\Program Files\BELKIN\Home Base Control Center\
Connect.exe. Select the program (highlighted below) and click
“Open”.
firewalls
Table of Contents
5.
sections
1
2
3
4
5
6
6.
Program control will then ask you for the appropriate action for this
program. Choose “Allow” and click “OK”.
Home Base
7
41
8
9
10
11
12
13
14
15
Click “Apply”. This confirms and applies the exception for Control
Center. Click “OK” to exit. You may need to reboot your computer
for the changes to take effect.
firewalls
Table of Contents
sections
1
2
3
4
5
6
7
8
Trend Micro PC-cillin Internet Security 2007
1.
Go to “Start > All Programs > Trend Micro PC-cillin Internet
Security 2007”. Select “Trend Micro PC-cillin Internet
Security 2007”.
2.
Click “Personal Network & Firewall Controls” on the left.
Home Base
3.
42
Click “Settings”.
9
10
11
12
13
14
15
firewalls
Table of Contents
4.
sections
1
2
3
4
5
6
5.
Ensure that the option “Direct Internet connection” is highlighted
(A), and then click “Add” (B).
Home Base
7
43
8
9
10
11
12
13
14
15
On the next screen ensure that the security level is set to “Low” (A).
Click the “Program Control” tab (B).
firewalls
Table of Contents
6.
sections
1
2
3
4
5
6
7.
Click “Add”.
Home Base
7
44
8
9
10
11
12
13
14
15
Browse to the folder where Control Center is installed. The default
path is C:\Program Files\BELKIN\Home Base Control Center\
Connect.exe.
firewalls
Table of Contents
sections
1
2
3
4
5
6
7
8.
Select the program “Connect” and click “Open”.
8
9
10
11
12
13
14
15
Ensure that the program setting is set on “Simple Mode” and that
the “Allow” option is selected. Click “OK”, and then “OK” once
more.
You may need to reboot your computer for the changes to take effect.
Home Base
45
firewalls
Table of Contents
sections
1
2
3
4
5
6
7
8
9
10
11
12
13
ZoneAlarm
1.
In Control Center, click “Configure General Hub Settings” under
“Tasks” in Control Center. The “Home Base Settings Properties”
tabs appear. Select the “Connected Home Bases” tab.
2.
Write down the IP address of your Home Base.
3.
Right-click on the ZoneAlarm icon in the task bar and open the
ZoneAlarm Control Center.
Home Base
4. Select “Firewall”. Select “Zones” and click “Add”.
46
14
15
firewalls
Table of Contents
sections
1
2
3
4
5.
Select “IP Address”.
6.
Enter the IP address that you wrote down earlier. Click “OK”.
Home Base
5
6
47
7
8
9
10
11
12
13
14
7.
Verify your settings.
8.
Make sure that the IP address of Home Base is listed in the
“Trusted” zone and click “Firewall”. The connection in Control
Center should now be enabled.
15
FAQs
Table of Contents
sections
1
2
3
4
5
6
7
8
9
10
11
12
13
14
15
Control Center and USB devices (“Available Devices”
tab)
Q: Why would I want to automatically start a specific piece of
software when I connect to a device?
Q: I can see a USB device in Control Center, but I can’t connect to
it. What should I do?
A: Many USB items use specific software to carry out their functions.
For example, a webcam will need software to capture video. The
Belkin Control Center enables you to specify that the software
automatically start when a device is connected to the Home Base.
For more information, see Device Properties’ “Connection” tab.
A: Check your firewall settings. During installation, the Control
Center configures the Windows firewall to enable connection,
but third-party firewalls may require additional settings. For more
information about how to configure several specific firewalls, see
the “Firewalls” section.
Q: Do I have to shut down Control Center completely before
installing an update? Do I need to reboot my computer after
installing?
A: No, you can install updates while Control Center is running and
devices are connected. You do not need to reboot your computer
after installing an update.
Q: Does this product work with any-speed USB device?
A: Yes. The Home Base supports Hi-, full-, and low-speed devices.
Information about the type of speed supported by a device is
gathered by Control Center from the device and displayed in the
Device Properties’ “General” tab.
USB disk drives and other storage devices
Q: Why does the Windows AutoPlay screen appear every time I
connect to a device?
Q: What is a NAS (Network Attached Storage)?
A: By default, Windows automatically plays many types of USB
devices. You can turn off this feature in Windows XP by clicking
“Start” and “Run”. In the “Run” field, type in “gpedit.msc” (without
the quotes). On the “Group Policy” screen, select “Computer
Configuration > Administrative Templates”. Click “System”. Doubleclick “Turn off Autoplay”. On the “Setting” tab, select “Disabled”
and click “OK”.
Home Base
A: A NAS device is a server specifically designed for handling files.
Network Attached Storage is accessible directly on the local area
network (LAN) from multiple users.
Q: What file systems can be used with Home Base in NAS mode?
A: Home Base will automatically mount FAT12, FAT16, FAT32, and
NTFS volumes in NAS mode. Disks using other file systems will be
available to one user at a time in Network USB mode.
48
FAQS
Table of Contents
sections
1
2
3
4
5
6
Q: How do I access USB disk drives connected to Home Base?
9
10
11
12
13
14
15
A: In Network USB mode, it is as if the USB device is connected
directly to your computer by a USB cable. If one person is using
a device, no one else will be able to connect to it. Many different
kinds of devices can be used. In NAS mode, a USB device can
be accessed from multiple computers at the same time; this only
works with USB storage devices and file sharing.
You can go to Windows Internet Explorer and type “\\
BK-HBxxxxxx” (where “xxxxxx” is the last six digits of Home
Base’s MAC address, printed on the bottom of Home Base) into the
address bar. Alternatively, you can browse the Windows network
and look for “\\BK-HBxxxxxx” in the list of available network
devices.
Q: Are there any limitations to how much data can be shared?
A: No, the amount of data that can be shared depends on the size of
the connected disk.
For Macintosh® computers, Control Center automatically mounts
discs connected to Home Base to the desktop. Alternatively, click
“Go > Connect to server” to connect to the disk.
Q: Can files be shared between Windows and Mac OS?
A: Yes, files can be shared between Windows and Mac OS X
computers.
Q: How are drive letters mapped on Windows?
A: When Control Center is running, disk volumes will be mapped to
drive letters starting with Z to avoid collision with commonly used
drive letters.
Home Base
8
Q: What is the difference between Network USB mode and NAS
mode?
A: In Windows, Control Center automatically maps a new drive letter
for your computer for each supported USB disk drive connected to
Home Base. You can access the drive by going to “Computer” (or
“My Computer” if you are using Windows XP).
7
Q: Can filters be applied to prevent certain people from accessing
files?
A: Files are made public to all computers on the network.
49
FAQS
Table of Contents
sections
1
2
3
4
5
6
7
8
9
10
11
12
13
14
15
Q: Can a password be set for a file?
Q: What is the password to log in to the FTP server?
A: Passwords cannot be set. If security is necessary, use filecompression software to create a password-protected archive.
A: The user ID is root, and the password is the password you
configured on the web page, if any. By default, there is no
password. In this case, log in by pressing the “Enter” key without
entering a password.
Q: Can files be encrypted when used with the Home Base NAS
feature?
Q: Is it safe to unplug a connected USB device at any time?
A: No, files are all saved as they are. This applies to disks formatted
as NTFS, too.
A: The device you are unplugging may be in use by another PC
or accessed by picture sharing, etc. Data may be destroyed if
unplugged suddenly. Always follow the “Safe Removal” procedure
to remove devices.
Q: Can compressed disk drives be used?
A: No, compressed drives cannot be shared via Home Base’s NAS
feature.
Q: Can I log in to a network domain environment using the NAS
mode?
Q: What protocol is used for sharing?
A: A domain environment cannot be logged in to.
A: The Windows file-sharing protocol is used. It is commonly referred
to as SMB or CIFS.
Q: When multiple USB disk drives are connected, can they be set
up to use RAID?
A: A RAID cannot be established using multiple disks attached to
Home Base, but Home Base can access a USB RAID device as a
single disk.
Home Base
50
TECHNICAL SUPPORT
Table of Contents
sections
Free Tech Support*
1
2
*National call rates may apply
3
4
5
www.belkin.com
You can find additional support information on our website www.belkin.
com through the tech‑support area. If you want to contact technical
support by phone, please call the number you need from this list*.
Home Base
6
7
8
9
10
11
12
13
14
15
Country
Number
Internet adress
AUSTRIA
0820 200766
www.belkin.com/de/networking/
BELGIUM
07 07 00 073
www.belkin.com/nl/networking/
www.belkin.com/fr/networking/
CZECH REPUBLIC
239 000 406
www.belkin.com/uk/networking/
DENMARK
701 22 403
www.belkin.com/uk/networking/
FINLAND
0972519123
www.belkin.com/uk/networking/
FRANCE
08 - 25 54 00 26
www.belkin.com/fr/networking/
GERMANY
0180 - 500 57 09
www.belkin.com/de/networking/
GREECE
00800 - 44 14 23 90
www.belkin.com/uk/networking/
HUNGARY
06 - 17 77 49 06
www.belkin.com/uk/networking/
ICELAND
800 8534
www.belkin.com/uk/networking/
IRELAND
0818 55 50 06
www.belkin.com/uk/networking/
ITALY
02 - 69 43 02 51
www.belkin.com/it/networking/
LUXEMBOURG
34 20 80 85 60
NETHERLANDS
0900 - 040 07 90
NORWAY
81 50 0287
www.belkin.com/uk/networking/
POLAND
00800 - 441 17 37
www.belkin.com/uk/networking/
PORTUGAL
707 200 676
www.belkin.com/uk/networking/
RUSSIA
495 580 9541
www.belkin.com/networking/
SOUTH AFRICA
0800 - 99 15 21
www.belkin.com/uk/networking/
SPAIN
902 - 02 43 66
www.belkin.com/es/networking/
SWEDEN
07 - 71 40 04 53
www.belkin.com/uk/networking/
SWITZERLAND
08 - 48 00 02 19
www.belkin.com/de/networking/
www.belkin.com/fr/networking/
UNITED KINGDOM
0845 - 607 77 87
www.belkin.com/uk/networking/
OTHER COUNTRIES
+44 - 1933 35 20 00
51
www.belkin.com/uk/networking/
€0.10 per minute
www.belkin.com/nl/networking/
information
Table of Contents
sections
1
2
3
4
5
6
FCC Statement
DECLARATION OF CONFORMITY WITH FCC RULES FOR
ELECTROMAGNETIC COMPATIBILITY
7
8
9
10
11
12
13
14
15
Federal Communications Commission Notice
This equipment has been tested and found to comply with the limits for a Class
B digital device, pursuant to Part 15 of the FCC Rules. These limits are designed
to provide reasonable protection against harmful interference in a residential
installation.
We, Belkin International, Inc., of 501 West Walnut Street, Compton, CA 90220,
declare under our sole responsibility that the device,
complies with Part 15 of the FCC Rules. Operation is subject to the following two
conditions: (1) this device may not cause harmful interference, and (2) this device
must accept any interference received, including interference that may cause
undesired operation.
This equipment generates, uses, and can radiate radio frequency energy, and if
not installed and used in accordance with the instructions, may cause harmful
interference to radio communications. However, there is no guarantee that
interference will not occur in a particular installation. If this equipment does cause
harmful interference to radio or television reception, which can be determined by
turning the equipment off and on, the user is encouraged to try and correct the
interference by one or more of the following measures:
Caution: Exposure to Radio Frequency Radiation.
•
Reorient or relocate the receiving antenna.
The device shall be used in such a manner that the potential for human contact
normal operation is minimized.
•
Increase the distance between the equipment and the receiver.
•
Connect the equipment to an outlet on a circuit different from that to which
thereceiver is connected.
•
Consult the dealer or an experienced radio/TV technician for help.
F5L049
This equipment complies with FCC radiation exposure limits set forth for an
uncontrolled environment. This equipment should be installed and operated with a
minimum distance of 20cm between the radiator and your body.
For IEEE 802.11b/g/n products in the USA market, only channels 1 through 11 can
be operated. Selection of other channels is not possible.
This device and its antenna(s) must not be co-located or operating in conjunction
with any other antenna or transmitter.
Home Base
52
information
Table of Contents
sections
1
2
3
4
5
6
7
8
9
10
11
12
13
14
15
Modifications
The FCC requires the user to be notified that any changes or modifications to this
device that are not expressly approved by Belkin International, Inc., may void the
user’s authority to operate the equipment.
Industry Canada Statement
This device complies with RSS-210 of the Industry Canada Rules. Operation is
subject to the following two conditions:
This device may not cause harmful interference, and (2) this device must accept any
interference received, including interference that may cause undesired operation.
IMPORTANT NOTE: Radiation Exposure Statement
This equipment complies with IC radiation exposure limits set forth for an
uncontrolled environment. This equipment should be installed and operated with
a minimum distance of 20cm between the radiator and your body. This device has
been designed to operate with an antenna having a maximum gain of 2 dB. An
antenna with a higher gain is strictly prohibited per regulations of Industry Canada.
The required antenna impedance is 50 Ohms.
For information on product disposal please refer to
http://environmental.belkin.com
This Class B digital apparatus complies with Canadian ICES-003.
Cet appareil numérique de la classe B conforme á la norme NMB-003 du Canada.
For product available in the USA/Canada market, only channel 1~11 can be
operated. Selection of other channels is not possible.
This device and its antenna(s) must not be co-located or operating in conjunction
with any other antenna or transmitter.
FOR USE IN
To reduce potential radio interference to other users, the antenna type and its gain
should be so chosen that the equivalent isotropically radiated power (EIRP) is not
more than that permitted for successful communication.
AT
BE
CY
CZ
DK
EE
FI
FR
DE
GR
HU
IE
IT
LV
LT
LU
MT
NL
PL
PT
SK
SI
ES
SE
GB
IS
LI
NO
CH
BG
RO
TR
Restricted Use in Certain Countries
Home Base
53
OPERATES ON CHANNELS 1-13
Class 2 Equipment
information
Table of Contents
sections
1
2
3
4
5
6
EU DECLARATION OF CONFORMITY
ýesky
[Czech]
[Belkin Ltd] tímto prohlašuje, že tento [F5L049] je ve shodČ se základními požadavky a dalšími
pĜíslušnými ustanoveními smČrnice 1999/5/ES.
Dansk
[Danish]
Undertegnede [Belkin Ltd] erklærer herved, at følgende udstyr [F5L049] overholder de
væsentlige krav og øvrige relevante krav i direktiv 1999/5/EF.
Deutsch
[German]
Hiermit erklärt [Belkin Ltd], dass sich das Gerät [F5L049] in Übereinstimmung mit den
grundlegenden Anforderungen und den übrigen einschlägigen Bestimmungen der Richtlinie
1999/5/EG befindet.
Eesti
[Estonian]
Käesolevaga kinnitab [Belkin Ltd] seadme [F5L049] vastavust direktiivi 1999/5/EÜ põhinõuetele
ja nimetatud direktiivist tulenevatele teistele asjakohastele sätetele.
English
Por medio de la presente [Belkin Ltd] declara que el [F5L049] cumple con los requisitos
esenciales y cualesquiera otras disposiciones aplicables o exigibles de la Directiva 1999/5/CE.
ǼȜȜȘȞȚțȒ
[Greek]
ȂǼ ȉǾȃ ȆǹȇȅȊȈǹ [Belkin Ltd] ǻǾȁȍȃǼǿ ȅȉǿ [F5L049] ȈȊȂȂȅȇĭȍȃǼȉǹǿ ȆȇȅȈ ȉǿȈ
ȅȊȈǿȍǻǼǿȈ ǹȆǹǿȉǾȈǼǿȈ Ȁǹǿ ȉǿȈ ȁȅǿȆǼȈ ȈȋǼȉǿȀǼȈ ǻǿǹȉǹȄǼǿȈ ȉǾȈ ȅǻǾīǿǹȈ 1999/5/ǼȀ.
Français
[French]
Par la présente [Belkin Ltd] déclare que l'appareil [F5L049] est conforme aux exigences
essentielles et aux autres dispositions pertinentes de la directive 1999/5/CE.
Italiano
[Italian]
Con la presente [Belkin Ltd] dichiara che questo [F5L049] è conforme ai requisiti essenziali ed
alle altre disposizioni pertinenti stabilite dalla direttiva 1999/5/CE.
Latviski
[Latvian]
Ar šo [Belkin Ltd Belkin Ltd ] deklarƝ, ka [F5L049] / iekƗrtas tips] atbilst DirektƯvas 1999/5/EK
bnjtiskajƗm prasƯbƗm un citiem ar to saistƯtajiem noteikumiem.
Lietuviǐ
[Lithuanian]
Nederlands
[Dutch]
Šiuo [Belkin Ltd] deklaruoja, kad šis [F5L049] atitinka esminius reikalavimus ir kitas 1999/5/EB
Direktyvos nuostatas.
Hierbij verklaart [Belkin Ltd] dat het toestel [F5L049] in overeenstemming is met de essentiële
eisen en de andere relevante bepalingen van richtlijn 1999/5/EG.
Malti
[Maltese]
Hawnhekk, [Belkin Ltd], jiddikjara li dan [F5L049] jikkonforma mal-ƫtiƥijiet essenzjali u ma
provvedimenti oƫrajn relevanti li hemm fid-Dirrettiva 1999/5/EC.
Magyar
[Hungarian]
Alulírott, [Belkin Ltd] nyilatkozom, hogy a [F5L049] megfelel a vonatkozó alapvetõ
követelményeknek és az 1999/5/EC irányelv egyéb elõírásainak.
Polski
[Polish]
Niniejszym [Belkin Ltd] oĞwiadcza, Īe [F5L049] jest zgodny z zasadniczymi wymogami oraz
pozostaáymi stosownymi postanowieniami Dyrektywy 1999/5/EC.
Português
[Portuguese]
[Belkin Ltd] declara que este [F5L049] está conforme com os requisitos essenciais e outras
disposições da Directiva 1999/5/CE.
Slovensko
[Slovenian]
[I Belkin Ltd] izjavlja, da je ta [F5L049] v skladu z bistvenimi zahtevami in ostalimi relevantnimi
doloþili direktive 1999/5/ES.
Slovensky
[Slovak]
[Belkin Ltd] týmto vyhlasuje, že [F5L049] spĎĖa základné požiadavky a všetky príslušné
ustanovenia Smernice 1999/5/ES.
Home Base
8
9
10
54
11
12
13
14
Suomi
[Finnish]
[Belkin Ltd] vakuuttaa täten että [F5L049] tyyppinen laite on direktiivin 1999/5/EY oleellisten
vaatimusten ja sitä koskevien direktiivin muiden ehtojen mukainen.
Svenska
[Swedish]
Härmed intygar Belkin Ltd] att denna [F5L049] står I överensstämmelse med de väsentliga
egenskapskrav och övriga relevanta bestämmelser som framgår av direktiv 1999/5/EG.
Íslenska
[Icelandic]
Hér með lýsir [Belkin Ltd] yfir því að [F5L049] er í samræmi við grunnkröfur og aðrar kröfur, sem
gerðar eru í tilskipun 1999/5/EC.
Norsk
[Norwegian]
[Belkin Ltd] erklærer herved at utstyret [F5L049] er i samsvar med de grunnleggende krav og
øvrige relevante krav i direktiv 1999/5/EF.
http://www.belkin.com/doc/
Hereby, [Belkin Ltd], declares that this product [F5L049] is in compliance with the essential
requirements and other relevant provisions of Directive 1999/5/EC.
Español
[Spanish]
7
15
information
Table of Contents
sections
1
2
3
4
5
6
7
8
9
10
11
12
13
14
15
Belkin International, Inc., Limited 3-Year Product Warranty
What this warranty covers.
Belkin International, Inc. (“Belkin”) warrants to the original purchaser of
this Belkin product that the product shall be free of defects in design,
assembly, material, or workmanship.
What is not covered by this warranty?
All above warranties are null and void if the Belkin product is not
provided to Belkin for inspection upon Belkin’s request at the sole
expense of the purchaser, or if Belkin determines that the Belkin product
has been improperly installed, altered in any way, or tampered with.
The Belkin Product Warranty does not protect against acts of God such
as flood, lightning, earthquake, war, vandalism, theft, normal-use wear
and tear, erosion, depletion, obsolescence, abuse, damage due to low
voltage disturbances (i.e. brownouts or sags), non-authorized program,
or system equipment modification or alteration.
What the period of coverage is.
Belkin warrants the Belkin product for three years.
What will we do to correct problems?
Product Warranty.
Belkin will repair or replace, at its option, any defective product free of
charge (except for shipping charges for the product). Belkin reserves the
right to discontinue any of its products without notice, and disclaims any
limited warranty to repair or replace any such discontinued products.
In the event that Belkin is unable to repair or replace the product (for
example, because it has been discontinued), Belkin will offer either a
refund or a credit toward the purchase of another product from Belkin.
com in an amount equal to the purchase price of the product as
evidenced on the original purchase receipt as discounted by its natural
use.
How to get service.
To get service for your Belkin product you must take the following steps:
1.Contact Belkin using the contact details show on page 51.
Be prepared to provide the following information:
a. The part number of the Belkin product.
b. Where you purchased the product.
c. When you purchased the product.
d. Copy of original receipt.
2.Your Belkin Customer Service Representative will then instruct
you on how to forward your receipt and Belkin product and how to
proceed with your claim.
Home Base
55
information
Table of Contents
sections
1
2
3
4
5
6
Belkin reserves the right to review the damaged Belkin product. All
costs of shipping the Belkin product to Belkin for inspection shall be
borne solely by the purchaser. If Belkin determines, in its sole discretion,
that it is impractical to ship the damaged equipment to Belkin, Belkin
may designate, in its sole discretion, an equipment repair facility to
inspect and estimate the cost to repair such equipment. The cost, if any,
of shipping the equipment to and from such repair facility and of such
estimate shall be borne solely by the purchaser. Damaged equipment
must remain available for inspection until the claim is finalized.
Whenever claims are settled, Belkin reserves the right to be subrogated
under any existing insurance policies the purchaser may have.
8
9
10
11
12
13
14
15
IN NO EVENT SHALL BELKIN BE LIABLE FOR INCIDENTAL, SPECIAL,
DIRECT, INDIRECT, CONSEQUENTIAL OR MULTIPLE DAMAGES SUCH
AS, BUT NOT LIMITED TO, LOST BUSINESS OR PROFITS ARISING
OUT OF THE SALE OR USE OF ANY BELKIN PRODUCT, EVEN IF
ADVISED OF THE POSSIBILITY OF SUCH DAMAGES.
This warranty gives you specific legal rights, and you may also have
other rights, which may vary from state to state. Some states do not
allow the exclusion or limitation of incidental, consequential, or other
damages, so the above limitations may not apply to you.
How state law relates to the warranty.
THIS WARRANTY CONTAINS THE SOLE WARRANTY OF BELKIN.
THERE ARE NO OTHER WARRANTIES, EXPRESSED OR, EXCEPT AS
REQUIRED BY LAW, IMPLIED, INCLUDING THE IMPLIED WARRANTY
OR CONDITION OF QUALITY, MERCHANTABILITY OR FITNESS FOR A
PARTICULAR PURPOSE, AND SUCH IMPLIED WARRANTIES, IF ANY,
ARE LIMITED IN DURATION TO THE TERM OF THIS WARRANTY.
Some states do not allow limitations on how long an implied warranty
lasts, so the above limitations may not apply to you.
Home Base
7
56
Belkin Ltd.
Express Business Park
Shipton Way, Rushden
NN10 6GL, United Kingdom
Belkin SAS
130 rue de Silly
92100 Boulogne-Billancourt,
France
Belkin GmbH
Hanebergstrasse 2
80637 Munich
Germany
Belkin Iberia
C/ Anabel Segura, 10 planta baja, Of. 2
28108, Alcobendas, Madrid
Spain
Belkin Italy & Greece
Via Carducci, 7
Milano 20123
Italy
Belkin B.V.
Boeing Avenue 333
1119 PH Schiphol-Rijk,
Netherlands
© 2009 Belkin International, Inc. All rights reserved. All trade names are registered trademarks of respective
manufacturers listed. Mac OS and Macintosh are trademarks of Apple Inc., registered in the U.S. and other
countries. Windows, Windows Live, OneCare, Internet Explorer, and Windows Vista are either registered
trademarks or trademarks of Microsoft Corporation in the United States and/or other countries.
8820-00115ea
F5L049ea