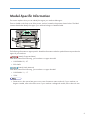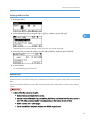
1
Operating Instructions
Software Guide
1
Preparing for Printing
2
Printing Documents
3
Printing Stored Documents
4
Making Printer Settings Using the Control Panel
5
Monitoring and Configuring the Printer
6
Using a Printer Server
7
Mac OS X Configuration
8
Appendix
Read this manual carefully before you use this machine and keep it handy for future reference. For safe and correct use, be sure to read "Safety
Information" before using the machine.
Introduction
This manual contains detailed instructions and notes on the operation and use of this machine. For your safety and
benefit, read this manual carefully before using the machine. Keep this manual in a handy place for quick reference.
Do not copy or print any item for which reproduction is prohibited by law.
Copying or printing the following items is generally prohibited by local law:
bank notes, revenue stamps, bonds, stock certificates, bank drafts, checks, passports, driver's licenses.
The preceding list is meant as a guide only and is not inclusive. We assume no responsibility for its completeness or
accuracy. If you have any questions concerning the legality of copying or printing certain items, consult with your
legal advisor.
Important
Contents of this manual are subject to change without prior notice.
In no event will the company be liable for direct, indirect, special, incidental, or consequential damages as a result
of handling or operating the machine.
For good print quality, the manufacturer recommends that you use genuine toner from the manufacturer.
The manufacturer shall not be responsible for any damage or expense that might result from the use of parts
other than genuine parts from the manufacturer with your office products.
Some illustrations in this manual might be slightly different from the machine.
Certain options might not be available in some countries. For details, please contact your local dealer.
TABLE OF CONTENTS
How to Read This Manual.................................................................................................................................8
Symbols...........................................................................................................................................................8
About IP Address............................................................................................................................................8
Model-Specific Information...............................................................................................................................9
Manuals for This Printer...................................................................................................................................10
List of Options...................................................................................................................................................12
1. Preparing for Printing
Before Using the Printer...................................................................................................................................13
Drivers and Utilities......................................................................................................................................13
Using User Authentication...........................................................................................................................13
Accessing the Extended Features...............................................................................................................13
Software Included on the CD-ROM...............................................................................................................15
Viewing the Contents of the CD-ROM.......................................................................................................15
Printer Drivers for This Printer.......................................................................................................................15
Downloading Utility Software.........................................................................................................................17
SmartDeviceMonitor for Admin..................................................................................................................17
DeskTopBinder.............................................................................................................................................17
SmartDeviceMonitor for Client...................................................................................................................18
If User Authentication is Specified..................................................................................................................19
User Code Authentication (Using the Printer Driver).................................................................................19
Log in (Using the Control Panel).................................................................................................................19
Log out (Using the Control Panel)...............................................................................................................20
Log in (Using the Printer Driver)..................................................................................................................20
Log in (Using Web Image Monitor)...........................................................................................................21
Log out (Using Web Image Monitor).........................................................................................................21
2. Printing Documents
Displaying the Printer Driver Settings Screen.................................................................................................23
Making Printer Default Settings - The Printer Properties............................................................................23
Making Printer Default Settings - Printing Preferences..............................................................................23
Making Printer Settings from an Application.............................................................................................24
Making Printer Settings - One Click Presets...............................................................................................24
Frequently Used Print Methods.......................................................................................................................26
Standard Printing.........................................................................................................................................26
1
Performing Duplex or Booklet Printing.......................................................................................................27
Combining Multiple Pages into Single Page.............................................................................................31
Advanced Printing............................................................................................................................................36
Menu Names and Brief Overview of Each Function................................................................................36
Specifying Printer Driver or Print Command Priority..................................................................................37
Printing on Cover Sheet...............................................................................................................................39
Inserting Slip Sheets.....................................................................................................................................40
Printing with Watermarks............................................................................................................................42
Collate Function................................................................................................................................................44
Spool Printing...................................................................................................................................................45
Setting Spool Printing...................................................................................................................................45
Viewing or Deleting Spooled Jobs Using Web Image Monitor..............................................................46
Printing a PDF File Directly...............................................................................................................................47
Using DeskTopBinder..................................................................................................................................47
Expanding DeskTopBinder features...........................................................................................................47
Function palette............................................................................................................................................48
PDF Direct Printing Using Function Palette.................................................................................................48
PDF Direct Print Properties...........................................................................................................................49
Using Commands to Print............................................................................................................................50
Specifying the Classification Code for a Print Job.........................................................................................52
Using the Virtual Printer....................................................................................................................................54
Adding a Virtual Printer...............................................................................................................................54
Changing a Virtual Printer Configuration...................................................................................................55
Confirming a Virtual Printer Configuration.................................................................................................55
Deleting a Virtual Printer..............................................................................................................................56
Printing Using a Virtual Printer.....................................................................................................................56
If Errors Occur with the Specified Paper Size and Type...............................................................................58
Changing the Paper Tray Settings..............................................................................................................58
Printing from a Selected Tray......................................................................................................................58
Canceling a Print Job...................................................................................................................................59
Proceeding with Printing Using the Bypass Tray........................................................................................60
3. Printing Stored Documents
Using the Print Job Function.............................................................................................................................61
2
Print Job Screen............................................................................................................................................61
Printing from the Print Job Screen....................................................................................................................64
Sample Print..................................................................................................................................................64
Locked Print..................................................................................................................................................67
Hold Print......................................................................................................................................................70
Stored Print...................................................................................................................................................73
Printing from the User ID Screen.....................................................................................................................77
Printing the Selected Print Job.....................................................................................................................77
Printing All Print Jobs....................................................................................................................................78
Canceling a Print Job.......................................................................................................................................79
If Printing Has Not Yet Started....................................................................................................................79
If Printing Has Already Started...................................................................................................................79
4. Making Printer Settings Using the Control Panel
Menu Chart.......................................................................................................................................................81
Applying the Machine Settings to Other Printers...........................................................................................86
About the Machine Settings Export Function.............................................................................................86
Exporting the Machine Settings to a SD Card...........................................................................................86
Importing the Machine Settings Stored on the SD Card into Other Printers...........................................87
Memory Erase Status Menu............................................................................................................................88
Viewing the Status of Remaining Data in Memory....................................................................................88
Paper Input Menu.............................................................................................................................................89
Paper Input Menu Parameters....................................................................................................................89
Changing the Paper Input Menu................................................................................................................90
Maintenance Menu.........................................................................................................................................92
Maintenance Menu Parameters.................................................................................................................92
Changing the Maintenance Menu.............................................................................................................97
List/Test Print Menu..........................................................................................................................................98
List/Test Print Menu Parameters..................................................................................................................98
Test Printing...................................................................................................................................................99
System Menu..................................................................................................................................................102
System Menu Parameters.........................................................................................................................102
Changing the System Menu.....................................................................................................................106
Print Settings Menu........................................................................................................................................108
3
Print Settings Menu Parameters................................................................................................................108
Changing the Print Settings Menu............................................................................................................118
Security Options Menu.................................................................................................................................120
Security Options Menu Parameters.........................................................................................................120
Changing the Security Options Menu.....................................................................................................123
Host Interface Menu......................................................................................................................................125
Host Interface Menu Parameters..............................................................................................................125
Changing the Host Interface Menu..........................................................................................................131
Language Menu.............................................................................................................................................132
Language Menu Parameters....................................................................................................................132
Changing the Language Menu................................................................................................................132
Options Menu................................................................................................................................................133
Options Menu Parameters........................................................................................................................133
Checking the Error Log.............................................................................................................................133
5. Monitoring and Configuring the Printer
Using Web Image Monitor...........................................................................................................................135
Introduction to Web Image Monitor........................................................................................................135
Displaying Top Page.................................................................................................................................136
When User Authentication is Set..............................................................................................................137
About Menu and Mode............................................................................................................................138
Access in the Administrator Mode...........................................................................................................139
Displaying Web Image Monitor Help.....................................................................................................139
Registering Classification Codes..................................................................................................................141
Configuring Classification Codes.............................................................................................................142
Address Book Backup and Restore..............................................................................................................143
Backing Up Address Book Data..............................................................................................................143
Restoring Address Book Data...................................................................................................................143
Using SmartDeviceMonitor for Admin.........................................................................................................144
When Using IPP with SmartDeviceMonitor for Client.................................................................................145
Printer Status Notification by E-Mail............................................................................................................146
Setting the Account for E-mail Notification.............................................................................................147
Mail Authentication...................................................................................................................................148
Auto E-mail Notification............................................................................................................................149
4
On-demand E-mail Notification...............................................................................................................150
Format of On-demand E-mail Messages................................................................................................151
6. Using a Printer Server
Preparing Printer Server................................................................................................................................153
Using NetWare..............................................................................................................................................154
Setting Up as a Print Server (NetWare 3.x)............................................................................................154
Setting Up as a Print Server (NetWare 4.x, 5 / 5.1, 6 / 6.5).............................................................155
Using Pure IP in the NetWare 5 / 5.1 or 6 / 6.5 Environment............................................................156
Setting Up as a Remote Printer (NetWare 3.x).......................................................................................158
Setting Up as a Remote Printer (NetWare 4.x, 5 / 5.1, 6 / 6.5)........................................................159
7. Mac OS X Configuration
Using PostScript 3..........................................................................................................................................163
Job Type.....................................................................................................................................................163
Paper Type.................................................................................................................................................169
Fit to Paper.................................................................................................................................................169
Print Mode.................................................................................................................................................169
Image Smoothing......................................................................................................................................170
Gradation..................................................................................................................................................170
Dithering.....................................................................................................................................................171
Rotate by 180 degrees.............................................................................................................................171
Orientation Override................................................................................................................................171
Watermark.................................................................................................................................................172
Watermark Text.........................................................................................................................................172
Watermark Font.........................................................................................................................................172
Watermark Size.........................................................................................................................................172
Watermark Angle......................................................................................................................................172
Watermark Style........................................................................................................................................173
8. Appendix
When Using Windows Terminal Service/Citrix Presentation Server/Citrix XenApp..............................175
Operating Environment.............................................................................................................................175
Supported Printer Drivers..........................................................................................................................175
Limitations...................................................................................................................................................175
Using DHCP...................................................................................................................................................177
5
Using AutoNet...........................................................................................................................................177
Configuring the WINS Server......................................................................................................................178
Using Web Image Monitor......................................................................................................................178
Using telnet................................................................................................................................................178
Using the Dynamic DNS Function................................................................................................................179
Updating....................................................................................................................................................179
DNS Servers Targeted for Operation......................................................................................................180
DHCP Servers Targeted for Operation....................................................................................................180
Setting the Dynamic DNS Function..........................................................................................................180
Precautions.....................................................................................................................................................182
Connecting a Dial-Up Router to a Network............................................................................................182
When the Wireless LAN Interface Unit is Installed.................................................................................182
Copyright Information about Installed Applications...................................................................................184
expat...........................................................................................................................................................184
NetBSD......................................................................................................................................................184
FreeBSD 4.6.2/netipx..............................................................................................................................193
Sablotron(Version 0.82)...........................................................................................................................194
JPEG LIBRARY............................................................................................................................................194
SASL...........................................................................................................................................................194
RSA BSAFE®..............................................................................................................................................195
Open SSL...................................................................................................................................................195
Open SSH..................................................................................................................................................197
Open LDAP................................................................................................................................................201
Heimdal......................................................................................................................................................202
IPSTM print language emulations.............................................................................................................203
SPX/IPX......................................................................................................................................................203
WPA Supplicant........................................................................................................................................203
nana...........................................................................................................................................................203
ILU...............................................................................................................................................................204
racoon........................................................................................................................................................204
TrouSerS.....................................................................................................................................................205
Samba........................................................................................................................................................208
Trademarks.....................................................................................................................................................215
6
INDEX...........................................................................................................................................................217
7
How to Read This Manual
Symbols
This manual uses the following symbols:
Indicates points to pay attention to when using the machine, and explanations of likely causes of paper
misfeeds, damage to originals, or loss of data. Be sure to read these explanations.
Indicates supplementary explanations of the machine's functions, and instructions on resolving user errors.
This symbol is located at the end of sections. It indicates where you can find further relevant information.
[]
Indicates the names of keys on the machine's display or control panels.
(mainly Europe and Asia)
(mainly North America)
Differences in the functions of Region A and Region B models are indicated by two symbols. Read the
information indicated by the symbol that corresponds to the region of the model you are using. For details
about which symbol corresponds to the model you are using, see p.9 "Model-Specific Information".
About IP Address
In this manual, "IP address" covers both IPv4 and IPv6 environments. Read the instructions that are relevant
to the environment you are using.
8
Model-Specific Information
This section explains how you can identify the region your machine belongs to.
There is a label on the front cover of the printer, and it is located in the position shown below. The label
contains details that identify the region your machine belongs to. Read the label.
CEE070
The following information is region-specific. Read the information under the symbol that corresponds to the
region of your machine.
(mainly Europe and Asia)
If the label contains the following, your machine is a region A model:
• CODE XXXX -22, -27
• 220-240V
(mainly North America)
If the label contains the following, your machine is a region B model:
• CODE XXXX -11, -17
• 120V
• Dimensions in this manual are given in two units of measure: metric and inch. If your machine is a
Region A model, refer to the metric units. If your machine is a Region B model, refer to the inch units.
9
Manuals for This Printer
Read this manual carefully before you use this printer.
Refer to the manuals that are relevant to what you want to do with the printer.
• Media differ according to manual.
• The printed and electronic versions of a manual have the same contents.
• Adobe® Acrobat® Reader® /Adobe Reader® must be installed in order to view the manuals as PDF
files.
• A Web browser must be installed in order to view the html manuals.
Safety Information
Contains information about safe usage of this printer.
To avoid injury and prevent damage to the printer, be sure to read this.
Quick Installation Guide
Contains procedures for removing the printer from its box, and connecting it to a computer.
Hardware Guide
Contains information about paper; names and functions of the parts of this printer; and procedures
such as installing options, replacing consumables, responding to error messages, and resolving jams.
Driver Installation Guide
Contains procedures for installing the printer driver. This manual is included on the driver CD-ROM.
Software Guide (This manual)
Contains information about using this printer, its software, and its security functions.
Security Guide
This manual is for administrators of the printer. It explains security functions that you can use to prevent
unauthorized use of the printer, data tampering, or information leakage. Be sure to read this manual
when setting the enhanced security functions, or user and administrator authentication.
VM Card Extended Feature Settings Web Reference
Contains information about setting up the extended features settings using Web Image Monitor.
UNIX Supplement
Contains information about the usage of commands to operate this printer.
To obtain the "UNIX Supplement", visit our Web site or consult an authorized dealer.
This manual includes explanations of functions and settings that might not be available on this printer.
This manual is provided in English only.
10
• Manuals provided are specific to printer types.
• The following software products are referred to as using general names:
Product name
General name
DeskTopBinder Lite and DeskTopBinder
Professional*1
DeskTopBinder
SmartDeviceMonitor for Client 2
SmartDeviceMonitor for Client
Enhanced Locked Print NX
ELP-NX
*1 Optional
11
List of Options
This section provides a list of options for this printer, and how they are referred to as in this manual.
Option List
Referred to as
Hard Disk Drive Type 4310
Hard disk
Memory Unit Type G 128MB
SDRAM module
Memory Unit Type G 256 MB
SDRAM module
IEEE 802.11a/g Interface Unit Type L
IEEE 802.11a/g Interface Unit Type M
Wireless LAN interface unit
Wireless LAN interface unit
IEEE 1284 Interface Board Type A
IEEE 1284 interface board
SD card for NetWare printing Type G
NetWare card
VM CARD Type O
VM card
IPDS Unit Type 4310
IPDS card
• For details about the specifications of each option, see "Specifications", Hardware Guide.
12
1. Preparing for Printing
This chapter explains the preparation procedure to use this printer.
Before Using the Printer
1
This section explains the settings, procedures, items, and other information on which the user is
recommended to check before you can use this printer.
Drivers and Utilities
To use this printer, you must install its driver on your computer.
For details about the procedure for installing the printer driver, see Driver Installation Guide on the driver
CD-ROM.
This printer comes with two CD-ROMs: a driver CD-ROM and a manual CD-ROM.
For details about the contents of the drivers CD-ROM, see p.15 "Software Included on the CD-ROM".
Besides drivers, there are other useful utilities available for this printer.
For details about these utilities, see p.17 "Downloading Utility Software".
Using User Authentication
Using authentication, administrators manage the printer and its users. To enable authentication, information
about both administrators and users must be registered in order to authenticate users via their login user
names and passwords.
There are four kinds of administrator. Each administrator manages a specific area of printer usage, such
as settings or user registration.
Access limits for each user are specified by the administrator responsible for user access to printer functions
and documents and data stored in the printer.
When authentication is set on the printer, see p.19 "If User Authentication is Specified".
Accessing the Extended Features
Various functions besides printing can be accessed using the [Switch Functions] key on this printer.
Use the following procedure to switch between applications.
13
1. Preparing for Printing
1. Press the [Switch Functions] key.
1
CEE502
2. Press the [ ] or [ ] key to select the [JavaTM/X].
3. Press the [OK] key.
4. If more than one extended feature is installed, use the [ ] or [ ] key to select the extended
feature you want to access.
5. Press the [OK] key.
• Function switching is possible only when the VM card is installed.
• This manual explains the procedure for changing settings when 'Printer' is selected as the application.
14
Software Included on the CD-ROM
Software Included on the CD-ROM
This section explains the software included on the "Printer Drivers and Utilities" CD-ROM that comes with
this printer.
1
Viewing the Contents of the CD-ROM
This section explains how to view the contents of the CD-ROM.
1. Insert the CD-ROM into the CD-ROM drive.
2. Select a language, and then click [OK].
3. Click [Browse This CD-ROM].
Explorer starts and displays the contents of the CD-ROM.
Printer Drivers for This Printer
This section explains printer drivers for this printer.
• You can install the PCL printer drivers (PCL 5e and PCL 6), and the PostScript® 3TM printer driver from
the CD-ROM provided with this printer or download them from the manufacturer's Web site.
Printing requires installation of the printer driver that is correct for your operating system. The following
drivers are included on the CD-ROM labeled "Printer Drivers and Utilities".
Operating System
PCL 5e
PCL 6
PostScript 3
Windows XP *1
OK
OK
OK
Windows Vista *2
OK
OK
OK
Windows 7 *3
OK
OK
OK
Windows Server 2003 *4
OK
OK
OK
Windows Server 2008 *5
OK
OK
OK
Mac OS X *6
OK
*1 Microsoft Windows XP Professional Edition/Microsoft Windows XP Home Edition
*2 Microsoft Windows Vista Ultimate/Microsoft Windows Vista Enterprise/Microsoft Windows Vista Business/
Microsoft Windows Vista Home Premium/Microsoft Windows Vista Home Basic
15
1. Preparing for Printing
*3 Microsoft Windows 7 Home Premium/Microsoft Windows 7 Professional/Microsoft Windows 7 Ultimate/
Microsoft Windows 7 Enterprise
1
*4 Microsoft Windows Server 2003 Standard Edition/Microsoft Windows Server 2003 Enterprise Edition/
Microsoft Windows Server 2003 R2 Standard Edition/Microsoft Windows Server 2003 R2 Enterprise Edition
*5 Microsoft Windows Server 2008 Standard /Microsoft Windows Server 2008 Enterprise/Microsoft Windows
Server 2008 Standard without Hyper-V/Microsoft Windows Server 2008 Enterprise without Hyper-V/
Microsoft Windows Server 2008 R2 Standard/Microsoft Windows Server 2008 R2 Enterprise
*6 Mac OS X 10.2 later
PCL Printer Drivers
Two kinds of PCL printer drivers (PCL 5e and PCL 6) are included. These drivers allow your computer
to communicate with this printer using a printer language.
PostScript 3 Printer Driver
PostScript 3 printer driver allows the computer to communicate with the printer using a printer
language.
PPD files
PPD files allow the printer driver to enable specific printer functions.
Font Manager
For installing new screen fonts, or organizing and managing fonts already in the system. For details
about Font Manager, see the manual on the CD-ROM labeled "Printer Drivers and Utilities".
• Some applications may require installation of the PCL 5e printer driver.
• For details about installation procedure, see Driver Installation Guide.
16
Downloading Utility Software
Downloading Utility Software
This section explains the utility software for this printer.
1
SmartDeviceMonitor for Admin
This section describes the functions available with SmartDeviceMonitor for Admin.
SmartDeviceMonitor for Admin is an application that monitors network printers. It can monitor multiple
network printers using IP address. We recommend that network administrators use this application.
SmartDeviceMonitor for Admin has the following functions:
• Group management for the machines
• Monitoring the machines
• Operation restriction
• Managing the Address Book
• Per-user counters
• User restriction
SmartDeviceMonitor for Admin with full functionality can be purchased from your local dealer. Contact
your local dealer for information on purchasing the software.
SmartDeviceMonitor for Admin with limited functionality is available as a free download. Contact your
local dealer for information on downloading the software.
• For details about the functionality, see the manual for SmartDeviceMonitor for Admin.
DeskTopBinder
This section describes the functions available with DeskTopBinder.
DeskTopBinder is to be installed on the client computers for integration and management of various kinds
of files such as scan files, files created with applications, and existing scan files. This software allows you
to use various functions for stored scan files such as viewing stored files. Also, with the ScanRouter delivery
software, you can view the files stored in in-trays of the delivery server, or use other functions for stored
files.
DeskTopBinder Professional provides the full functionality of the software. Contact your local dealer for
information on purchasing the software.
DeskTopBinder Lite with limited functionality is available as a free download. Contact your local dealer
for information on downloading the software.
17
1. Preparing for Printing
• For details about the functionality, see Help of DeskTopBinder.
1
SmartDeviceMonitor for Client
This section describes the functions available with SmartDeviceMonitor for Client.
SmartDeviceMonitor for Client allows you to manage and print various data such as files created with an
application, images scanned with a scanner, and existing images as one document.
SmartDeviceMonitor for Client has the following functions:
• Checking printer supplies such as paper or toner
• Checking results of print jobs executed from the computer
SmartDeviceMonitor for Client is available as a free download. Contact your local dealer for information
on downloading the software.
• For details about the functionality, see Help of SmartDeviceMonitor for Client.
18
If User Authentication is Specified
If User Authentication is Specified
When user authentication (User Code Authentication, Basic Authentication, Windows Authentication, LDAP
Authentication, or Integration Server Authentication) is specified, an authentication screen appears
whenever a user attempts to use the printer. The printer is usable only if the user enters a valid login user
name and password on this screen.
1
When authentication is specified, users must log in to use the printer and log out when they have finished
using it. Logging out prevents unauthorized usage of the printer, so users must be sure to log out.
• Consult the User Administrator about your login user name, password, and user code.
• For user code authentication, enter a number registered in the Address Book as User Code.
User Code Authentication (Using the Printer Driver)
To specify User Code using the printer driver, you must specify a user code in the printer Printing Preference
of the printer driver. The following procedure explains how to configure the printer driver settings under
Windows XP. If you are using another operating system, the procedure might vary slightly.
1. On the [Start] menu, click [Printers and Faxes].
2. Click the icon of the printer you want to use.
3. On the [File] menu, click [Printing Preferences...].
4. Click the [Detailed Settings] tab.
5. In the [Menu:] box, click the [Job Setup] icon.
6. Enter the user code in [User Code:], using up to 8 numeric characters.
7. Click [OK].
Log in (Using the Control Panel)
Use the following procedure to log in when Basic Authentication, Windows Authentication, LDAP
Authentication, or Integration Server Authentication is enabled.
1. Press the [Menu] key.
2. Press [Login].
3. Enter the login user name, and then press the [OK] key.
4. Enter the login password, and then press the [OK] key.
When the user is authenticated, the screen for the function you are using appears.
19
1. Preparing for Printing
Log out (Using the Control Panel)
1
Use the following procedure to log out when Basic Authentication, Windows Authentication, or LDAP
Authentication is set.
1. Press the [Menu] key.
2. Press [Logout].
3. Press [Yes].
• Users who log in using the printer driver do not have to log out.
Log in (Using the Printer Driver)
When Basic Authentication, Windows Authentication, or LDAP Authentication is set, users must enter a
login user name and password to use the printer and/or print an individual job. The following procedure
explains how to configure the printer driver settings under Windows XP. If you are using another operating
system, the procedure might vary slightly.
Setting Authentication
1. On the [Start] menu, click [Printers and Faxes].
2. Click the icon of the printer you want to specify authentication for.
3. On the [File] menu, click [Properties].
4. Click the [Advanced Options] tab.
5. On the [Authentication] menu, select [User Authentication].
6. Click [OK].
Setting Authentication for individual print jobs
1. On the [Start] menu, click [Printers and Faxes].
2. Click icon of the printer you want to specify authentication for.
3. On the [File] menu, click [Printing Preferences...].
4. Click the [Detailed Settings] tab.
5. In the [Menu:] box, click the [Job Setup] icon.
6. Click [Authentication...].
7. In [Login User Name:], enter a login user name using up to 32 characters.
8. In [Login Password:], enter a login password using up to 128 characters. Then, in
[Reenter the confirmation password:], enter the login password again, and then click
[OK].
20
If User Authentication is Specified
Log in (Using Web Image Monitor)
Use the following procedure to log in to the printer via Web Image Monitor.
1. Click [Login] in the Header area of Web Image Monitor.
1
2. Enter a login user name and password, and then click [Login].
Depending on the configuration of your Web browser, the login user name and password might be
saved. If you do not want to save them, configure your Web browser's settings so that this information
is not saved.
• If User Code Authentication is used, Web Image Monitor cannot be used to log in to the printer.
• The procedure may differ depending on Web Image Monitor used.
• For details about the login user name and password, consult your network administrator.
Log out (Using Web Image Monitor)
Use the following procedure to log out of Web Image Monitor.
1. Click [Logout] to log out.
• Delete the cache memory in Web Image Monitor after logging out.
21
1. Preparing for Printing
1
22
2. Printing Documents
This chapter explains how to print documents using the printer driver. It also describes the procedure for
configuring PDF Direct Print and other printing functions.
Displaying the Printer Driver Settings Screen
This section explains how to open and configure the printer driver properties.
2
The following procedure explains how to configure the printer driver settings under Windows XP. If you
are using another operating system, the procedure might vary slightly.
Making Printer Default Settings - The Printer Properties
• To change the printer's default settings (including settings for options), log on using an account that
has Manage Printers permission. Members of the Administrators group have Manage Printers
permission by default.
• You cannot change the printer default settings for individual users. Settings made in the [Printer
Properties] dialog box are applied to all users.
1. On the [Start] menu, click [Printers and Faxes].
2. Click the icon of the printer you want to use.
3. On the [File] menu, click [Properties].
4. Make the settings you require, and then click [OK].
• Depending on the applications, the settings you make here may not be used as the default settings.
• For details, see the printer driver Help.
Making Printer Default Settings - Printing Preferences
• When the printer driver is distributed from the print server, the setting values specified by the server
are displayed as the default for [Printing Defaults...].
1. On the [Start] menu, click [Printers and Faxes].
2. Click the icon of the printer you want to use.
3. On the [File] menu, click [Printing Preferences...].
23
2. Printing Documents
4. Make the settings you require, and then click [OK].
The setting is temporarily registered as [Unregistered] in the [One Click Preset List:] area.
• Depending on the applications, the settings you make here may not be used as the default settings.
2
• The [Unregistered] setting is invalid if the other [One Click Presets] icon is selected. If you wish to
confirm the [Unregistered] setting, click [Register Current Settings...]. For details about confirming the
setting, see p.24 "Making Printer Settings - One Click Presets".
• For details, see the printer driver Help.
Making Printer Settings from an Application
You can make printer settings for a specific application.
To make printer settings for a specific application, open the [Printing Preferences] dialog box from that
application. The following procedure explains how to make printer settings for a specific application using
Windows XP WordPad as an example.
1. On the [File] menu, click [Print...].
2. In the [Select Printer] list, select the printer you want to use.
3. Click [Preferences].
4. Make the settings you require, and then click [OK].
• Procedures for opening the [Printing Preferences] dialog box vary depending on the application. For
details, see the manuals provided with the application.
• Any settings you make using this procedure apply to the current application only.
• General users can change the properties displayed in the print dialog box of an application. Settings
made here are used the defaults when printing from the application.
• For details, see the printer driver Help.
Making Printer Settings - One Click Presets
This section explains how to register and use one click presets.
Each function explained in this section is preconfigured and registered under [One Click Preset List:] on the
[One Click Presets] tab.
You can apply the relevant setting simply by clicking on the one click preset name. This helps to avoid
incorrect settings and misprints.
24
Displaying the Printer Driver Settings Screen
One click presets can be added, modified, and deleted as required. By using registered one click presets,
users without in-depth knowledge of the printer driver can utilize advanced printing functions easily.
Follow the procedure to register one click presets.
1. In the application, on the [File] menu, click [Print].
2. Select the printer, and then open the [Printing Preferences] dialog box in the document's
native application.
3. Make the settings you require.
2
4. Click [Register Current Settings...].
Enter a name and comment that describe the setting, and then click [OK]. The newly registered icon
appears with its registered name in the [One Click Preset List:] area.
5. Click [OK].
• Under Windows operating systems, this function is available through the PCL 6 or PostScript 3 printer
driver.
• For details about modifying and deleting one click presets, see the printer driver Help.
25
2. Printing Documents
Frequently Used Print Methods
This section explains how to use the various printing functions including normal printing, duplex printing,
and combine printing.
2
Each function described in this section is configured and registered under "One Click Presets". You can
also change the parameters for each function by modifying "One Click Presets". For details about custom
settings, see p.24 "Making Printer Settings - One Click Presets".
Standard Printing
Use the following procedure to print documents using the normal printing function with the printer driver.
• If you are using a printer with ELP-NX installed, all print jobs for which "Normal Print" or "Locked Print"
is specified are stored in ELP-NX when user authentication is set. After issuing the print command from
the printer driver, log in to ELP-NX and print the job.
• If you are using a printer with ELP-NX installed, all print jobs for which "Locked Print" is specified are
stored in ELP-NX when user authentication is not set. Also note that any jobs for which "Locked Print"
is not specified will be deleted according to the default setting of ELP-NX.
• For details about how to print using ELP-NX, see the manuals provided with the application.
• For details about the option settings of ELP-NX, consult your administrator.
• Before printing, make sure that the settings for the installed options and loaded paper are correctly
configured.
For the PCL 6 printer driver:
1. In the application, on the [File] menu, click [Print].
2. Select the printer, and then open the [Printing Preferences] dialog box in the document's
native application.
3. Click the [One Click Presets] tab, if it is not already selected.
4. In the [Job Type:] list, select [Normal Print].
If you want to print multiple copies, specify a number of sets in the [Copies:] box.
5. In the [Document Size:] list, select the size of the original to be printed.
6. In the [Orientation:] list, select [Portrait] or [Landscape] as the orientation of the
original.
7. In the [Input Tray] list, select the paper tray that contains the paper you want to print
onto.
If you select [Auto Tray Select] in the [Input Tray] list, the source tray is automatically selected
according to the paper size and type specified.
26
Frequently Used Print Methods
8. In the [Paper Type:] list, select the type of paper that is loaded in the paper tray.
9. To save current setting in the One Click Preset List, click [Register Current Settings...].
Enter a name and comment that describe the setting, and then click [OK]. The newly registered
icon appears in the [One Click Preset List:] area.
10. Click [OK] to close the Printing Preferences dialog box.
11. Print the document using the print function in the document's native application.
2
For the PCL 5e printer driver:
1. In the application, on the [File] menu, click [Print].
2. Select the printer, and then open the [Printing Preferences] dialog box in the document's
native application.
3. In the [Job Type:] list, select [Normal Print].
If you want to print multiple copies, specify a number of sets in the [Copies:] box.
4. In the [Orientation:] list, select [Portrait] or [Landscape] as the orientation of the
original.
5. Click the [Paper] tab.
6. In the [Document Size:] list, select the size of the original to be printed.
7. In the [Input Tray:] list, select the paper tray that contains the paper you want to print
onto.
If you select [Auto Tray Select] in the [Input Tray:] list, the source tray is automatically selected
according to the paper size and type specified.
8. In the [Type:] list, select the type of paper that is loaded in the paper tray.
9. Click [OK] to close the Printing Preferences dialog box.
10. Print the document using the print function in the document's native application.
• The types of paper loaded in the paper trays are indicated on the printer's display. This allows you
to see which tray the selected paper type is loaded in. However, the paper type setting available in
the printing preference dialog box might be different from the type indicated on the printer's display.
• If a warning message appears notifying you of a paper type or size mismatch see p.58 "If Errors
Occur with the Specified Paper Size and Type".
Performing Duplex or Booklet Printing
This section explains how to print on both sides of each page using the printer driver.
27
2. Printing Documents
For the PCL 6 printer driver:
1. In the application, on the [File] menu, click [Print].
2. Select the printer, and then open the [Printing Preferences] dialog box in the document's
native application.
2
3. To use an existing One Click Presets, click the [One Click Presets] tab, and then click the
icon in the [One Click Preset List:] box.
If you do not wish to modify a custom setting that is already registered in the printer driver, change
settings such as paper size and source tray as required, and then proceed to step 9.
4. Click the [Detailed Settings] tab.
5. In the [Menu:] box, click the [Edit] icon.
6. Select duplex or booklet printing.
When duplex printing is specified, select the method for binding the output pages in the [2 sided:]
list. For details, see p.29 "Types of duplex printing".
When booklet printing is specified, select the method for binding the output pages in the [Booklet:]
list. For details, see p.30 "Types of booklet printing".
7. Change any other print settings if necessary.
8. To save current setting in the One Click Preset List, click [Register Current Settings...].
Enter a name and comment that describe the setting, and then click [OK]. The newly registered
icon appears in the [One Click Preset List:] area.
9. Click [OK] to close the Printing Preferences dialog box.
10. Print the document using the print function in the document's native application.
For the PCL 5e printer driver:
1. In the application, on the [File] menu, click [Print].
2. Select the printer, and then open the [Printing Preferences] dialog box in the document's
native application.
3. Select duplex or booklet printing in the [Duplex:] list.
For details about the different methods of binding that can be selected, see p.29 "Types of
duplex printing" or p.30 "Types of booklet printing".
4. Change any other print settings if necessary.
5. Click [OK] to close the Printing Preferences dialog box.
6. Print the document using the print function in the document's native application.
• If the document contains pages with different original sizes, page breaks may occur.
28
Frequently Used Print Methods
Paper sizes and types supported by duplex printing function
This section explains the paper sizes and types that can be used with the duplex printing function.
Paper sizes supported by duplex printing function
• A4
• A5
2
• B5
• 81/2 " × 14 "
• 81/2 " × 13 "
• 81/2 " × 11 "
• 81/4 " × 13 "
• 8 " × 13 "
• 51/2 " × 81/2 "
• 16K
• Duplex printing on A5
or 51/2 " × 81/2 "
is supported only by Tray 1 and the bypass tray.
Paper types supported by duplex printing function
• Plain
• Letterhead
• Recycled
Types of duplex printing
This section explains the page binding methods available when using the duplex printing function. When
using the duplex printing function, you can select whether to bind pages by the left or top edge.
2 sided:
• Open to Left
CBK520
29
2. Printing Documents
• Open to Top
2
CBK521
• To specify duplex printing in the PCL 5e printer driver, select [Open to Left] or [Open to Top] in the
[Duplex:] list in the printer properties dialog box.
Types of booklet printing
This section explains the page binding methods available when using the booklet printing function. When
using the booklet printing function, you can select the direction to which the pages open.
Booklet:
• Magazine
When [Portrait] is selected in the [Orientation:] list in the printer properties dialog box. For details,
see the printer driver Help.
CBK531
When [Landscape] is selected in the [Orientation:] list in the printer properties dialog box. For
details, see the printer driver Help.
30
Frequently Used Print Methods
2
CBK532
• To specify booklet printing in the PCL 5e printer driver, select [Booklet] in the [Duplex:] list in the printer
properties dialog box.
Combining Multiple Pages into Single Page
This section explains how to print multiple pages onto a single sheet. The combine printing function allows
you to economize on paper by printing multiple sheets at reduced size onto a single sheet.
• The combine printing function is not available on a custom size paper. To use the combine printing
function, specify a standard size paper.
For the PCL 6 printer driver:
1. In the application, on the [File] menu, click [Print].
2. Select the printer, and then open the [Printing Preferences] dialog box in the document's
native application.
3. To use an existing One Click Presets, click the [One Click Presets] tab, and then click the
icon in the [One Click Preset List:] box.
If you do not wish to modify a custom setting that is already registered in the printer driver, change
settings such as paper size and source tray as required, and then proceed to step 9.
4. Click the [Detailed Settings] tab.
5. In the [Menu:] box, click the [Edit] icon.
6. Select the combination pattern in the [Layout:] list, and then specify the method for
combining pages in the [Page Order:] list.
To draw a border line around each page, select [Draw Frame Border].
7. Change any other print settings if necessary.
31
2. Printing Documents
8. To save current setting in the One Click Preset List, click [Register Current Settings...].
Enter a name and comment that describe the setting, and then click [OK]. The newly registered
icon appears in the [One Click Preset List:] area.
9. Click [OK] to close the Printing Preferences dialog box.
2
10. Print the document using the print function in the document's native application.
For the PCL 5e printer driver:
1. In the application, on the [File] menu, click [Print].
2. Select the printer, and then open the [Printing Preferences] dialog box in the document's
native application.
3. Select the combination pattern in the [Layout:] list, and then specify the method for
combining pages in the [Page Order:] list.
To draw a border line around each page, select [Draw Frame Border].
4. Change any other print settings if necessary.
5. Click [OK] to close the Printing Preferences dialog box.
6. Print the document using the print function in the document's native application.
• If the document contains pages with different original sizes, page breaks may occur.
• If the application you are using also has a combine function, disable it. If the application's combine
function is also enabled when the driver's combine function enabled, incorrect printing is likely.
• For details about combining pages with different orientations and other advanced functions, see the
printer driver Help.
Types of combine printing
This section explains the different methods of combine printing that are available. Combine printing allows
you to print 2, 4, 6, 9, or 16 pages at reduced size onto a single sheet and to specify a page ordering
pattern for the combination. For 2 pages per sheet combine, you can select from two patterns. When
combining 4 or more pages onto a single sheet of paper, four patterns are available. The following
illustrations show example page ordering patterns for 2- and 4-page combinations.
2 Pages per Sheet
• From Left to Right/Top to Bottom
32
Frequently Used Print Methods
2
CBK522
CBK528
• From Right to Left/Top to Bottom
CBK527
CBK528
When using the PCL 5e printer driver, select one of the following four patterns:
[Right, then Down], [Left, then Down], [Down, then Right], [Down, then Left]
33
2. Printing Documents
4 Pages per Sheet
• Right, then Down
2
CBK523
• Left, then Down
CBK524
• Down, then Right
CBK525
• Down, then Left
34
Frequently Used Print Methods
2
CBK526
35
2. Printing Documents
Advanced Printing
This section explains the printer's advanced printing functions.
2
Other than the functions that can be configured in the [One Click Presets] tab, various print functions can
be setup from each [Menu:] icon in the [Detailed Settings] tab. The settings for each function described in
this section can be changed by using the following menus.
Using the PCL6 printer driver as an example, the following procedure explains how to configure the printer's
advanced printing functions.
Menu Names and Brief Overview of Each Function
The following is an overview of the settings that are available on the [Basic], [Paper], and [Effects] menus.
[Basic] menu
You can specify the type of the paper you want to print on.
• Document Size:
If the printer's trays do not contain paper matching the settings of the print job, you can proceed
with printing by using the bypass tray.
For details about this function, see p.37 "Specifying Printer Driver or Print Command
Priority".
[Paper] menu
You can enable/disable the cover and slip sheets function.
• Paper Type:
You can specify the type of the paper you want to print on. If the printer's trays do not contain
paper matching the settings of the print job, you can proceed with printing by using the bypass
tray.
For details about this function, see p.37 "Specifying Printer Driver or Print Command
Priority".
• Front Cover
Using this function, you can insert cover sheets fed from a different tray to that of the main paper,
and print on them. For details, see p.39 "Printing on Cover Sheet".
• Slip Sheet
Using this function, you can insert slip sheets fed from a different tray to that of the main paper,
and print on them. For details, see p.40 "Inserting Slip Sheets".
[Effects] menu
You can enable/disable the Watermark function.
36
Advanced Printing
The Watermark function prints text under the main content of every page of a document. For details
about this function, see p.42 "Printing with Watermarks".
• For details about the menu items not explained in this section, see the printer driver Help.
Specifying Printer Driver or Print Command Priority
2
If you select [Any Size/Type] or [Any Custom Size/Type] for [Bypass Tray] in [Tray Setting Priority] under
[Print Settings] using the control panel, you can print onto a specified paper without changing or confirming
the paper settings for print jobs.
If the printer's trays do not contain paper matching the settings of the print job, you can proceed with printing
by applying the paper settings specified in the print job to paper fed from the bypass tray. You do not need
to change the paper settings using the control panel, even if you frequently use paper of different sizes, or
if you are printing onto an unusual type of paper.
• To continue printing from the bypass tray onto all paper sizes, select [Any Size/Type] for [Bypass
Tray] in [Tray Setting Priority] under [Print Settings]. To continue printing from the bypass tray onto
custom size paper only, select [Any Custom Size/Type] for [Bypass Tray] in [Tray Setting Priority]
under [Print Settings]. For details about each setting on the Print Settings menu, see p.108 "Print
Settings Menu Parameters".
• Select [Auto Tray Select] in the printer driver. If [Auto Tray Select] is specified when a job is sent to
the printer, the matching tray will be detected in the order specified in [Tray Priority] under [Paper
Input]. If you select [Bypass Tray] for [Tray Priority], paper will always be fed from the bypass tray,
as long as paper is loaded there. For details about printer driver settings, see p.36 "Menu Names
and Brief Overview of Each Function". For details about the [Tray Priority] setting, see p.89 "Paper
Input Menu Parameters".
If you select [Any Size/Type] or [Any Custom Size/Type] for the bypass tray, jobs will be printed in the
following manner.
Any Size/Type
If the printer's trays do not contain paper matching the settings of the print job, printing can proceed
from the bypass tray with the job's settings applied.
37
2. Printing Documents
2
CBK507
Any Custom Size/Type
If the printer's trays do not contain paper matching the settings of the print job but custom paper was
specified using the printer driver or by print command, printing can proceed from the bypass tray with
the job's settings applied.
CBK508
• When this function is enabled, printing may be slower than usual.
• If paper is not loaded in the bypass tray when a job is received, a message prompting you to load
paper will appear on the control panel. When this message appears, load paper of the indicated
size and type print side down on the bypass tray.
38
Advanced Printing
• When printing a job that consists of pages of different sizes and the sheets of corresponding sizes are
not loaded in any of the printer’s paper trays, each of these pages will be printed on the sheets fed
from the bypass tray. Only the pages for which the matching paper sizes are loaded in the printer’s
paper trays will be printed on the sheets fed from the printer’s paper trays.
• If the paper size or type specified for the print job does not match the paper loaded on the bypass
tray, a message warning you of the mismatch will appear on the control panel. For the procedure to
resolve this problem, see p.60 "Proceeding with Printing Using the Bypass Tray".
2
Printing on Cover Sheet
Using this function, you can insert cover sheets fed from a different tray to that of the main paper, and print
on them.
• To use this function, Collate must be set.
Prints the first page of the document on the sheet for the cover page.
Print on one side
Prints on one side of the cover sheet only, even when duplex printing is selected.
CBK512
Print on both sides
Prints on both sides of the cover sheet when duplex printing is selected.
• Cover sheet printed on both sides
CBK513
• Cover sheet printed on one side
39
2. Printing Documents
2
CEC304
Blank
• When printing one side
CEC303
• When printing both side
CEC305
• The cover sheets should be the same size and orientation as the body of the paper.
• If "Auto Tray Select" is set for the body paper feed tray, body paper will be delivered from a tray that
contains paper set in portrait orientation. Therefore, if the cover paper is set to landscape orientation,
the orientation of the cover and body paper will be different.
• For printing methods, see the printer driver Help.
Inserting Slip Sheets
Inserting a slip sheet between each page
• Leave Blank
40
Advanced Printing
CBK515
2
• Print on Slip Sheet
CBK517
Inserting a slip sheet between OHP transparencies
• Leave Blank
CBK516
• Print on Slip Sheet
CBK518
• Collate cannot be set when using slip sheets.
• When the duplex printing or cover printing is set, you cannot insert slip sheets.
• The slip sheet should be the same size and orientation as the body paper.
• If "Auto Tray Select" has been set as the paper feed tray for the body paper, the paper will be delivered
from a tray containing paper in orientation. Therefore, when the slip sheet has been set to
orientation, the orientation of the output slip sheet and body paper will be different.
• The same paper feed tray cannot be set for the body of the document and slip sheets.
41
2. Printing Documents
Printing with Watermarks
Using this function, you can print documents with text watermarks.
This function increases a document's security and identifiability by embedding a specified text (watermark)
on every page. You can specify only one type of watermark at a time.
2
• You can create and apply custom watermarks. For details about creating original watermarks, see
the printer driver Help.
Types of watermarks
This section explains the types of watermarks available.
Following are the pre-registered text watermarks that are available:
• CONFIDENTIAL
CBK503
• URGENT
CBK502
• DRAFT
42
Advanced Printing
2
CBK504
• ORIGINAL
CBK505
• COPY
CBK501
43
2. Printing Documents
Collate Function
This section explains the printer's Collate function.
The Collate function allows you to print while sorting printouts into page-ordered sets, such as when printing
multiple copies of meeting materials.
2
• Up to 150 pages can be stored in the printer's RAM. If the hard disk is installed, up to 1,000 pages
can be stored.
• Collate will be canceled if an error occurs during printing of the first set.
Output can be assembled as sets in sequential order.
CBK511
• For printing methods, see the printer driver Help.
44
Spool Printing
Spool Printing
Spool Printing allows print jobs transferred from a computer to be temporarily stored, and then prints them
after they are transferred. This shortens printing time as it maximizes printer efficiency.
With Spool Printing, the print data is saved in the hard disk before printing.
• This function is available only if the hard disk is installed on the printer.
2
• Use the "spoolsw clear job" telnet command to clear a spooled print job. Do not turn off the printer
or computer while a print job is being spooled and the Data In is flashing. Print jobs that are interrupted
in this way remain on the printer's hard disk and will finish printing out when the printer is turned back
on.
• The Spool Printing function is available for data received using "diprint", "lpr", "ipp", "ftp", "sftp (TCP/
IP (IPv6))" , and "wsd (printer)".
• When using diprint, the Spool Printing function cannot be used with bi-directional communication.
• The domain reserved for spool printing is about 1 GB.
• When Spool Printing is on, the size of a single print job cannot exceed 500 MB.
• When receiving jobs from multiple computers, the printer can spool a maximum of ten lpr jobs, and
only one "diprint", "ipp", "ftp", "sftp", "smb" , or "wsd (printer)" job. If the printer's spooling capacity
is exceeded, newer jobs cannot be printed. You must wait before sending further jobs.
• Printing the first page with Spool Printing will be slow.
• The computer requires less print processing time when large amounts of data are spooled.
• Stored spool jobs can be viewed or deleted using Web Image Monitor.
• The list of spool jobs cannot be viewed from the printer's control panel.
• For information about the "spoolsw clear job" command on the telnet, see UNIX Supplement.
Setting Spool Printing
Spool printing settings can be made using control panel or telnet or Web Image Monitor.
• Using control panel
In [System] menu, select [On] in [Spool Printing]. For details about control panel, see p.102 "System
Menu".
• Using Web Image Monitor
Click [Configuration] in the menu area, and then set [Spool Printing] in [System] under "Device
Settings" to [Active].
45
2. Printing Documents
• Using telnet
Enter "spoolsw spool on".
• For details about Web Image Monitor, see Web Image Monitor Help.
2
• For details about "Using telnet", see UNIX Supplement.
Viewing or Deleting Spooled Jobs Using Web Image Monitor
Follow the procedure below to check or delete spooled jobs using Web Image Monitor.
1. Log in to Web Image Monitor as an administrator.
For details about logging in, see p.139 "Access in the Administrator Mode".
2. In the menu area, click [Job].
3. On the [Printer] menu, click [Spool Printing].
4. To delete a job, select the check box of the job you want to delete, and then click [Delete].
The selected job is deleted.
5. Click [Logout].
6. Quit Web Image Monitor.
• For details about Web Image Monitor, see Web Image Monitor Help.
46
Printing a PDF File Directly
Printing a PDF File Directly
This section explains how to print PDF files directly without having to open a PDF application by using
DeskTopBinder or UNIX commands.
Using DeskTopBinder
2
This section explains how to print PDF files directly without having to open a PDF application by using
DeskTopBinder. To use this function, you must first download DeskTopBinder from the manufacturer's
Website and install it on your computer. Contact your local dealer for information on downloading
DeskTopBinder.
• This function is possible for genuine Adobe PDF files only.
• PDF files that are Version 1.7 or earlier are compatible.
• PDF files created using PDF version 1.5 Crypt Filter functions or more than eight DeviceN Color Space
components cannot be printed.
• PDF files created using PDF version 1.6 watermark note functions, or extended optional contents
cannot be printed.
• AcroForm is a function specific to PDF version 1.7 and is not supported.
• If the document contains transparency function data, it may fail to print. When this happens, use the
printer driver to print the document.
• Large PDF files might not be printable using the PDF direct print function.
• Paper size errors may occur when printing on custom size paper.
Expanding DeskTopBinder features
This section explains how to extending the features of DeskTopBinder.
To extend a feature, click on its icon in the [Type:] list.
The following procedure explains how to use the extended features Wizard to print PDF files directly.
1. On the [Start] menu, point to [All Programs], [DeskTopBinder], and then click [Extended
Features Wizard].
2. Select [Easy settings], then click [Start] and then, click [Next] repeatedly until the [Printing
Function2] dialog box appears.
If you have selected [All function settings], click [Start], and then click the [Output] icon in the [Type:]
list. Select [PDF Direct Print] in [Selectable function(s):], and then click [Add].
47
2. Printing Documents
3. In the [Printing Function2] dialog box, click [Add...].
4. Click [Specify...], and then enter the IP address or host name of the printer.
5. Click [OK].
6. Click [OK].
2
7. Click [Next] repeatedly until [Finish] appears.
8. Click [Finish].
Function palette
The Function Palette contains buttons for functions that are already configured through expanded
DeskTopBinder functions. Using these buttons, you can print Windows files, preview printouts, convert
images, and register scanners for documents without having to open DeskTopBinder. You can also use
these functions simply by dragging a target file to the button corresponding to the required function and
dropping it there.
1. On the [Start] menu, point to [All Programs], [DeskTopBinder], and then click [Function
Palette].
An icon for the Function palette is added to the task tray displayed at the bottom right of the screen.
2. Right-click the new icon that has been added to the task tray, and then click [Properties...].
3. Click the [Contents] tab, select the [PDF Direct Print] check box at the center, and then click
[OK].
The [Properties] screen closes and the [PDF Direct Print] icon is added to the palette.
PDF Direct Printing Using Function Palette
Follow the procedure below to print PDF files directly.
1. Drag the PDF file you want to print to the PDF Direct Printing icon on the Function Palette and
drop it there.
2. Highlight the PDF file you want to print, and then click [OK].
48
Printing a PDF File Directly
PDF Direct Print Properties
1
9
2
10
3
11
2
12
4
6
5
14
13
15
7
8
CEC306
1. Setting name:
Displays the plug-in configuration name (up to 63 single byte characters)
2. Change Icon...
Changes the icon displayed on the tool bar.
3. Printer:
Displays printer's IP address or hostname.
4. Duplex
Prints on both sides of sheets.
5. Layout
Prints multiple pages on a single sheet.
6. Punch (not supported for this printer)
Punches holes in printed sheets.
7. Staple (not supported for this printer)
Staples together printed sheets.
8. Display this dialog box before printing
Appears in PDF direct printing mode if this check box is selected.
9. Orientation:
Specify the original's orientation.
10. Number of copies
Specify the number of copies to print.
11. Collate
Sorts printed sheets.
49
2. Printing Documents
12. Range:
Specify which paper to print.
13. Printout paper size:
Specify the paper size you want copies to be printed onto.
14. Color/Black and White:
2
Specify [Black and White] printing for this printer.
15. Resolution:
Specify a print resolution.
Using Commands to Print
This section explains how to print PDF files directly using printing commands, such as "lpr", "rcp", "ftp", and
"sftp".
Sending a PDF file
Use the following procedure to send a PDF file to this printer using printing commands.
Following is an example when using the "lpr" command to print a PDF file by specifying the printer's IP
address.
c:\> lpr -S printer's IP address -P printer name [-o l] \path\ PDF file name
• Entering the text enclosed in brackets [ ] is optional.
• For details about printing PDF files directly, see UNIX Supplement.
Entering the PDF password
Use the following procedure to print a password protected PDF file directly.
To print a PDF file that is protected by a password, enter the password using the control panel or Web
Image Monitor.
Using the Control Panel
To enter a PDF password using the control panel, select [Change PDF Password] on [PDF Menu]
under [Print Settings].
Using Web Image Monitor
To enter a PDF password using Web Image Monitor, click [Configuration] in the menu area, and then
select [PDF Temporary Password] under "Printer".
50
Printing a PDF File Directly
• For details about Web Image Monitor, see Web Image Monitor Help.
2
51
2. Printing Documents
Specifying the Classification Code for a Print Job
When printing in an environment where classification codes are required, a classification code must be
specified for each print job.
2
• The PostScript 3 printer driver does not support the classification codes and it cannot be used to print
under environment which the classification codes are required.
For the PCL 6 printer driver:
1. In the application, on the [File] menu, click [Print].
2. Select the printer, and then open the [Printing Preferences] dialog box in the document's
native application.
3. Click the [Detailed Settings] tab.
4. In the [Menu:] box, click the [Job Setup] icon.
5. Enter the classification code in the [Classification Code:] box.
This code identifies the user. The classification code can contain up to 32 alphanumeric (a-z, A-Z,
0-9, "-") characters.
6. Make any other necessary print settings, and then click [OK].
7. Execute the print command.
8. The print job is sent to the printer.
For the PCL 5e printer driver:
1. In the application, on the [File] menu, click [Print].
2. Select the printer, and then open the [Printing Preferences] dialog box in the document's
native application.
3. Click the [Valid Access] tab.
4. Enter the classification code in the [Classification Code:] box.
This code identifies the user. The classification code can contain up to 32 alphanumeric (a-z, A-Z,
0-9, "-") characters.
5. Make any other necessary print settings, and then click [OK].
6. Execute the print command.
7. The print job is sent to the printer.
• The specified classification code is stored in the printer driver.
52
Specifying the Classification Code for a Print Job
• To switch between different classification codes, install the printer driver under different names, and
specify different classification code for each driver.
• For details about how to view the log collected using Classification Code, see the manual for the
external log collection system.
2
53
2. Printing Documents
Using the Virtual Printer
2
A virtual printer is a pseudo printer that can only be recognized on a network. The virtual printer has various
print options, such as feeding tray selection and duplex printing, which you can set in advance. You can
also use the interrupt printing function. This function suspends the ongoing job and gives priority to a new
job.
This function is available only if the hard disk is installed on the printer.
If you use the virtual printer under UNIX, Solaris, and other operating systems, various print functions are
possible without having you manually enter usual print commands.
Adding a Virtual Printer
• Adding a virtual printer requires Administrators privilege. Log in using an account that has
Administrators privilege.
• The following Virtual Printer protocols are available: "TCP/IP (Unspecified, Normal)", "TCP/IP
(Unspecified, Priority)", "TCP/IP (DIPRINT)", "TCP/IP (RHPP)", "TCP/IP (IPDS)", and "NetWare".
1. Log in to Web Image Monitor as an administrator.
For details about logging in, see p.139 "Access in the Administrator Mode".
2. In the menu area, click [Configuration], and then click [Virtual Printer Settings] in the "Printer"
category.
3. Click [Add].
4. In [Virtual Printer Name], enter a name for the new printer, and then select the protocol in
the [Protocol] list.
5. Click [OK].
• If you select [TCP/IP (DIPRINT)], [TCP/IP (IPDS)], or [NetWare] in the [Protocol] list, you cannot
specify a virtual printer name.
• You can specify a virtual printer name using up to 47 characters.
• You can add up to 50 virtual printers. After 50 virtual printers have been added, [Add] will no longer
be displayed.
54
Using the Virtual Printer
Changing a Virtual Printer Configuration
• You must have Administrators privilege to change the configuration of a virtual printer. Log in using
an account that has Administrators privilege.
1. Log in to Web Image Monitor as an administrator.
For details about logging in, see p.139 "Access in the Administrator Mode".
2
2. In the menu area, click [Configuration], and then click [Virtual Printer Settings] in the "Printer"
category.
3. Select the virtual printer whose configuration you want to change, and then click [Change].
If you want to configure this virtual printer for an interrupt printer, select [TCP/IP (Unspecified, Priority)]
in the protocol list.
4. Change the configuration as required.
5. Click [OK].
• For details about virtual printer configuration, see Web Image Monitor Help.
Confirming a Virtual Printer Configuration
1. Start Web Image Monitor.
2. In the menu area, click [Configuration], and then click [Virtual Printer Settings] in the "Printer"
category.
3. Select the virtual printer whose configuration details you want to confirm, and then click
[Details].
• [Details] is not displayed if you log in to Web Image Monitor as an administrator. To confirm a virtual
printer configuration, click [Change].
• When the virtual printer function is disabled, the list of virtual printers is not displayed if you are using
Web Image Monitor in guest mode. For details about enabling the virtual printer function, see
p.56 "Printing Using a Virtual Printer".
55
2. Printing Documents
Deleting a Virtual Printer
• You must have Administrators privilege to delete a virtual printer. Log in using an account that has
Administrators privilege.
2
1. Log in to Web Image Monitor as an administrator.
For details about logging in, see p.139 "Access in the Administrator Mode".
2. In the menu area, click [Configuration], and then click [Virtual Printer Settings] in the "Printer"
category.
3. Select the virtual printer that you want to delete, and then click [Delete].
4. Click [OK].
• You cannot delete this printer's default virtual printer.
• [Delete] appears only if you have already added a virtual printer.
Printing Using a Virtual Printer
To print directly from a specified virtual printer, assign the virtual printer in the print command. If you use
the interrupt printing function, enter the name of the virtual printer that you configured for interrupt printing.
Before printing for the first time, specify the virtual printer you want to use.
1. Log in to Web Image Monitor as an administrator.
For details about logging in, see p.139 "Access in the Administrator Mode".
2. In the menu area, click [Configuration], and then click [Basic Settings] in the "Printer"
category.
3. Select [Active] in [Virtual Printer], and then click [OK].
4. Send a command from your computer.
Following is an example when using the "lpr" command to print a file.
c:\> lpr -S printer's IP address -P virtual printer name [-o l] \path\file name
• When the ongoing job meets any of the following conditions, interrupt printing is not possible even if
you print with the virtual printer that is configured for interrupt printing. The printer waits to print a new
job until it finishes printing the current job.
• When the ongoing print job is performed using the bypass tray
• When a function related to cover or slip paper is specified for the ongoing print job
56
Using the Virtual Printer
• If a large amount of memory is used for the ongoing print job or a large number of sheets are being
printed, there may not be enough memory to process an interrupt print job, or only part of the interrupt
job may be printed. If this happens, certain functions for the interrupt job, such as stapling or storing
data onto the printer, can be canceled or sheets can be sorted in a number smaller than the standard
maximum capacity.
• For details about printing PDF files directly, see UNIX Supplement.
2
57
2. Printing Documents
If Errors Occur with the Specified Paper Size and
Type
2
If the paper size or type specified for the print job does not match the paper loaded in the paper tray or
on the bypass tray, a message warning you of the mismatch will appear on the control panel. Resolve the
mismatch by following the instructions in the message.
Changing the Paper Tray Settings
Use the following procedure to change the paper size and type specified for a tray and continue printing.
1. On the warning screen, press [Change].
2. Press the [ ] or [ ] key to select the tray whose paper size setting you want to change, and
then press the [OK] key.
3. Select the paper size you want to set using the scroll keys, and then press the [OK] key.
4. Press the [ ] or [ ] key to select the tray whose paper type you want to change, and then
press the [OK] key.
5. Press the [ ] or [ ] key to select the paper type you require, and then press the [OK] key.
6. Press the [Escape] key
Printing starts if the selected tray contains paper matching the size and type settings specified in the
print job.
Printing from a Selected Tray
If the printer does not have a tray for the selected paper size or paper type, or if the selected paper loaded
in the printer has run out, a caution message appears. If this message appears, do the following procedure.
58
If Errors Occur with the Specified Paper Size and Type
1. When the caution message appears, press [FormFeed].
2. Press the [OK] key.
3. Select the tray for form feed using the [ ] or [ ] key from those that appear on the display
panel, and then press the [OK] key.
2
• If a tray with a smaller paper size is selected, the print job may be cut short, or other problems may
occur.
Canceling a Print Job
Follow this procedure for canceling the print job if the message prompting form feed appears.
1. Press [JobReset].
2. Press [Current].
To resume printing jobs, press [Resume].
59
2. Printing Documents
3. Press [Yes] to cancel the print job.
2
4. Press [No] to return to the previous display.
• If the printer is shared by multiple computers, be careful not to accidentally cancel someone else's
print job.
• Under Windows, If the printer is connected to the computer using a parallel cable, sent print jobs may
be canceled if the [Job Reset] key is pressed while "Please wait..." is displayed on the control panel.
After the interval set in [I/O Timeout] in [Host Interface] has passed, the next print job can be sent. A
print job sent from a different client computer will not be canceled in this case.
• You cannot stop printing data that has already been processed. For this reason, printing may continue
for a few pages after you press the [Job Reset] key.
• A print job containing a large volume of data may take considerable time to stop.
• To stop data printing, see p.79 "Canceling a Print Job".
Proceeding with Printing Using the Bypass Tray
If you select [Any Size/Type] or [Any Custom Size/Type] for the bypass tray, a warning message will
appear whenever the paper fed from the source tray does not match the size specified in the print job.
When this warning message appears, check the size of the loaded paper and do the following.
1. Load paper of the size/type indicated in the message onto the bypass tray.
2. Press [Continue].
Printing resumes from the page in which the error occurred.
• For details about [Any Size/Type] or [Any Custom Size/Type], see p.37 "Specifying Printer Driver
or Print Command Priority" and p.108 "Print Settings Menu".
60
3. Printing Stored Documents
This chapter explains how to print documents stored in the printer.
Using the Print Job Function
This describes how to print or delete files stored in the printer. There are following types of print files: Sample
Print, Locked Print, Hold Print, and Stored Print.
Print files sent from computers can be stored in the hard disk of the printer. Using the Print Job function, you
can print or delete the print files.
3
• This function is available only if the hard disk is installed on the printer.
Print Job Screen
If you press [Prt.Jobs] on the initial screen, a screen prompting to select the type of print job appears.
After selecting a type, you can select print files in the list by pressing:
• [Job List]
Displays the Job List screen.
• [User ID]
Displays the User ID screen.
If you select Sample Print, Locked Print, or Hold Print, the print files saved in the printer are deleted after
printing is completed. If you select Stored Print, the files remain in the printer even after printing is finished.
61
3. Printing Stored Documents
Job List Screen
CEE500
3
1. The type of print jobs
Displays the type of the print job you select.
2. Page number
Displays the current page number. Each time pressing the [ ] or [ ] key, the screen switches.
3. User ID, Date/Time, and File Name display
• User ID shows the user's ID set by the printer driver.
• Date and Time show the time at which the print job was stored in the printer.
• File name shows the name of the file. However, "****" is shown instead of the file name for a Locked Print
file.
4. [Print]
Prints a selected file.
5. [Change]
Changes or clears the password of a file if a password is set. To change the password of a Locked/Stored Print
job, press [Change], enter the current password, and then enter the new password on the confirmation screen.
To clear the password for the Stored Print Job, press [Change], enter the current password, and then press the
[OK] key in the confirmation screen without entering anything in the new password box.
You can also set passwords to the Stored Print files that do not currently have passwords.
6. [Delete]
Deletes a selected file.
• When you press [Change] to change or clear a password, you must first enter the existing password.
If the password you entered is incorrect, you cannot change or clear any current passwords.
• You can use [Change] to set or clear passwords only when Stored Print files are stored in the printer.
62
Using the Print Job Function
User ID Screen
CEE501
1. The type of print jobs
3
Displays the type of the print job you select.
2. Page number
Displays the current page number. Each time pressing the [ ] or [ ] key, the screen switches.
3. User ID
• User ID shows the ID of the user who stored the selected type of files.
• User ID set by the printer driver is shown.
4. [PrintAll]
Prints all files stored by the user whose user ID has been selected.
5. [Job List]
Switches the screen to the [Job List] screen.
Displays the print jobs of the selected user only.
• To cancel selecting a file, press the [Escape] key.
• The display is not updated if a new file is stored while the list of stored files is displayed. To update
the display, press the [Menu] or [Escape] key to return to the initial screen, and then press [Prt.Jobs]
again.
• If a large number of print jobs are stored in the printer, processing may slow temporarily, depending
on which functions are used.
63
3. Printing Stored Documents
Printing from the Print Job Screen
This section gives instruction about Sample Print, Locked Print, Hold Print, and Stored Print.
• If you are using a printer with ELP-NX installed, all print jobs for which "Normal Print" or "Locked Print"
is specified are stored in ELP-NX when user authentication is set. After issuing the print command from
the printer driver, log in to ELP-NX and print the job.
3
• If you are using a printer with ELP-NX installed, all print jobs for which "Locked Print" is specified are
stored in ELP-NX when user authentication is not set. Also note that any jobs for which "Locked Print"
is not specified will be deleted according to the default setting of ELP-NX.
• For details about how to print using ELP-NX, see the manuals provided with the application.
• For details about the option settings of ELP-NX, consult your administrator.
• This function is available only if the hard disk is installed on the printer.
Sample Print
Use this function to print only the first set of a multiple-set print job. After you have checked the result,
remaining sets can be printed or canceled using the printer's control panel. This can reduce misprints due
to mistakes in content or settings.
• A Sample Print file cannot be stored if:
• the hard disk is not installed in the printer.
• the total number of Sample Print, Locked Print, Hold Print, and Stored Print files in the printer is
over 100. (The maximum number varies depending on the volume of data in files.)
• the file contains over 1,000 pages.
• sent or stored files in the printer contain over 9,000 pages in total.
• If a Sample Print file has not been stored properly, check the error log in the control panel.
• Even after you turn off the printer, stored documents in the printer remain. However, the [Auto Delete
Temporary Jobs] or [Auto Delete Stored Jobs] settings are applied first.
• If the application has a collate option, make sure it is not selected before sending a print job. By
default, Sample Print jobs are automatically collated by the printer driver. If a collate option is selected
from the application's print dialog box, more prints than intended may be produced.
• If the first set of the Sample Print files is not as you expected and you do not want to print remaining
sets, delete the Sample Print file using the display panel. If you print the remaining sets of the Sample
Print file, the job in the printer is deleted automatically.
64
Printing from the Print Job Screen
• Sample Print files printed or deleted using Web Image Monitor, after you select [Sample Print] using
the control panel will appear on the display panel. However, an error message will appear if you try
to print or delete those Sample Print files.
• If stored files have similar and long file names, recognizing the file you want to print on the display
panel may be difficult. Print the file you want to print either by checking the user ID or the time the file
is sent, or by changing the file name to something that can be recognized easily.
• For details about the error log in the display panel, see p.133 "Checking the Error Log".
• For details about [Auto Delete Temporary Jobs] and [Auto Delete Stored Jobs], see p.92
"Maintenance Menu".
3
Sending a Sample Print file
The following procedure describes how to print a Sample Print file with the PCL 6/PCL 5e or PostScript 3
printer driver.
• Applications with their own drivers, such as PageMaker®, do not support this function.
1. Configure the Sample Print in the printer driver's properties.
For details about configuring the printer drivers, see the relevant Help files.
2. Click [Details...], and then enter a user ID in the [User ID:] box.
3. Click [OK] to close [Details...], and then click [OK] to close the printer driver's properties.
4. Start printing from the application's print dialog box.
Make sure to set more than two copies.
The Sample Print job is sent to the printer, and the first set is printed.
Printing a Sample Print file using the control panel
1. On the printer's control panel, press [Prt.Jobs].
65
3. Printing Stored Documents
2. Select [Sample Print Jobs] using the [ ] or [ ] key, and then press [Job List].
Depending on the security settings, certain print jobs may not be displayed.
3
You can print files also by pressing [User ID].
3. Select the file you want to print using the [ ] or [ ] key, and then press [Print].
If you want to print multiple copies, specify a number of sets in the [Quantity] box. Press the [Clear]
key to correct any entry mistakes.
4. Press [Print].
To cancel printing, press [Cancel].
• If the set quantity is changed when [User ID] is pressed in step 2, the changed quantity is applied to
all selected files.
• When printing is completed, the stored file will be deleted.
• To stop printing after printing has started, press the [Job Reset] key. The file will be deleted.
• For details about [User ID], see p.77 "Printing from the User ID Screen".
Deleting Sample Print files
If you are not satisfied with the Sample printout, you can delete the Sample Print file, revise it and print it
again until the settings are suitable.
1. Press [Prt.Jobs].
66
Printing from the Print Job Screen
2. Select [Sample Print Jobs] using the [ ] or [ ] key, and then press [Job List].
Depending on the security settings, certain print jobs may not be displayed.
3. Select the file you want to delete using the [ ] or [ ] key, and then press [Delete].
3
4. Press [Delete].
To cancel deleting, press [Cancel].
Locked Print
Use this function to maintain privacy when printing confidential documents on the printer over a shared
network. Usually, it is possible to print data using the display panel once it is stored in this printer. When
using Locked Print, it is not possible to print unless a password is entered on the printer's display panel.
Your confidential documents will be safe from being viewed by other people.
• If you are using a printer with ELP-NX installed, all print jobs for which "Normal Print" or "Locked Print"
is specified are stored in ELP-NX when user authentication is set. After issuing the print command from
the printer driver, log in to ELP-NX and print the job.
• If you are using a printer with ELP-NX installed, all print jobs for which "Locked Print" is specified are
stored in ELP-NX when user authentication is not set. Also note that any jobs for which "Locked Print"
is not specified will be deleted according to the default setting of ELP-NX.
• For details about how to print using ELP-NX, see the manuals provided with the application.
• For details about the option settings of ELP-NX, consult your administrator.
• A Locked Print file cannot be stored if:
• the hard disk is not installed in the printer.
• the total number of Sample Print, Locked Print, Hold Print, and Stored Print files in the printer is
over 100. (The maximum number varies depending on the volume of data in files.)
• the file contains over 1,000 pages.
• sent or stored files in the printer contain over 9,000 pages in total.
67
3. Printing Stored Documents
• If a Locked Print file has not been stored properly, check the error log in the control panel.
• Even after you turn off the printer, stored documents remain. However, the [Auto Delete Temporary
Jobs] or [Auto Delete Stored Jobs] settings are applied first.
• If the application has a collate option, make sure it is not selected before sending a print job. Locked
Print jobs are automatically collated by the printer driver as default. If a collate option is selected in
the application print dialog box, more sets than intended may be printed.
3
• After the Locked Print file is printed, the job is automatically deleted.
• Locked Print files printed or deleted using Web Image Monitor, after you select [Locked Print] using
the control panel will appear on the display panel. However, an error message will appear if you try
to print or delete those Locked Print files.
• For details about the error log in the display panel, see p.133 "Checking the Error Log".
• For details about [Auto Delete Temporary Jobs] and [Auto Delete Stored Jobs], see p.92
"Maintenance Menu".
Sending a Locked Print file
The following procedure describes how to print a Locked Print file with the PCL 6/PCL 5e or PostScript 3
printer driver.
• Applications with their own drivers, such as PageMaker, do not support this function.
1. Configure the Locked Print in the printer driver's properties.
For details about configuring the printer drivers, see the relevant Help files.
2. Click [Details...], and then enter a user ID in the [User ID:] box, and then enter a password
in the [Password:] box.
3. Click [OK] to close [Details...], and then click [OK] to close the printer driver's properties.
4. Start printing from the application's print dialog box.
The Locked Print job is sent to the printer and stored.
Printing a Locked Print file using the control panel
1. On the printer's control panel, press [Prt.Jobs].
68
Printing from the Print Job Screen
2. Select [Locked Print Jobs] using the [ ] or [ ] key, and then press [Job List].
Depending on the security settings, certain print jobs may not be displayed.
You can print files also by pressing [User ID].
3. Select the file you want to print using the [ ] or [ ] key, and then press [Print].
3
4. Enter the password, and then press the [OK] key.
A confirmation screen will appear if the password is not entered correctly. Press [Clear] or the [Clear]
key to enter the password again.
If you forget your password, contact your administrator for help.
5. Press [Print].
To cancel printing, press [Cancel].
• When printing is completed, the stored file will be deleted.
• To stop printing after printing has started, press the [Job Reset] key. The file will be deleted.
• For details about [User ID], see p.77 "Printing from the User ID Screen".
Deleting Locked Print files
1. Press [Prt.Jobs].
69
3. Printing Stored Documents
2. Select [Locked Print Jobs] using the [ ] or [ ] key, and then press [Job List].
Depending on the security settings, certain print jobs may not be displayed.
3
3. Select the file you want to delete using the [ ] or [ ] key, and then press [Delete].
4. Enter the password, and then press the [OK] key.
A confirmation screen will appear if the password is not entered correctly. Press [Clear] or the [Clear]
key to enter the password again.
If you forget your password, contact your administrator for help.
5. Press [Delete].
To cancel deleting, press [Cancel].
Hold Print
Use this function to temporarily hold a file in the printer, and print it from the computer or the printer's control
panel later.
• A Hold Print file cannot be stored if:
• the hard disk is not installed in the printer.
• the total number of Sample Print, Locked Print, Hold Print, and Stored Print files in the printer is
over 100. (The maximum number varies depending on the volume of data in files.)
• the file contains over 1,000 pages.
• sent or stored files in the printer contain over 9,000 pages in total.
70
Printing from the Print Job Screen
• If a Hold Print file has not been stored properly, check the error log in the control panel.
• Even after you turn off the printer, stored documents in the printer remain. However, the [Auto Delete
Temporary Jobs] or [Auto Delete Stored Jobs] settings are applied first.
• If the application has a collate option, make sure it is not selected before sending a print job. By
default, Hold Print jobs are automatically collated by the printer driver. If a collate option is selected
from the application's print dialog box, more prints than intended may be produced.
• Hold Print files printed or deleted using Web Image Monitor, after you select [Hold Print] using the
control panel will appear on the display panel. However, an error message will appear if you try to
print or delete those Hold Print files.
3
• If stored files have similar and long file names, recognizing the file you want to print on the display
panel may be difficult. Print the file you want to print either by checking the user ID or the time the file
is sent, or by changing the file name to something that can be recognized easily. If you enter the
document name on the printer driver's [Details...], that name appears on the display panel.
• It is possible, but not required, to set a file name or a password to a Hold Print file.
• For details about the error log in the display panel, see p.133 "Checking the Error Log".
• For details about [Auto Delete Temporary Jobs] and [Auto Delete Stored Jobs], see p.92
"Maintenance Menu".
Sending a Hold Print file
The following procedure describes how to print a Hold Print file with the PCL 6/PCL 5e or PostScript 3
printer driver.
• Applications with their own drivers, such as PageMaker, do not support this function.
1. Configure the Hold Print in the printer driver's properties.
For details about configuring the printer drivers, see the relevant Help files.
2. Click [Details...], and then enter a user ID in the [User ID:] box.
A file name can also be entered arbitrarily.
3. Click [OK] to close [Details...], and then click [OK] to close the printer driver's properties.
4. Start printing from the application's print dialog box.
The Hold Print job is sent to the printer and stored.
71
3. Printing Stored Documents
Printing a Hold Print file using the control panel
1. On the printer's control panel, press [Prt.Jobs].
3
2. Select [Hold Print Jobs] using the [ ] or [ ] key, and then press [Job List].
Depending on the security settings, certain print jobs may not be displayed.
You can print files also by pressing [User ID].
3. Select the file you want to print using the [ ] or [ ] key, and then press [Print].
4. Press [Print].
To cancel printing, press [Cancel].
• When printing is completed, the stored file will be deleted.
• To stop printing after printing has started, press the [Job Reset] key. The file will be deleted.
• For details about setting printer drivers, see the printer driver Help. You can also print or delete a Hold
Print file from Web Image Monitor. For details, see Web Image Monitor Help.
• For details about [User ID], see p.77 "Printing from the User ID Screen".
72
Printing from the Print Job Screen
Deleting Hold Print files
1. Press [Prt.Jobs].
2. Select [Hold Print Jobs] using the [ ] or [ ] key, and then press [Job List].
3
Depending on the security settings, certain print jobs may not be displayed.
3. Select the file you want to delete using the [ ] or [ ] key, and then press [Delete].
4. Press [Delete].
To cancel deleting, press [Cancel].
Stored Print
Use this function to store a file in the printer, and then print it from the computer or the printer's control panel
later.
Jobs are not deleted after they are printed, so the same job need not be resent in order to print multiple
copies.
• A Stored Print file cannot be stored if:
• the hard disk is not installed in the printer.
• the total number of Sample Print, Locked Print, Hold Print, and Stored Print files in the printer is
over 100. (The maximum number varies depending on the volume of data in files.)
• the file contains over 1,000 pages.
• sent or stored files in the printer contain over 9,000 pages in total.
73
3. Printing Stored Documents
• If a Stored Print file has not been stored properly, check the error log in the control panel.
• Even after you turn off the printer, stored documents in the printer remain. However, the [Auto Delete
Temporary Jobs] or [Auto Delete Stored Jobs] settings are applied first.
• If the application has a collate option, make sure it is not selected before sending a print job. By
default, Stored Print jobs are automatically collated by the printer driver. If a collate option is selected
from the application's print dialog box, more prints than intended may be produced.
3
• Stored Print files printed or deleted using Web Image Monitor, after you select [Stored Print] using
the control panel will appear on the display panel. However, an error message will appear if you try
to print or delete those Stored Print files.
• If stored files have similar and long file names, recognizing the file you want to print on the display
panel may be difficult. Print the file you want to print either by checking the user ID or the time the file
is sent, or by changing the file name to something that can be recognized easily.
• If you enter the document name on the printer driver's [Details...], that name appears on the display
panel.
• For details about the error log in the display panel, see p.133 "Checking the Error Log".
• For details about [Auto Delete Temporary Jobs] and [Auto Delete Stored Jobs], see p.92
"Maintenance Menu".
Sending a Stored Print file
The following procedure describes how to print a Stored Print file with the PCL 6/ PCL 5e or PostScript 3
printer driver.
• Applications with their own drivers, such as PageMaker, do not support this function.
1. Configure the Stored Print in the printer driver's properties.
You can select two ways for Stored Print:
• [Stored Print]
Stores the file in the printer and print it later using the control panel.
• [Store and Print] (or [Store and Normal Print])
Prints the file at once and also stores the file in the printer.
For details about configuring the printer drivers, see the relevant Help files.
2. Click [Details...], and then enter a user ID in the [User ID:] box.
You can also set a file name and a password. The same password must be entered when printing or
deleting.
3. Click [OK] to close [Details...], and then click [OK] to close the printer driver's properties.
74
Printing from the Print Job Screen
4. Start printing from the application's print dialog box.
The Stored Print job is sent to the printer and stored.
Printing a Stored Print file using the control panel
1. On the printer's control panel, press [Prt.Jobs].
3
2. Select [Stored Print Jobs] using the [ ] or [ ] key, and then press [Job List].
You can print files also by pressing [User ID].
3. Select the file you want to print using the [ ] or [ ] key, and then press [Print].
If you set a password in the printer driver, a password confirmation screen appears. Enter the
password.
If you want to print multiple copies, specify a number of sets in the [Quantity] box. Press the [Clear]
key to correct any entry mistakes.
4. Press [Print].
To cancel printing, press [Cancel].
• When multiple files are selected without setting a quantity, one set less than the minimum number of
all settings is applied. If the least number of settings is one set, all selected files will be printed at one
set.
• If the number of set quantity is changed when [User ID] is pressed in step 2, the changed quantity is
applied to all selected files.
• To stop printing after printing has started, press the [Job Reset] key. A Stored Print file is not deleted
even if the [Job Reset] key is pressed.
75
3. Printing Stored Documents
• The Stored Print file that sent to the printer is not deleted unless you delete a file or select [Auto Delete
Stored Jobs].
• You can set or delete a password after sending files to the printer. Select the file and press [Change]
in the Print Job List screen. To set a password, enter the new password. To delete the password, leave
the password box blank on entering or confirming the new password, and press the [OK] key.
• For details about the [Auto Delete Stored Jobs], see p.92 "Maintenance Menu".
• For details about [User ID], see p.77 "Printing from the User ID Screen".
3
Deleting Stored Print files
1. Press [Prt.Jobs].
2. Select [Stored Print Jobs] using the [ ] or [ ] key, and then press [Job List].
Depending on the security settings, certain print jobs may not be displayed.
3. Select the file you want to delete using the [ ] or [ ] key, and then press [Delete].
If you set the password in the printer driver, enter the password to delete.
If you forget your password, contact your administrator for help.
4. Press [Delete].
To cancel deleting, press [Cancel].
76
Printing from the User ID Screen
Printing from the User ID Screen
This describes how to print the files saved in the printer from the User ID screen.
Printing the Selected Print Job
1. On the initial screen, press [Prt.Jobs].
3
2. Press [User ID].
3. Select the user ID whose file you want to print using the [ ] or [ ] key, and then press [Job
List].
4. Select the file you want to print using the [ ] or [ ] key, and then press [Print].
5. Press [Print].
To cancel printing, press [Cancel].
• If you print a Sample, Locked, or Hold Print file, the print file saved in the printer is deleted after printing
is completed.
77
3. Printing Stored Documents
Printing All Print Jobs
1. On the initial screen, press [Prt.Jobs].
3
2. Select a type of print jobs you want to print using the [ ] or [ ] key, and then press [User
ID].
3. Select the user ID whose file you want to print using the [ ] or [ ] key, and then press
[PrintAll].
4. Press [Print].
To cancel printing, press [Cancel].
• If you print a Sample, Locked, or Hold Print file, the print file saved in the printer is deleted after printing
is completed.
• You cannot select a print job that is not stored under the selected user ID.
• When printing multiple Sample Print files without specifying the number of sets on the confirmation
screen, one set less than the least number of set specified on the computer is applied for every selected
document. If the number of sets specified on the computer is "1", one set each is printed for every
document.
• When printing multiple Stored Print files without specifying the number of sets on the confirmation
screen, the least number of set specified on the computer is applied for every selected document.
• If you select [Locked Print Jobs], enter the correct password. If there are multiple passwords, the printer
prints only files that correspond to the entered password.
• If you select Stored Print files, and some of these require a password, the printer prints files that
correspond to the entered password and files that do not require a password.
78
Canceling a Print Job
Canceling a Print Job
You can cancel printing from either the printer or a client computer. Since canceling procedures vary
depending on the print job status, check the job status and cancel printing according to the following
procedure.
If Printing Has Not Yet Started
You can cancel a print job from the computer.
3
• If the printer is shared by multiple computers, be careful not to accidentally cancel someone else's
print job.
• A print job containing a large volume of data may take considerable time to stop.
Windows
1. Double-click the printer icon on the Windows task tray.
A window appears, showing all print jobs currently queued for printing. Check the current status of
the job you want to cancel.
2. Select the name of the job you want to cancel.
3. On the [Document] menu, click [Cancel].
Mac OS X
1. Click the printer icon on the dock.
A window appears showing all print jobs that are currently queuing to be printed. Check the current
status of the job you want to cancel.
2. Select the name of the job you want to cancel.
3. In the application, on the [Jobs] menu, click [Delete Job].
If Printing Has Already Started
You can cancel a print job from the printer's control panel.
79
3. Printing Stored Documents
1. Press the [Job Reset] key.
3
CEE503
2. Press [Current].
To resume printing jobs, press [Resume].
3. Press [Yes] to cancel the print job.
Press [No] to return to the previous display.
• If the printer is connected to the computer using a parallel cable, sent print jobs may be canceled if
the [Job Reset] key is pressed while "Please wait..." is displayed on the control panel. After the interval
set in [I/O Timeout] in Printer Features has passed, the next print job can be sent. A print job sent from
a different client computer will not be canceled in this case.
• You cannot stop printing data that has already been processed. For this reason, printing may continue
for a few pages after you press the [Job Reset] key.
80
4. Making Printer Settings Using the
Control Panel
This chapter explains the menu displayed on the control panel and how to change the printer's settings.
Menu Chart
This section explains how to change the default settings of the printer and provides information about the
parameters included in each menu.
Memory Erase Status
Displays data status inside the memory.
This menu can be displayed only if all the following conditions are met:
4
• The optional hard disk and the SD card provided with the hard disk are installed.
• [Auto Erase Memory Setting] is enabled.
Paper Input
Menu
Paper Size: Bypass Tray
Paper Size: Tray 1
Paper Size: Tray 2
Paper Size: Tray 3
Paper Type: Bypass Tray
Paper Type: Tray 1
Paper Type: Tray 2
Paper Type: Tray 3
Duplex Tray
Auto Tray Select
Tray Priority
• Only installed trays appear on the display panel.
81
4. Making Printer Settings Using the Control Panel
Maintenance
Menu
Quality Maintenance
General Settings
Timer Settings
HDD Management
Machine Settings Export
4
• [HDD Management] appears only when the hard disk is installed.
List/Test Print
Menu
Multiple Lists
Config. Page
Error Log
Network Summary
Supply Info List
Menu List
PCL Config./Font Page
PS Config./Font Page
PDF Config./Font Page
IPDS Font List
Hex Dump
System
Menu
Print Error Report
82
Menu Chart
Menu
Auto Continue
Memory Overflow
Printer Language
Sub Paper Size
Default Printer Lang.
Auto Off
4
Auto Off Scheduler
ECO Night Sensor
Print Compressed Data
Memory Usage
Spool Printing
RAM Disk
Auto E-mail Notify
• [Spool Printing] appears only when the hard disk is installed.
• [RAM Disk] appears only when the hard disk is not installed.
Print Settings
Menu
Machine Modes
PCL Menu
PS Menu
PDF Menu
IPDS Menu
83
4. Making Printer Settings Using the Control Panel
Security Options
Menu
Extended Security
Service Mode Lock
Firmware Version
Network Security Level
Auto Erase Memory Setting
4
Erase All Memory
Transfer Log Setting
Machine Data Encryption
• [Service Mode Lock] may not appear depending on the setting of the printer.
• [Auto Erase Memory Setting] and [Erase All Memory] will appear when the optional hard disk and
the SD card provided with the hard disk are installed.
• [Machine Data Encryption] will appear when the optional hard disk and the SD card provided with
the hard disk are installed, and you have logged on as the machine administrator.
Host Interface
Menu
I/O Buffer
I/O Timeout
Network
Parallel Interface
Wireless LAN
USB Settings
• [Parallel Interface] appears when the optional IEEE 1284 interface board is installed.
• [Wireless LAN] appears when the optional Wireless LAN interface unit is installed.
84
Menu Chart
Shutdown
Prepares the printer for power off. To prevent damage to the hard disk or memory leading to
malfunction, be sure to shutdown the printer properly before turning off the power switch.
• For details about shutting down the printer, see "Turning off the Power", Hardware Guide.
Language
Menu
English
French
German
4
Italian
Spanish
Dutch
Norwegian
Danish
Swedish
Polish
Portuguese
Hungarian
Czech
Finnish
Russian
Extended Features
This menu is not available on the printer you are using.
85
4. Making Printer Settings Using the Control Panel
Applying the Machine Settings to Other Printers
About the Machine Settings Export Function
Use this function to store the printer's configuration settings on an SD card. Information stored on the card
can be used to restore the printer's configuration. The card can also be used to export this printer's
configuration settings to other printers of the same manufacturer.
The following settings are exportable:
• All settings under the [System] menus
4
• All settings under the [Print Settings] menus
• [Machine IPv4 Address] under [Network] on the [Host Interface] menu
• [Fixed USB Port] under [USB Settings] on the [Host Interface] menu
Exporting the Machine Settings to a SD Card
1. Make sure the printer is turned off.
2. Insert the SD card in the SD card slot.
3. Turn the printer on.
4. Press the [Menu] key.
CEE128
5. Press the [ ] or [ ] key to select [Maintenance], and then press the [OK] key.
6. Press the [ ] or [ ] key to select [Machine Settings Export], and then press the [OK] key.
7. When the confirmation screen appears, press [Yes].
8. Make sure the message regarding that the exporting process being successfully completed
appears, and then press [Exit].
9. Turn the printer off, and then remove the SD card on which the exported settings are stored.
86
Applying the Machine Settings to Other Printers
• For details about inserting the SD card and the slot location, see "Installing the SD Memory Card
Options", Hardware Guide.
Importing the Machine Settings Stored on the SD Card into Other Printers
1. Make sure the printer to which the settings will be imported is turned off.
2. Insert the SD card in the SD card slot.
3. Turn the printer on while pressing and holding down the [Job Reset] key.
4. When the confirmation screen appears, press [Yes].
5. When the message regarding the completion of the import process appears, turn off the
printer.
4
6. Remove the SD card.
7. Turn on the printer.
8. Make sure the settings have been imported properly. Modify the settings if necessary.
• The SD card installation procedure and the SD card slot location differ depending on the machine
you are using.
87
4. Making Printer Settings Using the Control Panel
Memory Erase Status Menu
Displays data status inside the memory.
• The Memory Erase Status menu can be displayed only if all the following conditions are met:
• The optional hard disk and the SD card provided with the hard disk are installed.
• [Auto Erase Memory Setting] is enabled.
4
Viewing the Status of Remaining Data in Memory
1. Press the [Menu] key.
CEE128
2. Press the [ ] or [ ] key to select [Memory Erase Status], and then press the [OK] key.
3. The current memory status is displayed.
[Data to erase remaining.] : Data remain inside the memory.
[Currently no data to erase.] : No data remain inside the memory.
[Erasing Data...] : Data are being deleted.
4. Press the [OK] key.
5. Press the [Menu] key.
88
Paper Input Menu
Paper Input Menu
This section explains about paper settings on the paper input menu such as paper sizes and types on each
tray.
Paper Input Menu Parameters
This section explains about parameters that can be set on the paper input menu.
• Only installed trays appear on the display panel.
• Be sure to set a paper type using the control panel. If you do not set it, the printing result might not be
proper.
4
Paper Size: Bypass Tray
You can specify the paper size for Bypass Tray.
Default:
(mainly Europe and Asia)
A4
81/2 × 11
(mainly North America)
Paper Size: Tray 1 to 3
You can specify the paper size for Tray 1 to 3.
Default:
(mainly Europe and Asia)
A4
81/
(mainly North America)
2 × 11
Paper Type: Bypass Tray
You can specify the paper type for Bypass Tray.
Default: [No Display (Plain Paper)]
Paper Type: Tray 1 to 3
You can specify the paper type for Tray 1 to 3.
Default: [No Display (Plain Paper)]
Duplex Tray
You can set each tray for duplex printing. Only installed trays appear on the display panel.
• Tray 1 to 3, Bypass Tray
89
4. Making Printer Settings Using the Control Panel
Default: [On]
• On
• Off
Auto Tray Select
You can select whether to assign each tray to automatically print the paper size and type set by printer
driver.
When using custom size paper, if automatic tray selection is enabled, the size selected on the control
panel has priority. If this setting is disabled, the size selected from the printer driver has priority.
You can select multiple trays.
4
If you need to have a tray locked, you must select the tray using both printer driver and control panel.
• Tray 1 to 3, Bypass Tray
Default: [On]
• On
• Off
Tray Priority
You can set a tray to be checked first when automatic tray selection is enabled from the printer driver.
The tray selected here is used when no tray is selected for a print job.
It is recommended that you load paper of the size and orientation you use most frequently in the tray
selected in this setting.
Default: [Tray 1]
• Tray 1
• Tray 2
• Tray 3
• Bypass Tray
• For details about which paper sizes can be specified, see "Supported Paper for Each Tray", Hardware
Guide.
• For details about which paper types can be specified, see "Supported Paper Types", Hardware Guide.
Changing the Paper Input Menu
Automatic tray selection
Follow the procedure below to change the automatic tray selection setting.
90
Paper Input Menu
1. Press the [Menu] key.
CEE128
2. Press the [ ] or [ ] key to select [Paper Input], and then press the [OK] key.
3. Press the [ ] or [ ] key to select [Auto Tray Select], and then press the [OK] key.
4
4. Press the [ ] or [ ] key to select the tray you want to print from, and then press the [OK]
key.
5. Press the [ ] or [ ] key to select [On], and then press the [OK] key.
6. Press the [Menu] key.
Tray priority
Follow the procedure below to change the tray priority.
1. Press the [Menu] key.
CEE128
2. Press the [ ] or [ ] key to select [Paper Input], and then press the [OK] key.
3. Press the [ ] or [ ] key to select [Tray Priority], and then press the [OK] key.
4. Press the [ ] or [ ] key to select a tray you want to use, and then press the [OK] key.
5. Press the [Menu] key.
91
4. Making Printer Settings Using the Control Panel
Maintenance Menu
You can set printing conditions such as density and calibration, and printer management such as deleting
temporary print jobs from the hard disk.
Maintenance Menu Parameters
This section explains about parameters that can be set on the maintenance menu.
4
Quality Maintenance
Image Density Adjustment
Adjusting the print image density can prevent faint spots or smears appearing on printed pages. You
can specify a density value between 6 and 3.
Only change this setting from its default value if necessary. For details about adjusting the print image
density, see "Adjusting the Image Density", Hardware Guide.
Registration
You can adjust the starting position of the printing page. For details, see "Adjusting Printing Position",
Hardware Guide.
• Print Test Sheet
You can print the registration test sheet.
Only the installed trays appear on the display panel.
• Tray 1
• Tray 2
• Tray 3
• Bypass Tray
• Duplex Unit
• Adjustment
You can select the start position for printing on a page.
Only the installed trays appear on the display panel.
• Horizontal: Tray 1
• Horizontal: Tray 2
• Horizontal: Tray 3
• Horizontal: Bypass Tray
• Horizontal: Back Side
92
Maintenance Menu
• Vertical: Std. Ppr Tray
• Vertical: Opt. Ppr Tray
• Vertical: Bypass Tray
• Vertical: Back Side
Curl Prevention
You can control the fuser temperature to prevent paper from curling. Use this mode only when paper
misfeed occurs frequently during duplex printing.
Default: [Off]
• On
• Off
4
General Settings
Replacement Alert
Use this function to specify the timing of when the Alert Indicator will light up to prompt the user to
replace supplies.
• Fusing Unit
Default: [Normal]
• Notify Sooner
• Normal
• Notify Later
Supply End Option
You can specify whether or not to continue printing after the following components have exceeded
their recommended service life.
Default: [Continue Printing]
• Continue Printing
• Stop Printing
Display Supply Info
You can select whether or not the amount of toner is displayed on the initial screen.
Default: [On]
• On
• Off
Menu Protect
You can select whether or not to protect the menu settings. If you enable this setting, you must specify
a protection level.
93
4. Making Printer Settings Using the Control Panel
If you would like to lower the protection level, disable this setting or select [Level 1].
You may not be able to change this setting depending on the setting of the printer.
Default: [Level 2]
• Level 1
• Level 2
• Off
List/Test Print Lock
You can select whether or not to prohibit List/Test printing.
You may not be able to change this setting depending on the setting of the printer.
4
Default: [Off]
• On
• Off
Unit of measure
You can specify the unit for measurement.
Default:
(mainly Europe and Asia)
[mm]
(mainly North America)
[inch]
• mm
• inch
Panel Key Sound
You can select whether or not to enable the panel key sound.
Default: [On]
• On
• Off
Warm-up Beeper
You can select whether or not to sound the beeper when the printer has completed a warm-up process.
Default: [Off]
• On
• Off
Display Contrast
You can specify the density of the display by selecting one of seven levels.
94
Maintenance Menu
Key Repeat
You can specify whether or not to scroll the display panel when the [ ] or [ ] key is held down.
When you enable this setting, specify the scroll speed. (If repeat time is set to "Long", scroll speed
becomes slow.)
Default: [Normal]
• Do not Repeat
• Normal
• Repeat Time: Medium
• Repeat Time: Long
Function Priority
Specify the function that is selected by default whenever the printer is turned on or leaves Energy
Saver mode.
4
The order of the items on this menu reflects the order of the functions that appear when [Switch
Functions] is pressed.
Default: [Printer]
• Printer
• Extended Features 1
• Extended Features 2
• Extended Features 3
Timer Settings
Auto Reset Timer
Specify how long the printer waits before it displays the initial screen following last usage (auto resets).
This function will be active when the printer is in the following conditions:
• Performing normal menu operations.
• When displaying a warning message regarding authentication.
If you suspend printing by pressing the [Suspend/Resume] key, the machine will resume printing when
the period of time specified by this setting has passed.
If you enable this setting, you can specify the number of seconds the printer waits before it auto resets.
Specify a wait time of between 10 and 999 seconds (in steps of one second). The default wait time
is 60 seconds.
Default: [On]
• On
• Off
95
4. Making Printer Settings Using the Control Panel
Set Date
Set the date for the printer's internal clock.
Set Time
Set the time for the printer's internal clock.
HDD Management
Specify the settings related to deletion of data saved on the hard disk. This menu appears only if the hard
disk is installed.
Delete All Temporary Jobs
4
Use this function to delete all temporary documents saved on the hard disk (Sample Print, Locked Print,
and Hold Print data) at once.
Delete All Stored Jobs
Use this function to delete all Stored Print data saved on the hard disk at once.
Auto Delete Temporary Jobs
Specify whether or not to automatically delete temporary documents saved on the hard disk (Sample
Print, Locked Print, and Hold Print data). If you enable this setting, you can specify the number of hours
the printer waits before it deletes documents. Specify a wait time of between one and 200 hours (in
steps of one hour). The default wait time is eight hours.
Default: [Off]
• On
• Off
Auto Delete Stored Jobs
Specify whether or not to automatically delete Stored Print data saved on the hard disk. If you enable
this setting, you can specify the number of days the printer waits before it deletes documents. Specify
a wait time of between one and 180 days (in steps of one day). The default wait time is three days.
Default: [On]
• On
• Off
Reset IPDS Fonts
Use this function to delete all IPDS captured fonts. This menu appears only when the optional IPDS
card is installed.
96
Maintenance Menu
Machine Settings Export
Use this function to store the settings of this printer on an SD card. The stored information can then be used
to restore the settings of this printer, or carried over to other printers of the same manufacturer. For details,
see p.86 "Applying the Machine Settings to Other Printers".
Changing the Maintenance Menu
This section explains changing the maintenance menu using examples.
Automatic deletion of temporary jobs in the hard disk
Follow the procedure below to set automatic deletion of temporary jobs stored in the hard disk.
4
1. Press the [Menu] key.
CEE128
2. Press the [ ] or [ ] key to select [Maintenance], and then press the [OK] key.
3. Press the [ ] or [ ] key to select [HDD Management], and then press the [OK] key.
4. Press the [ ] or [ ] key to select [Auto Delete Temporary Jobs], and then press the [OK]
key.
5. Press the [ ] or [ ] key to select [On], and then press the [OK] key.
6. Press the [ ] or [ ] key to set automatic deletion timer in hours between 1 through 200.
7. Press the [OK] key.
8. Press the [Menu] key.
97
4. Making Printer Settings Using the Control Panel
List/Test Print Menu
The list/test print menu allows you to print lists showing the printer configuration and the setting status of
print-related conditions.
List/Test Print Menu Parameters
This section explains about parameters that can be set on the list/test print menu.
Multiple Lists
4
You can print the configuration page and error log, network summary and supply list.
Config. Page
You can print the current configuration of the printer. For details, see p.99 "Interpreting the
Configuration Page".
Error Log
You can print an error report.
Network Summary
You can print the network device status.
Supply Info List
You can print the supply status.
Menu List
You can print a menu list showing all available menus.
PCL Config./Font Page
You can print the current configuration and installed PCL font list.
PS Config./Font Page
You can print the current configuration and installed PostScript font list.
PDF Config./Font Page
You can print the current configuration and installed PDF font list.
IPDS Font List
You can print a list of IPDS-supported fonts. This menu appears only when the optional IPDS card is
installed.
Hex Dump
You can print the data sent by the computer using Hex Dump.
98
List/Test Print Menu
Test Printing
Follow the procedure below to print the configuration page.
• The configuration page is printed on A4 or Letter (8 1/2"×11") size paper, so load them in the same
paper tray.
Printing a Configuration Page
Use the following procedure to print the Configuration Page.
4
1. Press the [Menu] key.
CEE128
2. Press the [ ] or [ ] key to select [List/Test Print], and then press the [OK] key.
3. Press the [ ] or [ ] key to select [Config. Page], and then press the [OK] key.
After the configuration page is printed out, the screen returns to List/Test print menu.
4. Press the [Menu] key.
Interpreting the Configuration Page
The meanings of the items on the Configuration Page are as follows:
System Reference
Machine ID
Shows the serial number assigned to the board by its manufacturer.
Total Memory
Shows the total memory status.
Total Counter
Shows the total number of pages printed by the printer to date.
99
4. Making Printer Settings Using the Control Panel
Firmware Version
• Printer
Shows the version number of the printer controller firmware.
• System
Displays the version number of the system firmware.
• Engine
Shows the version number of the printer engine firmware.
• NIB
Shows the version number of the network interface board.
4
Device Connection
Shows the names of device options installed in the printer.
HDD: Font/Macro Download
Shows the hard disk status.
Printer Language
Shows the version number of the printer language.
Attached Equipment
Shows the options attached to the printer.
Paper Input
Shows the current Paper Input settings. For details, see p.89 "Paper Input Menu".
Maintenance
Shows the current Maintenance settings. For details, see p.92 "Maintenance Menu".
System
Shows the current System settings. For details, see p.102 "System Menu".
Machine Modes
Shows the current machine modes settings. For details, see p.108 "Print Settings Menu".
PCL Menu
Shows the current PCL settings. For details, see p.108 "Print Settings Menu".
PS Menu
Shows the current PS settings. For details, see p.108 "Print Settings Menu".
PDF Menu
Shows the current PDF settings. For details, see p.108 "Print Settings Menu".
IPDS Menu
Shows the current IPDS settings. For details, see p.108 "Print Settings Menu".
100
List/Test Print Menu
Host Interface
Shows the current Host Interface settings. When DHCP is active on the network, the IPv4 address,
subnet mask, and gateway address appear in parentheses. For details, see p.125 "Host Interface
Menu".
Interface Information
Interface information is displayed.
User Paper Type
Registered user paper types are displayed.
4
101
4. Making Printer Settings Using the Control Panel
System Menu
The system menu allows you to set the printer's basic functions. Although you can operate the printer using
the default settings, you can also change its settings to better suit your printing needs. Changes made to
settings remain effective after power off.
System Menu Parameters
This section explains about parameters that can be set on the system menu.
Print Error Report
4
Select whether or not to print an error report when a printer error or memory error occurs.
Default: [Off]
• On
• Off
Auto Continue
Specify whether or not to continue printing after a system error. When you enable this setting, specify
how long the printer is to display error before resuming print.
When [Auto Continue] is set to on, and a certain error occurs in the printer while printing, the job
might be cancelled, or printing will not be as intended. When a job is cancelled due to error, the
printer automatically begins the next job in the queue.
Default: [Off]
• Off
• Immediate
• 1 minute
• 5 minutes
• 10 minutes
• 15 minutes
Memory Overflow
You can specify whether or not to print a memory overflow error report.
Default: [Do not Print]
• Do not Print
• Error Information
Printer Language
You can specify the printer language.
Default: [Auto]
102
System Menu
• Auto
• PCL
• PS
• PDF
Sub Paper Size
Specify whether or not the paper size switches automatically when if paper of the specified size is not
loaded in the tray.
This feature supports automatic switching between A4 and Letter (8 1/2" x 11") size paper only.
Paper switching can cause page edges to be cropped and other undesirable print results. This is due
to the difference between A4 and Letter (8 1/2" x 11") in maximum printable area.
Default: [Auto]
4
• Auto
• Off
Default Printer Lang.
Select the printer language to use when the printer fails to detect the printer language.
Default: [PCL]
• PCL
• PS
• PDF
Auto Off
Use this function to reduce the power consumption of the printer when the printer is not in use.
Auto Off On/Off
You can select whether or not to enable Auto Off Mode.
Default: [On]
• On
• Off
Auto Off Timer
You can specify the duration the printer waits before entering Auto Off Mode. The printer enters
Auto Off Mode if no user input has been made during the specified duration. When the printer
is in Auto Off Mode, it takes longer for the printer to start printing.
Default: [1 minute]
• 1 minute
• 5 minutes
• 15 minutes
103
4. Making Printer Settings Using the Control Panel
• 30 minutes
• 45 minutes
• 60 minutes
Auto Off Scheduler
Specify when the printer enters Auto Off Mode. You can specify the time of the day and the day of
the week.
If a print job is sent to the printer or a user uses the control panel while the printer is in Auto Off Mode,
the printer will return to Auto Off Mode right after the sent job is printed, or one minute after the user
finishes using the control panel.
4
This function can also be enabled or disabled from Web Image Monitor. For details, see Web Image
Monitor Help.
Default: [Inactive]
• Daily (Web Preset Time)
Specify the time of the day that the printer enters Auto Off Mode each day of the week. Use
Web Image Monitor to specify the time of the day. For details, see Web Image Monitor Help.
• Day of Week(Preset Time)
Specify the time for each specific day that the printer enters Auto Off Mode. Use Web Image
Monitor to specify the time of the day and the day of the week. For details, see Web Image
Monitor Help.
• Inactive
ECO Night Sensor
Specify whether or not the printer uses the ECO Night Sensor (ambient light sensor) to automatically
enter Auto Off Mode.
Auto Off Setting
Select whether to enable or disable the ECO Night Sensor.
Default: [Inactive]
• Active
• Inactive
Auto Off Timer
Specify how long the printer waits to enter Auto Off Mode after the ECO Night Sensor has
detected that the lights have been turned off.
The Auto Off Timer will reset if any of the following occurs:
• If the sensor detects an increase in ambient brightness before the specified duration elapses.
• If a key is pressed, or a print is made.
Default: [30 minutes]
104
System Menu
• 5 minutes
• 15 minutes
• 30 minutes
• 60 minutes
• 120 minutes
Brightness Sensor Level
Specify the ambient light sensor's brightness sensitivity level (trigger threshold).
You can set the light sensor to one of five sensitivity thresholds. "Level 5 (Dim)" is the highest
sensitivity threshold. Selecting this level will cause the sensor to trigger at the smallest decrease
in ambient light.
Selecting a lower level will cause the sensor to trigger at progressively lower levels of ambient
light.
4
Default: [Level 3 (Dark)]
• Level 1 (Very Dark)
(equivalent to a moonlit night: approximately 0.4 lx)
• Level 2
• Level 3 (Dark)
(equivalent to a cinema during a screening: approximately 2.4 lx)
• Level 4
• Level 5 (Dim)
(equivalent to a building interior at sunset: approximately 75.0 lx)
Print Compressed Data
Specify whether or not to print compressed data. The supported compression format is GZIP.
Default: [Off]
• On
• Off
Memory Usage
Select memory to be used from Font Priority or Frame Priority.
Default: [Frame Priority]
• Font Priority
Allocates more memory to the PDL work area. Select this setting if printing fails due to insufficient
memory.
• Frame Priority
105
4. Making Printer Settings Using the Control Panel
Allocates more memory for image processing. Select this setting to increase print speed.
Depending on the document you are printing, this setting might not be effective.
Spool Printing
Specify whether or not to complete spooling before starting to print. Spooling stores a sent print job
temporarily in the printer, and then prints it. This function is available only if the hard disk is installed
on the printer.
Default: [Off]
• On
• Off
4
RAM Disk
If the hard disk is not installed for PDF Direct Print, select a value of 2 MB or higher. This function is
displayed only if no hard disk is installed. For details about the optional SDRAM module, see
Hardware Guide.
Default: [4 MB]
• 0 MB
• 2 MB
• 4 MB
• 8 MB
Auto E-mail Notify
Specify whether or not to send an error message to a preset e-mail address when an error occurs in
the printer. After changing the setting, turn off the power of the printer briefly, and then turn it on again.
For information, see Web Image Monitor Help.
Default: [On]
• On
• Off
Changing the System Menu
Follow the procedure below to change the settings for Auto Off.
106
System Menu
1. Press the [Menu] key.
CEE128
2. Press the [ ] or [ ] key to select [System], and then press the [OK] key.
3. Press the [ ] or [ ] key to select [Auto Off], and then press the [OK] key.
4
4. Press the [ ] or [ ] key to select [Auto Off Timer], and then enter the [OK] key.
5. Press the [ ] or [ ] key to select the lead time needed to switch to Auto Off Mode.
6. Press the [OK] key.
7. Press the [Menu] key.
107
4. Making Printer Settings Using the Control Panel
Print Settings Menu
The System Menu allows you to set conditions for printing.
Print Settings Menu Parameters
This section explains about parameters that can be set on the print settings menu.
Machine Modes
Copies
4
Specify the number of copies to print.
If the number of copies to print is specified by command or the printer driver, this setting is
overridden.
Default: 1
• 1 to 999
Page Size
Specify the default paper size. The default paper size is used when the paper size is not specified
in the print data.
Default:
(mainly Europe and Asia)
A4
81/
(mainly North America)
2 × 11
•
(mainly Europe and Asia)
A4, A5, A6, B5 JIS, B6 JIS, C5 Env., C6 Env., DL Env., 81/2 × 14, 81/2 × 13, 81/2 × 11,
81/4 × 13, 8 × 13, 71/4 × 101/2, 51/2 × 81/2, 41/8 × 91/2, 37/8 × 71/2, 16K, Custom
Size
•
(mainly North America)
81/2 × 14, 81/2 × 13, 81/2 × 11, 81/4 × 13, 8 × 13, 71/4 × 101/2, 51/2 × 81/2,
41/8 × 91/2, 37/8 × 71/2, A4, A5, A6, B5 JIS, B6 JIS, C5 Env., C6 Env., DL Env., 16K,
Custom Size
Edge to Edge Print
Select to whether or not to print using the whole area of paper, leaving no edge borders.
Default: [Off]
• On
• Off
108
Print Settings Menu
Duplex
Select whether or not to print on both sides of a sheet. If you specify duplex printing, you must
also specify the binding method. This menu appears only when the optional duplex unit is
installed.
Default: [Off]
• Off
• Long Edge Bind
• Short Edge Bind
Rotate by 180 Degrees
Select whether or not to rotate the print image by 180 degrees.
Default: [Off]
4
• On
• Off
Blank Page Print
Select whether or not to print blank pages.
Default: [On]
• On
• Off
Edge Smoothing
Select whether or not to smooth the edges of texts and images when printing. When this setting
is enabled, gradation in images may be degraded.
Default: [On]
• On
• Off
Toner Saving
Reduces toner consumption when printing. When this setting is enabled, print quality may be
degraded.
Default: [Off]
• On
• Off
Letterhead Setting
Select whether or not to print on paper that has a fixed print side or print direction (letterhead
paper, for example). For details, see "Printing on Fixed-Orientation Paper", Hardware Guide.
Default: [Auto Detect]
109
4. Making Printer Settings Using the Control Panel
• Off
Not printing with the letterhead printing mode.
• Auto Detect
Select whether or not to print using letterhead mode whenever a page that has a fixed print
side or print direction is specified as the first page.
• On (Always)
Print with the letterhead printing mode regularly.
Tray Setting Priority
4
Specify whether the paper size and type settings that are applied are those specified using the
control panel, printer driver, or print command.
• Bypass Tray
Specify whether the paper size and type settings applied for bypass Tray are those specified
using the control panel, printer driver, or print command.
Default: [Driver/Command]
• Driver/Command
When the source paper tray is specified for a print job, the paper settings specified
using the printer driver or by print command are applied, regardless of any settings
specified using the control panel.
• Machine Setting(s)
The paper settings specified on the printer's control panel are applied to all print jobs.
An error will occur if the paper settings specified using the printer driver or by print
command do not match those specified using the control panel.
• Any Size/Type
If the printer's trays do not contain paper matching the settings of the print job, printing
can proceed from the bypass tray with the job's settings applied.
• Any Custom Size/Type
If the printer's trays do not contain paper matching the settings of the print job but
custom paper was specified using the printer driver or by print command, printing can
proceed from the bypass tray with the job's settings applied.
• Tray 1 to 3
Specify whether the paper size and type settings applied for Tray 1 to 3 are those specified
using the control panel, printer driver, or print command.
Default: [Machine Setting(s)]
• Driver/Command
• Machine Setting(s)
110
Print Settings Menu
Tray Switching
You can specify whether or not the printer automatically switches paper trays if paper of the
specified size and type is not loaded in the driver-designated tray.
Default: [Off]
• On
• Off
Extend Auto Tray Switching
This setting enables the printer to switch paper trays automatically, regardless of whether the
tray is manually or automatically selected.
Default: [Off]
• On
4
• Off
PCL Menu
You can set conditions when using PCL for printing.
Orientation
Select the page orientation.
Default: [Portrait]
• Portrait
• Landscape
Form Lines
Specify the number of lines per page between 5 to 128. The default paper size is used when
the paper size is not specified in the print data.
Default:
(mainly Europe and Asia)
64
(mainly North America)
60
Font Source
Specify the location of the default font.
When you select [RAM], you can select only fonts downloaded to the printer RAM.
When you select [HDD], you can select only fonts downloaded to the hard disk.
When you select [SD Font Download], you can select only fonts downloaded to the SD card.
Default: [Resident]
• Resident
111
4. Making Printer Settings Using the Control Panel
• RAM
• HDD
• SD
• SD Font Download
Font Number
Specify the ID of the default font you want to use.
Default: 0
• 0 to 63 (Resident)
• 1 to X (Download; "X" is the number of downloaded fonts)
4
Point Size
Specify the point size you want to use for the default font between 4 to 999.75 in 0.25 increments.
This setting is effective only for a variable-space font.
Default: 12.00 points
Font Pitch
Specify the number of characters per inch you want to use for the default font between 0.44 to
99.99 in 0.01 increments. This setting is effective only for fixed-space fonts.
Default: 10.00 pitches
Symbol Set
You can specify the character set for the default font.
Default: [PC-8]
Available sets are as follows:
Roman-8, Roman-9, ISO L1, ISO L2, ISO L5, ISO L6, ISO L9, PC-775, PC-8, PC-8 D/N,
PC-850, PC-852, PC-858, PC8-TK, PC-1004, Win L1, Win L2, Win L5, Win Baltic, Desktop,
PS Text, MS Publ, Math-8, PS Math, Pifont, Legal, ISO 4, ISO 6, ISO 11, ISO 15, ISO 17, ISO
21, ISO 60, ISO 69, Win 3.0, MC Text, UCS-2, PC-864, Arabic-8, Win Arabic, PC-866,
PC-866U, ISO Cyrillic, Win Cyrillic, PC-851, Greek-8, ISO Greek, PC-8 Greek, Win Greek,
PC-862, Hebrew-7, Hebrew-8, ISO Hebrew
Courier Font
Select the type of courier font.
Default: [Regular]
• Regular
• Dark
Ext. A4 Width
Select whether or not to extend the width of the printable area of A4 sheets, by reducing side
margins.
112
Print Settings Menu
Default: [Off]
• On
• Off
Append CR to LF
Select whether or not to append a CR code to each LF code to print text data clearly.
Default: [Off]
• On
• Off
Resolution
You can specify the print resolution in dots per inch.
Default: [600dpi]
4
• 300dpi
• 600dpi
PS Menu
You can set conditions when using PostScript for printing.
Job Timeout
You can specify how long the printer waits (in seconds) before canceling the current job when
the job is interrupted while being processed. If you select Use Machine Setting(s), enter a value
between 0 to 999. (Default: 0)
Default: [Use Driver/Command]
• Use Driver/Command
• Use Machine Setting(s)
Wait Timeout
You can specify how long the printer waits (in seconds) before it cancels receiving a job when
the printer cannot detect the end of the job. If you select Use Machine Setting(s), enter a value
between 0 to 999. (Default: 300)
Default: [Use Driver/Command]
• Use Driver/Command
• Use Machine Setting(s)
Data Format
Select the data format from Binary Data or TBCP.
This setting is ineffective when using a parallel or EtherTalk connection.
When using a parallel or USB connection, the print job is canceled if binary data is sent from
the printer driver.
113
4. Making Printer Settings Using the Control Panel
Default: [TBCP]
When using an Ethernet connection, the print job is canceled if:
• The printer driver data format is TBCP and the data format selected using the control panel
is Binary Data.
• The printer driver data format is binary and the data format selected using the control panel
is TBCP.
Resolution
Select the resolution.
Default: [600dpi Fast]
• 300dpi
4
• 600dpi Fast
• 600dpi Standard
Orientation Auto Detect
Specify the orientation auto detect.
Default: [On]
• On
• Off
PDF Menu
You can set conditions when using PDF for printing.
Change PDF Password
Specify the password for the PDF file executing PDF Direct Print. If you do not set a PDF password,
this menu does not appear. The password can be set using Web Image Monitor, but must be
sent through the network. For increased security, use this menu on the control panel to set the
password directly.
PDF Group Password
This setting is not available on this printer.
Reverse Order Printing
This setting enables printing to start from the last page of the document. Use this function when
prints come out face up in the output tray. This allows a printed document to be assembled in
page order.
Default: [Off]
• On
• Off
Resolution
Specify the resolution for the PDF file executing PDF Direct Print.
114
Print Settings Menu
Default: [600dpi Fast]
• 300dpi
• 600dpi Fast
• 600dpi Standard
Orientation Auto Detect
Specify the orientation auto detect for the PDF file executing PDF Direct Print.
Default: [On]
• On
• Off
IPDS Menu
You can set conditions when using IPDS for printing.
4
Tray Form
Specify an IPDS form for each paper tray. For each paper tray, select the IPDS form you want
to allocate to it. Only installed trays appear on the display panel.
• Tray 1
• Tray 2
• Tray 3
• Bypass Tray
Emulation Mode
Specify the emulation mode.
Default: [Native]
• Native
• 4028
Print Mode
Specify the print mode.
Default: [Enhanced]
• Standard
• Enhanced
Def. Code Page
Specify the default code page.
Default: 37
37, 38, 260, 273, 274, 276, 277, 278, 280, 281, 284, 285, 286, 287, 288, 290, 297,
420, 423, 424, 500, 870, 871, 875, 880, 892, 893, 905, 1025, 1026, 1140, 1141,
1142, 1143, 1144, 1145, 1146, 1147, 1148, 1149
115
4. Making Printer Settings Using the Control Panel
Default FGID
Specify the default FGID (Font Typeface Global Identifier), which identifies the printer's default
resident font.
Default: 416
3, 11, 12, 18, 19, 46, 85, 86, 92, 111, 112, 159, 164, 203, 221, 223, 254, 256, 281,
283, 290, 304, 305, 306, 318, 319, 400, 404, 416, 420, 424, 428, 432, 2304, 2305,
2306, 2307, 2308, 2309, 2310, 2311, 5687, 5707, 5815, 5835, 20224
Chara. Per Inch
Specify the number of characters per inch (pitch) for the default font. Valid values are 5.0 to
30.0 in units of one tenth of an inch.
4
Default: 10.0
Valid Prnt.Area
Enable or disable valid printable area checking.
Default: [On]
• On
• Off
Page
Specify how data is positioned on the page.
Default: [Whole]
• Whole
• Comp1
• Comp2
• Print
Edge to Edge
Enable or disable "Edge to Edge" printing.
Default: [Off]
• On
• Off
Font Substitution
Enables or disables font substitution.
Default: [Off]
• On
• Off
116
Print Settings Menu
Caching
Specify whether or not to apply caching for repeated overlays.
Default: [Off]
• On
• Off
Font Capture
Enable or disable font capturing. This menu appears only when the hard disk is installed.
Default: [On]
• On
• Off
Resolution
4
Specify the resolution reported to the host in the "IPDS XOAOPC" command for raster coded
fonts and IM1 image support.
Default: [Auto]
• Auto
• 240dpi
• 300dpi
• 600dpi
Graph.Char.Str.
Specify the Graphic Character String (Graphic Character Sizing) processing method.
Default: [Auto]
• Auto
• Character Scale
• Font Activation
Bar Code
Specify the barcode level protocol.
Default: [Auto]
• Auto
• 4028
• Native
Box Draw
Specify the Box Draw processing.
Default: [Off]
117
4. Making Printer Settings Using the Control Panel
• On
• Off
Clr. Simulation
Specify how color specification controls are processed on a monochrome printer.
Default: [Fidelity]
• Fidelity
• Legacy
Text Color Simulation
Specify how text color specification controls are processed on a monochrome laser printer.
4
Default: [On]
• On
• Off
Tray Mapping
Map the media source (input tray) to an ID the host uses for the media source.
Default: [Auto]
• IPDS Tray
• Auto
Changing the Print Settings Menu
Follow the procedure below to change Tray Setting Priority.
1. Press the [Menu] key.
CEE128
2. Press the [ ] or [ ] key to select [Print Settings], and then press the [OK] key.
3. Press the [ ] or [ ] key to select [Machine Modes], and then press the [OK] key.
4. Press the [ ] or [ ] key to select [Tray Setting Priority], and then enter the [OK] key.
118
Print Settings Menu
5. Press the [ ] or [ ] key to select the tray whose paper type or size you want to change,
and then press the [OK] key.
6. Press the [ ] or [ ] key to select the desired setting item, and then press the [OK] key.
7. Press the [Menu] key.
4
119
4. Making Printer Settings Using the Control Panel
Security Options Menu
The system menu allows you to set conditions for printing.
Security Options Menu Parameters
This section explains about parameters that can be set on the security options menu.
Extended Security
Depending on the setting of the printer, some of the settings listed below may not appear.
4
Driver Encryption Key
Specify the driver encryption key.
Encrypt Address Book
Select whether or not to encrypt the printer's address book data.
Default: [Off]
• On
• Off
Restrict User Info.Display
Select whether or not to display user information as "********" when checking job information
without being authenticated through user authentication.
Default: [Off]
• On
• Off
Enhance File Protection
Select whether or not to automatically lock password-protected print files if an invalid password
is entered ten times. When a file is locked, you cannot select them even if the correct password
is entered.
Default: [Off]
• On
• Off
Settings by SNMPv1 and v2
Select whether or not to prohibit changes to the printer settings through access using SNMPv1,
v2 protocol.
Default: [Do not Prohibit]
• Prohibit
120
Security Options Menu
• Do not Prohibit
Simple Encryption
Select whether or not to use apply simple encryption (restrict usage) when enhanced encryption
cannot be used.
Default: [Do not Restrict]
• Restrict
• Do not Restrict
Authenticate Current Job
Select whether or not authentication is required for operations such as canceling jobs. If set to
[Login Privilege], only authorized users or your administrator can operate the printer. If set to
[Access Privilege], users who sent a print job or your administrator can operate the printer.
Default: [Off]
4
• Login Privilege
• Access Privilege
• Off
Password Policy
Specify the format of passwords: types of characters to be used and minimum length.
Valid characters for passwords are upper-case letters, lower-case letters, decimal numbers, and
symbols such as #. If complexity is set to [Level 1], passwords must use two types of these
characters; if set to [Level 2], three types.
• Complexity Setting
Default: [Do not Restrict]
• Level 2
• Level 1
• Do not Restrict
• Minimum Character No.
If set to 0, minimum length is not specified.
Default: 0
• Between 0 to 32
@Remote Service
Select whether or not to prohibit @Remote Service. If you would like to set to Prohibit, contact
your service representative.
Default: [Do not Prohibit]
• Prohibit
• Do not Prohibit
121
4. Making Printer Settings Using the Control Panel
Update Firmware
Select whether or not to prohibit Update Firmware. If you would like to set to Prohibit, contact
your service representative.
Default: [Do not Prohibit]
• Prohibit
• Do not Prohibit
Change Firmware Structure
Select whether or not to prohibit Change Firmware Structure. If you would like to set to Prohibit,
contact your service representative.
4
Default: [Do not Prohibit]
• Prohibit
• Do not Prohibit
Service Mode Lock
Select whether or not to prohibit entering service mode. This setting appears only when the user has
logged in as the machine administrator.
Default: [Off]
• On
• Off
Firmware Version
Display the firmware version of the printer.
Network Security Level
Specify the network security level.
Default: [Level 0]
• Level 0
• Level 1
• Level 2
Auto Erase Memory Setting
Select whether or not to automatically delete memory. When set to on, specify the overwrite times.
To specify the number of memory overwrites, select [Random Numbers]. This setting appears only
when the optional hard disk and the SD card provided with the hard disk are installed.
Default: [Off]
• On
HDDErase
• NSA
122
Security Options Menu
• DoD
• Random Numbers
Number of Erase: Between 1 to 9
• Off
Erase All Memory
Select to delete all data inside the memory. When deleting memory, specify the overwrite times. To
specify the number of memory overwrites, select [Random Numbers]. This setting appears only when
the optional hard disk and the SD card provided with the hard disk are installed.
Default: [Random Numbers]
HDDErase
• NSA
4
• DoD
• Random Numbers
Number of Erase: Between 1 to 9
Transfer Log Setting
You can select whether or not to send log information to the log collection server.
Default: [Off]
• On (Only available from the log collection server.)
• Off
Machine Data Encryption
Encrypt data stored on the hard disk. Once you encrypt the data, the following menus appear on the
control panel display. This setting appears only when the optional hard disk and the SD card provided
with the hard disk are installed.
• Update Encryption Key
Update the encryption key.
• Cancel Encryption
Cancel the encryption settings.
• Print Encryption Key
Print the encryption key.
Changing the Security Options Menu
Follow the procedure below to erase data inside memory.
123
4. Making Printer Settings Using the Control Panel
• This setting appears only when the optional hard disk and the SD card provided with the hard disk
are installed.
1. Press the [Menu] key.
4
CEE128
2. Press the [ ] or [ ] key to select [Security Options], and then press the [OK] key.
3. Press the [ ] or [ ] key to select [Extended Security], and then press the [OK] key.
4. Press the [ ] or [ ] key to select [Erase All Memory], and then press the [OK] key.
5. Press the [ ] or [ ] key to select [On], and then press [EraseNo.].
6. Press the [ ] or [ ] key to enter overwrite times, and then press the [OK] key.
7. Press the [ ] or [ ] key to select [On], and then press the [OK] key.
8. Press the [Menu] key.
124
Host Interface Menu
Host Interface Menu
You can set configurations about network connections and communication when using parallel connection
between the printer and the computer. The changed configuration holds even if the printer is turned off.
Host Interface Menu Parameters
This section explains parameters that can be set on the host interface menu.
I/O Buffer
Select the size of I/O Buffer. Normally it is not necessary to change this setting.
Default: [128 KB]
4
• 128 KB
• 256 KB
I/O Timeout
Specify how many seconds the printer should wait before ending a print job. If printing operation is
frequently interrupted by data from other ports, you can increase the timeout period.
Default: [15 seconds]
• 10 seconds
• 15 seconds
• 20 seconds
• 25 seconds
• 60 seconds
Network
You can make network-related settings. For details, see "Configuration", Hardware Guide.
Machine IPv4 Address
Select whether to set the IPv4 address automatically or manually.
Default: [Auto-Obtain (DHCP)]
• Auto-Obtain (DHCP)
When DHCP is set to on, the IPv4 address, subnet mask address, and gateway address
cannot be changed. To change them, set DHCP to off. Contact your administrator for
information about the network configuration.
• Specify
• IP Add.
Manually specify the IPv4 address.
125
4. Making Printer Settings Using the Control Panel
Default: 11.22. 33.44
• Subnet M
Manually specify the subnet mask.
Default: 0.0.0.0
• Gateway
Manually specify the gateway address.
Default: 0.0.0.0
IPv6 Stateless Setting
Select whether to enable or disable stateless IPv6 address auto configuration.
4
Default: [Active]
• Active
• Inactive
IPsec
This is a security function. For details, contact your administrator.
Default: [Inactive]
• Active
• Inactive
NW Frame Type
Specify the frame type for NetWare.
Default: [Auto Select]
• Auto Select
• Ethernet II
• Ethernet 802.2
• Ethernet 802.3
• Ethernet SNAP
Effective Protocol
Specify the effective protocol.
• IPv4
Default: [Active]
• Active
• Inactive
• IPv6
Default: [Inactive]
126
Host Interface Menu
• Active
• Inactive
• NetWare
Default: [Inactive]
• Active
• Inactive
• SMB
Default: [Active]
• Active
• Inactive
Ethernet Speed
4
Specify the network speed to operate the printer.
Default: [Auto Select]
• Auto Select
• 10Mbps Half Duplex
• 10Mbps Full Duplex
• 100Mbps Half Duplex
• 100Mbps Full Duplex
IEEE802.1X Auth.(Ethernet)
Specify IEEE 802.1X Ethernet authentication. For details about IEEE 802.1X authentication, see
"Configuration", Hardware Guide.
Default: [Inactive]
• Active
• Inactive
Restr.IEEE802.1X Auth.Def.
Restore the default IEEE 802.1X setting.
LAN Type
Select Ethernet or Wireless LAN. This menu appears only when the optional Wireless LAN
interface unit is installed.
Default: [Ethernet]
• Ethernet
• Wireless LAN
127
4. Making Printer Settings Using the Control Panel
Permit SSL/TLS Comm.
Set the encrypted communication for SSL/TLS. If you set to [Ciphertext Only], you need to install
the SSL certificate for the printer.
Default: [Ciphertext Priority]
• Ciphertext Only
• Ciphertext Priority
• Ciphertext/Cleartext
Parallel Interface
Specify parallel interface settings. This menu appears when the IEEE 1284 interface board is installed.
4
Parallel Timing
Specify the parallel interface timing.
Default: [ACK outside]
• ACK inside
• ACK outside
• STB down
Parallel Comm. Speed
Specify whether or not to use DMA transfer for receiving data.
Default: [High Speed]
• High Speed
• Standard
Selection Signal Status
Specify the selection signal level of the parallel interface.
Default: [High]
• High
• Low
Input Prime
You usually do not need to change this setting.
Default: [Inactive]
• Active
• Inactive
Bidirectional Comm.
Specify whether to enable or disable bi-directional communication.
Default: [On]
128
Host Interface Menu
• On
• Off
Wireless LAN
Configure settings for Wireless LAN. This menu appears only when the optional Wireless LAN interface
unit is installed.
Communication Mode
Specify the transmission mode for Wireless LAN.
Default: [Infrastructure Mode]
• 802.11 Ad-hoc Mode
• Infrastructure Mode
SSID Setting
4
Specifies SSID to distinguish the access point in [Infrastructure Mode] or [802.11 Ad-hoc Mode].
The characters that can be used are ASCII 0x20-0x7e (32 bytes).
If blank is specified in [802.11 Ad-hoc Mode], "ASSID" appears.
Ad-hoc Channel
Specify the channel to use when [802.11 Ad-hoc Mode] has been selected. Set the channel
that matches the type of wireless LAN being used. The channel in use might differ depending on
the country.
The following channels are available:
(mainly Europe and Asia)
• IEEE 802.11a/b/g Wireless LAN
Frequency range:
2412 - 2472 MHz (1 - 13 channels)
5180 - 5240 MHz (36, 40, 44, and 48 channels)
In some countries, only the following channels are available:
• IEEE 802.11b/g Wireless LAN
Frequency range:
2412 - 2462 MHz (1 - 11 channels)
Default: [11]
(mainly North America)
• IEEE 802.11a/b/g Wireless LAN
Frequency range:
2412 - 2462 MHz (1 - 11 channels)
5180 - 5240 MHz (36, 40, 44, and 48 channels)
129
4. Making Printer Settings Using the Control Panel
Default: [11]
Security Method
Select whether to enable encryption and specify the security type when the encryption is enabled.
WPA appears only when the optional Wireless LAN interface unit is installed.
Default: [Off]
• Off
• WEP
Press [Details], and then enter the WEP key using hexadecimal and ASCII characters.
• WPA
Press [Details], and then select the Encryption and Authentication Methods.
4
Select one of the following Encryption Methods:
TKIP, CCMP(AES)
Select one of the following Authentication Methods:
WPA-PSK, WPA, WPA2-PSK, WPA2
Wireless LAN Signal
You can check the signal strength when using Wireless LAN.
Restore Defaults
Reset the Wireless LAN to default.
USB Settings
Configure the communication parameters for computer-to-printer connection via USB.
USB Speed
Default: [Auto Select]
• Auto Select
• Full Speed
Fixed USB Port
Default: [Off]
• Level 1
• Level 2
• Off
• For details about how to configure the settings using Web Image Monitor, see p.135 "Using Web
Image Monitor" and Web Image Monitor Help.
130
Host Interface Menu
Changing the Host Interface Menu
Follow the procedure below to change the I/O Timeout setting.
1. Press the [Menu] key.
4
CEE128
2. Press the [ ] or [ ] key to select [Host Interface], and then press the [OK] key.
3. Press the [ ] or [ ] key to select [I/O Timeout], and then press the [OK] key.
4. Press the [ ] or [ ] key to select the lead time needed to end a printing operation, and then
press the [OK] key.
5. Press the [Menu] key.
131
4. Making Printer Settings Using the Control Panel
Language Menu
You can set a language to be displayed on the menu.
Language Menu Parameters
You can select the language you use.
Default: [English]
Available languages are as follows:
4
English, French, German, Italian, Spanish, Dutch, Norwegian, Danish, Swedish, Polish, Portuguese,
Hungarian, Czech, Finnish, Russian.
Changing the Language Menu
Follow the procedure below to change the interface language.
1. Press the [Menu] key.
CEE128
2. Press the [ ] or [ ] key to select [Language], and then press the [OK] key.
3. Press the [ ] or [ ] key to select the language, and then press the [OK] key.
4. Press the [Menu] key.
132
Options Menu
Options Menu
Using the options menu, you can configure settings related to form feeding and error logs. This section
provides a list of the configurable settings and explains how to check error logs.
Options Menu Parameters
Form Feed
Outputs data that are unprintable, due to errors such as the absence of a line-feed code.
Error Log
If a document cannot be printed due to errors or other reasons, an error log is created. You can check
the error log using the control panel.
4
• All
• Sample Print Jobs
• Locked Print Jobs
• Hold Print Jobs
• Stored Print Jobs
Checking the Error Log
If a document could not be printed due to a printing error, identify the cause of the error by checking the
error log in the control panel.
• The most recent 30 errors are stored in the error log. If a new error is added when there are 30 errors
already stored, the oldest error is deleted. However, if the oldest error belongs to one of the following
print jobs, it is not deleted. The error is stored separately until the number of those errors reaches 30.
You can check any of these print jobs for error log information.
• Sample Print Jobs
• Locked Print Jobs
• Hold Print Jobs
• Stored Print Jobs
• If the power switch is turned off, the log is deleted.
133
4. Making Printer Settings Using the Control Panel
1. Press [Option].
2. Select [Error Log] using the [ ] or [ ] key, and then press the [OK] key.
4
3. Select a type of print jobs using the [ ] or [ ] key, and then press the [OK] key.
If you select [All], all error logs appears.
4. Select the error log you want to check using the [ ] or [ ] key.
Press the [Menu] key until the initial screen appears after checking the log.
• To print files that appear in the error log, resend them after stored files have been printed or deleted.
134
5. Monitoring and Configuring the
Printer
This chapter explains how to use Web Image Monitor and other applications to monitor the printer or
change its settings.
Using Web Image Monitor
Using Web Image Monitor, you can check the printer status and change settings.
Introduction to Web Image Monitor
Available operations
The following operations can be remotely performed using Web Image Monitor from a client
computer.
5
• Displaying printer status or settings
• Checking the print job status or history
• Interrupting currently printing jobs
• Resetting the printer
• Managing the Address Book
• Making printer settings
• Making network protocol settings
• Making security settings
Configuring the printer
To perform the operations from Web Image Monitor, TCP/IP is required. After the printer is configured
to use TCP/IP, operations from Web Image Monitor become available.
Recommended Web browser
• Windows:
Internet Explorer 6.0 or higher
Firefox 2.0 or higher
• Mac OS X:
Firefox 2.0 or higher
Safari 3.0 or higher
Web Image Monitor supports screen reader software. We recommend JAWS 7.0 or a later version.
135
5. Monitoring and Configuring the Printer
• Web Image Monitor does not support Safari running under Mac OS X 10.4.1.
• Display and operation problems can occur if you do not enable JavaScript and cookies, or if you are
using a non-recommended Web Browser.
• If you are using a proxy server, change the Web browser settings. Contact your administrator for
information about the settings.
• If you click your browser's back button but the previous page does not appear, click the browser's
refresh button and try again.
• Printer information is not automatically updated. To perform an update, click [Refresh] in the display
area.
• We recommend using Web Image Monitor in the same network.
• If the printer is firewall-protected, it cannot be accessed from computers outside the firewall.
5
• When using the printer under DHCP, the IP address may be automatically changed by the DHCP
server settings. Enable DDNS setting on the printer, and then connect using the printer's host name.
Alternatively, set a static IP address to the DHCP server.
• If the HTTP port is disabled, connection to the printer using the printer's URL cannot be established.
SSL setting must be enabled on this printer. For details, contact your administrator.
• When using the SSL encryption protocol, enter "https://(printer's IP address)/".
• When you are using Firefox, fonts and colors may be different, or tables may be out of shape.
• When using a host name under Windows Server 2003/2003 R2/2008/2008 R2 with IPv6
protocol, perform host name resolution using an external DNS server. The host file cannot be used.
• To use JAWS 7.0 under Web Image Monitor, you must be running Windows OS and Microsoft
Internet Explorer 5.5 SP2, or a later version.
• If you are using Internet Explorer 8, downloading will be slower than with other browsers. To
download faster with Internet Explorer 8, open the browser's [Internet Options] menu and register the
printer's URL as a trusted site. Then disable SmartScreen filter for trusted sites. For details about these
settings, see the Internet Explorer 8 Help files.
• The process of opening Web Image Monitor can be simplified by adding the URL of Web Image
Monitor to the bookmarks of your Web browser. When adding a bookmark, do so in the top page
before logging in to Web Image Monitor. If the bookmark is added after the user has logged in the
top page, it may not display correctly.
Displaying Top Page
This section explains the Top Page and how to display Web Image Monitor.
1. Start your Web browser.
136
Using Web Image Monitor
2. Enter "http://(printer's IP address or host name)/" in your Web browser's URL bar.
If the printer's host name has been registered on the DNS or WINS server, you can enter it.
When setting SSL, a protocol for encrypted communication, under environment which server
authentication is issued, enter "https://(printer's IP address or host name)/".
Every Web Image Monitor page is divided into the following areas:
5
CEE504
1. Menu area
If you select menu, its content will be shown on the work area, or the sub area.
2. Tab area
Details about each menu appear.
3. Header area
The dialog box for switching to the user mode and administrator mode appears, and each mode's menu will be
displayed.
The link to help and dialog box for keyword search appears.
4. Help
Use Help to view or download Help file contents.
5. Display area
Displays the contents of the item selected in the menu area.
Printer information in the display area is not automatically updated. Click [Refresh] at the upper right in the display
area to update the printer information. Click the Web browser's [Refresh] button to refresh the entire browser
screen.
When User Authentication is Set
For details about logging in to and out of Web Image Monitor, see p.19 "If User Authentication is
Specified".
137
5. Monitoring and Configuring the Printer
About Menu and Mode
There are two modes available with Web Image Monitor: guest mode and administrator mode.
Guest mode
In the guest mode, printer status, settings, and print job status can be viewed, but the printer settings
cannot be changed.
5
CEE505
1. Home
The [Status], [Supplies], [Device Info], and [Counter] tab are displayed. Details of the tab menu are displayed
on the work area.
2. Printer: Print Jobs
Allows you to display a list of Sample Print, Locked Print, Hold Print, and Stored Print jobs.
3. Job
Display all print files.
4. Configuration
Display current printer and network settings.
Administrator mode
In the administrator mode, you can configure various printer settings.
CEE506
138
Using Web Image Monitor
1. Home
The [Status], [Supplies], [Device Info], and [Counter] tab are displayed. Details of the tab menu are displayed
on the work area.
2. Printer: Print Jobs
Allows you to display a list of Sample Print, Locked Print, Hold Print, and Stored Print jobs.
3. Job
Display all print files.
4. Address Book
User information can be registered, displayed, changed, and deleted.
5. Configuration
Make system settings for the printer, interface settings, and security.
6. Reset Device
Click to reset the printer. If a print job is being processed, the printer will be reset after the print job is completed.
This button is located on Top Page.
7. Reset Printer Job
5
Click to reset current print jobs and print jobs in queue. This button is located on Top Page.
• For details about messages and settings, see Web Image Monitor Help.
Access in the Administrator Mode
Follow the procedure below to access Web Image Monitor in the administrator mode.
1. Click [Login] in the Header area of Web Image Monitor.
2. Enter a login user name and password, and then click [Login].
For details about the login user name and password, consult your network administrator.
Depending on the configuration of your Web browser, the login user name and password might be
saved. If you do not want to save them, configure your Web browser's settings so that this information
is not saved.
Displaying Web Image Monitor Help
When using Help for the first time, clicking the icon marked "?" (
) makes the following screen appear,
in which you can view Help in two different ways, as shown below:
Viewing Help on our Web site
Viewing Help to your computer.
139
5. Monitoring and Configuring the Printer
Downloading and checking Help
You can download Help to your computer. As the Help URL, you can specify the path to the local file
to view the Help without connecting to the Internet.
• By clicking "?" (
) in the header area, the contents of Help appear.
• By clicking "?" (
appears.
), the Help icon in the display area, Help for the setting items in the display area
Downloading Help
1. In the [OS] list, select the operating system.
2. In the [Language] list, select the language.
5
3. Click [Download].
4. Download Help by following the instructions on the screen.
5. Store the downloaded compressed file in a given location, and then decompress the file.
To create a link for the Help button (
), save the downloaded Help files on a Web server.
Linking the URL of the downloaded Help
You can link the URL of the help file on a Web server to the "?" button.
1. Log in to Web Image Monitor as an administrator.
For details about logging in, see p.139 "Access in the Administrator Mode".
2. In the menu area, click [Configuration].
3. Click [Webpage].
4. In the [Set Help URL Target] box, enter the URL of the help file.
If you saved the help file to "C:\HELP\EN", enter "file://C:/HELP/". For example, if you saved the
file to a Web server, and the URL of the index file is "http:// a.b.c.d/HELP/EN/index.html", enter
"http://a.b.c.d/HELP/".
5. Click [OK].
• If you save the Help files on your hard disk, you must access them directly - you cannot link to them
).
using the Help button (
140
Registering Classification Codes
Registering Classification Codes
This section explains classification codes.
If you register classification codes, the printer logs the number of prints made under each code.
You can register classification codes to individual users and specified purposes, enabling you to monitor
printer usage by each.
For example, you can manage accounts according to individual clients or account titles.
Classification Code - Based Process (example)
5
CBK519
1. Divisions, sections, departments, project teams, users, etc., to be managed.
2. The appropriate classification code for the print job is entered.
3. The job is printed.
4. Classification codes are collected and managed by an external log collection system.
• For details about how to enter classification codes, see p.52 "Specifying the Classification Code for
a Print Job".
141
5. Monitoring and Configuring the Printer
• When printing in an environment where classification codes are required, print jobs that do not have
a classification code cannot be printed. For details, see p.142 "Configuring Classification Codes".
Configuring Classification Codes
Use Web Image Monitor to specify whether or not to apply classification code requirement to print jobs.
• The configuration page can be printed at any time.
• The default setting for classification code requirement is "Optional".
1. Log in to Web Image Monitor as an administrator.
For details about logging in, see p.139 "Access in the Administrator Mode".
5
2. Click [Configuration] in the menu area, and then click [Logs].
3. Select that [Required] or [Optional] is selected for [Classification Code] in the [Common
Settings for All Logs] column.
If "Required" is selected for the classification code requirement setting in Web Image Monitor, any
print job without a classification code specified will not be printed.
4. Click [OK].
5. Click [Logout].
6. Quit Web Image Monitor.
142
Address Book Backup and Restore
Address Book Backup and Restore
Using Web Image Monitor, you can save or restore the printer's address book data.
Backing Up Address Book Data
Follow the procedure below to save a copy of the printer's address book data.
1. Log in to Web Image Monitor as an administrator.
For details about logging in, see p.139 "Access in the Administrator Mode".
2. Click [Address Book].
3. Click [Maintenance].
4. Enter the encryption key and click [Backup].
Enter the encryption key that was set when the address book was encrypted. For details, contact your
administrator.
5
Restoring Address Book Data
Follow the procedure below to restore previously saved address book data to the printer.
1. Log in to Web Image Monitor as an administrator.
For details about logging in, see p.139 "Access in the Administrator Mode".
2. Click [Address Book].
3. Click [Maintenance].
4. Click [Restore].
5. Select the file to be restored by following the on-screen instructions.
6. Click [OK].
7. Confirm the message, and then click [OK].
8. Click [Back].
9. Click [Logout].
• The restore will overwrite any address data currently on the printer. The restore will also reset all user
counters.
• For details about restoring the address book data, see Web Image Monitor Help.
143
5. Monitoring and Configuring the Printer
Using SmartDeviceMonitor for Admin
Using SmartDeviceMonitor for Admin, you can monitor and manage multiple devices connected to the
network. Use of this software is recommended for administrators only.
You can download SmartDeviceMonitor for Admin from the manufacturer's Web site.
For details about SmartDeviceMonitor for Admin, see the manual supplied with the software.
5
144
When Using IPP with SmartDeviceMonitor for Client
When Using IPP with SmartDeviceMonitor for
Client
When using IPP with SmartDeviceMonitor for Client, note the following:
• To use this function, you must first download SmartDeviceMonitor for Client from the manufacturer's
Web site and install it on your computer. Contact your local dealer for information on downloading
SmartDeviceMonitor for Client.
• Documents cannot be printed if the user logs on to Windows using a user name that has characters
other than single byte alphanumeric letters.
• The names of the IPP port for SmartDeviceMonitor for Client and the standard IPP port for the operating
system must be different from each other.
• When setting SSL, a protocol for encrypted communication, under the environment where the device
certificate is installed, enter "https://( printer's IP address)/ ". Internet Explorer must be installed on
your computer. Use the highest version. Internet Explorer 6.0 or higher is recommended.
5
• If the [Security Alert] dialog box appears when accessing the printer using IPP to create or configure
an IPP port, or when printing, install the certificate. To select the certificate store location when using
Certificate Import Wizard, click [Place all certificates in the following store], and then click [Local
Computer] under [Trusted Root Certification Authorities].
• For details about SSL settings, consult your network administrator.
145
5. Monitoring and Configuring the Printer
Printer Status Notification by E-Mail
Whenever a paper tray becomes empty or paper is jammed, an e-mail alert is issued to the registered
addresses to notify the printer status.
For this notification, you can make the e-mail notification settings.
Notification timing and e-mail content can be set.
• Depending on your e-mail application, a phishing warning might appear after you receive an e-mail
message. To prevent phishing warnings appearing after you receive e-mail from a specified sender,
you must add the sender to your e-mail application's exclusion list. For details about how to do this,
see your e-mail application's Help.
The e-mail notification functions you can set are as follows:
5
• Auto e-mail notification
Information including the printer status is automatically sent by e-mail. Before you use this function,
register the e-mail address to be used.
• On-demand e-mail notification
Information including the printer status is sent by e-mail when a request e-mail from the administrator
is received.
The information that can be notified by auto e-mail notification is as follows:
• Call Service
• Out of Toner
• Toner Almost Empty
• Paper Misfeed
• Cover Open
• Out of Paper
• Almost Out of Paper
• Paper Tray Error
• Output Tray Full
• Unit Connection Error
• Waste Toner Bottle is Full
• File Storage Memory Full Soon
• Device Access Violation
• Replacement Required: Unit
• Replacement Required Soon: Unit
146
Printer Status Notification by E-Mail
• Replacement Required: Print Cartridge
• Replacement Required Soon: Print Cartridge
• Check Replacement: Print Cartridge
• Toner Almost Empty (Remaining Level Selectable)
1. Under [System] Menu, set [Auto E-mail Notify] to [On], using the printer's control panel.
(The default setting is [On].)
2. Log in to Web Image Monitor as an administrator.
For details about logging in, see p.139 "Access in the Administrator Mode".
3. In the menu area, click [Configuration].
4. Under "Device Settings", click [E-mail].
5. Make the following settings:
• Items in the Reception column: Make the necessary settings for sending and receiving e-mail.
• Items in the SMTP column: Configure the SMTP server. Check your mailing environment, and
then specify the necessary items. You can also perform mail authentication for the SMTP server.
5
• Items in the POP before SMTP column: Configure the POP server. Check your mailing
environment, and then specify the necessary items. You can also perform mail authentication for
the POP server.
• Items in the POP3/IMAP4 column: Configure the POP3 or IMAP4 server. Check your mailing
environment, and then specify the necessary items.
• Items in the E-mail Communication Port column: Configure the port to be used for access to the
mail server.
• Items in the E-mail Notification Account column: Specify these items If you want to use e-mail
notification.
6. Click [OK].
7. Click [Logout].
8. Quit Web Image Monitor.
• For details about Web Image Monitor, see p.135 "Using Web Image Monitor".
• For details about the settings, see Web Image Monitor Help.
Setting the Account for E-mail Notification
Before you use Auto E-mail Notification or On-demand E-mail notification, setup an e-mail account to be
used for the function. Perform the following configuration task in Web Image Monitor.
147
5. Monitoring and Configuring the Printer
1. Log in to Web Image Monitor as an administrator.
For details about logging in, see p.139 "Access in the Administrator Mode".
2. In the menu area, click [Configuration].
3. Under "Device Settings", click [E-mail].
4. Make the following settings in E-mail Notification Account:
• E-mail Notification E-mail Address: Enter the address using alphanumeric characters. This will
appear as the sender (From:) of the e-mail notification. Send requests for e-mail notification to
this address.
• Receive E-mail Notification: Specify whether to use on-demand e-mail notification.
• E-mail Notification User Name: Enter the specified user name for the e-mail account in "E-mail
Notification E-mail Address".
5
• E-mail Notification Password: Enter the specified password for the e-mail account in "E-mail
Notification E-mail Address".
5. Click [OK].
6. Click [Logout].
7. Quit Web Image Monitor.
• The user name and e-mail address that is already registered as e-mail destination cannot be specified
as the recipient of e-mail notification.
Mail Authentication
You can configure mail authentication to prevent illegal use of the mail server.
SMTP Authentication
Specify SMTP authentication.
When mail is sent to the SMTP server, authentication is performed using the SMTP AUTH protocol by
prompting the mail originator to enter the user name and password. This prevents illegal use of the
SMTP server.
1. Log in to Web Image Monitor as an administrator.
For details about logging in, see p.139 "Access in the Administrator Mode".
2. In the menu area, click [Configuration].
3. Under "Device Settings", click [E-mail].
4. Make the following settings in SMTP column:
• SMTP Server Name: Enter the IP address or host name of the SMTP server.
• SMTP Port No.: Enter the port number used when sending e-mail to the SMTP server.
148
Printer Status Notification by E-Mail
• SMTP Authentication: Enable or disable SMTP authentication.
• SMTP Auth. E-mail Address: Enter the e-mail address.
• SMTP Auth. User Name: Enter the SMTP account name.
• SMTP Auth. Password: To set or change the password for SMTP AUTH.
• SMTP Auth. Encryption: Select whether to encrypt the password or not.
[Auto Select]: If the authentication method is PLAIN, LOGIN, CRAM-MD5, or DIGESTMD5.
[Active]: If the authentication method is CRAM-MD5 or DIGEST-MD5.
[Inactive]: If the authentication method is PLAIN or LOGIN.
5. Click [OK].
6. Click [Logout].
7. Quit Web Image Monitor.
POP before SMTP Authentication
5
Select whether to log in to the POP3 server before sending e-mail.
1. Log in to Web Image Monitor as an administrator.
For details about logging in, see p.139 "Access in the Administrator Mode".
2. In the menu area, click [Configuration].
3. Under "Device Settings", click [E-mail].
4. Make the following settings in POP before SMTP column:
• POP before SMTP: Enable or disable POP before SMTP.
• POP E-mail Address: Enter the e-mail address.
• POP User Name: Enter the POP account name.
• POP Password: To set or change the POP password.
• Timeout setting after POP Auth.: Enter the time available before connecting to the SMTP
server after logging in to the POP server.
5. Click [OK].
6. Click [Logout].
7. Quit Web Image Monitor.
Auto E-mail Notification
1. Log in to Web Image Monitor as an administrator.
For details about logging in, see p.139 "Access in the Administrator Mode".
2. In the menu area, click [Configuration].
149
5. Monitoring and Configuring the Printer
3. Under "Device Settings", click [Auto E-mail Notification].
The dialog box for making notification settings appears.
4. Make the following settings:
• Notification Message: You can set this according to your needs, for example, the printer's
location, service representative contact information.
• Items in the Groups to Notify column: E-mail notification addresses can be grouped as required.
• Items in the Select Groups/Items to Notify column: Select groups for each notification type, such
as printer status and error.
To make detailed settings for these items, click [Edit] next to "Detailed Settings of Each Item".
5. Click [OK].
6. Click [Logout].
5
7. Quit Web Image Monitor.
• For details about Web Image Monitor, see p.135 "Using Web Image Monitor".
• For details about the settings, see Web Image Monitor Help.
On-demand E-mail Notification
1. Log in to Web Image Monitor as an administrator.
For details about logging in, see p.139 "Access in the Administrator Mode".
2. In the menu area, click [Configuration].
3. Under "Device Settings", click [On-demand E-mail Notification].
4. Make the following settings:
• Notification Subject: Enter a text string to be added to the subject line of return e-mails.
• Notification Message: You can set this according to your needs, for example, the printer's
location, service representative contact information.
• Restriction to Device Status Info.: Select whether or not to allow access to the information such
as the printer settings and status.
• Items in the Receivable E-mail Address/Domain Name Settings column: Enter an e-mail address
or domain name to use for requesting information by e-mail and to receive its return e-mail.
5. Click [OK].
6. Click [Logout].
7. Quit Web Image Monitor.
150
Printer Status Notification by E-Mail
• For details about Web Image Monitor, see p.135 "Using Web Image Monitor".
• For details about the settings, see Web Image Monitor Help.
Format of On-demand E-mail Messages
To use "on-demand e-mail notification", you need to send a request e-mail with a particular format to the
printer.
Using your mail software, enter the following:
Format of the request e-mail
Item
Description
To
Enter the specified e-mail address in "E-mail
Notification E-mail Address".
Subject
Enter "requeststatus".
From
Specify a valid mail address. The device
information will be sent to the address specified
here.
5
• A mail message must be within 1 MB in size.
• E-mail may be incomplete if sent immediately after power on.
• The subject is not case sensitive.
• The body of a request e-mail has no meaning. Any text written in the e-mail body is ignored.
151
5. Monitoring and Configuring the Printer
5
152
6. Using a Printer Server
This chapter explains how to configure this printer to work as a network printer.
Preparing Printer Server
This section explains how to configure the printer as a Windows network printer. The printer is configured
to enabling network clients to use it. When the network printer is connected via SmartDeviceMonitor for
Client, you can set the printing notification function to notify clients of the results of their print jobs.
• Under Windows XP Professional or Windows Server 2003/2003 R2/2008/2008 R2, to change
printer properties in the [Printer] folder, you need Printer Management access authentication; under
Windows Vista/7, Full Control access authentication. Log on to the file server as an Administrator
group.
1. Open the [Printers and Faxes] window from the [Start] menu.
2. Click the icon of the printer you want to use. On the [File] menu, click [Properties].
3. On the [Sharing] tab, click [Share this printer].
6
4. To share the printer with users using a different version of Windows, click [Additional
Drivers...].
If you have installed an alternative driver by selecting [Share As:] during the printer driver installation,
this step can be ignored.
5. On the [Advanced] tab, click the [Printing Defaults...] button. Specify the default values for
the printer driver that will be distributed to client computers, and then click [OK].
6. Click [OK], and then close the printer properties.
153
6. Using a Printer Server
Using NetWare
This section describes the setting procedure for network printers in the NetWare environment. In the
NetWare environment, you can connect the printer as a "print server" or "remote printer".
• IPv6 cannot be used on this function.
• This procedure assumes an environment is already prepared for normal NetWare running the printing
service setting.
• The procedure is explained with the following example settings:
• File server name ...CAREE
• Print server name ...PSERV
• Printer name ...R-PRN
6
• Queue name ...R-QUEUE
Setting Up as a Print Server (NetWare 3.x)
Follow the procedure below to connect the printer as a print server using NetWare 3.x.
1. Log in to Web Image Monitor as an administrator.
For details about logging in, see p.139 "Access in the Administrator Mode".
2. Click [Configuration] in the menu area, and then click [NetWare Print Settings].
• Print Server Name: Enter the NetWare print server name. To use the interface board as a print
server, enter the name of a print server that is not active on the file server. Use up to 47 characters.
• Logon Mode: Specify whether to designate a file server or NDS tree when logging in to
NetWare.
• File Server Name: When a file server name is entered here, only the specified file server is
searched for. This item is mandatory. Use up to 47 characters.
• NDS Tree: To enable NDS mode, enter the name of the NDS tree you want to log in to. Use up
to 32 alphanumeric characters.
• NDS Context Name: To enable NDS mode, enter the print server context. Use up to 127
characters.
• Operation Mode: Specify whether to use the interface board as a print server or a remote printer.
• Remote Printer No.: This item is effective when the interface board is specified as a remote printer.
Enter the same number as the number of the printer to be created on the print server (0 to 254
characters).
154
Using NetWare
• Job Timeout: When the interface board is used as a NetWare remote printer, the printer cannot
detect when a print job ends. Therefore, the printer terminates printing when a certain period of
time has elapsed since it last received print data (i.e., when it has not received print data for a
certain period of time). Specify here this period of time (3 to 255 seconds). The initial value is
15 (seconds).
• Frame Type: Select the frame type from the drop-down menu.
• Print Server Protocol: Select the protocol for NetWare from the drop-down menu.
• NCP Delivery Protocol: Select the protocol for NCP delivery.
3. Confirm the settings, and then click [Device Name].
Configuration is now complete. Wait several before restarting Web Image Monitor.
4. Click [Logout].
• To check the configuration is correct, enter the following from the command prompt:
F:> USERLIST
• If the printer works as configured, the name of the print server appears as a connected user.
• If you cannot identify the printer you want to configure, check the printer name against the
configuration page printed from the printer. For details about printing a configuration page, see
p.99 "Test Printing".
6
• If no printer names appear in the list, match the frame types of IPX/SPX for the computer and printer.
Use the [Network] dialog box of Windows to change the frame type of the computer.
• For details about Web Image Monitor, see p.135 "Using Web Image Monitor".
Setting Up as a Print Server (NetWare 4.x, 5 / 5.1, 6 / 6.5)
Follow the procedure below to connect the printer as a print server using NetWare 4.x, NetWare 5 / 5.1,
or NetWare 6 / 6.5.
• When using the printer as a print server in NetWare 4.x, NetWare 5 / 5.1, or NetWare 6 / 6.5,
set it to the NDS mode.
• When using NetWare 5 / 5.1 or NetWare 6 / 6.5, set the printer as a print server.
1. Log in to Web Image Monitor as an administrator.
For details about logging in, see p.139 "Access in the Administrator Mode".
2. Click [Configuration] in the menu area, and then click [NetWare Print Settings].
3. Confirm the settings, and then click [Device Name].
4. Click [Logout].
155
6. Using a Printer Server
5. Quit Web Image Monitor.
• To check the configuration is correct, enter the following from the command prompt:
F:> USERLIST
• If the printer works as configured, the name of the print server appears as a connected user.
• If you cannot identify the printer you want to configure, check the printer name against the
configuration page printed from the printer. For details about printing a configuration page, see
p.99 "Test Printing".
• If no printer names appear in the list, match the frame types of IPX/SPX for the computer and printer.
Use the [Network] dialog box of Windows to change the frame type of the computer.
• For details about Web Image Monitor, see p.135 "Using Web Image Monitor".
Using Pure IP in the NetWare 5 / 5.1 or 6 / 6.5 Environment
6
Follow the procedure below to connect the printer as a print server in a pure IP environment of NetWare
5 / 5.1 or NetWare 6 / 6.5.
• When creating a queued print server in a pure IP environment of NetWare 5 / 5.1 or NetWare 6 /
6.5, create a print queue on the file server using NetWare Administrator.
• This printer is not available as a remote printer for use in a pure IP environment.
• To use the printer in a pure IP environment, set it to IPv4.
Setting up using NWadmin
1. From Windows, start NWadmin.
For details about NWadmin, see the NetWare manuals.
2. Select the object in which the print queue is located in the directory tree, and then click
[Create] on the [Object] menu.
3. In the [Class of new object] box, click [Print Queue], and then click [OK].
4. In the [Print Queue Name] box, enter the name of the print queue.
5. In the [Print Queue Volume] box, click [Browse].
6. In the [Available objects] box, click the volume in which the print queue is created, and then
click [OK].
7. Check the settings, and then click [Create].
8. Select the object in which the printer is located, and then click [Create] on the [Object] menu.
9. In the [Class of new object] box, click [Printer], and then click [OK]. For NetWare 5, click
[Printer (Non NDPS)].
156
Using NetWare
10. In the [Printer name] box, enter the printer name.
11. Select the [Define additional properties] check box, and then click [Create].
12. Click [Assignments], and then click [Add] in the [Assignments] area.
13. In the [Available objects] box, click the queue you created, and then click [OK].
14. Click [Configuration], click [Parallel] in the [Printer type] list, and then click
[Communication].
15. Click [Manual load] in the [Communication type] area, and then click [OK].
16. Check the settings, and then click [OK].
17. Select a context specified, and then click [Create] on the [Object] menu.
18. In the [Class of new object] box, click [Print Server], and then click [OK]. For NetWare 5,
click [Print Server (Non NDPS)].
19. In the [Print Server Name] box, enter the print server name.
20. Select the [Define additional properties] check box, and then click [Create].
21. Click [Assignments], and then click [Add] in the [Assignments] area.
22. In the [Available objects] box, click the queue you created, and then click [OK].
23. Check the settings, and then click [OK].
6
24. Start the print server by entering the following from the console of the NetWare server.
If the print server is in operation, quit and restart it.
To quit
CAREE: unload pserver
To start
CAREE: load pserver print_server_name
Setting up using Web Image Monitor
1. Log in to Web Image Monitor as an administrator.
For details about logging in, see p.139 "Access in the Administrator Mode".
2. Click [Configuration] in the menu area, and then click [NetWare Print Settings].
3. Confirm the settings, and then click [Device Name].
4. Click [Logout].
5. Quit Web Image Monitor.
• If you cannot identify the printer you want to configure, check the printer name against the
configuration page printed from the printer. For details about printing a configuration page, see
p.99 "Test Printing".
157
6. Using a Printer Server
• If no printer names appear in the list, match the frame types of IPX/SPX for the computer and printer.
Use the [Network] dialog box of Windows to change the frame type of the computer.
• For details about Web Image Monitor, see p.135 "Using Web Image Monitor".
Setting Up as a Remote Printer (NetWare 3.x)
Follow the procedure below to use the printer as a remote printer under NetWare 3.x.
Setting up using PCONSOLE
1. Enter "PCONSOLE" from the command prompt.
F:> PCONSOLE
2. Create a print queue.
When using the existing print queue, go to the procedure for creating a printer.
6
3. From the [Available Options] menu, select [Print Queue Information], and then press the
[Enter] key.
4. Press [Insert] key, and then enter a print queue name.
5. Press [Esc] key to return to the [Available Options] menu.
6. Set up the network connection to a printer.
7. On the [Available Options] menu, click [Print Server Information], and then press the [Enter]
key.
8. To create a new print server, press the [Insert] key, and then enter a print server name.
For a currently defined print server, select a print server in the [Print Server] list.
9. From the [Print Server Information] menu, select [Print Server Configuration].
10. From the [Print Server Configuration] menu, select [Printer Configuration].
11. Select the printer indicated as [Not Installed].
12. To change the printer name, enter a new name.
A name "printer x" is assigned to the printer. The "x" stands for the number of the selected printer.
13. As type, select [Remote Parallel, LPT1].
The IRQ, Buffer size, Starting form, and Queue service mode are automatically configured.
14. Press the [Esc] key, and then click [Yes] on the confirmation message.
15. Press the [Esc] key to return to [Print Server Configuration Menu].
16. Assign print queues to the created printer.
17. From [Print Server Configuration Menu], select [Queues Serviced By Printer].
18. Select the printer created.
158
Using NetWare
19. Press the [Insert] key to select a queue serviced by the printer.
You can select several queues.
20. Follow the instructions on the screen to make other necessary settings.
Following these steps, check that the queues are assigned.
21. Press the [Esc] key until "Exit?" appears, and then select [Yes] to exit PCONSOLE.
22. Start the print server by entering the following from the console of the NetWare server.
If the print server is in operation, quit and restart it.
To quit
CAREE: unload pserver
To start
CAREE: load pserver print_server_name
If the printer works as configured, the message "Waiting for job" appears.
Setting up using Web Image Monitor
1. Log in to Web Image Monitor as an administrator.
For details about logging in, see p.139 "Access in the Administrator Mode".
6
2. Click [Configuration] in the menu area, and then click [NetWare Print Settings].
3. Confirm the settings, and then click [Device Name].
Configuration is now complete. Wait several minutes before restarting Web Image Monitor.
4. Click [Logout].
5. Quit Web Image Monitor.
• If you cannot identify the printer you want to configure, check the printer name against the
configuration page printed from the printer. For details about printing a configuration page, see
p.99 "Test Printing".
• If no printer names appear in the list, match the frame types of IPX/SPX for the computer and printer.
Use the [Network] dialog box of Windows to change the frame type of the computer.
• For details about Web Image Monitor, see p.135 "Using Web Image Monitor".
Setting Up as a Remote Printer (NetWare 4.x, 5 / 5.1, 6 / 6.5)
Follow the procedure below to use the printer as a remote printer under NetWare 4.x, 5 / 5.1 and 6 /
6.5.
• To use the printer as a remote printer under NetWare 4.x, 5 / 5.1, 6 / 6.5, set it to NDS mode.
159
6. Using a Printer Server
• Do not use the printer as a remote printer when Pure IP is used.
Setting up using NWadmin
1. From Windows, start NWadmin.
For details about NWadmin, see the NetWare manuals.
2. Set up the network connection to a print queue. Select the object in which the print queue is
located in the directory tree, and then click [Create] on the [Object] menu.
3. In the [Class of new object] box, click [Print Queue], and then click [OK].
4. In the [Print Queue Name] box, enter the name of the print queue.
5. In the [Print Queue Volume] box, click [Browse].
6. In the [Available objects] box, click the volume in which the print queue is created, and then
click [OK].
7. Check the settings, and then click [Create].
6
8. Set up the network connection to a printer. Select the object in which the printer is located,
and then click [Create] on the [Object] menu.
9. In the [Class of new object] box, click [Printer], and then click [OK]. For NetWare 5, click
[Printer (Non NDPS)].
10. In the [Printer name] box, enter the printer name.
11. Select the [Define additional properties] check box, and then click [Create].
12. Assign print queues to the created printer. Click [Assignments, and then click [Add] in the
[Assignments] area.
13. In the [Available objects] box, click the queue you created, and then click [OK].
14. Click [Configuration], click [Parallel] in the [Printer type] list, and then click
[Communication].
15. Click [Manual load] in the [Communication type] area, and then click [OK]. Check the
settings, and then click [OK].
16. Set up the network connection to a print server. Select a context specified, and then click
[Create] on the [Object] menu.
17. In the [Class of new object] box, click [Print Server], and then click [OK]. For NetWare 5,
click [Print Server (Non NDPS)].
18. In the [Print Server Name:] box, enter the print server name.
19. Select the [Define additional properties] check box, and then click [Create].
20. Assign the printer to the created print server. Click [Assignments], and then click [Add] in
the [Assignments] area.
21. In the [Available objects] box, click the queue you created, and then click [OK].
22. In the [Printers] area, click the printer you assigned, and then click [Printer Number].
160
Using NetWare
23. Enter the printer number, and then click [OK]. Check the settings, and then click [OK].
24. Start the print server by entering the following from the console of the NetWare server.
If the print server is in operation, quit and restart it.
To exit
CAREE: unload pserver
To start
CAREE: load pserver print_server_name
25. Enter the printer server name as the context name, and then press the [Enter] key.
26. Select the printer name on the context menu, and then press the [Enter] key.
Setting up using Web Image Monitor
1. Log in to Web Image Monitor as an administrator.
For details about logging in, see p.139 "Access in the Administrator Mode".
2. Click [Configuration] in the menu area, and then click [NetWare Print Settings].
3. Confirm the settings, and then click [Device Name].
Configuration is now complete. Wait several minutes before restarting Web Image Monitor.
6
4. Click [Logout].
5. Quit Web Image Monitor.
• If you cannot identify the printer you want to configure, check the printer name against the
configuration page printed from the printer. For details about printing a configuration page, see
p.99 "Test Printing".
• If no printer names appear in the list, match the frame types of IPX/SPX for the computer and printer.
Use the [Network] dialog box of Windows to change the frame type of the computer.
• For details about Web Image Monitor, see p.135 "Using Web Image Monitor".
161
6. Using a Printer Server
6
162
7. Mac OS X Configuration
This chapter explains how to use this printer with PostScript 3.
Using PostScript 3
The following section explains how to use the PostScript 3 printer driver.
For details about installing the PostScript 3 printer driver, see Driver Installation Guide.
Job Type
Use this to select the type of print job.
• If you are using a printer with ELP-NX installed, all print jobs for which "Locked Print" is specified are
stored in ELP-NX when user authentication is not set. Also note that any jobs for which "Locked Print"
is not specified will be deleted according to the default setting of ELP-NX.
• For details about how to print using ELP-NX, see the manuals provided with the application.
• For details about the option settings of ELP-NX, consult your administrator.
The following shows the tabs or menus where you can select this function.
7
[Job Type:] on [Job Log] in the print dialog box.
You can select the following items:
Normal Print
Select this for normal printing. The print job starts immediately after the print command is given.
Sample Print
Use this function to print only one set of a multiple print jobs.
The other sets are saved in the printer. The saved job can be printed from the printer's control panel.
You can also delete the saved job.
• The user ID can contain up to eight alphanumeric characters (a-z, A-Z, 0-9). The password can
contain 4-8 digits.
• Entering a user ID helps you distinguish your print jobs from others.
Locked Print
Use this function to save documents in the printer memory with a password, and then edit and print
them as you want.
163
7. Mac OS X Configuration
• The user ID can contain up to eight alphanumeric characters (a-z, A-Z, 0-9). The password can
contain 4-8 digits.
• Entering a user ID helps you distinguish your print jobs from others.
Hold Print
Use this function to temporarily hold a file in the printer, and print it from the computer or the printer's
control panel later.
• "User ID:" can contain up to eight alphanumeric (a- z, A- Z, 0- 9) characters.
• "File Name:" can contain to 16 alphanumeric (a-z, A-Z, 0-9) characters.
• Entering a user ID helps you distinguish your print jobs from others.
Stored Print
Use this function to store a file in the printer, and then print it from the computer or the printer's control
panel later.
7
• The user ID can contain up to eight alphanumeric characters (a-z, A-Z, 0-9). The password can
contain 4-8 digits.
• The File Name can contain up to 16 alphanumeric characters (a-z, A-Z, 0-9).
• You can assign a password to a saved document, but password assignment is not mandatory.
• Entering a user ID helps you distinguish your print jobs from others.
Store and Print
Use this function to prints the file at once and also stores the file in the printer.
• The user ID can contain up to eight alphanumeric characters (a-z, A-Z, 0-9). The password can
contain 4-8 digits.
• The File Name can contain up to 16 alphanumeric characters (a-z, A-Z, 0-9).
• You can assign a password to a saved document, but password assignment is not mandatory.
• Entering a user ID helps you distinguish your print jobs from others.
Using Sample Print
• You need Mac OS X 10.2 or higher to use this function.
• This function is available only if the hard disk is installed on the printer.
164
Using PostScript 3
• The number of pages the printer can save varies depending on the contents of the print images. At
most, the printer can save 100 jobs or 9,000 pages for Sample Print, Locked Print, Hold Print, and
Stored Print.
• Sample Print files will not appear on the display panel if they have already been executed or deleted
using the Web browser before you select [Sample Print] from the control panel.
• Sample Print files printed or deleted using Web Image Monitor after you select [Sample Print] using
the control panel will appear on the display panel. However, an error message will appear if you try
to print or delete those Sample Print files.
• If the application has a collate option, be sure to disable it before you send a print job. By default,
sample print jobs are automatically collated by the printer driver. If the collate option is selected in
the application's print dialog box, more prints than intended may be printed.
• Print jobs are not saved on the hard disk in the following cases. You can check the error log for jobs
not saved.
• When there are 100 Sample Print, Locked Print, Hold Print, and Stored Print jobs saved on the
hard disk.
• When the total number of pages saved on the hard disk exceeds 9,000 pages.
Sending a Sample Print file
1. In the application, on the [File] menu, click [Print].
2. Set the number of copies to two or more.
7
The sample print job is sent to the printer, and one set is printed.
3. In the pop-up menu, click [Job Log].
4. On the [Job Type:] pop-up menu, select [Sample Print].
5. In the [User ID:] box, enter a user ID using up to eight alphanumeric (a-z, A-Z, 0-9)
characters.
The user ID associates the user with his/her jobs.
6. Check the printed output to make sure the settings are correct.
If the settings are correct, perform the following steps to print the remaining sets.
Printing a selected Sample Print file
To print a saved job, use the printer’s control panel. For details, see p.65 "Printing a Sample Print file
using the control panel".
Deleting a selected Sample Print file
If you want to delete a saved job, see p.66 "Deleting Sample Print files".
165
7. Mac OS X Configuration
Using Locked Print
• You need Mac OS X 10.2 or higher to use this function.
• This function is available only if the hard disk is installed on the printer.
• The number of pages the printer can save varies depending on the contents of the print images. At
most, the printer can save 100 jobs or 9,000 pages for Sample Print, Locked Print and Hold Print.
• Locked Print files will not appear on the display panel if they have already been printed or deleted
using Web Image Monitor before you select [Locked Print] using the control panel.
• Locked Print files printed or deleted using Web Image Monitor after you have selected [Locked Print]
using the control panel will still appear on the display panel. However, an error message will appear
if you try to print or delete those Locked Print files.
• If the application has a collate option, be sure to disable it before you send a print job. By default,
locked print jobs are automatically collated by the printer driver. If the collate option is selected in the
application's print dialog box, more prints than intended may be printed.
• Print jobs are not saved on the hard disk in the following cases. You can check the error log for jobs
not saved.
7
• When there are 100 Sample Print, Locked Print, Hold Print, and Stored Print jobs saved on the
hard disk.
• When the total number of pages saved on the hard disk exceeds 9,000 pages.
Sending a Locked Print file
1. In the application, click [Print] on the [File] menu.
2. In the pop-up menu, click [Job Log].
3. On the [Job Type:] pop-up menu, click [Locked Print].
4. In the [User ID:] box, enter a user ID using up to eight alphanumeric (a-z, A-Z, 0-9)
characters, and then enter a 4-8 digit password in the Password: box.
The user ID associates the user with his/her jobs.
5. After making the necessary settings, click [Print].
The document file is saved in the printer.
To print the document, perform the following steps.
Printing a selected Locked Print file
To print a saved job, use the printer’s control panel. For details, see p.68 "Printing a Locked Print file
using the control panel".
Deleting a selected Locked Print file
If you want to delete a saved job, see p.69 "Deleting Locked Print files".
166
Using PostScript 3
Using Hold Print
• You need Mac OS X 10.2 or higher to use this function.
• This function is available only if the hard disk is installed on the printer.
• The number of pages the printer can save varies depending on the contents of the print images. At
most, the printer can save 100 jobs or 9,000 pages for Sample Print, Locked Print and Hold Print.
• Hold Print files will not appear on the display panel if they have already been printed or deleted using
Web Image Monitor before you select [Hold Print] using the control panel.
• Hold Print files printed or deleted using Web Image Monitor after you have selected [Hold Print] using
the control panel will still appear on the display panel. However, an error message will appear if you
try to print or delete those Hold Print files.
• If the application has a collate option , be sure to disable it before you send a print job. By default,
Hold print jobs are automatically collated by the printer driver. If the collate option is selected in the
application's print dialog box, more prints than intended may be printed.
• Print jobs are not saved on the hard disk in the following cases. You can check the error log for jobs
not saved.
• When there are 100 Sample Print, Locked Print, Hold Print, and Stored Print jobs saved on the
hard disk.
• When the total number of pages saved on the hard disk exceeds 9,000 pages.
7
Sending a Hold Print file
1. In the application, click [Print] on the [File] menu.
2. In the pop-up menu, click [Job Log].
3. On the [Job Type:] pop-up menu, click [Hold Print].
4. In the [User ID:] box, enter a user ID using up to eight alphanumeric (a-z, A-Z, 0-9)
characters. [File Name] can also be set.
The user ID associates the user with his/her jobs.
5. After making the necessary settings, click [Print].
The document file is saved in the printer.
To print the document, perform the following steps.
Printing a selected Hold Print file
To print a saved job, use the printer’s control panel. For details, see p.72 "Printing a Hold Print file
using the control panel".
Deleting a selected Hold Print file
If you want to delete a saved job, see p.73 "Deleting Hold Print files".
167
7. Mac OS X Configuration
Using Stored Print
• You need Mac OS X 10.2 or higher to use this function.
• This function is available only if the hard disk is installed on the printer.
• Stored Print files will not appear on the display panel if they have already been printed or deleted
using Web Image Monitor before you select [Stored Print] using the control panel.
• Stored Print files printed or deleted using Web Image Monitor after you have selected [Stored Print]
using the control panel will still appear on the display panel. However, an error message will appear
if you try to print or delete those Stored Print files.
• If the application has a collate option , be sure to disable it before you send a print job. By default,
Stored print jobs are automatically collated by the printer driver. If the collate option is selected in the
application's print dialog box, more prints than intended may be printed.
• Print jobs are not saved on the hard disk in the following cases. You can check the error log for jobs
not saved.
• When there are 100 Sample Print, Locked Print, Hold Print, and Stored Print jobs saved on the
hard disk.
• When the total number of pages saved on the hard disk exceeds 9,000 pages.
7
Sending a Stored Print file
1. In the application, click [Print] on the [File] menu.
2. In the pop-up menu, click [Job Log].
3. On the [Job Type:] pop-up menu, click [Stored Print] or [Store and Print].
• [Stored Print]
Stores the file in the printer and print it later using the control panel.
• [Store and Print]
Prints the file at once and also stores the file in the printer.
4. In the [User ID:] box, enter a user ID using up to eight alphanumeric (a-z, A-Z, 0-9)
characters, and then enter a 4-8 digit password in the [Password:] box. [File Name] can
also be set.
The user ID associates the user with his/her jobs.
You can assign a password to a saved document, but password assignment is not mandatory.
The password must be entered when printing or deleting.
5. After making the necessary settings, click [Print].
The document file is saved in the printer.
To print the document, perform the following steps.
168
Using PostScript 3
Printing a selected Stored Print file
To print a saved job, use the printer’s control panel. For details, see p.75 "Printing a Stored Print file
using the control panel".
Deleting a selected Stored Print file
If you want to delete a saved job, see p.76 "Deleting Stored Print files".
Paper Type
Use this to select the paper type.
The following shows where you can select this function.
[Paper Type] is displayed under [General 1] in the [Feature Sets:] list on [Printer Features] in the print dialog
box.
Fit to Paper
When the size of the document and paper size differ, set whether or not to print according to paper size.
The following shows where you can select this function.
[Fit to Paper] is displayed under [General 1] in the [Feature Sets:] list on [Printer Features] in the print dialog
box.
7
Prompt User
Print is performed with the size of document to be printed unchanged.
Nearest Size and Scale
If the paper size is smaller than the selected paper size, the driver reduces the print size.
If the paper size is larger than the size of document to be printed, print is not to fit the paper size.
Nearest Size and Crop
Print is performed regardless of any differences between selected and actual paper size. However,
the print output is not adjusted to fit the paper size.
Print Mode
Use this mode to select the print mode you want to use.
[Print Mode] is displayed under [General 1] in the [Feature Sets:] list on [Printer Features] in the print dialog
box.
Off
Prints in normal quality.
169
7. Mac OS X Configuration
Edge Smoothing
Select whether or not to smooth the edges of texts and images when printing. If this setting is enabled,
gradation in images might be degraded.
Toner Saving 1
Reduces toner consumption when printing. If this setting is enabled, print quality might be degraded.
Toner Saving 2
Further reduces toner consumption when printing. If this setting is enabled, print quality might be
degraded.
Image Smoothing
Use this to select the image smoothing type.
The following shows where you can select this function.
[Image Smoothing] is displayed under [General 1] in the [Feature Sets:] list on [Printer Features] in the print
dialog box.
You can select from the following items:
7
Off
Disables image smoothing.
On
Performs image smoothing unconditionally.
Auto
Performs image smoothing automatically for images that have a resolution less than 25% of supported
printer resolution.
Less than 90 ppi to Less than 300 ppi
Performs image smoothing only when the image has an image resolution (pixels per inch) less than
the respective value you have selected in the list.
• When [Auto] is selected, data processing may take a long time.
• When Image Smoothing is used for a mask image, this function may have an undesired effect on the
print result.
Gradation
Use this to select a type of gradation based on your purpose.
The following shows where you can select this function.
170
Using PostScript 3
[Gradation] is displayed under [General 1] in the [Feature Sets:] list on [Printer Features] in the print dialog
box.
• For details about the gradation types, see the printer driver Help.
Dithering
Use this to set the Image Rendering mode.
The following shows where you can select this function.
[Dithering] is displayed under [General 1] in the [Feature Sets:] list on [Printer Features] in the print dialog
box.
You can select from the following items:
Auto
Use this setting to configure the best dithering method automatically depending on the appearance
of the document to be printed.
Photographic
Performs dithering using an appropriate pattern for photographs.
Text
7
Performs dithering using an appropriate pattern for text.
User Setting
Use this setting to print images set in halftones in your application.
Rotate by 180 degrees
Use this to rotate the print image by 180 degrees.
The following shows where you can select this function.
[Rotate by 180 degrees] is displayed under [General 2] in the [Feature Sets:] list on [Printer Features] in
the print dialog box.
Orientation Override
Use this to set the paper orientation.
The following shows where you can select this function.
[Orientation Override] is displayed under [General 2] in the [Feature Sets:] list on [Printer Features] in the
print dialog box.
171
7. Mac OS X Configuration
You can select from the following items:
• Off
• Landscape
• Portrait
Watermark
Set the Watermark function.
The following shows where you can select this function.
[Watermark] is displayed under [General 2] in the [Feature Sets:] list on [Printer Features] in the print dialog
box.
Watermark Text
Select the Watermark Text type.
The following shows where you can select this function.
7
[Watermark Text] is displayed under [General 2] in the [Feature Sets:] list on [Printer Features] in the print
dialog box.
Watermark Font
Select the Watermark Font type.
The following shows where you can select this function.
[Watermark Font] is displayed under [General 2] in the [Feature Sets:] list on [Printer Features] in the print
dialog box.
Watermark Size
Select the Watermark size.
The following shows where you can select this function.
[Watermark Size] is displayed under [General 2] in the [Feature Sets:] list on [Printer Features] in the print
dialog box.
Watermark Angle
Select the Watermark angle.
172
Using PostScript 3
The following shows where you can select this function.
[Watermark Angle] is displayed under [General 3] in the [Feature Sets:] list on [Printer Features] in the print
dialog box.
Watermark Style
Select the Watermark style.
The following shows where you can select this function.
[Watermark Style] is displayed under [General 3] in the [Feature Sets:] list on [Printer Features] in the print
dialog box.
7
173
7. Mac OS X Configuration
7
174
8. Appendix
When Using Windows Terminal Service/Citrix
Presentation Server/Citrix XenApp
The following explains how to use Windows Terminal Service and Maintenance.
Operating Environment
The following operating systems and Citrix Presentation Server/Citrix XenApp versions are supported.
Citrix Presentation Server 4.5/ Citrix XenApp 5.0
• Windows Server 2003/2003 R2
• Windows Server 2008/2008 R2
Supported Printer Drivers
When Windows Terminal Service is operating
• PCL printer drivers
• PostScript 3 printer driver
8
Limitations
The following limitations apply to the Windows Terminal Service environment.
These limitations are built in Windows Terminal Service or Citrix Presentation Server/Citrix XenApp.
Citrix Presentation Server/Citrix XenApp [Auto-creating client printers]
Using [Auto-creating client printers] can select a logical printer created by copying the client's local
printer data to the Citrix Presentation Server/Citrix XenApp. We strongly recommend testing this
function in your network environment before using it for your work.
• The settings for optional equipment will not be stored in the server after the equipment is
disconnected. The settings for optional equipment will be restored to its defaults each time the
client computer logs on to the server.
• When printing a large number of bitmap images or using the server in a WAN environment over
dial-up lines such as ISDN, printing may not be possible or errors may occur, depending on
data transfer rates.
175
8. Appendix
Citrix Presentation Server/Citrix XenApp [Printer driver replication]
Using [Printer driver replication] can distribute printer drivers across all servers in a server farm. We
strongly recommend testing this function in your network environment before using it for your work.
• If the printer drivers are not properly copied, install them directly onto each server.
8
176
Using DHCP
Using DHCP
You can use the printer in a DHCP environment. You can also register the printer NetBIOS name on a
WINS server when it is running.
• Printers that register the printer NetBIOS name on a WINS server must be configured for the WINS
server.
• Supported DHCP servers are Microsoft DHCP Server included with Windows Server 2003/2003
R2/2008/2008 R2, and the DHCP server included with NetWare and UNIX.
• If you do not use the WINS server, reserve the printer's IP address in the DHCP server so the same IP
address is assigned every time.
• To use the WINS server, change the WINS server setting to "active" using the control panel.
• Using the WINS server, you can configure the host name via the remote network printer port.
• DHCP relay-agent is not supported. If you use DHCP relay-agent on a network via ISDN, it will result
in increased line charges. This is because your computer connects to the ISDN line whenever a packet
is transferred from the printer.
• If there is more than one DHCP server, use the same setting for all servers. The printer operates using
data from the DHCP server that responds first.
• DHCP servers can operate in an IPv6 environment, but they cannot be configured to allocate IPv6
addresses or obtain host names.
Using AutoNet
8
If the printer IPv4 address is not automatically assigned by the DHCP server, a temporary IP address starting
with 169.254 and not used on the network can be automatically selected by the printer.
• The IP address assigned by the DHCP server is given priority over that selected by AutoNet.
• You can confirm the current IPv4 address on the configuration page. For more information about the
configuration page, see p.99 "Test Printing".
• When AutoNet is running, the NetBIOS name is not registered on the WINS server.
• The printer cannot communicate with devices that do not have the AutoNet function. However, this
printer can communicate with Macintosh computers running Mac OS X 10.2.3. or higher.
177
8. Appendix
Configuring the WINS Server
The printer can be configured to register its NetBIOS name with a WINS server when the power is turned
on. This enables the NetBIOS name of the printer to be specified from Web Image Monitor even in a DHCP
environment.
This section explains configuring the WINS server.
• WINS servers are supported by Windows Server 2003 or later.
• For details about the WINS server settings, see Windows Help.
• If there is no reply from the WINS server, the NetBIOS name is registered by broadcast.
• The NetBIOS name can be entered using up to 13 alphanumeric characters.
Using Web Image Monitor
1. Log in to Web Image Monitor as an administrator.
For details about logging in, see p.139 "Access in the Administrator Mode".
2. In the menu area, click [Configuration].
3. Click [Network] and then click [IPv4].
8
4. Check that [Active] is selected for [WINS] in the [Ethernet + Wireless LAN] column, and then
enter the WINS server IPv4 address in [Primary WINS Server] and [Secondary WINS
Server].
5. Click [OK].
6. Quit Web Image Monitor.
Using telnet
Use the telnet "wins" command to configure WINS.
• For details, see "Using telnet", UNIX Supplement.
178
Using the Dynamic DNS Function
Using the Dynamic DNS Function
Dynamic DNS is a function which dynamically updates (registers and deletes) records (A record, AAAA
record, CNAME, and PTR record) managed by the DNS server. When a DNS server is part of the network
environment to which this printer, a DNS client, is connected, records can be dynamically updated using
this function.
Updating
Updating procedure varies depending on whether the printer IP address is static or acquired by DHCP.
• Dynamic update using message authentication (TSIG, SIG(0)) is not supported.
For a static IPv4 setting
If the IP address or host name is changed, the A and PTR records are updated. If the A record is
registered, CNAME is also registered. CNAMEs that can be registered are as follows:
• Ethernet and Wireless LAN
RNPXXXXXX (XXXXXX represents the last 3 hexadecimal bytes of the MAC address)
However, if CNAME (RNPXXXXXX) overlaps with the host name, CNAME will not be registered.
For DHCPv4 settings
As a substitute for the printer, the DHCP server updates the record, and one of the following occurs:
• When the printer acquires the IP address from the DHCP server, the DHCP server updates the A
and PTR records.
8
• When the printer acquires the IP address from the DHCP server, the printer updates the A record,
and the DHCP server updates the PTR record.
If the A record is registered, CNAME is also registered. CNAMEs that can be registered are as follows:
• Ethernet and Wireless LAN
RNPXXXXXX (XXXXXX represents the last 3 hexadecimal bytes of the MAC address)
For IPv6 settings
This printer updates the AAAA record and PTR record.
It also registers CNAME when the AAAA record is updated.
When a stateless address is newly set, it is automatically registered on the DNS server also.
• When the dynamic DNS function is not used, records managed by the DNS server must be updated
manually, if the printer's IP address is changed.
• To update the record using the printer, the DNS server has to have one of the following:
179
8. Appendix
• No security settings made.
• If security settings are made, an IP-specified client (this printer) permits updating.
DNS Servers Targeted for Operation
For static IP setting
• Microsoft DNS servers with standard Windows Server 2003/2003 R2/2008/2008 R2
features
• BIND 8.2.3 or higher
For DHCP setup, when the printer updates the A record
• Microsoft DNS servers with standard Windows Server 2003/2003 R2/2008/2008 R2
features
• BIND 8.2.3 or higher
For DHCP setup, when the DHCP server updates records
• Microsoft DNS servers with standard Windows Server 2003/2003 R2/2008/2008 R2
features
• BIND 8.2.3 or higher
• DNS servers with standard NetWare 5 (or a higher version) features
8
For IPv6 setting
• Microsoft DNS servers with standard Windows Server 2003/2003 R2/2008/2008 R2
features
• BIND 9.2.3 or higher
DHCP Servers Targeted for Operation
As a substitute for the printer, DHCP servers capable of updating the A record and PTR record are as
follows:
• Microsoft DHCP servers with standard Windows Server 2003/2003 R2/2008 features
• ISC DHCP 3.0 or higher
• DHCP server with standard NetWare 5 features
Setting the Dynamic DNS Function
Use the telnet "dns" command to configure DNS.
180
Using the Dynamic DNS Function
• For details, see "Using telnet", UNIX Supplement.
8
181
8. Appendix
Precautions
Please pay attention to the following when using the network interface board. When configuration is
necessary, follow the appropriate procedures below.
Connecting a Dial-Up Router to a Network
When using NetWare (file server)
If the NetWare file server and printer are on opposite sides of a router, packets are sent back and forth
continuously, possibly incurring communications charges. Because packet transmission is a feature of
NetWare, you need to change the configuration of the router. If the network you are using does not allow
you to configure the router, configure the printer instead.
Configuring the router
Filter packets so they do not pass over the dial-up router.
Configuring the printer with NetWare
1. Following the setup method described earlier in this manual, configure the file server.
2. Set the frame type for NetWare environment.
8
Configuring the printer without NetWare
1. When not printing, the network interface board sends packets over the network. Set
NetWare to "inactive".
• The MAC address of the filtering printer is printed on the printer configuration page. For more
information about printing a configuration page, see p.99 "Test Printing".
• For more information about configuring the printer if the router cannot be configured, see the following
instructions.
• For more information about selecting a frame type, see "Ethernet Configuration", Hardware Guide.
• For more information about selecting a protocol, see "Ethernet Configuration", Hardware Guide.
When the Wireless LAN Interface Unit is Installed
When using the Wireless LAN interface on the network, note the following:
182
Precautions
If the network area provides poor radio environment
Where radio wave conditions are bad, the network may not function due to interrupted or failed
connections. When checking the Wireless LAN signal and the access point, follow the procedure
below to improve the situation:
• Position the access point nearer to the printer.
• Clear the space between access point and printer of obstructions.
• Move radio wave generating appliances, such as microwaves, away from the printer and access
point.
• For information about how to check radio wave status, see "Wireless LAN Configuration", Hardware
Guide.
• For more information about access point radio wave conditions, refer to the access point manual.
8
183
8. Appendix
Copyright Information about Installed
Applications
expat
Copyright (c) 1998, 1999, 2000 Thai Open Source Software Centre, Ltd. and Clark Cooper.
Copyright (c) 2001, 2002 Expat maintainers.
Permission is hereby granted, free of charge, to any person obtaining a copy of this software and associated
documentation files (the "Software"), to deal in the Software without restriction, including without limitation
the rights to use, copy, modify, merge, publish, distribute, sublicense, and/or sell copies of the Software,
and to permit persons to whom the Software is furnished to do so, subject to the following conditions:
The above copyright notice and this permission notice shall be included in all copies or substantial portions
of the Software.
THE SOFTWARE IS PROVIDED "AS IS", WITHOUT WARRANTY OF ANY KIND, EXPRESS OR IMPLIED,
INCLUDING BUT NOT LIMITED TO THE WARRANTIES OF MERCHANTABILITY, FITNESS FOR A
PARTICULAR PURPOSE AND NONINFRINGEMENT. IN NO EVENT SHALL THE AUTHORS OR
COPYRIGHT HOLDERS BE LIABLE FOR ANY CLAIM, DAMAGES OR OTHER LIABILITY, WHETHER IN
AN ACTION OF CONTRACT, TORT OR OTHERWISE, ARISING FROM, OUT OF OR IN CONNECTION
WITH THE SOFTWARE OR THE USE OR OTHER DEALINGS IN THE SOFTWARE.
8
NetBSD
[I] Copyright Notice of NetBSD
For all users to use this product: This product contains NetBSD operating system:
For the most part, the software constituting the NetBSD operating system is not in the public domain; its
authors retain their copyright.
The following text shows the copyright notice used for many of the NetBSD source code. For exact copyright
notice applicable for each of the files/binaries, the source code tree must be consulted.
A full source code can be found at http://www.netbsd.org/.
Copyright (c) 1996-2005 The NetBSD Foundation, Inc.
All rights reserved.
Redistribution and use in source and binary forms, with or without modification, are permitted provided
that the following conditions are met:
1. Redistributions of source code must retain the above copyright notice, this list of conditions and the
following disclaimer.
184
Copyright Information about Installed Applications
2. Redistributions in binary form must reproduce the above copyright notice, this list of conditions and
the following disclaimer in the documentation and/or other materials provided with the distribution.
3. All advertising materials mentioning features or use of this software must display the following
acknowledgement:
This product includes software developed by the NetBSD Foundation, Inc. and its contributors.
4. Neither the name of The NetBSD Foundation nor the names of its contributors may be used to endorse
or promote products derived from this software without specific prior written permission.
THIS SOFTWARE IS PROVIDED BY THE NETBSD FOUNDATION, INC. AND CONTRIBUTORS ``AS IS''
AND ANY EXPRESS OR IMPLIED WARRANTIES, INCLUDING, BUT NOT LIMITED TO, THE IMPLIED
WARRANTIES OF MERCHANTABILITY AND FITNESS FOR A PARTICULAR PURPOSE ARE DISCLAIMED.
IN NO EVENT SHALL THE FOUNDATION OR CONTRIBUTORS BE LIABLE FOR ANY DIRECT, INDIRECT,
INCIDENTAL, SPECIAL, EXEMPLARY, OR CONSEQUENTIAL DAMAGES (INCLUDING, BUT NOT
LIMITED TO, PROCUREMENT OF SUBSTITUTE GOODS OR SERVICES; LOSS OF USE, DATA, OR
PROFITS; OR BUSINESS INTERRUPTION) HOWEVER CAUSED AND ON ANY THEORY OF LIABILITY,
WHETHER IN CONTRACT, STRICT LIABILITY, OR TORT (INCLUDING NEGLIGENCE OR OTHERWISE)
ARISING IN ANY WAY OUT OF THE USE OF THIS SOFTWARE, EVEN IF ADVISED OF THE POSSIBILITY
OF SUCH DAMAGE
[II] Authors Name List
All product names mentioned herein are trademarks or registered trade-marks of their respective owners.
The following notices are required to satisfy the license terms of the software that we have mentioned in
this document:
• This product includes software developed by the University of California,Berkeley and its contributors.
• This product includes software developed by the NetBSD Foundation.
8
• This product includes software developed by The NetBSD Foundation, Inc. and its contributors.
• This product includes software developed for the NetBSD Project. See http://www.netbsd.org/ for
information about NetBSD.
• This product contains software developed by Ignatios Souvatzis for the NetBSD project.
• This product contains software written by Ignatios Souvatzis and MichaelL. Hitch for the NetBSD
project.
• This product contains software written by Michael L. Hitch for the NetBSD project.
• This product includes cryptographic software written by Eric Young([email protected])
• This product includes cryptographic software written by Eric Young([email protected])
• This product includes software designed by William Allen Simpson.
• This product includes software developed at Ludd, University of Lulea,Sweden and its contributors.
• This product includes software developed at Ludd, University of Lulea.
• This product includes software developed at the Information Technology Division, US Naval Research
Laboratory.
185
8. Appendix
• This product includes software developed by Berkeley Software Design, Inc.
• This product includes software developed by David Jones and Gordon Ross
• This product includes software developed by Gordon W. Ross and Leo Weppelman.
• This product includes software developed by Hellmuth Michaelis and Joerg Wunsch
• This product includes software developed by Internet Research Institute, Inc.
• This product includes software developed by Leo Weppelman and Waldi Ravens.
• This product includes software developed by Mika Kortelainen
• This product includes software developed by Aaron Brown and Harvard University.
• This product includes software developed by Adam Ciarcinski for the NetBSD project.
• This product includes software developed by Adam Glass and Charles M.Hannum.
• This product includes software developed by Adam Glass.
• This product includes software developed by Advanced Risc Machines Ltd.
• This product includes software developed by Alex Zepeda, and Colin Wood for the NetBSD Projet.
• This product includes software developed by Alex Zepeda.
• This product includes software developed by Alistair G. Crooks.
• This product includes software developed by Alistair G. Crooks. for the NetBSD project.
• This product includes software developed by Allen Briggs
• This product includes software developed by Amancio Hasty and Roger Hardiman
8
• This product includes software developed by Berkeley Software Design, Inc.
• This product includes software developed by Berkeley Software Design, Inc.
• This product includes software developed by Bill Paul.
• This product includes software developed by Bodo Moeller. (If available, substitute umlauted o for
oe)
• This product includes software developed by Boris Popov.
• This product includes software developed by Brad Pepers
• This product includes software developed by Bradley A. Grantham.
• This product includes software developed by Brini.
• This product includes software developed by Causality Limited.
• This product includes software developed by Charles D. Cranor and Seth Widoff.
• This product includes software developed by Charles D. Cranor and Washington University.
• This product includes software developed by Charles D. Cranor, Washington University, and the
University of California, Berkeley and its contributors.
• This product includes software developed by Charles D. Cranor, Washington University, the University
of California, Berkeley and its contributors.
186
Copyright Information about Installed Applications
• This product includes software developed by Charles D. Cranor.
• This product includes software developed by Charles Hannum.
• This product includes software developed by Charles M. Hannum, by the University of Vermont and
State Agricultural College and Garrett A.Wollman, by William F. Jolitz, and by the University of
California,Berkeley, Lawrence Berkeley Laboratory, and its contributors.
• This product includes software developed by Charles M. Hannum.
• This product includes software developed by Christian E. Hopps, Ezra Story, Kari Mettinen, Markus
Wild, Lutz Vieweg and Michael Teske.
• This product includes software developed by Christian E. Hopps.
• This product includes software developed by Christian Limpach
• This product includes software developed by Christopher G. Demetriou for the NetBSD Project.
• This product includes software developed by Christopher G. Demetriou.
• This product includes software developed by Christos Zoulas.
• This product includes software developed by Chuck Silvers.
• This product includes software developed by Colin Wood for the NetBSD Project.
• This product includes software developed by Colin Wood.
• This product includes software developed by Cybernet Corporation and Nan Yang Computer
Services Limited
• This product includes software developed by Daishi Kato
• This product includes software developed by Dale Rahn.
• This product includes software developed by Daniel Widenfalk and Michael L. Hitch.
8
• This product includes software developed by Daniel Widenfalk for the NetBSD Project.
• This product includes software developed by Darrin B. Jewell
• This product includes software developed by David Miller.
• This product includes software developed by Dean Huxley.
• This product includes software developed by Eduardo Horvath.
• This product includes software developed by Eric S. Hvozda.
• This product includes software developed by Eric S. Raymond
• This product includes software developed by Eric Young (eay@@mincom.oz.au)
• This product includes software developed by Eric Young ([email protected])
• This product includes software developed by Eric Young ([email protected])
• This product includes software developed by Ezra Story and by Kari Mettinen.
• This product includes software developed by Ezra Story, by Kari Mettinen and by Bernd Ernesti.
187
8. Appendix
• This product includes software developed by Ezra Story, by Kari Mettinen, Michael Teske and by
Bernd Ernesti.
• This product includes software developed by Ezra Story, by Kari Mettinen, and Michael Teske.
• This product includes software developed by Ezra Story.
• This product includes software developed by Frank van der Linden for the NetBSD Project.
• This product includes software developed by Gardner Buchanan.
• This product includes software developed by Gary Thomas.
• This product includes software developed by Gordon Ross
• This product includes software developed by Gordon W. Ross
• This product includes software developed by HAYAKAWA Koichi.
• This product includes software developed by Harvard University and its contributors.
• This product includes software developed by Harvard University.
• This product includes software developed by Herb Peyerl.
• This product includes software developed by Hubert Feyrer for the NetBSD Project.
• This product includes software developed by Iain Hibbert
• This product includes software developed by Ian F. Darwin and others.
• This product includes software developed by Ian W. Dall.
• This product includes software developed by Ichiro FUKUHARA.
8
• This product includes software developed by Ignatios Souvatzis for the NetBSD Project.
• This product includes software developed by Internet Initiative Japan Inc.
• This product includes software developed by James R. Maynard III.
• This product includes software developed by Jared D. McNeill.
• This product includes software developed by Jason L. Wright
• This product includes software developed by Jason R. Thorpe for And Communications, http://
www.and.com/
• This product includes software developed by Joachim Koenig-Baltes.
• This product includes software developed by Jochen Pohl for The NetBSD Project.
• This product includes software developed by Joerg Wunsch
• This product includes software developed by John Birrell.
• This product includes software developed by John P. Wittkoski.
• This product includes software developed by John Polstra.
• This product includes software developed by Jonathan R. Stone for the NetBSD Project.
• This product includes software developed by Jonathan Stone and Jason R. Thorpe for the NetBSD
Project.
188
Copyright Information about Installed Applications
• This product includes software developed by Jonathan Stone.
• This product includes software developed by Jukka Marin.
• This product includes software developed by Julian Highfield.
• This product includes software developed by Kazuhisa Shimizu.
• This product includes software developed by Kazuki Sakamoto.
• This product includes software developed by Kenneth Stailey.
• This product includes software developed by Kiyoshi Ikehara.
• This product includes software developed by Klaus Burkert,by Bernd Ernesti, by Michael van Elst,
and by the University of California, Berkeley and its contributors.
• This product includes software developed by LAN Media Corporation and its contributors.
• This product includes software developed by Leo Weppelman for the NetBSD Project.
• This product includes software developed by Leo Weppelman.
• This product includes software developed by Lloyd Parkes.
• This product includes software developed by Luke Mewburn.
• This product includes software developed by Lutz Vieweg.
• This product includes software developed by MINOURA Makoto, Takuya Harakawa.
• This product includes software developed by Manuel Bouyer.
• This product includes software developed by Marc Horowitz.
• This product includes software developed by Marcus Comstedt.
• This product includes software developed by Mark Brinicombe for the NetBSD project.
8
• This product includes software developed by Mark Brinicombe.
• This product includes software developed by Mark Murray
• This product includes software developed by Mark Tinguely and Jim Lowe
• This product includes software developed by Markus Wild.
• This product includes software developed by Martin Husemann and Wolfgang Solfrank.
• This product includes software developed by Masanobu Saitoh.
• This product includes software developed by Masaru Oki.
• This product includes software developed by Mats O Jansson and Charles D.Cranor.
• This product includes software developed by Mats O Jansson.
• This product includes software developed by Matt DeBergalis
• This product includes software developed by Matthew Fredette.
• This product includes software developed by Matthias Pfaller.
• This product includes software developed by Michael Graff for the NetBSD Project.
189
8. Appendix
• This product includes software developed by Michael Graff.
• This product includes software developed by Michael L. Hitch.
• This product includes software developed by Michael Shalayeff.
• This product includes software developed by Michael Smith.
• This product includes software developed by Mike Glover and contributors.
• This product includes software developed by Mike Pritchard.
• This product includes software developed by Minoura Makoto.
• This product includes software developed by Nan Yang Computer Services Limited.
• This product includes software developed by Niels Provos.
• This product includes software developed by Niklas Hallqvist, Brandon Creighton and Job de Haas.
• This product includes software developed by Niklas Hallqvist.
• This product includes software developed by Onno van der Linden.
• This product includes software developed by Paul Kranenburg.
• This product includes software developed by Paul Mackerras.
• This product includes software developed by Per Fogelstrom
• This product includes software developed by Peter Galbavy.
• This product includes software developed by Phase One, Inc.
• This product includes software developed by Philip A. Nelson.
8
• This product includes software developed by Philip L. Budne.
• This product includes software developed by RiscBSD.
• This product includes software developed by Roar Thronaes.
• This product includes software developed by Rodney W. Grimes.
• This product includes software developed by Roger Hardiman
• This product includes software developed by Roland C. Dowdeswell.
• This product includes software developed by Rolf Grossmann.
• This product includes software developed by Ross Harvey for the NetBSD Project.
• This product includes software developed by Ross Harvey.
• This product includes software developed by Scott Bartram.
• This product includes software developed by Scott Stevens.
• This product includes software developed by Shingo WATANABE.
• This product includes software developed by Softweyr LLC, the University of California, Berkeley, and
its contributors.
• This product includes software developed by Soren S. Jorvang.
190
Copyright Information about Installed Applications
• This product includes software developed by Stephan Thesing.
• This product includes software developed by Steve Woodford.
• This product includes software developed by Takashi Hamada
• This product includes software developed by Takumi Nakamura.
• This product includes software developed by Tatoku Ogaito for the NetBSD Project.
• This product includes software developed by Terrence R. Lambert.
• This product includes software developed by Tetsuya Isaki.
• This product includes software developed by Thomas Gerner
• This product includes software developed by Thomas Klausner for the NetBSD Project.
• This product includes software developed by Tobias Weingartner.
• This product includes software developed by Todd C. Miller.
• This product includes software developed by Tohru Nishimura and Reinoud Zandijk for the NetBSD
Project.
• This product includes software developed by Tohru Nishimura for the NetBSD Project.
• This product includes software developed by Tohru Nishimura. for the NetBSD Project.
• This product includes software developed by TooLs GmbH.
• This product includes software developed by Toru Nishimura.
• This product includes software developed by Trimble Navigation, Ltd.
• This product includes software developed by WIDE Project and its contributors.
• This product includes software developed by Waldi Ravens.
8
• This product includes software developed by Wasabi Systems for Zembu Labs, Inc. http://
www.zembu.com/
• This product includes software developed by Winning Strategies, Inc.
• This product includes software developed by Wolfgang Solfrank.
• This product includes software developed by Yasushi Yamasaki
• This product includes software developed by Zembu Labs, Inc.
• This product includes software developed by the Alice Group.
• This product includes software developed by the Center for Software Science at the University of Utah.
• This product includes software developed by the Charles D. Cranor, Washington University, University
of California, Berkeley and its contributors.
• This product includes software developed by the Computer Systems Engineering Group at Lawrence
Berkeley Laboratory.
• This product includes software developed by the David Muir Sharnoff.
• This product includes software developed by the Harvard University and its contributors.
191
8. Appendix
• This product includes software developed by the Kungliga Tekniska Hogskolan and its contributors.
• This product includes software developed by the Network Research Group at Lawrence Berkeley
Laboratory.
• This product includes software developed by the OpenSSL Project for use in the OpenSSL Toolkit.
(http://www.OpenSSL.org/)
• This product includes software developed by the PocketBSD project and its contributors.
• This product includes software developed by the RiscBSD kernel team
• This product includes software developed by the RiscBSD team.
• This product includes software developed by the SMCC Technology Development Group at Sun
Microsystems, Inc.
• This product includes software developed by the University of California, Berkeley and its contributors,
as well as the Trustees of Columbia University.
• This product includes software developed by the University of California, Lawrence Berkeley
Laboratory and its contributors.
• This product includes software developed by the University of California, Lawrence Berkeley
Laboratory.
• This product includes software developed by the University of Illinois at Urbana and their contributors.
• This product includes software developed by the University of Vermont and State Agricultural College
and Garrett A. Wollman.
8
• This product includes software developed by the University of Vermont and State Agricultural College
and Garrett A. Wollman, by William F. Jolitz, and by the University of California, Berkeley, Lawrence
Berkeley Laboratory, and its contributors.
• This product includes software developed for the FreeBSD project
• This product includes software developed for the NetBSD Project by Bernd Ernesti.
• This product includes software developed for the NetBSD Project by Christopher G. Demetriou.
• This product includes software developed for the NetBSD Project by Christos Zoulas
• This product includes software developed for the NetBSD Project by Emmanuel Dreyfus.
• This product includes software developed for the NetBSD Project by Frank van der Linden
• This product includes software developed for the NetBSD Project by Ignatios Souvatzis.
• This product includes software developed for the NetBSD Project by Jason R. Thorpe.
• This product includes software developed for the NetBSD Project by John M. Vinopal.
• This product includes software developed for the NetBSD Project by Matthias Drochner.
• This product includes software developed for the NetBSD Project by Michael L. Hitch.
• This product includes software developed for the NetBSD Project by Perry E. Metzger.
• This product includes software developed for the NetBSD Project by Scott Bartram and Frank van der
Linden
192
Copyright Information about Installed Applications
• This product includes software developed for the NetBSD Project by Allegro Networks, Inc., and
Wasabi Systems, Inc.
• This product includes software developed for the NetBSD Project by Genetec Corporation.
• This product includes software developed for the NetBSD Project by Jonathan Stone.
• This product includes software developed for the NetBSD Project by Piermont Information Systems
Inc.
• This product includes software developed for the NetBSD Project by SUNET,Swedish University
Computer Network.
• This product includes software developed for the NetBSD Project by Shigeyuki Fukushima.
• This product includes software developed for the NetBSD Project by Wasabi Systems, Inc.
• This product includes software developed under OpenBSD by Per Fogelstrom Opsycon AB for RTMX
Inc, North Carolina, USA.
• This product includes software developed under OpenBSD by Per Fogelstrom.
• This software is a component of "386BSD" developed by William F. Jolitz,TeleMuse.
• This software was developed by Holger Veit and Brian Moore for use with "386BSD" and similar
operating systems. "Similar operating systems" includes mainly non-profit oriented systems for
research and education, including but not restricted to "NetBSD", "FreeBSD", "Mach" (by CMU).
• This software includes software developed by the Computer Systems Labora-tory at the University of
Utah.
• This product includes software developed by Computing Services at Carnegie Mellon University
(http://www.cmu.edu/computing/).
• This product includes software developed by Allen Briggs.
8
In the following statement, "This software" refers to the Mitsumi CD-ROM driver:
• This software was developed by Holger Veit and Brian Moore for use with "386BSD" and similar
operating systems. "Similar operating systems" includes mainly non-profit oriented systems for
research and education, including but not restricted to "NetBSD" , "FreeBSD" , "Mach" (by CMU).
In the following statement, "This software" refers to the parallel port driver:
• This software is a component of "386BSD" developed by William F. Jolitz, TeleMuse.
FreeBSD 4.6.2/netipx
Copyright (c) 1984, 1985, 1986, 1987, 1993
The Regents of the University of California. All rights reserved.
Modifications Copyright (c) 1995, Mike Mitchell
Modifications Copyright (c) 1995, John Hay
193
8. Appendix
Sablotron(Version 0.82)
Copyright (c) 2000 Ginger Alliance Ltd. All Rights Reserved
a) The application software installed on this product includes the Sablotron software Version 0.82
(hereinafter, "Sablotron 0.82"), with modifications made by the product manufacturer. The original code
of the Sablotron 0.82 is provided by Ginger Alliance Ltd., the initial developer, and the modified code of
the Sablotron 0.82 has been derived from such original code provided by Ginger Alliance Ltd.
b) The product manufacturer provides warranty and support to the application software of this product
including the Sablotron 0.82 as modified, and the product manufacturer makes Ginger Alliance Ltd., the
initial developer of the Sablotron 0.82, free from these obligations.
c) The Sablotron 0.82 and the modifications thereof are made available under the terms of Mozilla Public
License Version 1.1 (hereinafter, "MPL 1.1"), and the application software of this product constitutes the
"Larger Work" as defined in MPL 1.1. The application software of this product except for the Sablotron
0.82 as modified is licensed by the product manufacturer under separate agreement(s).
d) The source code of the modified code of the Sablotron 0.82 is available at: http://supportdownload.com/services/device/sablot/notice082.html
e) The source code of the Sablotron software is available at: http://www.gingerall.com
f) MPL 1.1 is available at: http://www.mozilla.org/MPL/MPL-1.1.html
JPEG LIBRARY
8
• The software installed on this product is based in part on the work of the Independent JPEG Group.
SASL
Copyright (c) 2001 Carnegie Mellon University. All rights reserved.
Redistribution and use in source and binary forms, with or without modification, are permitted provided
that the following conditions are met:
1. Redistributions of source code must retain the above copyright notice, this list of conditions and the
following disclaimer.
2. Redistributions in binary form must reproduce the above copyright notice, this list of conditions and
the following disclaimer in the documentation and/or other materials provided with the distribution.
3. The name "Carnegie Mellon University" must not be used to endorse or promote products derived
from this software without prior written permission.
For permission or any other legal details, please contact:
Office of Technology Transfer
Carnegie Mellon University
194
Copyright Information about Installed Applications
5000 Forbes Avenue
Pittsburgh, PA 15213-3890
(412) 268-4387, fax: (412) 268-7395
[email protected]
4. Redistributions of any form whatsoever must retain the following acknowledgment: "This product
includes software developed by Computing Services at Carnegie Mellon University (http://
www.cmu.edu/computing/)."
CARNEGIE MELLON UNIVERSITY DISCLAIMS ALL WARRANTIES WITH REGARD TO THIS SOFTWARE,
INCLUDING ALL IMPLIED WARRANTIES OF MERCHANTABILITY AND FITNESS, IN NO EVENT SHALL
CARNEGIE MELLON UNIVERSITY BE LIABLE FOR ANY SPECIAL, INDIRECT OR CONSEQUENTIAL
DAMAGES OR ANY DAMAGES WHATSOEVER RESULTING FROM LOSS OF USE, DATA OR PROFITS,
WHETHER IN AN ACTION OF CONTRACT, NEGLIGENCE OR OTHER TORTIOUS ACTION, ARISING
OUT OF OR IN CONNECTION WITH THE USE OR PERFORMANCE OF THIS SOFTWARE.
RSA BSAFE®
8
• This product includes RSA BSAFE (c) cryptographic software from RSA Security Inc.
• RSA, BSAFE are either registered trademarks or trademarks of RSA Security Inc. in the United States
and/or other countries.
• RSA Security Inc. All rights reserved.
Open SSL
Copyright (c) 1998-2004 The OpenSSL Project. All rights reserved.
Redistribution and use in source and binary forms, with or without modification, are permitted provided
that the following conditions are met:
1. Redistributions of source code must retain the above copyright notice, this list of conditions and the
following disclaimer.
195
8. Appendix
2. Redistributions in binary form must reproduce the above copyright notice, this list of conditions and the
following disclaimer in the documentation and/or other materials provided with the distribution.
3. All advertising materials mentioning features or use of this software must display the following
acknowledgment:
"This product includes software developed by the OpenSSL Project for use in the OpenSSL Toolkit. (http://
www.openssl.org/)"
4. The names "OpenSSL Toolkit" and "OpenSSL Project" must not be used to endorse or promote products
derived from this software without prior written permission. For written permission, please contact [email protected].
5. Products derived from this software may not be called "OpenSSL" nor may "OpenSSL" appear in their
names without prior written permission of the OpenSSL Project.
6. Redistributions of any form whatsoever must retain the following acknowledgment:
"This product includes software developed by the OpenSSL Project for use in the OpenSSL Toolkit (http://
www.openssl.org/)"
8
THIS SOFTWARE IS PROVIDED BY THE OpenSSL PROJECT "AS IS" AND ANY EXPRESSED OR IMPLIED
WARRANTIES, INCLUDING, BUT NOT LIMITED TO, THE IMPLIED WARRANTIES OF
MERCHANTABILITY AND FITNESS FOR A PARTICULAR PURPOSE ARE DISCLAIMED. IN NO EVENT
SHALL THE OpenSSL PROJECT OR ITS CONTRIBUTORS BE LIABLE FOR ANY DIRECT, INDIRECT,
INCIDENTAL, SPECIAL, EXEMPLARY, OR CONSEQUENTIAL DAMAGES (INCLUDING, BUT NOT
LIMITED TO, PROCUREMENT OF SUBSTITUTE GOODS OR SERVICES; LOSS OF USE, DATA, OR
PROFITS; OR BUSINESS INTERRUPTION) HOWEVER CAUSED AND ON ANY THEORY OF LIABILITY,
WHETHER IN CONTRACT, STRICT LIABILITY, OR TORT (INCLUDING NEGLIGENCE OR OTHERWISE)
ARISING IN ANY WAY OUT OF THE USE OF THIS SOFTWARE, EVEN IF ADVISED OF THE POSSIBILITY
OF SUCH DAMAGE.
This product includes cryptographic software written by Eric Young ([email protected]). This product
includes software written by Tim Hudson ([email protected]).
Original SSLeay License
Copyright (C) 1995-1998 Eric Young ([email protected]) All rights reserved.
This package is an SSL implementation written by Eric Young ([email protected]).
The implementation was written so as to conform with Netscapes SSL.
This library is free for commercial and non-commercial use as long as the following conditions are aheared
to. The following conditions apply to all code found in this distribution, be it the RC4, RSA, lhash, DES, etc.,
code; not just the SSL code. The SSL documentation included with this distribution is covered by the same
copyright terms except that the holder is Tim Hudson ([email protected]).
Copyright remains Eric Young's, and as such any Copyright notices in the code are not to be removed. If
this package is used in a product, Eric Young should be given attribution as the author of the parts of the
library used. This can be in the form of a textual message at program startup or in documentation (online
or textual) provided with the package.
196
Copyright Information about Installed Applications
Redistribution and use in source and binary forms, with or without modification, are permitted provided
that the following conditions are met:
1. Redistributions of source code must retain the copyright notice, this list of conditions and the following
disclaimer.
2. Redistributions in binary form must reproduce the above copyright notice, this list of conditions and the
following disclaimer in the documentation and/or other materials provided with the distribution.
3. All advertising materials mentioning features or use of this software must display the following
acknowledgement: "This product includes cryptographic software written by Eric Young
([email protected])" The word 'cryptographic' can be left out if the rouines from the library being used
are not cryptographic related :-).
4. If you include any Windows specific code (or a derivative thereof) from the apps directory (application
code) you must include an acknowledgement: "This product includes software written by Tim Hudson
([email protected])"
THIS SOFTWARE IS PROVIDED BY ERIC YOUNG "AS IS" AND ANY EXPRESS OR IMPLIED
WARRANTIES, INCLUDING, BUT NOT LIMITED TO, THE IMPLIED WARRANTIES OF
MERCHANTABILITY AND FITNESS FOR A PARTICULAR PURPOSE ARE DISCLAIMED. IN NO EVENT
SHALL THE AUTHOR OR CONTRIBUTORS BE LIABLE FOR ANY DIRECT, INDIRECT, INCIDENTAL,
SPECIAL, EXEMPLARY, OR CONSEQUENTIAL DAMAGES (INCLUDING, BUT NOT LIMITED TO,
PROCUREMENT OF SUBSTITUTE GOODS OR SERVICES; LOSS OF USE, DATA, OR PROFITS; OR
BUSINESS INTERRUPTION) HOWEVER CAUSED AND ON ANY THEORY OF LIABILITY, WHETHER IN
CONTRACT, STRICT LIABILITY, OR TORT (INCLUDING NEGLIGENCE OR OTHERWISE) ARISING IN
ANY WAY OUT OF THE USE OF THIS SOFTWARE, EVEN IF ADVISED OF THE POSSIBILITY OF SUCH
DAMAGE.
The licence and distribution terms for any publically available version or derivative of this code cannot be
changed. i.e. this code cannot simply be copied and put under another distribution licence
8
[including the GNU Public Licence.]
Open SSH
The licences which components of this software fall under are as follows. First, we will summarize and say
that all components are under a BSD licence, or a licence more free than that.
OpenSSH contains no GPL code.
1)
Copyright (c) 1995 Tatu Ylonen <[email protected]>, Espoo, Finland All rights reserved
As far as I am concerned, the code I have written for this software can be used freely for any purpose. Any
derived versions of this software must be clearly marked as such, and if the derived work is incompatible
with the protocol description in the RFC file, it must be called by a name other than "ssh" or "Secure Shell".
[Tatu continues]
197
8. Appendix
However, I am not implying to give any licenses to any patents or copyrights held by third parties, and the
software includes parts that are not under my direct control. As far as I know, all included source code is
used in accordance with the relevant license agreements and can be used freely for any purpose (the GNU
license being the most restrictive); see below for details.
[However, none of that term is relevant at this point in time. All of these restrictively licenced software
components which he talks about have been removed from OpenSSH, i.e.,
- RSA is no longer included, found in the OpenSSL library
- IDEA is no longer included, its use is deprecated
- DES is now external, in the OpenSSL library
- GMP is no longer used, and instead we call BN code from OpenSSL
- Zlib is now external, in a library
- The make-ssh-known-hosts script is no longer included
- TSS has been removed
- MD5 is now external, in the OpenSSL library
- RC4 support has been replaced with ARC4 support from OpenSSL
- Blowfish is now external, in the OpenSSL library
[The licence continues]
8
Note that any information and cryptographic algorithms used in this software are publicly available on the
Internet and at any major bookstore, scientific library, and patent office worldwide. More information can
be found e.g. at "http://www.cs.hut.fi/crypto".
The legal status of this program is some combination of all these permissions and restrictions. Use only at
your own responsibility. You will be responsible for any legal consequences yourself; I am not making any
claims whether possessing or using this is legal or not in your country, and I am not taking any responsibility
on your behalf.
NO WARRANTY
BECAUSE THE PROGRAM IS LICENSED FREE OF CHARGE, THERE IS NO WARRANTY FOR THE
PROGRAM, TO THE EXTENT PERMITTED BY APPLICABLE LAW. EXCEPT WHEN OTHERWISE STATED
IN WRITING THE COPYRIGHT HOLDERS AND/OR OTHER PARTIES PROVIDE THE PROGRAM "AS IS"
WITHOUT WARRANTY OF ANY KIND, EITHER EXPRESSED OR IMPLIED, INCLUDING, BUT NOT
LIMITED TO, THE IMPLIED WARRANTIES OF MERCHANTABILITY AND FITNESS FOR A PARTICULAR
PURPOSE. THE ENTIRE RISK AS TO THE QUALITY AND PERFORMANCE OF THE PROGRAM IS WITH
YOU. SHOULD THE PROGRAM PROVE DEFECTIVE, YOU ASSUME THE COST OF ALL NECESSARY
SERVICING, REPAIR OR CORRECTION.
IN NO EVENT UNLESS REQUIRED BY APPLICABLE LAW OR AGREED TO IN WRITING WILL ANY
COPYRIGHT HOLDER, OR ANY OTHER PARTY WHO MAY MODIFY AND/OR REDISTRIBUTE THE
PROGRAM AS PERMITTED ABOVE, BE LIABLE TO YOU FOR DAMAGES, INCLUDING ANY GENERAL,
SPECIAL, INCIDENTAL OR CONSEQUENTIAL DAMAGES ARISING OUT OF THE USE OR INABILITY
TO USE THE PROGRAM (INCLUDING BUT NOT LIMITED TO LOSS OF DATA OR DATA BEING
198
Copyright Information about Installed Applications
RENDERED INACCURATE OR LOSSES SUSTAINED BY YOU OR THIRD PARTIES OR A FAILURE OF THE
PROGRAM TO OPERATE WITH ANY OTHER PROGRAMS), EVEN IF SUCH HOLDER OR OTHER PARTY
HAS BEEN ADVISED OF THE POSSIBILITY OF SUCH DAMAGES.
2)
The 32-bit CRC compensation attack detector in deattack.c was contributed by CORE SDI S.A. under a
BSD-style license.
Cryptographic attack detector for ssh - source code
Copyright (c) 1998 CORE SDI S.A., Buenos Aires, Argentina.
All rights reserved. Redistribution and use in source and binary forms, with or without modification, are
permitted provided that this copyright notice is retained.
THIS SOFTWARE IS PROVIDED "AS IS" AND ANY EXPRESS OR IMPLIED WARRANTIES ARE
DISCLAIMED. IN NO EVENT SHALL CORE SDI S.A. BE LIABLE FOR ANY DIRECT, INDIRECT,
INCIDENTAL, SPECIAL, EXEMPLARY OR CONSEQUENTIAL DAMAGES RESULTING FROM THE USE
OR MISUSE OF THIS SOFTWARE.
Ariel Futoransky <[email protected]>
<http://www.core-sdi.com>
3)
One component of the ssh source code is under a 3-clause BSD license, held by the University of California,
since we pulled these parts from original Berkeley code.
Copyright (c) 1983, 1990, 1992, 1993, 1995
The Regents of the University of California. All rights reserved.
Redistribution and use in source and binary forms, with or without modification, are permitted provided
that the following conditions are met:
8
1. Redistributions of source code must retain the above copyright notice, this list of conditions and the
following disclaimer.
2. Redistributions in binary form must reproduce the above copyright notice, this list of conditions and the
following disclaimer in the documentation and/or other materials provided with the distribution.
3. Neither the name of the University nor the names of its contributors may be used to endorse or promote
products derived from this software without specific prior written permission.
THIS SOFTWARE IS PROVIDED BY THE REGENTS AND CONTRIBUTORS "AS IS" AND ANY EXPRESS
OR IMPLIED WARRANTIES, INCLUDING, BUT NOT LIMITED TO, THE IMPLIED WARRANTIES OF
MERCHANTABILITY AND FITNESS FOR A PARTICULAR PURPOSE ARE DISCLAIMED. IN NO EVENT
SHALL THE REGENTS OR CONTRIBUTORS BE LIABLE FOR ANY DIRECT, INDIRECT, INCIDENTAL,
SPECIAL, EXEMPLARY, OR CONSEQUENTIAL DAMAGES (INCLUDING, BUT NOT LIMITED TO,
PROCUREMENT OF SUBSTITUTE GOODS OR SERVICES; LOSS OF USE, DATA, OR PROFITS; OR
BUSINESS INTERRUPTION) HOWEVER CAUSED AND ON ANY THEORY OF LIABILITY, WHETHER IN
CONTRACT, STRICT LIABILITY, OR TORT (INCLUDING NEGLIGENCE OR OTHERWISE) ARISING IN
199
8. Appendix
ANY WAY OUT OF THE USE OF THIS SOFTWARE, EVEN IF ADVISED OF THE POSSIBILITY OF SUCH
DAMAGE.
4)
Remaining components of the software are provided under a standard 2-term BSD licence with the
following names as copyright holders:
Markus Friedl
Theo de Raadt
Niels Provos
Dug Song
Kevin Steves
Daniel Kouril
Wesley Griffin
Per Allansson
Jason Downs
Solar Designer
Todd C. Miller
Redistribution and use in source and binary forms, with or without modification, are permitted provided
that the following conditions are met:
8
1. Redistributions of source code must retain the above copyright notice, this list of conditions and the
following disclaimer.
2. Redistributions in binary form must reproduce the above copyright notice, this list of conditions and the
following disclaimer in the documentation and/or other materials provided with the distribution.
THIS SOFTWARE IS PROVIDED BY THE AUTHOR "AS IS" AND ANY EXPRESS OR IMPLIED
WARRANTIES, INCLUDING, BUT NOT LIMITED TO, THE IMPLIED WARRANTIES OF
MERCHANTABILITY AND FITNESS FOR A PARTICULAR PURPOSE ARE DISCLAIMED. IN NO EVENT
SHALL THE AUTHOR BE LIABLE FOR ANY DIRECT, INDIRECT, INCIDENTAL, SPECIAL, EXEMPLARY, OR
CONSEQUENTIAL DAMAGES (INCLUDING, BUT NOT LIMITED TO, PROCUREMENT OF SUBSTITUTE
GOODS OR SERVICES; LOSS OF USE, DATA, OR PROFITS; OR BUSINESS INTERRUPTION) HOWEVER
CAUSED AND ON ANY THEORY OF LIABILITY, WHETHER IN CONTRACT, STRICT LIABILITY, OR TORT
(INCLUDING NEGLIGENCE OR OTHERWISE) ARISING IN ANY WAY OUT OF THE USE OF THIS
SOFTWARE, EVEN IF ADVISED OF THE POSSIBILITY OF SUCH DAMAGE.
5)
Portable OpenSSH contains the following additional licenses:
c) Compatibility code (openbsd-compat)
Apart from the previously mentioned licenses, various pieces of code in the openbsd-compat/ subdirectory
are licensed as follows:
200
Copyright Information about Installed Applications
Some code is licensed under a 3-term BSD license, to the following copyright holders:
Todd C. Miller
Theo de Raadt
Damien Miller
Eric P. Allman
The Regents of the University of California
Redistribution and use in source and binary forms, with or without modification, are permitted provided
that the following conditions are met:
1. Redistributions of source code must retain the above copyright notice, this list of conditions and the
following disclaimer.
2. Redistributions in binary form must reproduce the above copyright notice, this list of conditions and the
following disclaimer in the documentation and/or other materials provided with the distribution.
3. Neither the name of the University nor the names of its contributors may be used to endorse or promote
products derived from this software without specific prior written permission.
THIS SOFTWARE IS PROVIDED BY THE REGENTS AND CONTRIBUTORS "AS IS" AND ANY EXPRESS
OR IMPLIED WARRANTIES, INCLUDING, BUT NOT LIMITED TO, THE IMPLIED WARRANTIES OF
MERCHANTABILITY AND FITNESS FOR A PARTICULAR PURPOSE ARE DISCLAIMED. IN NO EVENT
SHALL THE REGENTS OR CONTRIBUTORS BE LIABLE FOR ANY DIRECT, INDIRECT, INCIDENTAL,
SPECIAL, EXEMPLARY, OR CONSEQUENTIAL DAMAGES (INCLUDING, BUT NOT LIMITED TO,
PROCUREMENT OF SUBSTITUTE GOODS OR SERVICES; LOSS OF USE, DATA, OR PROFITS; OR
BUSINESS INTERRUPTION) HOWEVER CAUSED AND ON ANY THEORY OF LIABILITY, WHETHER IN
CONTRACT, STRICT LIABILITY, OR TORT (INCLUDING NEGLIGENCE OR OTHERWISE) ARISING IN
ANY WAY OUT OF THE USE OF THIS SOFTWARE, EVEN IF ADVISED OF THE POSSIBILITY OF SUCH
DAMAGE.
8
Open LDAP
Copyright (c) 1999-2003 The OpenLDAP Foundation, Redwood City, California, USA. All Rights
Reserved. Permission to copy and distribute verbatim copies of this document is granted.
The OpenLDAP Public License Version 2.8, 17 August 2003.
Redistribution and use of this software and associated documentation ("Software"), with or without
modification, are permitted provided that the following conditions are met:
1. Redistributions in source form must retain copyright statements and notices,
2. Redistributions in binary form must reproduce applicable copyright statements and notices, this list of
conditions, and the following disclaimer in the documentation and/or other materials provided with the
distribution, and
3. Redistributions must contain a verbatim copy of this document.
201
8. Appendix
The OpenLDAP Foundation may revise this license from time to time. Each revision is distinguished by a
version number. You may use this Software under terms of this license revision or under the terms of any
subsequent revision of the license.
THIS SOFTWARE IS PROVIDED BY THE OPENLDAP FOUNDATION AND ITS CONTRIBUTORS "AS IS"
AND ANY EXPRESSED OR IMPLIED WARRANTIES, INCLUDING, BUT NOT LIMITED TO, THE IMPLIED
WARRANTIES OF MERCHANTABILITY AND FITNESS FOR A PARTICULAR PURPOSE ARE DISCLAIMED.
IN NO EVENT SHALL THE OPENLDAP FOUNDATION, ITS CONTRIBUTORS, OR THE AUTHOR(S) OR
OWNER(S) OF THE SOFTWARE BE LIABLE FOR ANY DIRECT, INDIRECT, INCIDENTAL, SPECIAL,
EXEMPLARY, OR CONSEQUENTIAL DAMAGES (INCLUDING, BUT NOT LIMITED TO, PROCUREMENT
OF SUBSTITUTE GOODS OR SERVICES; LOSS OF USE, DATA, OR PROFITS; OR BUSINESS
INTERRUPTION) HOWEVER CAUSED AND ON ANY THEORY OF LIABILITY, WHETHER IN CONTRACT,
STRICT LIABILITY, OR TORT (INCLUDING NEGLIGENCE OR OTHERWISE) ARISING IN ANY WAY OUT
OF THE USE OF THIS SOFTWARE, EVEN IF ADVISED OF THE POSSIBILITY OF SUCH DAMAGE.
The names of the authors and copyright holders must not be used in advertising or otherwise to promote
the sale, use or other dealing in this Software without specific, written prior permission. Title to copyright
in this Software shall at all times remain with copyright holders.
Heimdal
Copyright (c) 1997-2005 Kungliga Tekniska Högskolan (Royal Institute of Technology, Stockholm,
Sweden). All rights reserved.
8
Redistribution and use in source and binary forms, with or without modification, are permitted provided
that the following conditions are met:
1. Redistributions of source code must retain the above copyright notice, this list of conditions and the
following disclaimer.
2. Redistributions in binary form must reproduce the above copyright notice, this list of conditions and
the following disclaimer in the documentation and/or other materials provided with the distribution.
3. Neither the name of the Institute nor the names of its contributors may be used to endorse or promote
products derived from this software without specific prior written permission.
THIS SOFTWARE IS PROVIDED BY THE INSTITUTE AND CONTRIBUTORS "AS IS" AND ANY EXPRESS
OR IMPLIED WARRANTIES, INCLUDING, BUT NOT LIMITED TO, THE IMPLIED WARRANTIES OF
MERCHANTABILITY AND FITNESS FOR A PARTICULAR PURPOSE ARE DISCLAIMED. IN NO EVENT
SHALL THE INSTITUTE OR CONTRIBUTORS BE LIABLE FOR ANY DIRECT, INDIRECT, INCIDENTAL,
SPECIAL, EXEMPLARY, OR CONSEQUENTIAL DAMAGES (INCLUDING, BUT NOT LIMITED TO,
PROCUREMENT OF SUBSTITUTE GOODS OR SERVICES; LOSS OF USE, DATA, OR PROFITS; OR
BUSINESS INTERRUPTION) HOWEVER CAUSED AND ON ANY THEORY OF LIABILITY, WHETHER IN
CONTRACT, STRICT LIABILITY, OR TORT (INCLUDING NEGLIGENCE OR OTHERWISE) ARISING IN
ANY WAY OUT OF THE USE OF THIS SOFTWARE, EVEN IF ADVISED OF THE POSSIBILITY OF SUCH
DAMAGE.
202
Copyright Information about Installed Applications
IPSTM print language emulations
Copyright (c) 1987-2006 Zoran Corporation. All rights reserved.
SPX/IPX
Copyright (c) 1984, 1985, 1986, 1987, 1993
The Regents of the University of California. All rights reserved.
Modifications Copyright (c) 1995, Mike Mitchell
Modifications Copyright (c) 1995, John Hay
WPA Supplicant
Copyright (c) 2003-2009, Jouni Malinen <[email protected]> and contributors All Rights Reserved.
Redistribution and use in source and binary forms, with or without modification, are permitted provided
that the following conditions are met:
1. Redistributions of source code must retain the above copyright notice, this list of conditions and the
following disclaimer.
2. Redistributions in binary form must reproduce the above copyright notice, this list of conditions and the
following disclaimer in the documentation and /or other materials provided with the distribution.
3. Neither the name (s) of the above-listed copyright holder (s) nor the names of its contributors may be
used to endorse or promote products derived from this software without specific prior written permission.
8
THIS SOFTWARE IS PROVIDED BY THE COPYRIGHT HOLDERS AND CONTRIBUTORS "AS IS" AND
ANY EXPRESS OR IMPLIED WARRANTIES, INCLUDING, BUT NOT LIMITED TO, THE IMPLIED
WARRANTIES OF MERCHANTABILITY AND FITNESS FOR A PARTICULAR PURPOSE ARE DISCLAIMED.
IN NO EVENT SHALL THE COPYRIGHT OWNER OR CONTRIBUTORS BE LIABLE FOR ANY DIRECT,
INDIRECT, INCIDENTAL, SPECIAL, EXEMPLARY, OR CONSEQUENTIAL DAMAGES (INCLUDING, BUT
NOT LIMITED TO, PROCUREMENT OF SUBSTITUTE GOODS OR SERVICES; LOSS OF USE, DATA, OR
PROFITS; OR BUSINESS INTERRUPTION) HOWEVER CAUSED AND ON ANY THEORY OF LIABILITY,
WHETHER IN CONTRACT, STRICT LIABILITY, OR TORT (INCLUDING NEGLIGENCE OR OTHERWISE)
ARISING IN ANY WAY OUT OF THE USE OF THIS SOFTWARE, EVEN IF ADVISED OF THE POSSIBILITY
OF SUCH DAMAGE.
nana
Copyright (c) 1995,1996,1997,1998 Phil Maker All rights reserved.
203
8. Appendix
Redistribution and use in source and binary forms, with or without modification, are permitted provided
that the following conditions are met:
1. Redistributions of source code must retain the above copyright notice, this list of conditions and the
following disclaimer.
2. Redistributions in binary form must reproduce the above copyright notice, this list of conditions and the
following disclaimer in the documentation and/or other materials provided with the distribution.
THIS SOFTWARE IS PROVIDED BY THE AUTHOR AND CONTRIBUTORS "AS IS" AND ANY EXPRESS
OR IMPLIED WARRANTIES, INCLUDING, BUT NOT LIMITED TO, THE IMPLIED WARRANTIES OF
MERCHANTABILITY AND FITNESS FOR A PARTICULAR PURPOSE ARE DISCLAIMED. IN NO EVENT
SHALL THE AUTHOR OR CONTRIBUTORS BE LIABLE FOR ANY DIRECT, INDIRECT, INCIDENTAL,
SPECIAL, EXEMPLARY, OR CONSEQUENTIAL DAMAGES (INCLUDING, BUT NOT LIMITED TO,
PROCUREMENT OF SUBSTITUTE GOODS OR SERVICES; LOSS OF USE, DATA, OR PROFITS; OR
BUSINESS INTERRUPTION) HOWEVER CAUSED AND ON ANY THEORY OF LIABILITY, WHETHER IN
CONTRACT, STRICT LIABILITY, OR TORT (INCLUDING NEGLIGENCE OR OTHERWISE) ARISING IN
ANY WAY OUT OF THE USE OF THIS SOFTWARE, EVEN IF ADVISED OF THE POSSIBILITY OF SUCH
DAMAGE.
ILU
Copyright (c) 1991-1999 Xerox Corporation. All Rights Reserved.
8
Unlimited use, reproduction, modification, and distribution of this software and modified versions thereof
is permitted. Permission is granted to make derivative works from this software or a modified version thereof.
Any copy of this software, a modified version thereof, or a derivative work must include both the above
copyright notice of Xerox Corporation and this paragraph. Any distribution of this software, a modified
version thereof, or a derivative work must comply with all applicable United States export control laws.
This software is made available AS IS, and XEROX CORPORATION DISCLAIMS ALL WARRANTIES,
EXPRESS OR IMPLIED, INCLUDING WITHOUT LIMITATION THE IMPLIED WARRANTIES OF
MERCHANTABILITY AND FITNESS FOR A PARTICULAR PURPOSE, AND NOTWITHSTANDING ANY
OTHER PROVISION CONTAINED HEREIN, ANY LIABILITY FOR DAMAGES RESULTING FROM THE
SOFTWARE OR ITS USE IS EXPRESSLY DISCLAIMED, WHETHER ARISING IN CONTRACT, TORT
(INCLUDING NEGLIGENCE) OR STRICT LIABILITY, EVEN IF XEROX CORPORATION IS ADVISED OF
THE POSSIBILITY OF SUCH DAMAGES.
racoon
Copyright (C) 1995, 1996, 1997, and 1998 WIDE Project.
All rights reserved.
204
Copyright Information about Installed Applications
TrouSerS
THE ACCOMPANYING PROGRAM IS PROVIDED UNDER THE TERMS OF THIS COMMON PUBLIC
LICENSE ("AGREEMENT"). ANY USE, REPRODUCTION OR DISTRIBUTION OF THE PROGRAM
CONSTITUTES RECIPIENT'S ACCEPTANCE OF THIS AGREEMENT.
1. DEFINITIONS
"Contribution" means:
a) in the case of the initial Contributor, the initial code and documentation distributed under this Agreement,
and
b) in the case of each subsequent Contributor:
i) changes to the Program, and
ii) additions to the Program;
where such changes and/or additions to the Program originate from and are distributed by that particular
Contributor. A Contribution 'originates' from a Contributor if it was added to the Program by such
Contributor itself or anyone acting on such Contributor's behalf. Contributions do not include additions to
the Program which: (i) are separate modules of software distributed in conjunction with the Program under
their own license agreement, and (ii) are not derivative works of the Program.
"Contributor" means any person or entity that distributes the Program.
"Licensed Patents " mean patent claims licensable by a Contributor which are necessarily infringed by the
use or sale of its Contribution alone or when combined with the Program.
"Program" means the Contributions distributed in accordance with this Agreement.
"Recipient" means anyone who receives the Program under this Agreement, including all Contributors.
8
2. GRANT OF RIGHTS
a) Subject to the terms of this Agreement, each Contributor hereby grants Recipient a non-exclusive,
worldwide, royalty-free copyright license to reproduce, prepare derivative works of, publicly display,
publicly perform, distribute and sublicense the Contribution of such Contributor, if any, and such derivative
works, in source code and object code form.
b) Subject to the terms of this Agreement, each Contributor hereby grants Recipient a non-exclusive,
worldwide, royalty-free patent license under Licensed Patents to make, use, sell, offer to sell, import and
otherwise transfer the Contribution of such Contributor, if any, in source code and object code form. This
patent license shall apply to the combination of the Contribution and the Program if, at the time the
Contribution is added by the Contributor, such addition of the Contribution causes such combination to be
covered by the Licensed Patents. The patent license shall not apply to any other combinations which include
the Contribution. No hardware per se is licensed hereunder.
c) Recipient understands that although each Contributor grants the licenses to its Contributions set forth
herein, no assurances are provided by any Contributor that the Program does not infringe the patent or
other intellectual property rights of any other entity. Each Contributor disclaims any liability to Recipient for
claims brought by any other entity based on infringement of intellectual property rights or otherwise. As a
205
8. Appendix
condition to exercising the rights and licenses granted hereunder, each Recipient hereby assumes sole
responsibility to secure any other intellectual property rights needed, if any. For example, if a third party
patent license is required to allow Recipient to distribute the Program, it is Recipient's responsibility to acquire
that license before distributing the Program.
d) Each Contributor represents that to its knowledge it has sufficient copyright rights in its Contribution, if
any, to grant the copyright license set forth in this Agreement.
3. REQUIREMENTS
A Contributor may choose to distribute the Program in object code form under its own license agreement,
provided that:
a) it complies with the terms and conditions of this Agreement; and
b) its license agreement:
i) effectively disclaims on behalf of all Contributors all warranties and conditions, express and implied,
including warranties or conditions of title and non-infringement, and implied warranties or conditions of
merchantability and fitness for a particular purpose;
ii) effectively excludes on behalf of all Contributors all liability for damages, including direct, indirect,
special, incidental and consequential damages, such as lost profits;
iii) states that any provisions which differ from this Agreement are offered by that Contributor alone and
not by any other party; and
iv) states that source code for the Program is available from such Contributor, and informs licensees how
to obtain it in a reasonable manner on or through a medium customarily used for software exchange.
8
When the Program is made available in source code form:
a) it must be made available under this Agreement; and
b) a copy of this Agreement must be included with each copy of the Program.
Contributors may not remove or alter any copyright notices contained within the Program.
Each Contributor must identify itself as the originator of its Contribution, if any, in a manner that reasonably
allows subsequent Recipients to identify the originator of the Contribution.
4. COMMERCIAL DISTRIBUTION
Commercial distributors of software may accept certain responsibilities with respect to end users, business
partners and the like. While this license is intended to facilitate the commercial use of the Program, the
Contributor who includes the Program in a commercial product offering should do so in a manner which
does not create potential liability for other Contributors. Therefore, if a Contributor includes the Program
in a commercial product offering, such Contributor ("Commercial Contributor") hereby agrees to defend
and indemnify every other Contributor ("Indemnified Contributor") against any losses, damages and costs
(collectively "Losses") arising from claims, lawsuits and other legal actions brought by a third party against
the Indemnified Contributor to the extent caused by the acts or omissions of such Commercial Contributor
in connection with its distribution of the Program in a commercial product offering. The obligations in this
section do not apply to any claims or Losses relating to any actual or alleged intellectual property
infringement. In order to qualify, an Indemnified Contributor must: a) promptly notify the Commercial
206
Copyright Information about Installed Applications
Contributor in writing of such claim, and b) allow the Commercial Contributor to control, and cooperate
with the Commercial Contributor in, the defense and any related settlement negotiations. The Indemnified
Contributor may participate in any such claim at its own expense.
For example, a Contributor might include the Program in a commercial product offering, Product X. That
Contributor is then a Commercial Contributor. If that Commercial Contributor then makes performance
claims, or offers warranties related to Product X, those performance claims and warranties are such
Commercial Contributor's responsibility alone. Under this section, the Commercial Contributor would have
to defend claims against the other Contributors related to those performance claims and warranties, and
if a court requires any other Contributor to pay any damages as a result, the Commercial Contributor must
pay those damages.
5. NO WARRANTY
EXCEPT AS EXPRESSLY SET FORTH IN THIS AGREEMENT, THE PROGRAM IS PROVIDED ON AN "AS
IS" BASIS, WITHOUT WARRANTIES OR CONDITIONS OF ANY KIND, EITHER EXPRESS OR IMPLIED
INCLUDING, WITHOUT LIMITATION, ANY WARRANTIES OR CONDITIONS OF TITLE, NONINFRINGEMENT, MERCHANTABILITY OR FITNESS FOR A PARTICULAR PURPOSE. Each Recipient is
solely responsible for determining the appropriateness of using and distributing the Program and assumes
all risks associated with its exercise of rights under this Agreement, including but not limited to the risks and
costs of program errors, compliance with applicable laws, damage to or loss of data, programs or
equipment, and unavailability or interruption of operations.
6. DISCLAIMER OF LIABILITY
EXCEPT AS EXPRESSLY SET FORTH IN THIS AGREEMENT, NEITHER RECIPIENT NOR ANY
CONTRIBUTORS SHALL HAVE ANY LIABILITY FOR ANY DIRECT, INDIRECT, INCIDENTAL, SPECIAL,
EXEMPLARY, OR CONSEQUENTIAL DAMAGES (INCLUDING WITHOUT LIMITATION LOST PROFITS),
HOWEVER CAUSED AND ON ANY THEORY OF LIABILITY, WHETHER IN CONTRACT, STRICT
LIABILITY, OR TORT (INCLUDING NEGLIGENCE OR OTHERWISE) ARISING IN ANY WAY OUT OF
THE USE OR DISTRIBUTION OF THE PROGRAM OR THE EXERCISE OF ANY RIGHTS GRANTED
HEREUNDER, EVEN IF ADVISED OF THE POSSIBILITY OF SUCH DAMAGES.
8
7. GENERAL
If any provision of this Agreement is invalid or unenforceable under applicable law, it shall not affect the
validity or enforceability of the remainder of the terms of this Agreement, and without further action by the
parties hereto, such provision shall be reformed to the minimum extent necessary to make such provision
valid and enforceable.
If Recipient institutes patent litigation against a Contributor with respect to a patent applicable to software
(including a cross-claim or counterclaim in a lawsuit), then any patent licenses granted by that Contributor
to such Recipient under this Agreement shall terminate as of the date such litigation is filed. In addition, if
Recipient institutes patent litigation against any entity (including a cross-claim or counterclaim in a lawsuit)
alleging that the Program itself (excluding combinations of the Program with other software or hardware)
infringes such Recipient's patent(s), then such Recipient's rights granted under Section 2(b) shall terminate
as of the date such litigation is filed.
207
8. Appendix
All Recipient's rights under this Agreement shall terminate if it fails to comply with any of the material terms
or conditions of this Agreement and does not cure such failure in a reasonable period of time after becoming
aware of such noncompliance. If all Recipient's rights under this Agreement terminate, Recipient agrees to
cease use and distribution of the Program as soon as reasonably practicable. However, Recipient's
obligations under this Agreement and any licenses granted by Recipient relating to the Program shall
continue and survive.
Everyone is permitted to copy and distribute copies of this Agreement, but in order to avoid inconsistency
the Agreement is copyrighted and may only be modified in the following manner. The Agreement Steward
reserves the right to publish new versions (including revisions) of this Agreement from time to time. No one
other than the Agreement Steward has the right to modify this Agreement. IBM is the initial Agreement
Steward. IBM may assign the responsibility to serve as the Agreement Steward to a suitable separate entity.
Each new version of the Agreement will be given a distinguishing version number. The Program (including
Contributions) may always be distributed subject to the version of the Agreement under which it was
received. In addition, after a new version of the Agreement is published, Contributor may elect to distribute
the Program (including its Contributions) under the new version. Except as expressly stated in Sections 2
(a) and 2(b) above, Recipient receives no rights or licenses to the intellectual property of any Contributor
under this Agreement, whether expressly, by implication, estoppel or otherwise. All rights in the Program
not expressly granted under this Agreement are reserved.
This Agreement is governed by the laws of the State of New York and the intellectual property laws of the
United States of America. No party to this Agreement will bring a legal action under this Agreement more
than one year after the cause of action arose. Each party waives its rights to a jury trial in any resulting
litigation.
8
• To obtain the source code for opening TrouSerS (Version 0.27), which is provided with this machine,
access the Web site at the following URL: http://www.ricoh.com/support/trousers/index.html
• TrouSerS version control is by SourceForge CVS. For methods of obtaining the source code, access
the Web site at the following URL: http://sourceforge.net/cvs/?group_id=126012
Samba
For SMB transmission, this machine uses Samba.
Copyright (c) Andrew Tridgell 1994-1998
This program is free software; you can redistribute it and/or modify it under the terms of the GNU General
Public License as published by the Free Software Foundation; either version 2 of the License, or (at your
option) any later version.
This program is distributed in the hope that it will be useful, but WITHOUT ANY WARRANTY; without even
the implied warranty of MERCHANTABILITY or FITNESS FOR A PARTICULAR PURPOSE. See the GNU
General Public License along with this program; if not, write to the Free Software Foundation, Inc., 675
Mass Ave, Cambridge, MA 02139, USA.
208
Copyright Information about Installed Applications
• The source code for SMB transmission by this machine can be downloaded from the following website:
http://support-download.com/services/scbs
Copyright (C) 1989, 1991 Free Software Foundation, Inc.59 Temple Place, Suite 330, Boston, MA
02111-1307 USAEveryone is permitted to copy and distribute verbatim copies of this license document,
but changing it is not allowed.
Preamble
The licenses for most software are designed to take away your freedom to share and change it. By contrast,
the GNU General Public License is intended to guarantee your freedom to share and change free software-to make sure the software is free for all its users. This General Public License applies to most of the Free
Software Foundation's software and to any other program whose authors commit to using it. (Some other
Free Software Foundation software is covered by the GNU Library General Public License instead.) You
can apply it to your programs, too.
When we speak of free software, we are referring to freedom, not price. Our General Public Licenses are
designed to make sure that you have the freedom to distribute copies of free software (and charge for this
service if you wish), that you receive source code or can get it if you want it, that you can change the
software or use pieces of it in new free programs; and that you know you can do these things.
To protect your rights, we need to make restrictions that forbid anyone to deny you these rights or to ask
you to surrender the rights. These restrictions translate to certain responsibilities for you if you distribute
copies of the software, or if you modify it.
For example, if you distribute copies of such a program, whether gratis or for a fee, you must give the
recipients all the rights that you have. You must make sure that they, too, receive or can get the source
code. And you must show them these terms so they know their rights.
8
We protect your rights with two steps: (1) copyright the software, and (2) offer you this license which gives
you legal permission to copy, distribute and/or modify the software.
Also, for each author's protection and ours, we want to make certain that everyone understands that there
is no warranty for this free software. If the software is modified by someone else and passed on, we want
its recipients to know that what they have is not the original, so that any problems introduced by others will
not reflect on the original authors' reputations.
Finally, any free program is threatened constantly by software patents. We wish to avoid the danger that
redistributors of a free program will individually obtain patent licenses, in effect making the program
proprietary. To prevent this, we have made it clear that any patent must be licensed for everyone's free use
or not licensed at all.
The precise terms and conditions for copying, distribution and modification follow.
TERMS AND CONDITIONS FOR COPYING, DISTRIBUTION AND MODIFICATION
0. This License applies to any program or other work which contains a notice placed by the copyright
holder saying it may be distributed under the terms of this General Public License. The "Program", below,
refers to any such program or work, and a "work based on the Program" means either the Program or any
derivative work under copyright law: that is to say, a work containing the Program or a portion of it, either
209
8. Appendix
verbatim or with modifications and/or translated into another language. (Hereinafter, translation is
included without limitation in the term "modification".) Each licensee is addressed as "you".
Activities other than copying, distribution and modification are not covered by this License; they are outside
its scope. The act of running the Program is not restricted, and the output from the Program is covered only
if its contents constitute a work based on the Program (independent of having been made by running the
Program). Whether that is true depends on what the Program does.
1. You may copy and distribute verbatim copies of the Program's source code as you receive it, in any
medium, provided that you conspicuously and appropriately publish on each copy an appropriate
copyright notice and disclaimer of warranty; keep intact all the notices that refer to this License and to the
absence of any warranty; and give any other recipients of the Program a copy of this License along with
the Program.
You may charge a fee for the physical act of transferring a copy, and you may at your option offer warranty
protection in exchange for a fee.
2. You may modify your copy or copies of the Program or any portion of it, thus forming a work based on
the Program, and copy and distribute such modifications or work under the terms of Section 1 above,
provided that you also meet all of these conditions:
a) You must cause the modified files to carry prominent notices stating that you changed the files and the
date of any change.
b) You must cause any work that you distribute or publish, that in whole or in part contains or is derived
from the Program or any part thereof, to be licensed as a whole at no charge to all third parties under the
terms of this License.
8
c) If the modified program normally reads commands interactively when run, you must cause it, when
started running for such interactive use in the most ordinary way, to print or display an announcement
including an appropriate copyright notice and a notice that there is no warranty (or else, saying that you
provide a warranty) and that users may redistribute the program under these conditions, and telling the
user how to view a copy of this License. (Exception: if the Program itself is interactive but does not normally
print such an announcement, your work based on the Program is not required to print an announcement.)
These requirements apply to the modified work as a whole. If identifiable sections of that work are not
derived from the Program, and can be reasonably considered independent and separate works in
themselves, then this License, and its terms, do not apply to those sections when you distribute them as
separate works. But when you distribute the same sections as part of a whole which is a work based on
the Program, the distribution of the whole must be on the terms of this License, whose permissions for other
licensees extend to the entire whole, and thus to each and every part regardless of who wrote it.
Thus, it is not the intent of this section to claim rights or contest your rights to work written entirely by you;
rather, the intent is to exercise the right to control the distribution of derivative or collective works based on
the Program.
In addition, mere aggregation of another work not based on the Program with the Program (or with a work
based on the Program) on a volume of a storage or distribution medium does not bring the other work
under the scope of this License.
210
Copyright Information about Installed Applications
3. You may copy and distribute the Program (or a work based on it, under Section 2) in object code or
executable form under the terms of Sections 1 and 2 above provided that you also do one of the following:
a) Accompany it with the complete corresponding machine-readable source code, which must be
distributed under the terms of Sections 1 and 2 above on a medium customarily used for software
interchange; or,
b) Accompany it with a written offer, valid for at least three years, to give any third party, for a charge no
more than your cost of physically performing source distribution, a complete machine-readable copy of
the corresponding source code, to be distributed under the terms of Sections 1 and 2 above on a medium
customarily used for software interchange; or,
c) Accompany it with the information you received as to the offer to distribute corresponding source code.
(This alternative is allowed only for noncommercial distribution and only if you received the program in
object code or executable form with such an offer, in accord with Subsection b above.)
The source code for a work means the preferred form of the work for making modifications to it. For an
executable work, complete source code means all the source code for all modules it contains, plus any
associated interface definition files, plus the scripts used to control compilation and installation of the
executable. However, as a special exception, the source code distributed need not include anything that
is normally distributed (in either source or binary form) with the major components (compiler, kernel, and
so on) of the operating system on which the executable runs, unless that component itself accompanies the
executable.
If distribution of executable or object code is made by offering access to copy from a designated place,
then offering equivalent access to copy the source code from the same place counts as distribution of the
source code, even though third parties are not compelled to copy the source along with the object code.
4. You may not copy, modify, sublicense, or distribute the Program except as expressly provided under
this License. Any attempt otherwise to copy, modify, sublicense or distribute the Program is void, and will
automatically terminate your rights under this License. However, parties who have received copies, or
rights, from you under this License will not have their licenses terminated so long as such parties remain in
full compliance.
8
5. You are not required to accept this License, since you have not signed it. However, nothing else grants
you permission to modify or distribute the Program or its derivative works. These actions are prohibited by
law if you do not accept this License. Therefore, by modifying or distributing the Program (or any work
based on the Program), you indicate your acceptance of this License to do so, and all its terms and conditions
for copying, distributing or modifying the Program or works based on it.
6. Each time you redistribute the Program (or any work based on the Program), the recipient automatically
receives a license from the original licensor to copy, distribute or modify the Program subject to these terms
and conditions. You may not impose any further restrictions on the recipients' exercise of the rights granted
herein. You are not responsible for enforcing compliance by third parties to this License.
7. If, as a consequence of a court judgment or allegation of patent infringement or for any other reason
(not limited to patent issues), conditions are imposed on you (whether by court order, agreement or
otherwise) that contradict the conditions of this License, they do not excuse you from the conditions of this
License. If you cannot distribute so as to satisfy simultaneously your obligations under this License and any
211
8. Appendix
other pertinent obligations, then as a consequence you may not distribute the Program at all. For example,
if a patent license would not permit royalty-free redistribution of the Program by all those who receive
copies directly or indirectly through you, then the only way you could satisfy both it and this License would
be to refrain entirely from distribution of the Program.
If any portion of this section is held invalid or unenforceable under any particular circumstance, the balance
of the section is intended to apply and the section as a whole is intended to apply in other circumstances.
It is not the purpose of this section to induce you to infringe any patents or other property right claims or to
contest validity of any such claims; this section has the sole purpose of protecting the integrity of the free
software distribution system, which is implemented by public license practices. Many people have made
generous contributions to the wide range of software distributed through that system in reliance on consistent
application of that system; it is up to the author/donor to decide if he or she is willing to distribute software
through any other system and a licensee cannot impose that choice.
This section is intended to make thoroughly clear what is believed to be a consequence of the rest of this
License.
8. If the distribution and/or use of the Program is restricted in certain countries either by patents or by
copyrighted interfaces, the original copyright holder who places the Program under this License may add
an explicit geographical distribution limitation excluding those countries, so that distribution is permitted
only in or among countries not thus excluded. In such case, this License incorporates the limitation as if
written in the body of this License.
8
9. The Free Software Foundation may publish revised and/or new versions of the General Public License
from time to time. Such new versions will be similar in spirit to the present version, but may differ in detail
to address new problems or concerns.
Each version is given a distinguishing version number. If the Program specifies a version number of this
License which applies to it and "any later version", you have the option of following the terms and conditions
either of that version or of any later version published by the Free Software Foundation. If the Program
does not specify a version number of this License, you may choose any version ever published by the Free
Software Foundation.
10. If you wish to incorporate parts of the Program into other free programs whose distribution conditions
are different, write to the author to ask for permission. For software which is copyrighted by the Free Software
Foundation, write to the Free Software Foundation; we sometimes make exceptions for this. Our decision
will be guided by the two goals of preserving the free status of all derivatives of our free software and of
promoting the sharing and reuse of software generally.
NO WARRANTY
11. BECAUSE THE PROGRAM IS LICENSED FREE OF CHARGE, THERE IS NO WARRANTY FOR THE
PROGRAM, TO THE EXTENT PERMITTED BY APPLICABLE LAW. EXCEPT WHEN OTHERWISE STATED
IN WRITING THE COPYRIGHT HOLDERS AND/OR OTHER PARTIES PROVIDE THE PROGRAM "AS IS"
WITHOUT WARRANTY OF ANY KIND, EITHER EXPRESSED OR IMPLIED, INCLUDING, BUT NOT
LIMITED TO, THE IMPLIED WARRANTIES OF MERCHANTABILITY AND FITNESS FOR A PARTICULAR
PURPOSE. THE ENTIRE RISK AS TO THE QUALITY AND PERFORMANCE OF THE PROGRAM IS WITH
212
Copyright Information about Installed Applications
YOU. SHOULD THE PROGRAM PROVE DEFECTIVE, YOU ASSUME THE COST OF ALL NECESSARY
SERVICING, REPAIR OR CORRECTION.
12. IN NO EVENT UNLESS REQUIRED BY APPLICABLE LAW OR AGREED TO IN WRITING WILL ANY
COPYRIGHT HOLDER, OR ANY OTHER PARTY WHO MAY MODIFY AND/OR REDISTRIBUTE THE
PROGRAM AS PERMITTED ABOVE, BE LIABLE TO YOU FOR DAMAGES, INCLUDING ANY GENERAL,
SPECIAL, INCIDENTAL OR CONSEQUENTIAL DAMAGES ARISING OUT OF THE USE OR INABILITY
TO USE THE PROGRAM (INCLUDING BUT NOT LIMITED TO LOSS OF DATA OR DATA BEING
RENDERED INACCURATE OR LOSSES SUSTAINED BY YOU OR THIRD PARTIES OR A FAILURE OF THE
PROGRAM TO OPERATE WITH ANY OTHER PROGRAMS), EVEN IF SUCH HOLDER OR OTHER PARTY
HAS BEEN ADVISED OF THE POSSIBILITY OF SUCH DAMAGES.
END OF TERMS AND CONDITIONS
How to Apply These Terms to Your New Programs
If you develop a new program, and you want it to be of the greatest possible use to the public, the best
way to achieve this is to make it free software which everyone can redistribute and change under these
terms.
To do so, attach the following notices to the program. It is safest to attach them to the start of each source
file to most effectively convey the exclusion of warranty; and each file should have at least the "copyright"
line and a pointer to where the full notice is found.
one line to give the program's name and a brief idea of what it does.Copyright (C)
This program is free software; you can redistribute it and/or modify it under the terms of the GNU General
Public License as published by the Free Software Foundation; either version 2 of the License, or (at your
option) any later version.
This program is distributed in the hope that it will be useful, but WITHOUT ANY WARRANTY; without even
the implied warranty of MERCHANTABILITY or FITNESS FOR A PARTICULAR PURPOSE. See the GNU
General Public License for more details.
8
You should have received a copy of the GNU General Public License along with this program; if not, write
to the Free Software Foundation, Inc., 59 Temple Place, Suite 330, Boston, MA
02111-1307 USA
Also add information on how to contact you by electronic and paper mail.
If the program is interactive, make it output a short notice like this when it starts in an interactive mode:
Gnomovision version 69, Copyright (C) year name of author Gnomovision comes with ABSOLUTELY NO
WARRANTY; for details type `show w'. This is free software, and you are welcome to redistribute it under
certain conditions; type `show c' for details.
The hypothetical commands `show w' and `show c' should show the appropriate parts of the General
Public License. Of course, the commands you use may be called something other than `show w' and `show
c'; they could even be mouse-clicks or menu items--whatever suits your program.
You should also get your employer (if you work as a programmer) or your school, if any, to sign a "copyright
disclaimer" for the program, if necessary. Here is a sample; alter the names:
213
8. Appendix
Yoyodyne, Inc., hereby disclaims all copyright interest in the program `Gnomovision' (which makes passes
at compilers) written by James Hacker.
signature of Ty Coon, 1 April 1989
Ty Coon, President of Vice
This General Public License does not permit incorporating your program into proprietary programs. If your
program is a subroutine library, you may consider it more useful to permit linking proprietary applications
with the library. If this is what you want to do, use the GNU Library General Public License instead of this
License.
8
214
Trademarks
Trademarks
Adobe, Acrobat, Acrobat Reader, PageMaker, PostScript, and Reader are either registered trademarks
or trademarks of Adobe Systems Incorporated in the United States and/or other countries.
Apple, EtherTalk, Macintosh, Mac OS, and Safari are trademarks of Apple Inc., registered in the U.S. and
other countries.
Citrix, Citrix Presentation Server and Citrix XenApp are either registered trademarks or trademarks of Citrix
Systems, Inc in the United States and/or other countries.
Firefox® is a registered trademark of the Mozilla Foundation.
IPDS is a trademark of Ricoh Co., Ltd.
IPS is a trademark or registered trademark of Zoran Corporation and/ or its subsidiaries in the United
States or other countries.
JAWS® is a registered trademark of Freedom Scientific, Inc.,St. Petersburg, Florida and/or other countries.
Microsoft®, Windows®, Windows Server®, and Windows Vista® are registered trademarks of Microsoft
Corporation in the United States and/or other countries.
Monotype is a registered trademark of Monotype Imaging, Inc.
NetWare, IPX, IPX/SPX are either registered trademarks or trademarks of Novell, Inc.
OpenLDAP is a registered trademark of the OpenLDAP Foundation.
PCL® is a registered trademark of Hewlett-Packard Company.
UNIX® is a registered trademark of The Open Group.
UPnPTM is a trademark of the UPnP Implementers Corporation.
8
Other product names used herein are for identification purposes only and might be trademarks of their
respective companies. We disclaim any and all rights to those marks.
The proper names of the Windows operating systems are as follows:
• The product names of Windows XP are as follows:
Microsoft® Windows® XP Professional Edition
Microsoft® Windows® XP Home Edition
Microsoft® Windows® XP Professional x 64 Edition
• The product names of Windows Vista are as follows:
Microsoft® Windows Vista® Ultimate
Microsoft® Windows Vista® Business
Microsoft® Windows Vista® Home Premium
Microsoft® Windows Vista® Home Basic
Microsoft® Windows Vista® Enterprise
• The product names of Windows 7 are as follows:
215
8. Appendix
Microsoft® Windows® 7 Home Premium
Microsoft® Windows® 7 Professional
Microsoft® Windows® 7 Ultimate
Microsoft® Windows® 7 Enterprise
• The product names of Windows Server 2003 are as follows:
Microsoft® Windows Server® 2003 Standard Edition
Microsoft® Windows Server® 2003 Enterprise Edition
• The product names of Windows Server 2003 R2 are as follows:
Microsoft® Windows Server® 2003 R2 Standard Edition
Microsoft® Windows Server® 2003 R2 Enterprise Edition
• The product names of Windows Server 2008 are as follows:
Microsoft® Windows Server® 2008 Standard
Microsoft® Windows Server® 2008 Enterprise
Microsoft® Windows Server® 2008 Standard without Hyper-VTM
Microsoft® Windows Server® 2008 Enterprise without Hyper-VTM
• The product names of Windows Server 2008 R2 are as follows:
Microsoft® Windows Server® 2008 R2 Standard
Microsoft® Windows Server® 2008 R2 Enterprise
8
216
INDEX
A
Account for e-mail notification...........................147
Administrator mode............................................. 138
Advanced printing.................................................36
AutoNet................................................................177
B
Before using the printer.........................................13
Booklet printing......................................................27
C
Canceling a print job............................................79
CD-ROM................................................................15
Changing the paper tray settings.........................58
Citrix Presentation Server...................................175
Citrix XenApp......................................................175
Classification code..............................................141
Classification code for a print job........................52
Classification code, configuring........................142
Collate....................................................................44
Combining multiple pages into single page........31
Commands.............................................................50
Configuration page........................................98, 99
Copyright information.........................................184
Cover sheets..........................................................39
D
Default settings.......................................................24
DeskTopBinder.........................................17, 47, 48
DeskTopBinder Lite................................................17
DeskTopBinder Professional.................................17
DHCP...................................................................177
Dial-up router......................................................182
Dithering...............................................................171
Downloading utility software................................17
Duplex printing......................................................27
Dynamic DNS......................................................179
Form feed...............................................................58
Format of on-demand e-mail messages............151
Frequently used print methods..............................26
Function Palette......................................................48
G
Gradation............................................................170
Guest mode.........................................................138
H
Hold print.........................................................70, 77
Host interface.......................................................125
I
If errors occur with the specified paper size and type
................................................................................58
Image smoothing.................................................170
Interrupt printing function......................................54
IP address.................................................................8
IPP.........................................................................145
J
Job reset.................................................................59
L
Language.............................................................132
Limitations.............................................................175
List of options.........................................................12
List/Test print..........................................................98
Locked print.....................................................67, 77
M
E
Mac OS X..............................................................79
Machine Settings Export.......................................86
Maintenance..........................................................92
Making printer default settings.............................23
Making printer settings..........................................24
Manuals.................................................................10
Memory erase status.............................................88
Model-specific information.....................................9
Error log...............................................................133
N
F
NetWare..............................................................154
NetWare 3.x..............................................154, 158
NetWare 4.x..............................................155, 159
Finishing menu.......................................................36
Fit to paper...........................................................169
217
NetWare 5......................................... 155, 156, 159
NetWare 5.1.....................................155, 156, 159
NetWare 6......................................... 155, 156, 159
NetWare 6.5.....................................155, 156, 159
O
One click presets...................................................24
Options menu......................................................133
Orientation override...........................................171
P
Paper input.............................................................89
Paper menu............................................................36
Paper type............................................................169
PDF direct print.........................................47, 48, 49
PDF password........................................................50
PostScript 3 printer driver...................................163
Print command priority..........................................37
Print job function....................................................61
Print job screen......................................................61
Print mode............................................................169
Print server...................................................154, 155
Print settings.........................................................108
Printer driver....................................................15, 52
Printer driver priority..............................................37
Printer driver setting screen...................................23
Printer server........................................................153
Printer status.........................................................146
Proceeding with printing using the bypass tray.......
................................................................................60
Pure IP environment............................................. 156
R
Remote printer.............................................158, 159
Rotate by 180 degrees......................................171
S
Sample print....................................................64, 77
ScanRouter.............................................................17
Security options...................................................120
Selected tray..........................................................58
Sending a PDF file.................................................50
Slip sheets..............................................................40
SmartDeviceMonitor for Admin................... 17, 144
SmartDeviceMonitor for Client....................18, 145
218
Spool printing........................................................45
Standard printing...................................................26
Store and Print.....................................................163
Stored print......................................................73, 77
Supported printer drivers....................................175
Symbols....................................................................8
System.........................................................102, 108
T
Types of booklet printing......................................30
Types of combined printing..................................32
Types of duplex printing.......................................29
U
User authentication.......................................19, 137
User ID....................................................................77
Utility software.......................................................17
V
Virtual printer.........................................................54
W
Watermark...........................................................172
Watermark angle................................................172
Watermark font...................................................172
Watermark size...................................................172
Watermark style..................................................173
Watermark text....................................................172
Watermarks...........................................................42
Web Image Monitor.........................135, 142, 178
auto e-mail notification...................................................149
E-mail notification............................................................146
mail authentication..........................................................148
on-demand e-mail notification.......................................150
Web Image Monitor help..................................139
Web Image Monitor, address book restore.....143
Web Image Monitor,address book backup...........
..............................................................................143
Windows................................................................79
Windows Terminal Service.................................175
WINS server........................................................178
Wireless LAN.......................................................182
MEMO
219
MEMO
220
EN GB
EN US
M0808530
© 2010
Operating Instructions Software Guide
M080-8530
US
EN