1
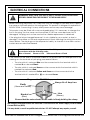
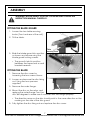
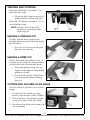
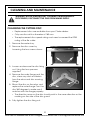
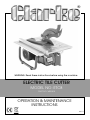
WARNING: Read these instructions before using the machine
ELECTRIC TILE CUTTER
MODEL NO: ETC8
PART NO: 3400515
OPERATION & MAINTENANCE
INSTRUCTIONS
LS0711
INTRODUCTION
Thank you for purchasing this Electric Tile Cutter.
Please read this manual thoroughly, before attempting to operate, and
carefully follow all instructions given.
It is vitally important that ALL precautions are taken, as specified, which will not
only provide protection for yourself and that of others around you, but will also
ensure that the product will give you long and satisfactory service.
GUARANTEE
This CLARKE product is guaranteed against faulty manufacture for a period of
12 months from the date of purchase. Please keep your receipt as proof of
purchase.
This guarantee is invalid if the product is found to have been abused or
tampered with in any way, or not used for the purpose for which it was
intended.
Faulty goods should be returned to their place of purchase, no product can
be returned to us without prior permission.
This guarantee does not effect your statutory rights.
SPECIFICATIONS
Motor
230V, 50 Hz 1ph
Power Rating
450 Watts
Speed
2950 RPM
Weight (net)
7.9 kg
Cutting Angle
0 - 45 degrees
Cutting Depth at 90O
35 mm
45O
22 mm
Cutting Depth at
Cutting Disc Diameter
180 mm
Cutting Disc Bore
22.2 mm
Sound Power Level
105 Lw(A)
Sound Pressure Level
92 dB(A)
Table Dimensions
330 x 360 mm
2
Parts & Service: 020 8988 7400 / E-mail: [email protected] or [email protected]
SAFETY PRECAUTIONS
WARNING: READ ALL INSTRUCTIONS. FAILURE TO FOLLOW ALL
INSTRUCTIONS LISTED BELOW MAY RESULT IN ELECTRIC SHOCK, FIRE AND/
OR SERIOUS INJURY. THE TERM “POWER TOOL” IN ALL WARNINGS LISTED
BELOW REFERS TO YOUR ELECTRIC TILE CUTTER.
WORK AREA
1. Keep work area clean and well lit. Cluttered and dark areas invite
accidents.
2. Do not operate power tools in explosive atmospheres, such as in the
presence of flammable liquids, gases or dust. Power tools create sparks
which may ignite the dust or fumes.
3. Keep children and bystanders away while operating a power tool.
Distractions can cause you to lose control.
ELECTRICAL SAFETY
1. Avoid body contact with earthed or grounded surfaces such as pipes,
radiators, ranges or refrigerators. There is an increased risk of electric shock
if your body is earthed or grounded.
2. Do not expose power tools to rain or wet conditions. Water entering a
power tool will increase the risk of electric shock.
3. When operating a power tool outdoors, use an extension cord suitable for
outdoor use. Use of a cord suitable for outdoor use reduces the risk of
electric shock.
PERSONAL SAFETY
1. Stay alert, watch what you are doing and use common sense when
operating a power tool. Do not use a power tool while you are tired or
under the influence of drugs, alcohol or medication. A moment of
inattention while operating power tools may result in personal injury.
2. Use safety equipment. Always wear eye protection. Safety equipment such
as dust mask, non-skid safety shoes, or hearing protection used for
appropriate conditions will reduce personal injuries.
3. Avoid accidental starting. Ensure the switch is in the off position before
connecting to the power supply.
4. Do not overreach. Keep proper footing and balance at all times. This
enables better control of the power tool in unexpected situations.
3
Parts & Service: 020 8988 7400 / E-mail: [email protected] or [email protected]
5. Dress properly. Do not wear loose clothing or jewellery. Keep your hair,
clothing and gloves away from moving parts. Loose clothes, jewellery or
long hair can be caught in moving parts.
POWER TOOL USE AND CARE
1. Do not force the power tool. Use the correct power tool for your
application. The correct power tool will do the job better and safer at the
rate which it was designed.
2. Do not use the power tool if the switch does not turn it on and off. Any
power tool that cannot be controlled with the switch is dangerous and
must be repaired.
3. Disconnect the power before making any adjustments, changing
accessories, or storing power tools. Such preventive safety measures
reduce the risk of starting the power tool accidentally.
4. Store idle tools out of the reach of children and do not allow persons
unfamiliar with the power tool or these instructions to operate the power
tool. Power tools are dangerous in the hands of untrained users.
5. Maintain power tools. Check for misalignment or binding of moving parts,
breakage of parts and any other condition that may affect the power tools
operation. If damaged, have the power tool repaired before use. Many
accidents are caused by poorly maintained power tools.
6. Keep cutting tools sharp and clean. Poorly maintained cutting tools with
sharp cutting edges are less likely to bind and are easier to control.
7. Use the power tool and accessories in accordance with these instructions
and in the manner intended for the particular type of power tool, taking
into account the working conditions and the work to be performed. Use of
the power tool for operations different from intended could result in a
hazardous situation.
SERVICE
1. Have your power tool serviced by a qualified repair person using only
identical replacement parts. This will ensure that the safety of the power
tool is maintained.
ENVIRONMENTAL PROTECTION
Recycle unwanted materials instead of disposing of them as waste.
All tools, accessories and packaging should be sorted, taken to a
recycling centre and disposed of in a manner which is compatible
with the environment.
4
Parts & Service: 020 8988 7400 / E-mail: [email protected] or [email protected]
ADDITIONAL SAFETY RULES FOR YOUR TILE CUTTER
1. Remove the mains plug from socket before carrying out any adjustment or
servicing.
2. If the supply cord is damaged have it replaced by a qualified person.
3. Always wear both eye and ear protection when using the machine.
4. Ensure that the directional arrow marked on the disc corresponds with the
rotational direction of the motor.
5. With the machine disconnected from the power supply, rotate the disc by
hand to ensure it is free from obstruction.
6. Always keep the disc securing arbor and collars clean.
7. Never try to cut freehand. Always ensure that the tile to be cut is pressed
firmly against the parallel side fence.
8. Ensure that the work piece to be cut off has sufficient room to move
sideways. Failure to do so may result in the off cut binding against the disc.
9. Never cut more than one tile at a time.
10. Never cut pieces too small to be held securely against the side fence
without leaving enough space for the hand to be a safe distance from the
disc.
11. Ensure that the table and surrounding area are clear with the exception of
the tile to be cut.
12. Never fit sub-standard discs to the machine. Only fit correctly sized
diamond discs.
13. Before cutting a tile piece, let the saw disc run freely for a few seconds. If it
makes an unfamiliar sound or vibrates excessively, switch it off immediately
and disconnect from the power supply. Investigate the cause or consult a
qualified person for advice.
14. Let the disc reach full speed before commencing the cut.
15. Do not force the disc to cut the tile.
16. Let the disc come to a complete stop before removing any jammed or off
cut material from around the disc area.
17. Always use the appropriate safety equipment that is required for the
product. E.g. goggles / safety spectacles, ear defenders (essential with
tools with a noise rating of over 85 dbA), gloves and face masks. In all
cases ensure that the safety equipment is in good condition.
5
Parts & Service: 020 8988 7400 / E-mail: [email protected] or [email protected]
ELECTRICAL CONNECTIONS
WARNING: READ THESE ELECTRICAL SAFETY INSTRUCTIONS THOROUGHLY
BEFORE CONNECTING THE PRODUCT TO THE MAINS SUPPLY.
Before switching the product on, make sure that the voltage of your electricity supply is
the same as that indicated on the rating plate. This product is designed to operate on
230VAC 50Hz. Connecting it to any other power source may cause damage.
This product may be fitted with a non-rewireable plug. If it is necessary to change the
fuse in the plug, the fuse cover must be refitted. If the fuse cover becomes lost or
damaged, the plug must not be used until a suitable replacement is obtained.
If the plug has to be changed because it is not suitable for your socket, or due to
damage, it should be cut off and a replacement fitted, following the wiring instructions
shown below. The old plug must be disposed of safely, as insertion into a mains socket
could cause an electrical hazard.
WARNING! The wires in the power cable of this product are coloured in
accordance with the following code:
Blue = Neutral
Brown = Live Yellow and Green = Earth
If the colours of the wires in the power cable of this product do not correspond with the
markings on the terminals of your plug, proceed as follows.
• The wire which is coloured Blue must be connected to the terminal which is
marked N or coloured Black.
• The wire which is coloured Brown must be connected to the terminal which is
marked L or coloured Red.
• The wire which is coloured Yellow and Green must be connected to the
terminal which is marked E or
or coloured Green.
Plug must be BS1363/A approved.
Always fit a 5 Amp fuse.
Earth
(Green and Yellow)
Live
Neutral
(Brown)
(Blue)
Ensure that the outer sheath of the cable is firmly held by the clamp
We strongly recommend that this machine is connected to the mains supply via a Residual
Current Device (RCD)
If in any doubt, consult a qualified electrician. DO NOT attempt any repairs yourself.
6
Parts & Service: 020 8988 7400 / E-mail: [email protected] or [email protected]
ASSEMBLY
WARNING: BEFORE USING YOUR TILE CUTTER BE SURE TO READ THE
INSTRUCTION MANUAL CAREFULLY.
FITTING THE BLADE GUARD
1. Loosen the two table securing
knobs (Front and rear of the unit).
2. Tilt the table.
3. Slide the blade guard into position
as shown and secure using the
blade guard locking screws.
• The guard is held in position
between the frame and a small
bracket beneath.
FITTING THE BLADE
1. Remove the disc cover by
loosening the two screws shown.
2. Loosen and remove the disc fixing
nut. Using the two spanners
supplied.
3. Remove the outer flange.
4. Mount the disc on the arbor and
replace the outer flange. Turn the
disc 360 degrees to make sure it matches with the flange properly.
• The direction arrow on the disc should point in the same direction as the
marking on the side of the disc guard.
5. Fully tighten the disc fixing nut and replace the disc cover.
7
Parts & Service: 020 8988 7400 / E-mail: [email protected] or [email protected]
OPERATION
WARNING: BEFORE USING YOUR TILE CUTTER BE SURE TO READ THE
INSTRUCTION MANUAL CAREFULLY.
THE WATER
Position the tray as shown and fill 3/4
full with water.
• Do not add chemicals or
detergents to the water.
• Always maintain this level (3/4
full) to ensure that there is
sufficient water in the tray for
dust suppression and cooling.
FITTING THE PARALLEL GUIDE
1. Position the parallel guide on the
work table as shown.
2. Align the hole in the fixing plate
with the hole in the end of the
parallel guide.
• The fixing plate should be fitted
on the inside surface of the
work table edges.
3. Attach it with the washer and
securing knob provided, repeat on the other end of the parallel guide.
ADJUSTING THE PARALLEL GUIDE
1. Loosen the two securing knobs
provided.
2. Adjust the parallel guide to the
desired position using the scales
on the table.
3. Re-tighten the two securing knobs.
8
Parts & Service: 020 8988 7400 / E-mail: [email protected] or [email protected]
STARTING AND STOPPING
Press the ON Button (marked “I“) to
start the tile cutter.
• Allow the tile cutter to reach full
speed before cutting any tiles.
Press the OFF Button (marked “O“) to
stop the tile cutter.
NOTE: The disc will continue to
rotate for some time after
switching off.
MAKING A STRAIGHT CUT
Position the tile firmly against the
parallel guide and push the tile slowly
past the disc.
• Do not try to force the tile past
the disc too quickly.
MAKING A MITRE CUT
Follow the same procedure as for a
straight cut but use the mitre guide in
conjunction with the parallel guide.
• The mitre guide simply runs up
against the edge of the parallel
guide as shown.
• Ensure that the tile is held firmly
into the guide before making
the cut.
CUTTING WITH THE TABLE AT AN ANGLE
Use this facility if you wish to cut at an
angle.
1. Loosen the two table securing
knobs (one at each side of table).
2. Tilt the table to the desired angle
using the scale under the table.
3. Re-secure the table and make the
cut as before.
9
Parts & Service: 020 8988 7400 / E-mail: [email protected] or [email protected]
CLEANING AND MAINTENANCE
WARNING: BEFORE STARTING ANY CLEANING OR MAINTENANCE
PROCEDURES, DISCONNECT THE PLUG FROM MAINS SUPPLY.
CHANGING THE CUTTING DISC
• Replacement discs are available from your Clarke dealer.
• Only use discs with a diameter of 180 mm.
• The replacement discs speed rating must meet or exceed the RPM
rating of the tile cutter.
1. Remove the water tray.
2. Remove the disc cover by
loosening the two screws shown.
3. Loosen and remove the disc fixing
nut. Using the two spanners
supplied.
4. Remove the outer flange and the
disc, clean any dust and debris
from the arbor and disc securing
flange.
5. Mount the disc on the arbor and
replace the outer flange. Turn the
disc 360 degrees to make sure it
matches with the flange properly.
• The direction arrow on the disc should point in the same direction as the
marking on the side of the disc guard.
6. Fully tighten the disc fixing nut.
10
Parts & Service: 020 8988 7400 / E-mail: [email protected] or [email protected]
DECLARATION OF CONFORMITY
11
Parts & Service: 020 8988 7400 / E-mail: [email protected] or [email protected]