1
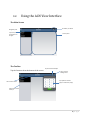
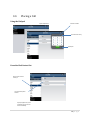
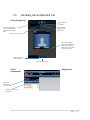
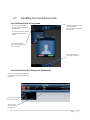
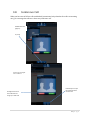
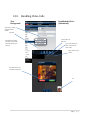
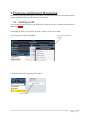
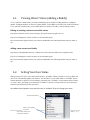
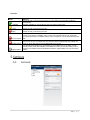
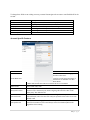
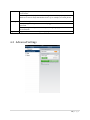
ACN View iPad Edition End User Manual 1|Page Contents 1. About ACN View iPad Edition ................................................................................................................................... 3 2. Configuring ACN View.................................................................................................................................................. 4 2.1 Getting Ready ................................................................................................................................................................ 4 2.2 Working with contacts ............................................................................................................................................ 5 3. Logging into ACN View ................................................................................................................................................ 6 4. Making Phone Calls ....................................................................................................................................................... 7 4.1. Starting and Quitting ACN View ..................................................................................................................... 7 4.2. Using the ACN View Interface ......................................................................................................................... 8 4.3. Placing a Call......................................................................................................................................................... 10 4.4. Handling Incoming Calls ............................................................................................................................... 11 4.5. Handling One Established Call ...................................................................................................................... 13 4.6. Placing a second ACN View Call.................................................................................................................... 14 4.7. Handling Two Established Calls ................................................................................................................... 16 4.8. Conference Call.................................................................................................................................................... 17 4.9. Call History............................................................................................................................................................ 18 4.10. 5. Handling Video Calls .................................................................................................................................... 19 Presence and Instant Messaging ........................................................................................................................... 21 5.1. Viewing Others’ Status (Adding a Buddy)..................................................................................................... 23 5.2. Setting Your Own Status....................................................................................................................................... 23 6. Settings ............................................................................................................................................................................. 24 6.1. Account ................................................................................................................................................................... 24 6.2 Preferences ........................................................................................................................................................... 26 6.3 Advanced Settings .............................................................................................................................................. 28 6.4 Help .......................................................................................................................................................................... 29 .................................................................................................................................................................................................. 29 7. 8. Support & Troubleshooting ..................................................................................................................................... 31 7.1. Using ACN View Diagnostics .......................................................................................................................... 31 7.2. More Information ............................................................................................................................................... 31 Glossary............................................................................................................................................................................ 32 2|Page About ACN View iPad Edition ACN View iPadEdition is a VoIP-based phone for the Apple iPad™ mobile digital device, and iPod touch™ mobile digital device. With ACN View iPad Edition (ACN View), you can use the Wi-Fi and mobile data connections on your iPad to make and receive calls. Standard Telephone Features ACN View iPhone Edition has all the standard telephone features, including: Call display Speakerphone, Mute, and Hold. Call history – list of received, missed, and dialed calls. Three-way audio conference. Support for DTMF: the ability to enter numbers to use with an auto attendant. Advanced Features Video calls. Instant Messaging and Presence Call quality statistics. Application diagnostics (logging and log files uploading). Accessories The following accessories are supported: Headset with microphone (including Bluetooth™): ACN View iPad Edition uses the ear-piece and microphone on the headset Headphones (no microphone): ACN View iPad Edition uses the ear-piece on the headphone and the built-in microphone on the device. 3|Page 1. Configuring ACN View 2.1 Getting Ready 1. Once you have installed the ACN View iPad Edition, make sure you have set up Wi-Fi and mobile data correctly on your device: Set up Wi-Fi: from the main iPhone screen, tap Settings > Wi-Fi. Turn on the Wi-Fi field. The panel will be populated with access points. Tap to choose an access point and wait for the item to show a checkmark (indicating that you are connected). Set up mobile data (if applicable): from the main iPhone screen, tap Settings > General > Network \ Cellular, and turn on the Cellular Data field. 2. Set up notifications in order to receive notification when ACN View is in the background: from the main iPad screen, tap Settings > Notifications. Tap ACN View and set up the following: Notification center (if desired): On to display ACN View notifications in the iPad's notification center. Alert Style: Choose how you want to be notified of incoming calls and messages when ACN View is in the background. None to receive no notification. Badge App Icon: On to display a number of notifications on the ACN View icon. Sounds: On to enable the sound preferences you choose on ACN View. Off to disable any sound for notifications while ACN View is in the background. View in Lock Screen: On to receive notifications when the iPad is locked. 3. Obtain the following information from your ACN View account: Your 8 digit User ID 4 digit password. 4. Tap the ACN View icon on the iPad. 5. If prompted, give ACN View a permission to access your Contacts on the iPhone. Without the permission, the ACN View’s Contacts tab will be empty. 4|Page 2.2 Working with contacts ACN View uses contacts saved on your device. ACN View’s contacts are continually synchronized with your native contacts; adding, modifying or deleting a contact from one list update the other list. On iOS, you can set up multiple sources for contacts (for example, iCloud, Gmail, Exchange, Facebook) and merge all into the native contact app. If you do this, you can access all contacts on ACN View as well. Updating Unified Contacts When multiple entries are merged into one entry on iOS, modifying a contact within ACN View updates all the contact sources. For example, if you have set up the contacts from iCloud, Gmail, and Exchange and link three entries as one entry on iOS, you will see one single contact on ACN View, with unified information from three sources. Editing this contact on ACN View updates all three sources of iCloud, Gmail, and Exchange. If you want to update only one source (such as iCloud), use the native Contacts app. 5|Page 2. Logging into ACN View To use ACN View as a phone, you need to enter your 8 digit User ID provided in the ACN View welcome email and 4 digit number you have selected upon registration. Enter your 8 digit User ID. Enter your 4 digit password. Tap to receive account information. Tap to enable to keep your password. Tap Login to enter the ACN View application. 6|Page 3. Making Phone Calls 3.1. Starting and Quitting ACN View Start ACN View. After a few seconds, the message “Phone Ready” appears. ACN View is ready. “No Service“ means that the device does not have Wi-FI or mobile data network, or that ACN View is not allowed to use data for VoIP. Go to Settings > Preferences to allow ACN View to use data. “No Registration“ means that the ACN View is not registered/enabled. Go to Settings > Accounts and enable the account This status appears when your Logout internet connection is not In order to logout from the ACN View Go to Settings > Preferences.available. Scroll down the bottom Seetosection 2.1. of the page and choose ‘Logout’. Quitting Double-tap the Home button on the iPhone. The list of active applications appears. Long-tap the ACN View icon until the red icon appears. Tap the red icon to close the application. 7|Page 3.2. Using the ACN View Interface The Main Screen The toolbar; see below Navigation panel. Tap an item; the module opens on the right Content panel The Toolbar Tap the Contacts tab at the bottom of the screen. The connection status Tap to show to the dialpad Tap to go to the Settings screen Tap anywhere outside a popup to remove the popup Search for the contact and tap it 8|Page The Settings Screen Close Settings and return to the main screen Tap an item. The screen opens on the right 9|Page 3.3. Placing a Call Using the Dialpad Tap the dialpad icon Enter the number Cleat the entire entry Backspace From the iPad Contact list Search for the contact and tap it Tap the desired phone number A prompt appears for you to confirm the call. Or the call starts immediately. 10 | P a g e The “network quality issues” Message This message appears if there is network congestion or a poor quality Wi-Fi signal. Try moving closer to your Wi-Fi access point. 3.4. Handling Incoming Calls When ACN View in the Foreground The caller’s phone number Your phone number and account name Tap Decline or Answer 11 | P a g e When ACN View is in the Background Tap to answer Or tap Close to decline the call The call may start immediately or you may need to tap Answer. You can change this behavior; see “Alert Answer” on page 28 12 | P a g e 3.5. Handling One Established Call Call in Foreground Start a video call if relevant To access the Navigation panel or Toolbar, tap here. The call is minimized; see below. Mute or unmute the call Enable or disable speakerphone for the active call Tap to show a keypad in order to enter numbers, for example, when choosing menu items such as “enter 1 for customer support” Hold or release hold on the active call Place a second phone call Call in (minimized) Background You can still work with the call in this mode Tap here to return the call to foreground 13 | P a g e 3.6. Placing a second ACN View Call Only when you are already on one ACN View incoming1 call, you can place a second ACN View call using the dial pad, from your Contact list, or from the History. Place the current call on hold, if desired Then tap Add Call Or tap here to go back to the first call Dial the number of the second person then tap Call, or choose one from your contacts/History 1 Adding a second call is supported only when the existing call is an incoming one (when someone else called you). A second call while on an outgoing call is not supported. 14 | P a g e When the call connects, the first call is put on hold and moves to the back. You are now speaking to the second person. To switch to the other call, tap that call popup; the popups switch positions. 15 | P a g e 3.7. Handling Two Established Calls Two Established Calls in Foreground Mute and speaker apply to both calls. Record applies only to the call that is in the front (the active call). The call in the back is always on hold. The call in the front may be on hold or active. To switch to the other call, tap that call popup; the popups switch positions. Or to access the Navigation panel or Toolbar, tap here. The calls are minimized. These controls apply to the call that is in the front. Two Established Calls in Background (Minimized) You can access the Navigation panel modules or the Settings module without putting your call on hold In this example one call is live You can still work with the calls in this mode Tap either call to return both calls to the foreground. 16 | P a g e 3.8. Conference Call When you have two ACN View calls established (as mentioned, only when the first call is an incoming one), you can merge the calls into a three-way conference call. Establish two calls (page 17) Tap merge The two calls are merged into a conference Clicking End Call ends the conference and hangs up on both calls If desired you can split the conference back into two calls 17 | P a g e 3.9. Call History Tap the History icon at the bottom of the screen. Tap to filter as desired If desired, tap to filter the calls to delete. For example, to clear only incoming calls, tap In Then tap Clear 18 | P a g e 3.10. Handling Video Calls Two Background Established Calls in (Minimized) Tap Contacts, and tap the desired phone number Tap Video ACN View starts sending your video as soon as the other party accepts your video call. Tap to switch to an audio call. Tap to stop sending your video. You will still see other’s video Tap to switch to a rear camera. Pinch open (zoom in) to show video in full screen. You 19 | P a g e Adding Video during an Audio Call When you place a call using Dialpad, ACN View makes an audio call. You can add video to the audio call by tapping the Video icon or the Send icon at the top. Receiving a Video Call When the other party places a video call, you will see their video on ACn View after you answer the call. You can start sending your video if desired by tapping the Send icon. If you do not want to receive the other party’s video during a call, tap the Video icon at the top. The call will be switched to an audio call. 20 | P a g e 4. Presence and Instant Messaging With Presence and Instant Messaging, you can share your online status (presence) and exchange instant messages with the contacts who have an ACN View account. 5.1 Sending an IM You can send an instant message to your buddy who is online. If you have no buddies, add someone as a buddy first (page 31). Tap Messaging Tap a conversation, or tap the compose icon to select a buddy Type a message Tap the Send button Tap to choose a predefined messages. You can also start an IM session from the Contacts Tap to send an IM 21 | P a g e 5.2 Receiving an IM A pop-up comes up when you receive an IM or SMS. Tap the pop-up to start chatting. When ACN View is in the background, a notification will pop-up Tap ‘View’ to see the message To hide the actual message on alert/banner, turn on “Private When Locked“ under Preferences. 22 | P a g e 4.1. Viewing Others’ Status (Adding a Buddy) To view someone’s online status, you need to add this person as a buddy. A buddy must have a softphone number. Softphone numbers are the user’s phone number. Your buddies are stored in your local iPad contacts. To see someone’s online status, you can either add a new contact as a buddy, or edit an existing contact. Editing an existing contact to see online status Tap Contacts Search for the contact and tap it Tap edit at the top right corner Tap ‘im uri’ Change the value from ‘None’ to the selectable option The contact will then appear both in your Contacts and Buddies lists, indicating whether they are online or not. Adding a new contact as a Buddy Tap Contacts Tap Buddies then tap + Enter the contact’s phone number at the ‘Softphone’ field Tap ‘im uri’ Change the value from ‘None’ to the selectable option The contact will then appear both in your Contacts and Buddies lists, indicating whether they are online or not. 4.2. Setting Your Own Status When you start ACN View, your online status becomes “Available”. When you make or receive a phone call, ACN View automatically updates your status to “On The Phone” if your online status is “Available” and no custom status note is specified. You can change your status from “Available” to other statuses such as “Busy” or “Away”. Once you change your status from “Available” or specify a custom status note, your status will remain as specified until you switch yourself. Your default status (appears at the top left corner) is ‘Available’ Tap it to change your status Tap your desired status Write a note to publish if you want Your contacts will see your status and custom note. 23 | P a g e Presence Status Available Meaning People can call you and send you an IM. If no custom status note is specified, ACN View automatically switches “Available” to “On The Phone” when you make or receive calls. Away People can call you and send you an IM. Busy People can call you and send you an IM. On The Phone When you make or receive phone calls, ACN View automatically updates your status to “On The Phone” if your status is “Available“ and no custom note is specified. When your call finishes, your status goes back to “Available“. While you are on the phone, you can still send and receive IMs. Do Not Disturb No one can call you; the call fails and your call history shows a missed call. Your buddies can send you IM; an alert comes up on the IM tab without any sound. Appear Offline You are able to see presence of your buddies, but your buddies see you as offline. You will actually receive phone calls and IMs if your buddies do contact you; they are unlikely to do so because your buddies cannot tell the difference between “Appear Offline“ and you really being offline. 5. Settings 5.1. Account Middle of the screen 24 | P a g e To change these fields on an existing account, you must first unregister the account or turn Enabled off for the account. Field Description Account Name Enabled Display as Username Password Account Specific Features Change the name as desired. For example, “business account” Typically On, in order to use the account for calls. Your name. This will be your Caller ID if supported. Your 8 digits ACN View password. Your 4 digits ACN View password. See below. Account Specific Features Field Description Turn this setting on if you do not want to use Mobile data. This setting appears only when “Use When Available” is enabled under Preferences. Disable Mobile Data Enable Video • When ON, no mobile data will be used; therefore you will get no messages or notifications on this ACN View account when Wi-Fi is not available. You also will not be able to place or receive calls without Wi-Fi. • When OFF, mobile data will be used when Wi-Fi is not available. ON to make video calls . Always Offer Video ON to always dial a number with video offer. Whether you use the keypad, the Contacts tab, or the History tab, all the outgoing calls will offer video to the other party. The default is Off. Auto Send Video When On, ACN View automatically starts sending video when you receive video calls. When Off, video does not start until you tap Send on the video screen. The default is Off. Auto Speaker On Usually ON. This setting applies to iPhone only. While headsets/Bluetooth are connected to ACN View, the sound always comes from headsets/Bluetooth regardless of this setting. 25 | P a g e This setting could solve a problem that audio calls are treated as video calls (thus the speaker comes on automatically). Turning this setting off allows you to hear the sound from the earpiece. Enable IM & Presence ON to share your online status with and send instant messages to your buddies. To use this feature. Publish Refresh Interval for publishing your status. Value in seconds. Minimum 30, default 900. Subscribe Refresh Interval for subscribing your buddy’s status. Value in seconds. Minimum 30, default 900. Enable SMS ON to send an SMS to PSTN cell phone numbers. ACN View do not support this feature. 6.2 Preferences Field Use When Available Description Appears only on iPhone. • ON: When a Wi-Fi connection is not available, ACN View uses mobile data for messaging and voice mail notifications. You will also have a choice to allow VoIP calls or not (See below) • OFF: When a Wi-Fi connection is not available, SIP and XMPP services will be unregistered; you will get no messages or notification. Allow VoIP Calls is OFF; you will not be able to place or receive calls either. Allow VoIP • ON: If using UDP for transport. 26 | P a g e Calls Run In Background Custom Colors • OFF: If using TCP or TLS for transport. This setting lets you receive calls when ACN View is running in background and your transport is UDP. Turning this setting on decreases battery life. But if it is turned off, you will not be able to receive calls if you are using UDP. If you are using TCP or TLS, there is no need to turn this setting on. • ON: If using UDP for transport (page 41). • OFF: If using TCP or TLS for transport. This setting lets you receive calls when ACN View is running in background and your transport is UDP. Turning this setting on decreases battery life. But if it is turned off, you will not be able to receive calls if you are using UDP. If you are using TCP or TLS, there is no need to turn this setting on. You can change the color of various parts of the screen. This setting includes a Reset button, so you can easily return to the defaults. Play Ringtone Vibrate ON to hear the ringtone. Alert Answer Controls the behavior of the incoming VoIP call prompt (when ACN View is in the Vibrate ON to vibrate when you receive a call. background): • ON: You can immediately answer the incoming call. • OFF: You can view the incoming call screen, and then choose either answer or decline the call. Alert Missed Ringtone Background Image Controls the behavior of the missed call prompt (when you receive a call when ACN View is in the background): • ON: A Missed Call alert appears on the native iPhone screen. • OFF: No alert appears. The ringtone for incoming calls. The background image that appears when you are on a call. Swipe the image to delete. Show URI Domain ON: The phone number displayed for an incoming, outgoing or established call will include the domain name (for example, [email protected]). Forward Calls OFF (default): The domain name is not included in the display. ON to send all incoming calls to a specific number. So long as ACN View is enabled and registered and Run In Background (above) is ON, incoming calls will be forwarded to this phone number. Send Landscape When ON, your video will be forcibly sent in the landscape orientation. This is a compatibility mode for older devices that cannot render video in the portrait orientation. Use as an exception. The default is "Off". Video Quality • Automatic: Recommended. Let ACN View select the best quality to use in a given situation. • Lower (QCIF): Quarter Common Intermediate Format uses 176 horizontal pixels and 144 vertical lines. QCIF transfers one fourth the amount of data; therefore it consumes less memory than CIF. 27 | P a g e • Higher (CIF): Common Intermediate Format uses 352 horizontal pixels and 288 vertical lines. • Extra High Decode (CIF): Choose this setting when the other party requires a different version of CIF (H.264 Baseline level 1.3), for example, Cisco hard phones. Auto Login Controls the Login behavior: ON: Upon App launch, you are automatically logged in with latest username and password. OFF: Upon App launch, you are asked to pass through login page and confirm account details. Logout Log out of current account and go to Login page. 6.3 Advanced Settings 28 | P a g e Field Description Verify TLS Cert Applies only if you use TLS as the transport. • On (default): ACN View attempts to verify the certificate, sent by the SIP server, to see if it is trusted. For the certificate to be trusted, a corresponding CA certificate, provided by your VoIP provider, must be installed on your device (using the iPhone Configuration Utility for example). • Off: ACN View accepts the certificate without attempting to verify it. Verbose Logging Leave this setting OFF unless customer support instructs you to turn it ON in order to troubleshoot a problem you are having on your device. Send Log Tap to upload the current log to customer support. Call Statistics To show detailed information about the current/last call. For example, the number of packets lost. For an ongoing call, the statistics information refreshes every second. Tapping the Refresh button stops auto refresh and presents you with a snapshot of the most current statistics. To enable auto refresh again, either long-tap the Refresh button, or leave the statistics page and come back again. 6.4 Help Use for Frequently Asked Questions information directly from the application. 29 | P a g e 6.5 About View ACN View installed application version information. 30 | P a g e 6. Support & Troubleshooting 6.1. Using ACN View Diagnostics If you have a problem with ACN View, customer support may ask you to turn on diagnostics to capture information. 1. Go to Settings > Advanced Settings. If Verbose Logging is OFF, turn it to ON and tap Apply Changes. 2. Reproduce the problem. When done, go to Settings > Advanced Settings again. Tap Send Log. A prompt Appears. 3. The description of the problem could include the following: • What you were doing when the problem occurred. • Your Apple device and model. • Any recent changes you have made to your setup of ACN View. • Whether you are in your “home” Wi-Fi zone (your normal Wi-Fi zone) or a different Wi-Fi zone. • Whether you normally have 3G/4G enabled on your device and in ACN View. 4. When done, turn off Verbose Logging. Tap Apply Changes. 6.2. More Information You can view Frequently Asked Questions at www.acnview.com 31 | P a g e 7. Glossary ACN View call DTMF Home button IP address IVR Media Native call Native phone service PSTN Signaling SIP SIP account softphone address Wi-Fi call 3G/4G call A call made using the ACN View screen. Compare to “native call”. Dual-tone multi frequency. DTMF is the system that is used in interactive voice response menu systems such as the menu system for accessing voicemail messages. The DTMF system allows the user to interact with the menu by pressing keys on a dialpad or keyboard. The button at the bottom of the iPhone or iPod touch. A unique number that identifies a device. Devices on a network use the IP address to communicate with each other. Interactive Voice Response. IVRs use DTMF. The audio portion (and the video portion if any) of a call. Compare to “Signaling”. A call made using the phone service that comes with the iPhone. Does not apply to the iPod touch. The phone service that comes with the iPhone. Public Switch Telephone Network. The traditional land-line phone network. The information in a call that deals with establishing and controlling the connection, and managing the network. The non-signaling portion of the call is the Media. Session Initiation Protocol. The signaling protocol followed by ACN View for handling phone calls. An account that provides the user the ability to make VoIP phone calls. The account encapsulates the rules and functions the user can access. The address used to connect to a SIP endpoint. In other words, the “phone number” used in a VoIP phone call. For example: sip:[email protected]. For ACN View the registered mobile phone number for the user should include country code + area code + number. An ACN View call made over the Wi-Fi internet. To make a Wi-Fi call, you must be in a WiFi zone. An ACN View call that uses the mobile data network rather than the Wi-Fi network. If you start (or receive) a call with an iPhone when you are not in a Wi-Fi zone, the call will be a 3G/4G 32 | P a g e call. Not all supported devices support 3G; 33 | P a g e