1
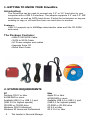
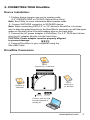
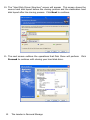
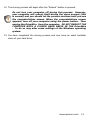
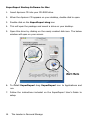
DriveWire
USB 2.0 to SATA/IDE CABLE
User Guide
Attention:
New security features and
partition types require
specific instructions that are
not included in this manual.
Please review the most
current DriveWire FAQ’s at:
apricorn.com/support.php
T he L eader
in
P ersonal S torage
Copyright © Apricorn, Inc. 2007. All rights reserved.
Windows is a registered trademark of Microsoft Corporation.
All other trademarks and copyrights referred to are the property of their
respective owners.
Distribution of substantively modified versions of this document is prohibited
without the explicit permission of the copyright holder.
Distribution of the work or derivative work in any standard (paper) book form
for commercial purposes is prohibited unless prior permission is obtained
from the copyright holder.
DOCUMENTATION IS PROVIDED AS IS AND ALL EXPRESS OR IMPLIED
CONDITIONS, REPRESENTATIONS AND WARRANTIES, INCLUDING ANY
IMPLIED WARRANTY OF MERCHANTABILITY, FITNESS FOR A PARTICULAR
PURPOSE OR NON-INFRINGEMENT, ARE DISCLAIMED, EXCEPT TO THE
EXTENT THAT SUCH DISCLAIMERS ARE HELD TO BE LEGALLY INVALID.
The Leader in Personal Storage
TABLE OF CONTENTS
1. Getting
to know your
DriveWire ................................. 4
Introduction ............................................................. 4
Features .............................................. 4
Package Contents ................................................... 4
2. System Requirements ................................................... 4
3. Connecting
your
DriveWire ....................................... 5
DriveWire Connectors .............................................. 5
4. Software .................................................................. 6
Before
Upgrade Suite (CD-ROM boot) ..................................... 7
your
Installation
Cloning
Backup! .................................................... 6
of EZ
your
Gig II for Windows ......................... 8
Hard Drive
with
Disk Clone ....................... 9
SuperDuper Backup Software For Mac ........................ 14
5. Contacting Technical Support ....................................... 15
6. RMA Policy .............................................................. 15
7. Warranty Conditions .................................................. 16
8. FAQs ....................................................................... 17
www.apricorn.com
1. GETTING TO KNOW YOUR DriveWire
Introduction:
The DriveWire can be used to connect any 2.5” or 3.5” hard drive to your
computer with a USB 2.0 interface. The adapter supports 2.5” and 3.5” IDE
hard drives, as well as SATA hard drives. Perfect for technicians or anyone
needing to copy or off-load files from one hard drive to another.
Features:
USB 2.0 supports up to 480Mbps data transfer rates and 52x CD-ROM
data read.
The Package Contains:
•USB to SATA/IDE Cable
• SATA to SATA Cable
•AC Power adapter and cables
•Upgrade Suite CD
•Quick Start Guide
2. SYSTEM REQUIREMENTS
PC
Pentium CPU II or later
64 MB RAM or more
Available USB 2.0 or USB 1.1 port
(USB 2.0 for highest speeds)
CD ROM or CD-RW drive
Windows 2000 Professional
Windows XP Home and Professional
The Leader in Personal Storage
Mac
Apple G3 or later
64 MB RAM or more
Available USB 2.0 or USB 1.1 port
(USB 2.0 for highest speeds)
CD ROM or CD-RW drive
OS 9.2 or later
OS X 10.2 or later
3. CONNECTING YOUR DriveWire
Device Installation:
1. Confirm device jumpers are set to master mode.
(3.5” IDE/PATA HDD or CD/DVD Optical Drive Only)
Note: See FAQs for more information about master mode
2. Connect SATA/IDE connector to SATA/IDE device.
Note: When connecting PATA 2.5” or 3.5” drives to DriveWire, it is necessary to align the polarizing pins in the DriveWire’s connector up with the open
space on the hard drive to avoid breaking pins on the hard drive.
3. Connect the AC power adapter to DriveWire. For 3.5” PATA hard drives,
plug the AC adapter directly into the hard drive.
CAUTION: Power adapter must be properly alligned to prevent damage.
4. Connect DriveWire to your computer using the
Mini USB Cable
DriveWire Connectors
40-pin
Connects to 3.5” IDE HDD
44-pin
Connects to
2.5” IDE HDD
Connects to
SATA HDD
Mini USB
Connector
AC Adapter
Connector
Connects with any USB
enabled notebook or
desktop PC
www.apricorn.com
4. SOFTWARE
After many years of use, hard drives can become cluttered with unusable file fragments and other file-system errors. Most file system errors are not immediately
obvious to the user, but can be identified and repaired with a few simple steps.
Although the steps below are not absolutely necessary to run EZ Gig, it’s best to
try and clean-up disk errors BEFORE they are copied over to the new drive.
Before running EZ Gig II we recommend you:
1) Clean up any file-system errors by running Windows ScanDisk (or
a similar disk cleanup utility) on your internal hard drive.
2) Defragment your hard drive using the Windows Disk-Defragment
Utility (or a similar disk defragment utility) on your internal hard
drive.
3) Backup any critical files or data.
4) Attach the AC adapter to your laptop, and make sure it is not running on battery power.
5) Attach the USB cable from your computer to the DriveWire.
6) If you plan on running EZ Gig II from the Bootable CD-ROM: You
may need to change your laptop’s BIOS boot order. You will find
these options inside the laptop’s BIOS Boot Option Menu. The BIOS
Boot Options menu allows the user to select the preferred boot
device when the laptop starts up. EZ Gig II can boot directly from
the CD-ROM but you must check the BIOS Boot settings to make
sure that “CD-ROM” is higher in the boot order than the C: drive.
The Leader in Personal Storage
UPGRADE SUITE (CD-ROM boot)
Upgrade Suite CD is a bootable disk with EZ Gig II data transfer utility that can
copy hard drives without booting to the Windows operating system. To use
Upgrade Suite as a stand-alone utility, your Computer must be able to boot
from a CD-ROM, and the CD-ROM must be set as the first boot device in your
computer’s System BIOS.
NOTE: The System BIOS controls basic hardware functions in computer, and
is the first screen that appears when booting your computer (i.e. before the
Windows Startup Logo appears on screen). Consult your Computer’s User Manual
for instructions on how to enter the System BIOS and change the boot order.
To start EZ Gig II directly from the CD-ROM
1) Insert the Upgrade Suite CD into your CD-ROM Drive.
2) Turn on the Computer and go immediately into the system BIOS
screen.
3) Set the CD-ROM as the First Boot device. Save your changes and
Exit the BIOS to reboot the computer.
Helpful tip:
♦ Some newer computers display a “Boot Options” message during
startup. Pressing the boot options key allows the user to temporarily
change the boot-order of the system. Use this option to boot from the
CD-ROM without changing the BIOS settings. The actual keys to activate
this option will depend upon the manufacturer (some BIOS use the <F12>
key, others use the <ESC> key), and the boot option is only available for
a few seconds at startup before the BIOS falls back into the normal boot
order.
4) Once the BIOS is set correctly, the CD-ROM should boot-up the computer and start the EZ Gig II software.
www.apricorn.com
Installation of EZ Gig II for Windows
1. Insert Upgrade Suite CD into your CD-ROM drive.
2. Setup screen will pop up. Click Install EZ GIG II button.
3. EZ Gig II installation screen will pop up.
4. Follow instructions for installation.
The Leader in Personal Storage
Read all instructions carefully before cloning. This is only
a quick overview of how to use Disk Clone. For detailed
instructions, read Chapter 7. “Transferring the system to
a new disk” located in the EZ Gig II manual located on the
Upgrade Suite CD
Cloning your hard drive with Disk Clone
EZ Gig II allows you to clone your hard drive from inside the Windows
operating system or by booting directly to the Upgrade Suite CD provided in
the kit. All of the procedures are identical and you will skip step number 2.
If your system is running normally we recommend that you clone your hard
drive by starting up the program inside the windows operating system.
1. Ensure your DriveWire is connected to your computer.
2. To start EZ Gig II, click Start > Programs > Apricorn > EZ Gig II and
click on Apricorn EZ Gig II. This will open the main screen of EZ Gig II.
You can also click on the Apricorn EZ Gig II icon on the Desktop.
3. Under New Disk Deployment on the main screen double click on the “Disk
Clone” icon to open Disk Clone Wizard.
4. When you see the “Welcome to the Disk Clone Wizard!” screen. Click
Next to continue.
www.apricorn.com
5. The “Upgrade Mode” screen will appear. Select “Automatic Upgrade” and
click Next to continue.
6. If the hard disk drive to receive the cloned data is new or blank, proceed
to step 10. If the hard disk drive to receive the cloned data either contains
data or is formatted, proceed to step 7.
7. The “Source Hard Disk” screen will appear. Select the appropriate source
hard disk. The source hard disk is typically the old hard disk. Click Next to
continue.
10
The Leader in Personal Storage
8. The “Destination Hard Disk” screen will appear. Select the appropriate
destination hard disk. The destination hard disk is typically your new hard
disk drive. Click Next to Continue.
9. The “Nonempty Destination Hard Disk” screen will appear when you have
selected to transfer data to a drive that already contains data. If you need
to confirm that you have selected the proper source and destination
drives, click the Back button to check. If you have chosen the proper
source and destination drives, then select the “Delete partitions on the
destination hard disk” button. Click Next to continue.
www.apricorn.com
11
10.The “Hard Disk Drives Structure” screen will appear. This screen shows the
source hard disk layout before the cloning process and the destination hard
disk layout after the cloning process. Click Next to continue.
11.The next screen outlines the operations that Disk Clone will perform. Click
Proceed to continue with cloning your hard disk drive.
12
The Leader in Personal Storage
12.The cloning process will begin after the “Reboot” button is pressed.
Do not turn your computer off during this process. However,
your computer will reboot itself during the clone process (this
is normal) and you should let the process continue until you see
the congratulations screen. When the congratulations screen
appears, turn off your computer using the power button. Then
unplug the DriveWire from the computer. DO NOT REBOOT THE
COMPUTER WITH A CLONED HARD DRIVE IN THE DriveWire
. To do so may alter some settings of the Windows operating
system.
13.You have completed the cloning process and now have an exact bootable
clone of your hard drive.
www.apricorn.com
13
SuperDuper! Backup Software for Mac
1. Insert Apricorn CD into your CD-ROM drive
2. When the Apricorn CD appears on your desktop, double click to open.
3. Double click on the SuperDuper!.dmg icon
4. This will open the package and mount a drive on your desktop.
5. Open this drive by clicking on the newly created disk icon. The below
window will open on your screen.
6. To install SuperDuper! drag SuperDuper! icon to Applications and
run.
7. Follow the instructions included on the SuperDuper! User’s Guide to
setup.
14
The Leader in Personal Storage
5. CONTACTING TECHNICAL SUPPORT
Apricorn provides the following helpful resources for you:
1. Hardware Installation Section of the User’s Guide.
2. Apricorn’s Website (http://www.apricorn.com)
This gives you the ability to check for up-to-date information.
3. Email us at [email protected].
4. Or call the Technical Support Department at 1-800-458-5448.
Apricorn’s Technical Support Specialists are available from 8:00 a.m.
to 5:00 p.m., Pacific Time from Monday through Friday.
6. RMA POLICY
An RMA (Return Merchandise Authorization) tracking number must be issued
by Apricorn. If you need to return or replace your DriveWire Apricorn requires
that you perform the following steps:
1. Simply call Apricorn’s technical support department with your DriveWire
part number and a description of the problem(s) you are experiencing.
2. If the Apricorn representative finds cause for a return, they will issue an
RMA number. Please write this number down.
3. Fill out an RMA authorization form with your package. The RMA form is
available on-line at http://www.apricorn.com/support/rma.php.
4. Please send the prepaid package to the following address, make sure the
RMA# is written on the exterior of the package:
Apricorn
RMA#: __________
12191 Kirkham Road
Poway, CA 92064
The purchaser shall be responsible for any loss or damage to the returned
product until it is received by Apricorn. Purchaser should consider obtaining
insurance with respect to shipping the product.
www.apricorn.com
15
7. WARRANTY INFORMATION
One-Year Warranty:
Apricorn will warrant the DriveWire against defects in materials and workmanship
under normal use for one year. The warranty period is effective from the date
of purchase either directly from Apricorn or an authorized reseller.
Disclaimer and Terms of the Warranties:
THE WARRANTY BECOMES EFFECTIVE ON THE DATE OF PURCHASE AND
MUST BE VERIFIED WITH YOUR SALES RECEIPT OR INVOICE DISPLAYING THE
DATE OF PRODUCT PURCHASE.
APRICORN WILL, AT NO ADDITIONAL CHARGE, REPAIR OR REPLACE
DEFECTIVE PARTS WITH NEW PARTS OR SERVICEABLE USED PARTS THAT
ARE EQUIVALENT TO NEW IN PERFORMANCE. ALL EXCHANGED PARTS AND
PRODUCTS REPLACED UNDER THIS WARRANTY WILL BECOME THE PROPERTY
OF APRICORN.
THIS WARRANTY DOES NOT EXTEND TO ANY PRODUCT NOT PURCHASED
DIRECTLY FROM APRICORN OR AN AUTHORIZED RESELLER OR TO ANY
PRODUCT THAT HAS BEEN DAMAGED OR RENDERED DEFECTIVE: 1. AS
A RESULT OF ACCIDENT, MISUSE, NEGLECT, ABUSE OR FAILURE AND/OR
INABILITY TO FOLLOW THE WRITTEN INSTRUCTIONS PROVIDED IN THIS
INSTRUCTION GUIDE; 2. BY THE USE OF PARTS NOT MANUFACTURED OR SOLD
BY APRICORN; 3. BY MODIFICATION OF THE PRODUCT; OR 4. AS A RESULT OF
SERVICE, ALTERATION OR REPAIR BY ANYONE OTHER THAN APRICORN AND
SHALL BE VOID. THIS WARRANTY DOES NOT COVER NORMAL WEAR AND
TEAR.
NO OTHER WARRANTY, EITHER EXPRESS OR IMPLIED, INCLUDING
ANY WARRANTY OF MERCHANTABILITY AND FITNESS FOR A PARTICULAR
PURPOSE, HAS BEEN OR WILL BE MADE BY OR ON BEHALF OF APRICORN OR BY
OPERATION OF LAW WITH RESPECT TO THE PRODUCT OR ITS INSTALLATION,
USE, OPERATION, REPLACEMENT OR REPAIR.
APRICORN SHALL NOT BE LIABLE BY VIRTUE OF THIS WARRANTY, OR
OTHERWISE, FOR ANY INCIDENTAL, SPECIAL OR CONSEQUENTIAL DAMAGE
INCLUDING ANY LOSS OF DATA RESULTING FROM THE USE OR OPERATION
OF THE PRODUCT, WHETHER OR NOT APRICORN WAS APPRISED OF THE
POSSIBILITY OF SUCH DAMAGES.
IRRESPECTIVE OF ANY STATUTE, PURCHASER RECOGNIZES THAT THE
EXPRESS WARRANTY SET FORTH ABOVE IS THE EXCLUSIVE REMEDY TO WHICH
PURCHASER IS ENTITLED AND WAIVES ALL OTHER REMEDIES, STATUTORY
OR OTHERWISE. REPAIR OR REPLACEMENT SHALL BE PURCHASER’S SOLE
REMEDY UNDER THIS WARRANTY.
16
The Leader in Personal Storage
8. FAQs
1. What is USB 2.0?
USB 2.0 represents the next generation of PC peripherals and connectivity.
USB 2.0 is the first major evolution of the Universal Serial Bus standard, which
was originally designed to bring low cost connections and “plug-and-play”
consumer devices to the PC world. USB 2.0 adds new functionality to your
laptop, by allowing faster connections and greater flexibility without the need
for upgrading your existing USB devices.
2. Why USB 2.0?
Modern PC peripherals can run faster and do more than the original USB
designers ever dreamed. The USB standard was upgraded to keep pace with
the rapid advances in technology, and the explosion of new consumer devices.
USB 2.0 host controllers add the faster speeds and greater flexibility than
these new devices require. USB 2.0 will allow your computer to connect to the
newest USB devices: High-Speed Video and Ethernet, ultra-fast scanners and
disk drives, etc.
3. How much faster is USB 2.0?
USB 1.1 devices can communicate at about 12 Megabits/sec. USB 2.0 devices
can communicate at speeds of up to 480 Megabits/sec.
4. What Windows software is included with my DriveWire?
EZ Gig II for Windows is one of the most powerful yet easy to use backup
utilities available. EZ Gig II is the second generation of the award winning EZ
Gig Data Transfer Utility. It now supports transferring data via USB, PC Card,
or internal IDE Bus. EZ Gig II is comprised of two modules:
Disk Clone is ideal for users who require an exact copy of their hard drive.
A cloned copy of a hard drive can be used for disaster recovery backup, or as
a hard drive upgrade.
Disk Image takes a snapshot of your entire system and compresses it into
a file up to half its original size. This method takes up less space, thus allowing multiple backups to a single drive. The Image option also includes a File
Editor that allows the editing or restoration of individual files or folders and a
password to be assigned to a backup image, providing security for your data.
A detailed description for each image can be entered giving the user total
flexibility to retain backups from multiple dates, or multiple computers.
www.apricorn.com
17
5. What Mac software is included with my DriveWire?
SuperDuper! is the wildly acclaimed program that makes recovery painless,
because it makes creating a fully bootable backup painless. Its incredibly
clear, friendly interface is understandable, easy to use. And it runs beautifully
on both Intel and Power PC Macs! SuperDuper’s interface confirms all your
actions in simple, clear language to ensure that the end result is exactly what
you intended.
6. What is the difference between “cloning” and “imaging”?
Disk Cloning is an exact copy of one drive to another. In doing so, a Clone
can boot and run the operating system. The data is exactly the same on both
drives.
Disk Imaging copies the data on the drive and stores it as a file. This file
can be compressed to a smaller size to take up less space. The Image is not
bootable.
7. Can I make a clone of my drive and put it in a different machine?
A clone is for disaster recovery purposes (i.e. when your drive fails and you
need to get back up and running). No, you should not make a clone of your
drive and put it in another or multiple machines. There are licensing issues for
the software on your machine.
8. Why am I unable to save a file larger than 4GB on to my Hard
drive?
Fat 32 has a file size limitation of 4GB. If you are using Windows 2000 or XP,
you can reformat the drive to NTFS. By reformatting the drive to NTFS, you
eliminate the 4GB limitation, but you will also lose any data stored on the
drive. Either reformat to NTFS before using it for the first time, or backup the
data before reformatting.
9. I am unable to format my 40GB or larger hard drive with FAT 32 in
Windows 2000 or XP?
Windows 2000 and XP limit a FAT32 partition to 32GB. If you choose to format
the drive in a larger partition, you will need to use the NTFS file system.
10. Can I boot Windows to my USB Device?
No. Because of limitations (both hardware and software) Windows is currently
prevented from booting and running off a USB drive.
18
The Leader in Personal Storage
11. What is master mode?
Master mode is a jumper setting that only applies to 3.5” IDE/PATA hard drive
or CD/DVD Optical Drives and determines which hard drive or CD/DVD optical
drive is the main boot device on the primary ATA bus, or if it is to be the master
device on the secondary ATA bus of an enhanced ATA controller.
12. How do I set my hard drive to master mode?
Setting your hard drive to master mode will vary from one hard drive
manufacturer to another. In most cases there will be a diagram on top of your
hard drive that shows the location and proper settings to configure the drive
as the Master. If it is not obvious, please refer to the manufacturers support
website for more information.
www.apricorn.com
19
12191 Kirkham Road
Poway, CA, U.S.A. 92064
1-800-458-5448
www.apricorn.com