1
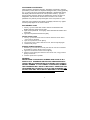
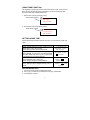
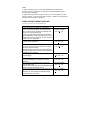
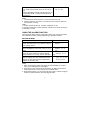
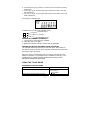
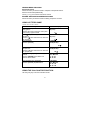
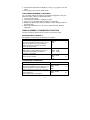
CONTENTS
INTRODUCTION................................................................... 1
GETTING TO KNOW YOUR ORGANIZER.......................... 1
BUTTONS AND KEYS....................................................................................... 1
DISPLAY ............................................................................................................ 2
USING YOUR NEW ORGANIZER FOR THE FIRST TIME.. 3
RESET ................................................................................................................ 3
BEEP SOUND ON/OFF .................................................................................... 4
MENU OPTIONS............................................................................................... 4
SECRET NUMBER FUNCTION (PASSWORD)................... 4
SETTING A PASSWORD................................................................................... 4
ACCESSING LOCKED DATA........................................................................... 5
EDIT SECRET CODE ....................................................................................... 5
DELETE SECRET CODE.................................................................................. 5
BORRAR NUMERO SECRETO
WARNING.......................................................................................................... 5
USING TIME FUNCTION...................................................... 6
SETTING HOME TIME..................................................................................... 6
SETTING WORLD CITY ................................................................................... 6
USING STOPWATCH FUNCTION ....................................... 7
(USANDO LA FUNCION DE CRONOMETRO)
USING COUNT DOWN FUNCTION ..................................... 8
(USANDO LA FUNCION DE CUENTA REGRESIVA)
USING THE ALARM FUNCTION ......................................... 9
SETTING ALARM.............................................................................................. 9
CHANGING ALARM SETTINGS .................................................................... 10
USING THE PHONE DIRECTORY..................................... 10
ENTERING PHONE RECORDS ..................................................................... 10
SEARCHING PHONE RECORDS................................................................... 11
VIEWING PHONE RECORDS........................................................................ 12
EDITING PHONE RECORDS......................................................................... 12
DELETING PHONE RECORDS ..................................................................... 13
USING THE SCHEDULE FUNCTION ................................ 13
ENTERING SCHEDULE RECORDS .............................................................. 13
i
VIEWING SCHEDULE RECORDS................................................................. 14
EDITING AND DELETING SCHEDULE RECORDS .................................... 14
USING THE ANNIVERSARY FUNCTION.......................... 15
ENTERING ANNIVERSARY RECORDS ......................................................... 15
SEARCHING AND VIEWING ANNIVERSARY RECORDS............................ 15
EDITING ANNIVERSARY RECORDS ............................................................ 15
DELETING ANNIVERSARY RECORDS ......................................................... 15
CALENDAR ........................................................................ 15
VIEWING SCHEDULE RECORDS FROM CALENDAR ............................... 16
USING THE TO-DO MODE ................................................ 16
ENTERING TO-DO RECORDS ...................................................................... 16
VIEWING TO DO RECORDS ......................................................................... 17
EDITING AND DELETING TO DO RECORDS............................................. 17
USING THE MEMO FUNCTION......................................... 17
ENTERING MEMO RECORDS....................................................................... 17
VIEWING MEMO RECORDS ......................................................................... 18
EDITING AND DELETING MEMO RECORDS............................................. 18
USING LOTTERY GAME ................................................... 18
(USANDO EL JUEGO DE LOTERIA)
USING THE CALCULATOR FUNCTION ........................... 18
USING THE EXPENSE MANAGER ................................... 19
ENTERING EXPENSE RECORDS.................................................................. 19
VIEWING EXPENSE RECORDS .................................................................... 20
EDITING AND DELETING EXPENSE RECORDS........................................ 20
CREATING EXPENSE REPORTS................................................................... 20
CUSTOMIZING EXPENSE CATEGORIES .................................................... 21
USING CURRENCY CONVERSION FUNCTION............... 21
ENTERING NEW CURRENCY ....................................................................... 21
CONVERTING CURRENCIES........................................................................ 21
EURO CONVERSION ..................................................................................... 22
USING METRIC CONVERSION......................................... 22
DATA COMMUNICATION WITH A PERSONAL
COMPUTER........................................................................ 22
CHANGING BATTERIES ................................................... 23
ii
WARNING........................................................................................................ 23
iii
INTRODUCTION
Thank you for purchasing this Personal Digital Organizer. Please read
this manual carefully to familiarize yourself with the organizer’s many
features, and ensure years of reliable operation.
NOTICE
•
This product was not designed to bend or survive extreme
pressure. Do not carry it in your trouser pockets. When in a bag or
briefcase, make sure that it is stationary and well padded and
protected.
•
To provide a longer product life, make sure the display is covered to
avoid scratching or damage when carrying the product. We strongly
suggest you use the organizer lid cover to protect the LCD display. A
special stylus is provided for LCD data entry. Do not use any sharp
object or fingers to touch the display. Do not apply pressure, harsh
chemicals or water to the display. Always keep the unit in a dry place.
Do not store the product in environments where temperature ranges
can be extreme.
•
We strongly recommend that separate, permanent printed
records be kept of all-important data. Under certain circumstances,
such as exposure to an electrostatic discharge, data may be lost or
altered, or the unit may become inoperative until reset. Therefore we
assume no responsibility for data lost or otherwise rendered
unusable, whether as a result of improper use, repair, battery
replacement, use after the specified battery life has expired or similar
causes.
We assume no responsibility, directly or indirectly, for financial losses
or claims from third persons resulting from the use of this product and
all of its functions, such as stolen credit card numbers, the loss or
alteration of stored data, etc.
•
We assume no responsibility for any damage or loss resulting
from the use of this manual.
•
The information provided in this manual is subject to change without
notice.
GETTING TO KNOW YOUR ORGANIZER
BUTTONS AND KEYS
Located on the front and the side of the unit are the following buttons:
1
• On/Off/Glo - Turns the organizer on/off. Touch and hold for 3 seconds
to turn Glo backlit display on. Glo automatically turns off after about 15
seconds. On/Off/Glo button is located on the front panel of the
organizer.
• Search [∆] and [∇]- Search for records. Search buttons are located
on the left side of the organizer.
• OK - Confirms entries. The OK button is located on the left side of the
organizer.
Located on the lower part of the display are 8 keys. They are from left to
right:
1. 2nd – Toggles between alpha and numeric keyboard layouts.
2. Clock – Press once for home time, twice for world time and three
times for stopwatch, four times for count down, five times for
alarm.(tres veces para el cronómetro, cuatro veces para la cuenta
regresiva, cinco veces para la alarma)
3. Phone Directory – Press to scroll through the following directories:
Personal, Business, Other and All. Directory titled ‘All’ displays all
contacts in the phone directory.
4. Schedule/Anniversary/ Calendar
(Agenda/Aniversario/Calendario)– Press to scroll through schedule,
anniversary and calendar.
5. To Do/Memo/Lottery (Lotería)– Press t scroll through To Do, memo
and lottery game.
6. Calculator/Expense/Conversions – Toggles between the different
functions.
7. PC Sync - Initiates data communications between the organizer and a
personal computer.
8. OK - Confirms entries. Provides same operations as OK button (see
above).
DISPLAY
There are 7 kinds of special icons:
SYMBOL
(((●)))
∧
∨
CAPS
MEANING
Alarm Ring Sign
Schedule Alarm Sign
Anniversary Sign
Alarm Sign
Up Sign
Down Sign
Caps Lock Sign
On the touch screen keyboard you will find the following:
2
• 12/24 – Selects 12/24-hour mode when in Home Time.
• MENU – Access to additional features and setup options.
• [∧], [∨], [<], [>] Directional Arrows – Allows navigation to view or
enter information.
• DST – Selects daylight savings time in the Home Time mode and
World Time mode.
• AM/PM – Selects AM or PM status in setting the Home Time, while
in the 12-hour mode.
• CE – Clears entries in the calculator and conversion modes. Or exit
from input, edit or delete mode. ( O para salir de los modos de escritura,
edición o borrado).
• DM/MD – Toggles between MM/DD/YYYY, DD/MM/YYYY and
YYYY/DD/MM formats.
• Tone (tone icon) – Toggles key tone ON/OFF.
• Password (key icon) - Allows for password entry or editing.
• INS – toggles between insert and non-insert modes.
• M+, M-, MRC - Perform store (+/-) / clear values in Calculator mode.
• Space - Puts a space between characters or words.
• +, -, x, ÷, +/- %, √ - Perform standard calculations in the Calculator
mode.
• CAP. – Toggles between upper and lower case characters.
• SYM - Scrolls through the symbols: .com # / \ $ ( ) _ ; : ’ ?
! % & £ ¥ € ˜ ^ ¡ ¿ ¢ Đ ☺ ð
• Prog - Starts the sequence to store new or changed information.
• EDIT - Edit existing information.
• DEL - Deletes a character and/or record, and clears entries in the
calculator.
USING YOUR NEW ORGANIZER FOR THE FIRST TIME
RESET THE ORGANIZER BEFORE USING IT FOR THE FIRST TIME.
RESET
1. Insert the pointed end of a paper clip into the small round hole located
at the back of the organizer next to the word "RESET". Push gently.
2. "System Reset Clear Data? (Yes No)" is displyed.
3. Select ‘Yes’. This will initialize and activate the organizer. It is
important to set the correct time; this allows the schedule and alarm
features to work properly.
4. If select “No” or no key is touched within 4 seconds, the organizer will
return to Home Time mode and all data won’t be deleted. (Si
selecciona ‘No’ o ninguna tecla es presionada dentro de 4 segundos,
3
la agenda volverá al modo de Hora Local y toda la información no
será borrada)
NOTE: RESET WILL CLEAR THE MEMORY OF ALL DATA AND
SETTINGS.
BEEP SOUND ON/OFF
1. Touch the [clock] key to enter Home Time mode.
2. Touch [Tone] to turn the beep sound off or on.
MENU OPTIONS
Touch [MENU] to access menu options. Touch the digit (1-4) to activate
corresponding function:
1. Contrast – Controls contrast level. To adjust display contrast, briefly
touch Search [∆] or [∇] buttons as needed to set desired contrast
level. Use [OK] to confirm when desired contrast level is reached.
2. Language – Selects prompt language. Default language of the
organizer is English. In order to change prompt language, touch the
number corresponding to your preferred prompt language as follows:
1. English 4. Español
2. Deutsch 5. Português
3. Italiano 6. Français
3. Auto off – Sets auto power shut off time. Auto power off will be
activated after 3 minutes if no key is touched. Touch [on/off] again to
restart the organizer. To adjust Auto Shut Off time touch the number
corresponding to the preferred auto shut off time.
4. Memory – Indicates available memory.
SECRET NUMBER FUNCTION (PASSWORD)
The Secret Function allows you to protect Telephone, Schedule,
Anniversary, Memo, To-Do and Expense records from unauthorized
access and sync ( y sincronización).
SETTING A PASSWORD
1. In home time mode (En modo de Hora Local), touch [³] to enter
Secret Number mode. The display will show "Enter secret code
(número secreto) "
2. Type a 6-digit secret number using the numeric keypad.
3. Touch [OK] to confirm. The next time the organizer is turned on, the
secret number lock will protect all records from unauthorized access
and a key icon will appear on the display.
4
ACCESSING LOCKED DATA
When accessing Telephone Directory, Schedule, Anniversary, Calendar
(Calendario) To-Do, Memo or Expense Manager modes, touching [ENTER]
key, or touching [Sync] key (presionando [ENTER], o presionando [Sync],
the display will show "Enter secret code (número secreto)". Type the
secret number and touch [OK]. If the password is correct, the key icon
disappears, and all function modes can be accessed. The correct
password entry will only be required again on the next power on cycle.
When the wrong password is entered, the display will show "Try again!"
and will prompt again for the secret number.
EDIT SECRET CODE
1. Touch [³] in the home time mode to enter the Password mode.
Display will show "Enter secret code".
2. Input correct password. Touch [OK]. Select ‘Edit Secret Number’ and
touch [OK].
3. Type the new password and touch [OK].
DELETE SECRET CODE
1. Touch [³] in the home time mode to enter the Password mode. "Enter
secret code" is displayed.
2. Input correct password. Touch [Enter]
3. Touch down cursor to select ‘Del secret code’, then touch [Enter] again.
4. “Deleted!” will prompt.
BORRAR NÚMERO SECRETO
1. Presione [³] en modo de hora local para entrar al modo de Contraseña.
En pantalla se muestra “Entrar número secreto”.
2. Ingresar la contraseña correcta. Presione [Enter].
3. Presionar cursor abajo para seleccionar ‘Del secret code’, luego presione
[Enter] nuevamente.
4. “Deleted!” aparecerá en pantalla.
WARNING
WRITE DOWN YOUR SECRET NUMBER AND STORE IT IN A
SAFE PLACE. PASSWORD PROTECTED ORGANIZER DATA
CANNOT BE ACCESSED WITHOUT ENTERING THE CORRECT
SECRET NUMBER. IF YOU FORGET YOUR SECRET NUMBER
THE ORGANIZER WILL HAVE TO BE RESET. RESETTING THE
ORGANIZER WILL ERASE ALL DATA IN THE ORGANIZER. WE
DO NOT HAVE ANY “BACK DOOR” METHODS TO ACCESS
DATA IF A SECRET NUMBER HAS BEEN SET.
5
USING TIME FUNCTION
The organizer's clock keeps track of two time zones: Home Time, which is
set to show local date and time and World Time which shows the date,
time and name of a selected World City.
1. Home Time (Touch [clock] key once).
Home Time Symbol
01/01/2002 MAR
NewYork U.S.A
AM 12:00:00
2. World Time (Touch [clock] key twice).
World Time Symbol
01/01/2002 MAR
NewYork U.S.A
AM 12:00:00
SETTING HOME TIME
Follow these steps to select and set the unit to your Home City, Date and
Time:
Operations
Display
Touch [on/off] button to turn the unit ON or touch
[clock] key if in any other mode.
Touch [Prog] to enter time setting mode.
The AM/PM field is flashing. Touch [∧] or [∨] to
select AM/PM. Touch [<] or [>] to select desired
time field. Enter time or use [∧] or [∨] when field
is highlighted for sequential change.
Use same method as above to set date.
Select desired home country/city.
Touch [OK] or [Prog] to confirm settings.
Touch [12/24] to select the 12 or 24-hour format.
Touch [DST] to select daylight savings time on
or off.
01/01/2002 MAR
New York U.S.A
AM 12:01:00
01/01/2002 TUE
New York U.S.A
PM 12:01:00
26/05/2001 SAT
London U.K.
PM 04:15:00
01/01/2000 SAT
London U.K. DST
17:16:53
SETTING WORLD CITY
1. Touch [clock] key twice for World City mode.
2. Use [∧] or [∨] to select your desired country-city combination.
3. Touch [OK] to confirm.
6
USING STOPWATCH FUNCTION
USANDO LA FUNCION DE CRONOMETRO
Operation
Display
Touch [clock] key three times for Stopwatch mode STOPWATCH
Presione la tecla [clock] tres veces para el modo
Cronómetro
00:00:00’00’’
Touch [Search] key to begin counting up time
STOPWATCH
Presione la tecla [Search] para empezar a
cronometrar el tiempo
00:00:00’61’’
After a while, touch [Search] key to stop. The
STOPWATCH
counted time is kept and the MILLISECOND will
stop running
00:01:04’01’’
Después de un período, presione la tecla
STOP!
[Search] para detenerlo. El tiempo registrado es
mantenido y los MILISEGUNDOS se detendrán
Touch [Enter] key to clear the counting time
STOPWATCH
Presione la tecla [Enter] para borrar el tiempo
registrado.
00:00:00’00’’
Touch [Search] key to begin again.
Presione la tecla [Search] para empezar
nuevamente.
Touch [ENTER] key to pause. The counted time
is kept, but the time will go on counting on the
back.
Presione la tecla [Enter] para pausar. El tiempo
registrado es mantenido, pero el tiempo
continuará corriendo.
After two seconds, Touch [Enter] key to display
the counting time
Después de 2 segundos, presione [Enter] para
mostrar el tiempo en progreso
Touch [CE] key to clear the time counting.
Presione [CE] para borrar el tiempo en progreso.
STOPWATCH
00:01:00’12’’
STOPWATCH
00:01:00’05’’
PAUSE!
STOPWATCH
00:01:02’20”
STOPWATCH
00:00:00’00”
7
Notes:
1. When Stopwatch stops, you can touch [ENTER] key to clear the time
counting. (Cuando el cronómetro se detenga, puede presionar [Enter] para
borrar el tiempo registrado).
2. Whether the stopwatch is running or stops, you can touch [CE] key to clear
the time counting. ( Si el cronómetro está corriendo o detenido, puede presionar
[CE] para borrar el tiempo en progreso)
USING COUNT DOWN FUNCTION
USANDO LA FUNCION DE CUENTA REGRESIVA
Operation
Display
Touch [clock] key four times for Count Down
mode. In Line 2 the first set “00” represent for
COUNT DOWN
Hour, the second “00” represent for Minute and
00 – 00 – 00
the last “00” stands for Second
Presione [Clock] cuatro veces para el modo de
Cuenta Regresiva. En la línea 2 el primer par “00’
representa la Hora, el segundo “00” los minutos, y
el último “00” los segundos.
Touch left cursor
COUNT DOWN
Presione cursor izquierdo
00 – 00 – 00
Touch number key [2] or
Touch up cursor key twice to select the number
then touch right cursor key
Presione número 2 o presione cursor arriba dos
veces para seleccionar el número luego presione
la tecla de cursor derecho.
Touch [3] [0]
Presione [3] [0]
COUNT DOWN
10 – 20 – 00
COUNT DOWN
00 – 20 – 30
Touch [ENTER] key to start the counting down
COUNT DOWN
Presione [ENTER] para empezar la cuenta
00 – 20 – 29
regresiva
After a while, touch [ENTER] key to stop and
COUNT DOWN
enter the edit mode
00 – 18 – 29
Después de un momento, presione [ENTER] para
detener y entrar al modo de edición
Set the new beginning time to count down: 00-19- COUNT DOWN
50
00 – 19 – 50
Configure un nuevo tiempo de partida para la
cuenta regresiva: 00-19-50
8
Touch [ENTER] key. When the time jumps down
COUNT DOWN
to “0”, “Bi-Bi” will be heard and touch any key to
00– 19 – 49
stop.
Presione [ENTER]. Cuando el tiempo llegue a “0”,
se escuchará “Bi-Bi” y presione cualquier tecla
para detener.
Notes:
1. The maximum value of the hour, minute and second is “59”
2. When it begins to count down, converting to other function mode will
not affect the counting.
Notas:
1. El valor máximo de la hora, minutos y segundos es “59”
2. Cuando comience la cuenta regresiva, cambiar a otro modo de función
no afectará el conteo.
USING THE ALARM FUNCTION
Three separate alarm options are provided. Each one of the three alarms
has a different number of beeps depending on the alarm number.
SETTING ALARM
Operations
Display
Touch [clock] three times to enter Alarm
mode. Use Search [∆] or [∇] buttons to select
one of three alarms.
Touch [Prog] for alarm setting. The first time
digit is highlighted. Edit time by using [∨] or [∧]
keys.
If MM/DD is not changed, the alarm will repeat
every day at the same time. Select desired
date for alarm to occur only once at that date.
Touch [OK]. Input alarm message and touch
[OK] to confirm your entry. When alarm time
arrives, the time and text will be displayed in
addition to the alarm sign.
- ALARM 1MM/DD - - : - - ALARM 2MM/DD 06 : 25
AM
- ALARM 2MM/DD 06 : 25
AM
- ALARM 210/28 06 : 25 AM
Wake up alarm!
Notes:
1. After confirming the setting, the alarm will automatically turn on and
the ((•)) icon will appear on the display.
2. When Home Time reaches the alarm setting, an alarm will sound for
nearly 60 seconds. Touch any key to turn off the alarm.
3. When setting alarm, you can touch [CE] key to exit.( Cuando configure
la alarma, puede presionar la tecla [CE] para salir)
9
CHANGING ALARM SETTINGS
1. Repeat all procedures above. The new setting will overwrite the old
setting.
2. In order to switch off alarm, display desired alarm and touch [OK].
Touch [OK] again to re-activate alarm.
USING THE PHONE DIRECTORY
Three directories are available: Business, Personal and Other.
Additional viewing directory, ‘All’, is used to view all records from all three
directories.
Each directory can store the following field names as one record.
Name:
FIRST NAME, LAST NAME up to 48 characters
each
Company:
COMPANY
up to 48 characters
each
Phone Numbers: HOME, WORK, FAX, CELL, PAGER up to 48
characters each
Address:
STREET ADDRESS
up to 96 characters
CITY
up to 48 characters
STATE
up to 48 characters
ZIP
up to 48 characters
Internet Address: E-MAIL, Web (URL)
up to 48 characters
each
Note:
NOTE
up to 96 characters
ENTERING PHONE RECORDS
Once you input data in any field of Last name, First name or Company,
touch [prog] key to store the record. (Una vez que ingrese la información
en cualquiera de los campos de Apellido, Nombre o Compañía, presione
la tecla [prog] para almacenar el registro)
Operations
Display
Touch [phone] key to enter the
Telephone mode.
Display shows:
Touch the [phone] key again for Business
directory. Touch [Prog] to start memory
storage input sequence.
Use onscreen keyboard and stylus to
10
Personal
Search Name?
Business
Search Name?
Last
DEWING
enter information. Touch [2nd] key to
toggle between the alpha and numeric
keyboards.
Touch [OK] to move to next field or skip
fields. Touch [∧] or [∨] to navigate
between fields.
After entering contact name (last, first or
company) (Después de ingresar el
nombre, apellido o compañía del
contacto) use [Prog] at any time to save
the record. Also, touch [OK] in Note field
to save record.
First
SONJA
Company Consumer Business
Home
123-456-7890
Last
DEWING
First
SONJA
Company Consumer Business
Home
123-456-7890
Notes:
1. Touch [SYM] several times to find the symbol you require.
2. If want to get the desired Euro characters, you can touch [SYM] and
the corresponding letter key repeatedly. For example, touch [SYM],
then [A] (CAPS off) twice to get “à”
2. Si quiere obtener los caracteres Europeos, puede presionar [SYM] y la
tecla de la letra correspondiente varias veces. Por ejemplo, presione
[SYM], luego [A] (CAPS desactivado) dos veces para obtener “à”.
3. A dot on the right side of the screen indicates scroll option for more
information.
4. When enter the input mode the sign “CAPS” will appear and the letters
will become capital automatically except for E-mail and URL file.
5. In the character files, letter keyboard will be displayed automatically on
touch panel. And in number files, numbers keyboard should be displayed
automatically.
6. During the course of input, you can touch [CE] key to exit input mode and
the inputted data will not be stored.
4. Cuando ingrese al modo de escritura el signo “CAPS” aparecerá y las
letras se harán mayúsculas automáticamente excepto para archivos
de E-mail y URL.
5. En los archivos de caracteres, el teclado de letras será mostrado
automáticamente en el panel de contacto. Y en archivos de números,
el teclado de números se mostrará automáticamente.
6. Durante el ingreso de datos, puede presionar la tecla [CE] para salir
del modo de escritura y la información ingresada no será almacenada.
SEARCHING PHONE RECORDS
Search of phone records is based on last name or company name fields.
Sequential Search by Name
1. Touch the [phone] key to enter desired Telephone Function.
11
2. Touch the Search [∇] button to display entries starting with the first
record. Use the cursor [∧] or [∨] to view the complete record.
3. Touch the Search [∇] button to view the next record in alphabetical
sequence sorted by last name. Touch the Search [∆] button to view
the previous record.
Direct Search by Last Name
1. Touch the [phone] key to enter the Telephone Function.
2. Type the first few characters of the desired name, for example [S] [M]
[I].
3. Touch the Search [∇] button to search for names beginning with
characters: SMI. If the matching record is not found, "Not Found!" will
appear on the display.
Direct Search by Company
1. Touch the [phone] key to enter the Telephone function.
2. Touch [OK], "Search Company?" will be displayed.
3. Type characters of the desired company.
4. Touch the Search [∇] button to search for and display the data starting
with the company name. Use the cursor [∧] or [∨] keys to view the
complete record.
VIEWING PHONE RECORDS
Operations
Display
Touch [∧] or [∨] to highlight another field.
First name, last name and company do
not disappear when scrolling down.
DEWING SONJA
Consumer Business
Home
123-456-7890
Work
234-567-8901
EDITING PHONE RECORDS
1. Touch [phone] key to enter the Telephone function and find the
desired Telephone directory.
2. Recall the record to be edited by following the previous instructions.
3. Touch [EDIT] to enter the Edit mode. The first character of the name
will flash.
4. Enter corrections to the name field and touch [OK] to advance to the
next field.
5. Touch [Prog] again after making all desired changes.
Note:
1. Touching any function key, [on/off] or [CE] (o [CE]) while in the Edit
Mode will cause the organizer to exit from the Edit mode without
saving any changes.
2. In the Edit mode, touch [DEL] to delete individual characters.
12
3. In the Edit mode, touch [INS] to toggle between insert and non-insert
modes.
DELETING PHONE RECORDS
1. To delete a record, search and view the record and touch the [DEL]
key. Display prompts
Delete Record?
Yes
No
2. Touch [OK] to confirm entry.
USING THE SCHEDULE FUNCTION
ENTERING SCHEDULE RECORDS
Operations
Touch the [schedule] key once to enter the
Schedule function.
Touch [Prog] to start entering schedule
information. Display shows the current
date. The cursor under the first digit of the
date is flashing. Edit date by using the
cursor keys or entering the desired dates
using numeric keys.
Touch [OK] to change to time entry. Edit
Start Time. Change End Time in the same
manner.
Touch [OK] to change to Alarm field.
Touch [<] or [>] for alarm ON/OFF. Use [∨]
to move to time setting field and reminder
field. A reminder can be set 0 - 99 minutes
before scheduled event.
Touch [OK]. Input up to 96 characters
schedule event. Touch [OK] again to
confirm and save the record.
Display
Schedule
Search Date?
01-01-2002
Date
01-01-2002
Start Time
6:13PM
End Time
6:13PM
Alarm
← Yes →
Reminder 0 Min. Before
Date
01-01-2002
Start Time
6:20PM
End Time
19:30PM
Alarm
← Yes →
Reminder 0 Min. Before
Date
01-01-2002
Start Time
6:20PM
End Time
7:30PM
Alarm
← Yes →
Reminder 15 Min. Before
Date
01-01-2002
Schedule: Project Meeting
Notes:
• After entering a schedule item the Schedule Alarm will be turned on.
The alarm icon will be displayed only if the alarm is set to be active in
the Time mode (see alarm section)
13
• The Schedule Alarm will sound for about 60 seconds when the Home
Time reaches the Reminder Alarm time. Touch any key/button to stop
the alarm.
• If the organizer is off, when the Home Time reaches the schedule
time, the Schedule Alarm will automatically turn the unit on and the
alarm will sound. And schedule record will be displayed on the screen
simultaneously. If password has been set and opened, “---Secret---”
will be displayed instead of schedule record. (Y registro de agenda
será mostrado en pantalla simultáneamente. Si la contraseña ha sido
configurada o abierta “---Secret---“ será mostrado en vez de el registro
de agenda)
• When input data, touch [CE] key to exit and the record won’t be
stored. (Cuando ingrese información, presione [CE] para salir y el
registro no será almacenado)
• When the cursor is in the Schedule file, touch panel displays letter
keyboard automatically; and when the cursor is in the other files,
display number keyboard. (Cuando el cursor está en el archivo de
Agenda, el panel de contacto muestra el teclado de letras
automáticamente; y cuando el cursor está en otros archivos, muestra
el teclado de números)
VIEWING SCHEDULE RECORDS
Schedule records are sorted chronologically. Follow these steps to
review Schedule events:
Sequential Search by Date
1. Touch [schedule] key once to enter Schedule mode.
2. Use the Search [∇] button to view the pending schedule records for
future dates. Use the [∧] or [∨] to view the complete record.
3. Touch the Search [∇] button to access the next schedule entry.
Touching Search [∆] button will scroll through the list in reverse
chronological order.
Direct Search by Date
1. Touch [schedule] key once to enter the Schedule mode.
2. Enter desired date and touch [OK].
EDITING AND DELETING SCHEDULE RECORDS
Follow the same procedures used in Editing and Deleting Telephone
records.
14
USING THE ANNIVERSARY FUNCTION
ENTERING ANNIVERSARY RECORDS
Operations
Touch the [schedule] key twice (dos veces)
to enter the Anniversary function.
Touch [Prog] to start entering anniversary
information. Display shows the current
date. The first digit of the date is flashing.
Edit date.
Touch [OK]. A reminder can be set 0 - 9
days before anniversary event.
Touch [OK]. Input event text up to 96
characters anniversary details.
Touch [OK].
Display
Anniversary
Search Date?
01-01
Anniversary
Date 01-01
Reminder 5 Days before
(Recordar 5 días antes)
Anniversary
Date
01-02
Reminder 2 Days Before
Anniversary
Detail: Annual club meeting
Anniversary
Search Date? (buscar fecha?)
01-01
The anniversary icon will be displayed in the Home Time on a day
specified by the reminder. If the reminder day is different from 0, the
anniversary icon will also show on the anniversary date.
SEARCHING AND VIEWING ANNIVERSARY RECORDS
Follow the same procedure used in Searching and Viewing Schedule
data records.
EDITING ANNIVERSARY RECORDS
To edit the record, search and view the record. Touch [EDIT] for Edit
mode. Change time/date of anniversary. Touch [OK]. Change the
anniversary description and touch [OK] to save changes.
DELETING ANNIVERSARY RECORDS
Follow the same procedures used in Deleting Telephone records.
CALENDAR
Follow these steps to review calendar:
1. Touch [schedule] key three times (tres veces) to enter Calendar mode.
The current month will be shown and the current day will be
highlighted.
15
2. Touch Search [∆] or [∇] button to view the next or the previous month
respectively.
3. Touch [<] or [>] to move the flash day to the previous day or the next
day respectively.
4. Touch [∨] or [∧] to move the flash day to the previous week or the next
week respectively.
An example of calendar view:
A detailed view of a day in the calendar mode:
Schedule Event
To do Item
Anniversary Event
VIEWING A DESIRED DATE/MONTH
1. Touch [Prog] to view date entry capability.
2. Input date, then touch [OK].
3. Desired month/year is shown. Desired date is highlighted.
VIEWING SCHEDULE RECORDS FROM CALENDAR
The calendar features access links to Schedule mode. Dots located on
the right hand side of the date in the Calendar mode represent scheduled,
anniversary and to do events.
Move the cursor to a desired day and touch [OK] to view the schedule
details for that date. If no schedule event is available for that day, a new
schedule will be created with date specified (see schedule section
ENTERING SCHEDULE RECORDS).
USING THE TO-DO MODE
ENTERING TO-DO RECORDS
Operations
Display
Touch the [todo] key.
To Do
Search Date?
01-01-2002
Touch [Prog] to start entering To-Do
16
To Do
information. Display shows the current
date. The first digit of the date is flashing.
Edit date. Touch [OK].
Touch [<] or [>] to set desired priority.
Priority values range from 1 to 9.
Touch [OK].
Input desired text up to 96 characters.
Touch [OK] to store record.
Date 01-01-2002
Priority 1
To Do
Date 09-11-2001
Priority ← 1 →
To Do
Priority: 1 Pending
Due Date: 2001-09-11
To Do: Buy flowers
VIEWING TO DO RECORDS
Sequential Search
1. Touch [todo] key to enter the To-Do mode.
2. Touch Search [∆] or [∇] buttons to see To-Do data records by priority.
3. Touch Search [∇] button again to view the next To-Do data record.
Date Search
1. Touch [todo] key to enter the To-Do mode. The display will prompt
"Search Date?”
2. Input desired date.
3. Touch [OK] to go back to To-Do view mode.
Note: If there is no record on the desired date, the latest record will be
displayed.
Nota: Si no hay registros en la fecha deseada, el último registro será
mostrado.
EDITING AND DELETING TO DO RECORDS
To edit To-Do record, recall the desired record to be edited and follow the
procedures used for editing Telephone records.
To delete To-do record, recall the desired record. Touch [DEL] key.
Select ‘Yes’ to delete record.
USING THE MEMO FUNCTION
ENTERING MEMO RECORDS
Touch the [todo] key twice. Display shows "Memo".
2. Touch [Prog].
3. Type the Memo information of up to 96 characters. Touch [OK] to
store the record.
4. Display shows "Saving" and shows memo record.
1.
17
VIEWING MEMO RECORDS
Sequential Search
Follow the same procedures used in Telephone Sequential search.
Records are stored alphabetically.
Touch [∨] or [∧] to scroll and view entire record.
EDITING AND DELETING MEMO RECORDS
Follow the same procedures used for Editing Telephone records.
USING LOTTERY GAME
USANDO EL JUEGO DE LOTERIA
Key in
Press [To Do] key three times to select
lottery game
Presione la tecla [To Do] tres veces para
seleccionar juego de lotería
Press [v] key to select your desired. For
example, 5
Presione [v] para seleccionar su elección.
Por ejemplo, 5
Press [ENTER]
Presione [ENTER]
Display
LOTTERY
Set (1~9) :
6v
LOTTERY
Set (1~9) :
5v
LOTTERY
Max # (05~99):
49 v
Press [▼] key to select your desired. For
example, 50
Presione [▼] para seleccionar su elección.
Por ejemplo, 50.
Press [ENTER] key to get the lottery
number
Presione [ENTER] para obtener los
números de la lotería
LOTTERY
Max # (05~99):
Press [ENTER] key repeatedly
Presione [ENTER] repetidamente.
LOTTERY
Set 5 Max 50
41 20 25
32 24 29
50 v
LOTTERY
Set 5 Max 50
11 22 33
44 45 46
USING THE CALCULATOR FUNCTION
Use the [calc] key to access calculator mode.
18
Functions include: addition (+), subtraction (-), multiplication (x) and
division (/). Memory storage operations such as M-, M+, MRC are also
available.
Notes:
• Calculations are performed in the order of entry, not by algebraic
conversion.
• "M" on the display indicates a number is stored in memory.
• "ERROR!" on the display indicates a number longer than 12 digits or
when divided by 0. Tap [CE] to clear error.
• [M+] adds the currently displayed value to the current memory
contents.
• [M-] subtracts the currently displayed value to the current memory
contents.
• [MRC] recalls numbers stored in memory or clears the number after
recalled from memory.
USING THE EXPENSE MANAGER
The Expense Manager tracks personal or household expenses and
provides expense summaries. Each expense record has six fields: data,
expense type (category), amount, payment type, receipt and note. In
addition, you can change the name of the expense type (category) to suit
your specific needs.
ENTERING EXPENSE RECORDS
Operations
Touch the [calc] key twice for Expense
Manager.
Touch [1] or [E] to select 1. Expense
Touch [Prog] for date entry. Change date.
Touch [OK].
Use the [<] or [>] to select the appropriate
expense categories: Meals, Hotel, Car,
Phone, Fares, Enter't (entertainment), Tips
and Misc. (miscellaneous). Touch [OK] to
confirm.
Input expense amount. Touch [OK].
Touch [<] or [>] to enter the payment type:
Cash, Check, Card and Others. Touch
19
Display
Expense
1. Expense
2. Report
3. Change Category
Expense
Search Date:
01 - 01 - 2002
Date
01-01-2000
Type
Meals
Amount
0
Payment
Receipt
Date
Type
Amount
01-01-2000
Meals
55.75
Payment
Cash
[OK] to confirm.
Yes
Toggle between Receipt available Yes/No Receipt
by using [<] or [>]. Touch [OK].
Input note if desired.
Expense
Touch [OK] to store record. 2 seconds later Search Date:
the display will turn back to the initial
01-01 -2002
screen.
Note: When the cursor is in Amount field, touch [CE] key to clear the
inputted amount; when the cursor is in other filed, touch [CE] key to exit
and the record won’t be stored.
Nota: Cuando el cursor está en el campo de Importe, presione [CE] para
borrar el importe ingresado, cuando el cursor está en otro campo,
presione [CE] para salir y el registro no será almacenado.
VIEWING EXPENSE RECORDS
Expense records are sorted by date. Follow the steps below to search for
expense records:
1. Touch [calc] key twice to view the expense menu.
2. Touch [1] or [E] to select 1. Expense.
3. Enter the expense date and touch Search [∆] or [∇] buttons to search
expense records.
4. If expense records are found on a specified date, the expense record
will be displayed. Touch [∨] or [∧] to view additional information in the
note field. Touch the Search [∆] or [∇] buttons to scroll to previous or
next records. If there is no record on the searched date, “Not Found!”
will be displayed.
EDITING AND DELETING EXPENSE RECORDS
Follow these steps to edit expense records:
1. Find desired record and touch [EDIT] key.
2. Modify each field of the expense record. After each modification, touch
[OK] to confirm the change. Note that when you are editing an amount,
the previous amount will not be blinking. Simply type in a new amount
and touch the [OK] key. Touch the [OK] key again after modifying or to
skip through the “note” field. This saves the modified record.
CREATING EXPENSE REPORTS
1.
2.
3.
4.
Touch [calc] key twice.
Touch [2] or [R] to select 2. Report.
Type the desired starting date for the period to be summarized.
Type the ending date. Touch [OK] to confirm.
20
5. The Expense Report will be displayed. Use [∨] or [∧] keys to view the
report.
6. Touch [OK] to return to the initial screen.
CUSTOMIZING EXPENSE CATEGORIES
You can easily change the eight pre-set expense categories to suit your
particular needs. Follow the steps listed below.
1. Touch [calc] key twice.
2. Touch [3] or [C] to select 3. Category change.
3. Touch [∨] or [∧] to select desired category. Touch [OK].
4. Modify the expense type and touch [OK] to confirm. Category field is 7
characters long.
5. Repeat the steps from 3 to 4 in order to customize other expense
categories.
USING CURRENCY CONVERSION FUNCTION
Touch the [calc] key three times for Currency Conversion mode.
ENTERING NEW CURRENCY
Five different currencies can be preset for conversion.
Operations
Display
Touch the [calc] key three times for
Currency Conversion mode. Use [∨] or [∧]
keys or the Search [∆] or [∇] buttons to
select the desired currency for setting.
Touch [Prog] for setup.
Input up to 3 characters to describe your
first currency. Touch [OK]. Input up to 3
characters to describe your second
currency. Touch [OK].
Input rate to convert unit 1 to unit 2.
Touch [OK] to confirm.
CONVERTING CURRENCIES
Operations
USD Æ $1
Rate=1
USD
$1
0.
Unit1? USD
Unit2? NTD
Rate= 32.66
USD Æ NTD
Rate= 32.66
USD
NTD
0.
Display
USD Æ NTD
Rate= 32.66
USD
NTD
Touch the [calc] key three times for
Currency Conversion mode. Use [∨] or [∧]
keys or the Search [∆] or [∇] buttons to
select the desired currency for conversion.
Input amount for conversion. Touch [OK] to USD Æ NTD
Rate= 32.66
convert amount.
USD
Touch [CE] to clear conversion.
21
0.
10.
Touch [<] to change conversion direction.
NTD
326.6
EURO CONVERSION
Touch the [conversion] key four times for Euro Conversion mode.
The Euro conversion function operation is similar to currency conversion
function.
Euro conversion is preset for 12 currencies. The rate for 1 Euro is shown
in the following table:
Country
Currency Symbol
Rate
Austria
Belgium
Finland
France
Germany
Ireland
Italy
Luxembourg
Netherlands
Spain
Portugal
Greece
ATS
BEF
FIM
FRF
DEM
IEP
ITL
LUF
NLG
PTE
ESP
GRD
13.7603
40.3399
5.94573
6.55957
1.95583
0.787564
1936.27
40.3399
2.20371
200.482
166.386
340.75
USING METRIC CONVERSION
1. Touch the [calc] key five times for Metric Conversion mode.
2. Use [∨] or [∧] keys to select the desired metric conversion.
3. Use [<] or [>] keys to select the desired metric conversion direction
(i.e. Meters to Feet or Feet to Meters).
4. Enter amount to convert. Touch [OK] for conversion calculation.
5. Touch [CE] to clear calculation result or enter a new amount to be
converted.
DATA COMMUNICATION WITH A PERSONAL
COMPUTER
Telephone, Schedule, Anniversary, Memo, To-Do and Expense data
records can be synchronized with a personal computer using
OrganizerLink™ software.
To initiate data synchronization, follow these steps:
1. Make sure your organizer is linked to your PC serial port using the PClink cable.
22
2. Make sure the appropriate software is installed and running on your
computer. Detailed instructions are provided with the PC link software
package.
3. Touch the [pc link] key and then touch [OK] to start synchronization.
Display will show 'Synchronizing…’
4. When synchronization is complete, the display will show ‘Successful
Synchronization!’ and return to Home Time mode.
CHANGING BATTERIES
The main batteries need to be changed when the “low battery” warning
message appears on the display. To change the batteries, do the
following:
1. Turn off the unit.
2. Use a screwdriver to remove the single screw holding the battery door
in place on the backside of the unit. Then remove the battery cover.
3. Remove every battery gently by pushing the stylus under the battery.
Replace old batteries with fresh CR-2032 batteries.
4. Replace the battery door. Use the screwdriver to position the battery
cover screw back into place.
5. Skip the RESET to prevent loss of previously stored data. Verify
correct time settings.
Note: Replace the batteries once every six months to ensure proper
battery power.
WARNING
THIS UNIT USES CR2032 LITHIUM BATTERIES.
“CAUTION: DANGER OF EXPLOSION IF BATTERY IS INCORRECTLY
REPLACED. REPLACE ONLY WITH THE SAME TYPE BATTERIES
RECOMMENDED BY THE MANUFACTURER. DISPOSE OF USED
BATTERIES ACCORDING TO THE MANUFACTURER’S INSTRUCTIONS.”
23