1
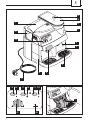
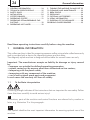
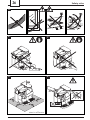
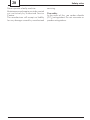
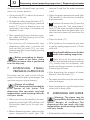
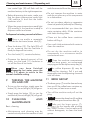
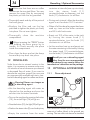
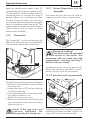
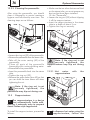
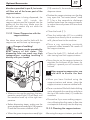
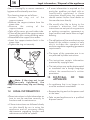
Vienna DeLuxe RS TYPE sup 018 Cr OPERATING INSTRUCTIONS READ THESE OPERATING INSTRUCTIONS CAREFULLY BEFORE USING THE MACHINE FOR HOUSEHOLD USE ONLY Congratulations! Congratulations on choosing this top-quality espresso machine and many thanks for your confidence in our products. Before operating the machine, we recommend you read the following instructions thoroughly which explain how to use, clean and maintain the machine. For any other information, please contact the retailer or our company directly. We will be glad to provide you with any explanations you may need. 3 12 14 1 13 11 2 10 9 3 8 4 6 5 15 16 17 18 19 20 7 21 22 4 28 27 12 29 30 31 32 5 33 34 35 36 37 38 24 1 2 3 4 5 6 7 GENERAL INFORMATION .................... 24 TECHNICAL SPECIFICATIONS ............. 25 SAFETY RULES ..................................... 27 INSTALLATION .................................... 30 COFFEE GRINDER ............................... 31 DISPENSING COFFEE .......................... 31 DISPENSING STEAM/PREPARING CAPPUCCINO ........................................... 32 8 DISPENSING HOT WATER ................... 32 General information 9 TURNING THE MACHINE ON AND OFF 33 10 CLEANING AND MAINTENANCE ........ 33 11 BREW GROUP ..................................... 33 12 DESCALING ........................................ 34 13 OPTIONAL ACCESSORIES ................... 34 14 LEGAL INFORMATION ........................ 38 15 DISPOSAL OF THE APPLIANCE ............ 38 PROBLEMS CAUSES REMEDIES ................. 39 Read these operating instructions carefully before using the machine 1 GENERAL INFORMATION This coffee machine is ideal for preparing espresso coffee using whole coffee beans only and is provided with a device for dispensing steam and hot water. The elegantly styled machine is designed and suitable for normal home use only. Important. The manufacturer accepts no liability for damage or injury caused by: improper use outside the defined operating parameters; repairs carried out by anyone other than authorized service centers; tampering with the power cable; tampering with any component of the machine; use of non-original spare parts and accessories. In such cases the warranty will lose all validity. 1.1 To facilitate interpretation A warning triangle indicates all the instructions that are important for user safety. Follow these directions carefully to avoid serious injury! 2 Illustrations, parts of the machine and control functions are referred to by number or letter, e.g. illustration 2 in this paragraph. i This symbol identifies the most important information for ensuring optimal use of the machine. 25 Technical specifications The illustrations corresponding to the text may be found on the inside cover flap. Keep this page open while reading the operating instructions. 1.2 How to use these operating instructions Keep these operating instructions in a safe place and make them available to anyone else who should use the coffee machine. If you require any further information or meet with any problems not completely or sufficiently explained in these instructions, contact the experts. 2 TECHNICAL SPECIFICATIONS Voltage rating See rating plate on machine Power rating See rating plate on machine Casing material Thermoplastic Size (w x h x d) (mm) 337 x 325 x 377 Weight (Kg) 8.5 Cable length (mm) 1200 Control panel Front Water container Removable Power supply See rating plate on machine Water container capacity (lt.) 1.7 Coffee container capacity (gr) 350 of coffee beans Pump pressure (bars) 13-15 Boilers 2 in Aluminium Safety features Boiler pressure safety valve, 2 safety thermostats. The manufacturer reserves the right to change the machines specifications in line with technological progress. The machine conforms to European Directive 89/336/EEC (Legislative Decree 476 of 04/12/92), regarding the elimination of radio-television interference. 26 Safety rules A C D E 2 0 0 B sizes in millimeter 27 Safety rules 3 SAFETY RULES Never place electrical parts in contact with water: danger of short circuit! The superheated steam and hot water may cause scalding! Never aim the steam or hot water flow towards parts of your body, use caution when touching the steam / hot water nozzle: danger of scalding! Intended use The coffee machine is designed for home use only. To avoid risks, do not make any technical changes or use the machine for purposes other than those stated! The machine must not be used by children. Power supply Plug the coffee machine into a suitable electrical outlet. The voltage must correspond to the value indicated on the rating plate. A Power cable Never use the coffee machine if the power cable is defective. You should have any defective cables or plugs immediately replaced by an Authorized Service Center. Do not pass the cable around corners, over sharp edges or over hot objects and keep it away from oil. Do not use the cable to carry or pull the coffee machine. Do not remove the plug by tugging on the cable or touch it with wet hands. Make sure the cable cannot drop freely from tables or shelves. B Protecting others Do not allow children to play with the coffee machine. Children are not aware of the dangers connected with household appliances. C Danger of burns Avoid aiming the superheated steam and/ or hot water flow at yourself and/or at others. Always use the handles or knobs provided. D Siting Place the coffee machine in a safe place where no one can tip it over or be injured by it. Do not use the coffee machine outdoors. To prevent melting or damage to the casing, do not rest the machine on very hot surfaces or near open flames. E Cleaning Before cleaning the machine, it is imperative to turn the button (15) to OFF and remove the plug from the electrical outlet. Also wait for the machine to cool down. Never immerse the machine in water! Never tamper with internal machine parts. Tampering with internal parts will void the manufacturers warranty. D Space for use and maintenance To ensure that the coffee machine works properly and efficiently, you are advised to: Rest it on a perfectly level surface; Place it in an adequately lit, hygienic site with an electrical outlet within easy reach; Ensure a minimum clearance between the machine and the walls as shown in the figure. Storing the machine If the machine is to remain out of use for a lengthy period, turn it off and pull out the plug. Store it in a dry place out of childrens reach. Keep it away from dust and dirt. Do not expose machine to freezing temperatures. Damage to internal components will occur. Servicing / Maintenance In the event of a breakdown, fault or suspected damage after a fall, immediately unplug the machine. 28 Never operate a faulty machine. Maintenance and repairs are to be carried out exclusively by Authorized Service Centers. The manufacturer will accept no liability for any damage caused by unauthorized Safety rules servicing. Fire safety In the event of fire, use carbon dioxide (CO2) extinguishers. Do not use water or powder extinguishers. Key to machine components / Control panel 29 Key to machine components 1 2 3 4 5 6 7 Water container lid Water container Front door Dump box Power cable Height-adjustable coffee dispenser Brew group 8 9 10 11 12 13 14 Drip tray + grill Steam Wand Control panel Steam knob Grinder adjustment knob Coffee bean container Coffee bean container lid Control panel 15 Power switch Allows you to turn the machine on and off 16 On/off light It lights up when you turn the machine on and goes off when you turn the machine off 17 Coffee dispensing button Allows you to dispense coffee: press once to fill one coffee cup; press twice to fill two coffee cups. 18 Coffee/steam Allows you to check the temperature: It flashes when the temperature is too low (machine is heating up) It stays lit when the machine is ready to dispense coffee and steam. 19 Hot water selector button When the machine is turned on, it is set on standby for coffee and standby for steam. Press the button to switch to the hot water setting. Press the button again to switch the machine back to the steam setting. 20 Hot water light It lights up when the machine has been switched to the hot water setting. 21 Knob for regulating the It adjusts the level of the coffee in the cup; e.g.: quantity of coffee dispensed Position ( ) = espresso coffee in one cup Position ( ) = regular coffee 22 Warning light Identifies machine alarms It remains lit when the coffee and/or water containers need refilling; It flashes when the dump box, brew group or drip tray have not been installed properly. 30 4 INSTALLATION For your own safety and the safety of others, you must strictly comply with the Safety Rules described in chap.3 4.1 Package The original packaging was designed and made to protect the machine during shipping. We recommend keeping it for future transport purposes. 4.2 Preliminary operations Remove the packet containing the lid, the key for the brew group unit and the cleaning brush from the packing materials. Take the coffee machine out of its packing and position it in a suitable place conforming to the requisites described in the safety rules (chap.3.) Fit the coffee container lid (14) onto the coffee container (13); store the brew group key and cleaning brush in a safe place. Make sure that the tray (8) with grill, the dump box (4) and the brew group (7) are installed properly and that the front door (3) is closed. Before plugging in the machine, make sure the button (15) is on OFF. i If the red light (22) flashes when you turn on the machine, it means that one of the above-described parts has not been correctly fitted in place. 4.3 Turning on for the first time 28 Lift out the water container (2) and Installation remove the lid (1). Rinse it out and fill it with fresh drinking water, making sure you do overfill it. Lower the container back into place inside the machine and replace the lid. Fill the container (2) only with cool, still water. Hot water or other liquids may damage the container and/or the machine. Always make sure there is enough water inside the container before starting the machine. 27 Take off the lid (14) and fill the container with whole coffee beans (13). Fit the lid of the coffee container back into place. Fill the container (13) with whole coffee beans only. Ground or freeze-dried coffee or any other objects will damage the machine. Insert the plug (5) into a suitable outlet. The button (15) is positioned on OFF. Simply press the button (15) to turn on the machine; the green pilot light (16) will go on. 4.4 Priming the machine Position the steam tube (9) over the drip tray. 30 Press the hot water selector button (19); the light (20) will go on. Turn the knob (11) counterclockwise and wait until water flows out smoothly from the steam tube; to cut off flow, turn the knob (11) clockwise. i Note: Before starting up for the first time, or if the machine has 31 Coffee grinder / Dispensing coffee been inoperative for a lengthy period or the water container has been completely emptied, it is advisable to prime the machine before it has time to heat up. Once you have completed the above operations, the machine is ready for use. Press the hot water selector button (19); the light (20) will go off. When dispensing coffee or steam, carefully follow the directions below to ensure proper use of the machine. 5 COFFEE GRINDER Warning! The grinder adjustment knob inside the coffee container must be turned only while the coffee grinder is operating. Do not introduce ground and/or freezedried coffee in the coffee bean container. Do not introduce any material other than coffee beans. Inside the coffee grinder there are moving parts that may be dangerous; do not place your fingers and/or other objects inside the grinder. Before performing any kind of operation inside the coffee container, switch off the machine and unplug it. Do not introduce coffee beans while the grinder is operating. i The quality and flavor of your coffee will depend not only on the blend you use but also on how finely you grind it. The machine has a knob (12) for adjusting the grind. To adjust the grind, turn the graduated knob while the grinder is operating; the numbers on the knob indicate the grind setting. Every machine is factory-regulated to a medium-sized grind; turn the knob to lower numbers to obtain a finer grind, turn the knob to higher numbers to obtain a coarser grind. The variation in the grind setting will be noted only after three or four coffees have been dispensed. i Use blends of coffee beans for espresso machines. Avoid using extreme grinding settings (e.g. 1 or 16); in these cases use different blends of coffee. Store coffee in an airtight container in a cool, dry place. You should adjust the grind setting when the coffee is not dispensed properly: Coffee pours out too fast = excessively coarse grind > set knob on a finer grind; Coffee drips out slowly and/or not at all = excessively fine grind > set knob on coarser grind. 6 DISPENSING COFFEE Before dispensing coffee, make sure the steam/hot water tube (11) is closed. When you switch on the machine the temperature control light (18) will flash until the machine heats up to the right temperature. Before dispensing coffee, make sure that the green temperature ready light (18) remains lit and that both the water and coffee containers are full. When the green light remains lit (18) the machine is ready to dispense coffee. 29 Place 1 or 2 cups beneath the dispenser nozzles (6); you may adjust the height of the dispenser to adapt it to your cups. 34 The dispenser (6) may be moved so that you may use large cups. In this case you must manually push the dispensing unit as high as it goes; to set the dispenser in 32 Dispensing steam/preparing cappuccino / Dispensing hot water the ideal position for small cups, you must move it to a lower position. remains lit and that the water container is full. Use the knob (21) to adjust the amount of coffee in the cup. When the green temperature ready light (18) remains lit, the machine is ready to dispense steam. To dispense coffee, press the button (17); the dispensing cycle will begin; press the button (17) once to dispense one cup and press it two times in succession to dispense 2 cups. After completing the pre-brewing cycle, the coffee will start flowing out of the dispensing nozzle (6). The machine will automatically stop dispensing coffee when it reaches the level set with the knob (21); you may however stop flow at any time by pressing the button (17). Before proceeding to dispense steam or hot water, make sure that the steam tube is positioned over the drip tray. 7 DISPENSING STEAM/ PREPARING CAPPUCCINO The steam may be used to froth milk for cappuccino and to heat up beverages. The machine requires no pre-heating. Danger of scalding! The steam may be preceded by brief sprays of hot water. The dispensing tube can reach very high temperatures: avoid touching it directly with your hands. When you turn on the machine, the temperature control light (18) will flash until the machine heats up to the right temperature. Before dispensing steam, make sure the green temperature ready light (18) 30 Position the steam tube (9) over the drip tray, open the hot water/steam knob (11) for a few seconds to discharge residual water from the steam tube; in a short time only steam will issue from the tube. Close the knob (11). Fill a pitcher or the receptacle you want to use for making cappuccino to 1/3 with cold milk. i Use only cold milk to ensure the best results when making cappuccino. 32 Place the tip of the steam tube in the milk to be heated and open the knob (11); slowly raise the receptacle, with gentle rotating movements, to obtain a uniform layer of foam. After dispensing the amount of steam desired, close the knob (11). The same procedure may be used to heat other beverages. After this operation, wipe the steam tube clean with a damp cloth. 8 DISPENSING HOT WATER Warning: The steam may be preceded by brief sprays of hot water: danger of scalding! The dispensing tube can reach very high temperatures: avoid touching it directly with your hands. If the machine is off, turn it on; the tempera- 33 Cleaning and maintenance / Dispending unit ture control light (18) will flash until the machine heats up to the right temperature. Before dispensing hot water, make sure that the green temperature ready light (18) remains lit and that the water container is full. When the green temperature ready light (18) remains lit, the machine is ready to dispense coffee and steam. To dispense hot water, proceed as follows: 31 Place a cup and/or a receptacle beneath the hot water/steam tube (9); Press the button (19). The light (20) will go on, meaning that the machine is ready to dispense hot water; and disconnected from the power supply. Do not immerse the machine in water and do not place any of its components in a dishwasher. Do not use sharp objects or aggressive chemical products (solvents) for cleaning. It is recommended that you clean the water container daily; fill the container with fresh drinking water. Clean out the coffee bean container before refilling it. Use a soft cloth moistened with water to clean the machine. Turn the knob (11) counterclockwise; Do not dry the machine and/or its components in a microwave and/or conventional oven. Dispense the desired amount of hot water; turn the knob (11) clockwise to cut off the flow of hot water. 33 Clean the machine compartment and the brew group, we recommend emptying out the dump box every day (4). When you have finished dispensing hot water, press the button (19) again to return to the normal machine setting. 34 The coffee dispenser (6) may be removed for cleaning. Pull it out and thoroughly rinse the dispensing channels with hot water. 9 11 i TURNING THE MACHINE ON AND OFF To turn on the machine, simply press the button (15); the on/off light (16) will go on. Simply press the button (15) to turn the machine off; the on/off light (16) will go off. BREW GROUP The brew group (7) must be cleaned every time you fill the coffee bean container or, in any case, at least once a week. Turn off the machine and pull out the plug. AND 37 33 Remove the dump box (4) and drip tray (8), then open the service door (3). Maintenance and cleaning may be carried out only when the machine is cold 35 Take out the brew group (7), holding it by the handle and pushing the PRESS button. Use hot water only, without detergents, to clean the brew group. 10 CLEANING MAINTENANCE Basic cleaning 34 Descaling / Optional Accessories 36 Make sure that there are no coffee residues on the two steel filters. You may remove the upper filter by unscrewing the plastic pin with the key provided. container at intervals (one cup at a time); turn the steam knob (11) counterclockwise to dispense; turn the knob (11) clockwise to cut off flow. Thoroughly wash and dry all the parts of the brew group. During each interval, allow the descaling agent to act for about 10-15 minutes. Replace the filter and use the key provided to tighten the plastic pin firmly into place. Do not over tighten. When all of the descaling agent has been used up, rinse out the water container and fill it with fresh water. Thoroughly clean the machine compartment. Empty out 2/3 of the water in the tank by turning the steam knob (11) counterclockwise; turn the knob (11) clockwise to cut off flow. 38 Without pressing the PRESS button and holding the brew group by its handle, fit it back securely into place inside the compartment. Then close the door and set the dump box and drip tray back into place. 12 DESCALING Scale forms due to mineral content in the water; it is necessary to remove scale every 4-6 months of use or whenever you observe a decreased flow of water. If you want to descale the machine yourself, you may use any commercially available non-toxic, nonharmful descaling agent for coffee machines. Let the machine heat up and empty out the water remaining in the tank by turning the steam knob (11) counterclockwise; turn the knob (11) clockwise to cut off flow. i Should you use a descaling agent other than the one recommended you are advised in any case to follow the manufacturers directions on the package. 13 13.1 OPTIONAL ACCESSORIES Dose adjustment Warning! Never use vinegar as a descaling agent. Mix the descaling agent with water as directed on the package and pour the solution into the water container. Turn on the machine by pressing the button (15); the on/off light (16) will go on. 1 + - 2 + - 3 Press the button (19); the light (20) will go on. Position the steam tube (9) over the drip tray. Empty the contents from the water The machine allows you to adjust the amount of coffee (dose) to be ground per serving. The manufacturer has set a standard 35 Optional Accessories dose that satisfies most needs: notch (3) corresponding to the point of reference (2). Turn the knob (1) inside the coffee container counterclockwise to increase the dose of ground coffee; turn it clockwise to reduce the dose of ground coffee. You must carry out the dose adjustment before pressing the button to dispense coffee (see par.6). This system makes it possible to achieve optimal coffee making with all types of coffee commercially available. 13.2 13.2.1 Steam/Cappuccino with the pannarello The steam may be used to froth milk for cappuccino and to heat up beverages. Pannarello The pannarello is a device enhancing the effect of the steam when you are frothing milk to make classic Italian-style cappuccino. 39 Danger of scalding! The steam may be preceded by brief sprays of hot water. The dispensing tube can reach very high temperatures: avoiding touching it directly with your hands. To dispense steam using the pannarello, follow the directions provided in par.7; steam will issue from the pannarello. 13.2.2 Hot water with the pannarello To install the pannarello, proceed as follows: Make sure no other devices are fitted on the steam tube. Loosen the ring nut (39) without slipping it off the pannarello. Insert the pannarello in the steam tube to a depth of about 3 cm. Tighten the ring nut securely. Remove the outer sleeve (item 40) so that you can hold the inner sleeve still when tightening the nut. Note: if the ring nut is not securely tightened, the pannarello may slip out during use. To dispense hot water using the pannarello, follow the directions provided in par.8; hot water will flow from the pannarello. 36 Optional Accessories 13.2.3 Cleaning the pannarello. After using the pannarello, you should clean it thoroughly to ensure maximum hygiene and functionality over time. The cleaning steps are as follows: Make sure that no other devices are fitted on the steam tube; you must remove any devices that have been installed. I.E. the Pannarello. Loosen the ring nut (39) without slipping it off the cappuccinatore. Insert the cappuccinatore in the steam tube to a depth of about 3 cm. Tighten the ring nut securely. 39 39 40 Loosen the ring nut (39) of the pannarello. Remove the pannarello from the steam tube. Take off the outer casing (40) of the pannarello. Clean all parts of the pannarello thoroughly with running drinking water. Reassemble the pannarello. Insert the pannarello back into the steam tube. Tighten the ring nut (39). Remove the outer sleeve (item 40) so that you can hold the inner sleeve still when tightening the nut. Note: if the ring nut is not securely tightened, the cappuccinatore may slip out during use. 13.3.1 Hot water cappuccinatore with the Note: if the ring nut is not securely tightened, the pannarello may slip out during use. 13.3 Cappuccinatore i The cappuccinatore is a device that automatically froths milk, making it extremely easy to prepare classic Italian-style cappuccino. To install the cappuccinatore, proceed as follows: i To dispense hot water using the cappuccinatore, follow the 37 Optional Accessories directions provided in par.8; hot water will flow out of the lower part of the cappuccinatore. While hot water is being dispensed, the silicone tube (41) inside the cappuccinatore must be inserted into the grating of the drip tray. Make sure the silicone tube cannot slip out while the machine is in use. 13.3.2 Steam/Cappuccino with the cappuccinatore The steam may be used to froth milk for cappuccino and to heat up beverages. Danger of scalding! The steam may be preceded by brief sprays of hot water. The dispensing tube can reach very high temperatures: avoiding touching it directly with your hands. 41 (18) remains lit, the machine is ready to dispense steam. Position the cappuccinatore over the drip tray, open the hot water/steam knob (11) for a few seconds to discharge residual water from the cappuccinatore; in a short time only steam will issue from the tube. Close the knob (11). Place the intake tube (41) in a suitable receptacle or directly into a container of milk, placed next to the machine. Place a cup containing previously prepared coffee beneath the nozzle of the cappuccinatore; Open the knob (11); frothed milk will start issuing from the cappuccinatore. Move the pin on the cappuccinatore to regulate the thickness of the foam; by pushing it upward you will increase its volume. i When preparing cappuccino, use cold milk to ensure the best results. When you have finished using the cappuccinatore and steam, clean the cappuccinatore to remove residual milk. When you turn on the machine, the temperature control light (18) will flash until the machine heats up to the right temperature. Before dispensing steam, make sure the green temperature ready light (18) remains lit and that the water container is full. When the green temperature ready light Place a container filled with fresh drinking water alongside the machine and place the tip of the intake tube (41) inside the container. Proceed as if you were making cappuccino, allowing the dirty water to flow into a receptacle or directly into the drip tray. 13.3.3 Cleaning the cappuccinatore. After using the cappuccinatore, you should 38 Legal information / Disposal of the appliance clean it thoroughly to ensure maximum hygiene and functionality over time. The cleaning steps are as follows: Loosen the ring nut of the cappuccinatore. Remove the cappuccinatore from the steam tube. Remove the casing of the cappuccinatore. Take off the cover, pin and intake tube. Clean all the parts of the cappuccinatore thoroughly with running drinking water. Reassemble the cappuccino maker. Insert the cappuccinatore back in the steam tube. Tighten the ring nut securely. If more information is required or if a particular problem not dealt with or insufficiently explained in these instructions should arise, the customer should contact his/her local dealer or the manufacturer directly. We would also like to bring to the customer s attention that these instructions are not part of any previous or existing convention, agreement or legal contract and hence have no legal bearing. The obligations of the manufacturer are based on the relative contract of sale which includes the complete and exclusive regulation regarding guarantee requirements. The terms of the guarantee are in no way affected by these instructions. The instructions contain information protected by copyright laws. 41 The instructions may not be photocopied or translated into a foreign language without the manufacturers written permission. 15 Note: if the ring nut is not securely tightened, the cappuccinatore may slip out during use. 14 LEGAL INFORMATION These instructions include information on how to use the machine correctly, its functions and its maintenance. If these instructions are followed closely no risks should be run in using the appliance and all necessary safety requirements regarding function and maintenance should be upheld. DISPOSAL APPLIANCE OF THE An appliance that is no longer in use must be rendered unworkable. Remove the plug and cut the power cord at the base. Take unused appliances to a qualified disposal center. 39 Problems - Causes - Remedies Problems Causes Remedies The machine does not turn on The machine not getting power Connect the machine to an operating electrical outlet The service door is open The coffee cycle does not start Brew group not positioned The red warning light (26) is properly or not locked in place flashing: Drip tray not positioned properly Close the door Fit or lock the brew group in place Fit the drip tray correctly into place Dump box not positioned Fit the dump box correctly into place properly The coffee cycle does not start The coffee container is empty The red warning light (26) goes on: The water container is empty Refill the coffee container and restart the dispensing cycle The coffee is not hot enough Pre-heat the cups The cups are cold Refill the water container, prime the machine and restart the dispensing cycle No hot water or steam is The opening of the steam tube Clean the opening of the steam dispensed is clogged tube with a pin No coffee is dispensed Coffee drips out slowly There is no water Refill the water container and reload the circuit (Par.4.4.) Brew group is dirty Clean the unit (Par.11) Machine not primed Prime the machine (Par.4.4) Coffee ground too finely Adjust grind setting to a coarser (higher number) grind. Machine not primed Prime the machine (Par.4.4) Brew group dirty Clean the brew group (Par.11) The blend is not suitable or the Change the coffee blend or coffee is not freshly roasted or adjust the grinder as directed in par.5 (Reduce the dose is ground too finely. Optional) 40 Problems Problems - Causes - Remedies Causes Remedies The coffee is not creamy on the The blend is not suitable or the Change the coffee blend or surface coffee is not freshly roasted or adjust the grinder as directed is ground too coarsely. in par.5 (Increase the dose Optional) Coffee leaks outside the brew Brew group unit clogged group Clean the brew group and its outlets The machine takes too long to The machine water system is Descale the machine (Par.12) heat up or the quantity of water clogged by scale dispensed from the tube is limited The brew group cannot be Brew group out of place taken out Dump box still in place Turn on the machine. Close the service door. The brew group will automatically go back into place. Remove the dump box before taking out the dispensing unit If you should have a problem that is not dealt with in the above table or is not resolved by any of these solutions please contact an authorized service center. Note 41 COD. 1.6.593.77.00 REV. 01 DEL 15/06/00