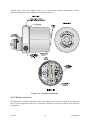
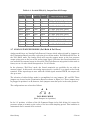
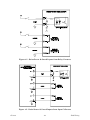
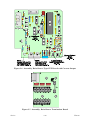
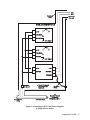
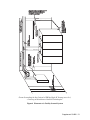
1
Instruction Manual
CI-9110
Mar. 2007
Remote Set Regulator
Model 9110-00A
www.EmersonProcess.com/Bristol
Series 9110
IMPORTANT! READ INSTRUCTIONS BEFORE STARTING!
Be sure that these instructions are carefully read and understood before any
operation is attempted. Improper use of this device in some applications may result
in damage or injury. The user is urged to keep this book filed in a convenient location
for future reference.
These instructions may not cover all details or variations in equipment or cover
every possible situation to be met in connection with installation, operation or maintenance. Should problems arise that are not covered sufficiently in the text, the purchaser is advised to contact Bristol for further information.
EQUIPMENT APPLICATION WARNING
The customer should note that a failure of this instrument or system, for
whatever reason, may leave an operating process without protection. Depending upon
the application, this could result in possible damage to property or injury to persons.
It is suggested that the purchaser review the need for additional backup equipment
or provide alternate means of protection such as alarm devices, output limiting, failsafe valves, relief valves, emergency shutoffs, emergency switches, etc. If additional
in-formation is required, the purchaser is advised to contact Bristol .
RETURNED EQUIPMENT WARNING
When returning any equipment to Bristol for repairs or evaluation, please note
the following: The party sending such materials is responsible to ensure that the
materials returned to Bristol are clean to safe levels, as such levels are defined and/or
determined by applicable federal, state and/or local law regulations or codes. Such
party agrees to indemnify Bristol and save Bristol harmless from any liability or
damage which Bristol may incur or suffer due to such party's failure to so act.
ELECTRICAL GROUNDING
Metal enclosures and exposed metal parts of electrical instruments must be
grounded in accordance with OSHA rules and regulations pertaining to "Design
Safety Standards for Electrical Systems," 29 CFR, Part 1910, Subpart S, dated: April
16, 1981 (OSHA rulings are in agreement with the National Electrical Code).
The grounding requirement is also applicable to mechanical or pneumatic instruments that include electrically-operated devices such as lights, switches, relays,
alarms, or chart drives.
EQUIPMENT DAMAGE FROM ELECTROSTATIC DISCHARGE VOLTAGE
This product contains sensitive electronic components that can be damaged by
exposure to an electrostatic discharge (ESD) voltage. Depending on the magnitude
and duration of the ESD, this can result in erratic operation or complete failure of the
equipment. Read supplemental document S14006 at the back of this manual for
proper care and handling of ESD-sensitive components.
Bristol Inc. 1100 Buckingham Street, Watertown, CT 06795
Telephone (860) 945-2200
WARRANTY
A.
Bristol warrants that goods described herein and manufactured by Bristol are free
from defects in material and workmanship for one year from the date of shipment
unless otherwise agreed to by Bristol in writing.
B.
Bristol warrants that goods repaired by it pursuant to the warranty are free from
defects in material and workmanship for a period to the end of the original warranty
or ninety (90) days from the date of delivery of repaired goods, whichever is longer.
C.
Warranties on goods sold by, but not manufactured by Bristol, are expressly limited
to the terms of the warranties given by the manufacturer of such goods.
D.
All warranties are terminated in the event that the goods or systems or any part
thereof are (i) misused, abused or otherwise damaged, (ii) repaired, altered or
modified without Bristol's consent, (iii) not installed, maintained and operated in
strict compliance with instructions furnished by Bristol, or (iv) worn, injured or
damaged from abnormal or abusive use in service time.
E.
THESE WARRANTIES ARE EXPRESSLY IN LIEU OF ALL OTHER
WARRANTIES EXPRESS OR IMPLIED (INCLUDING WITHOUT LIMITATION
WARRANTIES AS TO MERCHANTABILITY AND FITNESS FOR A PARTICULAR
PURPOSE), AND NO WARRANTIES, EXPRESS OR IMPLIED, NOR ANY
REPRESENTATIONS, PROMISES, OR STATEMENTS HAVE BEEN MADE BY
BRISTOL UNLESS ENDORSED HEREIN IN WRITING. FURTHER, THERE ARE
NO WARRANTIES WHICH EXTEND BEYOND THE DESCRIPTION OF THE
FACE HEREOF.
F.
No agent of Bristol is authorized to assume any liability for it or to make any written
or oral warranties beyond those set forth herein.
REMEDIES
A.
Buyer's sole remedy for breach of any warranty is limited exclusively to repair or
replacement without cost to Buyer of any goods or parts found by Seller to be
defective if Buyer notifies Bristol in writing of the alleged defect within ten (10) days
of discovery of the alleged defect and within the warranty period stated above, and if
the Buyer returns such goods to Bristol's Watertown office, unless Bristol's Watertown office designates a different location, transportation prepaid, within thirty (30)
days of the sending of such notification and which upon examination by Bristol
proves to be defective in material and workmanship. Bristol is not responsible for
any costs of removal, dismantling or reinstallation of allegedly defective or defective
goods. If a Buyer does not wish to ship the product back to Bristol, the Buyer can
arrange to have a Bristol service person come to the site. The Service person's
transportation time and expenses will be for the account of the Buyer. However,
labor for warranty work during normal working hours is not chargeable.
B.
Under no circumstances will Bristol be liable for incidental or consequential
damages resulting from breach of any agreement relating to items included in this
quotation, from use of the information herein or from the purchase or use by Buyer,
its employees or other parties of goods sold under said agreement.
How to return material for Repair or Exchange
Before a product can be returned to Bristol for repair, upgrade, exchange, or to verify
proper operation, form (GBU 13.01) must be completed in order to obtain a RA (Return
Authorization) number and thus ensure an optimal lead time. Completing the form is very
important since the information permits the Bristol Repair Dept. to effectively and
efficiently process the repair order.
You can easily obtain a RA number by:
A. FAX
Completing the form (GBU 13.01) and faxing it to (860) 945-3875. A Bristol Repair
Dept. representative will return call (or other requested method) with a RA number.
B. E-MAIL
Accessing the form (GBU 13.01) via the Bristol Web site (www.bristolbabcock.com)
and sending it via E-Mail to [email protected]. A Bristol Repair Dept.
representative will return E-Mail (or other requested method) with a RA number.
C. Mail
Mail the form (GBU 13.01) to
Bristol Inc.
Repair Dept.
1100 Buckingham Street
Watertown, CT 06795
A Bristol Repair Dept. representative will return call (or other requested method)
with a RA number.
D. Phone
Calling the Bristol Repair Department at (860) 945-2442. A Bristol Repair Department representative will record a RA number on the form and complete Part I, then
send the form to the Customer via fax (or other requested method) for Customer
completion of Parts II & III.
A copy of the completed Repair Authorization Form with issued RA number should be included with the product being returned. This will allow us to quickly track, repair, and
return your product to you.
Bristol Inc. Repair Authorization Form
(off-line completion)
(Providing this information will permit Bristol Inc. to effectively and efficiently process your return. Completion is required
to receive optimal lead time. Lack of information may result in increased lead times.)
Date___________________
RA #___________________SH_
Standard Repair Practice is as follows: Variations to this is
practice may be requested in the “Special Requests” section.
• Evaluate / Test / Verify Discrepancy
• Repair / Replace / etc. in accordance with this form
• Return to Customer
Part I
Line No.____________
Please be aware of the Non warranty standard charge:
• There is a $100 minimum evaluation charge, which is
applied to the repair if applicable (√ in “returned”
B,C, or D of part III below)
Please complete the following information for single unit or multiple unit returns
Address No.
(office use only) Address No.
(office use only)
Bill to :
Ship to:
Purchase Order:
Contact Name:____________________________________
Phone:
Fax:
Part II
E-Mail:
Please complete Parts II & III for each unit returned
Model No./Part No.
Description
Range/Calibration
S/N
Reason for return :
1.
Failure
Upgrade
Verify Operation
Other
Describe the conditions of the failure (Frequency/Intermittent, Physical Damage, Environmental Conditions,
Communication, CPU watchdog, etc.)
(Attach a separate sheet if necessary)
2.
Comm. interface used:
3.
What is the Firmware revision? _____________________
Standalone
RS-485
Ethernet
Other:______________
Modem (PLM (2W or 4W) or SNW)
What is the Software &version?
Part III If checking “replaced” for any question below, check an alternate option if replacement is not available
A. If product is within the warranty time period but is excluded due
to Bristol’s warranty clause, would you like the product:
repaired
returned
replaced
scrapped?
B. If product were found to exceed the warranty period,
would you like the product:
repaired
returned
replaced
scrapped?
C. If product is deemed not repairable would you like your product:
returned
replaced
scrapped?
D. If Bristol is unable to verify the discrepancy, would you like the product:
returned
replaced
*see below?
* Continue investigating by contacting the customer to learn more about the problem experienced? The person to contact
that has the most knowledge of the problem is:
______________________________ phone_____________________
If we are unable to contact this person the backup person is: _________________________ phone_____________________
Special Requests: ____________________________________________________________________________________
____________________________________________________________________________________________________
Ship prepaid to:
Bristol Inc., Repair Dept., 1100 Buckingham Street, Watertown, CT 06795
Form GBU 13.01 Rev. C 04/27/06
Phone: 860-945-2442
Fax: 860-945-2220
Bristol
Training
GET THE MOST FROM YOUR BRISTOL
BABCOCK INSTRUMENT OR SYSTEM
•
Avoid Delays and problems in getting your system on-line
•
Minimize installation, start-up and maintenance costs.
•
Make the most effective use of our hardware and software.
•
Know your system.
As you know, a well-trained staff is essential to your operation. Bristol Inc. offers a full
schedule of classes conducted by full-time, professional instructors. Classes are offered
throughout the year at three locations: Houston, Orlando and our Watertown, CT
headquarters. By participating in our training, your personnel can learn how to install,
calibrate, configure, program and maintain any and all Bristol products and realize the full
potential of your system.
For information or to enroll in any class, contact our training department in Watertown at
(860) 945-2343. For Houston classes, you can also contact our Houston office, at (713) 6856200.
A Few Words About Bristol Inc.
For over 100 years, Bristol® has been providing innovative solutions for the measurement
and control industry. Our product lines range from simple analog chart recorders, to
sophisticated digital remote process controllers and flow computers, all the way to turnkey
SCADA systems. Over the years, we have become a leading supplier to the electronic gas
measurement, water purification, and wastewater treatment industries.
On off-shore oil platforms, on natural gas pipelines, and maybe even at your local water
company, there are Bristol Inc. instruments, controllers, and systems running year-in and
year-out to provide accurate and timely data to our customers.
Getting Additional Information
In addition to the information contained in this manual, you may receive additional assistance in using this product from the following sources:
Help Files / Release Notes
Many Bristol software products incorporate help screens. In addition, the software typically
includes a ‘read me’ release notes file detailing new features in the product, as well as other
information which was available too late for inclusion in the manual.
Contacting Bristol Inc. Directly
Bristol's world headquarters is located at 1100 Buckingham Street, Watertown,
Connecticut 06795, U.S.A.
Our main phone numbers are:
(860) 945-2200
(860) 945-2213 (FAX)
Regular office hours are Monday through Friday, 8:00AM to 4:30PM Eastern Time,
excluding holidays and scheduled factory shutdowns. During other hours, callers may leave
messages using Bristol's voice mail system.
Telephone Support - Technical Questions
During regular business hours, Bristol's Application Support Group can provide telephone
support for your technical questions.
For technical questions about TeleFlow products call (860) 945-8604.
For technical questions about ControlWave call (860) 945-2394 or (860) 945-2286.
For technical questions regarding Bristol’s OpenEnterprise product, call (860) 945-3865
or e-mail: [email protected]
For technical questions regarding ACCOL products, OpenBSI Utilities, UOI and all other
software except for ControlWave and OpenEnterprise products, call (860) 945-2286.
For technical questions about Network 3000 hardware, call (860) 945-2502.
You can e-mail the Application Support Group at: [email protected]
The Application Support Group maintains an area on our web site for software updates and
technical information. Go to: www.bristolbabcock.com/services/techsupport/
For assistance in interfacing Bristol hardware to radios, contact Bristol’s Communication
Technology Group in Orlando, FL at (407) 629-9463 or (407) 629-9464.
You can e-mail the Communication Technology Group at:
[email protected]
Telephone Support - Non-Technical Questions, Product Orders, etc.
Questions of a non-technical nature (product orders, literature requests, price and delivery
information, etc.) should be directed to the nearest sales office (listed on the rear cover of
this manual) or to your Bristol-authorized sales representative.
Please call the main Bristol Inc. number (860-945-2200) if you are unsure which office
covers your particular area.
Visit our Site on the World Wide Web
For general information about Bristol Inc. and its products, please visit our site on the
World Wide Web at: www.bristolbabcock.com
Training Courses
Bristol’s Training Department offers a wide variety of courses in Bristol hardware and
software at our Watertown, Connecticut headquarters, and at selected Bristol regional
offices, throughout the year. Contact our Training Department at (860) 945-2343 for course
information, enrollment, pricing, and scheduling.
CI-9110
MODEL 9110-00A REMOTE SET REGULATOR
TABLE OF CONTENTS
SECTION
TITLE
PAGE #
Section 1 -INTRODUCTION
1.1
1.2
1.2.1
1.2.2
1.2.3
1.2.4
1.3
PRODUCT DESCRIPTION ...............................................................................................1-1
THEORY OF OPERATION................................................................................................1-1
Analog Regulator Model .....................................................................................................1-1
Guard Input..........................................................................................................................1-4
Current Output.....................................................................................................................1-4
Raise/Lower Regulator Model.............................................................................................1-6
DATA PLATE .......................................................................................................................1-6
Section 2 - INSTALLATION
2.1
2.2
2.2.1
2.2.2
2.3
2.3.1
2.3.2
2.3.3
2.3.4
2.4
2.4.1
2.4.2
2.5
GENERAL.............................................................................................................................2-1
MOUNTING..........................................................................................................................2-1
Two-Inch Pipe Mounting.....................................................................................................2-1
In-Line Mounting.................................................................................................................2-1
PRESSURE CONNECTIONS.............................................................................................2-2
General Piping......................................................................................................................2-2
Moisture in Lines.................................................................................................................2-3
Line Size................................................................................................................................2-4
Venting ..................................................................................................................................2-4
INTERNAL ACCESS...........................................................................................................2-4
Body and Cover ....................................................................................................................2-4
Electrical Conduit Port........................................................................................................2-5
INSTALLATION IN HAZARDOUS LOCATIONS...........................................................2-5
Section 3 - BOARD SETUP
3.1
3.1.1
3.2
3.3
3.3.1
3.3.2
3.4
3.5
3.5.1
3.5.2
3.6
3.7
USING OPTION SWITCHES ............................................................................................3-1
Switch Functions..................................................................................................................3-2
ANALOG INPUT MODELS................................................................................................3-2
RAISE/LOWER MODELS...................................................................................................3-2
Continuous Signal................................................................................................................3-3
Incremental Signal...............................................................................................................3-3
INPUT FILTER....................................................................................................................3-4
GUARD INPUT....................................................................................................................3-5
Guard logic............................................................................................................................3-5
Static or Dynamic Guard Input..........................................................................................3-5
OUTPUT RATE OF CHANGE............................................................................................3-5
ANALOG FAILURE MODES (Fail Hold & Fail Zero)
.....................................................3-6
Section 4 - FIELD WIRING
4.1
4.2
GENERAL.............................................................................................................................4-1
TERMINAL BLOCK IDENTIFICATION..........................................................................4-1
9110 Remote Set Regulator
Contents / 0-1
SECTION
TITLE
PAGE #
Section 4 - FIELD WIRING (Continued)
4.3
4.4
4.5
4.6
4.7
4.8
4.9
ANALOG VOLTAGE INPUT (1-5 V) WITH GUARD .................................................. 4-2
ANALOG CURRENT INPUT (4-20 mA) WITH GUARD............................................. 4-4
RAISE/LOWER INPUTS WITH GUARD ..................................................................... 4-4
4-20 mA CURRENT OUTPUT....................................................................................... 4-6
DC POWER ..................................................................................................................... 4-6
OPERATING NOTES..................................................................................................... 4-7
INITIAL CHECKS.......................................................................................................... 4-7
Section 5 - SERVICE
5.1
5.2
5.3
5.3.1
5.3.2
5.3.3
5.4
5.5
5.6
5.7
5.7.1
5.7.2
5.7.3
5.8
5.8.1
5.8.2
5.9
GENERAL....................................................................................................................... 5-1
TROUBLESHOOTING HINTS ..................................................................................... 5-2
SETTING OUTPUT LIMITS ......................................................................................... 5-3
General Principles .......................................................................................................... 5-3
Test Setup ....................................................................................................................... 5-3
Procedure ........................................................................................................................ 5-3
CALIBRATION TEST SETUP ...................................................................................... 5-4
CALIBRATION PRECAUTION .................................................................................... 5-4
PRELIMINARY CALIBRATION CHECK .................................................................... 5-5
DETAILED CALIBRATION FOR ANALOG MODELS............................................... 5-6
Feedback Zero & Span.................................................................................................... 5-6
Current Output Span & Load ........................................................................................ 5-6
Pressure Output Check .................................................................................................. 5-6
DETAILED CALIBRATION FOR RAISE/LOWER MODEL....................................... 5-7
Feedback Zero & Span.................................................................................................... 5-7
Current Output Span & Load ........................................................................................ 5-8
PCB REFERENCE DRAWINGS ................................................................................... 5-8
Section 6 - SPECIFICATIONS
6.1
6.2
6.3
6.4
6.5
6.6
6.7
6.8
6.9
6.10
6.11
ANALOG INPUT MODEL ............................................................................................. 6-1
RAISE/LOWER INPUT MODEL................................................................................... 6-1
GUARD INPUT .............................................................................................................. 6-2
ANALOG OUTPUT ........................................................................................................ 6-2
ACCURACY - ANALOG MODELS................................................................................ 6-2
ACCURACY - RAISE/LOWER MODELS ..................................................................... 6-2
DC POWER ..................................................................................................................... 6-2
STEPPER DRIVE MECHANISM.................................................................................. 6-2
PRESSURE REGULATOR ASSEMBLY ...................................................................... 6-3
INSTRUMENT ENCLOSURE....................................................................................... 6-3
ENVIRONMENT. ........................................................................................................... 6-3
Section 7 - PARTS
7.1
7.2
MODEL 9110 MAIN PARTS.......................................................................................... 7.1
REMOTE SET REGULATOR BASIC PARTS.............................................................. 7-4
SUPPLEMENTAL INSTRUCTIONS
GUIDELINES FOR SYSTEM GROUNDING ......................................................... S1400
CARE AND HANDLING OF PC BOARDS AND
ESD-SENSITIVE COMPONENTS ........................................................................ S14006
0-2 / Contents
9110 Remote Set Regulator
Chapter 1
INTRODUCTION
1.1 PRODUCT DESCRIPTION
Series 9110-00A, Remote Set Regulators are transducer devices that use an electrical input
signal to set the level of a pneumatic output signal. Depending on the actual model, the
electrical input may be either an analog or a raise/lower type signal. For analog models, the
input can be configured for a 1-5 V dc or 4-20 mA dc signal. For the Raise/Lower models,
the input can be configured to accept a continuous or pulse incremental dc signal.
The pneumatic output of a Remote Set Regulator may be specified with a 3-15, 3-27 or 6-30
psi output. All models can operate from pressure supplies up to 100 psi (Max). Minimum
supply pressure must be at least 3 psi above the maximum range value.
The Regulator also provides a guard input. This signal can be used to Enable (turn ON) or
Inhibit (turn OFF) the input for telemetry and security applications. When the guard signal
is Enabled, it allows the output to respond to a change of the input signal.
The Remote Set Regulator is contained in a weatherproof, explosion-proof enclosure having
a detachable threaded cover. Removal of the cover provides access to the field wiring
terminals and the programmable option switches.
Regulators are factory-furnished for 12 Vdc or 24 Vdc supply operation. These voltage
ratings are fixed and cannot be changed in the field.
In-line or pipe mounting are offered as for installations. The former uses a 1/4 inch rigid
pressure line for support, while the latter includes a special bracket for two-inch pipe
mounting.
1.2 THEORY OF OPERATION
The Remote Set Regulator contains a CPU Board and a Termination Board. The CPU
Board contains the central processor and its associated circuitry, while the Termination
Board contains the field wiring terminals and the input protection circuitry.
The Regulator is offered in Analog and Raise/Lower models. Both types use similar
circuitry but they perform different functions. A description of the Analog model follows
while the Raise/Lower model is explored later in the text.
1.2.1 Analog Regulator Model
The Analog Regulator circuitry is shown in the block diagram of Figure 1-2. In this circuit,
the Command signal (1-5 V or 4-20 mA) is applied to a buffer amplifier which drives the
plus (+) input of the Lower Comparator and the minus (-) input of the Raise Comparator.
Also note that the opposing inputs of both comparators are referenced to the same point
which is the center arm of a feedback pot.
CI-9110
1-1
Introduction
Figure 1-1 - Remote Set Regulator
The CPU, clock and reset circuitry performs the timing, measurement and decision making
functions of the Remote Set Regulator. This circuit analyzes the comparator outputs and
sends data to the stepper driver which, in turn, pulses the stepper motor in either direction.
Since the driveshaft of the stepper motor is mechanically coupled to the feedback pot and a
pressure regulator valve, both will be set in accordance with data received from the CPU.
Introduction
1-2
CI-5450
Figure 1-2 - Block Diagram of Analog Type Regulator
CI-9110
1-3
Introduction
The feedback pot connects across a regulated +5 Vdc source. The voltage at the feedback
pot’s contact corresponds to the mechanical position of the pressure regulator. This
reference voltage is applied to the Raise and Lower Comparators.
If an increase in signal level occurs at the command input, the Raise Comparator will
become unbalanced since this signal will exceed the voltage present at the center arm of the
pot. The Lower Comparator will be unaffected since the input signal will be of opposite
polarity compared to the feedback pot voltage. The CPU senses the increased output at the
Raise Comparator and outputs a signal that drives the stepper motor in an upward
direction. The upward driving action will continue until the voltage at the pot’s center arm
becomes equal to the new signal level. Once the comparator is balanced, the CPU will turn
off the stepper motor and the pressure regulator will provide a corresponding pressure output level. Input changes that reduce the output value will have the opposite effect.
The comparators are biased so that they include a certain amount of hysteresis. This bias
keeps the stepper motor in a stable, deenergized zone that is less affected by noise bursts
that may appear on the command input line.
The stepper motor is actuated in incremental steps. The pulse signals received from the
stepper driver will increment the motor one step at a time. The motor requires approximately 22,000 steps for full rotation.
1.2.2 Guard Input
An optional signal can be applied to the guard input to Enable or Inhibit the command Signal. The guard circuit consists of a non-polarized, opto-isolated circuit whose output is
applied to the CPU via a logic circuit.
Analog Regulator models include a fault detector circuit that is activated through jumper
selection. The fault detector monitors the analog input value for a value that is less than
0% of scale. This condition, which occurs when the AI command input signal fails, will stop
the stepper motor and maintain the last output value prior to the failure.
Two types of signal failure modes are provided by jumper selection as shown at the left of
Figure 1-2. Position "A" of the jumper provides fail-hold mode, while position "B" provides
fail-hold zero. Should the AI signal fail (signal < 0% of scale), fail-zero mode will drive the
output slowly to zero, while fail-hold mode will retain its last output value.
Mechanical limiting is also provided by adjustable tangs located on the main drive gear of
the stepper motor. When the input signal is of a value that causes the stepper to drive
against a limit, a mechanical clutch on the drive shaft will slip. After making several
revolutions, the software will time out and cut off power to the motor. Power will be reapplied when the signal level returns to the normal operating range.
1.2.3 Current Output
A 4-20 mA current output is obtained via an amplifier/converter circuit. The input to this
circuit is the feedback pot whose center arm adjusts the current output to track the valve
position.
Introduction
1-4
CI-5450
Figure 1-3 - Block Diagram of Raise/Lower Type Regulator
CI-9110
1-5
Introduction
1.2.4 Raise/Lower Regulator Model
A block diagram for the Raise/Lower Regulator model is shown in Figure 1-3. It will be
noted that this diagram is similar to the Analog Regulator except for the input circuit arrangement. This circuit contains Raise, Lower and Guard input circuits which are optoisolated.
The outputs of all three opto-isolators are applied to a logic circuit that checks the status of
the three signals and determines whether the output will be in a Raise, Lower or Guard
mode.
Each Raise and Lower input may be configured to accept a continuous or pulse incremental
signal. The continuous signal is a dc input that, when switched to an ON state, allows the
stepper motor to rotate in the proper direction; when switched to an OFF state, it stops the
stepper motor and maintains a corresponding output value. The pulse incremental signal
can be a single dc pulse or a pulse train input that causes stepper motor to change the output by an incremented amount. The amount of the output increment is determined by the
settings of the configuration switches.
The outputs of all three opto-isolators in Figure 1-3 are status signals that, when processed
by the CPU, establish a pressure output value that corresponds to the input signals. The
remainder of the circuitry shown in the illustration operates in the same manner as
described for Analog Regulators.
1.3 DATA PLATE
A data plate affixed to the Remote Set Regulator lists the instrument model, serial number
and other relevant information. The features and options present in an instrument can be
determined by comparing its model number to the model breakdown of Table 1-A.
Remote Set Regulators certified for use in hazardous areas will include the seal of the
certifying laboratory on the data plate. Certification will also be indicated as an element of
the instrument model number listed on the data plate.
Table 1A - Model Number Breakdown
- SAMPLE MODEL NUMBER -
# = BASE MODEL NUMBER
A = ELECTRICAL INPUT
B = POWER
1 = Raise/lower Input
2 = Analog Input (1-5V or 4-20 mA)
Introduction
1 = 12V dc
2 = 24V dc
1-6
CI-5450
Table 1A - Model Number Breakdown (Continued)
C = PNEUMATIC OUTPUT
D = MOUNTING ARRANGEMENT
1 = 3-15 psi
2 = 3-27 psi
3 = 6-30 psi
1 = 2 In. Pipe Mtg. Bracket
2 = In-Line Pressure Pipe
E = CERTIFICATION
1 = None
2 = FM-EXP/NI
3 = CSA-EXP
NOTE: This table is only provided for product identity and not for ordering purposes. Contact the Bristol Sales Department for
ordering information.
CI-9110
1-7
Introduction
BLANK PAGE
Chapter 2
INSTALLATION
2.1 GENERAL
Proper installation techniques will ensure highest performance and also minimize
measurement errors. The Remote Set Regulator should be mounted in a location that is not
subject to radical temperature extremes, vibration and shock. See Section 6 Specifications
for environmental operating conditions.
This section describes the mechanical mounting arrangements of the Regulator and
explains the technique of bringing in wiring via electrical conduit.
The installation procedures described herein are furnished as a guideline and cannot cover
all possible variations. All deviations from the installation procedures described herein are
at the discretion of the user.
2.2 MOUNTING
The overall mounting dimensions for the unit are given in Figure 2-1. Be sure that the
selected site has sufficient clearance to remove the Regulator cover and access internal
switches and terminals. Choose the appropriate mounting arrangement below as required
2.2.1 Two-Inch Pipe Mounting
Refer to the overall dimension of Figure 2-1 for views of the universal pipe mounting
bracket. For this type of installation, the bracket is assembled to the Regulator using three
screws. Select the desired set of bracket holes for either vertical or horizontal mounting
pipes.
Once the bracket is mounted, position the assembly next to the pipe as required and install
the u-bolts from the hardware kit into the appropriate bracket holes. Install nuts on the ubolts and tighten them until the instrument is self-supporting.
2.2.2 In-Line Mounting
In-line mounting can be used when the pressure line and electrical conduit provide
sufficient strength to support the weight of the unit. This type of mounting should never be
attempted on lines constructed of soft or low-strength materials. In-line mounting is also
not recommended for non-secured lines subject to excessive vibration or hammering.
Once the desired location has been selected, cut the pressure pipe and install proper fittings
(1/4 in. NPT male) to mate with the two pressure connection ports on the Regulator. It is
recommended that unions and shutoff valves also be installed in each line to allow an easy
disconnect for maintenance or troubleshooting operations.
CI-9110
2-1
Installation
2.3 PRESSURE CONNECTIONS
Remote Set Regulators are furnished in models that provide 3-15, 3-27 or 6-30 psig outputs.
All models will accept 100 psig maximum on the supply side. Pressure supplies that exceed
this value will require an external pressure regulator or limiter.
Figure 2-1 - Overall Mounting Dimensions
2.3.1 General Piping
A basic piping diagram is shown in Figure 2-3. The pressure supply line may include a
pressure gauge, external regulator, filter and a shutoff valve as shown. Union type
connections are recommended for pressure lines to allow an easy disconnect. A pressure
Installation
2-2
CI-9110
shutoff valve allows the supply source to be closed down during maintenance checks
without disturbing other equipment operating on the line.
Figure 2-2 - Regulator Assembly
2.3.2 Moisture in Lines
The Regulator should be installed so that the supply and output lines slope downward and
away. This arrangement allows any condensate trapped in the lines to drain away from the
instrument.
CI-9110
2-3
Installation
2.3.3 Line Size
For most installations 1/4 inch pipe or tubing is satisfactory. However, if the input or
output lines run a great distance, the response lag time may become objectionable. In these
instances the use of 3/8 inch tubing is recommended.
2.3.4 Venting
The user should note that the Remote Set Regulator bleeds a small amount of pressure into
the atmosphere during operation. A 1/4 inch NPT vent is provided on the pressure regulator
body for this purpose. The vent location is shown in Figure 2-3.
When air is used as the pressure source, the vent fitting may be allowed to bleed into the
atmosphere. If fuel gas or other hazardous type gases are used as the pressure source for a
Remote Set Regulator, the VENT port must be piped to a safe location.
** Warning **
Covers of Remote Set Regulators operating in hazardous
areas should not be removed. If servicing is required, the
environment should first be made safe or the supply power
should be turned off, allowing the instrument to be disconnected and removed to a safe area.
Figure 2-3 - Typical Pressure Connections
2.4 INTERNAL ACCESS
The subtopics that follow discuss the main mechanical and electrical assemblies that will
be accessed during installation. They describe the method of removing and installing the
cover, the use of the electrical conduit ports, and the installation precautions to be
observed.
2.4.1 Body and Cover
The Remote Set Regulator is contained in a aluminum body with a gasketed screw-on cover
as shown in Figure 2-2. Four raised lugs on the cover permit it to be loosened or tightened
Installation
2-4
CI-9110
using a flat metal bar or similar tool. When replacing the cover, it should be snugged in and
not over-tightened. The threads of the cover should also be coated with a layer of anti-seize
compound to prevent lockup.
When the cover is removed, the PC board assemblies become accessible (see right view of
Figure 2-3). The Termination Board contains the field wiring terminals while the CPU
Board contains the option switches. The gear mechanism and feedback potentiometer are
also accessible.
2.4.2 Electrical Conduit Port
Two 3/4 in. NPT electrical ports are provided at the lower part of the housing. Either or
both ports may be used to bring in signal and supply wiring (left of Figure 2-3). These ports
accommodate a standard 3/4 inch NPT pipe thread connection. If a port is not used, it must
have a conduit plug installed to maintain the explosion-proof integrity of the unit.
2.5 INSTALLATION IN HAZARDOUS LOCATIONS
Instruments that operate in hazardous locations must adhere to the following rules of
safety:
A. All instrument wiring that runs through a hazardous area must be enclosed in metal
conduit. The point where the conduit connection meets the unit's housing should be
properly tightened to prevent entry of gas or other ignitable substances. Explosion-proof
wiring practices must be followed to prevent flashback through the conduit.
B. The cover of the installed unit must be screwed in hand tight and fully seated. The cover
must not be damaged and no threads should be stripped.
C. The cover of the unit must never be removed during operation unless the atmosphere is
made safe or all electrical power is removed from the instrument.
** Warning **
No maintenance procedures should be performed while the
unit is powered and operating in a combustible or
explosive environment. If on-site maintenance is a
necessity, steps must be taken to make the environment
safe (non-hazardous). Otherwise, the instrument must be
powered down, unwired, and brought into a safe area. A
failure to observe these precautions could result in fire or
explosion and injury to persons.
** Safety Note **
For certified instruments, all installation and operating
practices must conform to area classification and safety
codes as specified by the certifying laboratory. The seal of
the certifying laboratory will appear on the instrument
data plate along with the model and serial number.
CI-9110
2-5
Installation
BLANK PAGE
Chapter 3
BOARD SETUP
3.1 USING OPTION SWITCHES
Two switch assemblies (SW1 and SW2) are used to set options and select ranges. These
switches are located on the CPU Board as shown in Figure 3-1. Each assembly contains
eight (8) miniature SPST switches. The individual switches of each package are identified
as subsets of the main switch, e.g., SW1-1, SW1-2, etc.
Two types of switch assemblies are used for Regulators. One type uses cradle switches,
while the other uses slide-type switches. The operation of each type differs as follows:
Cradle Switches with OPEN Designation:
OPEN side pressed down = OFF (open circuit)
Numbered side pressed down = ON (closed circuit)
Slide Switches with ON Designation:
Set in direction of ON arrow = ON (closed circuit)
Set in opposite direction of arrow = OFF (open circuit)
The switch assemblies are fragile and require careful handling. Use a small, blunt object
such as a miniature screwdriver to set the switch positions. Do not use pencils, ballpoint
pens, or extremely sharp objects for this purpose.
WARNING
When starting a unit for the first time, all switch options must be set before
any power is applied. Improper switch settings can cause improper
operation or dangerous control situations that could damage process
equipment and property, or cause injury to persons.
NOTE
Attempting to change settings of any switch (excluding SW2-6 and SW2-8)
while the unit is on line will not produce a change of configuration.
Although the switches have been set, the configuration will not take effect
until the power applied to the Regulator has been turned OFF and, after a
moment, turned back ON again.
If switch settings are changed without turning the power OFF, the present
on-line configuration will remain in effect until the unit is turned OFF and
powered up again.
CI-9110
3-1
Board Setup
3.1.1 Switch Functions
The Regulator assembly is configured by two, eight-switch packages which perform the
functions listed in Table 3-1.
Table 3-1 - Regulator Assembly Switch SW1 & SW2 Functions & Settings
Switch
Label
SW1-1
SW1-2
SW1-3
SW1-4
SW1-5
SW1-6
SW1-7
SW1-8
SW2-1
SW2-2
SW2-3
SW2-4
SW2-5
SW2-6
SW2-7
SW2-8
Switch
Function
Page
Ref.
R/L % per pulse increment
R/L % per pulse increment
R/L % per pulse increment
R/L % per pulse increment
R/L % per pulse increment
Not Used
Not Used
Input Filter
Guard (Dynamic/Static)
Actuator Output Rate of Change
Actuator Output Rate of Change
Actuator Output Rate of Change
Actuator Output Rate of Change
Guard (Active/Inactive)
Not Used
Analog Input (V or I)
3-4
3-4
3-4
3-4
3-4
None
None
3-4
3-5
3-6
3-6
3-6
3-6
3-5
None
3-2
*
Your Setting
**
Your Notes
* Record your switch settings (ON or OFF) here for future reference.
** List your corresponding switch functions or values here.
3.2 ANALOG INPUT MODELS
Initially, it will be necessary to check the position of switches SW1-1 through SW1-5. These
switches must be set to their OPEN positions to properly disable the functions associated
with Raise/Lower models. The other uses of these switches are described under topic 3.3.
Analog models can be set to accept a 4-20 mA or 1-5 V dc signal at the Command Input.
Switch SW2-8 selects these outputs as follows:
SW2-8
Analog Range
Close
Open
4-20 mA dc
1-5 V dc
3.3 RAISE/LOWER INPUT MODELS
Raise/Lower Actuator models can be set for continuous or incremental-type input signals
via switches SW1-1 through SW1-5. The switch positions are shown in Table 3-2. The
switch selections are described as follows:
Board Setup
3-2
CI-9110
3.3.1 Continuous Signal
A continuous input signal is one that, when placed in a TRUE state, will cause the output
to change until the input is set FALSE. To achieve this mode of operation, all five switches
of SW1 should be set to the OPEN position (bottom condition of Table 3-2). This will configure the Regulator so that its output will change as long as the one signal applied to the
Raise and Lower Command Inputs is TRUE (dc = ON) and the other is FALSE (dc = OFF).
No other change will occur when both inputs are simultaneously set FALSE or TRUE.
Figure 3-1 - Option Switches on CPU Board
3.3.2 Incremental Signal
The five switches can be set for any increment from 0.110% per pulse to 1.830% per pulse.
The pulses that raise or lower the output perform in real time and are not stored. As a
requirement, each pulse must remain in a TRUE state for a period of time necessary for the
Remote Set Regulator to reach the new output value. Should the input change from a raise
to a lower operation (or vice-versa) before the completion of an incremental step, the unfinished increment will be cut off and the next pulse will be freshly processed.
A unit that is set up with a slower rate of change value or a greater percent of full scale
change per input pulse will require a longer input pulse. Therefore, the minimum time
period required for an ON and OFF pulse to produce an output change is dependent upon
the settings of switches SW1 (1-5). There are no maximum limits for either the ON or OFF
pulse periods (time between pulses).
CI-9110
3-3
Board Setup
The relationship between an ON and OFF pulse time periods are shown by the following
two equations:
1) T on Minimum (sec.) = (.01 SR) + K
2) T off Minimum (sec.) = K
Where:
T on Minimum
T off Minimum
S
R
K
=
=
=
=
=
Raise, Lower or Guard pulse
Time between pulses.
Incremental step value (Table 3-2)
Rate of output change (Table 3-3)
.04 sec. with R/L filter active or 0.01 sec. with R/L filter turned
off. See Section 3.6 - "Output Rate of Change."
Table 3-2 - Switch SW1 (1-5), Pulse Increments
SW1-5
SW1-4
SW1-3
SW1-2
SW1-1
Output Change
(nominal, ±15%)
Close
Close
Close
Close
Close
Disabled
Close
Close
Open
Open
Close
0.110% / Pulse
Open
Close
Close
Close
Open
0.182% / Pulse
Open
Close
Close
Open
Close
0.365% / Pulse
Open
Close
Open
Close
Close
0.730% / Pulse
Open
Close
Open
Open
Close
1.090% / Pulse
Open
Close
Open
Open
Open
1.280% / Pulse
Open
Open
Close
Close
Close
1.460% / Pulse
Open
Open
Close
Close
Open
1.640% / Pulse
Open
Open
Close
Open
Close
1.830% / Pulse
Open
Open
Open
Open
Open
Continuous *
*Analog Regulator models must always have these switches
set for Continuous Mode.
3.4 INPUT FILTER
A raise or lower input signal can contain noise pulses of an amplitude sufficient to affect
the output. In these situations, switch SW1-8 can be set to activate an input filter. The
switch positions are given below. For Analog models, this switch must always be set to
OPEN.
Board Setup
SW1-8
Filter Status
Close
Open
Active
Inactive
3-4
CI-9110
3.5 GUARD INPUT
The guard input (TB1-5 & TB1-6) is used to Enable or Inhibit the command input. This
feature provides assurance that the command input will read its signal only during a
security period selected by the user. The guard input can be used with either Analog or
Raise/Lower (R/L) models.
3.5.1 Guard Logic
The guard logic can be set for logical operation so that a TRUE-state signal “enables” the
Command input, while a FALSE-state signal “inhibits” it. The Guard input logic can also be
set internally so that it is kept ON continuously; in this mode the Command input will be
“enabled” at all times. Switch SW2-6 is used to set the guard mode as follows:
SW2-6
Guard Mode
Open
Close
Active (Guard signal must be in TRUE state to accept input)
Inactive (All inputs accepted)
3.5.2 Static or Dynamic Guard Input
The Guard input may be set to operate in a static or dynamic mode. The static mode, which
can be used with either Analog or Raise/Lower command signals, allows the output to
respond to a Command signal only when the Guard terminal is in a TRUE state.
The dynamic mode, which is only available with Raise/Lower models, responds to the
simultaneous transition of two pulse-type signals. Consequently, the output will only
change when a guard pulse and a command pulse (either a raise or lower) occur at the same
moment. Furthermore, both pulses must remain TRUE until the actuator output change is
complete. If either a guard or command pulse is not completed before the specified time, the
pressure output will be held at its last value until a new change occurs. This arrangement
can be used to obtain greater system security from extraneous signals and signal failure.
This feature should not be used with Analog models.
The selection of static or dynamic mode is obtained via switch SW2-1 as follows:
SW2-1
Guard Status
Close
Open
Dynamic (R/L type only)
Static (AI or R/L types) *
*
The "Open" position must always be used when "Fail Zero" mode is selected
(see Section 3.7 - "Analog Failure Modes").
3.6 OUTPUT RATE OF CHANGE
The Regulator includes provisions for changing the time required by the stepper motor to
sweep the entire pressure output range. This feature, which is available on both Analog and
Raise/Lower models, is implemented by setting switches SW2-2 through SW2-5 as noted in
Table 3-3.
CI-9110
3-5
Board Setup
Table 3-3 - Switch SW2 (2-5), Output Rate Of Change
SW2-5
SW2-4
SW2-3
SW2-2
Nominal
Rate Of Change, ±15%
Close
Close
Close
Close
1.8 Min. Full Scale Travel
Close
Close
Close
Open
5.5 Min. Full Scale Travel
Close
Close
Open
Close
11.0 Min. Full Scale Travel
Close
Close
Open
Open
16.5 Min. Full Scale Travel
Close
Open
Close
Close
21.9 Min. Full Scale Travel
Close
Open
Open
Close
32.9 Min. Full Scale Travel
Close
Open
Open
Open
38.3 Min. Full Scale Travel
Open
Close
Close
Open
43.8 Min. Full Scale Travel
Open
Close
Open
Open
60.3 Min. Full Scale Travel
Open
Open
Close
Close
65.85 Min. Full Scale Travel
Open
Open
Close
Open
69.4 Min. Full Scale Travel
3.7 ANALOG FAILURE MODES (Fail Hold & Fail Zero)
Analog models have an "Analog Fault Detector" feature which, when selected by jumpers on
the Termination Board, provides a selection of two failure modes, Fail Hold and fail Zero. In
the "Fail Hold" mode, the Analog Fault will stop the stepper motor at the last pressure
output value prior to the loss of the analog input signal. Note that the Guard terminals are
not available for external usage in this mode. The Fault Detector trip point for this mode is
factory set at 0.8 volts which corresponds to -5% of fullscale.
In the alternate "Fail Zero" mode, the Guard terminals are available for use with an
external signal. In this mode, the analog input signal is “enabled” by a signal at the Guard
terminal. If the input drops to zero while the Guard signal remains TRUE, the output will
also go to zero.
The selection of either failure mode is accomplished via two jumpers, W1 and W2. These
jumpers are located on the Termination Board as shown in Figure 3-2. These jumpers may
be plugged in position A or B; however, both jumpers must always be in the same position.
The configurations are selected as follows:
FAIL-HOLD MODE
(Both Jumpers in A position)
In the "A" position, a failure of the AI Command Input (value fails below 0%) causes the
pressure output to remain at the value of the last valid sampling period. This condition is
maintained until a normal AI is received.
Board Setup
3-6
CI-9110
FAIL-ZERO MODE
(Both Jumpers in B position)
In the "B" position (if the Guard signal remains TRUE), a failure of the AI Command Input
signal (value fails below 0%) causes the pressure output to decay to 0% of scale and remain
there until a normal AI is received. Should the Guard Input go FALSE prior to the AI
command failure, the last pressure output value will be held.
Figure 3-2 - Jumper Location on Analog Termination Board
CI-9110
3-7
Board Setup
BLANK PAGE
Chapter 4
FIELD WIRING
4.1 GENERAL
This section illustrates and describes the field wiring terminals and various wiring
configurations that apply to Analog, Raise/Lower, and Guard inputs, as well as the 4-20 mA
current output and the dc power source. The wiring arrangements described herein are
general and are not intended to cover every application.
4.2 TERMINAL BLOCK IDENTIFICATION
The Termination Board contains the field wiring terminals. Access to this board is obtained
by removing the cover as described in Section 2 - Installation.
Two terminal blocks (TB1 & TB2) are located on the termination Board as shown in Figure
4-1. Each of these blocks contain six (6) terminal screws for field wiring connections. TB1
contains terminals TB1-1 through TB1-6, while TB2 contains TB2-1 through TB2-6.
The function of each terminal depends on whether the Regulator is an Analog or
Raise/Lower model. The terminal designations for the Analog type are given in Table 4-1,
while designations for the R/L types are given in Table 4-2.
Figure 4-1 - Field Wiring Terminals
CI-9110
4-1
Field Wiring
Table 4-1 - Terminal Identification For Analog Input Models
TERMINAL
LEGEND
FUNCTION
TB1-1
TB1-2
TB1-3
TB1-4
TB1-5
TB1-6
Unused
Unused
Analog In+ (Command Input)
Analog In- (Command Input)
Guard
Guard Com
TB2-1
TB2-2
TB2-3
TB2-4
TB2-5
TB2-6
Unused
Current Out +
Current Out Supply +
Supply Unused
Green Screw
Chassis
Table 4-2 - Terminal Identification For Raise/Lower Models
TERMINAL
LEGEND
FUNCTION
TB1-1
TB1-2
TB1-3
TB1-4
TB1-5
TB1-6
Raise
(Command) Input)
Raise Com (Command) Input)
Lower
(Command) Input)
Lower Com (Command) Input)
Guard +
Guard Com
TB2-1
TB2-2
TB2-3
TB2-4
TB2-5
TB2-6
Remote/Local Status
Current Out +
Current Out Supply +
Supply Unused
Green Screw
Chassis
Note: Raise, Lower & Guard Terminals are
non-polarized and opto-isolated.
4.3 ANALOG VOLTAGE INPUT (1-5 V) WITH GUARD
A voltage signal can be used as the Command Input as shown in Figure 4-2. In this
example, a Bristol Babcock, METATONE B, Analog FSK Tone Receiver (Model 8772-31B)
provides the input to the Remote Set Regulator. Switch SW2-8 must be set to the OPEN
position to accommodate a 1-5 V input.
Field Wiring
4-2
CI-9110
Figure 4-2 - Analog Voltage Input with Guard
Figure 4-3 - Analog Current Input with Guard
CI-9110
4-3
Field Wiring
For the application of Figure 4-2, the Carrier Presence output signal of the receiver may be
connected to the Guard terminal as shown. Should the tone carrier fail, the Regulator will
hold the last valid output value and prevent the Command Input from responding to
extraneous signals.
4.4 ANALOG CURRENT INPUT (4-20 mA) WITH GUARD
In Figure 4-3, a 4-20 mA signal is obtained from the collector of an output transistor and
wired to the input of the Regulator. Switch SW2-8 is set to the CLOSE position to bring the
loop resistor into the circuit. The equivalent 1-5 volt drop across the 250 ohm loop resistor
provides the Regulator input.
A switch or contact signal may be wired to the Guard Terminal as shown in Figure 4-3.
This signal will be in an ON state when valid command data is sent and in an OFF state if
the telemetry link opens.
The Guard signal may also emanate from an open collector circuit such as shown in Figure
4-2
4.5 RAISE/LOWER INPUTS WITH GUARD
The Raise and Lower inputs will accept either a continuous or incremental signal. A
continuous signal is one that is held in a TRUE state to obtain a change of output pressure.
An incremental signal is one that produces a step change of the output value for each
TRUE input pulse that is received. Both types of inputs will maintain the last output value
during the FALSE or failed states of the signal. The wiring illustrations described herein
are applicable to either type.
The Guard input performs the same function as described under the previous analog
subtopics. Since the Guard input is electrically identical to the Raise and Lower inputs, it
can be wired in the same manner.
Figure 4-4 shows all inputs wired to external relay contacts or switches. Each contact is
wired to a positive voltage source which must have the same value as the supply voltage
required to power the Regulator (12 or 24 V type). When a contact is closed, the input is set
ON (TRUE). When a contact is open, it is set OFF (FALSE).
The arrangement of Figure 4-5 receives all three inputs from a METATONE B FSK TriState Receiver. This receiver provides a MARK and SPACE output which connect to the
respective Raise and Lower input terminals, and a CARRIER output that connects to the
Guard terminal. The Receiver's tri-state outputs are provided as open collectors that drive
the opto-isolated inputs of the Regulator. When any of the receiver's driver transistors
conduct, the corresponding Regulator input will be set TRUE. When any driver transistor
is cut off, the corresponding Regulator input will be set FALSE.
Field Wiring
4-4
CI-9110
Figure 4-5 - Raise/Lower & Guard Inputs from Relay Contacts
Figure 4-5 - Raise/Lower & Guard Inputs from Open Collectors
CI-9110
4-5
Field Wiring
CAUTION
When using the Regulator with a device that provides latching type
outputs (output stays ON until turned OFF), the Raise/Lower inputs
must be set for a pulse incremental signal. (see Section 3 - Board
Setup). This will prevent the Regulator from driving full scale should
the telemetry line open while in the middle of a Raise or Lower
command. By using this configuration, the pressure output value will
only change when input pulses are received.
Figure 4-6 - Current Output to FSK Bi-State Transmitter
4.6 4-20 mA CURENT OUTPUT
The current output of the Regulator can be used to drive a METATONE B, FSK Analog
Transmitter as shown in Figure 4-6. The 4-20 mA current signal is referenced to signal
common and flows through the loop resistor present at the input of the Analog Transmitter.
The current signal modulates a tone carrier which communicates with an Analog Tone
Receiver at the command site (not shown).
4.7 DC POWER
The Remote set Regulator is factory-shipped for 12 or 24 Vdc supply operation. Before
power is applied, a check should be made to ensure that the Regulator type matches the
supply source.
The dc supply source is wired to the Regulator in Figure 4-7. An earth ground must be
provided for both the Regulator housing and the supply. The connection for the Regulator is
made to the green grounding screw located inside the housing (see Section 2 - Installation
for illustration).
WARNING
Metal enclosures and exposed metal parts of all electrical
instruments and devices must be grounded to prevent accidental
electrical shock. Grounding must be in accordance with latest
OSHA rules and regulations pertaining to "Design Safety
Standards For Electrical Systems."
Field Wiring
4-6
CI-9110
Figure 4-7 - DC Supply Connections
4.8 OPERATING NOTES
The startup procedures described herein are general for most applications. It is assumed
that the user is familiar with all the external process devices such as shutoff valves,
pressure limiters, circuit breakers, fuses, electrical supply, etc. and operates these devices
in a manner that produces a safe startup. It is also assumed that the unit is properly wired
and grounded as described in this section.
4.9 INITIAL CHECKS
Prior to starting the Regulator, its supply pressure and dc power source should be turned
OFF. Also, the process associated with the Regulator should also be turned OFF or placed
under some form of guarded control. A process that is not guarded may run out of control
and cause property damage and injury to persons. Once these conditions have been met,
proceed as follows:
1. The Regulator will be furnished as a 12 or 24 V dc type. Make sure that the supply
voltage is correct for the Regulator.
2. Remote Set Regulators will be furnished with a 3-15, 3-27 or 6-30 psig output range.
Check input pressure to the Regulator. It should be set to at least 3 psig above the
upper range value, and not more than 100 psig. Pressures greater than 100 psig will
require an external pressure limiter or regulator to maintain a safe input pressure.
3. To start the Remote Set Regulator, apply supply pressure and turn ON the dc power.
4. When power is applied, the stepper motor will operate immediately and set the output
to a value that corresponds to the level of the Command input signal.
CI-9110
4-7
Field Wiring
5. If the output pressure of the Remote Set Regulator fails to change even with a change at
the Command input, the internal fuse may be blown. Check and replace it as required
with a 1A, 250V 3AG type. If the fuse continues to blow, check for wiring mistakes at
the field wiring terminals or check for a defective PC board. Do not attempt further
operation until the problem has been resolved.
6. Once all the above checks have been completed, turn on the associated process and
verify that the Regulator is operating properly. Startup is complete.
Field Wiring
4-8
CI-9110
Chapter 5
SERVICE
5.1 GENERAL
The servicing and calibration procedures described in this section should only be performed
by qualified technical personnel.
These procedures should not be performed while the Remote Set Regulator is connected to
an on-line process. A laboratory setup is recommended for calibration and servicing. If this
is not possible, steps should be taken to close down the process or to isolate the Regulator in
such a manner that it has no control over the process.
** Warning **
Models intended for operation in hazardous areas require
additional precautions. Under no circumstances should
the cover be removed while the instrument is powered and
operating. If access is required, either the dc power must
be turned off, or the environment must be made safe, i.e.,
non-hazardous. An electrical spark in a hazardous environment could cause fire or an explosion and result in
property damage and injury to persons.
Figure 5-1 - Rear View of Gear Drive Assembly
CI-9110
5-1
Service
5.2 TROUBLESHOOTING HINTS
Some basic types of problems that can occur in the field are listed as follows:
○ Unit dead, no motor movement
Measure across power terminals TB2-4 & -5 with a DVM. The reading should be 12 or 24 V
dc depending upon model. Incorrect or no voltage indicates an external supply problem. If
proper voltage is present, check Fuse F1 on the Termination Board. Fuse F1 should be a
1A, 250 V, 3AG type. If replacement fuses continue to blow, a short may be present at the
field wiring terminals or in the PC boards.
○ Output drift on Analog model
Check for open signal lead at input terminals TB1-2 & -3. Measure across terminals with a
DVM and check for proper voltage range.
○ Output stays constant with input change
If Guard mode is used, check for proper signal at Guard terminals TB1-5 & -5. If Guard is
not used, make sure SW2-6 is in the CLOSE position.
○ Severe output tracking errors on Analog model
Check setting of switches SW1 (1-5). If any are set to Pulse Increment mode, the output will
not balance properly. These switches must be set OPEN for Analog models.
○ Noisy or Erratic Output on Raise Lower Model
Try SW1-8 in both positions and choose the one with the lowest noise level. For Analog
models, this switch must be set OPEN.
○ Raise or Lower function does not work on Raise/Lower model
Check voltage at Raise or Lower terminals TB1 (1-4) with voltmeter during activation. Also
check across Guard terminals TB1-5 & -6, if used. If no voltage change occurs at any given
input, check for broken signal leads or a defect in the external device.
○ Output pressure does not rise above certain point
A high limit may be set too low or the pressure regulator vent may be restricted. Also check
for water or oil in pressure lines.
○ Output pressure drops off with constant level input
Check for leaks in pressure lines or loose fittings.
Service
5-2
CI-9110
5.3 SETTING OUTPUT LIMITS
5.3.1 General Principles
The Regulator provides mechanical output limits that prevent the output from
underranging or overranging the process. When the Command Input is of a value that
causes the stepper motor to drive against a limit, the clutch will allow the driveshaft to slip.
After the motor has completed several revolutions, the software will turn it OFF to prevent
clutch wear. The motor will remain OFF until the Command Input signal returns to a value
that is within the set limits.
5.3.2 Test Setup
When a Remote Set Regulator leaves the factory, the low limit is set to about -10% below
the minimum range value, and +10% above the high range value. These limits may be
changed in the field if the user has the capability to adjust the dc input signal over the full
range of the Regulator and to monitor the pressure output. Bench calibration setups similar
to that shown in Figures 5-2 or 5-3 may be used to set the mechanical limits on Analog or
Raise/Lower models. The DMMs (digital multimeters) shown in both illustrations are not
required for setting limits.
5.3.3 Procedure
The method of setting the mechanical Hi and Lo Limit adjustments are described as
follows:
1. Check that pressure supply to Remote Set Regulator is at proper value. Turn off dc
power source (12 or 24 V dc) to Remote Set Regulator and remove Regulator Cover.
2. For all models, set switch SW2-6 to CLOSE to disable the Guard input.
3. For Analog models, set jumpers W1 and W2 for Fail/Hold mode. See Section 3, Board
Setup. Turn ON dc power source.
4. Locate two limit adjustment tangs on main gear assembly. Refer to Figure 5-1.
5. Adjust dc test input level to approximately -20% below minimum range value. Pressure
output will fall to a minimum value and remain there.
6. If limit tangs were previously set at factory their positions on main gear will appear
about as shown in Figure 5-1. If tangs are at different positions, other limit values may
have been field-selected.
7. Turn off dc power. Limits are set by estimating positions on main gear assembly. To set
a limit, slightly lift edge of tang from teeth of main gear and carefully move tang to approximate desired position. Release tang to lock its position. If access to a tang is
blocked, re-apply dc power and adjust dc input level to a value that will rotate main
gear in a direction to make tang accessible. Turn off dc power and set limits as required.
CI-9110
5-3
Service
8. Once limits have been set, re-apply dc power and adjust input test circuit (analog or
raise/lower) for range value above upper limit. When upper limit is reached, main gear
will stop rotating and output pressure will hold constant at value of desired limit.
** Caution **
Do not attempt to turn main gear or driveshaft by hand to
reach a limit. The force generated in this manner can
easily damage the gear teeth and limit tangs. Always use a
dc test input signal to drive the main gear through its
range.
9. If limit values are not at desired points, continue to experiment with tangs until correct
positions can be found.
10. When adjustments are complete, disconnect test setup and recheck board configuration
as required. Replace cover and restore unit to normal operating status.
5.4 CALIBRATION TEST SETUP
The calibration of the Remote Set Regulator will require a laboratory bench setup. The
setup of Figure 5-2 is used for Analog models, while that of Figure 5-3 is used for
Raise/Lower models.
In Figure 5-2, the Analog model uses a precision 1 - 5 volt test source to provide an adjustable input signal. In Figure 5-3, the Raise/Lower model uses a switch test circuit consisting of two pushbutton switches that apply dc power to either the Raise or Lower inputs.
As long as a switch is pressed, the output will be raised or lowered assuming continuous dc
input configuration.
From this point on, the test setups of Figures 5-2 and 5-3 are identical. A digital multimeter
(DMM #1) is connected across test points TP3 and TP4 to monitor the voltage at the center
arm of the feedback potentiometer. The 250 ohm resistor and switch circuit is used to load
the current output circuit, while DMM #2,functioning as a milliammeter, measures the load
current.
On the pneumatic side, a constant supply pressure is applied to the pressure regulator assembly. A precision test gauge monitors the pressure output signal. The pressure regulator
assembly of the unit does not have calibration adjustments. All adjustments are electrical.
5.5 CALIBRATION PRECAUTION
During calibration, the stepper motor will be driven to both ends of it operating range.
Since this movement is extremely slow, do not be tempted to run the unit up or down range
by manually forcing the main gear or driveshaft. Doing so can cause damage to the gear
teeth and the mechanical limit tangs. Always use a dc test input signal to reposition the
main gear and allow the Remote Set Regulator to balance itself out.
Service
5-4
CI-9110
5.6 PRELIMINARY CALIBRATION CHECK
Once the test setup of Figure 5-2 or 5-3 has been completed, the following conditions must
be established.
1. For all models, set switches SW1 (1-5) to OPEN for continuous operation, and SW2-6 to
OPEN to disable Guard circuit. For Analog models only, set SW2-8 to OPEN for 1 - 5 V
input.
2. Determine the output range of the Regulator (3-15, 3-27 or 6-30 psi). See if it is possible
to scan the complete range of the regulator by adjusting the input test circuit and
observing the pressure test gauge. If range of travel is not complete, mechanical limits
are less than output span or:
0% < Limits < 100%
At this time, position limits to following settings (see topic 5.3):
Lo Limit = -10% (approximately)
Hi Limit = +110% (approximately)
If full range cannot be obtained even with above limits, other problems may be
indicated. Refer to topic 5.2 for troubleshooting hints before proceeding.
Figure 5-2 - Analog Test Setup
3. Set input test circuit for 0.995 V reading on DMM #1. DMM #2 should read 4 mA, ±.02
mA Test gauge should read minimum range value (3 or 6 psi), ±5.0%.
4. Press input test circuit push-buttons for 4.995 V, ±0.004 V reading on DMM #1. Reading
on DMM #2 should be 20 mA, ±.02 mA. Test gauge should read maximum output range
value (15, 27 or 30 psi), ±5.0%.
CI-9110
5-5
Service
5. If above readings are within stated specifications, stop! No calibration is required.
Restore instrument to normal operation. Otherwise, proceed to topic 5.7 or 5.8 as
required.
5.7 DETAILED CALIBRATION FOR ANALOG MODEL
If calibration errors were found in topic 5.6, the procedures described here for Analog
models are performed.
5.7.1 Feedback Zero & Span
Precision voltage of an input test circuit is used to calibrate the zero and span as follows:
1. Adjust input test circuit for 1.000 V output.
2. DMM #1 should read 0.995 V, ±.004 V.
3. If reading of step 2 is out of tolerance, slightly loosen two screws on body of feedback pot
(Figure 5-1) and rotate body until DMM #1 reads as specified in step 2. Secure pot
screws to lock in setting.
4. Adjust the input test circuit for 5.000 V.
5. DMM #1 should read 4.995 V, ±.004 V
6. If the reading of step 5 is out of tolerance, adjust potentiometer R35 on CPU to correct.
7. Recheck both points and readjust zero and span if required.
5.7.2 Current Output Span & Load
The current output circuitry is provided with two calibration adjustments. Potentiometer
R50 is used for span adjustment and R49 for load compensation. For these tests, DMM #2
(used as a milliammeter) is connected in series with a 250 ohm load resistor as shown in
Figure 5-2. The pushbutton switch is used for load testing.
1. Adjust input test circuit for 5.000 V.
2. DMM #2 should read 20 mA, ±.02 mA. If necessary, adjust pot R50 to correct.
3. Press load pushbutton while observing DMM #2. If current reading increases, adjust
R49 CCW. If reading decreases, turn it CW. Repeat procedure until change is less than
±.02 mA.
4. Final reading should be 20 mA, ±.02 mA. If necessary, reset pot R50 and repeat the
procedure.
5.7.3 Pressure Output Check
1. Adjust input test circuit for 1.000 V.
Service
5-6
CI-9110
2. Reading on test gauge should be minimum range value (3 or 6 psi), ±5%.
3. Adjust input test circuit for 5.000 V.
4. Reading on test gauge should be maximum range value (15, 27 or 30 psi), ±5%.
5. If electronic calibration is correct but output pressure is in error, no further adjustments
are possible. Refer to topic 5.2 for possible pneumatic faults.
6. Calibration is complete. Restore unit to normal operation.
Figure 5-3 - Raise/Lower Test Setup
5.8 DETAILED CALIBRATION FOR RAISE/LOWER MODEL
If calibration errors were found using the procedures of topic 5.6, the procedures described
herein for Raise/Lower models are performed.
5.8.1 Feedback Zero & Span
The tracking voltage provided by the motor-driven feedback potentiometer is calibrated
against the pressure output as follows:
1. Adjust input test circuit for minimum range indication on test gauge (3 or 6 psi).
2. DMM #1 should read 0.995 V, ±.004.
3. If reading of step 2 is out of tolerance, slightly loosen two screws on body of feedback pot
(Figure 5-1) and rotate body until DMM #1 reads as specified in step 2. Secure pot
screws to lock in setting.
4. Adjust input test circuit for maximum range indication on test gauge (15, 27 or 30 psi).
CI-9110
5-7
Service
5. DMM #1 should read 4.995 V, ±.01 V
6. If the reading of step 5 is out of tolerance, adjust potentiometer R35 on CPU Board to
correct.
7. Recheck both points and readjust if required.
5.8.2 Current Output Span & Load
The current output circuitry is provided with two calibration adjustments. Potentiometer
R50 is used for span adjustment and R49 for load compensation. For these tests DMM #2
using the current measurement function is connected in series with a 250 ohm resistor load
as shown in Figure 5-3. The pushbutton switch is used to jump the load.
1. Adjust input test circuit for 4.995 V on DMM #1.
2. DMM #2 should read 20 mA. If necessary, adjust pot R50 to correct.
3. Press load pushbutton while observing DMM #2. If current reading increases, adjust
R49 CCW. If reading decreases, turn it CW. Repeat procedure until change is less than
±.02 mA.
4. Final reading should be 20 mA, ±.02 mA. If necessary, reset pot R50 and repeat
procedure.
5. Calibration is complete. Restore unit to normal operating status.
5.9 PCB REFERENCE DRAWINGS
Table 5-1 below provides part numbers and drawing references (Figures 5-4 through 5-7)
for the printed circuit boards provided with the Remote Set Regulator.
Table 5-1 - CPU Board & Termination Board Reference Table
Fig.
5-4
5-4
5-5
5-6
5-6
5-7
Service
Assembly
Part #
Assembly, Analog Type CPU Board w/ Current Output (12V)
Assembly, Analog Type CPU Board w/ Current Output (24V)
Assembly, Analog Termination Board
Assembly, Raise/Lower Type CPU Board w/ Current Output (12V)
Assembly, Raise/Lower Type CPU Board w/ Current Output (24V)
Assembly, Raise/Lower Termination Board
5-8
389615-03-0
389615-06-4
389644-01-3
389613-03-7
389613-06-1
389616-01-0
Pag
e
5-9
5-9
5-9
5-10
5-10
5-10
CI-9110
Figure 5-4 - Assembly, Analog Type CPU Board with Current Output
Figure 5-5 - Assembly, Analog Termination Board
CI-9110
5-9
Service
Figure 5-6 - Assembly, Raise/Lower Type CPU Board with Current Output
Figure 5-7 - Assembly, Raise/Lower Termination Board
Service
5-10
CI-9110
Chapter 6
SPECIFICATIONS
6.1 ANALOG INPUT MODEL
Function:
Uses Analog Input to set a pressure output signal.
Ranges:
4 - 20 mA dc or 1 - 5 Vdc
Input Impedance:
For 1 - 5 V > 330 K Ohms
For 4 - 20 mA > 250 Ohms, ±0.1%
Analog Fault Detector:
Stepper Motor is cut off when AI < 0.8 V, ±0.1V
6.2 RAISE/LOWER INPUT MODEL
Function:
Uses Raise and Lower Inputs to set a pressure output signal. Input may be configured
to accept a continuous ON/OFF dc signal or
incrementing dc pulse signal.
Input Characteristics:
Opto-isolated and bi-polar. Limited to 47 V by
metal oxide varistor (MOV).
Types of Inputs Accepted:
May be configured for continuous dc input
signal (On or Off) or dc pulse incrementing
signal.
Continuous DC Input:
Maximum dc input level is a function of the
supply voltage as follows:
12V Model: 11 - 14 Vdc
24V Model: 22 - 28 Vdc
DC Pulse Incrementing Input:
Pulse rates adjustable from 0.110%/pulse to
1.830%/pulse. Pulse must be held in TRUE
state for time period necessary for Regulator
to reach the new output value. An input that
changes state before completion of an
operation will have its remaining pulse increment discarded. The next complete pulse
starts a new increment.
Input Impedance:
For 12V Model: 1800 Ohms
For 24V Model: 4300 Ohms
CI-9110
6-1
Specifications
6.3 GUARD INPUT
Enables or inhibits command signal input on both Analog and raise/Lower models.
6.4 ANALOG OUTPUT
Function:
Current feedback signal tracks the output of
the Remote Set Regulator. Signal is typically
used to telemeter pressure output value back
to the command site.
Range:
4 - 20 mA common ground type output
Load Resistance:
380 Ohms Max.
6.5 ACCURACY - ANALOG MODELS
Electrical Input to Pressure Output:
±5% of span
Pressure output to Feedback:
±5% of span
6.6 ACCURACY - RAISE/LOWER MODELS
Feedback Volts to Pressure Output:
±5% of span
Pulse Input to Pressure Output:
±20% of span
6.7 DC POWER
12 Volt Model:
11 - 14 Vdc @ 0.35 A Max.
24 Volt Model:
22 - 28 Vdc @ 0.25 A Max.
Fuse:
1 A, 250 Vdc, 3AG
6.8 STEPPER DRIVE MECHANISM
Stepper Motor:
Gearing from motor shaft to pressure
regulator assembly results in approximately
22,000 incremental steps for 100% output
range travel.
Output Rate of Change:
Full scale sweep adjustable from 1.8 to 69.4
minutes.
Environmental Effects:
±1.0% Max. full scale per 50°F (28°C)
Supply Voltage Effect:
±0.15% Max. full scale per 1 volt change
Specifications
6-2
CI-9110
Hysteresis:
(Output to gauge) 0.5% of span
Motor Protection:
Adjustable mechanism limits restrict output
for over and under range conditions.
Automatic timeout prevents clutch wear.
Power Failure:
Mechanism maintains output pressure prior
to loss or drop of supply voltage.
6.9 PRESSURE REGULATOR ASSEMBLY
Factory Calibrated with
20 psig supply
30 psig supply
35 psig supply
Output Ranges Offered:
Range
3 - 15 psig
3 - 27 psig
6 - 30 psig
Supply Pressure Range:
Type
Unit
(psig)
3 - 15
3 - 27
6 - 30
Supply Pressure Effect:
0.1 psig Max. change in output for each 10
psig change of input.
Connection:
IN, OUT and VENT ports (1/4 Inch NPT)
Min.
Supply
(psig)
20
30
35
Max.
Supply
(psig)
100
100
100
6.10 INSTRUMENT ENCLOSURE
Type of Case:
Weatherproof and explosion proof. Cast
aluminum with gasketed screw-on cover.
Gray
epoxy
finish.
Meets
NEMA-3
specifications
General Dimensions:
6 inch (152.4 mm) diameter
7 inch (176.8 mm) length
Weight:
10 pounds (4.54 kg)
Mounting Options:
In-line pressure pipe or 2 inch pipe bracket
6.11 ENVIRONMENTAL
Temperature Limits:
CI-9110
-20° to +150° F (-29° to +65° C) Operating
-40° to +185° F (-40° to +85° C) Storage
6-3
Specifications
Humidity:
10 to 95% over -20° to +130° F (-29° to +55°
C) range
10 to 50% over +130° to +150° F (+55° to +65°
C) range
Vibration Limits:
0.1 gram Max. over 10 to 500 Hz range
RFI Rejection:
Per SAMA standard PMC 33.1, Class 1 and 2,
20 MHz to 500 MHz. Rejection is greater than
0.5% full scale error.
Specifications
6-4
CI-9110
Chapter 7
PARTS
7.1 MODEL 9110 MAIN PARTS
Parts Referenced in Figure 7-1
Item
1
2
3
4
5
6
7
8
9
10
11
12
13
14
15
16
17
18
19
20
21
23
24
29
30
33
34
35
36
38
39
42
43
44
CI-9110
Description
Part Number
Housing
O-Ring, Size – 161
Remove Setpoint Cover
Motor Support Assembly
Clutch Assembly
Potentiometer
Socket Head Screw, 6-40 x 1/8
Right Hand Stop
Left Hand Stop
Shaft & Pot. Support Assembly
Shoulder Screw, 10-32 x 1-3/16
Gear, 144 Teeth, 63 Pitch
Screw, 2-64 x 3/16 FH
Shaft Assembly
Sleeve, Output Shaft
Motor Assembly:
12 V dc type
24 V dc type
Bracket, Terminal Block
Clamp, Pot.
PC Board Assembly, 624-II Remote
Raise/Lower Termination Board:
12 & 24 Vdc Discrete Input Versions
12 & 24 Vdc Analog Input Version
Gear, 68 Teeth, 64 Pitch
Jumper, Remote Regulator
Screw, 4-40 x 3/1 Pan Head
Cable Tie, Self Clinching (Not Shown)
Bushing, 3/4" ID Wire
Cable, Pot.
Screw, 10-32 x 3/8 PH
Screw, 10-32 x 1/2 PH
Screw, 10-32 x 3/4 PH
Screw, 10-32 x 1-1/2 PH
Screw, 6-32 x 3/16 PH
Screw, 6-32 x 5/16 PH
Lockwasher, #10
Screw, 8-32 x 5/16 HH
Cup Washer, #8
390701-01-7
316135-12-7
389385-02-6
390724-01-7
390692-01-8
390739-01-4
282403-00-0
390736-02-3
390736-01-5
390723-01-0
390726-01-0
390684-01-5
237603-00-4
396405-01-0
390695-01-7
7-1
390738-01-8
390738-02-6
390080-01-2
390090-01-8
389616-01-0
389644-01-3
390735-01-9
390761-01-0
374600-03-1
308708-00-8
390104-01-9
390404-01-2
374602-06-9
374602-08-5
374602-12-3
374602-24-7
374601-03-8
374287-01-5
235638-00-5
374616-01-9
387445-01-3
Parts
Figure 7-1 – Remote Set Regulator Actuator Unit
Parts
7-2
CI-9111
Parts Referenced in Figure 7-1 (Continued)
Item
45
50
60
Description
Part Number
Clamp, Sleeve
#4 Cable Clip
CPU Board Type
390102-01-6
295379-00-6
(see below):
Type
Analog (AI)
Analog (AI)
Raise/Lower (DI)
Raise/Lower (DI)
101
102
104
115
251
252
Supply
12 V
24 V
12 V
24 V
Output
Current
Current
Current
Current
O-Ring, .864 ID x .070 W
Seat, Spring
Plug, ¾ N.P.T. Hex Socket
Bushing, Regulator Shaft
Regulator
Spring, 3-15 psig Range
Spring, 3-27 & 6-30 psig Range
Part Number
398615-03-0
389615-06-4
389613-03-7
389613-06-1
317303-08-2
396404-01-4
379891-05-0
396403-01-8
390737390737-01-1
390737-02-0
Parts Referenced in Figure 7-2
Item
103
201
202
203
204
205
Description
Part Number
Screw, 10-32 x 1-1/2 SHCS
Bracket, Mounting
Screw 1/4-20 x 1/2” Hex Head
1/4" Lockwasher
Clamp Assembly
5/16” Lockwasher
396400-02-7
390190-01-2
379496-02-0
234918-00-4
388931-01-9
277992-00-1
Figure 7-2 – Remote Set Regulator Actuator Unit Mounting Parts
CI-9110
7-3
Parts
7.2 REMOTE SET REGULATOR BASIC PARTS
Parts Referenced in Figure 7-3
Item
103
104
105
106
107
108
110
111
112
113
116
Description
Part Number
Diaphragm
Ring, Regulator Exhaust
Base, Pressure Regulator Ass’y.
Spring, Helical Compression
Screw, 10-32 x 1 SHCS
Screw, 7/16 x 20 Pilot Retaining
Plunger, Regulator
Diaphragm, Ass’y. Exhaust
Spacer
Block, Regulator
Diaphragm, Regulator
383825-01-6
385389-01-9
342172-00-0
307905-00-4
396400-01-9
297261-00-2
307908-00-3
396394-01-9
297248-00-6
390570-01-0
385268-01-7
Figure 7-3 – Remote Set Regulator Assembly Basic Parts
Parts
7-4
CI-9111
Supplement S1400
Guidelines for
System Grounding
- Contents IMPORTANCE OF GOOD GROUNDS . . . . . . . . . . . . . . . . . . . . . . . . . . . . . . . 1
GENERAL RECOMMENDATIONS . . . . . . . . . . . . . . . . . . . . . . . . . . . . . . . . . 3
TRANSIENTS AND INTERFERENCE . . . . . . . . . . . . . . . . . . . . . . . . . . . . . . 5
TYPES OF EARTH GROUNDS . . . . . . . . . . . . . . . . . . . . . . . . . . . . . . . . . . . . 7
SOIL CONDITIONS . . . . . . . . . . . . . . . . . . . . . . . . . . . . . . . . . . . . . . . . . . . . . . 9
GROUNDING TECHNIQUES FOR 33XX SYSTEMS . . . . . . . . . . . . . . . . . . . 9
Several DPCs in Metal Cabinet w/ Power Supply . . . . . . . . . . . . . . . . . . . 10
Multiple DPC Cabinets w/ Local Supply in Each Cabinet . . . . . . . . . . . . 10
Multiple DPC Cabinets Powered by Single Supply . . . . . . . . . . . . . . . . . . 12
Multiple Clusters of DPC Cabinets Powered by Local Supplies . . . . . . . 14
IMPORTANCE OF GOOD GROUNDS
The equipment used with instrument systems must operate continuously within their stated
accuracy over long periods of time with minimum attention. Since many system sites are
unmanned and located in remote areas, failures resulting from an improperly grounded system
can become costly in terms of lost time. A properly grounded system will help to: prevent
electrical shock hazards resulting from contact with live metal surfaces; protect equipment from
lightning strikes and power surges; minimize the effects of electrical noise and power transients;
and reduce signal errors caused by ground wiring loops. Conversely, an improperly grounded
system may exhibit a host of problems that appear to have no relationship to grounding. It is
essential that the reader have a good understanding of this subject to prevent needless
troubleshooting procedures.
Warning
This device must be installed in accordance with the National
Electrical Code (NEC) ANSI/NFPA-70. Installation in hazardous
locations must also comply with Article 500 of the code.
Supplement S1400 / 1
PROTECTION BOX
COPPER WELD
GROUND ROD
PROTECTION BOX
CLAMP ONE PER
CONDUCTOR (1)
STRANDED COPPER CABLE
AWG 0000
SOIL LINE
(a) BRING ALL CONDUCTORS TO THE SURFACE.
RADIUS AT LEAST 12"
(b) INSTALL WITHOUT KINKS OR SHARP BENDS.
BURRY TO DEPTH OF AT LEAST 3 FEET,
DEEPER IN DRY SOIL.
DRIVE 7’ OR MORE AS REQUIRED
Figure 1 Basic Ground Rod Installation
POWER GROUND
RTD WELLS
PERIMETER FENCE
GROUND BED
AWG 0000 COPPER
METER TUBES
METER STAND
GROUND RODS
PER N.E.C.
INSTRUMENT
HOUSE
TESTED EARTH CONNECTION
COMMUNICATIONS
GROUND
STRANDED COPPER CABLE
AWG 0000
Figure 2 Overhead Map of Ground Bed for Gas Metering Station
2 / Supplement S1400
GENERAL RECOMMENDATIONS
When wiring equipment into a system, the electrical conduit must have a diameter that will
accommodate the desired number of wires. The cross- sectional area of the conduit should be
large enough to allow the wires to be pulled through without excessive tightness or binding. A
conduit that is too tight can shred insulation, damage wiring, and result in possible opens,
shorts, or intermittent effects. Such conditions are often difficult to trace because the defect is
concealed inside the conduit.
Noise and Signal Errors
Noise and signal errors are often the result of poor wiring and grounding practices. Some
common problem areas are listed as follows:
o
Shielding AIs and AOs. Very often analog DC signal leads must run parallel to wires
radiating AC fields, pulse information, or switching transients. Due to inductive and
capacitive pickup, some of this information can leak into an analog I/O and cause
peculiar effects in the control systems. To minimize or eliminate this problem, the use of
insulated and shielded, twisted lead pairs is recommended between the external devices
(transmitters, sensors, etc.) and the instrument inputs (controllers, recorders, etc.).
The shields of each analog signal source should only be grounded at the input of the instrument. In some equipment, the shield will connect to the instrument chassis. In other
equipment, a "shield" terminal will be provided with several grounding options. The user
should refer to the instrument manual and follow grounding recom-mendations.
o
Common Returns. The use of a single "common" return wire for two or more input
signals is not recommended. This approach may introduce system ground loops that
cause erroneous readings at the instrument. Shielded transmitter or sensor wires should
be grounded at the input of the instrument, or connected to a shield terminal (where
provided) to prevent "sneak" ground paths.
o
Discrete Outputs. Instruments provided with bi-state discrete outputs perform functions
such as control switching, alarm switching or pulse duration com-munications. These
outputs are furnished as either open collector or relay contact outputs that operate at
low power levels. While these levels are sufficient to operate many devices, some will
require much higher power levels. The use of external amplifiers or repeating relays to
drive end devices will prevent output overload and add to the reliability of the system.
o
Compatible System Wiring. In a distributed system, the designer should use the same
wiring identification and color codes throughout to maintain system uniformity. By
observing compatibility at all levels, wiring mistakes are minimized and troubleshooting
tasks are simplified.
o
Placement of Wiring. The dressing or physical placement of wiring requires close
scrutiny. Cables inside cabinets should be neatly secured at regular intervals. Cables
running between cabinets at different locations should be placed in conduits. The cable
length should allow sufficient slack for routine operational checks and maintenance of
Supplement S1400 / 3
1" COPPER
GROUNDING BUS
RADIUS = 12 IN.
STRANDED COPPER CABLE
AWG 0000
AWG 4
OR LARGER
GROUND BED
CONDUCTOR
Figure 3 Grounding of Equipment Housing
PHONE LINE(S)
AT DEMARKATION POINT,
INSTALL COMMUNICATIONS
LIGHTNING ARRESTER (S)
ON POLE OR OUTSIDE OF
BUILDING.
AWG 10
COPPER WIRE
SMOOTHLY
DRESSED
COMMUNICATIONS
GROUND ROD
RADIUS = 12 IN.
STRANDED COPPER CABLE
AWG 0000
CLAMP OR BRAZE
GROUND BED CONDUCTOR
Figure 4 Grounding of Phone Line
4 / Supplement S1400
the equipment. Wiring from input signal circuits and power circuits should be separated
as much as possible to minimize noise and transient pickup. Power and signal leads
should be run in separate conduit to minimize inductive pickup.
o
Terminal Lugs. The use of crimp-type terminal lugs as connections for screw terminals
should be avoided. Terminal lugs, in many industrial climates, can be affected by hidden
corrosion. It is preferable to tin the wire end with solder and loop it around the terminal
screw. The screw should be tightened sufficiently to hold the lead in place but not
excessively so that the lead is sheared or the screw is stripped. Equipment furnished with
compression-type terminals include an opening for inserting tinned ends.
TRANSIENTS AND INTERFERENCE
The extensive use of low-power integrated circuitry in modern electronic equipment requires
proper grounding techniques to insure reliable system operation. The following checklist will
help identify some critical areas:
1. All instrumentation devices at the site should be checked so that no potential greater than
the standoff voltage can exist within or between devices.
2. To minimize outside signal interference and provide equipment protection from lightning or
transients, the earth ground at the site must be tested to insure that its impedance measures
less than 10 ohms at 7 MHz. This qualification is essential since a transient potential or an
interference signal at the instrument site can vary over the entire electromagnetic spectrum
from DC to several hundred MHz.
Note that transients can be produced through natural phenomena and man-made
conditions. Natural transients may result from lightning (7-14 MHz), static (many
frequencies), and wind (DC charge and static). Man-made transients can result from
defective light bulbs or electrical appliances, sudden electrical load shifts, inductive load
surges, arcing contacts and poor AC power connections.
3. If radio frequency (RF) interference is present at the input of an instrument, observe if it has
a consistent or irregular pattern. Constant interference can come from commercial radio
stations, while irregular interference can come from private stations. Although shielding and
grounding will eliminate or minimize most cases of RF interference, obstinate cases may
require attenuation filters.
RF interference can also be caused by power companies that apply modulated RF
signals to power lines to communicate data. Other RF noise sources include digital
clocks, computers, relay contacts, motors transformers, switches, arc welders, etc.
Supplement S1400 / 5
LIGHTNING &
SURGE PROTECTOR
#14 BARE
COPPER GROUND
CONDUCTOR
CLAMP
METER STAND
CLAMP (S)
SIGNAL
CABLE
CONDUIT
TWISTED SHIELDED
TW
PAIR FOR SIGNAL
RADIUS = 12 IN.
GROUND BED CONDUCTOR
STRANDED COPPER CABLE
AWG 0000
CLAMP OR BRAZE
Figure 5 Grounding of Transmitter
BRAZE CONNECTION
THERMOMETER WELL
METER RUN
COPPER BRAID (AWG 4 OR LARGER)
DRESSED TO SMOOTH CURVE
GAS DISCHARGE TUBE
LIGHTNING ARRESTOR
PIPE SUPPORT 1" DIA.
SOIL LINE
RADIUS = 12 IN.
CLAMP OR BRAZE
FOUNDATION
GROUND BED
STRANDED COPPER CABLE
AWG 0000
Figure 6 Grounding of Thermometer Well in Gas Line
6 / Supplement S1400
TYPES OF EARTH GROUNDS
A common misconception of a ground is that it consists of nothing more than a metal pipe driven
into the soil. While such a ground may function for some applications, it will often not be suitable
for a complex system of sophisticated electronic equipment. Conditions such as soil type,
composition and moisture will all have a bearing on ground reliability.
A basic ground consists of a rod 3/8 in. diameter with a minimum 8 ft. length driven into
conductive earth to a depth of about 7 ft as shown in Figure 1. Number 14 AWG solid copper wire
(or larger) should be used for the ground wire. The end of the wire should be clean, free of any
coating, and fastened to the rod with a clamp. A cover or housing should be installed over the
ground connection to protect it from the weather and the environment.
Where soil conditions are poor, additional ground rods can be driven into the earth at various
distances and strapped together. Figure 2 shows an overhead layout of a ground bed used for
a gas metering station. Other arrangements (not shown) consist of a buried wire counterpoise
or a 3 ft. square copper plate.
A ground should be tested for conductivity before putting it into service. Details on on this test
are described in the NATIONAL ELECTRIC CODE HANDBOOK. Once a reliable ground has
been established, it should be tested on a regular basis to preserve system integrity.
Instrument enclosures, measuring devices, metal process vats, metal piping, and other
associated mechanical and electrical devices should all be grounded. The method of grounding
an instrument rack is shown in Figure 3. In this application the ground lead typically attaches
to a ground bus that is common to all equipment in the rack.
For applications employing equipment that communicates over telephone lines, a lightning
arrestor must be provided at the point where the communication line enters the building as
shown in Figure 4. The ground terminal of this arrestor must connect to a ground rod and/or a
buried ground bed.
Applications that use transmitters or transducers require grounding and shielding. In Figure
5, the ground conductor feeds through the electrical conduit and connects to the ground screw
of the transmitter even though the support pipe is grounded. However, if the transmitter uses
shielded wiring for its signal output, the shield should not be grounded at the transmitter. For
maximum signal accuracy, the shield should only be grounded at one point in the system,
typically at the input of the associated equipment.
Gas lines also require special grounding considerations. If a gas meter run includes a
thermocouple or RTD sensor installed in a thermometer well, the well (not the sensor) must
connect to a gas discharge-type lightning arrestor as shown in Figure 6. A copper braid, brazed
to the thermal well, is dressed into a smooth curve and connected to the arrestor as shown. The
curve is necessary to minimize arcing caused by lightning strikes or high static surges. The path
from the lightning arrestor to the ground bed should also be smooth and free from sharp bends
for the same reason.
Supplement S1400 / 7
SERVICE
TRANSFORMER
MAIN
BREAKER
BOX
ELECTRIC
METER
LIGHTNING
ARRESTERS
EACH PHASE
POWER COMPANY GROUND
AND GROUND ROD
GROUND BED
CONDUCTOR
NOTE:
TEST POWER COMPANY
GROUND ROD
Figure 7 AC Power Grounding System
8 / Supplement S1400
The ac power required to operate a system typically includes a service transformer located at
the street and a main breaker box and rate meter assembly at the building as shown in Figure
7. The service transformer is grounded at the company's pole, while the breaker box is grounded
at the building. A lightning arrestor should be included at the breaker box in each phase of the
AC line, and each arrestor should be grounded accordingly.
SOIL CONDITIONS
Before installing a ground rod, the soil type and moisture content should be analyzed. Ideally,
the soil should be moist and moderately packed throughout to the depth of the ground rod.
However, some soils will exhibit less than ideal conditions and will require extra attention.
Dry Soil
Very dry soil will not provide enough free ions for good conductance and a single ground rod will
not be effective. A buried counterpoise or copper screen is recommended for these situations.
It will also be necessary to keep the soil moist through regular applications of water.
Sandy Soil
Sandy soil, either wet or dry, may have had its soluble salts leached out by rain water, thereby
reducing conductivity of the ground. High currents from lightning strikes could also melt sand
and cause glass to form around the ground rod, making it ineffective. A buried counter- poise
or copper screen is preferred for these installations along with regular applications of salt water.
Rocky Soil
Rocky soil can pose many grounding problems. A counterpoise or copper plate will probably be
required. Constructing a trench at the grounding site and mixing the fill with a hygroscopic salt
such as calcium chloride may help for a time. Soaking the trench with water on a regular basis
will maintain conductivity.
GROUNDING TECHNIQUES FOR SERIES 33XX SYSTEMS
When installing a system that includes a number of Bristol Babcock, Series 33XX Distributed
Process Controllers (DPCs), it is essential to follow the procedures set forth by the National
Electrical Code (NEC) to minimize risk of equipment damage and electrical shock.
WARNING
Electrically powered equipment must be properly grounded to
protect users from electrical shock and injury. All such devices
must be installed, wired, and grounded in accordance with the
National Electrical Code (NEC).
Series 33XX DPCs employ a power grid ground terminal (CHASSIS) and an instrument ground
terminal (24VRET) that connects to the "zero reference point" of the system. Improper grounding
of these terminals can produce multiple ground paths throughout the system and result in
Supplement S1400 / 9
increased noise pickup and signal offset errors. If more information is required on this subject,
the reader should refer to the publications cited at the end of this document.
The examples that follow describe the grounding techniques for several types of Bristol Babcock
systems employing DPCs. Refer to the system description that is closest to your application.
Several DPCs Mounted in Metal Cabinet with Power Supply
A small system can consist of one or more DPCs mounted in a single metal cabinet or rack with
a power supply. A power wiring diagram for this arrangement is shown in the example of Figure
8. The following installation procedures apply:
1. Instrument Ground. The instrument ground of the DPCs (24VRET terminal of each DPC)
must connect to a terminal block within the cabinet that is electrically isolated from the
cabinet frame. This terminal block must provide termination for all in-strument grounds and
include termination for a multistranded, insulated, #4 gauge wire (or greater). This wire,
which will connect to the "zero reference point" of the facility, must be run through metal
conduit (pipe). Only the #4 wire will be contained in this conduit. The conduit must also be
connected by bonding strap to the cabinet and facility frame as described in the NEC.
2. Setting DPC Power Jumpers. If the DPC is a Model 3335 OR 3310, jumpers W1A and W1B
on the System Interconnect Board must be removed to isolate the chassis connection from
the 24VRET connection (see Figure 8). If it is a Model 3330, jumpers W1A, W1B and W1C on
the System Interconnect Board must be removed. Series 3308 Gas Flow Computers or
Correctors, if used with these systems, provide an isolated instrument ground without setting
jumpers.
3. AC Power Source. The 24 Vdc power supply requires a 120 Vac power source. The ac power
terminals of this supply are identified in Figure 8. The 120 Vac wiring for this supply must
be contained in cable trays along with the power grid grounding wire. Figure 9 illustrates
the cable tray layout and grounding points of a typical facility. The cabinet frame and the
DPC chassis must be connected with bonding strap at points specified in the NEC.
4. Grounding of Peripheral Equipment. Some peripheral devices such as printers, CRTs,
personal computers, etc., have their internal logic ground connected to the chassis. This
configuration will cause loss of isolation between the DPC's instrument ground and chassis.
These devices may still be used providing that opto- isolated circuits, galvanic isolation, or
other types of circuitry between the device and the DPC are added to maintain the integrity
of the DPC's instrument ground-to-chassis isolation.
Multiple DPC Cabinets with Local Power Supply in Each Cabinet
This application consists of two or more DPC cabinets either separated or clustered together in
a room. Each cabinet has its own 24 Vdc power supply. The following procedures apply:
10 / Supplement S1400
120
Vac
Conduit
Tray
Pwr. Grid
Ground
METEL CABINET OR RACK
W1*
+24V
CHASSIS
24VRET
DPC 33XX
W1*
+24V
CHASSIS
24VRET
DPC 33XX
LINE
+24V
24VRET
NEUTRAL
CHASSIS
Isolated
Terminal
From Other
Units
* Power Jumpers
for ground ref.
See text.
Conduit Pipe
Bonding
Strap
To
Zero Ref. Point
of Facility
(#4 gauge min.)
Figure 8 Grounding for DPCs and Power Supplies
in Single Metal Cabinet
Supplement S1400 / 11
1.
Multi-Cabinet Instrument Grounding using Multiple Supplies. The instrument ground
(24VRET terminal) of each DPC in a cabinet must connect to a terminal block within that
cabinet that is electrically isolated from the cabinet frame. This terminal block must
provide termination for all DPC instrument grounds within that cabinet and include
termination for a #4 gauge (or greater), multistranded, insulated wire that will connect
to the zero reference point of the facility. This #4 wire will be run through metal conduit
(pipe) to the same termination point in the other cabinets. Only the #4 wire will be
containe in this conduit. This conduit must also be connected by bonding strap to the
cabinet and facility frame as described in the NEC.
2. Setting DPC Power Jumpers. If the DPC is a Model 3335 or 3310, jumpers W1A and W1B on
the System Interconnect Board must be removed to isolate the chassis connection from the
24V RET connection (see Figure 8). If it is a Model 3330, jumpers W1A, W1B and W1C on the
System Interconnect Board must be removed. Series 3308 Gas Flow Computers, if used with
these systems, provide an isolated instrument ground without setting jumpers.
3. AC Power Source. The 24 Vdc power supply requires a 120 Vac power source. The ac power
terminals of this supply are identified in Figure 8. The 120 Vac wiring for this supply must
be contained in cable trays along with the power grid grounding wire. Figure 9 illustrates
the cable tray layout and grounding points of a typical facility. The cabinet frame and the
DPC chassis must be connected with bonding strap at points specified in the NEC.
4. Grounding of Peripheral Equipment. Some peripheral devices such as printers, CRTs,
personal computers, etc., have their internal logic ground connected to the chassis. This
configuration will cause loss of isolation between the DPC's instrument ground and chassis.
These devices may still be used providing that opto-isolated circuits, galvanic isolation, or
other types of circuitry between the device and the DPC are added to maintain the integrity
of the DPC's "instrument ground to chassis" isolation.
Multiple DPC Cabinets Powered by Single Power Supply
All of the DPC cabinets in this installation operate from a single power supply which may be
installed in one of the cabinets or in a separate cabinet. The following procedures apply:
1. Multi-Cabinet Instrument Grounding using Single Supply. The instrument ground (24VRET
terminal) of each DPC in a cabinet must connect to a terminal block within that cabinet that
is electrically isolated from the cabinet frame. This terminal block must provide termination
for all instrument grounds within that cabinet and include termination for a multistranded,
insulated, #4 gauge wire (or greater).
2. Routing of Instrument Ground and 24 V Power Wires. The #4 wire, along with +24V and
24VRET wires, are run through conduit trays to the power supply. The #4 wire connects to
the 24VRET terminal of the supply and to the zero reference point of the facility. The +24V
and 24RET wires connect to corresponding terminals on the power supply.
3. Cable Trays. Figure 9 illustrates the cable tray layout and grounding points of a typical
facility. The cabinet frame and the DPC chassis must be connected with bonding strap at
points specified in the NEC. The NEC also applies to the connection of the 120 Vac power
supply terminals to the line.
12 / Supplement S1400
Equipment Cabinets
Bonded To Equipment
Ground Plates Or To
Structure
Structural
Columns Bonded
Safety Ground
Equipment
Ground Plate
Electrical Supporting
Structure Bonded To
Building Structure
Electrical Code Ground
Cable Tray
Sections Grounded
Utility Pipe Bonded
To Structure
Cable Trays Bonded
To Structure
Equipment Ground Plate Bonded
To Structural Steel By Welding,
Brazing, Or Bolting Or With
Auxiliary Bond Strap.
From: Grounding for the Control of EMI by Hugh W. Denny (see ref. 1)
- Courtesy of Interference Control Technologies Figure 9 Elements of a Facility Ground System
Supplement S1400 / 13
4. Setting DPC Power Jumpers. If the DPC is a Model 3335 or 3310, jumpers W1A and W1B on
the System Interconnect Board must be removed to isolate the chassis connection from the
24V RET connection (see Figure 8). If it is a Model 3330, jumpers W1A, W1B and W1C on the
System Interconnect Board must be removed. Series 3308 Gas Flow Computers, if used with
these systems, provide an isolated instrument ground without setting jumpers.
Multiple Clusters of DPC Cabinets Powered by Local Supplies
A cluster consists of two or more DPC cabinets that may be grouped together as shown in Figure
9. Several such clusters performing related functions in the same facility make up a multiple
cluster system. The following procedures apply:
1. Grounding for DPC Cabinet Cluster using Local Supply. The instrument ground (24VRET
terminal) of each DPC in a cabinet must connect to a terminal block within that cabinet that
is electrically isolated from the cabinet frame. This terminal block must provide termination
for all instrument grounds within that cabinet and include termination for a multistranded,
insulated, #4 gauge wire (or greater) that will connect to the same termination point to other
cabinets of that cluster, and to the 24VRET terminal of the local power supply.
2. Routing of Cluster Grounds. The instrument grounds (isolated terminal) from each cabinet
cluster must connect to each other and then to a single wire that connects to the zero
reference point of the facility. This wire should be #4 gauge minimum (multistranded and
insulated) and be contained in a metal conduit (pipe). A heavier stranded #4/0 gauge could
be used to connect each cluster to the zero reference point while the #4 wire instrument
grounds could be locally terminated to the #4/0 wire. The conduit containing this wire must
also be connected by bonding strap to the cabinet and facility frame as described in the NEC.
3. AC Power Source. The 24 Vdc power supply of each cluster requires a 120 Vac power
source. The ac power terminals of this supply are identified in Figure 8. The 120 Vac wiring
for this supply must be contained in cable trays along with the power grid grounding wire.
Figure 9 illustrates the cable tray layout and grounding points of a typical facility. The frame
of each cabinet and each DPC chassis a cluster must be connected with bonding strap at
points specified in the NEC.
4. Setting DPC Power Jumpers. If the DPC is a Model 3335 or 3310, jumpers W1A and W1B on
the System Interconnect Board must be removed to isolate the chassis connection from the
24V RET connection (see Figure 8). If it is a Model 3330, jumpers W1A, W1B and W1C on the
System Interconnect Board must be removed. Series 3308 Gas Flow Computers and
Correctors, if used with these systems, provide an isolated instrument ground without setting
jumpers.
References:
1. Grounding for the Control of EMI; Hugh W. Denny;
Don White Consultants, Inc. (c) 1983, 1st Ed.
2. IEEE Std. 518-1982
3. ANSI/IEEE Std. 142-1982
14 / Supplement S1400
BLANK PAGE
Remote Set Regulator - Model 9110-00A
Emerson Process Management
Bristol, Inc.
1100 Buckingham Street
Watertown, CT 06795
Phone: +1 (860) 945-2262
Fax: +1 (860) 945-2525
www.EmersonProcess.com/Bristol
Emerson Electric Canada, Ltd.
Bristol Canada
6338 Viscount Rd.
Mississauga, Ont. L4V 1H3
Canada
Phone: 905-362-0880
Fax: 905-362-0882
www.EmersonProcess.com/Bristol
Emerson Process Management
BBI, S.A. de C.V.
Homero No. 1343, 3er Piso
Col. Morales Polanco
11540 Mexico, D.F.
Mexico
Phone: (52-55)-52-81-81-12
Fax: (52-55)-52-81-81-09
www.EmersonProcess.com/Bristol
Emerson Process Management
Bristol Babcock, Ltd.
Blackpole Road
Worcester, WR3 8YB
United Kingdom
Phone: +44 1905 856950
Fax: +44 1905 856969
www.EmersonProcess.com/Bristol
Emerson Process Management
Bristol, Inc.
22 Portofino Crescent,
Grand Canals Bunbury, Western Australia 6230
Mail to: PO Box 1987 (zip 6231)
Phone: +61 (8) 9725-2355
Fax: +61 (8) 8 9725-2955
www.EmersonProcess.com/Bristol
Customer Instruction Manual
CI-9110
Mar., 2007
The information in this document is subject to change without notice. Every effort has
been made to supply complete and accurate information. However, Bristol, Inc.
assumes no responsibility for any errors that may appear in this document.
If you have comments or questions regarding this manual, please direct them to your
local Bristol sales representative, or direct them to one of the addresses listed at left.
Bristol, Inc. does not guarantee the accuracy, sufficiency or suitability of the software
delivered herewith. The Customer shall inspect and test such software and other
materials to his/her satisfaction before using them with important data.
There are no warranties, expressed or implied, including those of merchantability and
fitness for a particular purpose, concerning the software and other materials delivered
herewith.
TeleFlow™ is a trademark of Bristol, Inc. The Emerson logo is a trade mark and service
mark of Emerson Electric Co. Other trademarks or copyrighted products mentioned in
this document are for information only, and belong to their respective companies, or
trademark holders.
Copyright (c) 2006, Bristol, Inc., 1100 Buckingham St., Watertown, CT 06795. No part
of this manual may be reproduced in any form without the express written permission of
Bristol Inc.