1
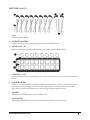
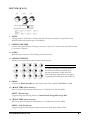
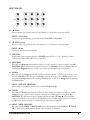
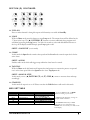
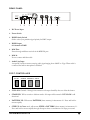
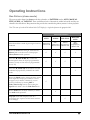
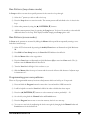
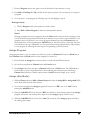
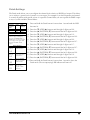
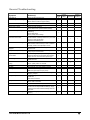
TECHNICAL REFERENCE & MANUAL
Stage Designer™ 16
with Foot Controller
TFX-16CON
CHAUVET
3000 North 29th Ct.
Hollywood, FL 33020 U.S.A.
Tel: 954-929-1115 Fax: 954-929-5560
www.CHAUVETlighting.com
Table of Contents
BEFORE YOU BEGIN..........................................................................................................3
Unpacking Instructions ........................................................................................................................................ 3
Installation ........................................................................................................................................................... 3
Powering ............................................................................................................................................................. 3
Warnings ............................................................................................................................................................. 3
INTRODUCTION ..................................................................................................................4
Product Overview ................................................................................................................................................ 4
Technical Specifications...................................................................................................................................... 4
What is enclosed? ............................................................................................................................................... 4
Quick Reference Guide ....................................................................................................................................... 5
Section (A & C)....................................................................................................................................... 6
Section (B & D)....................................................................................................................................... 7
Section (D) ............................................................................................................................................. 8
Section (D) Continued ............................................................................................................................ 9
Midi Settings........................................................................................................................................... 9
Rear Panel ........................................................................................................................................... 10
Foot Controller...................................................................................................................................... 10
OPERATING INSTRUCTIONS...........................................................................................11
Run Pattern (chase mode) ................................................................................................................................ 11
Run Pattern (loop chase mode) ........................................................................................................................ 12
Run Pattern (cross mode) ................................................................................................................................. 12
Programming your own patterns ....................................................................................................................... 12
Assign Program................................................................................................................................................. 13
Assign (Run Mode)............................................................................................................................................ 13
Patch Settings ................................................................................................................................................... 14
APPENDIX .........................................................................................................................15
Maintenance...................................................................................................................................................... 15
Returns Procedure ............................................................................................................................................ 15
Claims ............................................................................................................................................................... 15
General Troubleshooting................................................................................................................................... 16
Issue Date:
Rev. No.
0
December 2003
Version
Date
Description
1.20
Dec 2004
TFX-16CON Users Guide version 1.20: Author: V.M. at CHAUVET
TFX-16CON Manual Version 1.20
2
Before you Begin
Unpacking Instructions
Immediately upon receiving a fixture, carefully unpack the carton, check the contents to ensure that all parts
are present, and have been received in good condition. Notify the shipper immediately and retain packing
material for inspection if any parts appear damaged from shipping or the carton itself shows signs of
mishandling. Save the carton and all packing materials. In the event that a fixture must be returned to the
factory, it is important that the fixture be returned in the original factory box and packing.
Installation
This fixture may be mounted in any position provided there is adequate room for ventilation. If equipped, it is
important never to obstruct the fan or vents pathway.
Powering
To determine the power requirements for a particular fixture, see the label affixed to the back plate of the
fixture or refer to the fixture’s specifications chart. A fixture’s listed current rating is its average current draw
under normal conditions. All fixtures must be powered directly off a switched circuit and cannot be run off a
rheostat(variable resistor) or dimmer circuit, even if the rheostat or dimmer channel is used solely for a 0% to
100% switch. Before applying power to a fixture, check that the source voltage matches the fixture’s
requirement. All fixtures must be connected to circuits with a suitable Earth Ground. Check the fixture or
device carefully to make sure that if a voltage selection switch exists that it is set to the correct line voltage you
will use.
Warnings
1.
This product is intended for indoor use only!
2. Keep out of the reach of children!
3. Make sure power cord is never crimped or damaged.
4. Never disconnect power cord by pulling or tugging on the cord.
5. Always make sure that you are connecting to the proper voltage and that the line voltage
you are connecting to is not higher than that stated on decal or rear panel of the fixture.
6. Do not disassemble this electrical product; there are no user serviceable parts inside.
7. Always disconnect from power source before servicing or replacing fuse and be sure to
replace with same fuse type.
8. To prevent risk of fire or shock, do not expose fixture to rain or moisture.
TFX-16CON Manual Version 1.20
3
Introduction
Product Overview
Thank you for the purchase of a TFX-16CON DMX controller. The TFX-16CON is a 16 channel
programmable console with MIDI & DMX interfaces. It features a 60 chase memory bank with 30 pre-built
chase patterns and 30 that are user programmable with 99 steps per chase. User can vary speed of chase, set
tempo with tap sync or let the music do the work by use of its audio (sound-to-light) mode. The provided
foot controller is a very handy tool for musicians, enabling access to full on, black out and chase changes.
Technical Specifications
Power Input
DMX Output
Audio Input
MIDI Interface
Accessory
Dimensions
Weight
DC 12 ~ 20V, 250mA minimum
XLR 3-Pin Connectors
RCA Jack, 100m V-1vpp
5 Pin multiple socket
Foot Controller
19in/482mm x 6.98in/177mm x 2.86in/73mm
5.07Lbs/2.4kg
Features
Warranty
16 channel control via;
- (8) Faders
- (8) Latch Buttons
- (16) Flash Buttons
96 DMX channels, patchable
60 pattern(chase) memory
- (1-30) Programmable
- (31-60) Pre-programmed chases
Foot controller
Chase speed control
Fade speed control
Sound Activated
Tap Sync mode
Master output level control
Stand by (blackout)
MIDI-IN control
Cross Fade function
Add/Kill (Solo) feature
2 Year Limited Warranty
What is enclosed?
Manual / Warranty Card
TFX-16CON Controller
AC ~ DC Power Adapter
9 Pin serial cable
Foot Controller
TFX-16CON Manual Version 1.20
4
Quick Reference Guide
B
A
C
Sections
A
B
C
D
Midi Settings
Rear Panel
Foot Controller
TFX-16CON Manual Version 1.20
D
Page
7
9
7
8, 9, 10
10
11
11
5
SECTION (A & C)
1.
LED
Channel output indicators.
2. CHANNEL FADERS
Controls the output levels in Assign program mode and in Manual mode.
3. LATCH (Ch 9 – 16)
Buttons 9 through 16 provide permanent full level channel output in Manual mode.
4. FLASH (Ch 1 – 16)
When pressed they run in a “momentary state”. They are active for as long as you press the individual
button.
5. MASTER FADER
Functions as a master output for all channel faders and latch buttons. If Cross On mode is active, the
master fader will step through scenes in the active chase memory on both upward and downward
slides. Select Loop and it will hold the next step and toggle between adjacent scenes.
6. (M) LED
Indicates the MASTER output status for faders 1 to 8.
7. (A) & (B) LED
Indicates the MASTER output status of two adjacent steps while in Cross On mode.
TFX-16CON Manual Version 1.20
6
SECTION (B & D)
8. LEVEL
In Chase mode it will function as master output for all current channels in a step. Where as the
MASTER fader will control output of all channels.
9. SPEED/FADE TIME
Controls chase speed between 10 steps per second to 1 step every 5 minutes and step fade time from
0.1 second to 5 minutes.
10. AUDIO
Manually adjust sensitivity to music during Audio Chase mode.
11. SEGMENT DISPLAY
Displays current operational function and mode information.
N O T E !
The labels underneath the buttons represent
mode/function directly accessible upon
pressing stated button. Labels above the
buttons represent mode/function accessible
by pressing and holding down the SHIFT key.
12. CROSS
Activates the Master (A & B) cross fade functionality. Only available if Cross On is enabled.
13. (F) PATTERN (chase memory)
Press to traverse chase memory in increments of 1. Hold down to traverse rapidly.
SHIFT + Button Setup
Toggles through the following functions, Channel Flash, Assign Kill, Assign Add
14. (H) PATTERN (chase memory)
Press to traverse chase memory in decrements of 1. Hold down to traverse rapidly.
SHIFT + Fade Time Setup
Toggles through the following operational functions, No Fade Time and Step Time.
TFX-16CON Manual Version 1.20
7
SECTION (D)
15. (F) STEP
Press to traverse step (scenes) memory in increments of 1. Hold down to traverse rapidly.
SHIFT + Cross Setup
Toggles through the following operational modes, Cross Off and Cross On.
16. (H) STEP (scene)
Press to traverse step (scene) memory in decrements of 1. Hold down to traverse rapidly.
SHIFT + Blind
Enables the Blind operational function
17. ADD/KILL
When enabled, any program assigned to a FLASH button will be on “solo”. Meaning, all other
output levels in the console will be set to zero/OFF.
18. PROGRAM
Press and hold Program button until the LED to the left is turned on., repeat to disable. Use (F)
PATTERN (H) to select from 30 program memories. Set Channel levels and/or Latch selections
and press the Program button to record a step. (Memory position will auto-increment by 1)
19. ASSIGN
Press and hold the Assign button until the LED to the left is turned on. This mode allows you to set
and store Channel levels 1 through 8 and Latch 9 through 16 to any of the 16 Flash buttons. You
must hold the Assign button while selecting a Flash button. NOTE! Exit Assign mode by pressing
the Chase button.
SHIFT + DELETE PROGRAM
Deletes active programmable memory space while in Program mode.
20. PATCH
Press and hold Patch button until the LED to the left is turned on to enable and repeat to disable.
Patch allows you to patch console channels 1 through 16 to DMX output 1 through 96. (M)
PATTERN (N) will traverse console channel assignments while (N) Step (M) traverses DMX
outputs 1 through 96. You can turn off an individual patch to a DMX output when the left 2 digits
read 00 on the display or assign a constant full level output when it reads FF.
21. SHIFT + MIDI CHANNEL
Press and hold the SHIFT + Midi Channel button until the display reads CH:01 use (N) STEP
(M) to select desired MIDI channel. Repeat “press and hold” to deactivate.
TFX-16CON Manual Version 1.20
8
SECTION (D) CONTINUED
22. FULL ON
Press to make channels 1 through 8 outputs at full intensity even while in Stand By.
23. LOOP
While in Chase mode press this button to enter Loop mode. The current chase will be defined as the
1st chase in the loop. Use (M) PATTERN (N) buttons to traverse additional chase programs and
add them by pressing the Loop button. You have 10 seconds to select and add additional chases to
the loop. If the display reads LC simply press Loop again to add.
SHIFT + LOOP EXIT (to exit mode)
24. CHASE
In this mode the Speed knob controls chase speed and the Level knob controls output levels for the
active chase.
SHIFT + AUDIO
Enables audio mode which will trigger steps within the chase based on sound.
25. TAP SYNC
While in Chase mode this function will capture the time between to consecutive presses or taps and
use it as the chase speed. Move the Speed knob to leave Tap Sync mode.
SHIFT + MANUAL STEP
In this mode you use (M) PATTERN (N) and (N) STEP (M) arrows to traverse chase and steps
accordingly.
2 6 . STAND BY
In this mode all output is set to off. Please note that the Full On button will work in this mode.
MIDI SETTINGS
NOTE DATA
Note Number
22-81
82-97
99
101
102
Velocity
Master level for the pattern
Channel Dimmer
TFX-16CON Manual Version 1.20
Function
LEVEL
Turn On/Off Patterns 1-60
Works same as FLASH 1-16
Full On
Traverse Patterns step at a time
Stand By
1. To receive MIDI signal, set MIDI
channel according to your device.
2. If MIDI signal disappears, settings are
dumped within 10 minutes.
3. The Patterns initiated by a MIDI
command are not controlled via the
LEVEL knob nor will they be visible in the
LCD display.
9
R E AR P AN E L
ON
1=Ground 1=Ground
2=Data - 2=Data +
3=DATA+ 3=DATA-
OFF
DC 12V~20V,
250mA min.
DC INPUT
POWER
1
1.
POLARITY SELECT DMX OUT
2
3
4
MIDI THRU
MIDI IN
5
6
LINE INPUT
7
FOOT CONTROL
8
DC Power Input
2. Power Switch
3. DMX Polarity Switch
Slide to select your particular signal polarity for DMX output.
4. DMX Output.
96 channels of DMX.
5. Midi Thru
Passes through midi data received via the MIDI IN port.
6. Midi In
Port to connect midi data cable.
7. Audio Line Input
Accepts RCA audio connector carrying audio signal ranging from 100MV to 1Vpp. When audio is
connected the built-in microphone is disabled.
FOOT CONTROLLER
FULL ON
STAND BY PATTERN UP
STEP UP
FULL ON: Channels 1 through 8 are turned to full output. Stand By does not affect this button.
STAND BY: Will set console to blackout mode. All output will be turned off. FULL ON is still
functional.
PATTERN UP: Will traverse PATTERN (chase memory) in increments of 1. Press and hold to
traverse rapidly.
STEP UP: In Chase mode, will traverse STEPS in PATTERN (chase memory) in increment of 1.
Press and hold to traverse rapidly through all steps in chase at a maximum of 10 steps per second.
TFX-16CON Manual Version 1.20
10
Operating Instructions
Run Pattern (chase mode)
The user can select from four chase modes also referred to as PATTERN modes; AUTO, MANUAL
STEP, AUDIO, and TAP SYNC. There are different levels of interactivity within each mode and they are
charted in the table below. Run pattern modes provide the controller the primary means for show playback.
Note! The status of a mode will be indicated in the LCD display by a single dot adjacent to the appropriate label.
PATTERN MODES
Select desired chase mode by pressing the buttons
indicated.
AUTO
AUDIO
TAP SYNC
MANUAL
STEP
(Audio/Chase)
Reference # 24
Shift +
(Audio/Chase)
Reference # 24
(Manual
Step/Tap Sync)
Reference # 25
Shift +
(Manual
Step/Tap Sync)
Reference # 25
Rotate the Level knob full right, and lower the
Master fader to the bottom to ensure proper
Chase/Pattern mode operation.
Press the (M) PATTERN (N) to select the
desired pattern from the 30 pre-programmed in
memory (31-60) or from the user programmable
area (1-30).
Press the (N) STEP (M) arrow buttons to select
individual steps preferably in MANUAL STEP
mode.
Rotate the Speed knob to change the chase speed
from super fast 10 steps per second to a slow 1
step per every 5 minutes. Alternately you can
control a fade time by selecting Shift +
Fade/Time Set Up button, then rotating the
Speed knob which is also the Fade Time knob.
Rotate Audio knob to adjust sensitivity to music
for Audio mode operation.
Tap Sync mode will sample the time in 2
concurrent taps or presses of this button and run
it accordingly.
TFX-16CON Manual Version 1.20
11
Run Pattern (loop chase mode)
In Loop mode the user can select specific patterns for the console to loop through.
1) Select the 1st pattern you wish to add to the loop.
2) Press the Loop button to enter into mode. The current pattern will be defined as the 1st chase in the
loop.
3) Select other patterns by using the (M) PATTERN (N) buttons.
4) Add the current pattern (chase) by pressing the Loop button. You have 10 seconds to select and add
additional chases to the loop. If the display reads LC simply press Loop again to add.
Run Pattern (cross mode)
In Cross mode, patterns are executed by sliding the Master fader up and down repeatedly creating a cross
fade effect between steps.
1) Select AUTO chase mode by pressing the Audio/Chase button as illustrated on Quick Reference
24.
2) Press Shift + Cross Setup button, the Cross On LED indicator should be lit.
3) Slide the Master fader to the top position.
4) Press the Cross button as illustrated on Quick Reference (12) to enter into Cross mode. The (A)
indicator near the Master fader will become lit.
5) Turn the Level knob full right if it is not done so yet.
6) Slide the Master fader from top to bottom and the console will cross fade between 2 adjacent steps
in increments of 1.
Programming your own patterns
There are 30 programmable memory locations called patterns which can hold up to 99 steps each.
1) Press and hold the Program button for more than 1 second until the LED becomes lit.
2) It will be helpful to rotate the Level knob full left in order to disable the chase output.
3) Press the (M) PATTERN (N) buttons to select a memory location, preferably 1 – 30.
4) Set a look by using both the Channel faders and Latch buttons.
5) Press the Program button once to store into memory the look as a new step.
6) You can set a new look by readjusting the levels once again by changing both Channel faders and
Latch buttons for the desired look.
TFX-16CON Manual Version 1.20
12
7) Press the Program button once again to store the desired look into memory as a step.
8) Press Shift + End Step (Ref. 18) to define the last step in a pattern. You can create up to 99 steps in
a program.
9) You can create a 1 step program by following steps 1-4 and skipping to step 8.
Deleting Patterns:
1) While in Program mode, select pattern you wish to delete.
2) Press Shift + Delete Program to delete the current pattern selected.
Notice!
Deleting a program removes its assignment from the Chase mode, however when re-creating a chase
you will notice that program data will remain in the memory. As you create a scene and add it to your
program it may be necessary for you to reset all output channels by moving all Channel faders up
then back down as well as re-pressing the LATCH buttons. This will assure you that older data is not
re-recorded into the step. Additionally, you can re-record the existing program data by simply adding
it to the program by following the same steps in “Programming your own patterns”.
Assign Program
Assign program allows you to set output levels and store a look to a Channel fader button or Flash button.
Both Channel faders and Flash buttons can be assigned for a total of 16.
1) Press and hold the Assign button for more than 1 second until the LED becomes lit.
2) Set a look by using both the Channel faders and Latch buttons.
3) Press Assign button first, then press a Channel fader button or Flash button. The LED indicator
for the button you have assigned will flash 3 times indicating that it has been stored. Selecting a
Channel fader will allow a variable output whereas a Latch button will simply act as a switch.
Assign (Run Mode)
1) While in Chase mode press Shift + Button Setup until either the Assign Kill or Assign Add LEDs
are lit. Both will work in the same manner.
2) You can choose whether the Assign programs will execute in a “Kill” state or an “Add” state by
pressing the Add/Kill button.
3) When the Add/Kill LED is on, the state is Kill, also called solo. Only channel outputs in the Assign
program will execute. Any existing chase output not in the Assign program will be set to 0.
4) When the Add/Kill LED is off, the state is Add. The execution of the Assign program will add to
the existing chase output.
TFX-16CON Manual Version 1.20
13
Patch Settings
The Patch mode allows you to reconfigure the channel level selection to DMX level output. This allows
you to achieve a greater level of control on your output. For example if you had 24 parcans and wanted
to control all parcans with specific colors on a specific Channel fader you can re-patch the DMX output
to any of your 8 available Channel faders.
Assign to
Channel
fader
6
7
8
Example
Color
DMX
Channel
Red
Green
Blue
8, 16
9, 17
10, 18
LCD display
The left 2 digits in the display
represent the Channel fader or
Latch button that will be assigned
to the 2 digits on the right which
represent the DMX channel
output.
Display Readout
Turns Off output of
DMX channel 16
00:
16
FF:
16
06:
06
06:
22
Permanently turns
On full level output
on channel 16
Indicates Channel
fader 6 is assigned to
DMX channel 6
1. Press and hold the Patch button for more than 1 second until the LED
becomes lit.
2. Press the (N) STEP (M) buttons until the right 2 digits read 08.
3. Press the (M) PATTERN (N) buttons until the left 2 digits read 06.
4. Press the (N) STEP (M) buttons until the right 2 digits read i6.
5. Press the (M) PATTERN (N) buttons until the left 2 digits read 06.
6. Press the (N) STEP (M) buttons until the right 2 digits read 09.
7. Press the (M) PATTERN (N) buttons until the left 2 digits read 07.
8. Press the (N) STEP (M) buttons until the right 2 digits read i7.
9. Press the (M) PATTERN (N) buttons until the left 2 digits read 07.
10. Press the (N) STEP (M) buttons until the right 2 digits read i0.
11. Press the (M) PATTERN (N) buttons until the left 2 digits read 08.
12. Press the (N) STEP (M) buttons until the right 2 digits read i8.
13. Press the (M) PATTERN (N) buttons until the left 2 digits read 08.
14. Press and hold the Patch button for more than 1 second to leave the
Patch mode. The accompanying LED indicator will turn off.
Indicates Channel
fader 6 is also
assigned to DMX
channel 22
TFX-16CON Manual Version 1.20
14
Appendix
Maintenance
To maintain optimum performance and minimize wear, fixtures should be cleaned frequently. Usage and
environment are contributing factors in determining frequency. As a general rule, fixtures should be cleaned at
least twice a month. Dust build up can cause overheating. This can lead to increased mechanical wear. Be sure
to power off fixture before conducting maintenance.
Unplug fixture from power. Use a vacuum or air compressor and a soft brush to remove dust collected on
external vents and internal components.
Returns Procedure
Returned merchandise must be sent prepaid and in the original packing, call tags will not be issued. Package
must be clearly labeled with a Return Merchandise Authorization Number (RA #). Products returned without
an RA # will be refused. Call CHAUVET and request RA # prior to shipping the fixture. Be prepared to
provide the model number, serial number and a brief description of the cause for the return. Be sure to
properly pack fixture, any shipping damage resulting from inadequate packaging is the customer’s
responsibility. CHAUVET reserves the right to use its own discretion to repair or replace product(s). As a
suggestion, proper UPS packing or double-boxing is always a safe method to use.
Claims
Damage incurred in shipping is the responsibility of the shipper; therefore the damage must be reported to
the carrier upon receipt of merchandise. It is the customer's responsibility to notify and submit claims with the
shipper in the event that a fixture is damaged due to shipping.
Any other claim for items such as missing component/part, damage not related to shipping, and concealed
damage, must be made within seven (7) days of receiving merchandise.
TFX-16CON Manual Version 1.20
15
General Troubleshooting
Applies to
Symptom
Solution(s)
Auto shut off
Check fan thermal switch reset
Beam is very dim or not bright
Clean optical system or replace lamp
Check 220/110v switch for proper setting
Breaker/Fuse keeps blowing
Check total load placed on device
Chase is too slow
Check users manual for speed adjustment
Device has no power
Check for power on Mains.
Check device’s fuse. (internal and/or external)
Fixture is not responding
Check DMX Dip switch settings for correct
addressing
Check DMX cables
Check polarity switch settings
Fixture is on but there is no
movement to the audio
Make sure you have the correct audio mode on the
control switches. If audio provided via ¼” jack, make
sure a live audio signal exists
Adjust sound sensitivity knob
Fluid indicator not working
The filter tip on the end of the tube inserted into the
fluid container must float freely in order to measure
correctly, check to see if perhaps it is stuck
Fogger or Snow output has
dropped
Clean with distilled water and vinegar
Replace hose
Lamps cuts off sporadically
Possible bad lamp or fixture is overheating.
Lamp may be at end of its life.
Light will not come on after
power failure
Some discharge lamps require a cooling off period
before the electronics in the fixture can kick start it
again, wait 5 to 10 minutes before powering up
Loss of signal
Use only DMX cables
Install terminator
Motor movements are jerky or
jumpy
Possible bad motor driver or sensors
Check polarity switch on controller
Moves slow
Check 220/110v switch for proper setting
No flash
Re-install bulb, may have shifted in shipping
No fog
Check fluid tank if empty
Make sure green light is on (for power)
No laser output
Bounce mirror motor may have shifted during
shipping, readjust
No light output
Check slip ring & brushes for contact
Install bulb
Call service technician
Relay will not work
Check reset switch
Check cable connections
Remote does not work
Make sure connector is firmly connected to device
Stand alone mode
All Chauvet lighting fixtures featuring stand-alone
functions do not require additional settings, simply
power the fixture and it will automatically enter into
this mode
Unit wobbles when rotating
Check for damages possibly incurred during
shipping
TFX-16CON Manual Version 1.20
Lights
Foggers
& Snow
Controllers
Dimmers
& Chaser
16