1
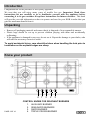
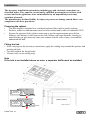
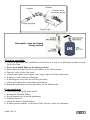
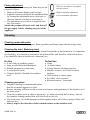
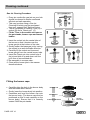
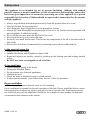
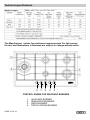
OWNER’S MANUAL
5 BURNER GAS HOB
MODEL: DHG 121 BLACK
MODEL: DHG 122 STAINLESS STEEL
You can rely on Defy. To simplify
CONTENT
2
2
2
3
4
5
5
5
6
6
6
7
7
7
7
8
8
9
10
11
12
13
13
14
15
16
16
Introduction
Unpacking
Know your product
Safety compliance with local
requirements
Installation
Electrical connection
Gas connection
Temporary installation
Gas nozzle, hose & clamp fixing
Check for leaks
If you smell gas
Using the hob
Flame failure - safety cut-out
Action in the event of a burn-back
Flame adjustment
Cleaning removable parts
Cleaning the hob
Cleaning the gas jets
Care guide for stainless steel
Safety notes
Technical specifications
Owner’s responsibility
Trouble shooting
Defy Service Centres
Warranty
Installer’s details
Purchase details
DHG 121 AND DHG 122
Gas HOB
Safe Appliance
LP Gas Safety Association
GAS PERMIT NUMBERS:
DHG 121: 1037/27/RSA - 08/A
DHG 122: 1037/29/RSA - 08/A
PAGE 1 OFPart
16
Number 067 721
Introduction
Congratulations on the purchase of this quality appliance.
We trust that you will enjoy many years of trouble free use. Important: Read these
instructions for use carefully so as to familiarize yourself with the appliance before
connecting it to its gas container. Keep these instructions for future reference. This book
will provide you with information on how to operate and care for your HOB in order that you
gain the maximum benefit from it.
Unpacking
•
•
•
Remove all packaging material and ensure that it is disposed of in a responsible manner.
Plastic bags should be cut up to prevent children playing with them and accidentally
suffocating.
If the appliance is damaged in any way, do not use it. Report the damage to your dealer, who
will take the necessary corrective action.
To avoid accidental injury, care should be taken when handling the hob prior to
installation as the exposed edges are sharp.
Know your product
4
1
2
2
3
CONTROL KNOBS FOR RELEVANT BURNERS
PAGE 2 OF 16
1.
2.
3.
4.
AUXILIARY BURNER
SEMI-RAPID BURNERS
RAPID BURNER
TRIPLE CROWN BURNER
Safety compliance with local requirements.
Permanent installation. Important information for the user.
The appliance may only be installed by a registered LP Gas installer. All registered
installers are issued with a card carrying their registration number. Ask to be shown
this card before allowing the installation to commence and make a note of the installer
QCC number below. Upon completion of the installation, the installer is required to explain
the operational details of the appliance together with the safety instructions. You will be asked
to sign acceptance of the installation and be provided with a completion certificate. You should
only sign for acceptance when the installation is completed to your satisfaction..
(SEE PAGE 16)
Failure to comply with the above will render the warranty invalid.
Note: Your invoice is required in the event of you wishing to make a warranty claim.
Important information for the installer.
This appliance may only be installed by a LP Gas installer registered with the LPGSASA.
(Liquid Petroleum Gas Association of Southern Africa) . The appliance must be installed in
accordance with the requirements of SANS 10087-1 and any fire department regulations and/
or local by-laws applicable to the area. If in doubt check with the relevant authority before
undertaking the installation. Upon completion of the installation you are required to fully
explain and demonstrate to the user the operational details and safety practices applicable to
the appliance and installation including:
a) The position of the isolation or shut-off valve in the gas supply line to the appliance.
b) The requirements for safe operation of the appliance.
Note.This appliance is supplied ex-factory with jets and air settings for use with LP gas
only.
PAGE 3 OF 16
Installation
The necessary installation instructions, including gas and electrical connections are
described below. They must be carried out by qualified personnel in accordance with
current and local regulations, since an installation by an unqualified person may
constitute a hazard.
The manufacturer declines liability for injury to persons or damage caused due to non
compliance with these provisions.
Preparing the cabinet
•
The hob should be installed in a ventilated cupboard fitted with a sturdy worktop.
•
Surfaces, adhesives and laminates must be heat resistant and be able to withstand 100°C.
•
Prepare the aperture (hole) in the counter-top as per the measurements given below.
Ensure a safe distance is left between the hob, kitchen walls and furniture, bearing in
mind that the gas pipe must not come into contact with the sides of any oven installed
underneath the hob.
Fitting the hob
• After carrying out the necessary connections, apply the sealing strip around the aperture and
position the hob.
• Carefully tighten the fixing hooks.
• Remove any excess sealing strip.
Note
If the hob is not installed above an oven, a separator baffle must be installed.
880
510
38.5
40
Aperture
840 + 3
803
- 0
480
470
+3
- 0
HOB
STANDARD
COUNTER TOP
50 - 60 mm.
30 SECURING
- 40 mm.BRACKET
AND SCREW
Baffle installation
HOB
THICKER
COUNTER TOP
Top thickness
SECURING BRACKET
AND SCREW
PAGE 4 OF 16
Electrical connection
This appliance must be earthed and the manufacturer and the seller
do not accept responsibility for any damage due to incorrect
installation or electrical connection.
The mains supply must correspond with the data specified on the
rating plate located on the base of the hob.
• The Gas hob requires an electrical connection for the flame ignition system and is fitted
with a 15 Amp 3 pin plug.
• Insert the plug into an earthed 15 Amp wall socket which is easily accessible but not
located directly above the hob.
• The mains lead must not be clamped, bent or trapped. Nor should it come into contact with
hot parts of the hob. If the mains lead is damaged it should be replaced by a qualified
electrician. The mains lead is a type 3x0.5mm² H05VV-F.
• The appliance is not intended to be operated by means of an external timer or separate
remote-control system.
Gas connection
This appliance uses LPG ( Liquid petroleum or bottle gas)
This appliance requires an operating pressure of 2.8 –3.0 kPa at the appliance. A
suitable LPG regulator that complies with the requirements of SANS 1237 must be used.
The manufacturer and the seller do not accept responsibility for any damage due to
incorrect installation or gas connection.
Flexible hose - Not supplied. Any hose that is used to connect the stove to the gas system
shall comply with SANS 1156-2 or BS 3212.
Ensure that pipe clamps are tightened correctly and are of good quality.
Gas cylinder - Not supplied.. For best results we recommend that gas cylinders with a
minimum capacity of 19kg be used.
Regulator - Not supplied. A 2,8 kPa LPG gas regulator which complies with SANS 1237
must be used.
Temporary installation.
A flexible hose connection from the gas appliance to the cylinder can be made.
Ensure that pipe clamps are tightened correctly and are of good quality.
• Gas bottles should be located outdoors in a suitable ventilated lock-up.
• The connecting hose should not exceed 125 cm in length.
• Soak the end of the flexible hose in hot water to soften it and then push the hose end fully
over the hose nozzle
• Secure the hose by tightening the hose clamp.
• In a similar fashion, secure the other end of the hose to the regulator on the gas cylinder.
See sketch on next page.
PAGE 5 OF 16
Gasket
Gasket
Flexible hose
and hose clamp
Hob gas pipe
te
Al
rn
iv
at
es
Copper pipe
Gas nozzle, hose and clamp
Fixing method
Check for gas leaks
• Check for gas leaks after installation and whenever a new or re-filled gas cylinder is used
for the first time.
• Never use a naked flame to check for gas leaks
• Ensure that the control knobs on the hob are in the OFF position.
• Open the valve on the Gas bottle.
• Using a small paint brush, apply some soapy water to all the connections.
• If there is a leak, bubbles will appear.
• If this happens, close the valve on the gas bottle.
• Check and tighten the connections immediately.
• Repeat the procedure to ensure that there are no further leaks.
If you smell gas:
• Turn off the gas supply at the bottle.
• Extinguish all naked flames.
• Do not operate any electrical appliances.
• Ventilate the area.
• Check for leaks as detailed above.
• If odour persists contact your nearest Defy Service Centre for assistance.
PAGE 6 OF 16
Using the hob
Operating the gas burners
• To switch the burner on, push down on the relevant control knob and then turn it to the left.
(counter clockwise) to the large flame symbol
• A spark is created and the gas ignites.
• Keep the knob depressed for an additional 3 to 5 seconds to engage the safety system.
• If the flame fails to continue burning, please repeat the sequence.
• Adjust the flame to the desired level
• The large flame symbol on the knob indicates the maximum and the small flame the lowest
setting.
Burner use
For lower gas consumption and better efficiency, it is advisable to use pots that are slightly
wider than the burner to ensure that the flame does not spread beyond the edge.
Flame failure –safety cut out.
In the unlikely event of a flame blow out, caused by an overflow of fluid at the burners, a
safety mechanism will automatically shut off the gas approximately 30 seconds after the flame
extinguishes.
Action to be taken in the event of a burn-back
• In the event of a burn-back (where the flame burns back into the jet) immediately turn off
the control valve to the affected burner.
• After ensuring the flame is extinguished, wait for 1 minute and re-light the burner in the
normal manner.
• If the burn-back occurs again, turn off the control valve to the affected burner, and consult
the nearest Defy Service Centre for assistance .
• Do not use the appliance again until a service technician has declared it safe to do so.
PAGE 7 OF 16
Flame adjustment
Should you find it necessary, the flame may be adjusted as follows:
• Remove the burner knobs (push on type)
• Light the burners and adjust the minimum flame
by turning the adjustment screw clockwise to
decrease and anti-clockwise to increase it.
• The adjustment screw driver is supplied with
the accessories.
Switch the product off at the wall and shut off
the gas supply before cleaning any part of the
appliance
Thin wire screwdriver is supplied
with accessories
Highest minimum adjustment
Lowest minimum adjustment
Cleaning
Cleaning removable parts.
Remove and clean the pan supports, flame spreaders and burner caps with hot soapy water.
Cleaning the hob ( Stainless steel)
Stainless steel is not adversely affected by normal household use but because of it’s reputation
for durability, it is sometimes assumed to be indestructible, and therefore subjected to abuse.
Care should be taken to avoid such ‘abnormal’ use.
Do Use
• A soft cloth or synthetic sponge.
• Soap, or mild household detergent.
• Diluted ammonia in warm water.
• A nylon bristle brush.
• Cleaners labelled “Suitable for stainless
steel”.
Do Not Use
• Acids.
• A steam cleaner.
• Coarse abrasive cleaning powders.
• Metallic scourers, steel wool or metal
scrapers.
• Wire brushes or emery paper.
• So called ‘silver cleaners’.
• Kitchen scourers / foam pads.
Cleaning procedure
• Frequent cleaning is recommended rather
than an occasional aggressive clean.
• Routine cleaning will preserve the corrosion resistance and appearance of the stainless steel
for many years.
• Clean the stainless steel as often as necessary ( ie. when noticeably dull or dirty ) and use
the simplest cleaning method that will effectively do the job.
• Use clean water, or a mild detergent solution applied with a soft cloth or sponge. Rinse well
and wipe dry.
• Always wipe in the direction of the brushed texture on the stainless steel.
PAGE 8 OF 16
Cleaning continued
Gas Jet Cleaning Procedure
• Every six months the gas jets on your hob
should be cleaned to ensure continued
efficient and safe operation.
• This may be done using a Gas Jet
Cleaning Kit which may be purchased
from your nearest Defy Service Centre.
• The kit comprises of a sliding T-bar (A) a
socket (B) and a ‘Classic pin’ (C).
• Fit the T-bar to the socket and remove
the pot stands, burner caps and burner
bodies.
1. Insert the socket into the central tube of
the burner so that it locates over the
brass gas jet at the bottom of the tube.
2. Gently loosen the brass gas jet by turning
the socket in an anti-clockwise direction.
3. Carefully lift the socket and loosened
brass gas jet from the central burner tube.
4. Insert the Classic pin into central hole of
the jet and slide it up and down until the
jet is free of accumulated dirt.
5. Re-assemble in reverse order.
6. Clean all the burner jets in the manner
described above.
Fitting the burner caps.
• Carefully align the hole in the burner body
with the flame failure sensor.
• Gently lower the burner body into position.
• Centralise and level the burner cap onto
the burner body. (The burner cap must be
positioned so that it rests centrally on the
burner body). Ensure that it is correctly
seated. Refit the pot stands.
PAGE 9 OF 16
BURNER CAP
BURNER BODY
FLAME FAILURE SENSOR
IGNITION
ELECTRODE
Care guide for stainless steel
Condition
Action
Notes and comments
Requires routine cleaning
Mild detergent solution applied with soft sponge or
cloth. Rinse and wipe dry.
If possible use warm to hand
-hot water. A 5% addition of
ammonia is beneficial.
Finger prints
Pre-treat finger marks with
alcohol or an organic solvent. Follow immediately
with routine cleaning.
Minimize re-occurrence by
applying a wax or silicone
based household polish to
the clean dry surface.
Wipe with a little baby oil
and a soft lint free cloth.
Buff to shine.
Apply whenever necessary.
Stubborn stains and
discolouration
Use a little Ceran cleaning
paste. (available from Defy
Service Centres)
Rinse and dry.
Repeat several times rather
than resorting to a single
aggressive cleaning method.
Grease and fat splatter.
Wipe off excess with a soft
cloth or paper towel. Use a
water borne degreasing
agent ( dishwashing liquid ).Follow up by routine
cleaning.
Scratches on the brushed
finish.
For slight scratches, use a
nylon pad loaded with an
iron free abrasive polishing
compound. Follow the direction of the original texture.
Follow up with routine
cleaning.
For deep scratches use a
coarser abrasive initially and
follow up as for light
scratches.
Deep scratches will be difficult to remove completely.
Do not use steel wool or
metal scourers unless they
are made from stainless
steel.
It must be appreciated that some of the above suggested procedures will
alter the surface appearance of the treated area.
They should therefore only be applied with due consideration and care.
PAGE 10 OF 16
Safety notes
This appliance is not intended for use by persons (including children) with reduced
physical, sensory or mental capabilities, or lack of experience and knowledge, unless they
have been given supervision or instruction concerning use of the appliance by a person
responsible for their safety. Children should be supervised to ensure that they do not play
with the appliance.
•
•
•
•
•
•
•
•
Always keep children and infirm persons away from the product when it is in use.
Only use the hob for preparing food.
Use a deep pan, large enough to cover the appropriate burner
Always dry food thoroughly before placing it in hot oil or fat. Frozen food in particular will
spit and splatter if added too quickly.
Never fill the pan more than one third full of fat or oil.
Never heat fat or fry with a lid on the pan.
Do not fry too much food at once. This lowers the temperature of the oil or fat and results in
fatty foods.
Do not leave hot fat or oil unattended. If overheating occurs, these could catch fire.
In the event of a pan fire
• Switch off the Gas supply.
• Smother the flames with a blanket or damp cloth.
• Burns and injuries are usually caused by picking up the burning pan and rushing outside
with it.
• Do NOT use water to extinguish an oil or fat fire.
If you smell gas:
• Turn off the gas supply at the bottle.
• Extinguish all naked flames.
• Do not operate any electrical appliances.
• Ventilate the area.
• Check for leaks as detailed on page 6 of this manual.
• If odour persists contact your nearest Defy Service Centre for assistance.
Room ventilation
• When using Gas, ensure that the room is well ventilated.
Good ventilation is essential for the safe operation of the hob. Do not install the hob in a room
below ground level unless it is open to ground level on at least one side. Prolonged extensive
use of the hob may call for additional ventilation, for example an open window or dedicated
extraction fan that exhausts to the outside.
PAGE 11 OF 16
Technical specifications
II 2H3 + (G20= 2.0 kPa ..G30=2.8—3.0/3.7 kPa)
2.0 kPa
2.8-3.0/3.7 kPa
The Manufacturer strives for continuous improvements. For this reason,
the text and illustrations in this book are subject to change without notice.
4
1
2
2
3
CONTROL KNOBS FOR RELEVANT BURNERS
1.
2.
3.
4.
PAGE 12 OF 16
AUXILIARY BURNER
SEMI-RAPID BURNERS
RAPID BURNER
TRIPLE CROWN BURNER
Owner’s responsibility
Since the following are not factory faults, they are the owner’s responsibility.
• Damage to exterior finish.
• Breakage of components.
• Damage through improper use or installation of the appliance.
• Damage caused by moving the appliance.
Trouble shooting
Problem
Possible cause
Advice / Remedy
No ignition spark
No electrical supply
Check the supply
No gas flow is evident
Regulator is closed
Open regulator
Gas hose is bent
Install hose without bends
Burners do not burn well Burners are dirty
Clean burner parts
Burners are wet
Dry burner parts
Burner cap is skew
Re-position burner caps
Regulator is partially closed
Open the regulator fully
Gas cylinder is empty
Replace with full cylinder
Check house fuses or trip switches.
Check the wall plug by plugging another small appliance into the wall socket.
Check that there is gas in the cylinder and that the valve is open.
Smoke and smell may be emitted for the first few hours of use. This is normal and is no
cause for concern.
• When metals heat up they expand and may cause ticking noises. This is normal and is no
cause for concern.
•
•
•
•
Be advised that you may be charged for a service call, even during the
warranty period, if the fault is due to or caused by any of the above.
Do not attempt to repair the appliance yourself.
PAGE 13 OF 16
Defy Service Centres
If you have followed the instructions and still have a problem, contact the nearest Defy Service Centre. They will be able to advise you on any aspect of the
product or send a qualified technician to repair it.
BLOEMFONTEIN
160 Long Street, Hilton,
Bloemfontein 9301.
Tel. 051 400 3900
[email protected]
PORT ELIZABETH
112 Patterson Road,
North End, Port Elizabeth 6001.
Tel. 041 401 6400
[email protected]
CAPE TOWN
5A Marconi Rd.
Montague Gardens, 7441.
Tel. 021-526 3000
[email protected]
JOHANNESBURG
Commercial Head Office,
Administration, Distribution,
National Groups, Tel. Sales,
Contracts and Credit.
Cnr. Mimetes & Kruger Sts.
Denver ext.12
Johannesburg. 2094.
Tel. 011 621 0200 or 011 621 0300
[email protected]
DURBAN
35 Intersite Avenue,
Umgeni Business Park, Durban 4051.
Tel. 031 268 3300
[email protected]
EAST LONDON
16 Bowls Rd. Arcadia,
East London 5201.
Tel. 043 743 7100
[email protected]
PRETORIA.
Block A1 Old Mutual Industrial Park.
Cnr. D.F.Malan Drive & Moot Str.
Hermanstad. 0082.
Tel. 012 377 8300
[email protected]
POLOKWANE
87 Nelson Mandela Drive.
Superbia 0699.
Tel. 0152 92 1166 / 7 / 8 / 9.
[email protected]
Other areas are serviced by over 200 authorised agents.
Consult the nearest regional Service Centre for details.
PAGE 14 OF 16
Warranty
This certificate is issued by DEFY APPLIANCES (PTY) LTD manufacturers of Defy and Ocean
products, hereinafter the Company, to the original purchaser only, of the appliance described on
the certificate and shall constitute the only warranty given in respect of this appliance.
The Company warrants to the original purchaser that for a period of TWO YEARS from date of
purchase the appliance is free from defect under normal domestic use, both in workmanship and
material, subject to the following conditions.
1. Repair or replacement of any part of this appliance, found by the Company to be defective, shall
be at the election of the Company. The Company reserves the right to effect such service
through any of its Service Divisions or Authorised Service Dealers. The cost of such service shall
be borne by the Company in full, provided that the appliance is located no further than 50 km
from a Company Service Centre or an Authorised Service Dealer. Where the appliance is
located beyond the 50 km radius, the purchaser shall be liable for the standard travelling
charges, as determined by the Company.
CARRY IN SERVICE Microwave ovens, Compact cookers and small appliances are repaired in
our service centres and are not collected from the customers home. Faulty units should be
delivered to the purchasing dealer or to the nearest Company Service Centre for warranty
repairs.
2. Rusted or corroded plates, vitreous enamelware, fuses and lamps are specifically excluded
from these warranties. It is an express condition of these warranties that the purchaser takes due
care and attention in the use and maintenance of the appliance. Abuse, misuse in conflict with
operating instructions, connection to incorrect voltages and subjection to commercial use shall
release the Company from its obligations.
3. This warranty shall become void and cease to operate if the appliance is dismantled by, or any
repairs to the appliance are effected by any persons not duly authorised by the Company, or if
substitute parts not approved by the Company are used in the appliance, or if the serial number
of the appliance is removed.
4. The Company shall not be responsible for damages resulting from fire, flood, civil disturbances
or any Act of God. The Company shall not, in terms of these warranties be responsible nor held
liable for any consequential loss or damage of any kind caused by or due to the failure or
malfunction of the appliance.
5. The Company shall not be responsible for transportation or other costs other than those
incurred within the provisions of Point 1 of this Certificate.
6. These warranties shall not apply to the appliance if it is purchased or used beyond the borders
of the Republic of South Africa, Namibia, Botswana, Swaziland and Lesotho.
7. Where service is requested under warranty and no fault or defect can be found by the
Company, all costs incurred will be for the purchaser's account.
8. This Certificate as well as your invoice will serve as proof of purchase. For the purpose of
warranty, it will be essential to produce this Certificate and invoice. Failure to do so, will render
the purchaser liable for service costs.
KEEP THIS CERTIFICATE AND SALES INVOICE AS PROOF OF PURCHASE FOR
WARRANTY PURPOSES.
PAGE 15 OF 16
Installer’s details to be recorded below
INSTALLER’S NAME AND COMPANY:
HHHHHHHHHHHHHHHHHHHHHHHHHHHHHHHHHHHHH...
HHHHHHHHHHHHHHHHHHHHHHHHHHHHHHHHHHHHH...
INSTALLER’S REGISTRATION NUMBER:
HHHHHHHHHHHHHHHHHHHHHHHHHHHHHHHHHHHHH..
HHHHHHHHHHHHHHHHHHHHHHHHHHHHHHHHHHHHH...
HAVE YOU RECEIVED A WRITTEN COMPLETION CERTIFICATE?
........................................................................................................................................
HHHHHHHHHHHHHHHHHHHHHHHHHHHHHHHHHHHHH...
HAS THE INSTALLER EXPLAINED THE OPERATIONAL DETAILS OF YOUR HOB
TO YOU?
........................................................................................................................................
HHHHHHHHHHHHHHHHHHHHHHHHHHHHHHHHHHHHHH
For future reference, record the listed information in the
space below.
The Serial number may be found at the base of the hob
SERIAL NUMBER:HHHHHHHHHHHHHHHHHHHHHHHHHHHH..
DATE OF PURCHASE:HHHHHHHHHHHHHHHHHHHHHHHHHH...
PURCHASED FROM:HHHHHHHHHHHHHHHHHHHHHHHHHHH.
HHHHHHHHHHHHHHHHHHHHHHHHHHHHHHHHHHHHHH
HHHHHHHHHHHHHHHHHHHHHHHHHHHHHHHHHHHHHH
Please register your product at
www.defy.co.za
PAGE 16 OF 16