1
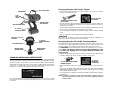
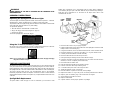
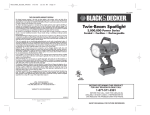
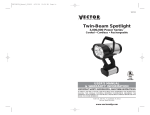
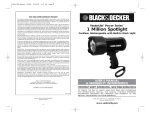
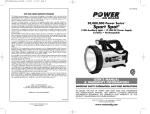
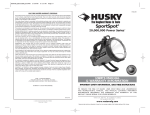
VEC158BD
Twin-Beam Spotlight
3,000,000 Power Series™
Corded • Cordless • Rechargeable
53SB
E231887
SAVE THIS MANUAL FOR FUTURE REFERENCE.
IMPORTANT SAFETY INFORMATION
WARNINGS
• Contains non-spillable sealed lead acid batteries. They must be recycled or disposed
of properly.
• DO NOT dispose of batteries in fire, as this may result in an explosion.
• RISK OF FIRE/ELECTRIC SHOCK — do not plug in a power supply without the bulb
lens and cover in place.
• ALL HALOGEN LIGHTS GIVE OFF HEAT.
– Do not touch lens while operating.
– Keep combustibles away from Spotlight lens. Extreme heat can cause fires.
– Never place the light face-down on any surface when lit.
CAUTIONS
• Never look directly into the light or shine the light into another person’s eyes.
• Keep sharp objects away from lens — it is glass and can break.
• Do not immerse spotlight in water.
• Do not drop or throw spotlight. It contains glass and a sealed lead acid battery.
• Only replace bulbs with type indicated in specifications (12 volt, H3 quartz halogen. 75 watt).
• Use only with AC or DC charging adapters that are provided with unit.
• DO NOT OVERCHARGE:
– AC recharge up to 30 hours maximum.
– DC recharge up to 4 hours maximum.
– After recharge, disconnect charging adapter and wait 5 minutes before use.
• NEVER ATTEMPT TO USE THE AC CHARGER AND DC CHARGING PORT SIMULTANEOUSLY.
• Do not crush, cut, pull or expose charging adapter cords to extreme heat.
• Position charging adapter cords so they do not become entangled or become a safety hazard. Keep
charging adapter cords away from sharp edges.
• Use in a dry location only.
• Do not open body casing. There are no user-serviceable parts inside.
THIS UNIT IS NOT A TOY AND SHOULD ONLY BE OPERATED BY ADULTS. KEEP AWAY FROM CHILDREN!
Read This User’s Manual Before Using This Spotlight.
SAVE THESE INSTRUCTIONS
INTRODUCTION
Thank you for purchasing the Black & Decker 3,000,000 Power Series™
Twin-Beam Spotlight. Please read this guide carefully before use to ensure
optimum performance and to avoid damage to the unit.
FEATURES
• Two powerful, focused, replaceable quartz halogen bulbs
• Two magnified LED Area Lights
• Three-position Light Mode Switch selects single Spotlight, dual Spotlight or LED
Area Lights
• Spotlight ON/OFF Trigger with Trigger Guard
• 12 Volt DC Accessory Outlet
• Protective rubber safety guard (bezel) around lens
• Rubber safety cap protects battery compartment
• Comfortable pistol grip handle
• Battery Status LED Indicator displays battery charge level while charging, or
whenever Battery Status Pushbutton is pressed
• UL listed, built-in 120 Volt AC Charger
• 12 Volt DC Charging/Power Adapter included
• Rechargeable, non-spillable, sealed lead acid battery
RUBBER BEZEL
EASY GRIP HANDLE
Charging Using the 120 Volt AC Charger
• Plug a standard North American 120 volt AC extension cord into the 120 Volt AC
Charger on the back of the unit.
2 LED
AREA
LIGHTS
HOUSEHOLD EXTENSION CORD
TWIN HALOGEN BULBS
TRIGGER GUARD
(AND TRIGGER)
12 VOLT DC
ACCESSORY OUTLET
BUILT-IN 120 VOLT
AC CHARGER
(NOT INCLUDED)
• Turn OFF the Area Lights and Spotlight (Light Mode Switch is not set to “AREA” and
the Trigger is not depressed). Disconnect any 12 volt DC appliances from the 12
Volt DC Accessory Outlet.
• Charge until the Battery Status LED Indicator green LED lights (approximately 20-30
hours). DO NOT CHARGE FOR LONGER THAN 30 HOURS.
• Once recharging is completed, disconnect the adapter from the external charging
source.
• After AC recharging, wait 5 minutes before using the Spotlight.
CAUTION
Do not turn on any lights or operate any appliances through the Spotlight’s DC
Accessory Outlet when using the 120 Volt AC Charger.
BUILT IN 120 VOLT AC
CHARGER
LIGHT MODE SWITCH
BATTERY STATUS
LED INDICATORS
12 VOLT DC
CHARGING/POWER
PORT
BATTERY STATUS
PUSHBUTTON
Charging Using the 12 Volt DC Charging Adapter
Make sure the DC source (jump-starter, battery pack, vehicle accessory outlet, etc.) is
12 volt DC and is able to supply at least one half amp at 12 volt DC for 8 hours. This
means a battery pack should be charged with at least 4 amp hours capacity.
The VEC158BD can be simultaneously charged and operated from a 12 volt DC
source. Make sure the 12 volt DC source can supply minimum 15 amps
of current if the Spotlight is to be operated while the batteries are
being charged.
• Insert the 12 volt DC plug end of the 12 Volt DC Charging/Power Adapter into the
accessory outlet of your vehicle or other 12 volt DC power source.
CHARGING/RECHARGING THE SPOTLIGHT
This unit is shipped in a partially charged state. BEFORE first use, charge the Spotlight
using the 120 Volt AC Charger for 20-30 hours or until the green LED Indicator lights.
To check the battery charge status at any time, press the Battery Status Pushbutton.
The LED Indicators display the level of charge. Three red LEDs indicate a high level of
charge; two, a medium level; and one red LED indicates that the unit should be
charged soon.) The green LED lights to show a fully charged unit.
12 VOLT DC CHARGING/POWER
ADAPTER (INCLUDED)
12 VOLT DC
CHARGING/
POWER PORT
• Plug the barrel-tip end into the 12 Volt DC Charging/Power Port on the back of the
unit.
• Charge until the Battery Status LED Indicator green LED lights when the Battery
Status Display pushbutton is pressed (approximately 3-4 hours). DO NOT CHARGE
FOR LONGER THAN 4 HOURS.
• Once recharging is completed, disconnect the adapter from the external charging/
power source.
Note: When using a vehicle’s 12 volt DC accessory outlet as a charging source, be
It is recommended that you charge the Spotlight after each use (or every 2 months
when not in frequent use) until the green LED lights so the unit is always ready when
you need it.
aware that some vehicles require you to turn on the ignition to power the
accessory outlet.
WARNING
NEVER ATTEMPT TO USE THE AC CHARGER AND DC CHARGING PORT
SIMULTANEOUSLY.
Phillips type screwdriver and a replacement bulb (or bulbs). During installation,
avoid touching the glass part of the bulb. Bulb life may be shortened by installing a
bulb with dirt or fingerprints on it. The bulb can be wiped clean with a cloth
moistened with alcohol.
OPERATING INSTRUCTIONS
Operating the Spotlight and LED Area Lights
To use the lights, first set the Light Mode Switch to the desired operation – “SINGLE”
Spotlight beam, “TWIN” Spotlight beam or “AREA” for LED Area Lights.
To operate the LED Area Lights, simply slide the switch to select AREA. To turn the LED
Area Lights OFF, slide the switch to any other setting.
To operate the Spotlight:
1. Slide the switch to select SINGLE or TWIN beam.
2. Flip up the Trigger Guard (see diagram on page 2).
3. Squeeze the Trigger.
To turn the Spotlight OFF, release the Trigger.
RUBBER
BEZEL
REFLECTOR
ASSEMBLY
RETAINER
REFLECTOR
PHILLIPS
SCREWS
RUBBER “O”
LENS
(GLASS) RING
HAIRPIN
RETAINING
WIRES
BULB
PHILLIPS
HEAD
SCREWS
Using the 12 Volt DC Accessory Outlet
Flip up the cover on the 12 Volt DC Accessory Outlet just above the base on the front
of the unit. Insert the appliance’s DC plug and operate as usual.
Note: Do not operate the 12 Volt DC Accessory Outlet while charging/recharging
using the 120 Volt AC Charger.
CARE AND MAINTENANCE
All batteries lose charge with time, especially when they are warm. Recharge the unit
every two months when not in frequent use, preferably using the 120 volt AC method.
Never submerge the unit in water. If the unit gets dirty, gently clean the outer surfaces of
the spotlight unit with a soft cloth moistened with a mild solution of water and detergent.
The quartz halogen bulbs are the only user-replaceable parts in the Spotlight.
Periodically inspect the condition of adapters, connectors and wires. Contact Technical
Support toll-free at (800) 618-5178 to replace any components that have become worn
or broken.
Spotlight Bulb Replacement
To replace either or both H3 type 12 volt 75 watt bulbs, you will need a small
REFLECTOR
1. Disconnect the unit from any charging adapters.
2. Push the rubber bezel forward toward the front of the spotlight to reveal two small
Phillips screws in the retaining ring.
3. Using the screwdriver, remove (counterclockwise) the two screws. Set them aside.
4. Lift off the retaining ring, glass lens and rubber “O” ring and set them aside.
5. Carefully remove the reflector and bulb assembly.
6. Disconnect the bulb wire from the red power wire.
7. Unsnap the hairpin retaining wires from the reflector’s flange.
8. Using the screwdriver, loosen the retaining screw to remove the bulb from the
reflector (no need to completely remove this screw).
9. Lift out the bulb and detach wire.
10. Insert the replacement bulb into the reflector’s flange.
11. Put back and secure the hairpin retaining wires.
12. Connect the bulb power wire to the red power wire.
13. Tighten the retaining screw on the flange.
14. Place the reflector in position in the body of the spotlight.
15. Replace the rubber “O” ring in the groove around the perimeter of the reflector.
16. Replace glass and retaining ring so the screw holes are aligned.
17. Secure retaining ring with two screws.
18. Replace rubber bezel.
19. Operate switch to ensure proper operation of spotlight.
WARNING
To reduce the risk of electric shock, replace bulbs with 12 volt H3 75
watt only.
Battery Replacement/Disposal
Safe Battery Disposal
Contains a maintenance-free, sealed, non-spillable, lead acid battery,
which must be disposed of properly. Recycling is required, contact your
local authority for information. Failure to comply with local, state and
federal regulations can result in fines, or imprisonment.
WARNINGS
• Do not dispose of the battery in fire as this may result in an
explosion.
• Before disposing of the battery, protect exposed terminals with
heavy-duty electrical tape to prevent shorting (shorting can result in
injury or fire).
• Do not expose battery to fire or intense heat as it may explode.
Operating Issues
The Area Light is operating, but the Spotlight is not.
• SINGLE or TWIN must be selected on the Light Mode Switch and the Trigger
depressed to operate the Spotlight.
• The Spotlight will not operate while charging using the 120 volt AC method.
Be sure all extension cords are disconnected from the AC charger before Spotlight
use. (The Spotlight can be operated while charging using the 12 volt DC method.)
• If you suspect the bulb is blown, check the filament. If the filament is coiled and
unbroken, the bulb is not blown. If bulb is blown, replace it.
None of the lights are operating.
• The battery may be completely discharged. Charge the unit following the
directions on page 2.
SPECIFICATIONS
Spotlight Bulb:
Dual 12 volt, H3 series, 75 watt
Battery:
Two maintenance-free, sealed lead acid,
6 volt, 6.0 amp hour
AC Charger:
UL Listed, Class 2, 12 volt DC (300 mA)
DC Plug Fuse
8A/250 V
12 Volt DC Charging Adapter Plug Fuse Replacement
The fuse in the plug end of the 12 Volt DC Charging Adapter protects the adapter’s
charging circuit. If the 120 Volt AC Charger operates, but the DC charging adapter
does not, then this fuse may be opened (blown).
To replace the fuse:
1. Unscrew the end cap of the DC plug (counterclockwise).
2. Remove spring center contact and fuse.
3. Check fuse with a continuity checker.
4. If blown, locate a replacement 8 amp/250 volt fuse.
5. Replace the fuse, spring, contact and end cap.
6. Screw end cap clockwise until it is finger tight – DO NOT OVER-TIGHTEN.
7. Test for proper operation of the 12 Volt DC Charging Adapter.
TROUBLESHOOTING
Charging Issues
No Battery Status Indicator LEDs Light When Charging
1. Check connection to the 120 Volt AC Charger or 12 Volt DC Charging Port.
2. Check connection to AC or DC power source.
3. Confirm there is a functioning AC or DC current.
BLACK DECKER ACCESSORIES
GARAGE ACCESSORIES