1
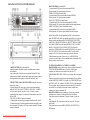
PREFATA
Va multumim ca ati ales sa cumparati acest sistem audio pentru masina.
Va rugam cititi cu atentie manualul de instructiuni pentru acest produs.
Va rugam pastrati acest manual pentru o viitoare utilizare.Va va fi de ajutor
daca veti intampina vreo problema operationala.
Selectand echipament audio de calitate este numai inceputul experientei
dumneavoastra muzicale.
Este timpul sa va ganditi cum sa maximizati aceasta experienta intelegand
cum functioneaza noul dumneavoastra sistem audio pentru masina.
MANUAL DE INSTRUCTIUNI
Speram sa va bucurati folosind acest produs si sa ascultati mereu moderat,
la un nivel sigur de sunet pentru a evita orice posibila leziune sau pierdere a
auzului. Daca ascultati la un volum excesiv de mare de fiecare data, auzul
dumneavoastra se poate adapta la volumuri inalte si ceea ce suna normal
pentru dumneavoastra poate fi destul de daunator si poate duce la leziuni
sau chiar pierderea auzului. Asadar va rugam practicati “sunet sigur” si
intotdeauna ascultati la un nivel moderat de sunet.
Incepeti cu controlul volumului de la setarea cea mai joasa, si incet cresteti
nivelul pana cand auziti confortabil si clar, fara distorsiuni.
Odata ce ati stabilit nivelul de sunet, lasati-l asa.
AVERTISMENT!
Pentru a reduce riscul de curentare, nu expuneti aparatul in ploaie sau intrun mediu cu umiditate ridicata.
Pentru a preveni expunerea la fasciculul laser, nu dezmembrati aparatul.
Radiatii vizibile si invizibile au loc cand deschideti sau dezmembrati
aparatul.
SISTEM DETASABIL AL FETEI CASETOFONULUI
PENTRU ANTIFURT
PLAYER CD/MP3/WMA CU SD/USB
RADIO DIGITAL AM/FM - RDS
CU FUNCTIE ELECTRONICA ANTI-SOC
Pentru a proteja mediul inconjurator, nu aruncati echipamentele electrice la
gunoiul menajer.
Va rugam duceti echipamentul electric pe care nu-l mai folositi la un centru
de colectare autorizat pentru reciclare.
In acest fel ajutati la potentialele efecte a depozitarii incorecte asupra
mediului inconjurator si sanatatii umane. Acest lucru contribuie la reciclare
si la alte forme de reutilizare a aparatelor electrice . Informatii referitoare
unde puteti depozita aceste echipamente le puteti obtine de la autoritatile
locale.
1
Downloaded from Caradio-Manual.com Manuals
LOCATIA SI FUNCTIA CONTROALELOR
BASS CONTROL (Control BASS)
1.Apasati butonul SEL pentru selectarea modului BASS.
2.Rotiti butonul VOL pentru ajustarea bass-ului.
TREBLE CONTROL (Control Inalte)
1.Apasati butonul SEL pentru selectarea modului TREBLE
2.Rotiti butonul VOL pentru ajustarea inaltelor.
BALANCE CONTROL (Control balans)
1.Apasati butonul SEL pentru selectarea modului BALANCE.
2.Rotiti butonul VOL pentru a ajusta balansul boxelor stanga/dreapta.
FADER CONTROL (Control de intensitate sonora)
1.Apasati butonul SEL pentru selectarea modului FADER.
2.Rotiti butonul VOL pentru a ajusta balansul boxelor fata/spate.
Apasati butonul SEL si tineti apasat mai mult de 2 secunde pentru a
porni TA SEEK/TA ALARM, apoi apasati butonul SEL scurt si repetati
pentru a selecta unul din modurile PI SOUND/PI MUTE, RETUNE
L/RETUNE S, MASK DPI/MASK ALL, BEEP 2ND/BEEP ALL/BEEP
OFF, SEEK1/SEEK2 (in modul radio)/DSP OFF/FLAT/ CLASSICS/
ROCK/ LOUD ON/LOUD OFF, SUBW OFF/ON (cu iesire de
subwoofer), STEREO/MONO (in modul FM),DX/LOCAL (in modul
FM), VOL AST/VOL ADJ (cand este in modul VOL ADJ, modul
urmator va fi A-VOL, dupa care puteti ajusta nivelul volumului.
Valoarea minima care poate fi setata este 10), si ESP6/ESP25 in
secventa si circulare.Dupa selectarea modului dorit, rotiti butonul VOL
pentru a selecta setarea acestuia.
1.OPEN BUTTON (Buton de deschidere)
Apasati butonul de deschidere pentru a deschide partea frontala a
casetofonului.
Apoi un disc poate fi introdus sau scos apasand butonul EJ. Dupa
deshiderea partii frontale, apasati inspre stanga, apoi trageti de partea
din dreapta inspre afara pentru a o detasa de unitatea de sasiu.
2.SEL BUTTON (Select) AND VOL KNOB (Butonul de selectare si
butonul de volum)
a.Apasati butonul SEL scurt, apoi se activeaza selectand unul din
modurile VOLUME→BASS→TREBLE→BALANCE →FADER→
In fiecare mod, timpul de asteptare este de 5 secunde, si cand se
termina timpul de asteptare, se intoarce la ultimul mod de tuner, disc,
SD sau USB.
VOLUME CONTROL (Controlul volumului)
1.Volumul poate fi ajustat la orice moment rotind butonul de volum .
2.Volumul mai poate fi ajustat si apasand continuu butonul SEL pana
cand caracterul VOL apare pe LCD, apoi rotiti de butonul VOL pentru
ajustarea volumului.
2
Downloaded from Caradio-Manual.com Manuals
TA SEEK/TA ALARM (TA CAUTARE/ TA ALARMA)
Modul TA SEEK: cand posturile noi de radio nu primesc informatii TP
(TRAFFIC PROGRAMME) timp de 5 secunde, radioul cauta
urmatorul post radio care nu are acelasi nume de statie –PI
(PROGRAMME IDENTIFICATION) ca precedentul, dar are informatii
TP.
Timpul pentru cautarea unui post nou cand informatia TP este pierduta
este dat de RETUNE SHORT – 60 secunde (CAUTARE SCURTA) sau
RETUNE LONG – 90 secunde (CAUTARE LUNGA). Cand informatia
TP este pierduta incepe cautarea unui nou post radio PI. Cand acelasi
post radio-PI- nu este gasit in durata unei scanari, radioul cauta
urmatorul post radio cu informatii TP.
Modul TA ALARM: cand acest mod este selectat, nici o cautarea
automata nu este activata. Se aude un dublu beep(ALARMA).
Cand posturi noi nu au informatii TP pentru 5 secunde, se aude un
beep.
Cand informatia TP este pierduta se aude un beep in loc de a cauta
postul radio.
Cand posturi noi nu au semnal RDS (RADIO DATA SYSTEM), PI
SEEK incepe.
3
PI SOUND/PI MUTE:
Modul PI SOUND: Daca o masina circula intre doua locatii, un
fenomen de oscilare poate aparea, din cauza ca coduri PI diferite pot fi
primite de la aceeasi AF, cand sunete diferite PI (DIP) sunt auzite din
cand in cand mai putin de 1 secunda.
Modul PI MUTE: in aceeasi situatie , un sunet mut va fi auzit mai putin
de 1 secunda.
RETUNE L / RETUNE S:
Timpul initial de cautare automata TA sau mod PI SEARCH este
selectat.
Cand informatia PI nu este gasita in timp de recautare, radioul incepe
recautarea aceluiasi post radio PI.
Cand nu se gasesti acelasi post PI in timpul unei scanari, radioul trece
la ultimul post si asteapta 4-5 minute pana cand codul PI este
receptionat.
Modul RETUNE L: selectat la 90 de secunde.
Modul RETUNE S: selectat la 60de secunde.
MASK DPI/MASK ALL:
Modul MASK DPI: mascheaza numai AF (ALTERNATIVE
FREQUENCIES) care are PI diferit.
Modul MASK ALL: mascheaza AF care are PI diferit si nici semnal
RDS de putere mare.
BEEP 2ND,BEEP ALL, BEEP OFF MODE
Situatia sunetului BEEP este selectata. Cele 3 moduri pot fi selectate si
rotind de butonul VOL.
-Modul BEEP 2ND – Beep-ul este generat cand doua butoane sunt
apasate mai mult (1 sec)
-Modul BEEP ALL – Beep-ul este generat cand fiecare buton este
apasat
-Modul BEEP OFF MODE – Beep-ul este dezactivat cand este apasat
un buton.
MODUL SEEK1/SEEK2 (MODUL CAUTARE 1/CAUTARE 2)
SEEK 1 – Tineti apasat butonul SUS/JOS pentru a cauta in sus sau in
jos pentru statii radio cu semnal puternic. Cautarea se opreste cand
gaseste un post radio cu semnal puternic.
SEEK 2 - Tineti apasat butonul SUS/JOS pentru a cauta in sus sau in
jos pentru statii radio cu semnal puternic. Dar cautarea nu se opreste
cand gaseste un post radio cu semnal puternic decat atunci cand luati
degetul de pe butonul SUS/JOS.
3.POWER ON/OFF
Cand unitatea este oprita, se aprinde apasand orice buton de pe panoul
frontal (exceptand butonul OPEN). Mai poate fi pornit introducand un
disc, card SD sau stick USB in sloturile lor. Cand unitatea este pornita,
Downloaded from Caradio-Manual.com Manuals4
tineti apasat butonul de oprit/pornit mai mult de 0.5secunde si unitatea
se stinge.
4.LCD DISPLAY
5&6. TUNE,SEEK,TRACK,SKIP/UP,DOWN BUTTONS
a.In timpul modului Radio:
Apasati butonul >>| sau |<< scurt pentru cautarea manuala a posturilor
preferate pas cu pas.
Apasati butonul >>| sau |<< mai mult de 0.5 secunde pentru cautarea
automata a posturilor radio cu semnal puternic.
b.In timpul redarii unui disc,SD,USB:
Apasati butonul >>| scurt pentru redare urmatoarei melodii. Apasati
butonul |<< odata pentru redarea melodiei curente de la inceput.
Apasati butonul |<< de doua ori continuu pentru a reda melodia
anterioara. Cand butonul >>| sau |<< este apasat mai mult de 1 secunda
se deruleaza inainte sau inapoi.
7.BAND BUTTON
Apasati butonul BND scurt pentru selectarea benzii radio dorite.
Benzile AM/FM sunt asezate ciclic FM1→FM2→FM3→AM1→AM2.
In modurile disc MP3/WMA, card SD sau USB, cand apasati butonul
BND repetat, vor aparea informatii despre numele fisierului, numele
folderului, titlul melodiei,artist,album. Atata timp cat melodiile
MP3/WMA contin informatii relevante (ID3 tag) in versiunea 1.0/2.0,
cele trei elemente subliniate vor aparea pe LCD, altfel nu. Cand
introduceti un disc cu formate CD si MP3/WMA la apasarea butonului
BND mai mult de 2 secunde va schimba redarea din format CD in
format MP3/WMA si viceversa.
8.MODE BUTTON
Apasati butonul MODE pentru a schimba intre radio,disc,card
MMC/SD, USB si modul AUX.
9.MUTE BUTTON
Acest buton dezactiveaza/activeaza sunetul.
10.A.P.BUTTON (Auto-storage/Preset Scan) (Stocare
automata/Scanare Presetata)
In timpul modului radio:
1.Cand este apasat si tinut apasat mai mult de 1 secunda, radioul cauta
de la frecventa curenta semnalele puternice pana cand 1 ciclu de
cautare este terminat.Si apoi 6 posturi radio cu frecventa puternica sunt
presetate corespunzator memoriei presetate. Operatia de auto stocare
este implementata in fiecare lungime de banda. Cand operatia de auto
stocare este terminata, radioul executa scanarea presetata.
5
2.Cand este apasat scurt, radioul cauta fiecare post radio presetat in
lungimea de banda curenta, si apasati numarul presetat timp de 5
secunde si apoi cautati din nou.
In timpul modurilor MP3/WMA, SD,USB:
Apasati A.P Button scurt, este activat ciclic selectand modul cantec
astfel:
1.In selectarea TRACK SEARCH (Cautarea track-ului), TRK T000 va
fi visibil pe LCD si cel mai mare digit 0 pe care discul MP3/WMA,
cardul SD sau USB il contine clipeste.
Rotiti butonul VOL pentru a selecta si introduceti numarul in digitul
care clipeste de la 0-9.
Apoi apasati butonul SEL pentru a confirma numarul introdus si apoi 0
de la celalalt digit va clipi.
Procedand la fel, selectati numarul digitului care clipeste.
Dupa ce introduceti toate numerele corespunzatoare melodiei, apasati
butonul SEL pentru a reda melodia respectiva.
2.In modul selectare melodie FIRST CHARACTER SEARCH
(Cautarea primului caracter) , pe LCD va aparea A--. (Daca sunt fisiere
care incep cu litera A, atunci prima melodie in ordinea A-Z, 0-9 va fi
redata prima, daca nu va aparea mesajul NONE).
Rotiti butonul VOL pentru a selecta fisierele care au ca prim caracter in
ordinea A-Z,0-9.
Apoi apasati butonul >>| sau |<< pentru a selecta un fisier care are
primul caracter ca cel selectat. In final apasati butonul SEL pentru a
reda fisierul selectat.
3.In modul de selectare a melodiei DIRECTORY SEARCH (Cautare in
director), folderul principal va fi visibil pe ecran. (Daca nu este un
folder principal pe discul MP3/WMA, card SD sau USB, veti gasi un
fisier principal numit ROOT). Apoi rotiti de butonul VOL pentru a
selecta directorul dorit. Apoi apasati butonul >>| sau |<< pentru a
selecta melodia preferata din director. In final, apasati butonul SEL
pentru a selecta melodia.
11. BUTONUL AF (ALTERNATIVE FREQUENCIES) –
FRECVENTE ALTERNATIVE
Cand este apasat scurt, modul AF este selectat, si starea modului AF
este afisata.
AF OFF: AF este oprit
AF ON: AF este pornit si are informatii RDS.
AF clipeste: AF este pornit, dar informatia RDS nu este receptionata
inca.
Cand modul AF este selectat, radioul verifica puterea semnalului AF
tot timpul. Intervalul de verificare depinde de puterea semnalului a
postului radio curent, de la cateva minute pentru un semnal puternic
pana la cateva secunde pentru un semnal slab al postului radio.
De fiecare data cand AF este mai puternic decat postul actual, schimba
frecventa pentru putin timp, si mesajul NEW FREQUENCY (Frecventa
Noua) apare pentru 1-2 secunde. Din cauza timpului scurt al schimbarii
sau verificarii, este abia auzit.
In timpul modului FM, cand AF este pornit, functiileSEEK,(SCAN),
AUTO-MEMORY pot doar receptiona si salva posturi RDS.
Cand este apasat mai mult timp, modul AF este convertit in modul
REGION ON/OFF.
Modul REGIONAL ON: schimbarea AF sau PI SEEK este implementat
postului care are toate codurile PI ca statia curenta (PI CODE este
verificat cand AF CHECK este in progres).
Modul REGIONAL OFF: codul regional in format cod PI este ignorat
cand comutarea sau PI SEEK este implementat.
(PI CODE si aria de acoperire nu este verificata cand AF CHECK
este in progres).
12.PRESET STATION MEMORY AND TOP />||, INT,RPT,RDM
BUTTONS
a. In timpul modului radio:
Duceti-va la orice post radio presetat apasand unul din cele 6 butoane
presetate (1-6). Apasand butonul de presetare mai mult de 2 secunde va
stoca postul radio curent.
b. In timpul modului SD sau USB:
Apasati butonul TOP />|| scurt pentru a intrerupe redarea discului, SD,
USB. Apasati din nou pentru a reveni la redarea normala a
discului,SD,USB. Apasati butonul TOP/>|| aproximativ 0,5 secunde
pentru a reda primul track de pe disc,SD,USB.
c. In modul CD/MP3/WMA, apasati butonul INT scurt pentru a va reda
primele 10 secunde din fiecare melodie a discului. Mesajul S-INT va
aparea pe LCD.
In modul SD sau USB, apasati butonul INT scurt pentru a va reda
primele 10 secunde din fiecare melodie a discului. Mesajul M-INT va
aparea pe LCD.
In modul disc MP3/WMA, SD sau USB, apasati butonul INT si tineti
apasat mai mult de 0,5 secunde pentru a va reda primele 10 secunde din
fiecare melodie a discului. Mesajul D-INT va aparea pe LCD.
In procesul INT, apasati butonul INT din nou pentru a opri si a reveni la
redarea normala a melodiei curente.
d. In modul CD/MP3/WMA, apasati butonul RPT scurt pentru a reda
melodia curenta in mod repetat. Mesajul S-RPT va aparea pe LCD.
In modul SD sau USB, apasati butonul RPT scurt pentru a reda melodia
curenta in mod repetat. Mesajul M-RPT va aparea pe LCD.
In modul disc MP3/WMA, SD sau USB, apasati butonul RPT si tineti
apasat mai mult de 0,5 secunde pentru a reda melodia din directorul
curent in mod repetat.Mesajul D-RPT va aparea pe LCD.
7
6
Downloaded from Caradio-Manual.com Manuals
In procesul RPT, apasati butonul RPT din nou pentru a opri repetarea
melodiei si revenire la redarea normala.
e. In modul CD/MP3/WMA, apasati butonul RDM scurt pentru a reda
toate melodiile intr-o ordine arbitrara. Mesajul S-RDM va aparea pe
LCD.
In modul SD sau USB, apasati butonul RDMscurt pentru a reda toate
melodiile intr-o ordine arbitrara. Mesajul M-RDM va aparea pe LCD.
In modul disc MP3/WMA, SD sau USB, apasati butonul RDM si tineti
apasat mai mult de 0,5 secunde pentru a reda toate melodiile din
directorul curent intr-o ordine arbitrara.Mesajul D-RDM va aparea pe
LCD.
In procesul RDM, apasati butonul RDM din nou pentru a opri modul de
redare arbitrara si revenirea la redarea normala.
f. In timpul redarii normale a discurilor MP3/WMA, cardurilor SD sau
USB-urilor:
Apasati butoanele radio presetate 6 si 5 pentru a sari cate 10 melodii
odata inainte sau inapoi.
13. PTY (PROGRAM TYPE) BUTTON (Butonul PTY)
Apasati butonul scurt si repetat pentru selectarea unui din moduri:
Grupul PTY MUSIC – grupul PTY SPEECH – PTY OFF.
In timp ce selectati PTY TYPE, selectia lui este implementata de
butoanele presetate (apasati scurt si repetat unul din cele 6 butoane
presetate pentru selectarea PTY TYPE).
Cand PTY MUSIC sau PTY SPEECH sunt activate, precedentul
program si cuvant PTY sunt afisate pe LCD. Daca nu sunt introduse
date timp de 2 secunde, PTY-ul precedent este cautat. In timpul unei
cautari, daca PTY-ul dorit nu este gasit, mesajul NO PTY apare pe LCD
si postul radio precedent si PTY dispar de pe ecran.
14.TA (TRAFFIC ANNOUNCEMENT) BUTTON (Butonul de
anunturi din trafic)
Cand apasati butonul, modul TA este activat/dezactivat.
Cand modul TA este activat (TA apare pe LCD), va incepe cautarea
statiilor TA si mesajul TA SEEK apare pe LCD pentru un timp.
Cand anunturi din trafic sunt transmise:
1.Daca unitatea este in modul SD sau USB, va schimba in modul radio
pentru un timp.
2.Comutarea temporara a posturilor EON cand detecteaza un anunt din
trafic pe acel post si TP va fi afisat pe LCD.
8 este crescut la 20, si revine la
3.Daca volumul este sub 20, volumul
modul si volumul precedent cand anuntul din trafic este terminat.
Daca volumul este ajustat in timpul anunturilor din trafic, numai
volumul anuntului din trafic este valabil.
Downloaded from Caradio-Manual.com Manuals
Functia de intrerupere TA:
Anuntul din trafic curent este revocat apasand acest buton. Dar modul
TA nu este oprit.
Cand functia TA este pornita, functiile SEEK, SCAN, AUTO
MEMORY pot fi folosite sau salvate numai cand codul de identificare
al programului de trafic este primit.
Cand functia TA este pornita, codul de identificare al programului de
trafic nu este primit intr-o anumita perioada de timp.
Cand este apasat mai mult, este selectat modul EON TA LOCAL/ EON
TA DISTANCE.
Scopul acestui buton este de a reduce comutarea nedorita EON TA,
cand informatia EON TA este receptionata de la statia curenta si radioul
comuta la acel pot EON, dar nu poate primi informatii deoarece statia
curenta este localizata prea departe de acea zona. Astfel radioul comuta
din nou la statia curenta. In operatia de sus, clientul asculta un program
gresit sau un sunet mut pentru un timp.
1. Modul EON TA LOCAL:
Cand nivelul de putere al postului EON este mai mic decat nivelul
de prag, radioul nu comuta la alt post, si clientul de abia asculta
zgomotele.
Cand modul EON TA LOCAL este selectat, EONTA LO este
indicat pe display pentru cateva secunde.
2. Modul EON TA DISTANCE:
Comutarea EON TA este incercata pentru a implementa informatia
statiei curente. Cand modul EON TA DISTANCE este selectat, EON
TA DX este indicat pe display pentru cateva secunde.
15.CLOCK BUTTON (Butonul de ceas)
Apasati butonul CLK scurt pentru a aparea timpul 5 secunde pe LCD,
si apoi revine la meniul precedent in caz ca butonul nu este apasat din
nou.
Apoi apasati butonul CLK si tineti-l mai mult de 1 secunda pana cand
timpul real incepe sa clipeasca pe LCD. Apoi puteti regla ora si
minutele rotind de butonul VOL.
16. SCAN BUTTON (Buton de scanare)
Apasati butonul SCAN pentru scanarea frecventei radio. Daca un
semnal valid s-a detectat, frecventa curenta va fi retinuta si va clipi
timp de 5 secunde, apoi apasati acest buton din nou pentru a stopa
scanarea si sa ramana frecventa curenta, altfel radioul va continua
scanarea altui post radio dupa 5 secunde.
9 pentru intrare AUX)
17. AUX INPUT JACK (Jack
Apasati butonul MODE pentru a selecta intrarea auxiliara. Apoi puteti
conecta orice dispozitiv audio extern care se potriveste. Folositi butonul
VOL pentru ajustarea volumului.
18. EJECT KEY (Butonul EJECT)
Cand unitatea este pornita,, discul incarcat poate fi scos apasand
butonul EJ.
19. CD SLOT (Slot CD)
20. USB PORT (Port USB)
Cand doriti sa redati dupa un stick de memorie USB, dati la o parte
protectia de plastic, apoi inserati stickul de memorie in portul USB.
Sistemul va schimba in mod USB automat, apoi redati primul fisier de
pe USB.
Inainte de a reda discul, stergeti-l cu o carpa curata fara praf.
Stergeti discul dinspre interior catre exterior.
2.
3.
4.
21.SD CARD SLOT (Slot de carduri de memorie SD)
Cand doriti sa redati fisiere dupa un card SD, inserati cardul in slotul
SD. Sistemul va schimba in mod SD automat, apoi redati primul fisier
de pe card.
Nota: Cand cardul SD sau USB sunt introduse amandoua in sloturile
sau porturile lor, sistemul va schimba in modul de redare a ultimului
introdus.
5.
22.FLASHING LED ( LUMINA LED)
Cand fata detasabila este indepartata acest indicator va licari.
7.
6.
Introduceti discul cu suprafata etichetata in sus, altfel puteti defecta
unitatea.
Nu expuneti direct la soare sau langa surse de caldura, cum ar fi
radiatoare sau calorifere care pot cauza discul sa se strambe.
Nu lasati discul in masina cand este parcata direct in lumina
soarelui pentru ca poate duce la o crestere considerabila de
temperatura in interiorul masinii.
Nu folositi discuri second hand sau inchiriate, de obicei, au lipici
pe suprafata, si pot cauza unitatea sa functioneze si sa-i produca
defecte.
Intotdeauna puneti discurile in carcasa de protectie . Discurile
zgariate vor produce sunet de proasta calitate si va cauza CD
player-ul sa sara.
In zilele ploioase sau zone umede, umezeala se poate produce pe
disc sau pe partile optice. Redarea nu va fi posibila. Daca umezeala
se formeaza pe disc, stergeti-l cu o carpa moale. Daca umezeala se
formeaza pe partile optice ale unitatii, permitetii sa stea aprinsa
timp de o ora.
Nu folositi solventi cum ar fi benzina sau diluanti. Curatatori sau
spray antistatic din comert pot produce defecte unitatii.
23.RESET BUTTON (Buton de reset)
Inainte de a opera prima oara pe unitate, sau dupa inlocuirea bateriei la
masina sau schimband conexiunile, aceasta trebuie resetata.
Apasati acest buton cu varful unui obiect. Aceasta operatiune va sterge
setarile ceasului si cateva din continuturile stocate.
GRIJA LA UTILIZAREA CD-URILOR
Despre discurile CD-R/CD-R/W:
In afara de CD-urile audio comercializate, aceasta unitate poate reda
discuri CD-R SI CD-R/W. In unele cazuri, in particular cand folositi
programe mai vechi de scris CD-uri, unele dintre ele pot sa nu
functioneze. De asemenea, ori de cate ori inregistrati un CD pentru
redarea in acest receiver, este recomandat sa nu scrieti la o viteza mai
mare de 24X pentru CD-R si 4X sau mai mica pentru CD-R/W pentru a
atinge o calitate buna a semnalului si performanta de redare.
1. Pentru a mentine un disc curat:
10 pe disc.
Nu lipiti nici un sticker sau banda adeziva
Prindeti discul de marginile acestuia pentru a pastra discul curat si nu
atingeti suprafata lui.
Downloaded from Caradio-Manual.com Manuals
REZOLVAREA PROBLEMELOR
119
Inainte de a verifica lista, va rugam faceti conexiunile.
Daca tot mai aveti intrebari dupa ce ati verificat lista, va rugam
consulati service-ul autorizat din localitatea dumneavoatra.
Probleme
Cauza
Solutie
Contactul masinii nu Daca alimentarea este bine
este pus
conectata, puneti cheia in
Nu este curent
contact la “ON” sau
“ACC”
Siguranta s-a ars
Inlocuiti siguranta
conform diagramei firelor
CD-ul nu este incarcat Prezenta CD-ului in
Scoateti discul din player
interiorul player-ului si puneti altul
CD-ul este incarcat
Suruburile de
Scoateti suruburile de
doar jumatate
transport nu au fost
transport inainte de
scoase
folosire
Incarcarea discului
Incarcati discul cu fata
cu fata in sus
etichetata in sus
Dispozitivul nu
Suprafata discului
Curatati discul sau
functioneaza corect
este foarte murdara
incercati altul, daca
(EJECT,
sau deteriorata
functioneaza corect,
LOAD,PLAY)
primul CD este stricat
Temperatura din
Raciti temperatura
masina este foarte
ambientala pana cand
mare
revine la normal
Nu exista sunet
Volumul este dat la
Mariti volumul potrivit
minim
Dispozitivul nu este
Verificati curentul si
conectat corect
impamantarea dupa
schema
Butoanele nu
1.Microcipul nu
1.Stingeti si aprindeti
functioneaza
functioneaza corect.
casetofonul. Sau apasati
2.Fata casetofonului
butonul RESET.
nu este atasata
2.Atasati corect fata
corect.
casetofonului.
Unghiul de instalare
Ajustati unghiul de
este mai mare de 30°. instalare ca sa fie mai mic
Suprafata asfaltului
de 30°.
este proasta.
Asteptati pana cand
asfaltul are o calitate buna
Sunetul la CD player
pentru a reda de pe CD
sare
Player.
Suprafata CD-ului
Curatati CD-ul sau
este extrem de
incercati alt CD, daca
Fara receptie radio
murdara sau este
deteriorata
Cablul antenei nu
este conectata
Downloaded from Caradio-Manual.com Manuals
functioneaza corect,
12 primul CD este deteriorat.
Introduceti cablul antenei
bine in mufa antenei de la
In modul cautare
automata radioul
gaseste doar un post
radio
Semnalul este foarte
slab
INSTALAREA
13
casetofon
Cautati posturile radio
manual
Specificatii:
Conectarea firelor
GENERAL
Voltaj
Consum curent
Putere iesire
Numar canale
Dimensiuni
Impamantare negativa DC 12V
Maxim 10A
25W x 4 (Masurati la DC 14.4V)
2 canale Stereo
178W x 165D x 50H mm
Sectiunea FM
Lungimea de banda
Senzitivitate efectiva
Frecventa I.F.
87.5Mhz – 108.0Mhz
3uV
10.7Mhz
Sectiunea AM
Lungimea de banda
Senzitivitate efectiva
Frecventa I.F.
522Khz – 1620Khz
40dB.
450Khz
Iesire RCA
Iesire
1200mV @ CD MAX
CD PLAYER
Sistem
CD-uri suportate
Caracteristicile frecventei
Conector A
1.
2.
3.
4. Memorie +12V
5.Iesire Antena Auto
6.
7. 12V(Contact)
8.Impamantare
Conector B
1.Boxa spate dreapta (+)
2.Boxa spate dreapta (-)
3.Boxa fata dreapta (+)
4.Boxa fata dreapta (-)
5.Boxa fata stanga (+)
6. Boxa fata stanga (-)
7.Boxa spate stanga (+)
8. Boxa spate stanga (-)
14
Downloaded from Caradio-Manual.com Manuals
S/N Ratio to CD
Sistem Audio Mp3
MP3,WMA,CD,CD-R,CD-RW
20Hz-100Hz ≤ 5dB.
10Khz-20Khz ≤ 5dB.
50dB [1Khz]
15
AKAI
Reciclarea echipamentelor electrice şi
electronice uzate:
Acest simbol prezent pe produs sau pe
ambalaj semnifică faptul că produsul
respectiv nu trebuie tratat ca un deşeu
menajer obişnuit. Nu aruncaţi aparatul
la gunoiul menajer la sfârşitul duratei de
funcţionare, ci duceţi-l la un centru de
colectare autorizat pentru reciclare. În
acest fel veţi ajuta la protejarea
mediului înconjurător şi veţi putea
împiedica eventualele consecinţe negative pe care le-ar avea
asupra mediului şi sănătăţii umane.
Pentru a afla adresa celui mai apropiat centru de colectare:
Contactaţi autorităţile locale;
Accesaţi pagina de internet: www.mmediu.ro ;
Solicitaţi informaţii suplimentare de la
magazinul de unde aţi achiziţionat produsul.
Downloaded from Caradio-Manual.com Manuals
WIRES CONNECTION
RED R
RCA LINE OUT
WHITE L
BLACK
ANTENNA LINE IN
FUSE 10 A
ISO SOCKET
CONNECTOR A
1.
2.
3.
4. Memory +12V
5. Auto Antenna Output
6.
7. 12V (To Ignition Key)
8. GROUND
ISO SOCKET SKETCH
CONNECTOR B
1. Rear Right Speaker (+)
2. Rear Right Speaker (-)
3. Front Right Speaker (+)
4. Front Right Speaker (-)
5. Front Left Speaker (+)
6. Front Left Speaker (-)
7. Rear Left Speaker (+)
8. Rear Left Speaker (-)
ACA-3628UC
INSTRUCTION MANUAL
SPECIFICATION
GENERAL
Power requirement...............................................................DC 12V.
Current consumption..........................................................10A MAX.
POWER OUTPUT................................................................4 X 25W.
Number of channels.........................................................2 STEREO.
Chassis dimensions...................................178[W] X 50[H] X 165[D].
FM SECTION
Frequency range..................................................87.5MHz -108MHz
Usable sensitivity.........................................................................3uV.
I.F Frequency.......................................................................10.7MHz.
AM SECTION
Frequency range.................................................522KHz - 1620KHz
I.F Frequency........................................................................450KHz
Usable Sensitivity.......................................................................40dB
LINE - OUT
Output......................................................................... MAX 1200mv
CD/MMC/SD or USB PLAYBACK
System................................................................MP3 audio system.
Usable disc.........................................CD/CD-R/CD-RW/MP3/WMA
Frequency characteristics......................................20-100Hz < 5dB
10-20KHz < 5dB.
Signal to noise ..............................................................50dB [1KHz]
Downloaded from Caradio-Manual.com Manuals
ANTI-THEFT FLIP DOWN DETACHABLE SYSTEM
CD/MP3/WMA PLAYER WITH MMC/SD USB
AM/FM-RDS DIGITAL PLL TUNING RADIO
WITH ELECTRONIC ANTI-SHOCK FUNCTION
PRECAUTIONS AND MAINTENANCE
INSTALLATION
1. If the car interior is extremely hot, as after being parked in the sun, do not use
the player until the car has been driven for a while to cool off the interior.
2. The protective case is to safely keep the front panel.
PROTECTIVE CASE
FRONT PANEL
3. The unit is designed for negative terminal of the battery which is connected
to the vehicle metal. Please confirm it before installation.
4. Do not allow the speaker wires to be shorted together when the unit is switched
on. Otherwise it may overload or burn out the power amplifier.
5. Do not install the detachable panel before connecting the wire.
1
Downloaded from Caradio-Manual.com Manuals
10
LOCATION AND FUNCTION OF CONTROLS
TROUBLE SHOOTING
9 10 18
Before using the check list please make all the connections first.
If you still have questions after going through the checklist, please consult
your local customer service representative.
SCN
2
7
19
CD/USB/MMC/MP3 PLAYER
TA
USB
3
Common Symptoms
Solution
Cause
The car ignition is switched off.
There is no power.
The operation keys
do not work
The sound of the
CD player skips
No radio reception.
BND
VOL
4
COMPACT
DIGITAL AUDIO
+
PTY
TOP
MODE
1/
CLK
INT
RPT
2
3
RDM
4
5
6
A.P
MUTE
AUX
Remove the transport screws before using.
Inserting the disc in upside down
Insert the compact disc with the label facing
upward
The surface of CD is extremely dirty
or it is damaged.
Clean the CD or try another CD, if this works
correctly, the first CD is properly damaged.
Temperature inside the car is too
high.
Cool off until the ambient temperature returns
to normal
The volume control is set too low.
Turn up the volume properly.
The device has not been correctly
connected.
Check the power and earth connection
according to the wiring diagram.
1.The built-in microcomputer is not
operating properly due to noise
2.Front panel is not properly fix into
its place
1. Switch the device off and on again. Or press
the RESET button to resume the program.
2. Reinstall the front panel
The installation angle is more than
30 degrees
Adjust the installation angle to less than 30
degrees
The surface of the road is uneven.
Wait until the road becomes smoother before
playing the CD.
The surface of CD is extremely dirty
or it is damaged.
Clean the CD or try another CD, if this works
correctly, the first CD is properly damaged.
The antenna cable is not connected. Insert the antenna cable firmly into the
antenna socket of the device.
In automatic search The transmission signals are too
mode the radio does weak.
not stop at a transmitting station.
9
Downloaded from Caradio-Manual.com Manuals
8
Tune in to a radio station manually.
13
17
1
16
12
21
5
11
15
20
SD/MMC
There is no sound.
6
Presence of CD disc inside the player Remove the disc in the player then put a new
upward.
The CDs are loaded The transport screws have not been
only halfway into
removed.
the CD tray.
The device does
not work correctly
(EJECT, LOAD,
PLAY)
SEL
_
Replace another fuse according to the wiring
diagram.
The fuse has blown.
The CDs cannot
be loaded.
If the power supply is properly connected to
the car accessory, switch the ignition key to
" ON " or " ACC " .
AF
14
23 22
1. SEL( AUDIO MODE SELECT)BUTTON/VOLUME +/- KNOB
(1) Press SEL button shortly and repeatedly to change the mode in the sequence as follows:
--> VOL --> BAS --> TRE --> BAL --> FAD -->
1) VOLUME CONTROL
A) The volume level can be adjusted at any time by rotating the audio level VOL knob as
select mode has been initially defaulted at volume mode.
B) The volume level is also obtained by stepping through the SEL button until the function
VOL is displayed and then rotate VOL knob to adjust the sound level.
2) BASS CONTROL
A) Press the SEL button to select the bass mode until BAS appears on the display.
B) rotate VOL knob to adjust the bass effect.
3) TREBLE CONTROL
A) Press the SEL button to select the treble mode until TRE appears on the display.
B) rotate VOL knob to adjust the treble effect.
4) BALANCE CONTROL
A) Press the SEL button to select the balance mode until BAL appears on the display.
B) rotate VOL knob to increase or decrease the sound level of left or right speaker.
5) FADER CONTROL
A) Press the SEL button to select the fader mode until FAD appears on the display.
B) rotate VOL knob to increase or decrease the sound level of front or rear speaker.
2
(2) Press SEL button and hold for more than 2 seconds to turn on TA SEEK/TA ALARM
mode, then press SEL button shortly and repeatedly to select PI SOUND/PI MUTE,
RETUNE L/RETUNE S, MASK DPI/MASK ALL, BEEP 2ND/BEEP ALL/BEEP OFF, SEEK1
/SEEK2(in RADIO mode), DSP OFF/FLAT/POP M/CLASSICS/ROCK, LOUD OFF/LOUD
ON, SUBW OFF/ON(with subwoofer output), STEREO/MONO(in FM mode), DX/LOCAL
(in FM mode), VOL LAST/VOL ADJ(When it is in VOL ADJ mode, the next mode will be
A-VOL after VOL ADJ mode, then you can adjust the volume level. The minimum value of
the volume level you can set is 10) and ESP 6/ESP 25 in the sequence and circulation. After
selecting the desired mode, rotate VOL knob to select one setup item of the desired mode.
1) TA SEEK/TA ALARM:
TA SEEK mode: when newly tuned station does not receive TP information for 5 seconds,
the radio retunes to next station which has not the same station(PI) as the last station, but
has the TP information.
When TP information gets lost at the current station for retune time which is set by
RETUNE SHORT(60 seconds) or RETUNE LONG(90 seconds), the radio start to retune
to next same PI station. When same PI station does not catch in 1 cyclic search, the radio
retunes to next station with TP information.
TA ALARM mode: when this mode is selected, any automatic retune mode is not activated.
Only double beep sound(ALARM) is out-put.
When newly tuned station does not have TP information for 5 seconds, beeps come out.
When TP information gets lost at the current station for retune time, the beep sound is
out-putted.
When newly tuned station has not RDS signal, PI SEEK is suppressed somewhat.
2) PI SOUND/ PI MUTE:
PI SOUND mode: if a car cruises that critical area back and forth, an oscillation phenome
-non can be occurred, because the different PI code can be receive from a same AF. when
the different PI sound (DIP) is heard once in a while, the different PI sound will be heard
for less than 1 second.
PI MUTE mode: under above same situation, a mute sound will be heard for less than 1
second.
3) RETUNE L / RETUNE S:
The initial time of automatic TA search or PI SEARCH mode is selected.
When PI information is not caught for retune time , the radio start to retune to next same
PI station.
When same PI station does not catch 1 cyclic search, the radio goes to last station and
waits for 4-5 minute until PI code is received.
RETUNE L mode: selected as 90 seconds.
RETUNE S mode: selected as 60 seconds.
4) MASK DPI/MASK ALL:
MASK DPI mode: masked only the AF which has different PI.
MASK ALL mode: masked the AF which has different PI and NO RDS signal with high
field strength.
5) BEEP 2ND/BEEP ALL/BEEP OFF:
BEEP 2ND mode: the beep is only generated when an allotted double key is pressed
long(1second).
BEEP ALL mode: the beep is generated when every key is pressed(except power and
release buttons).
BEEP OFF mode: the beep is disabled.
6) SEEK1/SEEK2:
SEEK1: press UP/DOWN button and hold to seek up or down for the strong signal station.
And then stop seek when received the strong signal station.
SEEK2: press UP/DOWN button and hold to seek up or down for the strong signal station. And
do not stop seek when received the strong signal station. After release it and then
received the strong signal station, the seek will stop.
3
Downloaded from Caradio-Manual.com Manuals
Ò
ÄFORÑ
É
½
³
â CD'S:
ý
CARE
USING
About CD-R/CD-R/W discs:
In addition to commercially-recorded audio CD's, this unit can play CD-R and
CD-R/W discs. In come cases, particularly when recorded on older CD burners,
some CD-R and CD-R/W discs may not play. Also, whenever you are recording
a CD for playback in this receiver, it is recommended that you record at 24x or
slower speed for CD-R and 4x or slower for CD-R/W to achieve higher signal
quality and better playback performance.
1. To keep the disc clean:
Do not attach any sticker or adhesive tape on the disc.
Handle the disc by its edge to keep the disc clean and do not touch the surface.
Before playing a disc, wipe it off with a clean, dust-free cleaning cloth.
Wipe the disc outwards from the disc center.
2. When one has already been inserted. Doing so may damage the unit . Insert a
disc with labeled surface up, or it will damage the unit.
3. Do not expose the disc to direct sunlight or nearby heat sources such as heating
vents, caliduct which can cause the disc to warp.
Do not leave disc in a car if it is parked in direct sunlight as that will lead to a
considerable rise in the temperature inside the car.
4. Do not use any secondhand or rented disc, usually, there is glue on the surface
of those discs, it will stop the unit working and damage it.
5. Always store the disc in its case for protection. Scratched up discs will produce
poor sound performance and cause CD player to skip.
6. In raining day or wet area, the moisture may form on the disc or the optical parts,
The playback may not be possible. If moisture forms on the disc, wipe it off with
a soft cloth. If moisture forms on the optical parts of the unit, allow the unit to sit
for about one hour with power on.
7. Do not use solvents such as benzine or thinners. Commercially available
cleaners or anti-static spray will damage the unit.
8
16. AUX INPUT JACK
Press the mode button to select auxiliary input playing mode. You can connect any matched
external audio device to this socket. Use the volume knob to adjust volume.
17. CLOCK BUTTON
1) RADIO MODE
When RDS DATA is received, press it shortly and repeatedly to display the following items
alternatively:
PS NAME ---> CLOCK ---> FREQUENCY ---> PTY --->
When RDS DATA is not received, press it shortly and repeatedly to display the following items
alternatively:
FREQUENCY ---> CLOCK ---> PTY --->
2) MMC/SD, USB or DISC MODE
Press it shortly to display time for 5 seconds, and then it returns to its previous display unless
the button is pressed again.
3) time adjustment
From the clock mode, press it and hold for more than 1 seconds to flash time and then rotate
VOL knob to adjust hour or minute.
18. SCAN BUTTON
Press it to scan up by one channel step with station detection. If a valid signal has detected,
the current frequency is blinked within 5 seconds, then press it again to stop scan and remain
the current frequency; otherwise, the unit continue to scan up by one channel step with station
detection 5 seconds later.
19. OPEN BUTTON
Press OPEN button to flip down the front panel from the unit chassis. Then you can insert the
disc into disc compartment or press EJECT button to eject disc. You can still remove away
the front panel from the player, and then press RESET button to resume the distorted program
when the LCD displays wrongly or the buttons are not available.
20. EJECT KEY
In the power on state, the loaded disc can be ejected by pressing the EJECT key.
21. CD SLOT
22. FLASHING LED
When the front control panel is removed this indicator flashes.
23. RESET BUTTON
Before operating the unit for the first time, or after replacing the car battery or changing the
connections, you must reset the unit. Press this button with a cuspidal object. This operation
will erase the clock setting and some stored contents.
7
Downloaded from Caradio-Manual.com Manuals
2. LCD (LIQUID CRYSTAL DISPLAY)
3&4.UP AND DOWN BUTTONS
1) In RADIO mode, press >>| or |<< button shortly and repeatedly to manually tune up or down
for the desired radio station step by step. Press >>| or |<< button and hold for more than 0.5
seconds to auto-matically tune up or down for the radio station of strong signal.
2) In MMC/SD, USB or DISC mode, press >>| button to play next track. Press |<< button once
to play the current track from the beginning of the current track, press |<< button twice
continuously to play the last track. Press >>| or |<< button and hold to skip forward or backward.
5. AUTO-STORAGE/PRESET MEMORY SCAN BUTTON
1) In radio mode, press it to perform all stations memory for 5 seconds each time, while memory
digital and frequency will flash on LCD. If the button is pressed for more than 2 seconds, it will
seek station on current band, then write to the preset memories. When the auto-storage
operation is completed, it will automatically perform for 5 seconds each time. After finishing 1
loop of memory scan, it will listen to the first memory station in the current band.
2) In MP3/WMA disc mode, MMC/SD or USB mode, press A.P button repeatedly to select TRACK
SEARCH, FIRST CHARACTER SEARCH or DIRECTORY SEARCH mode.
3) In TRACK SEARCH mode, the LCD will display TRK T 000 and flash the biggest digit 0 that the
MMC/SD card, USB or MP3/WMA disc contain. Rotate VOL knob to select the number of the
flashing digit from 0 ~ 9. Then press SEL button to confirm the number and flash next smaller
digit 0. With the same means, select the number of the flashing digit. After finishing selecting the
number of all flashing digit, press SEL button to play the track of the selected serial number.
In FIRST CHARACTER SEARCH mode, the LCD will display A--......, If there are files names its
first character are A , the ......is the first file name its first character is A by the order of A~Z and
0~9; otherwise, the ......is NONE. Rotate VOL knob to select file’s first character by the order of
A~Z and 0~9. Then press >>| or |<< button to select one file its first characters is the selected
one. Finally press SEL button to play the selected file.
In DIRECTORY SEARCH mode, the LCD will display the root folder(if there is not the root folder,
it will find a root folder named ROOT). Then rotate VOL knob to select your desired folder and
then press >> | or |<< button to select your desired track in the folder. Finally press SEL button
to play the selected track.
6. BAND BUTTON
Press it repeatedly to select your desired radio band during RADIO mode.
In MMC/SD, USB or MP3/WMA disc mode, if you press BAND button repeatedly, the file name,
folder name, song’s title, artist and album information will be scrolling on the LCD display. As long
as the current playing MP3/WMA music contains relevant ID3 tag information in version 1.0/2.0
format, the 3 items underlined above will be scrolling on the LCD display. Otherwise, they will not.
In CD & MP3/WMA format-mixed disc playback mode, long press BAND button, it will change from
playing the CD formatted songs to MP3/WMA formatted songs.
7. TA [TRAFFIC ANNOUNCEMENT] BUTTON
(1) When press the button, it is activated as TA mode on or off.
When TA mode is on(TA is displayed on LCD), it will begin to seek TA station and TA SEEK will
be displayed on LCD for a while.
When traffic announcement is transmitted:
1) If the unit is in MMC/SD, USB or disc mode, it will switch to radio mode temporarily.
2) Temporarily switch over to an EON linked station when EON detects a traffic announcement on
that other program, and TP will be displayed on LCD.
3) If volume level is below 20, volume level is raised to 20, and returns to its previous mode and
volume level when the traffic announcement is over.
If volume is adjusted during traffic announcement, only the traffic announcement volume is valid.
4
* TA interruption function:
The current traffic announcement is cancelled by pressing this key. But the TA mode will not be off.
* When TA is on, SEEK, (SCAN), AUTO MEMORY function can be received or saved only when
traffic program identification code has been received.
When TA is ON, traffic program identification code is not received during specified time.
(2) When pressed long, it is selected EONTA LOCAL/EONTA DISTANCE mode.
The purpose of this key is to reduce unwanted EON TA switching, which EON TA Information was
received from current station and the radio switched to that EON linked station, but no information
could not be received because the EON linked station is located too far from that area. So the radio
is switched back to current station again. In above operation, a customer listen to a wrong program
or mute sound for a while.
1) EONTA LOCAL mode:
When the filed strength level of EON linked is less than the threshold level, the radio does not switch
that station, and a customer can hardly listen to any disturbances.
When EONTA LOCAL mode is selected, EONTA LO on numeric display is indicated for a few seconds.
2) EONTA DISTANCE mode:
EON TA switching is try to implemented by the information of current station. When EONTA DISTANCE
mode is selected, EONTA DX on numeric display is indicated for a few seconds.
8. PTY (PROGRAM TYPE) BUTTON
Press it shortly and repeatedly to select one of the following mode:
PTY MUSIC group- - PTY SPEECH group- - PTY OFF
While selecting PTY TYPE, its selection is implemented by preset buttons as described in preset key.
(press one of the 6 preset buttons shortly and repeatedly to select the PTY TYPE in the preset button)
When PTY MUSIC or PTY SPEECH is on, the previous PTY program and PTY word is displayed on
LCD. If there are no keys entered for 2 seconds, previously selected PTY is searched. During 1 loop,
if desired PTY is not found, NO PTY is flashed, then return to previous normal radio and PTY word
disappear.
9. POWER BUTTON
Press any button except the EJECT and OPEN button to turn on the unit.
It also can turn on the unit to insert disc, MMC/SD card or USB stick into their slot or socket.
Press the power button and hold for more than 0.5 seconds to turn off the unit.
10. AF [ALTERNATIVE FREQUENCIES] BUTTON
When pressed short, AF switching mode is selected and the state of AF switching mode is displayed
by AF segment in display.
Segment off: AF switching mode off.
Segment on: AF switching mode on, and has RDS information.
Segment flashing: AF switching mode on, but RDS information is not received yet.
When AF switching mode is selected, the radio checks the signal strength of AF all the time. The
interval of checking time of each AFs depends on the signal strength of current station, from a few
minute for strong station to a few seconds for weak station. Every time that new AF is stronger than
current station, it switches over to that frequency for very short time, and NEW FREQUENCY is
displayed for 1-2 second. Because the mute time of AF switching or checking time is very short, it is
almost inaudible in case of normal program.
During FM mode, when AF is on, SEEK, (SCAN), AUTO-MEMORY function can only receive and
save RDS program.
When pressed long, AF mode is converted to REGION ON/OFF mode.
REGIONAL MODE ON:
AF switching or PI SEEK is implemented to the station which have all PI codes are same as current
station.(PI CODE is checked when AF CHECK in progress)
REGIONAL MODE OFF:
The regional code in the format of PI code is ignored when AF switching or PI SEEK is implemented.
(PI CODE and COVERAGE AREA is not checked when AF CHECK in progress)
5
Downloaded from Caradio-Manual.com Manuals
11. MUTE BUTTON
Press the button to eliminate or resume the sound immediately.
To resume the sound immediately, can also press MODE, BAND, SEL button or rotate the
VOL knob.
12. PRESET STATION [ 1-6 ] AND TOP/>||, INT, RPT, RDM BUTTONS.
A) RADIO MODE
When pressed short, these keys select a preset station directly,
When pressed longer than one seconds, current station is stored in preset memory bank.
When PTY mode is selected, the preset memory buttons is shared as follows:
PTY music group ------------------PTY speech group --------------- OFF
1. POP M, ROCK M
1. NEWS, AFFAIRS, INFO
2. EASY M, LIGHT M
2. SPORT, EDUCATE, DRAMA
3. CLASSICS, OTHER M
3. CULTURE, SCIENCE, VARIED
4. JAZZ, COUNTRY
4. WEATHER, FINANCE, CHILDREN
5. NATION M, OLDIES
5. SOCIAL, RELIGION, PHONE IN
6. FOLK M
6. TRAVEL, LEISURE, DOCUMENT
B) In MMC/SD, USB or DISC mode, press TOP/>|| button to pause MMC/SD, USB or disc
playback, press it again to resume MMC/SD, USB or disc playback. Press it and hold for
more than about 0.5 seconds to play the first track of the MMC/SD, USB or disc.
C) In MMC/SD, USB mode, press INT button shortly to display M-INT and play the first 10
seconds part of each track of all.
In CD/MP3/WMA disc mode, press INT button shortly to display S-INT and play the first 10
seconds part of each track of all.
In MMC/SD, USB or MP3/WMA disc mode, press INT button long to display D-INT and play
the first 10 seconds part of each in current folder.
During INT mode, press INT button again to stop INT mode and retain playing the track
currently selected.
D) In MMC/SD, USB mode, press RPT button shortly to display M-RPT and play the current
track repeatedly.
In CD/MP3/WMA disc mode, press RPT button shortly to display S-RPT and play the current
track repeatedly.
In MMC/SD, USB or MP3/WMA disc mode, press RPT button long to display D-RPT and play
the current folder repeatedly.
During RPT mode, press RPT button again to cancel RPT mode.
E) In MMC/SD, USB mode, press RDM button shortly to display M-RDM and play the track
of all in random order.
In CD/MP3/WMA disc mode, press RDM button shortly to display S-RDM and play the track
of all in random order.
In MMC/SD, USB or MP3/WMA disc mode, press RDM button long to display D-RDM and play
the track in the current folder in random order.
During RDM mode, press RDM button again to cancel RDM mode.
F) In MMC/SD, USB or MP3/WMA disc mode, M6 and M5 is assigned as 10 TRACK up/down
when normal play.
13. MODE BUTTON
Press it to select RADIO, DISC, CARD(after inserting MMC/SD card), USB(after inserting
USB stick) and AUX mode.
14/15. MMC/SD SLOT and USB SOCKET and THEIR OPERATION
When needing to do MMC/SD or USB playing, insert the MMC/SD card or USB stick into
MMC/SD slot or USB socket. Then the playing mode will be changed into MMC/SD or USB
mode and display CARD or USB on LCD(When MMC/SD card and USB stick are both
inserted into their slot or socket, the playing mode will be changed into the mode of the latter
one), and then play the first track of MMC/SD or USB.
6