1
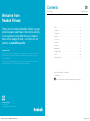
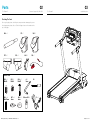
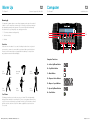
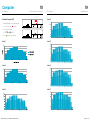
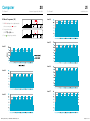
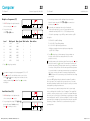
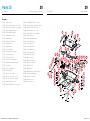
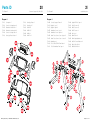
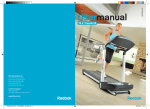
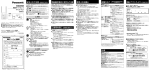
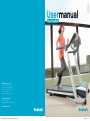
reebokfitness.info
Usermanual
T3.2 Treadmill
RFE International Ltd
The Performance Centre
Maidstone Road, Kingston
Milton Keynes MK10 0BD
+44 (0) 1908 793 020
[email protected]
Customer Support
0800 440 2459
[email protected]
reebokfitness.info
RFE4489_RE013411_T3.2 TREADMILL UMFINAL.indd 1-1
28/06/2010 11:41
Contents
T3.2 Treadmill
01
reebokfitness.info
Welcome from
Reebok Fitness
Thank you for choosing Reebok. Before you get
started, please read these instructions carefully.
If you experience any difficulties, our support
team will be happy to help – or check out our
website at reebokfitness.info
Parts . . . . . . . . . . . . . . . . . . . . . . . . . . . . . . . . . . . . . . . . . . . . . . . . . . . . . . . . . 02
Assembly . . . . . . . . . . . . . . . . . . . . . . . . . . . . . . . . . . . . . . . . . . . . . . . . . . . . 04
Precautions . . . . . . . . . . . . . . . . . . . . . . . . . . . . . . . . . . . . . . . . . . . . . . . . . . 08
Functions . . . . . . . . . . . . . . . . . . . . . . . . . . . . . . . . . . . . . . . . . . . . . . . . . . . . 10
Correct Use . . . . . . . . . . . . . . . . . . . . . . . . . . . . . . . . . . . . . . . . . . . . . . . . . . . 11
Warm Up . . . . . . . . . . . . . . . . . . . . . . . . . . . . . . . . . . . . . . . . . . . . . . . . . . . . 12
Computer . . . . . . . . . . . . . . . . . . . . . . . . . . . . . . . . . . . . . . . . . . . . . . . . . . . 13
Important note:
Consult your doctor before starting any exercise programme. If you feel any sickness, chest
pain, dizziness or breathlessness during your training, stop exercising and consult your
doctor immediately.
Maintenance . . . . . . . . . . . . . . . . . . . . . . . . . . . . . . . . . . . . . . . . . . . . . . . . . 24
Troubleshooting . . . . . . . . . . . . . . . . . . . . . . . . . . . . . . . . . . . . . . . . . . . . . . 26
Parts ID . . . . . . . . . . . . . . . . . . . . . . . . . . . . . . . . . . . . . . . . . . . . . . . . . . . . . . 28
Limited Warranty . . . . . . . . . . . . . . . . . . . . . . . . . . . . . . . . . . . . . . . . . . . . 36
If you have any further queries please contact our customer support team on the details
provided either at the foot of this page or on the back of the manual.
Model name: Reebok T3.2 Treadmill
Serial number: . . . . . . . . . . . . . . . . . . . . . . . . . . . . . . . . . . . . . . . . . . . . . . . . . These details can be found on the underside of your product.
Customer Support
0800 440 2459
[email protected]
RFE4489_RE013411_T3.2 TREADMILL UMFINAL.indd 1-1
28/06/2010 11:41
Parts
02
T3.2 Treadmill
Customer Support 0800 440 2459
03
T3.2 Treadmill
reebokfitness.info
Checking The Parts
Before you begin, please check all parts are present and undamaged. If you are
missing any parts, please call our Technical Support team on the number at the
top of this page.
208 x 2
137 x 1
276 x 2
275 x 2
104 x 1
246 x 2
130 x 1
Blister Pack
809 x 2
M8x30
810 x 2
M8x18
806 x 4
M8x45
802 x 8
M4x15mm
807 x 4
8mm
808 x 4
8mm
RFE4489_RE013411_T3.2 TREADMILL UMFINAL.indd 2-3
Ax1
5mm
Silicone Oil x 1
Bx1
Cx4
28/06/2010 11:41
Assembly
04
T3.2 Treadmill
Customer Support 0800 440 2459
05
T3.2 Treadmill
reebokfitness.info
Uprights
Handlebars
1. Remove the treadmill from the box.
4. Rotate console until it is in an appropriate position for use.
2. Lift the uprights to the unfolded position and secure using 2 x 810 bolts.
5. Push one handlebar (208) into the left hand side of the console support frame.
3. Insert 2 x 809 bolts into the base of the uprights and cover with 2 x 246 caps.
6. Secure the handlebar using 2 x 806 bolts, 2 x 807 spring washers and 2 x 814 washers.
7. Repeat for the right hand handlebar.
You will require:
246 x 2
You will require:
810 x 2
RFE4489_RE013411_T3.2 TREADMILL UMFINAL.indd 4-5
809 x 2
806 x 4
208 x 2
807 x 4
814 x 4
28/06/2010 11:41
Assembly
06
T3.2 Treadmill
Customer Support 0800 440 2459
07
T3.2 Treadmill
reebokfitness.info
8. Clip the handlebar covers over the handlebars and secure using 4 x 802 screws.
Inserting The Cup Holders
9. Repeat for the other handlebar.
10. Insert the left hand cup holder (137) into the left hand side of the console housing.
11. Insert the right hand cup holder (104) into the right hand side of the console housing.
You will require:
You will require:
802 x 8
275 x 2
RFE4489_RE013411_T3.2 TREADMILL UMFINAL.indd 6-7
276 x 2
137 x 1
104 x 1
28/06/2010 11:41
Precautions
T3.2 Treadmill
08
Customer Support 0800 440 2459
These instructions are intended to provide important information for use and
maintenance of the equipment as well as for your personal safety. Keep this
user manual in a safe place for future reference.
WARNING!
This product is made for home use only and tested up to a maximum body
weight of 130 kilograms.
RFE International Ltd. assumes no responsibility for personal injury or
property damage sustained by or through the use of this equipment. It is
the responsibility of the owner to ensure that all users of this equipment are
adequately informed of all warnings and precautions.
SCOPE
•
Maximum user weight of 130kg.
•
This product is designed for physical exercise by adults. This product is not
suitable for use by persons under 14 years of age.
•
Never allow more than one person on the equipment at a time.
ENVIRONMENT
•
Ensure that those present are aware of possible hazards e.g. moveable
parts during training.
09
T3.2 Treadmill
USER HEALTH
•
Consult your doctor before starting any exercise programmes to receive
advice on the optimal training.
•
Ensure the product is on a flat, level surface with at least 0.5m of clear
area surrounding the product.
•
incorrect/excessive training can cause health injuries.
•
If you feel sickness, chest pain, fits of dizziness or breathlessness during
your training, immediately stop the training and consult your doctor.
PRODUCT PREPARATION
•
Ensure that training only starts after correct assembly, adjustment and
inspection of the product.
•
Follow the steps of the assembly instructions carefully.
•
Only use suitable tools for assembly and ask for assistance
if necessary.
•
Only use original Reebok parts as delivered (see checklist).
SAFETY CHECKS (Before Every Use)
•
Tighten all adjustable parts to prevent sudden movement while training.
•
Tighten all nuts and bolts.
Check that the tension knob is secure.
•
Ensure that sufficient space is available to use the product.
•
•
Please ensure that liquids or perspiration are wiped off the product.
•
Ensure the product is on a flat, level surface.
•
This product is designed to be used and stored indoors. Do not store the
product outside, or in damp/ dusty environments.
•
Do not use the product without shoes or with loose shoes.
•
•
The product is made for home use only. Warranty and manufacturer’s
liability do not extend to any product or damage to the product caused by
commercial use.
Be aware of non-fixed or moving parts whilst mounting or dismounting
the product.
•
Do not wear loose or poorly fitting clothing that may become trapped
in the product.
RFE4489_RE013411_T3.2 TREADMILL UMFINAL.indd 8-9
reebokfitness.info
28/06/2010 11:41
Functions
T3.2 Treadmill
10
Customer Support 0800 440 2459
Correct Use
T3.2 Treadmill
Fold
Transport
1. Lift the treadmill deck until you hear a click.
1. Fold up the treadmill as per the above instructions.
2. Tilt treadmill forwards until transport wheel engages.
The click will confirm the treadmill deck is locked into its folded position.
2. Engage the castor wheel if required.
11
reebokfitness.info
3. Manoeuvre the treadmill to desired location.
4. Depress foot lever to disengage transport lever.
5. Ensure treadmill is level.
6. Unfold as per the above instructions.
Correct Use
We recommend you use your treadmill
in the following way:
Unfold
1. Press the lever on the top of the castor wheel to release it.
2. Unfold the treadmill deck by pressing the lever on the damper,
and allow if to fall to the ground.
The soft drop mechanism will assist you with lowering the deck.
WARNING!
Stand to one side whilst the treadmill is lowered.
3. Once the deck is flat on the floor, stand on the running deck and wobble the side
handlebar to ensure the upright tubes have locked into place correctly.
RFE4489_RE013411_T3.2 TREADMILL UMFINAL.indd 10-11
28/06/2010 11:41
Warm Up
12
T3.2 Treadmill
Customer Support 0800 440 2459
Computer
13
T3.2 Treadmill
reebokfitness.info
Warming Up
It is important to warm up before exercising to prepare your body for the workout it
is about to do. The first phase of a warm up is to increase your heart rate and get
blood pumping around your body faster. Choose an activity which will warm up
the same muscles you are going to use during your workout.
F
G
A
B
C
1. 5-10 minutes heart rate raising activity
2. Static stretching
3. Workout
Stretches
Hold each stretch for about 30 seconds. Stretching should not hurt; only stretch
your muscles to as far as is comfortable. If you have a tight or previously injured
muscle stretch the affected muscle group within the warm up. Do not perform
any sudden movements while warming up.
D
E
Computer Functions:
A – Incline Up/Down Button
B – Stop/Enter Button
Calf
Stretch
Hamstring
Stretch
Groin
Stretch
C – Mode Button
D – Express Incline Buttons
E – Express Speed Buttons
Side
Stretch
Quad
Stretch
Arm
Stretch
Cool Down
F – Speed Up/Down Buttons
G – Start Button
Following your workout you should carry out a cool down. This should gradually
bring your heart rate back to a resting level. To do a cool down perform an activity
of your choice at a low intensity e.g. a steady 5 minute jog. This should be followed
by static stretches, similar to those in the warm up. Again, hold each stretch for
30 seconds.
RFE4489_RE013411_T3.2 TREADMILL UMFINAL.indd 12-13
28/06/2010 11:41
Computer
14
T3.2 Treadmill
Customer Support 0800 440 2459
15
T3.2 Treadmill
reebokfitness.info
Preset Programmes
Your T3.2 treadmill has 8 preset programs:
Time (P1)
A programme where you can workout for a set amount of time.
Distance (P2)
A programme where you can workout for a set distance.
Calories (P3)
A programme where you can workout until you have burnt a set number
of calories.
15 Minute Preset Speed (P4)
A programme with 7 level options giving you a 15 minute workout at varied
inclines and speeds.
30 Minute Preset Speed (P5)
A programme with 7 level options giving you a 30 minute workout at varied
inclines and speeds.
45 Minute Preset Speed (P6)
A programme with 7 level options giving you a 45 minute workout at varied
inclines and speeds.
Weight Loss (P7)
A programme with 7 level options, intended for a medium intensity workout over
varied inclines and speeds.
Heart Rate Control (P8)
A programme where the treadmill automatically adjusts the incline and speed of
your workout according to your heart rate.
Quick Start
To exercise without any preset programme:
•Insert the safety key into the front of the console, and attach to the
users waistband.
•Turn the power on. Press
button and the treadmill belt will begin to move.
RFE4489_RE013411_T3.2 TREADMILL UMFINAL.indd 14-15
Safety Key
The safety key must be inserted into the front of the console in order to operate the
treadmill. Always insert the safety key and attach the clip to your clothing waistband
before beginning your workout. If you should encounter problems and need to stop
the treadmill quickly, simply pull on the cord (removing the safety key from the console).
To continue your workout turn the power switch to off, set the speed to stop and then
reinsert the safety key into the console.
WARNING!
During any programme, you can override the speed by pressing SPEED
buttons. You can also override the incline using the INCLINE
Alternatively, press or pull out the safety key.
and
and
buttons.
28/06/2010 11:41
Computer
16
T3.2 Treadmill
Customer Support 0800 440 2459
Time Programme (P1)
17
T3.2 Treadmill
reebokfitness.info
Level 1
Level 2
Level 3
Level 4
Level 5
Level 6
1. With P1 flashing on the right hand side
of the screen, Press to select.
2. Set your target time using SPEED
and
3. Press
buttons. Press
to select.
to begin your workout.
Distance Programme (P2)
1. With P2 flashing on the right hand side
of the screen, Press to select.
2. Set your target distance using
SPEED and buttons.
Press to select.
3. Press
to begin your workout.
Calories Programme (P3)
1. With P3 flashing on the right hand side
of the screen, Press to select.
2. Set your target calories to burn using
Level 7
SPEED and buttons.
Press to select.
3. Press
to begin your workout.
15 Minutes Preset Speed (P4)
1. With P4 flashing on the right hand side
of the screen, Press to select.
2. Set your target time using
SPEED
and
buttons. Press
to select.
4. Confirm your level selection by
pressing to select.
5. Press
to begin your workout.
3. Now select your level.
(See right for the 7 different levels using
SPEED and buttons).
RFE4489_RE013411_T3.2 TREADMILL UMFINAL.indd 16-17
28/06/2010 11:41
Computer
T3.2 Treadmill
18
Customer Support 0800 440 2459
30 minute Program (P5)
19
T3.2 Treadmill
reebokfitness.info
Level 4
1. With P5 flashing on the right hand side
of the screen, press to select.
2. Set your level using
SPEED
3. Press
and
buttons.
to begin your workout.
Level 1
Level 5
Level 2
Level 6
Level 3
Level 7
RFE4489_RE013411_T3.2 TREADMILL UMFINAL.indd 18-19
28/06/2010 11:41
Computer
T3.2 Treadmill
20
Customer Support 0800 440 2459
45 Minute Programme (P6)
21
T3.2 Treadmill
reebokfitness.info
Level 4
1. With P6 flashing on the right hand side
of the screen, press to select.
2. Set your level using
SPEED
3. Press
and
buttons.
to begin your workout.
Level 5
Level 1
Level 6
Level 2
Level 7
Level 3
RFE4489_RE013411_T3.2 TREADMILL UMFINAL.indd 20-21
28/06/2010 11:41
Computer
22
T3.2 Treadmill
Customer Support 0800 440 2459
Weight Loss Programme (P7)
reebokfitness.info
To calculate your target heart rate use the following rule:
2. Set your level using
and
T3.2 Treadmill
3. Now, the target heart rate will be flashing in the pulse window.
Adjust this value using the SPEED and buttons, and select
the value using button.
1. With P7 flashing on the right hand side
of the screen, press to select.
SPEED
23
•Deduct your age from 220 e.g. for a 35 year old person, their
maximum heart rate (MHR) is 220 – 35 = 185 beats per minute
buttons.
•Decide the percentage of your MHR you want to work at e.g. 85%
As a guide:
Level
Min.Speed
Max. Speed
Min. Incline
Max. Incline
L1
3.2/2.0
5.6/3.5
0
4
L2
4.0/2.5
6.4/4.0
1
5
L3
4.8/3.0
7.2/4.5
2
6
L4
5.6/3.5
8.0/5.0
3
7
L5
6.4/4.0
8.8/5.5
4
8
L6
7.2/4.5
9.6/6.0
5
9
L7
8.0/5.0
10.4/6.5
6
10
3. Press
to begin your workout.
If you want to change the level during program P5, P6 or P7
press button. The level will flash on the screen. Use the
SPEED and buttons to adjust the level and select the
to continue
option you want using the button. Press
working out.
Heart Rate Control (P8)
1. With P8 flashing on the right hand side
of the screen, press to select.
2. Set your target time using SPEED
and
buttons (the default is 60.00 minutes).
Press to confirm your choice.
RFE4489_RE013411_T3.2 TREADMILL UMFINAL.indd 22-23
50-70% MHR = Health/Fat Burning
70 – 80% MHR = Fitness/Bodyshaping
80 – 90% MHR = High intensity performance
•Multiply your maximum heart rate by the percentage value
e.g. 185 x 0.85 = 157bpm
to begin your 3 minute warm up. Keep your hands on
4. Press
the pulse sensors at all times during this workout to monitor
your pulse correctly.
During the warm up the only buttons that will function are the button
to restart. The warm up will continue until
to pause the workout or
your heart rate reaches your target heart rate zone, up to a maximum
of 9 minutes. During this time the incline and speed will be adjusted at
30 second intervals to try and get you warmed up to your target heart
rate. If, after 9 minutes you have not reached your target heart rate
“FAIL” will show on the screen, and you should review the level setting
you selected.
If you see a “P” flashing in the pulse window, the treadmill is unable to
detect your pulse. The computer checks your pulse every 30 seconds
and without a reading is unable to alter the speed to ensure you continue
working within your target heart rate zone.
Once the warm up is completed, and your heart rate is at your target
level, you will begin the Heart Rate Control Programme. The treadmill will
continue to monitor your pulse every 30 seconds. The treadmill will adjust
the incline level of your workout to try and keep you working at your target
heart rate (between 0 and 15%). If you are running at 15% incline on a given
speed, and still not working at your desired heart rate then the speed will
increase by 0.5mph or 0.8 km/h at 30 second intervals until you reach
your target zone.
28/06/2010 11:41
T3.2 Treadmill
reebokfitness.info
Maintenance
24
Customer Support 0800 440 2459
Proper maintenance is very important to ensure your equipment is always in top
working condition. Improper maintenance could cause damage or shorten the life
of your equipment as well as exceeding the warranty coverage.
1. Ensure the running belt lubrication is checked and carried out (when required).
This is likely to be every 4 weeks of use, or 20 hours.
2. Check periodically (4 weeks) that the running belt is centered and has not
moved to one side. In this instance stop the machine and carry out the belt
adjustment (directions in the troubleshooting section).
3. To ensure all components of the machine (including the frame) are in a good
condition please ensure any perspiration or dust is wiped clean on a regular
basis. This can be done by using a soft, damp cloth. Please don’t use
detergents as this may affect the colouring or operation of the components.
4. To ensure correct operation the machine must be stored in a dry, indoor
environment at all times.
enjoy
5. Inspect and tighten all parts of the machine regularly. Any worn parts must
be replaced immediately. Pay particular attention to nuts, bolts, screws
and washers.
The new Reebok Performance Series combines innovative
design and ultimate functionality in a unique line of products.
Product shown: T7.8 LE Treadmill.
RFE4489_RE013411_T3.2 TREADMILL UMFINAL.indd 24-25
28/06/2010 11:41
Troubleshooting
T3.2 Treadmill
26
Customer Support 0800 440 2459
Q How do I lubricate my treadmill deck?
A At the back of the running deck / machine (opposite end to the computer)
on each side there are two Allen head bolts. Turn these bolts anticlockwise
five full turns to release the belt tension. Lift the edge of the treadmill running
belt approximately 30 to 40cm from the front roller. Apply 10ml of silicone oil
under the running belt, from front to back and across the width of the running
deck. Tighten the bolts five turns, clockwise, to add tension to the belt.
WARNING!
Do not over lubricate the running belt, as this will cause the running belt
to slip. After application power your treadmill up to 6mph or 10 Km/h for
5 to 10 minutes. Wipe any excess oil away. If necessary, repeat for a
further 10 minutes.
Q How often should I lubricate my treadmill deck?
A The running belt has been adjusted properly by the factory. However
transportation, uneven flooring or other unpredicted reasons could cause the
belt to shift off centre resulting in the belt rubbing with the plastic side rail or
end caps and possibly causing damage. To adjust the belt back to its correct
position, use the tension bolts at the back of the deck in the following way:
1. If your belt tends to move to the right, rotate the right tension bolt clockwise.
We recommend adjustments of 1 circle at a time, and follow with a test. If your
belt continues to move to the right, simply adjust the left belt tension bolt by
turning it 1 circle counter-clockwise, follow with a test.
2. If your belt tends to move to the left, rotate the left tension bolt clockwise 1
circle at a time, and follow with a test. If the belt continues to move to the left,
simply adjust the right tension bolt counterclockwise.
3. If your belt appears to be loose, simply tighten both bolts evenly 1 circle.
4. If it appears tight, simply loosen both bolts evenly 1 circle.
27
T3.2 Treadmill
reebokfitness.info
Q I have just ordered my treadmill and there are some parts missing can
you help?
A Yes, if you are missing parts from your new machine these can be ordered
on our helpline 0800 440 2459. When you call we will require your full
address, the part numbers (you require) from the user manual that and
your machine serial number.
Q How long is my warranty on my treadmill?
A All Reebok treadmills come with a manufacturers warranty this varies on
each machine, this should be printed in your manual, if you have any
questions regarding your warranty please don’t hesitate to contact our
helpline 0800 440 2459.
Q My treadmill is out of the warranty can you still help me?
A Yes we can still help, we have a large network of engineers that cover 98% of
the British Isles and can provide replacement parts. For a quote on parts or
engineer call out please contact our helpline on 0800 440 2459.
Q Can I keep my equipment in my garage?
A We advise to keep the equipment indoors, away from moisture and dust.
Do not store the product outside, or in damp or dusty environments.
Q Is there a maximum user weight for my treadmill?
A There is a maximum user weight with all our treadmills this varies on each
machine, this should be printed in your manual, if you have any questions
regarding the user weight, please don’t hesitate to contact our
helpline 0800 440 2459.
WARNING!
Run your Treadmill for 5 – 10 minutes after adjusting the belt
Q What is the safety key for and where does it go?
A The safety key is a red plastic key that should be inserted into the front of the
computer when using the treadmill, this is an automatic cut off so if you have
any problems or get into any difficulties you can pull the key out to stop the
machine. The treadmill will not work without this key being inserted.
RFE4489_RE013411_T3.2 TREADMILL UMFINAL.indd 26-27
Q Why is there a black dust starting to appear under my treadmill?
A Occasionally a black dust can start to appear under your treadmill this
is due to normal wear and tear. You can remove the dust easily with a
vacuum cleaner. If you want to keep the dust away from the floor we would
recommend for you to place your treadmill on a protective mat.
28/06/2010 11:41
Parts ID
T3.2 Treadmill
28
Customer Support 0800 440 2459
29
T3.2 Treadmill
reebokfitness.info
Diagram 1
T32-401 Motor Hood x 1
T32-466 25.6x25x41.6xR17 Cover - Lower x 1
T32-402 Motor Hood Decorate Cover - Left x 1
T32-467 Elevation Support Tube Fix Holder x 1
T32-449 Motor Hood Decorate Cover - Right x 1
T32-468 54x24x10 Power Cable Cover x 1
T32-461 Elevation Support Tube x 1
T32-428 Elevation Motor Cover - Left x 1
T32-462 Ø22 Round End Cap x 2
T32-429 Elevation Motor Cover - Right x 1
T32-463 20x26x46 End Cap x 2
T32-802 M4x15 Screw x 6
T32-369 Incline Motor x 1
T32-807 8x14x2 Spring Washer x 6
T32-444 Incline Motor Sleeve x 1
T32-811 M10x40 Allen Bolt x 3
T32-337 Transformer x 1
T32-812 M10 Nylon Nut x 7
T32-336 Relay Board x 1
T32-821 M10x67 Allen Bolt x 1
T32-411 Control Board x 1
T32-822 10.5x20x2 Washer x 3
T32-442 Soft Drop Shock Holder x 1
T32-823 M10x33 Allen Bolt x 1
T32-413 Soft Drop Shock x 1
T32-824 M8x65 Allen Bolt x 1
T32-355 Soft Drop Locker x 1
T32-338 M8 Nylon Nut x 3
T32-334 Soft Drop Locker Spring x 1
T32-826 8.5x16.5x1.5 Washer x 6
T32-354 22.5x28.2x22 Nylon Brushing x 1
T32-850 M8x20 Allen Screw x 4
T32-417 DC Motor x 1
T32-851 M10x115 Bolt x 1
T32-435 220J-6 Driving Belt x 1
T32-853 M8x48 Bolt x 1
T32-464 Motor Holder x 1
T32-854 M8x85x20 Motor Holder Fix Bolt x 1
T32-433 Motor Cover - Lower x 1 T32-855 9x35x8 Curve Washer x 2
T32-431 Side Decorate Cover - Left x 1
T32-856 8x26x11 PU Cushion x 1
T32-425 Side Decorate Cover - Right x 1
T32-834 M8x14 Screw x 2
T32-430 Elevation Motor Cover x 1
T32-844 Plastic Insert x 4
T32-465 25.6x29.5x41.6xR17 Cover - Upper x 2
RFE4489_RE013411_T3.2 TREADMILL UMFINAL.indd 28-29
28/06/2010 11:41
Parts ID
T3.2 Treadmill
30
Customer Support 0800 440 2459
Diagram 2
31
T3.2 Treadmill
reebokfitness.info
Diagram 3
T32-101 Computer x 1
T32-109 Safety Key Base x 1
T32-278 Console Support Frame x 1
T32-246 Upright Fix Bolt Cap x 2
T32-139 Console Housing Upper x 1
T32-130 Safety Key X 1
T32-254 Upright - Left x 1
T32-801 M3x14 Screw x 14
T32-137 Water bottle holder-left x 1
T32-801 M3x14 x 14
T32-253 Upright - Right x 1
T32-802 M4x15 Screw x 65
T32-104 Water bottle holder-right x 1
T32-802 M4x15 x 65
T32-275 Handlebar Cover - Left x 2
T32-846 M6x15 Screw x 2
T32-134 Console Housing Lower x 1
T32-841 M4x16 x 6
T32-276 Handlebar Cover - Right x 2
T32-847 M6 Nut x 2
T32-820 M4.2x11 x 4
T32-274 Hand Pulse Sensor Cover - Upper x 1
T32-806 M8x45 Bolt x 4
T32-207 Hand Pulse Sensor Cover - Lower x 1
T32-807 8x14x2 Spring Washer x 6
T32-208 Handlebar x 2
T32-814 8x20.5x2 Curve Washer x 4
T32-266 OD36-37x3x3D5MM Foam Grip x 2
T32-809 M8x30 Allen Bolt x 2
T32-210 OD38.1 Handlebar End Cap x 2
T32-810 M8x18 Allen Bolt x 2
T32-106 Safety Key Base Holder x 1
RFE4489_RE013411_T3.2 TREADMILL UMFINAL.indd 30-31
28/06/2010 11:41
32
T3.2 Treadmill
Customer Support 0800 440 2459
33
T3.2 Treadmill
reebokfitness.info
Diagram 4
T32-559 L-1100MM Side Rail x 2
T32-621 Main Frame x 1
T32-623 OD30xID9xT2.0 Cushion x 1
T32-859 M6x55 Allen Screw x 2
T32-502 445x2668x1.6 Running Belt x 1
T32-620 Front Roller Shaft x 1
T32-624 ID15xOD75x34 Transport Wheel x 1
T32-860 6.5x12.6x1.25 Screw x 3
T32-556 Left Rear End Cap - Inside x 1
T32-617 Front Roller x 1
T32-625 50x30 End Cover x 1
T32-544 M6x10 Screw x 2
T32-555 Right Rear End Cap - Inside x 1
T32-615 Rear Roller Shaft x 1
T32-626 Main Frame Cross Bar x 1
T32-861 6.4x18x1.5 Washer x 2
T32-550 Left Rear End Cap - Outer x 1
T32-614 Rear Roller x 1
T32-613 ABS Frame Lower Cover x 1
T32-862 M10x32 Cap Head Bolt x 1
T32-547 Right Rear End Cap - Outer x 1
T32-622 OD30x25 Frame Crash Cushion x 1
T32-843 M4x19 Screw x 16
T32-839 M4x12 Screw x 15
T32-560 9.2x17x32 Side Rail Guider x 8
T32-607 Rear Transport Wheel Cover - Left x 1
T32-857 M8x30 Screw x 10
T32-508 1170x642x16 (TR310) Running Deck x 1
T32-612 Rear Transport wheel cover-right x 2
T32-858 M6x65 Allen Screw x 1
RFE4489_RE013411_T3.2 TREADMILL UMFINAL.indd 32-33
28/06/2010 11:42
Parts ID
34
T3.2 Treadmill
Customer Support 0800 440 2459
35
T3.2 Treadmill
reebokfitness.info
Diagram 3
T32-374 Base Frame x 1
T32-377 25x28x30 Elliptical Tube Cushion x 2
T32-305 Base Frame Transport Wheel Locker x 1
T32-802 M4x15 Screw x 65
T32-303 Base Frame Transport Wheel Holder x 1
T32-811 M10x40 Allen Bolt x 3
T32-306 Base Frame Transport Wheel x 1
T32-812 M10 Nylon Nut x 7
T32-370 2.0xØ14x4 Spring x 1
T32-813 Ø8x36 Transport Axle x 2
T32-375 OD28x12 Round Cushion x 4
T32-825 M8-C Clipper x 1
T32-345 Power Plate Holder x 1
T32-848 Ø6x11.5 Fixed Bolt x 2 T32-343 Power Plate x 1
T32-849 M6-C Clipper x 2
T32-333 Power Cord Plug x 1
T32-816 M5x14 Screw x 6
T32-365 Electronic Protector x 1
T32-832 M10x53 x 1
T32-332 Power Switch x 1
T32-828 M3x8 x 2
T32-339 Frame Front Transport Wheel Holder x 2
T32-827 M4.2x11 Screw x 4
T32-376 ID19xOD66x24 Transport Wheel x 2
T32-852 M16x80 Bolt x 2
N.B. All given quantities are for the complete, assembled product.
RFE4489_RE013411_T3.2 TREADMILL UMFINAL.indd 34-35
28/06/2010 11:42
T3.2 Treadmill
36
Customer Support 0800 440 2459
Performance
range
RFE International Ltd warrants products to be free from defective workmanship
and materials, under normal use and service conditions, for the period of 2 years
from the date of purchase. Details of these service conditions can be found within
the product’s user manual.
reebokfitness.info
Limited Warranty
In order to validate warranty dates, a proof of purchase is required. This warranty
only extends to the original purchaser and will only be covered in the country the
machine was purchased.
RFE’s obligation under this warranty is limited to replacing or repairing, at RFE’s
discretion, the product through one of its authorised service centres. All repairs for
which warranty claims are made must be pre-authorised by RFE.
This warranty does not extend to any defect caused by abuse, misuse, additions,
modifications or repairs not provided by an RFE authorised service centre.
Products used for commercial or rental purposes and/or used as store display
models are not covered by this warranty. This product is designed for
home use.
C5.8e LE Crosstrainer
No other warranty beyond that specifically set forth above is authorised by RFE.
RFE is not responsible or liable for indirect, special or consequential damages
arising out of or in connection with the use or performance of the product or
damages with respect to any economic loss, loss of property, loss of revenues
or profits, loss of enjoyment or use, costs of removal, installation or other
consequential damages of whatsoever nature.
We advise that your product is kept in a room with a constant environment;
preventing your product from being exposed to extremes in temperature,
heat, humidity and moisture. Guidance on the correct storage of equipment is
contained within the product’s user manual.
B5.8 LE Bike
PLEASE RETAIN YOUR RECEIPT AS PROOF OF PURCHASE.
Your statutory rights remain unaffected.
cycle
CV Mat
Reebok products are recyclable. At the end of its useful life please dispose of
this Reebok product correctly and safely at a local refuse site.
For more information visit
www.reebokfitness.info
RFE4489_RE013411_T3.2 TREADMILL UMFINAL.indd 36-37
28/06/2010 11:42