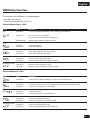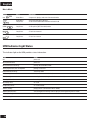
1
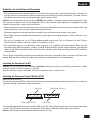
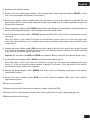
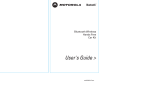
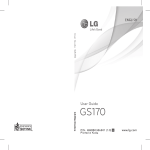
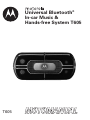
®
Universal Bluetooth
In-car Music &
Hands-free System T605
T605
English
General and safety information
European Union Directives Conformance Statement
Hereby, Motorola Inc., declares that this T605 is in compliance with the essential requirements and
other relevant provisions of Directive 1999/5/EC.
You can view your product's Declaration of Conformity (DoC) to Directive 1999/5/EC (the R&TTE Directive) at www.
motorola.com/rtte.
Caring for the Environment by Recycling
When you see this symbol on a Motorola product, do not dispose the product with household waste.
Recycling Mobile Phones and Accessories
Do not dispose of mobile phones or electrical accessories, such as chargers or headsets, with your household
waste. In some countries or regions, collection systems are set up to handle electrical and electronic waste
items. Contact your regional authorities for more details. If collection systems aren’t available, return unwanted
mobile phones or electrical accessories to any Motorola Approved Service Centre in your region.
FCC Notice to Users
Users are not permitted to make changes or modify the device in any way. Changes or modifications not expressly
approved by the party responsible for compliance could void the user’s authority to operate the equipment.
See-47-CFR-Sec.-15.21.
This device complies with part 15 of the FCC Rules. Operation is subject to the following two conditions: (1) This
device may not cause harmful interference, and (2) this device must accept any interference received, including
interference that may cause undesired operation. See-47-CFR-Sec.-15.19(3).
1
English
Welcome
Welcome to Motorola’s “connected” world of Bluetooth™ personal area wireless networking. The Motorola T605
Automotive Bluetooth Music and Handsfree System makes wireless connection simple and quick.
The advanced, sophisticated Motorola T605 Automotive Bluetooth Music and Handsfree System offers these
features:
• Seamless, wireless handsfree audio through a Bluetooth link
• High quality, full-duplex digital audio interface
• Voice dialing using your phone’s voice control (if available)
• Entertainment mute—automatically mutes radio during calls
• Noise reduction and acoustic echo cancellation
• Automatic volume control
• Compatible with Bluetooth 1.2 devices, and backwards-compatible with Bluetooth 1.1 devices—supports
Headset, Handsfree, Advanced Audio Distribution (A2DP), and Audio Video Remote Control (AVRCP) profiles.
• Wireless stereo connection from your Bluetooth-enabled music player to your car’s entertainment system
Certain mobile phone features are dependent on the capabilities and settings of your service provider’s network.
Additionally, certain features may not be activated by your service provider, and/or the provider’s network settings
may limit the feature’s functionality.
The use of wireless devices and their accessories may be prohibited or restricted in certain areas. Always obey
the laws and regulations on the use of these products.
Installing the Handsfree Car Kit
Package Contents
•
•
•
•
•
•
•
Electronic Control Module (ECU)/Junction box (SYN1782)
Power adapter cable (SKN6249)
Audio adapter cable (SKN6250)
User Interface Module (UIM) (SYN2015)
Microphone with mounting hardware (SMN4095)
3.5mm stereo audio cable (SKN6251)
External speaker with mounting screws (SSN4020)
2
English
Guidelines for Installation and Connection
• Only qualified personnel should install this car kit. Because of the wide variety of vehicle types and models it
may be necessary to contact the vehicle manufacturer for detailed installation information. If needed, contact
the vehicle manufacturer for air bag information specific to the vehicle.
Caution: An air bag inflates with great force. DO NOT place objects, including communication equipment, in the
area over the air bag or in the air bag deployment area. If the communication equipment is improperly installed
and the air bag inflates, serious injury could occur.
• Mount components securely on strong surfaces to prevent shifting that could cause injury or interfere with safe
vehicle operation. Always use the supplied mounting hardware.
• Mounted components and attached wires or cables must not interfere with seating or leg space.
• Route cables so they are protected from pinching, sharp edges and crushing. Keep all in-line connectors easily
accessible.
• The car kit is intended for use in 12 Volt negative ground systems only. The car kit draws less than 3 Amps.
Confirm that the vehicle’s electrical system can supply this current.
• The installation steps are in no particular order. In general, you should first pick the locations where you will
be mounting the UIM, microphone, speaker, and ECU. Mount the UIM, speaker and microphone and route the
cables to the ECU mounting location. Install the power adaptor cable. Plug everything into the ECU, and then
mount the ECU.
The car kit has separate output paths for the handsfree audio (line and speaker levels) and music (RCA line-level
output). Both handsfree and music audio paths need to be connected for full system operation.
Installing the Handsfree Car Kit
Caution: This car kit must be connected to a maximum 5 Amp fuse in the car fuse panel to prevent fire or other
damages should a short circuit occur in the ECU.
Before installation, unpack, assemble, and test all components on a service bench.
Installing the Electronic Control Module (ECU)
Mount the ECU securely.
The best location for the ECU is under the dash. The box must be protected from dirt and moisture, have adequate
space for cooling, and allow for cable connections.
Barcode
Mounting Surface
Mounting Surface
Barcode
For optimal Bluetooth performance, mount the ECU so that the side with the barcode faces away from the mounting
surface. The ECU can be oriented in any direction. Do not place it behind or within large areas of metal.
Caution: The location must not interfere with the vehicle’s air bag.
3
English
Installing the Power Adapter Cable
Caution: Failure to follow these steps may cause the accessory not to work properly and could cause damage
to the car kit.
Note: A vehicle adapter harness may be available from a third-party vendor that allows integration of the T605
handsfree audio into the vehicle entertainment system. The power adapter cable is designed to be connected
directly to such an adapter harness using the 8-pin white connector, while the 6-pin black connector (for power
and line-level audio) and 2-pin black connector (for speaker-level audio) are connected to the ECU. If you choose
to use a third-party vehicle adapter harness (not supplied), follow the third-party vendor’s guidelines for proper
installation.
For installation into a vehicle without the use of a third-party adapter harness:
Electronic Control Module (ECU)
External Speaker
Power Adapter Cable
Microphone
Purple and Gray:
Speaker-Level Handsfree
Audio (not used in this
configuration)
User Interface Module (UIM)
Red: Fuse Box
(Power)
Green: Fuse Box
(Ignition)
L/R In
(Aux Device)
Audio Adapter Cable
Black: Vehicle
Chassis (Ground)
L Out and R Out (Audio)
Orange: Line Level Handsfree Audio (+)
Blue: Line Level Handsfree Audio (-)
Yellow: Mute
Vehicle Entertainment System
4
English
1 Disconnect the vehicle’s battery.
2 Remove all fuses from the power adapter cable and tape them to their respective holders. DO NOT re-insert
fuses until you complete and inspect all connections.
3 On the power adapter cable, cut off the white 8-pin connector as close to the connector as possible. Be sure
to leave the inline fuses on the cable along with enough spare length of wire to allow connections to be made.
Dispose of the connector.
4 Connect the power adapter cable’s GREEN Ignition Sense wire (3 Amp fuse) to an ignition-switched location on
the fuse block. When the ignition is off, the ignition sense line should be low.
5 Connect the power adapter cable’s YELLOW Entertainment Mute Wire to the vehicle’s entertainment system’s
mute input.
Note: This feature is only usable if the vehicle’s entertainment system supports an active low, single wire,
radio mute signal. Otherwise, the installation may require an optional relay adaptor (not included) or other
customization.
6 Connect the power adaptor cable’s RED positive primary lead (4 amp fuse) to a point in the vehicle’s fuse box
that is fused at 4 to 5 amps. The RED positive primary lead should be powered continuously. On/Off switching
is performed by the GREEN Ignition Sense wire.
Important: Do not connect the RED and GREEN wires together. Doing so limits the functionality of the car kit.
7 Connect the power adapter cable’s BLACK ground wire to the vehicle chassis.
Note: Skip steps 8 and 9 if your vehicle entertainment system does not support the telephone audio input
feature, or if you are using the external speaker (supplied). This feature is only operational if the vehicle’s
entertainment system supports this capability.
8 Connect the power adaptor cable’s ORANGE wire to the + line-level telephone audio input of the vehicle’s
entertainment system.
9 Connect the power adaptor cable’s BLUE wire to the line-level telephone audio input of the vehicle’s
entertainment system.
10 Inspect all connections.
11 Connect the black 6-pin connector on the power adapter cable to the ECU.
12 Reinsert all fuses into the power adapter cable. Do not replace any fuse with a high amperage fuse.
13 Reconnect the vehicle’s battery.
5
English
Installing the Microphone
Note: Always use the supplied mounting hardware.
Note: The microphone must be positioned properly or the car kit WILL NOT perform optimally.
1 Mount the microphone in a suitable location using either screw, velcro, or clip.
• The preferred spot to mount the microphone is on the overhead console/dome light assembly near the front
center of the vehicle, away from the window, pointed toward the driver’s head.
• Locate the microphone no more than 16 inches (40 cm) from the driver.
• Aim the microphone toward the driver.
• Do not allow anything (such as a rear-view mirror or sun visor) to block the path between the microphone and
the driver.
• Mount the microphone firmly so that vibrations do not affect audio quality.
• Refrain from locating the microphone directly in the path of heat/AC vents.
• Refrain from mounting the microphone on door pillars or windows that can transmit exterior wind noise to it.
• Microphone should not be attached to the car’s visor.
2 Route the microphone cable down the side of the windshield, through the dash, and to the ECU.
3 Connect the microphone to the ECU.
Installing the External Speaker
Important: Do not perform this procedure if you used the ORANGE and BLUE wires on the power adapter cable to
connect the audio to the vehicle’s entertainment system.
Note: Always use the supplied mounting hardware.
1 Mount the speaker so that the audio is clearly heard by the driver. However, it must not interfere with the safe
operation of the vehicle. It is recommended that the speaker and microphone be separated by at least 3 feet
(90cm).
Caution: The location of the external speaker MUST NOT interfere with the vehicle’s air bag deployment.
2 Connect the speaker to the ECU.
Because you are using an external speaker, you can ignore the 2-pin audio out connector (purple and gray
wires) on the power adapter cable.
6
English
Installing the Music Audio Adapter Cable
Important: Do not perform this procedure if no Auxiliary input exists on the vehicle entertainment system. Instead,
you can utilize a FM modulator (not supplied) to send audio to the vehicle entertainment system.
1 Unplug any cables connected to the vehicle entertainment system’s Auxiliary input. If no cables are connected,
skip to step 3.
2 Connect the unplugged cables to the L/R In connector on the audio adapter cable using an appropriate adapter
if needed (not supplied).
3 Connect the R Out and L Out connectors on the audio adapter cable to the vehicle entertainment system’s
Auxiliary input using an appropriate adapter if needed (not supplied).
4 Connect the 8-pin connector on the audio adapter cable to the ECU.
Installing the User Interface Module (UIM)
The User Interface Module (UIM) can be mounted in several orientations to provide a safe and comfortable
environment for use. You should mount the UIM on a flat spot within easy reach of the driver (curved surfaces can
cause difficulties in pushing the buttons, and can cause the UIM to come loose after repeated use).
Caution: The location of the UIM must not interfere with the vehicle’s air bag deployment.
1 Select a location on the dash and press the UIM cable into the grooves on the back of the UIM such that
the UIM is oriented properly in the desired location. The cable must be contained in the slot to provide a flat
surface for the UIM to be mounted on.
2 Remove the backing on the rear of the UIM and press the UIM firmly into place.
Caution: Clean the mounting surface thoroughly to ensure good adhesion.
• The mounted UIM MUST NOT create a visual distraction.
• DO NOT mount the UIM on the steering wheel.
• The UIM must be in easy reach of the driver.
3 Connect the UIM to the ECU.
7
English
Using Your Car Kit
The User Interface Module (UIM) enables you to set up and use your T605 Bluetooth Handsfree Car Kit. The UIM
provides both buttons to perform operations, and an indicator light for status.
Multi-function (MFB)
button
red (END)
button
green (SEND)
button
blue (UP ARROW)
button
indicator light
blue (DOWN ARROW)
button
You can perform three types of actions with each UIM button:
• Short press (or “press and release”)
• Long press (or “press and hold for 2 to 6 seconds”)
• Extended press (or “press and hold for 6 seconds or longer”)
The function of each button changes depending on what operating mode the car kit is in.
Your T605 car kit has two operating modes: Connected mode and Music mode. Mode selection is automatic.
Operating Mode
Connected Mode
Description
• Used for making and receiving calls Mode
• Indicator light is colored blue
• External speaker (if connected) is enabled
• Received call pauses music while the call is active. When call is ended, music is
resumed
Music Mode
• Used for listening to music
• Indicator light is colored yellow
• Connection to vehicle entertainment system is enabled
• Music player operations can be performed from UIM or music player
Linking Your Car Kit and Bluetooth Enabled Device
Before you can use your Bluetooth car kit, you must first link it with your Bluetooth-enabled device. You establish
a Bluetooth link between your car kit and your device by creating a paired link.
When you set up a paired link, the car kit remembers your device and automatically connects to your device every
time you start your vehicle or power up the car kit. The car kit can remember up to 6 devices, and can connect
up to 2 devices at once as long as they are of separate services (a phone device and a music device, but not two
phone devices or two music devices).
Note: For safety reasons, it is recommended that the pairing process be performed in a stationary vehicle.
8
English
Initial Pairing
Important: The process of initiating a Bluetooth connection with a device varies by device manufacturer. Please
have your device’s user manual available for reference if needed.
STEP ONE — Turn on your Device’s Bluetooth Feature
Your device’s Bluetooth feature is off by default. To use your car kit, you must first turn on the Bluetooth feature in
your device. See your device’s user manual.
STEP TWO — Connecting to your Car Kit
Before using your car kit, you must first pair (link) it to your device. With the car kit and device turned on and in
proximity:
1 ENSURE THAT THE CAR KIT IS IN PAIRING MODE.
Press and hold Multifunction (MFB) button for 2-6 seconds until it beeps and the indicator begins flashing in
blue. The car kit is now in the pairing mode.
2 SET YOUR DEVICE TO LOOK FOR YOUR CAR KIT.
Perform a Bluetooth device discovery/search from your device (See your device’s user manual) The phone lists
Bluetooth devices it finds.
Select Motorola T605 in the list of discovered devices and confirm by following the on-screen prompts.
When prompted by the device enter the passkey 0000 and confirm.
When pairing is successful, the indicator light flashes in purple followed by steady blue (for Connected mode) or
steady yellow (for Music mode).
If initial pairing is not successful, the car kit attempts to connect to devices that have already been paired. This
is indicated by the indicator light flashing red and blue. When this occurs, return to step 2 to repeat the initial
pairing process.
Additional Pairings
Ensure that any previously paired devices are turned off, and perform steps in “Initial Pairing.
Automatic Connection
Once paired, each time you start your vehicle, your Bluetooth-enabled device and car kit are automatically
connected (when your device is powered on and the device’s relevant settings have not changed).The car kit first
tries to connect to the last phone device used. If it is unable to connect, the car kit then tries connecting to the next
device in its history list. If a phone device and a music device are both present, both are connected. If there are
two phone devices available, the car kit connects to the one last used (and ignores the other phone).
When the Bluetooth connection is established, the indicator light stays lit. If you are in a call when the car kit
powers up, the call is automatically transferred to the car kit once the Bluetooth link is completed.
If your device is powered off when you start your vehicle, the Bluetooth connection may not be automatically
established when you turn on your device.
To manually connect to a previously paired device:
1 Turn on the device.
2 Set your device to look for the car kit. Select Motorola T605 and confirm.
Your device attempts to connect to the car kit. If a Bluetooth connection is established, the indicator light
changes from flashing red/blue to either steady blue (if connected to a phone) or steady yellow (if connected to
a music device).
9
English
Making and Receiving Calls
Note: Before you can use your Bluetooth-enabled phone, you must first create a paired link (see “Linking Your Car
Kit and Bluetooth Enabled Device”).
The following table provides details for making and receiving calls from your connected phone using your car
kit:
Note: Some features are phone/network dependent.
Function
Make a Call (Hand Dial)
Phone
On-in idle
T605
On
Action
Enter phone number on phone, phone dials call.
Make a Call (Voice Dial)
On-in idle
On
Press and hold green button for 2-6 seconds, wait for
prompt from phone, speak name, phone dials call.
Redial Last Number
On-in idle
On
Press green button. Note: This feature is available only
in Connected mode.
Receive (Answer) a Call
On–phone rings
On–indicator light
flashes quickly in blue
Press green button. While call is active, indicator light
flashes slowly in blue. If music is playing, it is paused
when on a call.
Change Call Volume
On–in call
On–indicator light
flashes slowly in blue
Press blue (up arrow) button to increase or blue (down
arrow) button to decrease. Note: You can also adjust call
volume from your phone (if supported by phone).
End a Call
On–in call
On–indicator light
flashes slowly in blue
Press red button. To end a call on hold, press green
button to make call active, then press red button to end
call. If music was playing when call was answered, it is
resumed when call is ended.
Reject a Call
On–phone rings
On–indicator light
flashes quickly in blue
Press red button.
Mute/ Unmute aCall
On–in call
On–indicator light
flashes slowly in blue
Press MFB button. While muted, indicator light flashes
slowly in purple
Answer
Second Incoming Call
On–in call, 2nd call On–indicator light
incoming
flashes quickly in blue
until call is answered
Press green button, places first call on hold, answers
incoming call. When call is on hold, indicator light
flashes quickly in blue.
Reject
Second Incoming Call
On–in call,
2nd call incoming
Press red button.
On–indicator light
flashes quickly in blue
Switch Between Two Calls On–in call, 2nd call On–indicator light
(Active and On Hold)
on hold
flashes slowly in blue
Press green button.
3-way Conference Calls
On–in call, 2nd call On–indicator light
on hold
flashes slowly in blue
Press and hold MFB button for 2-6 seconds.
Transferring Call
from Car Kit to Phone
(Privacy Mode)
On–in call
On–indicator light
flashes slowly in blue
Press and hold green button for 2-6 seconds.
Note: Some phones require you to press and hold the
MFB button twice.
Transferring Call
from Phone to Car Kit
On–in call
On
Press and hold green button for 2-6 seconds.
Note: Some phones require you to press and hold the
MFB button twice.
Change Ring Tone
Alert Tone Volume
On–in idle
On
Press blue (up arrow/down arrow) buttons.
10
English
Listening to Music
Your T605 car kit allows you to listen to music from your Bluetooth streaming music source.
Note: Before you can use your Bluetooth-enabled music device, you must first create a paired link (see “Linking
Your Car Kit and Bluetooth Enabled Device”).
The following table provides details for listening to music from your connected Bluetooth streaming music
source:
Function
Play Music
Music Device
On–music playing
T605
On–in idle
Action
Press MFB button. Indicator light flashes quickly three
times in yellow, then becomes steadily lit in yellow. Car
kit is placed in Music mode.
Play or Resume Music
On–music begins
playing
On–indicator light steadily Press green button.
lit in yellow when playing,
flashing in yellow when
paused
Change Music Volume
On–music playing
On–in Music mode
Use volume buttons/knob on music player or vehicle
entertainment system
Make Voice Dial Call
On
On–in Music mode
Press and hold green button for 2-6 seconds, speak
name, phone dials call Car kit is placed in Connected
mode.
Skip Back to Previous Song On
On–in Music mode
Press blue (down arrow) button.
Skip Forward to Next Song On
On–in Music mode
Press blue (up arrow) button.
Fast-Forward Through Song On–music playing
On–in Music mode
Press and hold blue (up arrow) button.
Rewind Through Song
On
On–in Music mode
Press and hold blue (down arrow) button.
Stop Music
On
On–in Music mode
Press MFB button. Indicator light flashes quickly three
times in yellow, then becomes steadily lit in blue. Car kit
is placed in Connected mode.
11
English
Using the Wired Audio Input
The car kit can select from 2 sources of audio: audio from the Bluetooth link or audio from auxiliary music input.
Selection is automatic. Music from the Bluetooth link takes precedent over music from the auxiliary music
inputs.
If the system is installed with an FM modulator to send music to your radio, you must first turn the FM modulator
on and tune to the appropriate spot on the dial to hear your music.
Disconnecting the Car Kit from Your Bluetooth Device
The Bluetooth connection between the car kit and Bluetooth device is automatically disconnected when you turn
off the vehicle. When the vehicle is powered down, the call is seamlessly transferred to the phone.
To do this...
Do this...
Manually disconnect the car kit
from your phone
Press and hold red button for 2-6 seconds while not in a call.
This disconnects the last connected device, and the car kit
begins searching for the next available device in its history list.
If last connected device is a handsfree device, then it searches
for another handsfree device. Similarly, if last connected device
is a music device, it searches for another music device.
If there are no other devices available, the car kit continues to
look for any previously paired device.
If you desire to reconnect the device that was just disconnected,
you must initiate the Bluetooth connection from the device.
Remove all paired devices
from the car kit’s history list
Press and hold red button for 6 seconds or longer while not in a
call.
Once a device has been removed from the car kit’s history
list, it must be re-paired again before it can be used.
12
English
UIM Button Functions
The functions of the 5 buttons vary depending on:
• how they are pressed
• what operating mode the car kit is in.
Connected Mode (Not in a Call)
Button
Press
Operations
red
Short Press
• Cancel current phone operation (such as making a voice dial call)
Long Press
• Disconnect from current device
• Try to connect with next device on history list
Extended Press
• Remove all paired devices from history list
Short Press
Long Press
• Last number redial
• Make voice dial call
Short Press
Long Press
• Enter Music mode and start music playing
• Enter pairing (discoverable) mode
Short Press
Long Press
• Increase ringer volume (one step)
• Increase ringer volume (one step per second)
Short Press
Long Press
• Decrease ringer volume (one step)
• Decrease ringer volume (one step per second)
green
Multifunction (MFB)
blue (up arrow)
blue (down arrow)
Connected Mode (In a Call)
Button
red
Press
Operations
Short Press
• End active call • Reject incoming call • Reject second incoming call
Short Press
Long Press
• Answer incoming call • Answer second incoming call • Switch between two calls
• Transfer active call from car kit to phone
Short Press
Long Press
• Mute/unmute call
• Join two active calls (3-way conference)
Short Press
Long Press
• Increase call volume (one step)
• Increase call volume (one step per second)
Short Press
Long Press
• Decrease call volume (one step)
• Decrease call volume (one step per second)
green
Multifunction
(MFB)
blue (up arrow)
blue (down arrow)
13
English
Music Mode
Button
Press
Operations
red
Short Press
• Stop music playing and enter Connected mode
green
Short Press
Long Press
• Pause/resume music playing
• Enter Connected mode and make voice dial call
Multifunction
(MFB)
Short Press
Long Press
• Stop music playing and enter Connected model
• Enter pairing (discoverable) mode
blue (up arrow)
Short Press
Long Press
• Next track
• Track fast-forward
blue (down arrow)
Short Press
Long Press
• Previous track
• Track fast-reverse
UIM Indicator Light Status
The indicator light on the UIM provides status information.
Light
Status
Off
power off
Blue (three flashes)
power on
Blue (continuous flashing)
pairing (discoverable) mode
Short purple flash, then steady blue
pairing successful
Red and blue (flashing)
searching mode
Red (steady)
idle (not connected to device)
Blue (steady)
standby (connected to phone in Connected mode)
Blue (quick flash)
incoming call
Blue (long flash)
on a call
Purple (long flash)
on a call (muted)
Yellow (steady)
playing music (connected in Music mode)
Yellow (three flashes)
connecting/disconnecting to music player (entering/leaving Music mode)
Yellow (flashing)
music paused
Red (flashing)
no service
14
English
Troubleshooting
I cannot pair my device with the car kit:
Turn the device off and then back on. Try pairing the device and car kit again. Sometimes removing the device’s
battery and reinstalling it helps.
Remove all previous pairings by pressing and holding the red (END) button for 6 seconds or longer, then try pairing
the device and car kit again.
Ensure that the car kit is not in Bluetooth search mode (indicator light is flashing red/blue). If so, press the MFB
button for 2-6 seconds to disable search mode and place car kit into Bluetooth discoverable mode (indicator light
is flashing in blue). Then try pairing the device and car kit again.
I make a call and the other party hears too much background noise: Check the location and placement of your
car kit’s microphone. It is recommended to mount the microphone in the front center of the car, no more than 16
inches (40 cm) from the drivers head. Exterior wind noise can easily be transmitted to the microphone if it is near
a window or if air is blowing on it from a vent.
My device doesn’t find my car kit: Make sure the indicator light is flashing in blue while the device is searching for
the car kit. Do this by pressing and holding the MFB button for 2-6 seconds to enter pairing mode.
Invalid Bluetooth passkey: If you enter an invalid Bluetooth passkey, you will have to start the pairing process
again. You do not get another chance to enter the passkey.
The car kit connects to another device instead of mine: The other device was the last device used by the car kit.
See the section “Disconnecting the Car Kit from Your Bluetooth Device”.
I paired my device with the car kit, but now the car kit won’t connect with it:
Your device has been manually disconnected from the car kit. Initiate a Bluetooth connection from the device as
described in “Automatic Connection”.
Repeat the initial pairing process.
The Bluetooth feature in your device has been turned off. Follow the directions in your device’s user manual to
turn it backon.
I cannot voice dial a call:
You may not have a «voice tag» set up for the number you want to dial in your phone. Follow your device’s user
manual to set up voice dialing.
Background noise may be interfering with your voice. Relocate the microphone to a quieter place. Move the
microphone closer to the driver. Passengers in the car should be quiet while voice dialing. Minimize wind noise
by rolling the windows up.
Most phones prompt with a beep to indicate it is now time to speak. Wait until the beep has ended before
speaking. Do not over speak the beep.
Call waiting does not work. Three-way calling does not work: Some networks do not support multi-party calling
features. Contact your service provider for more information.
15
English
My phone and my wife’s phone will not connect at the same time (even though the car kit’s user manual says it
can handle two devices at a time): This is correct. While the car kit can connect up to two devices at a time, the
two devices cannot be of the same service type. One phone and one music device will connect, but two phones
will not and two music devices will not. Some phones have onboard music capabilities, in which case only one
physical device will connect.
My phone has a music player, but I can’t hear music even though I can hear the phone:
Most phones with a music player pair both devices at the same time. Some won’t, and require another initial
pairing process to pair the music player. Try initiating the pairing process again to pair the music player.
Even though you can hear the phone, you must still have the entertainment system set to the correct input to hear
music. In most cases that would be the AUX input.
If your entertainment system includes a FM modulator to send your music to the radio, you must first turn on the
FM modulator and tune the radio to the correct spot on the radio dial to hear your music.
I have one Bluetooth music device paired and operating, but I cannot connect a second device: Certain Bluetooth
music adapters can interrupt the pairing process and prevent the pairing of any other devices. If this occurs, turn
off the music adapter/device, and then attempt to pair the next Bluetooth device. Once the next Bluetooth device
is paired, turn the music adapter back on so that it can connect again.
If I interrupt the Bluetooth link by walking away from the car, it does not automatically reestablish itself when I
come back within range: Certain Bluetooth music adapters can interrupt the establishment of a second Bluetooth
link. If this occurs, reconnect the phone to the car kit using the phone’s connection menu/commands. Alternatively,
you can press and hold the green button for 2-6 seconds to establish a voice dial session in order to force a phone
connect. Once connected, press the red button to end the voice dialing session. Some phones require you to
reconnect the phone to the car kit from the phone’s menu after the Bluetooth link has been interrupted.
If you have any additional questions, please call your hotline number (0870-9010-555) or visit us at www.hellomoto.com.
16
CFJN4205A
MOTOROLA and the Stylized M Logo are registered in the US Patent & Trademark Office. The use of wireless
devices and their accessories may be prohibited or restricted in certain areas. Always obey the laws and
regulations on the use of these products. The Bluetooth trademarks are owned by their proprietor and used by
Motorola, Inc. under license. All other product or service names are the property of their respective owners.
© Motorola, Inc. 2007.