1
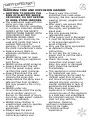
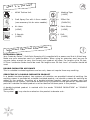
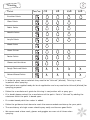
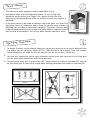
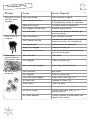
Craft Paint Spraying Kit CHV512 Operating Instructions Thank you for purchasing this Create by Earlex™ Craft Paint Spraying kit. This is a highly versatile spray kit and can be used on a variety of applications. BEFORE USE - PLEASE READ THESE SAFETY & OPERATING INSTRUCTIONS. Please retain for future reference Go to www.earlexcreate.com to register your product ORMATION IMPORTANT INF 1. 2. (not supplied) 3. Certain coatings may require dilution. 2 CTIONS SAFETY INSTRU WARNING! FIRE AND EXPLOSION HAZARD. l l l l l l l l l l l l CAUTION: TO REDUCE THE RISK OF ELECTRIC SHOCK OR INJURY, DO NOT EXPOSE TO RAIN. STORE INDOORS. The substances used with this spray gun may contain hazardous, harmful, explosive or corrosive materials. ALWAYS COMPLY WITH THE SAFETY INSTRUCTIONS ISSUED WITH THIS PRODUCT AND THE MATERIAL BEING USED. The spray gun must only be used with paints that have a suitable flash point for spraying. If in doubt, consult the paint manufacturer's data. Always ensure there is adequate ventilation when spraying. NEVER spray near an open flame, including an appliance pilot flame. NEVER smoke whilst spraying. Always disconnect the unit from the power supply when re-filling the paint container. Always disconnect the unit from the power supply when cleaning the spray gun. Always ensure the spray area is safe and free from all debris that may present a fire or trip hazard. NEVER under any circumstances point the spray gun at another person or animal. In the event of injury occurring, seek expert medical advice immediately. NEVER allow children or unauthorized users to operate or play with the spray equipment. Always read the paint manufacturer's thinning instructions before use. Always wear the correct protective face mask when spraying. We also recommend wearing gloves, goggles and overalls. l After every use ensure that you clean the spray gun thoroughly and grease the gland seal. l Use only genuine Earlex replacement parts. l If the supply cord is damaged, it must be replaced by Earlex or its appointed agents to avoid a hazard. l Only use the spray equipment as detailed in these instructions. l Do not use the air hose or power cord to pull the HVLP turbine unit. l Check the hoses, hose connectors and power cord daily. Any worn or damaged parts should be replaced immediately. l This appliance is recommended for household use only. l This appliance can be used by children aged from 8 years and above and persons with reduced physical, sensory or mental capabilities or lack of experience and knowledge if they have been given supervision or instruction concerning use of the appliance in a safe way and understand the hazards involved. Children shall not play with the appliance. Cleaning and user maintenance shall not be made by children without supervision. 3 l box? What’s in the 1. 400W Turbine Unit 5. Masking Tape (L1955) 2. Craft Spray Gun with 1.0mm needle (see accessory list for extra needles) 6. 250ml Pot (CHVAC01) 3. Air Hose (L0543) 7. Paint Stirrer (L1565) 4. 5 Stencils (L1950) 8. DVD (L1953) DVD l Information a c ri t c le E t n a Import EXTENSION CORDS Your Create by Earlex™ Craft Paint Spraying Kit is supplied with a power cord that is 6 feet long. Make sure your extension cord is in good condition. When using an extension cord, be sure to use one heavy enough to carry the current your product will draw. For lengths up to 50 feet, 0.75mm extension cords should be used. For lengths over 50 feet 1mm or heavier should be used. DOUBLE-INSULATED APPLIANCE This is a double-insulated appliance and as such, does not require three-way earthing. SERVICING OF A DOUBLE-INSULATED PRODUCT In a double-insulated product, two systems of insulation are provided instead of earthing. No earthing means is provided on a double-insulated product, nor should a means for earthing be added to the product. Servicing of a double-insulated product requires extreme care and knowledge of the system, and should be done only by qualified service personnel. Replacement parts for a double-insulated product must be identical to those parts in the product. A double-insulated product is marked with the words “DOUBLE INSULATION” or “DOUBLE INSULATED.” The symbol may also be marked on the product to denote such. 4 View Exploded Parts 15 1 2 3 4 5 6 14 8 7 9 10 12 11 13 16 Parts List No. Description 1. 2. 3. 4. 5. 6. 7. 8. Air Cap Ring Air Cap Spray Direction Plate Fluid Tip (1mm) Fluid Tip Seal Fluid Needle (1mm) Spring Fluid Adjusting Screw Gland Nut 9. 10. Gland Seal Part No. L0215 L2038 L0206 L0231 L0211 L0230 L0216 L0210 L0208 L0272 No. Description 11. 12. 13. 14. 15. 16. 17. 18. 19. + Accessories No. Description 1. 2. 3. 1.0mm Needle + Tip 1.5mm Needle + Tip 2.0mm Needle + Tip Part No. L0947 Paint Feed Tube L0335 Paint Container Seal 250ml Paint Container (Clear)L0909 L0202 Trigger L0209 Trigger Pin L1565 Paint Stirrer L1955 Masking Tape (not shown) L1950 Stencils x 5 (not shown) L0543 Air Hose (not shown) Part No CHVAC10R CHVAC15R CHVAC20R No. Description 4. 5. 250ml Pot + Lid Craft Gun Assembly with 250ml pot Part No CHVAC01R L1956 5 Introduction Create by Earlex™ is a simple to use paint sprayer specifically designed for arts and crafts. The compact, portable unit and easy to use spray gun provides a soft, even spray, perfect for your decorating tasks. Selecting Paint This is a highly versatile Craft Spraying Kit that can be used with several different water-based spray mediums including acrylics, fabric and poster paints. However, some materials cannot be sprayed so please check the recommendation of the manufacturer before buying the paint. If a material refers to brush application only then it usually cannot be sprayed. THIS UNIT CANNOT BE USED FOR TEXTURED OR SOLVENT-BASED PAINTS. USE OF THESE MATERIALS WILL CAUSE PREMATURE WEAR, WHICH WILL VOID THE GUARANTEE. TO OBTAIN THE BEST RESULTS FROM YOUR SPRAY KIT PLEASE READ THE INSTRUCTIONS CAREFULLY BEFORE USE. Preparation l l l l Preparation of the surface and thinning of the paint are the two most important areas to be concerned with to obtain the best results from your Craft Spraying Kit. Ensure all surfaces are free from dust, dirt, rust and grease. If necessary rub down with sandpaper or use a wire brush to clean. Wipe over with a cloth, ensure surface to be sprayed is absolutely dry. Masking of areas is important to ensure you do not spray those areas you wish to remain untouched. Explained Your Spray Gun l l l l l The 250ml spray gun offers you great control when painting. The Fluid Adjusting Screw (8) at the back of the gun allows you to regulate the amount of paint spraying from the gun. The Trigger (14) is easy to use and control. You can use the Spray Direction Plate (3) at the front of the gun to change between the spray patterns. Your spray gun comes with a 1.0mm needle already installed, which can be removed at the back of the gun. This needle is perfect for detailed decorating, stencilling and fine detail projects. 6 Thinning Paint Yes/no 0% 10% 25% 30% Emulsion Paints Gloss Paints Fabric Paints Metallic Paints Acrylic Paints Wood Stains Gesso Primer Poster Paints Glazes and Varnishes l l l l l l l l Rough Textured Paints X X X Solvent-Based Paints X X X X X In order to spray some materials they need to be “thinned” (diluted). Thinning is very important when spraying. Most paints are supplied ready for brush application and may need to be thinned (diluted) for spraying purposes. Follow the manufacturer’s guide for thinning in conjunction with a spray gun. If in doubt please contact the manufacturer of the paint. Paint is “thinned” by adding the substance which the paint is based upon. If a water-based paint then water is added. Follow the guidance chart above to reach the recommended consistency for your paint. The consistency of single cream should spray easily and leave a good finish. We recommend a face mask, gloves and goggles are worn at all times when spraying. 7 Operation 1. 2. 3. 4. 5. 6. 7. 8. 9. 10. Fill the Paint Container (13) with the material to be sprayed. DO NOT FILL above MAX level indicator. Stir the paint well using Paint Stirrer (16) supplied. Push the Paint Feed Tube (11) firmly into the base of the spray gun body. Screw the container onto the gun body tightly. An airtight seal is essential for the correct operation of this gun. Before operating the unit please ensure that the Paint Container (13) is securely fixed to the gun body and the Gland Nut (9) is not loose. Over time the Gland Seal (10) will wear and the gland nut will need adjusting to compensate. To check the gland nut is correctly fitted you will need a small adjustable spanner. Pull the Trigger (14) back and gradually tighten the gland nut by turning clockwise until the needle is not free to move when the trigger is released. To obtain the optimum setting gradually unscrew the gland nut by turning anticlockwise until the Fluid Needle (6) moves forward into the Fluid Tip (4). To check your settings are correct spray a container of water. Re-adjust if necessary. Place the motor unit onto a clean and level surface, free from any loose debris or liquids. Connect the hose to the back of the spray gun. Uncoil the power cord and plug into a mains power socket-outlet. ALWAYS KEEP THE MOTOR UNIT AS FAR AWAY FROM THE SPRAYING AREA AS POSSIBLE TO PREVENT PAINT FROM CONTAMINATING THE MOTOR. MASK ANY AREA YOU DO NOT WISH TO SPRAY. Now you are set up ready to spray, switch on the unit. No paint will be sprayed until the Trigger (14) on the spray gun is gently pulled. Before starting any work on spraying actual objects we suggest you spend some time practicing on cardboard or newspaper until you have got used to how the spray gun works. s Spray Pattern 1. 2. 3. Twist and click the Air Cap (2) horizontally to obtain a vertical side to side spray pattern. Twist and click the Air Cap (2) vertically to obtain a horizontal up and down spray pattern. Twist and click the Air Cap (2) to a diagonal setting for a round spray pattern for more detailed projects. Vertical Jet 8 Horizontal Jet Fig.2 Round Jet Paint Volume Min. The volume of paint sprayed is easily adjustable (Fig.3). l Completely close the Fluid Adjusting Screw (8) by turning fully clockwise. While pulling the Trigger (14), begin turning the fluid adjusting screw anticlockwise until the volume of paint you require is obtained. l If the paint spray is too wide or contains too much paint turn the Fluid Adjusting Screw (8) clockwise again. Once the correct spray pattern is obtained you are able to commence spraying. The paint volume needs to be adjusted everytime you change the spray pattern, especially when you use the round pattern, as this can often contain too much paint. l Fig.3 ique Spraying Techn 1. 2. 3. To obtain the best results always keep your spray gun level and at an equal distance from the object you are spraying, idealy 10”-12” (side to side or up or down) from the surface. Avoid spraying at an angle as this will lead to runs on the surface (Fig.4a-4c). Let your arm control the left to right movement rather than your wrist as this will help give you an even paint distribution over the whole area. Do not tip the spray gun to more than a 45˚ angle when the motor is switched OFF. You can tip the spray gun at more of an angle when spraying provided the motor is switched ON. Fig.4a Fig.4b Fig.4c 9 Helpful Hints 1. 2. 3. 4. 5. 6. 7. Evenly control the speed of movement of the spray gun. A fast speed will give a thin coat and a slow speed will give a thick coat. Only apply one coat at a time. If an additional coat is required, follow the paint manufacturer’s instructions for drying times. If spraying small areas or objects keep the output setting low as this will avoid excessive use of paints and will minimize overspray. When spraying large areas or objects, it is best to use a ‘criss-cross’ pattern, either from left to right then up or down or vice-versa. This will ensure maximum coverage (Fig. 5). Avoid stopping and starting when spraying as this can lead to too much or not enough material on a surface. To ensure edges are covered, commence spraying just to the side of area being sprayed. CLEAN SPRAYER INSTRUCTIONS). 10 AFTER EVERY USE (SEE CLEANING Fig.5 Stencilling l l l l l l l l l l l l Your Create by Earlex™ Craft Paint Spraying Kit comes complete with 5 stencils, perfect for decorating walls, furniture, fabric and other items (Fig.6). Attach the stencil to the surface using the masking tape provided, making sure the stencil lies completely flat. This will prevent the air from the gun getting underneath the stencil and raising it from the surface. Prepare your paint and your spray gun as explained earlier in the manual and in the DVD. Test the spray on a piece of paper to obtain the desired spray for your project. For stencilling it is best to dial down the Fluid Adjusting Screw (8) to gain a smaller spray width. This will help you achieve a more detailed finish and finer spray. If any of the paint sprays outside the stencil and masking tape use a moist baby wipe to remove quickly but gently. Once you have sprayed your stencil, carefully peel away the masking tape avoiding pulling any of the background paint from the walls or item. Lift and remove the stencil to avoid smudging the wet paint. To dry more quickly you can use a hair dryer. If you are looking to achieve a recurring pattern, repeat the process. If paint starts to compromise the design of the stencil, clean with soapy water. You can achieve many effects by moving the stencil slightly and repeating the spray with different colours. This will give an attractive layered design. For best results, only spray a light coat of each colour. You do not need to complete all areas of the stencil for each colour. Fig.6 11 tions Cleaning Instruc THE SPRAY GUN MUST BE THOROUGHLY CLEANED IMMEDIATELY AFTER USE. IF THE PAINT DRIES INSIDE THE GUN CLEANING WILL BECOME MUCH MORE DIFFICULT AND MAY RENDER THE GUN INOPERABLE. THIS IS NOT COVERED BY THE LIMITED WARRANTY. The spray gun is the same as a paintbrush, if it is not cleaned the paint will go hard and can become useless. You must therefore clean this out after use. 1. 2. 3. 4. 5. 6. 7. 8. 9. 10. 11. 12. 13. 14. 15. 16. Remove Paint Container (13) from gun. Pull Trigger (14) to allow paint to run out of Paint Feed Tube (11). Pour any excess paint back into its container to use another time. Pour a quantity of warm water into the Paint Container (13), reattach the gun and gently shake to clean inside of pot. Add fresh quantity of warm water into the Paint Container (13), attach the gun and spray into a bucket or container until the spray flows clear with no signs of paint. Clean any remaining signs of paint from the Paint Feed Tube (11). If the gun is still not clean repeat this process. For a more thorough clean disassemble the gun. Unscrew Air Cap (2). Remove Spray Direction Plate (3). Use a spanner to remove Fluid Tip (4). Unscrew the Fluid Adjusting Screw (8) on reverse of the gun. Remove Spring (7). Remove Fluid Needle (6). Clean all parts thoroughly with a small brush and dry before re-assembling. Clean the turbine unit and Air Hose (19) with a damp cloth after use. 12 Needle Assembly 1. 2. 3. 4. 5. 6. 7. 8. 9. Screw the Fluid Tip (4) in place. Gently tighten with a spanner. Insert Fluid Needle (6) into the back of the gun. Next place the Spring (7) into the back of the gun over the Fluid Needle (6). Hold the Trigger (14) down whilst you screw the Fluid Adjusting Screw (8) into place. Release Trigger (14). Place the Spray Direction Plate (3) on top of the Fluid Tip (4). Place the Air Cap (2) over the Fluid Tip (4). Screw on the Air Cap Ring (1). Tighten the Gland Nut (9). ion Mains Connect This unit is a Class II appliance which means it is double-insulated for your protection, no earthing wire is necessary. If the supply cord is damaged, it must be replaced by Earlex Ltd or our appointed agents to avoid a hazard. Your unit has been supplied with a mains cord fitted with a fuse plug. This is identified by the fuse holder in the base of the plug. Please read the following safety instructions before use. 1. 2. 3. 4. 5. If the fitted plug is cut off from the mains cord then the plug must be disposed of safely. NEVER under any circumstances insert such a plug into a 13 Amp socket-outlet. NEVER under any circumstances use the appliance or mains cord without the fuse cover fitted. This is the little cover fixed into the base of the plug to hold the fuse in place. If you lose the fuse cover then please contact any electrical dealer for a replacement or ring our helpline. A replacement fuse must be rated at 5 Amps. This must be manufactured and approved to BS 1362. IF IN ANY DOUBT CONTACT A QUALIFIED ELECTRICIAN. If you need to fit a plug to the mains cord, this should be fitted in accordance with the wiring instructions below, and will need to be used with a 5 Amp fuse approved to BS 1362. If in doubt consult a qualified electrician. If you are using an extension lead it must be rated at a minimum of 6 Amps and fully unwound. Do not operate with a lead rated less than 6 Amps as this will cause premature failure of the motor which is not covered by the guarantee. As the colours of the wires in the mains lead of the application may not correspond with the coloured markings identifying the terminals in your plug, proceed as follows: The wire which is coloured blue must be connected to the terminal which is marked with the letter N or coloured black. The wire which is coloured brown must be connected to the terminal which is marked with the letter L or coloured red. 13 Troubleshooting Problem The paint runs on the item being sprayed Cause Action Required Paint volume too high Reduce the paint flow by turning Fluid Adjusting Screw (8) clockwise Paint too diluted Moving too slowly Paint too diluted Add undiluted material Paint volume too low Increase the paint flow by turning Fluid Adjusting Screw (8) anticlockwise Reduce speed of application Clean the spray gun Paint too thick Add water Reduce the distance between spray gun and work-piece Gun clogged Clean the spray gun Paint feed tube clogged Clean Paint Feed Tube (11) Paint too thick Add water Paint feed tube clogged Clean Paint Feed Tube (11) Grainy paint Filter the paint Gun clogged Air hose split Container almost empty Gun at an angle Air intake blocked 14 Increase the distance between gun and work-piece Spray gun clogged Spray gun too far away No paint being produced Increase speed of application Release trigger earlier Moving too fast Paint being sprayed gives an orange peel effect Add undiluted material Gun trigger held too long Gun too close Paint is thin or irregular ? Clean the spray gun Replace Air Hose (19) Refill Paint Container (13) Ensure Paint Feed Tube (11) is collecting paint Check no paper or loose debris can block the air intake Notes 15 PLEASE NOTE: We have done all we can to ensure that, if used correctly and according to these instructions, this Craft Spray Kit will give a long and trouble-free life. We accept no responsibility for damage caused by the use of incorrect or unsuitable substances, paints or fluids which have not been thinned correctly or are unsuitable for the surfaces to which they are applied, health hazards arising from lack of ventilation when working in confined spaces or failure of the equipment due to inadequate cleaning of the components after use. If in doubt always test a small inconspicuous area first. Always read the paint manufacturer’s instructions first. Neither our limited guarantee nor the above statement affects your statutory rights. INFORMATION ON THE DISPOSAL OF WASTE ELECTRICAL & ELECTRONIC EQUIPMENT KNOWN AS WEEE. Please do not dispose of tools with your household waste collected by the council. It is your responsibility to dispose of this type of waste by handing it over to a special designated collection point for recovery and recycling. EC Declaration of Conformity We declare that this unit CHV512 conforms to: LVD 2006/95/EC, EN60335-1, EMF EN62233; EMC 2004/108/EC, EN55014-1, EN55014-2, EN61000-3-2, EN61000-3-3. Design Registrations: GB 3019116 ECD 000317128-0001 US D541,903S Copyright & Design Right Reserved © 2012 EARLEX LTD WILL ACCEPT NO RESPONSIBILITY FOR THE USE OF THIS PRODUCT IF USED FOR ANY PURPOSES OTHER THAN THOSE DETAILED HEREIN GUARANTEE There is a full 2 years guarantee on your Create by Earlex™ Craft Paint Spraying Kit against faulty manufacture and materials from date of purchase. This is offered over and above your normal consumer statutory rights. This guarantee does not include damage to the product caused by incorrect use. Earlex Ltd, Opus Park, Moorfield Road, Guildford, Surrey, GU1 1SZ, UK. Tel: +44 (0) 1483 454666. Fax: +44 (0) 1483 454548. E-mail: [email protected] Website: www.earlex.com © 2012 Earlex Ltd. L1952 11/12