1
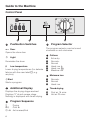
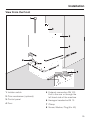
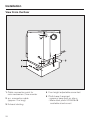
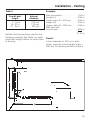
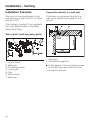
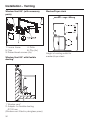
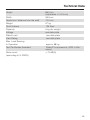
Operating and Installation Instructions
for Tumble Dryer
T 5206
It is essential to read these
operating instructions before
installing or using the machine,
to avoid the risk of accident
or damage to the machine.
V
M.-Nr. 05 775 530
Contents
Warning and Safety Instructions . . . . . . . . . . . . . . . . . . . . . . . . . . . . . . . . . . . . . 4
Help to Protect the Environment
Disposal of the Packing Material . . . . . . . . . . . . . . . . . . . . . . . . . . . . . . . . . . . . . . . .7
Disposal of Your Old Machine . . . . . . . . . . . . . . . . . . . . . . . . . . . . . . . . . . . . . . . . . .7
Energy Saving Tips . . . . . . . . . . . . . . . . . . . . . . . . . . . . . . . . . . . . . . . . . . . . . . . . . .7
Guide to the Machine
Control Panel . . . . . . . . . . . . . . . . . . . . . . . . . . . . . . . . . . . . . . . . . . . . . . . . . . . . . . 8
Explanation of Control Panel . . . . . . . . . . . . . . . . . . . . . . . . . . . . . . . . . . . . . . . . . . 9
Use of the Appliance . . . . . . . . . . . . . . . . . . . . . . . . . . . . . . . . . . . . . . . . . . . . . . . . 9
Preparation of Laundry. . . . . . . . . . . . . . . . . . . . . . . . . . . . . . . . . . . . . . . . . . . . . 10
Program Chart . . . . . . . . . . . . . . . . . . . . . . . . . . . . . . . . . . . . . . . . . . . . . . . . . . . 11
How to Dry Correctly
A Prepare the Laundry. . . . . . . . . . . . . . . . . . . . . . . . . . . . . . . . . . . . . . . . . . . . . . 13
B Load the Drum . . . . . . . . . . . . . . . . . . . . . . . . . . . . . . . . . . . . . . . . . . . . . . . . . . .13
C Select a Program . . . . . . . . . . . . . . . . . . . . . . . . . . . . . . . . . . . . . . . . . . . . . . . . .14
D Start a Program . . . . . . . . . . . . . . . . . . . . . . . . . . . . . . . . . . . . . . . . . . . . . . . . . .14
E At the End of a Program . . . . . . . . . . . . . . . . . . . . . . . . . . . . . . . . . . . . . . . . . . .14
Changing a Program
To Cancel a Program. . . . . . . . . . . . . . . . . . . . . . . . . . . . . . . . . . . . . . . . . . . . . . . . .15
Adding or Removing Items . . . . . . . . . . . . . . . . . . . . . . . . . . . . . . . . . . . . . . . . . . . .15
To Select a Different
Program During Drying . . . . . . . . . . . . . . . . . . . . . . . . . . . . . . . . . . . . . . . . . . . . . . .15
Cleaning and Care
Cleaning the Lint Filters . . . . . . . . . . . . . . . . . . . . . . . . . . . . . . . . . . . . . . . . . . . . . . 16
Casing and Drum . . . . . . . . . . . . . . . . . . . . . . . . . . . . . . . . . . . . . . . . . . . . . . . . . . . .17
Problem Solving Guide
What to do if . . . ? . . . . . . . . . . . . . . . . . . . . . . . . . . . . . . . . . . . . . . . . . . . . . . . . . . .18
To Change the Lamp . . . . . . . . . . . . . . . . . . . . . . . . . . . . . . . . . . . . . . . . . . . . . . . . .21
Service . . . . . . . . . . . . . . . . . . . . . . . . . . . . . . . . . . . . . . . . . . . . . . . . . . . . . . . . . . . .22
2
Contents
Installation
View From the Front . . . . . . . . . . . . . . . . . . . . . . . . . . . . . . . . . . . . . . . . . . . . . . . . . 23
View From the Rear . . . . . . . . . . . . . . . . . . . . . . . . . . . . . . . . . . . . . . . . . . . . . . . . . 24
Leveling the Machine . . . . . . . . . . . . . . . . . . . . . . . . . . . . . . . . . . . . . . . . . . . . . . . . 25
Venting . . . . . . . . . . . . . . . . . . . . . . . . . . . . . . . . . . . . . . . . . . . . . . . . . . . . . . . . . . . 26
Electrical Connection
Electrical Connection . . . . . . . . . . . . . . . . . . . . . . . . . . . . . . . . . . . . . . . . . . . . . . . . 33
Technical Data . . . . . . . . . . . . . . . . . . . . . . . . . . . . . . . . . . . . . . . . . . . . . . . . . . . . .35
3
Warning and Safety Instructions
Please read the operating instructions before using the tumble dryer
for the first time. They contain important information about the safety, use
and maintenance of the machine.
This way you will avoid the risk of
accidents and damage to the machine.
Keep these operating instructions in
a safe place and ensure that new
users are familiar with the content.
Pass them on to any future owner of
the machine.
Correct Use
The tumble dryer is only intended
for drying fabrics which have been
washed in a water solution, marked on
the manufacturer’s wash care label as
being suitable for tumble drying.
Any other applications may be dangerous. The manufacturer is not liable for
damage resulting from improper use or
operation.
Do not let small children play with the
machine or its controls. Supervise its
use by the elderly or infirm.
Technical Safety
Before setting up the machine
check it for any externally visible
damage. Do not install or use a damaged machine.
Before connecting the machine,
ensure that the connection data on
the data plate (fusing, voltage and frequency) matches the mains electricity
4
supply. If in any doubt, consult a qualified electrician.
The electrical safety of this machine can only be guaranteed
when continuity is complete between
the appliance and an effective earthing
system which complies with local and
national regulations. It is most important
that this basic safety requirement is
regularly tested by a qualified
electrican.
The manufacturer cannot be held responsible for the consequences of an
inadequate earthing system (e.g. electric shock).
Do not connect the machine to the
mains electricity supply by an extension lead. Extension leads do not
guarantee the required safety of the
machine (e.g. danger or overheating).
The machine is built in accordance
with current safety requirements.
Unauthorized repairs could result in unforeseen dangers for the user, for which
the manufacturer cannot accept responsibility. Repairs should only be undertaken by a Miele approved engineer.
Faulty components must only be
exchanged for Miele original spare
parts. Only when these parts are fitted
can the safety standards of the machine be guaranteed.
Warning and Safety Instructions
In the event of a fault or for cleaning purposes, the machine is only
completely isolated from the electricity
supply either when:
– it is switched off at the mains or
– the mains fuse is withdrawn.
Adequate ventilation is essential,
especially where another appliance which also uses the room air (e.g.
gas, oil or coal fired heater, continuous
flow or other water heater), is installed
in the same or an adjacent room. To ensure safe operation, and to prevent
gases being given off by these appliances being drawn back into the room,
an underpressure of 4 Pa is the maximum permissible. Ventilation can be
maintained by air inlets which cannot
be blocked, in windows, doors and outside wall vents, or by an automatic window opening arrangement when the
tumble dryer is switched on.
If in any doubt, the advice of a competent builder, or for gas, a "Corgi" registered installer (in the UK) must be
sought.
The exhaust air must not be vented
into a chimney or vent flue which is
in use. Neither should it be connected
to ducting which ventilates rooms with
fireplaces. It would be dangerous if
smoke or exhaust fumes were drawn
back into the room.
Always close the door after use.
This way you will avoid the danger
of:
– anyone sitting or leaning on the door,
which can cause the machine to tip
up.
– children climbing onto or into the
dryer or hiding things in it.
Do not install the machine in a
room where the temperature may
drop below freezing. At very cold temperatures the machine may be difficult
to start. Laundry will not dry, and the
sequence indicator light ~ r
Anticrease/End will flash to indicate a
problem.
Vented dryers must be installed
with a suitable venting system. If
the machine is not correctly ducted it
will draw damp exhaust air back into
the drum, increasing running time and
energy consumption quite considerably. If moist air is passed back into the
room this may lead to long-term damage of walls.
5
Warning and Safety Instructions
There is a danger of fire with fabrics which:
– contain rubber, foam rubber or rubber like materials
– have been treated with inflammable
cleaning agents
– have been splashed with hair lacquer, hair spray, nail varnish remover
or similar substances
– which contain padding or fillings
(e.g. pillows, jackets). If these were
damaged the filling could get out
with the risk of igniting in the dryer.
Avoid contact of stainless steel surfaces (front, lid, casing) with liquid
cleaning and disinfecting agents which
contain chlorine or sodium
hypochlorite. These agents can have a
corrosive effect on stainless steel. Aggressive vapours containing chlorine
bleach can also be corrosive. Do not
store open containers or these agents
near the machine.
6
Using Accessories
Accessory parts may only be fitted
when expressly approved by Miele.
If other parts are used, guarantee, performance and product liability claims
may be invalidated.
Disposal of your Old Machine
Before discarding an old machine
unplug it and render the plug useless. Cut off the cable directly behind
the appliance to prevent misuse.
Help to Protect the Environment
Disposal of the Packing
Material
The transport and protective packing
has been selected from materials which
are environmentally friendly for disposal
and can normally be recycled.
Rather than just throwing these materials away, please ensure they are offered for recycling.
Disposal of Your Old Machine
Old machines contain materials which
can be reclaimed or recycled. Please
contact your dealer, your local waste
collection centre or scrap merchant
about potential recycling schemes.
Ensure that the machine presents no
danger to children while being stored
for disposal.
Energy Saving Tips
^ Make sure that your laundry is thoroughly spun before drying. You will
save up to 30% energy and time if
laundry is spun at 1200 rpm instead
of at 600 rpm.
^ Load according to the optimum
amount of washing recommended for
the program being used.
Underloading is uneconomical. Overloading gives a poorer quality of drying and may cause unnecessary
creasing.
^ To save energy and time:
– make sure the room in which the
dryer is located is well ventilated.
– Make sure the lint filter is clean before using the dryer.
^ The vent ducting should be as short,
straight and smooth as possible. Expelled air is slowed down in the vent
duct due to friction against the inner
walls of the ducting, therefore the
shorter the duct and the smoother the
inner walls, the less friction occurs
which in turns saves drying time and
energy costs.
7
Guide to the Machine
Control Panel
Program Selector
Pushbutton Switches
a Door
The program selector can be turned
clockwise or anti-clockwise.
Opens the drum door
Cottons
n
Light
Illuminates the drum
L
Low temperature
Lower drying temperatures (for delicate
fabrics with the care label r, e.g.
acrylics)
hStart
Starts a program
A
B
C
D
E
F
Minimum iron
G
H
I
Additional Display
Displays the drying stage reached.
Displays "0" at anti-crease stage.
Nothing is displayed with timed drying.
Program Sequence
!
Drying
ä
Cool air
~ r Anti-crease/End
8
Extra dry
Normal+
Normal
Hand iron r
Hand iron rr
Machine iron
Normal+
Normal
Hand iron
Timed drying
J
K
Cool air 15 mins
Hot air 20 mins
Guide to the Machine
Explanation of Control Panel
Use of the Appliance
A small panel is supplied with the machine to explain the symbols on the
control panel. Position this on the left
hand side next to the control panel.
This automatic tumble dryer is particularly suitable for use in commercial and
coin-op laundries, hotels, motels, nursing
homes, dry cleaners, etc. where considerable amounts of laundry are handled.
^ Set the small panel into the lower
guide, press downwards and at the
same time slot into the upper guide.
9
Preparation of Laundry
Wash Care Labels
Before drying check the drying
symbol on the wash care label.
Significance of symbols:
q = Dry at normal temperature
r = Dry at low temperature
s = Do not tumble dry
If no symbol is featured dry at your own
risk applying the following principles:
Cottons and minimum iron items
should be dried at a normal temperature using the appropriate program
setting.
Delicate fabrics with the following
wash care label r, e.g. acrylics should
be dried at a low temperature.
The following fabrics should
not be dried in a tumble dryer:
Woollens and wool blends
these fabrics tend to become matted
and shrink.
Items filled with down
the fine fabric interior tends to shrink,
depending on the quality involved.
Pure linen
should only be machine dried if specified as suitable by the manufacturer on
the wash care label, as the surface of
the fabric may otherwise tend to
roughen.
10
General Notes
Woven and loopkit materials (e.g.
t-shirts, knitted garments) tend to
shrink to varying extents depending on
their quality. This tendency is exaggerated by over-drying. When purchasing
woven materials, it is advisable to take
their shrinkage properties into account.
Starched laundry can be dried in the
tumble dryer. To achieve the usual finish, double the amount of starch should
be used.
Minimum iron fabrics should be spun
briefly at the end of their wash
program, or spun for 10 to 30 seconds if hand washed before they are
dried. Some fabrics tend to crease if
overdried. These items should be given
only a short period in the dryer, and
taken out slightly damp. Do not use the
B Minimum iron - G Normal+
program for these fabrics.
Minimum iron shirts in 100% cotton
may crease during tumble drying depending on the quality of the weave.
These should be dried using the Hand
iron I setting. In extreme cases drip
dry on a coat hanger.
Minimum iron fabrics tend to crease
more the greater the load. This is
particulary the case with delicate fabrics.
The load should be reduced to 2 kg or
if necessary to 1.5 kg.
New dark coloured garments should
be dried separately from light coloured
garments to avoid the danger of
colours running.
Program Chart
Program
Laundry / Fabric Type
max.
Load 1)
Notes
To prevent shrinkage do
not select the A Extra
dry program
for jerseywear.
COTTONS
Extra dry
Multi-layered fabrics
which would not be
thoroughly dried using
the B Normal+
program.
6 kg
Normal+
Mixed loads of cotton
fabrics, e.g. Turkish
towelling and
jerseywear, i.e. single and multi - layer fabrics.
6 kg
Normal
(EN 61121)
Loads of similar cotton
fabrics (jerseywear,
flannelette sheets,
Turkish towelling).
6 kg
Should certain items still
be slightly damp, select
the A Extra dry or B
Normal + programs
Hand iron r
Cotton or linen fabrics,
e.g. table linen, bedding, starched laundry,
etc.
6 kg
-
6 kg
If fabrics are too damp
for hand ironing, select
the D Hand iron r
program.
Cotton or linen fabrics,
also starched laundry,
for machine ironing.
6 kg
Laundry should be
rolled up to prevent it
from drying out until it
can be ironed.
Hand iron rr
(EN 61121)
Machine iron
1)
Weight of dry laundry
11
Program chart
Program
Laundry / Fabric type
max.
load 1)
Notes
Normal +
Minimum iron items
made of synthetics or
blended fabrics, e.g.
pullovers,dresses, trousers etc., which are not
dried adequately in the
H Normal program.
3 kg
Normal
(EN 61121)
Minimum iron shirts, table cloths, etc., made of
blended fabrics, e.g. cotton/synthetics.
3 kg
With blended fabrics
consisting of wool
and synthetics, consult the manufacturer’s instructions,
as the wool component may cause the
fabric to become
matted.
Hand iron
Minimum iron shirts, table cloths, etc., made of
blended fabrics, e.g. cotton/synthetics which are
still to be hand-ironed.
3 kg
Cold air
Items which are only to
be aired.
6 kg
-
Hot air
Individual items,
e.g. towels.
6 kg
-
MINIMUM IRON
Timed drying
1)
Weight of dry laundry
12
How to Dry Correctly
Prepare the Laundry
^ As far as possible, sort laundry for:
– the type of fibre or weave
– the degree of dryness required
– similar size of items
– the moisture content after spinning.
This will help towards achieving an
even drying result.
^ Fasten duvet covers etc. to prevent
small items from being rolled up inside them.
^ Do up zippers and tie fabric belts and
apron strings.
Do not overload the drum. Overloading can cause unnecessary
wear and tear to the laundry and
give a disappointing drying result.
See the program chart for maximum
loads.
^ Before closing the door check that
the lint filter is correctly positioned.
Important: Please check that items
of laundry cannot be trapped by the
door, as this will cause damage to
the fabric.
Make sure there is no detergent dispenser ball etc. in with the laundry,
as this could melt and damage the
machine and the laundry.
Load the Drum
^ Press the door button a and open
the door.
^ Load the laundry loosely into the
drum.
^ Shut the door with a firm swing.
13
How to dry correctly
Select a program
At the end of a program
^ Turn the program selector to the
program required.
^ Turn the program selector to the
r End position.
^ Select low temperature L if required.
^ Press the door a button to open the
door.
If the machine is fitted with a coin
mechanism / time counter:
^ Insert coins or tokens.
Remember to empty the coin / token
box regularly, so that it does not become blocked.
For further information on operating the
dryer with a coin mechanism / time
counter see "Installation".
Start a program
^ Press the Start h button.
^ Press the Light n button.
^ Remove the laundry from the dryer.
Make sure that the drum is empty.
If items are left in the dryer, they
could be damaged by overdrying
when the dryer is next used.
If laundry is not taken out of the dryer at
the end of the program the dryer will
commence an anti-crease phase, during which the drum rotates at timed intervals to keep the laundry suspended
and reduce the risk of creasing.
^ To save both energy and operation
time the fluff filter in the door should
be cleaned after every program
(see "Cleaning and Care").
^ Shut the door when you have finished. As a safety precaution do not
leave the door open when not in use.
14
Changing a program
To cancel a program
^ Turn the program selector switch
to the r End position.
For safety reasons all programes
where the residual moisture content is
monitored have a maximum running
time of 130 minutes, after which period
the heater elements are switched off
and the cooling down phase commences.
To select a different
program during drying
^ Turn the program selector to the
required program.
The new program starts from the beginning.
Adding or removing items
^ Press the door a button to open the
door.
If the door is opened during drying the
program will have to be started
again. Take out or add items as required.
^ Close the door.
^ Press the Start h button.
The program selected will then continue from the point it was at when the
door was opened.
The program is not continued
– if there is a power failure lasting more
than 30 minutes
– if the program has already
reached the ä cooling down
phase or the ~ r Anti-crease
stage.
15
Cleaning and Care
Cleaning the Lint Filters
The lint which occurs during drying
is collected in the lint filters in the
door and in the door opening.
Clean the filters after every
program to reduce drying time
and save energy.
^ Open the door and pull the lint filter
up out of the door holder.
^ Push the cleaned filter back into the
door holder and close the door.
If there is a great deal of compacted
lint on the filters, they can be
cleaned under hot running water.
^ The filter in the door opening should
only be removed for cleaning with
water (see illustration for instructions
on how to remove it).
^ Remove the lint from:
^ After cleaning shake any excess water off the filters.
– the filter in the door
^ Dry them carefully and thoroughly.
– the filters in the door opening
(do not use sharp or pointed objects.).
^ Replace the filters in the door opening.
^ Remove any lint from the hollow part
of the door holder through the wide
slit at the bottom.
A cleaning brush is available at extra
cost from the Miele Spare Parts Department.
16
^ Replace the filter in the door, ensuring it is fitted the correct way round in
its holder.
Cleaning and Care
Casing and Drum
Disconnect the machine from the
mains electricity supply.
Avoid contact of stainless steel surfaces (front, lid, casing) with liquid
cleaning and disinfecting agents
which contain chlorine or sodium
hypochlorite. These agents can
have a corrosive effect on stainless
steel. Aggressive vapours containing chlorine bleach can also be corrosive. Do not store open containers
or these agents near the machine.
^ Clean the housing and control panel
with a mild detergent or soapy water.
^ Clean the drum and other stainless
steel parts with a suitable proprietary
stainless steel cleaner following the
manufacturer’s instructions.
Never use abrasive substances, disinfecting agents or solvents. These
could damage the machine because
of their chemical content. The machine must never be hosed down.
^ Dry all parts with a soft cloth.
17
Problem Solving Guide
What to do if . . . ?
With the help of the following notes minor faults in the performance of the
machine, some of which may result from incorrect operation, can be put right
without contacting the Service Department.
Repairs to the machine should only be undertaken by a suitably qualified
service engineer to ensure safety. Unauthorized repairs could be dangerous.
Fault
Possible Cause
The machine fails to
No obvious cause.
start when switched on.
The progam has
been interrupted.
Laundry is not sufficiently dried.
18
Remedy
Check that
– the door is properly
shut.
– the machine is
switched on at the
mains and the fuse is
not defective.
The load was too small or – Dry small amounts of
laundry using the
consisted of individual
items which caused the
Timed Drying C
program.
program to finish prematurely.
The load consisted of too – Select a more suitable
program next time
many types and thick(see "Program Overnesses of fabric.
view")
Problem Solving Guide
Fault
Drying times are
too long.
Possible Cause
Remedy
The lint filters
– Clean as described in
might be clogged up.
"Cleaning and Care".
Ventilation to and from
– Open a door or window while
the dryer is insufficient
the machine is operating to
(e.g. in a small room).
increase air flow.
The ventilation ducting or – Remove any objects that are
causing the blockage.
room ventilation (e.g.
window or wall vents
are blocked).
The laundry was not suf- – Spin the laundry in the washficiently spun.
ing machine at the highest
possible speed.
Metallic components e.g. – Complete the drying process
zippers have prevented
using a Timed Drying
the dryer from registering
progam.
the correct moisture level
in the laundry.
If after checking all the above, drying times are still too
long, there may be a fault. Contact the Service Dept.
– Contact the Service Dept.
The heater limiter has
automatically switched
off one or more
heater elements.
19
Problem Solving Guide
Fault
There is a build up of
lint.
Items made of synthetic fibres are
charged with static
electricity after drying.
Possible Cause
Lint comes off textiles nat- – Remove any lint from
urally during wearing and
the lint filter (see
washing. The lint that col"Cleaning and Care").
lects in the filters of a tumble dryer has no effect on
the lifetime of your laundry.
– Static charges can be
reduced by adding liquid fabric conditioner
to the final rinse of the
wash program.
The interior drum light- The lamp is defective.
ing does not come on
when the n button
is pressed.
20
Remedy
– Change the lamp as
described on the next
page.
Problem Solving Guide
To Change the Lamp
Disconnect the machine from the
mains electricity supply.
To open the door during a
power failure
^ Open the door.
^ Pull the door open.
^ Unscrew the plastic cover inside the
drum, above the door.
The lamp must not exceed the maximum wattage quoted on the data
plate and on the plastic light cover.
The temperature resistant lamp should
be ordered from your Miele Dealer or
the Miele Spare Parts Department only.
^ Replace the lamp and screw the
plastic cover back on.
The cover must be fixed securely, as
otherwise moisture may seep in and
cause a short circuit.
21
Problem Solving Guide
Service
In the event of any faults which cannot
be remedied, or if the machine is under
warranty, please contact
– Your Miele Dealer or
– The nearest Miele Service
Department (see back cover for
address)
When contacting the Service Department, please quote the Model and Serial numbers, both of which are located
on the right hand side below the opening on the drum.
Example:
22
Installation
View From the Front
1 Isolator switch
2 Coin mechanism (optional)
3 Control panel
4 Door
5 Exhaust connection DN 100
Exit to the rear or through the
left hand side of the machine
6 Hexagon headed nut M 10
7 Clamp
8 Screw, Washer, Plug (8 x 40)
23
Installation
View From the Rear
1 Cable connection point for
coin mechanism / time counter
2 a.c. connection cable
(approx. 2 m long)
3 Exhaust ducting
24
4 Four height adjustable screw feet
5 Plinth base if required:
- masonry base built on site or
- Miele steel plinth UG 5005-08
available at extra cost
Installation
Leveling the Machine
Take into consideration the space required by the vent duct when calculating the distance between the machine
and a wall or other appliances etc. to
the sides or rear of the machine.
A ventilation gap of 10 mm must be
maintained between the base of the
machine and the floor. This must not
be blocked by sealing strips, deep
pile carpet etc., as otherwise there
will be insufficient flow of cool air for
the machine to function correctly.
The machine must be perfectly level to
ensure safe and proper installation.
The machine must not be built under.
Coin mechanism / Time
counter
This dryer can be fitted with a coin
mechanism.*
It can also be connected to an existing
time counter using a special connection
cable*.
Do not use devices to turn the machine
off automatically, (e.g. automatic timers).
^ The screw feet can be adjusted to
compensate for any unevenness in
the floor.
The tumble dryer can be combined with
a Miele washing machine in a
washer-dryer stack. For this purpose
the appropriate stacking kit * is required.
* These items are all available from your
Miele Dealer or the Miele Professional
Sales Dept.
25
Installation - Venting
Fitting the Exhaust Ducting
The moist air produced during drying
has to be vented to the outside.
The dryer must only be operated
when it is correctly fitted with exhaust ducting.
The exhaust connection may be
made:
– to the rear of the machine (the machine is supplied as standard with
this connection point open) or
– to the left of the machine.
The side exhaust connection has a
cover cap.
^ At the same time turn the cover cap
anti-clockwise.
Vent Socket
^ In the same way remove the vent
socket from the rear vent outlet.
^ Secure into the side outlet by turning
clockwise.
^ Close the rear outlet with the cover
cap.
Avoid:
– very long exhaust systems
– too many corners
– tight corners.
These reduce efficiency and increase
Exhaust Connection to the Side time and energy consumption.
of the Machine
Disconnect the machine from the
mains electricity supply.
^ Remove the cover cap.
^ Insert a thin screwdriver into the slit
on the retaining hook and press the
hook gently upwards.
26
Installation - Venting
The following materials are suitable
for the exhaust ducting:
– galvanized steel
– plastic ducting
– flexible ducting.
Note that all ducting must be of a
suitable heat resistant specification.
Install the exhaust ducting so that
the expelled exhaust air cannot be
sucked into the machine again.
Standard accessories include an
adapter for the exhaust ducting:
Application:
In installations where conditions do not
allow the machine to be permanently
connected to a ducting system.
Purpose:
The adapter enables rapid, simple connection or disconnection of the exhaust
ducting.
Installation:
The adapter is fitted to the non-connected end of the vent duct.
Important
Connection must not be made to a
flue used by gas or solid fuel boilers
or heaters.
27
Installation - Venting
Calculating the Duct Length
To calculate the effective duct length:
The shortest passage for the expelled
air is preferable, to ensure the tumble
dryer functions most efficiently. Expelled air is slowed down in the vent
duct due to friction against the inner
walls of the duct, therefore the shorter
the duct and the smoother the inner
walls, the less friction occurs.
^ Measure the actual duct length.
^ Establish the number of elbows or
bends necessary, noting the type of
bend, angle and radius involved (see
Table I).
An elbow or bend creates more friction
than a straight duct. An additional duct
length factor should therefore be calculated for each elbow or bend (see Table
1). This factor expresses the resistance
of the bend in terms of a straight length
of duct.
The additional length factor is then
added to the actual duct length to give
the effective total duct length.
A larger duct diameter also helps to reduce friction. The duct diameter should
therefore increase with increasing duct
length.
^ Add the additional length factor as
specified in Table I to the actual duct
length to give the effective duct
length.
^ The appropriate duct length can then
be taken from Table II.
Note
Drying times and energy consumption
remain unaltered for Ø100 mm ducting
up to a total length of 15 metres. Longer ducting may lead to slight increases in drying times and energy
consumption, but does not impair the
function of the machine, if the necessary duct diameter is adhered to (see
Table II).
Table I
Type of bend
Angle
Radius R
in mm
Additional duct
length in metres
Flexible ducting (heat resistant)
90°
45°
100 to 400
100 to 400
0.5
0.3
Plain ducting (heat resistant)
Plastic ducting (heat resistant)
90°
90°
100
200
0.35
0.25
90°
200
0.7
Elbow
Concertina bend
2.3
Wall vent with grille or window vent kit
Wall vent kit with flap or window vent kit
3.6
1.25
Exhaust connection to the left
1.0
28
Installation - Venting
Table II
Overall duct
length
0 - 15 m
15 - 21 m
21 - 34 m
Example:
Internal
diameter
100 mm
110 mm
120 mm
Flexible ducting has been used for the
following example. See Table I for additional duct length factors for other types
of ducting.
Side connection . . . . . . . . . . . . . 1.00 m
Length (L) . . . . . . . . . . . . . . . . . . 2.50 m
Lower radius R = 400 mm . . . . . 0.50 m
Height (H) . . . . . . . . . . . . . . . . . . 2,00 m
Upper radius R = 200 mm . . . . . 0.50 m
Wall duct with
louvred vent . . . . . . . . . . . . . . . . 3.60 m
10.10 m
Result:
A duct diameter of 100 mm is adequate, since the overall length is less
than the 15 metres specified in Table II.
29
Installation - Venting
Installation Examples
Connection directly to a wall vent
The moist air can be directed to the
outside using a Wall Vent Kit* or a Window Vent Kit*.
If the dryer is connected direclty to a
wall vent a flexible foam gasket* is required.
The kits/parts (marked *) are available
from your Miele Dealer or the Miele
Spare Parts Dept.
Wall vent kit* (with necessary parts)
1. Louvre frame
2. Wall pipe
3. Connecting piece
4. Louvre grill
5. Flap
6. Wood screw
7. Wall plug
30
1. Wall pipe*
2. Flexible foam gasket*
^ Fit the gasket to the connecting piece
on the wall pipe and push the dryer
up against the wall.
Installation - Venting
Upward ducting via plastic vent
ducting* to wall vent*
Upward ducting via flexible vent
ducting* to exhaust flue
Adapter* required.
1. Wall pipe*
2. Adapter*
3. Plastic ducting (external Ø 110 mm)
Connect the plastic vent ducting to the
dryer
A = Wire wound spiral ducting
B = Flexible ducting
1. Wall pipe*
2. Adapter*
3. Flue / chimney, insulated against
damp
The exhaust air must not be vented
into a chimney or vent flue which is
in use. Neither should it be connected to ducting which ventilates
rooms with fireplaces. It would be
dangerous if smoke or exhaust
fumes were drawn back into the
room!
1. Plastic ducting
2. Adapter* between exhaust
outlet and plastic ducting
31
Installation - Venting
Window Vent Kit* (with necessary
parts)
1. Louvre frame
4. Grille
5. Flap
8. Clip (4x)
9. Raised head screws (4x)
Window Vent Kit* with flexible
ducting*
1. Window vent*
2. Adapter for flexible ducting
Ø 100 mm
(Window vent fitted in plexiglass pane)
32
Washer/Dryer stack
Height of venting outlet for
washer/dryer stack.
Electrical connection
Electrical connection Canada
All electrical work should be carried out
only by a suitably qualified and competent person, in strict accordance with
national and local safety regulations.
Ensure power is not supplied to the
appliance while installation work is
being carried out.
Connection should be made via a suitable isolator which complies with
national and local safety regulations.
The on/off switch should be easily accessible for servicing work.
Two Phase:
208-240 V/60 Hz/2x30A/5.4kW
Three Phase:
208-240 V/60 Hz/3x20A
THIS APPLIANCE
MUST BE GROUNDED
33
Notes
34
Technical Data
Height
85.0 cm
(adjustable +1/-0.5 cm)
Width
59.5 cm
Depth (incl. distance from the wall)
Weight
70.0 cm
57 kg
Drum Volume
Capacity
126 litres
6 kg dry weight
Voltage
Rated Load
see data plate
see data plate
Fuse Rating
Max. Load Bearing
in Operation
see data plate
approx. 68 kg
Test Certificates Awarded
Radio/TV suppression, (VDE in Germany)
Noise Level
(according to 3. GSGV)
< 70 dB(A)
35
[email protected]
Alteration rights reserved/2402
M.-Nr. 05 775 530 / V01
This paper consists of cellulose which has been bleached without the use of chlorine.