1
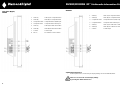
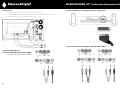
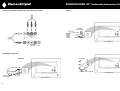
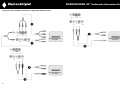
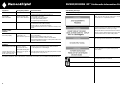
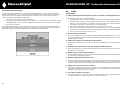
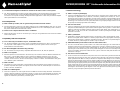
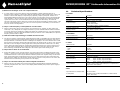
DV300/DV301B
30" Multimedia Information Display
© Copyright 2004, Mitsubishi Electric Australia Pty. Ltd. All rights reserved.
No part of this publication may be reproduced, transmitted, transcribed, stored in a retrieval system or
translated into any language or computer language, in any form or by any means, electronic, mechanical,
magnetic, optical, chemical, manual or otherwise, without the prior written permission.
DV300/DV301B 30" Multimedia Information Display
Table of Contents
1.
Safety and Installation
4
2.
About this Manual
5
3.
Product Information
6
4.
Accessory Pack
7
5.
Installing your LCD Monitor
8
6.
Setting up your TFT Monitor
13
7.
On Screen Display
21
8.
Remote Control
45
9.
Troubleshooting
48
10. FAQ’s
54
11. Technical Specifications
58
12. Service Contacts
62
2
DV300/DV301B 30" Multimedia Information Display
1. Safety and Installation
Disclaimer
Mitsubishi Electric Australia Pty. Ltd. makes no representations or warranties, either expressed or implied, with
respect to the contents hereof and specifically disclaims any warranties, merchantability or fitness for any
particular purpose. Further, Mitsubishi Electric Australia reserves the right to revise this publication and to
make changes from time to time in the contents hereof without obligation to notify any person of such revision
or changes.
Diamond Digital is a registered trademark of Mitsubishi Electric Australia Pty. Ltd.Microsoft and Windows are registered
trademarks of Microsoft Corporation. All other trademarks remain the property of their respective owners.
Safety precautions and maintenance
WARNING: Use of controls, adjustments or procedures other than those specified in this
documentation may result in exposure to shock, electrical hazards and/or mechanical
hazards.
Read and follow these instructions when connecting and using your monitor:
•
Unplug the monitor if you are not going to use it for an extensive period of time.
•
Unplug the monitor if you need to clean it with a slightly damp cloth. The screen many be wiped with a dry
cloth when the power is off. However, never use alcohol, solvents or ammonia-based liquids.
•
Consult a service technician if the monitor does not operate normally when you have followed the
instructions in this manual.
•
Only qualified service personnel should open the casing cover.
•
Keep the monitor out of direct sunlight and away from stoves or any other heat source.
•
Remove any object that could fall into the vents or prevent proper cooling of the monitor’s electronics.
•
Do not block the ventilation holes on the cabinet.
•
Keep the monitor dry. To avoid electric shock, do not expose it to rain or excessive moisture.
•
If turning off the monitor by detaching power cable or DC power cord, wait for 6 seconds before reattaching the power cable or DC power cord for normal operation.
•
To avoid the risk of shock or permanent damage to the monitor do not expose the monitor to rain or
excessive moisture.
•
When positioning the monitor, make sure the power plug and outlet are easily accessible.
•
IMPORTANT: Always have a screen saver program installed on your computer. If a still image in high
contrast remains on the screen for an extended period of time, it may leave an ‘after-image’ or ‘ghost
image’ on the front of the screen. This is a well-known phenomenon that is caused by the shortcomings
inherent in the LCD technology. In most cases the after-image will disappear gradually over a period of time
after the power has been switched off. Be aware that the after-image symptom cannot be repaired and is
not covered under warranty.
Reference Information
For future reference, write the following information about your monitor in the space below. The serial number
is found on the back of the product.
Consult a service technician if the monitor does not operate normally when the operating instructions given in
this manual have been followed.
Monitor Information
Product Name:
Serial Number:
Date of Purchase:
Dealer Information
Dealer:
Telephone Number:
Address:
3
Diamond Digital DV300/DV301B
Installation Locations
•
Avoid exposure to heat and extreme cold
•
Do not store or use the product in locations exposed to heat, direct sunlight or extreme cold.
•
Avoid moving the product between locations with large temperature differences. Choose a site that falls
within the following temperature and humidity ranges.
•
Temperature: 0-35°C 32-95°F
•
Humidity: 20-80% RH
•
Do not subject the product to severe vibration or high impact conditions. Do not place the product inside
a car boot.
•
Take care not to mishandle this product by either knocking or dropping during operation or transportation.
•
Do not store or use the product in locations where there is a high level of humidity or in dusty environments.
Do not allow water or other liquids to spill on or into the product.
4
DV300/DV301B 30" Multimedia Information Display
2. About this Manual
3. Product Information
About This Guide
Product Features
This user’s guide is intended for anyone who uses the Diamond Digital LCD Information Display. It describes
the features, setup, operation and other important information.
DV300/DV301B
•
29.5-inch WXGA (1280x768 resolution, 176 degree viewing angle) LCD all-in-one Monitor with excellent
display performance
Safety and Troubleshooting Information provides tips and solutions for common problems as well as other
related information you may need.
•
Multiple video input allowing display of PC, TV, HDTV, VCD, DVD, Progressive DVD and Camcorder
•
Network controllability via RS232 interface for managing the performances, setting, etc.
About This Manual gives an overview of information included, along with notation icon descriptions and
other documentation for your reference.
•
Digital High Definition Picture (1080i, 720p, 576p, 576i, 480p, 480i)
•
DCDi™ de-interlacing technology for superior depiction of motion
•
Product Information gives an overview of the monitor’s features
•
Picture-in-Picture (PIP) function in PC VGA mode
•
Installing Your Monitor describes the initial setup process and gives an overview of how to use the monitor.
•
Light sensor to adjust brightness automatically
•
On-Screen Display provides information on adjusting the settings on your monitor.
•
Digital Nicam/2CS stereo (available only in Asia Pacific and Western Europe)
•
Remote Control provides information on adjusting the settings for your TV function.
•
Component Video Input (YPbPr/YCbCr) for DVD/HDTV
•
Service Contacts contains a list of national Diamond Digital service locations along with support phone
numbers/web address and information on the warranty applicable to your product.
•
Euro connector (SCART) (available in Western Europe)
•
MultiSystem TV tuner-PAL (available in DV300 model only)
It includes the following sections:
•
•
Notational Descriptions
The following subsections describe notational conventions used in this document.
Notes, Cautions and Warnings
Throughout this guide blocks of text may be accompanied by an icon and printed in bold or italic type. These
blocks contain notes, cautions or warnings. They are used as follows:
NOTE: This icon indicates important information and tips that help you make better use of your
computer system.
CAUTION: This icon indicates information that tells you how to avoid either potential damage
to hardware or loss of data.
WARNING: This icon indicates the potential for bodily harm and tells you how to avoid the
problem.
Some warnings may appear in alternate formats and may not be accompanied by an icon. In such cases, the
relevant regulatory authority mandates the specific presentation of the warning.
5
6
DV300/DV301B 30" Multimedia Information Display
5. Installing your LCD Monitor
4. Accessory Pack
Unpack all the parts.
1
INPUT INPUT Selecting input source
2
▲▼
3
▲
▼
Product Description
Side View (Left)
4
MENU MENU Open the OSD or confirm the selected function
AA type x2
Power cable
Remote control & batteries
••
••
•
5
Increase or decrease the channel number
or moving up or down to highlight the function in OSD
Increase or decrease the level of audio volume
or moving left or right to highlight the sub-menu in the
selected function of OSD
DC power switch On/Off
1
2
DVI-D cable
VGA signal cable
Instruction Manual
S-video cable (DV300 only)
Base
2x 5W Detachable Speakers (DV300 only)
7
3
4
5
8
DV300/DV301B 30" Multimedia Information Display
Rear View
DV300
DV301B
••
8
9
••
••
10
8
11
1
2
3
4
5
6
•
•
••
•
•
•
•
•
••
•
•
•
9
7
1
2
3
4
5
6
7
1
AC IN
AC power in
1
AC IN
AC power in
2
AC Power
AC power switch
2
AC Power
AC power switch
3
D-Sub
PC analog D-Sub input
3
D-Sub
PC analog D-Sub input
4
PC - Audio
PC Stereo input
4
PC - Audio
PC Stereo input
5
DVI-D
PC digital input
5
DVI-D
PC digital input
6
RS232
RS232 network connection
6
RS232
RS232 network connection
7
External/EURO-AV
SCART connection (for Europe only)
7
External/EURO-AV
SCART connection (for Europe only)
8
Composite Video Output
Composite Video CVBS output
8
9
Audio (L) Output
Audio (R) Output
Audio (L) output
Audio (R) output
Audio (L) Output
Audio (R) Output
Audio (L) output for the detachable speaker (L)
Audio (R) output for the detachable speaker (R)
9
Line out
Audio output for external speakers
10
Audio (L) Output
Audio (R) Output
Audio (L) output for the detachable speaker (L)
Audio (R) output for the detachable speaker (R)
11
Line out
Audio output for external speakers
9
10
DV300/DV301B 30" Multimedia Information Display
DV301B
Side View (Right)
DV300
•
••
••
•
1
Audio (L)
Audio (L) for component video
1
Audio (L)
Audio (L) for component video
2
Audio (R)
Audio (R) for component video
2
Audio (R)
Audio (R) for component video
3
Component Video
Component video Y/Pb/Pr input
3
Component Video
Component video Y/Pb/Pr input
4
Composite Video
Composite video CVBS input
4
Composite Video
Composite video CVBS input
5
Audio (L)
Audio (L) for CVBS and S-Video
5
Audio (L)
Audio (L) for CVBS and S-Video
6
Audio (R)
Audio (R) for CVBS and S-Video
6
Audio (R)
Audio (R) for CVBS and S-Video
7
S-Video
S-Video input
7
S-Video
S-Video input
8
RF 75Ω
TV Antenna or CATV cable in
8
•
•
3
1
7
6
5
4
2
••
••
•
7
6
5
4
2
4
2
•
•
3
1
Optimising Performance
•
For best performance, ensure that your display settings are set at 1280x768, 60Hz.
Note: You can check the current display settings
by pressing the ‘MENU’ button once.
11
12
DV300/DV301B 30" Multimedia Information Display
6. Setting up your TFT Monitor
Connecting the monitor/TV
•
Connect the cables to the rear of your monitor/TV according to the numbers:
•
DV300
•
DV301B
7
9
• •
7
8
••
7
8
••
••
9
10
7
8
•
• •• • • •
1
2 3
4
5
• •• • • •
10
6
1
2
3
4
5
(Optional)
6
•
8
EXTERNAL SPEAKERS
EXTERNAL SPEAKERS
• • • • • •
• • • • • •
AC IN
AC IN
1
13
2 3
DC-SUB
3
4
5
6
PC AUDIO IN
DVI-D
RS232
SCART
1
2 3
DC-SUB
3
PC AUDIO IN
4
DVI-D
5
RS232
6
SCART
14
DV300/DV301B 30" Multimedia Information Display
Connect to DVD/VCR /VCD through SCART (for Europe only)
Connect to PC
•
Connect the cables to the back of your computer by following step 1~3.
•
If your monitor displays the computer image the installation has been completed successfully.
•
If installation was not successful, see the Troubleshooting section.
•
3
•
2
•
1
Connect to DVD/VCD/VCR
Connect to DVD/VCR /VCD through composite video (CVBS)
R/Cr/Pr
COMPONENT VIDEO
(DVD/HD IN)
G/Y
B/Cb/Pb
R/Cr/Pr
R
R/Cr/Pr
AUDIO
B/Cb/Pb
B/Cb/Pb
L
G/Y
G/Y
R
AUDIO
Connect to DVD/VCR/VCD through S-VIDEO
AUDIO
COMPONENT VIDEO
(DVD/HD IN)
L
•
COMPONENT VIDEO
(DVD/HD IN)
L
Connect to DVD/VCR/VCD through S-VIDEO
R
AUDIO
CVBS
15
L
COMPONENT VIDEO
(DVD/HD
R IN) S-VIDEO
CVBS
L
AUDIO
R
S-VIDEO
CVBS
L
R
S-VIDEO
16
DV300/DV301B 30" Multimedia Information Display
Connect to DVD/VCR /VCD through component video (YPbPr)
Antenna
300(ohm) to
75Ω (ohm) Adapter
Twin-Lead Wire
COMPONENT VIDEO
(DVD/HD IN)
L
AUDIO
Combination
VHF/UHF
Antenna
(Outdoor
or Indoor)
G/Y
B/Cb/Pb
R/Cr/Pr
Round Cable 75Ω (ohm)
R
Back of Monitor TV
CVBS
COMPONENT VIDEO
L(DVD/HD IN)
R
S-VIDEO
Connecting to Cable TV
Cable TV
U/V Combiner
Cable TV Signal Input
300- to 75-ohm Adapter
Back of Monitor TV
Cable TV Converter
Box Connection
Round Cable
75Ω (ohm)
Back of Monitor TV
17
18
DV300/DV301B 30" Multimedia Information Display
Progressive video and HDTV connections for digital high-definition picture
L
AUDIO
COMPONENT VIDEO
(DVD/HD IN)
G/Y
B/Cb/Pb
R/Cr/Pr
R
AUDIO
CVBS
L
R
S-VIDEO
L
AUDIO
COMPONENT VIDEO
(DVD/HD IN)
G/Y
B/Cb/Pb
R/Cr/Pr
R
Progressive DVD player/
Set Top Box
Progressive DVD player/
Set Top Box
AUDIO
CVBS
L
R
S-VIDEO
L
COMPONENT VIDEO
(DVD/HD IN)
AUDIO
G/Y
B/Cb/Pb
R/Cr/Pr
R
AUDIO
CVBS
L
R
S-VIDEO
Progressive DVD player/
Set Top Box
19
20
DV300/DV301B 30" Multimedia Information Display
Icon
7. On Screen Display
Menu Name and Sub-menus
EXIT
Description
This is used to exit out of the Main menu.
On Screen Display Controls
An overall view of the On-Screen Display (OSD) structure is shown below. You can use it as a reference for
further adjusting your Monitor/TV.
Select video source for main display:
There are three different modes of OSD available for different models:
• PC ANALOG: PC VGA input
•
PC Mode
• PC DIGITAL: PC DIGITAL input
•
Audio/Video Mode
• TV TUNER: Antenna or cable TV input (For DV300 only)
•
TV Mode
• EXT: Scart input (Europe Only)
• COMPOSITE: Composite video input
PC Mode
• S-VIDEO: S-video input
• COMPONENT: Component video input
INPUT SELECT
A Main Menu
B Sub-Menu name
C Menu icon
1. With the menu off, push the MENU button to enter OSD system and display the main menu.
▲
▲
▼▼
2. Push the ▲ and ▼ buttons to move between the function icons. As you move from one icon to
another, the function name will be highlighted.
3. Push the MENU button once to activate the highlighted function. Push
or
parameter, push the button to enter the selected one, then use the
and
making your changes.
to select the preferred
buttons
4. Push the MENU button to return the main menu or select another function.
21
22
DV300/DV301B 30" Multimedia Information Display
Icon
Menu Name and Sub-menus
Icon
Description
Menu Name and Sub-menus
Select your preferred function.
▲▼
The Brightness function:
Push the
push the
button to increase luminance;
button to decrease luminance (min 0 ~ max. 100).
▲▼
The Contrast function:
Push the
push the
button to increase the contrast;
button to decrease the contrast (min 0 ~ max. 100).
▲
▼
The Light Sensor function:
Push the
buttons to toggle Light Sensor function.
This function automatically fine tunes the brightness of the
monitor according to the environment.
BRIGHTNESS/CONTRAST
23
Description
EXIT:
Exit this menu
TREBLE:
Adjustable from 0 to 100
BASS:
Adjustable from 0 to 100
BALANCE:
Adjustable from 0 to 100
VOLUME:
Adjustable from 0 to 100
SURROUND:
ON/OFF
MUTE:
ON/OFF
AUDIO SOURCE:
Only in PC TV/VIDEO mode
POWER SAVING:
ON/OFF
AUDIO
24
DV300/DV301B 30" Multimedia Information Display
Icon
Description
Menu Name and Sub-menus
To adjust the image settings.
Positioning moves the viewing area around on
the monitor screen.
EXIT:
EXIT: Exit this menu
Exit this menu
▼
PHASE:
buttons to adjust
▼
AUTO ADJUST: Press to select automatic adjustment.
H.POSITION /V.POSITION: When making changes
to either the ‘Horizontal’ or ‘Vertical’ settings, the
image will simply be shifted in response to your
selection/change.
Minimum is ‘0’ ( ). Maximum is ‘100’ (
).
buttons to adjust
Use the
and
from 0 to 100.
PIXEL CLOCK: Use the
and
from 0 to 100.
▼
▲
Description
▲
Menu Name and Sub-menus
▲
Icon
4:3 ASPECT RATIO: Select 4:3 image display
FULL SCREEN: Select full screen (16:9) image display
IMAGING SETTINGS
SIZE & POSITION
NOTE:
1. When operating in DVI mode, the positioning adjustments
are not available.
Note: Operating in DVI mode, the Pixel Clock and
Phase adjustments are not available.
2. The 4:3 Aspect Ratio and Full Screen items are not
available in WXGA 1280x768 modes.
25
26
DV300/DV301B 30" Multimedia Information Display
Icon
Menu Name and Sub-menus
Icon
Description
Menu Name and Sub-menus
Each time the OSD opens, it displays in the same location on
the screen. ‘OSD Settings’ (horizontal/vertical) provides
control over this location.
Colour Settings adjusts the colour temperature.
EXIT:
Description
Exit this menu
NATURE COLOUR: Equivalent to original panel colour.
EXIT:
Exit this menu
NORMAL COLOUR: 6500K (Same as sRGB)
default from FACTORY
HORIZONTAL:
Adjustable from 0 to 100.
VERTICAL:
Adjustable from 0 to 100.
OSD HOLD TIME:
The OSD stays active for as long as it is
in use. The range of time setting is from
5 to 60 seconds.
OSD LOCK:
Controls user access to adjustments.
Show key icon after selecting lock.
BLUE PRESET:
Equivalent to 9300K
RED PRESET:
Equivalent to 5700K
USER PRESET:
Adjust red, green, blue three colours
from 0 to 100.
COLOUR SETTINGS
OSD SETTINGS
Note: When the OSD is locked, pressing the menu button
again and it will take user to OSD LOCK menu. Press
(+) to unlock and allow user access to all applicable
settings.
27
28
DV300/DV301B 30" Multimedia Information Display
Icon
Menu Name and Sub-menus
Icon
Description
Menu Name and Sub-menus
Description
Adjust picture in picture preferences.
LANGUAGE Language sets the OSD to display in one of the
five or six languages provided. That is, English, Spanish,
French, German, Italian and simplified Chinese (China model only)
SIZE: Turn off and set the size of PIP. Users can chose your
preferred size.
• OFF
LANGUAGE
• SMALL
• MEDIUM
• LARGE
H POSITION: Adjust the Horizontal position of PIP.
V POSITION: Adjust the Vertical position of PIP.
VIDEO SOURCE: Select video source of PIP:
• EXIT
Reset the settings to the factory default values.
EXIT:
• TV TUNER (For DV300 only)
Exit this menu
• EXT
POSITION SETTINGS ONLY: Resume position setting to
factory default.
• COMPOSITE VIDEO
• S-VIDEO
COLOUR SETTINGS ONLY: Resume colour setting to
factory default.
ALL SETTINGS:
FACTORY RESET
29
• COMPONENT VIDEO
Load all factory default
settings.
PICTURE IN PICTURE
30
DV300/DV301B 30" Multimedia Information Display
Icon
Audio/Video Mode
Icon
Menu Name and Sub-menus
Menu Name and Sub-menus
Description
Description
Adjust picture characteristics to suit personal preference.
Exit from this menu
EXIT:
Exit from this menu
BRIGHTNESS:
Adjustable from 0 to 100
CONTRAST:
Adjustable from 0 to 100
COLOUR:
Adjustable from 0 to 100
SHARPNESS:
Adjustable from 0 to 100
TINT:
Available in overseas models only.
Adjustable from 0 to 100
EXIT
HORIZONTAL SHIFT: Adjustable from 0 to 100
COLOUR TEMP:
Select from Normal, Cool or Warm
by “-” and “+” buttons.
PICTURE
Use up and down arrow button to highlight the “INPUT SELECT”.
Select video source for main display:
• PC ANALOG: PC VGA input
• PC DIGITAL: PC DIGITAL input
• TV TUNER: Antenna or cable TV input (For DV300 only)
• EXT: Scart input (Europe Only)
• COMPOSITE: Composite video input
• S-VIDEO: S-video input
• COMPONENT: Component video input
INPUT SELECT
NOTE:
1. “TINT” is not available in component input in all models.
2. “TINT” is available in NAFTA model only.
3. “HOR SHIFT” only function in component input.
31
32
DV300/DV301B 30" Multimedia Information Display
Menu Name and Sub-menus
Description
AUDIO
Adjust audio characteristics to suit personal preference.
Activate special control features:
EXIT:
Exit from this menu.
EXIT:
Exit from this menu.
TREBLE:
Adjustable from 0 to 100
SLEEP TIMER:
BASS:
Adjustable from 0 to 100
Slide bar to select
off/15/30/60/90/120/150/180.
OSD LOCK:
Show key icon after selecting lock.
BALANCE:
Adjustable from 0 to 100
LIGHT SENSOR:
VOLUME:
Adjustable from 0 to 100
Push the
buttons to toggle
Light Sensor function.
SURROUND:
Switch Surround Sound On/ Off
VIDEO MODE:
MUTE:
Switch Mute On/ Off
Set the screen scaling mode to suit
personal preference:
Icon
Menu Name and Sub-menus
Description
▲
▼
Icon
FOR DV301B
• STANDARD MODE
• 4:3
• FULL SCREEN
• NONLINEAR SCALING
SPECIAL FEATURES
Set language for OSD.
There are 6 languages of OSD display.
• ENGLISH
LANGUAGE
• ESPANOL
• FRANCAIS
• DEUTSCH
• ITALIANO
•
FOR DV300
• AUTOMATIC
• 16:9
• 4:3
• FULL SCREEN
• NONLINEAR SCALING
NOTE: In AP/China models, Simplified Chinese is supported.
33
34
DV300/DV301B 30" Multimedia Information Display
Icon
Menu Name and Sub-menus
Description
Icon
Menu Name and Sub-menus
Description
Reset the setting to default values.
1) When users first enter the PARENTAL CONTROLS, the
screen will show the window asking user key in the code.
NO:
Keep the setting as current.
YES: Load factory setting
FACTORY RESET
2) Users will see the window “Access code” when they enter
this function.
• EXIT
TV Mode (DV300 Only)
• LOCK
Exit from this menu
• CHANGE CODE
• CLEAR ALL
EXIT
PARENTAL CONTROLS
3) Enter Master code “0711” twice or the code entered in step 1.
35
36
DV300/DV301B 30" Multimedia Information Display
Icon
Icon
Menu Name and Sub-menus
Description
INPUT SELECT
Select video source for main display:
Menu Name and Sub-menus
Description
PICTURE
Adjust picture characteristics to suit personal preference.
• PC ANALOG:
PC VGA input
EXIT:
Exit from this menu
• PC DIGITAL:
PC DIGITAL input
BRIGHTNESS:
Adjustable from 0 to 100
• TV TUNER:
Antenna or cable TV input
CONTRAST:
Adjustable from 0 to 100
• EXT:
Scart input (Europe only)
COLOUR:
Adjustable from 0 to 100
• COMPOSITE:
Composite video input
SHARPNESS:
Adjustable from 0 to 100
• S-VIDEO:
S-video input
TINT:
• COMPONENT:
Component video input
Not available in component input.
Adjustable from 0 to 100
COLOUR TEMP: Select from Normal, Cool or Warm
by “-” and “+” buttons.
NOTE:
NOTE:
1. “TINT” is not available in component input in all models.
2. “TINT” is available in overseas model only.
37
38
DV300/DV301B 30" Multimedia Information Display
Icon
Icon
Menu Name and Sub-menus
Description
AUDIO
Adjust audio characteristics to suit personal preference.
Menu Name and Sub-menus
Description
LANGUAGE
Set language for OSD.
EXIT:
Exit from this menu.
There are 6 languages of OSD display.
TREBLE:
Adjustable from 0 to 100
• ENGLISH
BASS:
Adjustable from 0 to 100
• ESPANOL
BALANCE:
Adjustable from 0 to 100
• FRANCAIS
VOLUME:
Adjustable from 0 to 100
• DEUTSCH
SURROUND:
Switch Surround Sound On/ Off
• ITALIANO
MUTE:
Switch Mute On/ Off
*
NOTE: In AP/China models, Simplified Chinese is supported.
39
40
DV300/DV301B 30" Multimedia Information Display
Icon
Menu Name and Sub-menus
Icon
Description
Menu Name and Sub-menus
1) When users first enter the PARENTAL CONTROL, the
screen will show the window asking user key in the code.
Activate special control features:
Exit from this menu.
SLEEP TIMER:
Slide bar to select
off/15/30/60/90/120/150/180.
OSD LOCK:
Show key icon after selecting lock.
LIGHT SENSOR:
Push the
buttons to toggle
Light Sensor function.
VIDEO MODE:
Set the screen scaling mode to suit
personal preference:
▲
▼
EXIT:
Description
PARENTAL CONTROLS
2) Users will see the window” Access code” when they
enter this foundation.
• AUTOMATIC
• 16:9
• EXIT
• 4:3
• FULL SCREEN
• LOCK
• NONLINEAR SCALING
• CHANGE CODE
• CLEAR ALL
SPECIAL FEATURES
3) Enter Master code “0711” twice or the code entered in step 1.
41
42
DV300/DV301B 30" Multimedia Information Display
Icon
Menu Name and Sub-menus
Description
Icon
Menu Name and Sub-menus
SETUP
MANUAL STORE:
SYSTEM:
CHANNEL SKIP:
Description
CHANNEL SWAP:
NOTE: The SYSTEM item is only available in
Western Europe model.
CHANNEL SEARCH:
FACTORY RESET
Reset the setting to default values.
NO: Keep the setting as current.
YES: Load factory setting
43
44
DV300/DV301B 30" Multimedia Information Display
8. Remote Control
1
PIP On/Off, Size
To activate or close the ‘Picture in Picture’ function in PC
mode and to enlarge or reduce the PIP window size using
the same button.
2
PIP Shift
To change ‘Picture in Picture’ window position in PC mode
3
AV source
To select TV/Video sources in PIP mode and TV mode
Remote Control Diagram
••
••
••
••
••
•
21
18
3
1
2
8
13
7
••
••
•
••
20
10
4
Smart sound controls
To access a series of settings: VOICE, MUSIC, THEATRE and
PERSONAL
19
5
Menu
To turn on or off the OSD (On-Screen Display).
To select function in OSD.
17
6
Cursor
To move the cursor up /down/right/left to scroll through a list
of options
11
•
45
Cursor down
To select the next item on the menu, and return to the last
item with cursor up
15
6
9
Cursor right
To access the sub-menus and adjust the settings with
cursor left
14
5
4
If using TV ‘STANDBY’, press this button to return to ‘ON’
7
Volume
To adjust the sound level
8
Mute
To disable sound. To restore sound, press button again.
9
Teletext features
Works only in areas where the Teletext service is available
10
Sound mode
To switch from STEREO to MONO or to choose between
Dual I and Dual II for bilingual transmissions.
For TV sets fitted with NICAM reception, depending on the
transmission, you can switch from NICAM STEREO to
MONO or choose between NICAM DUAL I, NICAM DUAL II
and MONO.
13
•
•
16
If using Teletext, press this button to display dual pages on
screen.
11
Previous program
To access the last program viewed.
12
Screen information
To display the program number, the video mode and the
sound mode.
13
Selecting TV programs
To move up or down a program.
The number and the sound mode are displayed for a few
seconds.
14
PC/TV mode selection
To select PC or TV mode.
15
Smart picture controls
To select your desired picture setting from 5 settings:
MOVIES, SPORTS, WEAK SIGNAL, MULTIMEDIA and
PERSONAL.
12
46
DV300/DV301B 30" Multimedia Information Display
16
Numerical keys
For direct access to programs.
For a 2-digit program number, the 2nd digit must be entered
before the dash disappears.
If using TV ‘STANDBY’, press any of number keys to return to
‘ON’
9. Troubleshooting
This page deals with problems that can be corrected by the user. If the problem still persists after you have
tried these solutions, contact your nearest Diamond Digital dealer.
17
OSD
To show OSD status.
Common Problems
18
Standby
To set the TV temporarily to standby mode. To switch on the
TV set, press Program button (p -, +), any digit between 0
and 9 or AV source button
(The amber light indicates when set is in standby mode)
Symptoms
Having this problem?
Check these items
No Video/ Power LED off
No picture, the LCD
Monitor TV is dead
• Check connection integrity at both ends of the video
cable and/or power cord.
19
Sleep timer
To select the period of time after which the set
will switch automatically to standby mode (up to 180 minutes)
20
Mode
Switch among available video modes
21
Surround
Toggle surround sound on/off
• Electric outlet verification
• Ensure AC power at the rear of the monitor is switched on.
No Video/ Power LED on
No picture or brightness
• Increase brightness and contrast controls.
• Perform the LCD Monitor TV self-test feature check.
• Check for bent or broken pins in video cable connector.
Poor Focus
Picture is fuzzy, blurry
or ghosting
• Auto adjust image through Menu -> Image Setting
-> AutoAdjust.
• Adjust Phase and Clock controls via OSD.
• Eliminate video extension cables.
• Perform the LCD Monitor TV factory reset
(via Menu -> Factory Reset -> All Settings).
• Lower video resolution or increase font size.
Shaky/Jittery Video
Wavy picture or
fine movement
• Auto adjust image through Menu -> Image Setting
-> Auto Adjust
• Adjust Phase and Clock controls via OSD
• Perform the LCD Monitor TV factory reset (via Menu ->
Factory Reset -> All Settings)
• Check environmental factors
• Relocate and test in other room
Missing Pixels
LCD screen has spots
• Cycle power on-off
• These are pixels that are permanently off and is a natural
defect that occurs in LCD technology
Stuck-on Pixels
LCD screen has
bright spots
• Cycle power on-off
• These are pixels that are permanently on and is a natural
defect that occurs in LCD technology
47
48
DV300/DV301B 30" Multimedia Information Display
Symptoms
Having this problem?
Check these items
Symptoms
Having this problem?
Check these items
Brightness Problems
Picture too dim
or too bright
• Perform the LCD Monitor TV factory reset (via
Menu -> Factory Reset -> All Settings)
LCD Scratched
Screen has scratches
or smudges
• Turn the LCD Monitor off and clean
the screen
• Auto adjust image through Menu -> Image Setting
-> Auto Adjust
Safety Related Issues
Visible signs of
smoke or sparks
• Do not perform any troubleshooting steps
The LCD Monitor
malfunctions on & off
• Ensure the LCD Monitor is in proper video mode
• Adjust brightness & contrast controls
Geometric Distortion
Screen not centered
correctly
Intermittent Problems
• Perform the LCD Monitor factory reset (via Menu ->
Factory Reset -> All Settings)
• Perform the LCD Monitor TV reset on “Position
Settings Only”
• Perform the LCD Monitor self-test feature check to
determine if the intermittent problem occurs
in self-test mode
• Auto adjust image through Menu -> Image Setting
-> Auto Adjust
TV and Audio Problems
• Adjust the centering controls
Poor TV signal reception Abnormal picture
seen from the screen
• The proximity of mountains or high
buildings may be responsible for ghost pictures, echoing
or shadows. In this case, try manually adjusting your
pictures: see ‘fine tuning’ or adjust the direction of the
outside aerial.
For Asia users in non-NTSC area: Does your antenna
enable you to receive broadcasts in this frequency range
(UHF or VHF band)? In the event of difficult reception
(snowy pictures) switch the NR on the PICTURE menu to ON.
No TV picture
No picture when
TV input was selected
• Have you connected the aerial socket properly?
• Have you chosen the right system? Poorly connected
SCART cables or aerial sockets are often the cause of
picture or sound problems (sometimes the connectors
can become half disconnected if the LCD Monitor TV set
is moved or turned). Check all connections.
No sound
No sound output
• Ensure that the audio cables are firmly connected to
when a program
both the audio input connectors on your the LCD
with sound was playing
Monitor TV and audio output connectors on your PC
or Video player.
Note:
When operating in DVI mode, the positioning
adjustments are not available.
• Perform the LCD Monitor TV reset
• Auto adjust image through Menu -> Image Setting
-> Auto Adjust
• Adjust Phase and Clock controls via OSD
• Perform the LCD Monitor TV self-test feature check
and determine if these lines are also in self-test mode
• Check for bent or broken pins in the video cable connector
• If on certain TV channels you receive a picture but no
sound, this means that you do not have the correct TV
system. Modify the SYSTEM setting.
Note: When operating in DVI mode, the Pixel Clock
and Phase adjustments are not available.
Sync Problems
Screen is scrambled
or appears torn
• Ensure video cable connection between computer and
the LCD monitor is secured
Note: When operating in DVI mode, the contrast
adjustment is not available.
• Ensure the LCD Monitor TV is in proper video mode
Horizontal/Vertical Lines Screen has one
or more lines
• The LCD Monitor needs to be repaired
• Perform the LCD Monitor TV reset
Video Problems
• Push Auto Adjust button
No Video
• Adjust Phase and Clock controls via OSD
No signal indicator is .
displayed
• Check Video Input Selection
• Composite: Yellow coloured RCA jack
• Perform the LCD Monitor TV self-test feature check to
determine if scrambled screen appears in self-test mode
• S-Video: Typically a round 4 pin jack
• Check for bent or broken pins
• Component: Typically 3 RCA jacks of Green,
Red and Blue.
• Boot up in the “safe mode”
49
50
DV300/DV301B 30" Multimedia Information Display
Symptoms
Having this problem?
Cont.
Check these items
OSD Warning Messages
• Make sure you did not plug the video cable to video
output port behind the LCD monitor TV.
A warning message may appear on the screen indicating the LCD Monitor current status.
Low Quality
DVD connection
Picture not crisp and
some colour distortion
•
•
•
•
No sound
See video but no audio •
•
•
•
Check DVD connection
Composite gives good picture
S-Video gives better picture
Component gives best picture
Check if the LCD Monitor volume is turned off or muted.
Connect the audio cable securely.
Audio cable is connected incorrectly.
Verify that the audio source is selected correctly in the
OSD.
Remote Control
Problems
Remote control does
not work properly
No response from the
• Point the remote control directly at the remote sensor on
LCD Monitor TV
the LCD Monitor.
when remote is pressed • Replace both batteries with new ones.
• Make sure the remote control is not disabled
(for disable/enable the remote control, please refer to the
section of Remote Control).
When user sees this warning message, it means that the
LCD Monitor is in adjustment process.
A warning message may appear on the screen indicating
that the LCD Monitor is out of sync range.
See Specifications for the Horizontal and Vertical
frequency ranges addressable by this the LCD Monitor.
Recommended mode is 1280x 768 @ 60Hz.
This message means that there is no video input signal.
Product Specific
Problems
Screen image is too small Image is centred
• Perform the LCD Monitor factory reset (via Menu
on screen, but does
-> Factory Reset -> All Settings).
not fill entire viewing area
The LCD Monitor is in a power saving mode
(in PC mode).
Cannot adjust the LCD OSD does not appear on • Turn the LCD Monitor off and unplug the power cord and
Monitor with the buttons the screen
then plug back and power on
at the side of the unit
.
For further assistance, refer to the Service Contacts list and contact your local Diamond Digital distributor.
The main OSD menu is unlocked.
The main OSD menu is locked.
51
52
DV300/DV301B 30" Multimedia Information Display
Self-Test Feature Check (STFC)
10.
Your the LCD Monitor when used as a computer display through DVI and/or VGA connection provides a
self-test feature that allows you to check whether your LCD Monitor TV is functioning properly. If your LCD
Monitor and computer are properly connected but the LCD Monitor screen remains dark, run the LCD
Monitor self-test by performing the following steps:
General FAQ’s
1. Turn off both your computer and the LCD Monitor.
2. Unplug the video cable from the back of the computer. To ensure proper Self-Test operation, remove
both Digital (white connector) and the Analogue (blue connector) cables from the back of computer.
3. Turn on the LCD Monitor.
The floating ‘Self-test Feature Check’ dialog box should appear on-screen (against a black background) if
the LCD Monitor cannot sense a video signal and is working correctly. While in self-test mode, the power
LED remains green and the self-test pattern will scroll through the screen continually.
FAQ’s
Q: When I install my monitor what should I do if the screen shows ‘Cannot display this video mode’?
A: Recommended video mode is 1280x768 @60Hz.
1. Unplug all cables, then connect your PC to the monitor you used previously, which displayed correctly.
2. In the Windows Start Menu, select Settings/Control Panel. In the Control Panel Window, select the
Display icon. Inside the Display Control Panel, select the ‘Settings’ tab. Under the settings tab, in a
box labelled ‘desktop area’, move the slide bar to 1280x768 pixels.
3. Open ‘Advanced Properties’ and set the Refresh Rate to 60Hz, then click OK.
4. Restart your computer and repeat steps 2 and 3 to verify that your PC is set at 1280x768@60Hz.
5. Shut down your computer, disconnect your old monitor and reconnect your Diamond Digital LCD monitor.
6. Turn on your monitor and then turn on your PC.
Q: How do I adjust the resolution?
A: Your video card/graphic driver and monitor together determine the available resolutions. You can select
the desired resolution under the Control Panel of Windows® 95/98, Me, 2000 or XP, and with the
‘Display properties/Settings’.
Q: What if I get lost while I am making monitor adjustments?
A: Simply press the MENU button, then select ‘Factory Reset/All Settings’ to recall all of the original factory
settings.
Q: My Monitor has no power (Power LED does not light up). What should I do?
A: Make sure the power cord is connected to the Monitor. Also, be sure the AC power switch at the rear of
the monitor is at ‘ON’ position.
Q: Will the product accept an Interlaced signal?
A: No. If an Interlaced signal is used, the screen displays both odd and even horizontal scanning lines at
the same time, thus distorting the picture.
Q. What does the Refresh Rate mean for LCD?
A: Unlike CRT display technology, in which the speed at which the electron beam is swept from the top to
the bottom of the screen determines flicker, an active matrix display uses an active element (TFT) to
control each individual pixel and the refresh rate is therefore not really applicable to LCD technology.
Q: Will the LCD screen be resistant to scratches?
A: A protective coating is applied to the surface of the LCD, which is durable to a certain extent (up to 3H
in this Diamond Digital 30” LCD monitor). In general, it is recommended that the panel surface is not
subjected to any excessive shocks or scratches.
Q: How should I clean the LCD surface?
A: For normal cleaning use a clean, soft cloth. For extensive cleaning, please use isopropyl alcohol. Do not
use other solvents such as ethyl alcohol, ethanol, acetone, hexane, etc.
53
54
DV300/DV301B 30" Multimedia Information Display
Q: Can the Diamond Digital LCD Monitor be mounted on the wall or used as a touch panel?
LCD Panel Technology
A: Yes, Diamond Digital LCD monitors have this optional feature. The standard VESA mount holes on the
back cover allow the user to mount the Diamond Digital monitor on any VESA standard ARM or
accessories. Touch panels are being developed for future applications. Check with your Diamond Digital
sales representative for more information.
Q: What is a Liquid Crystal Display?
Screen Adjustments
A: A Liquid Crystal Display (LCD) is an optical device that is commonly used to display ASCII characters
and images on digital items such as watches, calculators, portable game consoles, etc. LCD is the
technology used for displays in notebooks and other small computers. Like light-emitting diode and
gas-plasma technologies, LCD allows displays to be much thinner than cathode ray tube (CRT)
technology. LCD consumes much less power than LED and gas-display displays because it works on
the principle of blocking light rather than emitting it.
Q: When I install my monitor, how do I get the best performance from the monitor?
Q: How are LCDs made?
A: For best performance, make sure your display settings are set at 1280x768@60Hz. Note: You can check
the current display settings by pressing the OSD OK button once. The current display mode is shown in
the product information in the OSD main controls.
A: LCDs are created from two glass plates separated from each other at a distance of a few microns.
The plates are filled with liquid crystal and then sealed together. The top plate is coloured with an RGB
pattern to make the colour filter. Polarizers are then glued to both plates. This combination is sometimes
called ‘glass’ or ‘cell.’ The LCD cell is assembled into a ‘module’ by adding the backlight, driver
electronics and frame.
Q: How do LCDs compare with CRTs in terms of radiation?
A: Unlike CRT, the LCDs do not use an electron gun, so they do not generate the same amount of radiation
at the screen surface.
Q: What is polarization?
Compatibility with other Peripherals
A: Polarization is basically directing light to shine in one direction. Light is electromagnetic waves.
Electric and magnetic fields oscillate in a direction perpendicular to the propagation of the light beam.
The direction of these fields is called the ‘polarization direction’. Normal or non-polarized light has fields
in several directions; polarized light has a field in only one direction.
Q: Can I connect my LCD monitor to any PC, workstation or Mac?
A: Yes, all Diamond Digital LCD monitors are fully compatible with standard PCs, Macs and workstations.
You may need a cable adapter to connect the monitor to your Mac system. Please contact your
dealer/retailer for more information.
Q: Are Diamond Digital LCD monitors Plug-and-Play?
A: Yes, the monitors are Plug-and-Play compatible with Windows® 95, 98, 2000, XP platforms.
Q: What is a TV System?
A: Television pictures are not broadcast in the same way in all countries. There are different standards: BG,
DK, I and L L’. The SYSTEM setting is used to select these different standards. This is not to be
confused with PAL or SECAM colour coding. PAL is used in Australia and the majority of European
countries, Secam in France, the CIS and the majority of African countries. The United States and Japan
use a different system called NTSC.
Q: What is SCART?
A: The SCART is a 20-pin rectangular connector fitted to the vast majority of PAL market TV receivers. It
provides composite video inputs and outputs, stereo audio in and out, and RGB input. It is also known
as Euro connector and PERI-tel.
Q: What differentiates passive matrix LCDs from active matrix LCDs?
A: An LCD is made with either a passive matrix or an active matrix display grid. An active matrix has a
transistor located at each pixel intersection, requiring less current to control the luminance of a pixel.
For this reason, the current in an active matrix display can be switched on and off more frequently,
improving the screen refresh time (your mouse pointer will appear to move more smoothly across the
screen, for example). The passive matrix LCD has a grid of conductors with pixels located at each
intersection in the grid.
Q: How does a TFT LCD Panel work?
A: On each column and row of the TFT LCD panel a data source drive and a gate drive are attached
respectively. The TFT drain of each cell is connected to the electrode. The molecular arrangement of
liquid crystal elements differs acceding to whether it is impressed with voltage or not. It varies the
direction of polarized light and the amount of light by letting it through different arrays of liquid crystal
elements. When two polarized filters are arranged vertically on a polarized light pole, the light that
passes through the upper polarized panel is turned 90 degrees along with the spiral structure of the
liquid crystal molecules and goes through the polarized filter at the bottom. When impressed with
voltage, liquid crystal molecules are arranged vertically from the original spiral structure and the direction
of the light is not turned through 90 degrees. In this case, light that comes through the top polarized
panel may not go through the polarized panel at the bottom.
Q: What are S-VIDEO Signals?
A: These are 2 separate Y/C video signals from the S-VIDEO and Hi-8 recording standards. The luminance
signals Y (black and white) and chrominance signals C (colour) are recorded separately on the tape. This
provides a better picture quality than is achieved with standard video (VHS and 8mm) where the Y/C
signals are combined to provide only one video signal.
55
56
DV300/DV301B 30" Multimedia Information Display
Q: What are the advantages of TFT LCD compared with CRT?
A: In a CRT monitor, a gun shoots electrons and general light by colliding polarized electrons on
fluorescent glass. Therefore, CRT monitors basically operate with an analogue RGB signal. A TFT LCD
monitor is a device that displays an input image by operating a liquid crystal panel. The TFT has a
fundamentally different structure than a CRT: Each cell has an active matrix structure and independent
active elements. A TFT LCD has two glass panels and the space between them is filled in with liquid
crystal. When each cell is connected with electrodes and impressed with voltage, the molecular
structure of the liquid crystal is altered and controls the amount of inlet lighting to display images. A TFT
LCD has several advantages over a CRT, since it can be very thin and no flickering occurs because it
does not use the scanning method.
11.
Technical Specifications
LCD PANEL
• Type
TFT LCD
• Screen size
29.5 inch
• Pixel Pitch
0.5025 x 0.1675 mm x RGB
• LCD Panel type
1280 x 768 pixels
R.G.B. vertical stripe
Hard coating surface, anti-glare polarizer
• Effective viewing area
(H) 643.2 x (V) 385.92mm
• Display Colours
8 bits interface (16.7M colours)
Q: Why is a vertical frequency of 60Hz optimal for an LCD monitor?
A: Unlike a CRT monitor, the TFT LCD panel has a fixed resolution. For example, an XGA monitor has
1024x3 (R, G, B) x 768 pixels and a higher resolution may not be available without additional software
processing. The panel is designed to optimise the display for a 65MHz dot clock, one of the standards
for XGA displays. Since the vertical/horizontal frequency for this dot clock is 60Hz/48kHz, the optimum
frequency for this monitor is 60Hz.
PC SCANNING
Q: What kind of wide-angle technology is available? How does it work?
• Vertical refresh rate
56Hz-61Hz
A: The TFT LCD panel is an element that controls/displays the inlet of a backlight using the dual refraction
of a liquid crystal. Using the property that the projection of inlet light refracts toward the major axis of
the liquid element, it controls the direction of inlet light and displays it. Since the refraction ratio of inlet
light on liquid crystal varies with the inlet angle of the light, the viewing angle of a TFT is much narrower
than that of a CRT. Usually, the viewing angle refers to the point where the contrast ratio is 10. Many
ways to widen the viewing angle are currently being developed and the most common approach is to
use a wide viewing angle film, which widens the viewing angle by varying the refraction ratio. IPS (In
Plane Switching) or MVA (Multi Vertical Aligned) is also used to give a wider viewing angle.
• Horizontal frequency
31kHz-63kHz
Q: Why is there no flicker on an LCD Monitor?
A: Technically speaking, LCDs do flicker, but the cause of the phenomenon is different from that of CRT
monitor — and it has no impact of the ease of viewing. Flickering in an LCD monitor relates to usually
undetectable luminance caused by the difference between positive and negative voltage. On the other
hand, CRT flickering that can irritate the human eye occurs when the on/off action of the fluorescent
object becomes visible. Since the reaction speed of liquid crystal in an LCD panel is much slower, this
troublesome form of flickering is not present in an LCD display.
PC VIDEO
• Video dot rate
< 80 MHz
• Input impedance
- Video
- Sync
75 ohm
2.2K ohm
• Input signal levels
0.7 Vpp
• Sync input signal
Separate sync
• Sync polarities
Positive and negative
• Input Frequency
WXGA
SVGA
VGA
• Video interface
D-sub, S-Video, TV-RF, SCART (Europe) or composite and
components video (others)
Q: Why is an LCD monitor virtually free of Electro Magnetic Interference?
A: Unlike a CRT, an LCD monitor does not have key parts that generate Electro Magnetic Interference,
especially magnetic fields. Also, since an LCD display utilizes relatively low power, its power supply is
extremely quiet.
Hsync 48 kHz, Vsync 60 Hz (N.I.)
Hsync 38 kHz, Vsync 60 Hz (N.I.)
Hsync 31 kHz, Vsync 60 Hz (N.I.)
AUDIO
57
• Input level for PC/SVHS/SCART
500 mV nominal
• Loudspeaker
5W Stereo Audio (2.5W/channel RMS x2, 200Hz~10kHz,
4 ohm, 10% THD)
58
DV300/DV301B 30" Multimedia Information Display
Resolution & Preset Modes
OPTICAL CHARACTERISTICS
• Contrast ratio
500:1 (typ.)
• Brightness
500 cd/m2 (typ.)
• White Chromaticity
• Viewing Angle
• Response time
x: 0.283 y: 0.297 (at 9300°K)
x: 0.313 y: 0.329 (at 6500°K)
x: 0.328 y: 0.344 (at 5700°K)
(C/R >5) Upper >88° (typ.)
Lower >88° (typ.)
Left >88° (typ.)
Right >88° (typ.)
• Recommended
sRGB
Using a standard unified color space, sRGB will help represent pictures taken by an sRGB compatible device
correctly on your sRGB enabled Diamond Digital monitor. In that way, the colours are calibrated and you can
rely on the correctness of the colours shown on your screen.
Important with the use of sRGB is that the brightness and contrast of your monitor is fixed to a predefined
setting as well as the colour gamut. Therefore it is important to select the sRGB setting in the monitor’s OSD.
To do so, at PC mode, open the OSD by pressing the MENU button of your monitor. Use the down button to
go to COLOR SETTINGS and press MENU again. Then move the down button to go to NORMAL COLOR and
press MENU again.
Resolution
Mode
H. freq (kHz)
V. freq (Hz)
640x480
VGA VESA 60
31.469
59.940
800x600
SVGA VESA 60
37.879
60.317
1024x768
XGA VESA 60
48.363
60.004
1280x768
GTF 60
47.700
60.000
EDTV
480P
31.470
60.000
SDTV
480i
15.734
59.940
EDTV
576P
31.250
50.000
SDTV
576i
15.625
50.000
HDTV
1080i
33.750
60.000
HDTV
720P
45.000
60.000
PC
<=16ms (typ.)
sRGB is a standard for ensuring correct exchange of colours between different devices (e.g. digital cameras,
monitors, printers, projectors, scanners, etc.).
1280 x 768 at 60Hz
10 factory preset modes:
Video
For more information on sRGB, please visit: www.srgb.com
* This data is subject to change without notice.
59
60
DV300/DV301B 30" Multimedia Information Display
Automatic Power Saving
12.
If you have VESA DPMS compliance display card or software installed in your PC, the monitor can
automatically reduce its power consumption when not in use. If an input from a keyboard, mouse or other
input device is detected, the monitor will then ‘wake up’ automatically. The following table shows the power
consumption and signaling of this automatic power saving feature:
If problems remain after checking this manual, please contact your place of purchase, visit the Customer
Support section of Mitsubishi Electric Australia’s web site at www.MitsubishiElectric.com.au for details of
your nearest Mitsubishi Electric Authorised Service Centre, or contact the Service Department for your state:
Power Management Definition
VESA Mode
Video
H-sync
V-sync
Power Used
LED colour
ON
Active
Pulse
Pulse
130W (typ.)
Blue
OFF
Blanked
No
No
< 5W
Amber
AC OFF
Blanked
No
No
< 2W
Off
Physical Specifications
• Dimension (WxHxD) *
867.7mm x 505mm x 183mm (incl. Pedestal, Speakers)
726.7mm x 469.3mm x 115mm (w/o Pedestal, Speakers)
• Weight
16.0 kg (incl. Pedestal, Speakers)
14.0 kg (w/o Pedestal, Speakers)
• Power supply
90 — 264 VAC, 50/60 Hz
• Power consumption
PC Mode: 130 W (typ.)
TV Mode: 150 W (typ.)
• Temperature (operating)
0° C to 35° C
• Relative humidity
20% to 80%
• System MTBF
50K hrs (excluding CCFL 40Khrs)
* This data is subject to change without notice.
61
Service Contacts
New South Wales and Australian Capital Territory
348 Victoria Road
Rydalmere NSW 2116
Telephone: (02) 1300 651-808
Fax: (02) 9684-7684
Queensland
1 / 104 Newmarket Road
Windsor QLD 4030
Telephone: (07) 3357-8877
Fax: (07) 3357-8488
South Australia and Northern Territory
77 Port Road
Hindmarsh SA 5007
Telephone: (08) 8340-0444
Fax: (08) 8340-0555
Victoria and Tasmania
4 / 303 Burwood Hwy
East Burwood VIC 3151
Telephone: (03) 9262-9899
Fax: (03) 9262-9850
Western Australia
5 / 329 Collier Road
Bassendean WA 6054
Telephone: (08) 9377-3411
Fax: (08) 9377-3499
62