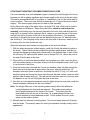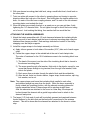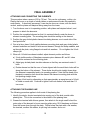
1
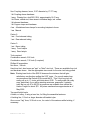
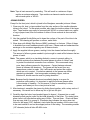
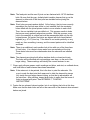
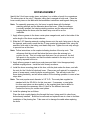
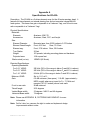
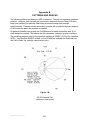
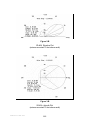
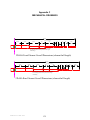
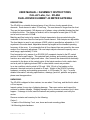
USER MANUAL / ASSEMBLY INSTRUCTIONS
CAL-AV Labs, Inc. 2D-40A
DUAL-DRIVEN ELEMENT 40 METER ANTENNA
DESCRIPTION:
The 2D-40A is a rotatable horizontal array of two full-size, closely spaced driven
elements. Each element is about 70 feet long. The rear element is longer than the front.
They are fed approximately 140 degrees out of phase, using a shielded phasing line that
is inside the boom. The pattern is cardioid, with a free space forward gain of 6.5 dBi
and a front-to-rear ratio of 20dB.
Matching and fine tuning is by means of hairpin transmission lines mounted along the
underside of the boom near the feed point of each element. Both hairpins are adjustable.
The front hairpin is used to set minimum VSWR, which is specified as adjustable to 1.0:1
anywhere in the entire band. Adjustable element tip lengths set the intended operating
frequency of the array. It is noteworthy that all four element tips are moved by the same
amount for a frequency adjustment. The rear hairpin adjusts resonant frequency over a
small range, approximately 70 kHz.
Feed connection is by means of an SO-239 UHF receptacle located in the RF neutral
section of the forward hairpin. This patented feed, phasing, and matching system also
functions as a wide band, high power balun. Also, because the elements are electrically
connected to the boom at the neutral points of the hairpin sections, both a static drain
and a dc path for lightning-induced EMP or direct-strike current are provided.
In no-ice conditions, wind survival is 100 mph. With 1/2 inch of ice loading on the
elements, the wind survival is de-rated to 40 mph. Weight of the 2D-40A, including
hardware, mounting, and matching accessories, is 163 pounds (74.1 kg). For more
detailed information, including specifications, drawings, parts list, patterns and graphs,
please see the appendices.
UNPACKING:
The 2D-40A is shipped in three cartons; two are about 7 feet long, and the third is about
a 2-foot square.
Inspect cartons for any sign of shipping damage. Then open cartons and inspect the
contents for hidden damage. Shipping damage is not a common occurrence, but it does
happen. If damage is found, save the cartons and packing materials, and notify the
carrier.
Remove contents and inventory for the following:
Carton 1:
1 of each of the following: Front, rear, boom and mast mounting plates
1 kit Mounting plate hardware.
Revised 14 June 2003
1
2ea. Coupling sleeves, boom, 3.25” diameter by 17.75” long.
1 kit Coupling sleeve hardware.
1 assy. Phasing line, dual RG-213/U, approximately 18.5’ long.
1 lot Rivets, closed end, three sizes in individual bags, incl. extras.
1 kit element hardware
1 kit Copper straps and hardware
4 ea. All-stainless hose clamps for mounting hairpins to boom
1 ea. Manual
Carton 2:
1 set Front element tubing
1 set Rear element tubing
Carton 3:
1 set Boom tubing
1 assy. Front hairpin
1 assy. Rear hairpin
Tools required:
Combination wrench, 9/16 inch
Combination wrench, 7/16 inch (2 required)
Phillips #2 screwdriver
Nut driver, 3/8 inch
Hand rivet tool, also known as "pop" or "blind" rivet tool. These are available from tool
and hardware stores. Use the appropriate size nozzle for the size rivet being pulled.
Note: Riveting hand tools of the $20-35 class are the minimum that will give
satisfactory results when pulling the 5/32” rivets. For a much easier time,
we recommend the Emhart (Pop) model A475. This 2-foot long tool will
easily pull up to ¼” rivets, and costs about $125. To really make life really
easy, particularly if you will be stacking antennas, pneumatic / hydraulic
tools that run on 45 to 90 PSI air pressure are available from outlets like
Harbor Freight for about $75. All prices mentioned are approximate as of
May 2002.
Two small bullet levels
A bridle, or trolley, if using a tram line, for lifting the assembled antenna
A hoisting line, 1/2 inch or larger diameter all-braided nylon
One or more "tag" lines, 3/16 inch or so, for control of the antenna while hoisting, if
necessary
Revised 14 June 2003
2
ASSEMBLY
ELEMENTS
This antenna has been sub-assembled at the factory and then disassembled for
shipment. However, it is a good idea to check the measurements on the elements during
assembly. The important measurements are those of the exposed lengths, that is, from
the outer edge of an element component to the outer edge of the next larger one. The
centermost element pieces (the ones that include the feed point terminals) are exposed
for their entire length. Element exposed lengths can be found in APPENDIX C. The
exposed lengths also appear in APPENDIX D, PARTS LIST.
Elements are stepwise tapered by using smaller diameter, thinner-walled tubing going
from the center toward the tip. The first two joints of each half-element are bolted.
Pieces farther out are swaged (at the last several inches farthest away from the center
of the element) down to the outer diameter of the next smaller element piece.
Sometimes the amount of size reduction due to the swage is just a few hundredths of an
inch, however, the swage is visible. The tip pieces fit into the swaged and slotted ends of
the next-to-last pieces, and are continuously adjustable for coarse frequency setting.
Element pieces have been marked for re-assembly with markings on both sides of each
joint.
Note: Element naming and marking convention is as follows: Imagine that you are
standing at the front of the boom looking toward the rear of the boom.
When the beam is installed for operation (hairpins, element mounting
plates, and elements below the boom), the front half-elements will have "A"
markings to the left and "B" markings to the right. The rear half-elements
will have "C" markings to the left, and "D" markings to the right.
The left front half-element begins with A1-A1 at the center fiberglass connecting piece,
then A2-A2 at the next joint out, then A3-A3, and so on. The other half of the element
begins with B1-B1, and is marked in a similar pattern. The rear element markings are
C1 and D1 at the center.
Important Note: Be SURE to align the hand-marked legends on all joints.
Legends are hand-marked on both sides of every joint. There
are three rows of rivets, only one of which has the legends.
The row with the legend is also the only row that has the small
drain hole in line with it. All three rows will be perfectly aligned
if and only if the legends are aligned.
Note: Elements are usually assembled as half elements, then are joined at the
center prior to mounting them to the boom.
Prepare a sturdy table or bench for antenna assembly.
Unwrap black tape to release element pieces.
Revised 14 June 2003
3
Note: Tape is best removed by unwinding. This will result in a minimum of tape
residue on antenna elements. Tape residue on elements can be removed
with mineral spirits or WD-40.
JOINING PIECES:
Except for the feed point, which is joined to the fiberglass, assemble joints as follows:
1. Clean any dirt, dust, or tape residue from the outer surface of the smaller diameter
tubing to be joined. To the extent possible, also clean the inside surface of the larger
tube. Tape residue may easily be removed with WD-40 or mineral spirits on a piece
of rag or paper towel, then the residue of either of those solvents is removed with
Acetone.
2. Use the supplied Scotch-Brite pad to clean the surface of the part of the tube to be
mated. This cleaning will produce a uniform, matte finish.
3. Wipe down with Methyl Ethyl Ketone (MEK) (preferred) or Acetone. Either of these
is available from most hardware stores in pint cans. Please read and understand the
warnings on the container regarding use of these solvents.
4. Apply the supplied silicone grease, working it into the cleaned surface thoroughly.
The amount of silicone grease needed is just enough to create a film between the two
pieces of metal.
Note: The grease, which is an insulating dielectric, serves to prevent galling, to
exclude moisture from between the metal pieces at points of contact, and
to protect the electrical connection from oxidation. We recommend using
pure, heavy silicone grease for this purpose. Contact between element
pieces is between the aluminum. The grease will be forced from any
areas where contact is made. But it will remain and protect the regions
which are not in contact. Conductive materials in the grease are neither
required nor desirable. Joint compounds containing copper, such as
Penetrox B, should never be used for joining aluminum.
Note: Because freshly cleaned aluminum immediately begins to re-grow its
protective oxide coating, it is important to apply the silicone grease within
a few minutes of cleaning. For this reason, it may be necessary to clean,
grease, and fasten just one or two joints at a time.
5. After treatment, assemble the pieces by sliding them together, with a rotary motion if
necessary. Be careful not to allow any dirt or grit into the joint.
6. Carefully align the holes, hand-marked legend to legend. A tapered pin or smalldiameter punch may be useful for the initial alignment of the holes. For riveted joints,
place rivets in all holes before setting any of them. Then set them. Rivets will have
from an easy slide fit to a snug fit. Excessive play indicates the wrong size rivet.
Holes for the larger (5/32” diameter) rivets have the part number of the correct rivet
to be used marked in red on the swaged portion of the tubing. The remaining smaller
(1/8” diameter) holes all take AD-42H rivets.
Revised 14 June 2003
4
Note: The feed-point and the next 2 joints out are fastened with 1/4"-20 stainless
bolts. Be sure that the gray, slotted plastic insulator sleeves that go on the
element to either side of the feed point are installed before joining the
element halves.
Note: Rivet holes are semi-random drilled. At the factory, the joint was correctly
assembled; the first hole was drilled, a rivet installed, then the remaining
holes drilled with the joined pieces unable to move relative to each other.
Then, the one installed rivet was drilled out. This process results in holes
that are as nearly-perfectly aligned as possible. With this process, every
joint in the assembly is unique and must be reassembled with only the two
original pieces. Be certain that joints are aligned with both hand-marked
legends (e.g., A7-A7) lined up. If the holes do not match perfectly or very
nearly so, then something is wrong, and the correct parts must be identified
and used.
Note: There is an additional, much smaller hole in line with one of the three lines
of rivet holes. It is a drain to keep water from accumulating at the joint.
These drain holes must face downwards when the elements are installed
for use.
Note: The elements are joined with either stainless bolts or closed-end rivets.
The holes will be identified with red markings near them, on the end of the
larger tubing. These markings will identify the correct fastener to use.
7. Clean, apply silicone grease, match markings and holes, and rivet, as outlined above,
until both sides of each element have been assembled.
Note: If the antenna is to be painted, this is the time to paint the elements. Be
sure to mask the feed point bolt areas and to slide the element tip pieces
fully inside the next larger element tubing, so that the tip adjustments will
be paint-free. After painting, inspect drain holes to make sure that none of
them is plugged with paint. See APPENDIX F, "PAINTING
INSTRUCTIONS".
8. Fasten the two element halves together, but do not tighten the bolts at this time.
Make sure that the drain holes are all on the same side of the element when element
halves are joined.
Revised 14 June 2003
5
BOOM ASSEMBLY
Identify the 5-foot boom center piece, and place it on a table or bench for convenience.
The center piece is the only 3” diameter tubing that is swaged at both ends. Place the
boom center piece on the table with the handwritten instructions and legends facing up.
Note: For assembly purposes only, the boom is upside down with the hairpin
matching sections and the elements above the boom. When the antenna
is actually installed, the hairpin matching sections and the elements will be
hanging below the boom, and the elastic stop nuts will be on the
underside.
1. Apply silicone grease to the boom center piece swaged ends, and to the inside of the
entire length of the boom coupler sleeves.
2. Slide the 3.25” diameter external coupling sleeves onto the ends, being sure to line up
the legends, and install in each the two 4” long quarter-inch diameter bolts, using flat
washers, finish side to the tubing, and elastic stop nuts. Tighten the nuts only enough
to prevent loss at this time.
Note: Follow instructions on the coupler indicating location of the stop nuts. This
will assure that the nuts will be below the boom when the antenna is in
position for use. This is to make sure that even if a nut comes off, the bolt
will remain in the coupler, and that the elastic material in the stop nut is not
directly exposed to the sun.
3. Apply silicone grease to each boom end piece and slide it into the appropriately
marked coupling sleeve. Install the bolts loosely as above.
4. Install the boom mounting plate at this time, with the plate under the boom, and with
the nuts for the U-bolts left relatively loose. Place some soft material, for example, a
piece of scrap carpet, under the boom mounting plate. This will help control the
boom during assembly, and will allow rotation for the leveling operation to come a few
steps later.
Note: The most popular mast diameter is 2.0" O.D. The mast plate supplied as
standard with the 2D-40A is for this size mast. If necessary, a mast plate
for other mast sizes can be supplied, or the supplied plate can be drilled to
accommodate the necessary size of U-bolt for the different size mast.
Contact the factory for custom mast plates.
5. Install the phasing line as follows:
Place the dual coaxial phasing line through the boom, being careful to clear those
bolts already installed. Bolts can be removed and replaced one at a time to facilitate
installation of the phasing line. Take care not to damage the cable when replacing
the bolts.
Revised 14 June 2003
6
ATTACHING THE BOOM TO ELEMENT MOUNTING PLATES
It is now necessary to provide adequate support of nearly the entire length of the boom,
because you will be adding significant and uneven weight to the boom in the next steps.
This can be accomplished with a long table or 3 sawhorses (one for the center plate to
control rotation). The boom ends should protrude about 2 ft. beyond the ends of each
support. This same support setup can be used for final assembly.
Notice that at one edge of the plate, there is a single 3/16” hole, which can be used to
orient the plate for installation. When facing the boom, which is now inverted for
assembly, and looking from the rear end toward the front end, that small hole and the
edge that it is nearest, will be outboard, that is, nearer to you and the end of the boom,
and the hole will be 3 inches to the left of the centerline of the boom. The imaginary
centerline (in line with the boom) can also be identified by the two 1/4” diameter holes
that lie along it. The foregoing is also true for the front end of the boom, where you will
be looking from the front toward the rear.
Attach the aluminum rear element mounting plate to the boom as follows:
1. With the plate oriented as outlined above, install the U-bolts that attach the plate to
the boom. These U-bolts will be installed through their saddle pieces, and then up
through the element mounting plate, where each of the threaded legs of each U-bolt
will receive a 3/8” split-ring lock washer, then a flanged 3/8” nut. Leave the nuts at
the end of the threads at this time.
2. When all four U-bolts have been installed, turn the plate over, slide it onto the boom,
with the saddles resting on the plate, while you lift and manipulate each U-bolt to get
it over the end of the boom.
3. Once the boom tube is through the U-bolts and saddles, rotate the plate around the
boom tube so that the plate is again above the boom, align the plate’s two 1/4”
diameter holes with those in the boom, and install the two 4.5” long, 1/4” bolts, with
each bolt going first through the boom, then through the plate, where it receives a flat
washer, then an elastic stop nut. This will put the nuts down and out of the sun when
the beam is in use. Do not fully tighten the nuts at this time.
4. Now that you have gained experience using the lighter aluminum rear plate, install the
heavier stainless steel plate for the front element.
Note: The weight difference of the mounting plates exactly offsets the difference
in weight between the front and rear element. This produces an antenna
that is weight-balanced at the center of the boom. This means that the
mast attach point will also be at the center, for a wind-balanced boom, and
that the antenna is torque-balanced as well. All this makes life much, much
easier on the rotation system.
5. Mutually level the element mounting plates. This is most easily done with 2 people
and two levels. The primary reason for having the elements mutually exactly level is
appearance.
Revised 14 June 2003
7
6. With one element mounting plate held level, using a small bullet level, check level on
the other plate.
7. Twist one plate with respect to the other by grasping them and turning in opposite
directions about the long axis of the boom. Now trial-tighten the twelve quarter-inch
bolts, 4 in each of the two boom coupling sleeves, and 2 in each of the two element
mounting plates, and recheck the level.
8. When the plates are mutually leveled, or as nearly so as you can get them, finish
tightening the 1/4” diameter bolts. Do not tighten enough to distort the boom tubing
out of round. Just touching the tubing, then another half turn would be fine.
ATTACHING THE HAIRPIN ASSEMBLIES
1. Attach the hairpin assemblies with 1/2 inch clearance between the insulating blocks
(at the very end of each hairpin) and the boom-to-element mounting plate using the
stainless hose clamps provided. Red markings indicate the location of the clamp
strapping over the hairpin supports.
2. Install the copper straps to the hairpin assembly as follows:
a) Apply silicone grease to both sides of the smaller (3/16”) hole end of each copper
strap.
b) Fasten the copper straps to the welded tab at the end of each hairpin tube.
The order of hardware for the 10-24 stainless screws in the insulating block is as
follows:
1) The head of the screw is on the side of the insulating block that is closest to
the element mounting plate.
2) The screw goes through a flat washer, finish side to the plastic, except for one
screw that passes through a ring terminal, then through a flat washer, finish
side to the plastic.
3) Each screw then protrudes through the plastic block and the welded tab.
4) After the tab, there is a fender washer, copper strap, fender washer, split ring
lock washer, and a nut.
Note: The copper straps must leave the insulating block parallel to each other
and dressed straight up away from the boom. When the boom assembly is
finally rotated into operating position, with the element mounting plates and
hairpin assemblies below it, these straps will be pointing straight down.
After the elements are attached to the boom in a later step, the straps will
be bent toward the element with a gentle large radius bend to attach to the
element feed points.
3. The larger (1/4”) hole end of each will be similarly greased and captured between
fender washers on the bolts that are the feed point connections for the antenna
element. This will be done after the elements are attached to the boom in a later
step.
Revised 14 June 2003
8
Note: If the antenna is to be painted, now is the time to paint the boom.
However, if you do paint the boom at this time be sure to take steps to
mask the hairpin assemblies and connecting straps so that they do not
get painted. See APPENDIX F, “PAINTING INSTRUCTIONS”.
Revised 14 June 2003
9
FINAL ASSEMBLY
ATTACHING AND CONNECTING THE ELEMENTS
This procedure takes a space of 25 by 75 feet. This can be a driveway, rooftop, etc.
Placing the boom on a couple of sturdy tables or sawhorses will make this assembly
much easier. If absolutely necessary, it can also be done on a tower, with the boom
vertical, and the plates and hairpins facing away from the tower.
1. Turn the boom over to its operating position, with plates and hairpins below it, and
prepare to attach the elements.
2. Position the completed element so that it is centered directly under the boom to
element mounting plate. The mounting plate should be resting on the element.
3. Position the gray slotted plastic element insulating sleeves, one to each side of the
feed point bolts.
4. One at a time, place U-bolt saddles between mounting plate and gray slotted plastic
element insulators and install U-bolts around element, through the clamp saddles, and
up through the plate, using flanged nuts and lock washers. Do not tighten the U-bolt
clamps yet.
5. When all 4 U-bolts have been installed, adjust element position as follows:
a) 2-inch visible section of fiberglass connector piece between B1 and A1 tubes
should be centered on the mounting plate.
b) Adjust gray slotted plastic insulator sleeves so that they are centered under Ubolts.
c) Rotate element so that the rows of rivets aligned with the small drain holes will be
along the bottom of the element. These holes should point straight down when
the antenna is assembled and in its operating position. Note that the head of the
feedpoint connection bolt should be nearest the element mounting plate with the
bolt pointing straight down.
d) Tighten U-bolt nuts by alternating so that approximately an equal amount of U-bolt
is visible on each side. Continue to tighten until lock washer is flat and then 1/2
turn more.
ATTACHING THE PHASING LINE
The following procedure applies to both ends of the phasing line:
1. Identify the single, shorter terminated wire coming out of the dual coaxial cable
phasing line. This is the connection to the shields of the phasing lines.
2. Grease the terminal with silicone grease, then attach to the single small hole at the
outer edge of the element to boom mounting plate using 10-24 hardware as follows:
Pass the screw down through the plate. Follow below the plate with a flat washer,
the terminal, another flat washer, a split ring lock washer, and a nut.
Revised 14 June 2003
10
Note: The phasing line must be installed so that there is a 180 degree phase
reversal in the connections to the elements. The ends of the phasing line
have been color coded to facilitate making this connection correctly.
3. Identify the terminated twisted pair of the phasing line. The red coded terminal
connects to the element feed point to your left as viewed facing the antenna looking
down the boom. The uncoded terminal connects to the other side of the feed point.
Using this procedure for each element results in the red coded terminals being
connected to the opposite side of the feed point of the other element. This procedure
provides the required reversed connection between the elements. See the schematic
diagram in APPENDIX E, “OPERATIONAL NOTES”.
The stainless 1/4-20 hex-head bolt head will be between the mounting plate and the
element, with the bolt protruding downward when the element is in operating position.
If it is not, make it so now. Verify that the drain holes in the element tubing will also
be on the bottom side of the element when the antenna is in its operating position.
4. Install a flat washer, a split ring lock washer, and a nut on each bolt and tighten.
5. After the element is secured in place on the mounting plate, install the following
hardware on each bolt in the following order:
a) a fender (large diameter) washer
b) the greased copper strap from the hairpin assembly
c) another fender washer
d) the correct terminal from the phasing line, greased and flat side to the fender
washer
e) a flat washer, a split ring lock washer, and a nut.
6. Tighten the hardware for the feedpoint connection.
HAIRPIN AND ELEMENT LENGTH SETTINGS
Settings for the exposed length of the element tips and for the position of the adjustable
shorts on the tuning and matching should be made at this time. See APPENDIX E,
“OPERATIONAL NOTES”, “Tune-up Procedures for the 2D-40A” to determine the proper
dimensions to use for your intended mounting height.
This completes assembly of the antenna. Double check all joints and connections, then
prepare the antenna for raising into position.
Be particularly careful with regard to working on towers and near power lines, either of
which can and has caused injuries and fatalities. No part of the antenna or tower should
ever be in a position such that it could come into contact with a power line in the event
that it fell, slipped, etc.
Revised 14 June 2003
11
Note: Use an adequate number of people, patience, common sense, and great care.
These will get your new antenna into the sky without damage to it or to you!
If you are not experienced with installation of larger antennas, we strongly recommend
that you get some very experienced help for the first few times. Then you can help
newcomers.
Revised 14 June 2003
12
Appendix A
Specifications for 2D-40A
Description: The 2D-40A is a 2-driven-element array for the 40-meter amateur band. It
features full size elements, an internal phasing line, and an innovative integral BALUN
feed system. This beam has gain comparable to a 2-element Yagi, and a front-to-rear
ratio comparable to a 3-element Yagi.
Physical Specifications:
Materials:
Elements:
Accessories:
Size:
Element Diameter:
Element Overall length:
Element sag:
Turn Radius:
Weight:
Projected area:
Wind survival (no ice):
Electrical Specifications:
Operating Bandwidth:
For 2.6:1 VSWR:
For 2.0:1 VSWR:
For 1.4:1 VSWR:
Minimum VSWR:
Gain:
Front to rear ratio:
Takeoff angle:
Vertical Beam width:
Horizontal Beam width:
Aluminum, 6061-T6.
Aluminum, Steel, PVC, and Acrylic
Elements taper from 2.500 inches to 0.375 inches
Front, 66.2 feet
Rear, 70.2 feet
Front, 27.9 inches Rear, 30.6 inches
36 feet
163 pounds, including mounting plates and hardware
16.8 square feet
100MPH (85 Knots)
295 kHz (36% of the range is below F0 and 64% is above)
206 kHz (39% of the range is below F0 and 61% is above)
94 kHz (45% of the range is below F0 and 55% is above)
Set to 1.0:1 at F0
6.5-dBi minimum (free space), 11.9 dBi (approximately NEC2 model) when array tuned for F0 = 7.1 MHz and
mounted 70 ft (21 meters) above local earth.
20-dB minimum
26.5 degrees
33 degrees -3dB 13 and 46 degrees
74 degrees
Note: Please see APPENDIX B, ‘PATTERNS AND GRAPHS” for more
information.
Note: Cal-Av Labs, Inc. reserves the right to make and implement design
improvements without notice.
Revised 14 June 2003
A-1
Appendix B
PATTERNS AND GRAPHS
The following patterns are based on NEC-2 modeling. They do not represent measured
patterns. However, both forward gain and relative response Front to Rear (F/R ratio)
have been verified (for relatively clean sites) by antenna range field strength
measurements. Patterns actually achieved in practice will be affected by many aspects
of the actual site where the antenna is installed.
All patterns modeled over ground use 5 milliSiemens for earth conductivity and 13 for
earth dielectric constant. We believe that this represents “average” ground conditions.
The modeling program used for the electrical modeling is EZNEC V2.0 by Roy Lewellen,
W7EL. Very accurate EZNEC models for the 2D-40A are available for download from
the Cal-Av Labs, Inc. website <www.cal-av.com>.
Figure 1-B
2D-40A Azimuth Plot
(antenna in free space)
Revised 14 June 2003
B-1
Figure 2-B
2D-40A Elevation Plot
(antenna mounted 70 feet above earth)
Figure 3-B
2D-40A Azimuth Plot
(antenna mounted 70 feet above earth)
Revised 14 June 2003
B-2
The following VSWR vs frequency plot was generated by the NEC-2 model. Actual
measurements of real antennas in the field have typically reproduced the general shape
of this curve. But the measured curves have shown a somewhat wider bandwidth
between the 2:1 VSWR points. This is due to measurements being taken at the
transmitter end of fairly long pieces of coax and to coupling of the antenna to the “stuff”
in its near field region. This curve is shown here only to give some idea of the relative
difference in rate of rise in SWR for frequencies below system resonance as compared
to frequencies above system resonance.
Figure 4-B
2D-40A Modeled VSWR curve
(antenna tuned for 7.1 MHz)
Revised 14 June 2003
B-3
Appendix C
MECHANICAL DRAWINGS
409 in
(maximum boom center to element tip)
(changes with tuning)
44.5 in
52 in
66 in
42
59
15
15
19
27
50.5
(changes with tuning)
18
Individual tubing dimensions are "exposed" lengths
not including portion telescoped into next larger
sized tubing.
2D-40A Front Element Overall Dimensions (element half length)
436.5 in
(maximum boom center to element tip)
(changes with tuning)
72 in
52 in
66 in
42
59
15
19
27
50.5
(changes with tuning)
15
18
Individual tubing dimensions are "exposed" lengths
not including portion telescoped into next larger
sized tubing.
2D-40A Rear Element Overall Dimensions (element half length)
Revised 14 June 2003
C-1
Appendix D
PARTS LIST
1 assy. BOOM, consisting of:
1 assy. MOUNTING PLATE, BOOM-TO-MAST, CONSISTING OF:
1 ea. Mounting Plate, Mast, DWG. No. 020218-001-0001
4 assy. Clamp, 2", Stainless, ASSY/N MC9200SSA
1 ea. Mounting Plate, Boom, DWG. No. 020215-001-0001
4 assy. Clamp, 3", Stainless, ASSY/No. MC9300SS
4 ea. Bolt, Hex head, 3/8-16 x 1", Stainless
1 ea. Bolt, Hex head, 3/8-16 x 1.25", Stainless
5 ea. Nut, 3/8-16, Stainless
21 ea. Lock washer, split ring, 3/8", Stainless
1 ea. BOOM CENTER TUBE,
3.00" dia., 6061-T6, 0.125 wall, 60" long, DWG. No. 020219-002-0001
2 ea. BOOM END TUBE,
3.0" dia., 6061-T6, 0.125 wall, 72" long, DWG. 020221-002-0001
2 ea. SLEEVE, BOOM EXTERNAL COUPLING,
3.25" DIA., 0.125 wall, 17.875" long, DWG. No. 020221-001-0001
8 ea. Bolt, 1/4-20 by 4.00", stainless
8 ea. Nut, elastic stop, 1/4-20, stainless
8 ea. Washer, flat, AN 960C416", stainless
1 assy. PLATE, FRONT ELEMENT MOUNTING, consisting of:
1 ea. Plate, Elem. Mtg, Stainless, 0.375" thick, weight, 13.1 pounds, DWG.
No. 001015-001-0001
8 assy. Clamp, 3", Stainless, Assy No. MC9300SS
16 ea. Washer, split-ring, 3/8", Stainless
2 ea. Bolt, Hex, 1/4"-20 x 4.5" long, Stainless
2 ea. Washer, Flat, 1/4"-20, AN-960C416, Stainless
2 ea. Nut, Elastic Stop, 1/4"-20, Stainless
1 assy. PLATE, REAR ELEMENT MOUNTING, consisting of:
1 ea. Plate, Element Mtg. 6061-T6, 0.375" thick, weight, 4.75 pounds,
DWG. No. 001015-002-0001
8 assy. clamp, 3", stainless, Assy No. MC9300SS
16 ea. Washer, split-ring, 3/8", stainless
2 ea. Bolt, Hex, 1/4"-20 x 4.5" long, Stainless
2 ea. Washer, Flat, 1/4"-20, AN-960C416, Stainless
2 ea. Nut, Elastic Stop, 1/4"-20, Stainless
1 assy. FRONT HAIRPIN, consisting of:
1 assy. insulating bushing, consisting of:
1 ea. Mtg. Bracket, Insulating Bushing
1 ea. Lower bushing piece, acrylic, DWG. No. 020221-004-0001
Revised 14 June 2003
D-1
1 ea. Upper bushing piece, acrylic, DWG. No. 020221-001-0001
4 ea. Screw, 10-24 x 1", Phillips pan head
8 ea. Washer, flat, stainless, AN-960C10
4 ea. Nut, elastic stop, 10-24, stainless
1 ea. Block, Insulating, acrylic, DWG. No. 020221-003-0001
2 ea. Screw, 10-24 x 1" Stainless
2 ea. Washer, flat, AN-960C10
4 ea. Washer, flat, #10 x 0.625", .188 hole, $$, P/N 10N62FENS
2 ea. Lock washer, split-ring, #10, Stainless
2 ea. Nut, 10-24, Stainless
1 assy. Front hairpin line, welded, with 2 tubes, 0.375 dia. 50" long, with
bracket for tubes and SO-239 connector, all 6061-T6. Includes int.
BALUN
1 assy. Shorting Bar, consisting of:
1 ea. Shorting Bar Machined block, DWG.000401-000-0001
1 ea. Screw, 1/4"-20, Phillips flat head, 1 1/4 long, Stainless
1 ea. Washer, lock, split-ring, 1/4", stainless
1 ea. Nut, jam, 1/4"-20, Stainless
1 ea. Shorting Bar Disc, DWG. 000401-000-0002
1 ea. Washer, Flat, AN-960C416
1 ea. Nut, Elastic Stop, 1/4"-20, Stainless
2 ea. Clamp, hose, all stainless, 71/95 mm, UPG P/N 4150
1 assy. REAR HAIRPIN, consisting of:
1 assy. insulating bushing, consisting of:
1 ea. Mtg. Bracket, Insulating bushing
1 ea. Lower bushing piece, acrylic, DWG. No. 020221-004-0001
1 ea. Upper bushing piece, acrylic, DWG. No. 020221-001-0001
4 ea. Screw, 10-24 x 1", Phillips pan head
8 ea. Washer, flat, stainless, AN-960C-10
4 ea. Nut, elastic stop, 10-24, stainless
1 ea. Block, Insulating, acrylic, DWG. No. 020221-003-0001
2 ea. Screw, 10-24 x 1" Stainless
2 ea. Washer, flat, AN-960C-10
4 ea. Washer, flat, #10 x 0.625", .188 hole, $$, P/N 10N62FENS
2 ea. Lock washer, split-ring, #10, Stainless
2 ea. Nut, 10-24, Stainless
1 assy. Rear hairpin, welded, with 2 tubes, 0.375 dia., 50" long, with
bracket, all 6061-T6
1 assy. Shorting Bar, consisting of:
1 ea. Shorting Bar Machined block, DWG.000401-000-0001
1 ea. Screw, 1/4"-20, Phillips flat head, 1 1/4” long, Stainless
1 ea. Washer, lock, split-ring, 1/4", stainless
1 ea. Nut, jam, 1/4"-20, Stainless
1 ea. Shorting Bar Compression Disc, DWG. 000401-000-0002
Revised 14 June 2003
D-2
1 ea. Washer, Flat, AN-960C416
1 ea. Nut, Elastic Stop, 1/4"-20, Stainless
2 ea. Clamp, hose, all stainless, 71/95 mm, UPG P/N 4150
2 kit, STRAP, CONNECTING, HAIRPIN TO ELEMENT, consisting of:
2 ea. Strap, connecting, 0.625" wide, 8.5" long,
DWG. No. 020219-003-0001
8 ea. Washer, flat, #10 x 0.750", .250” hole, $$, P/N 10N75FENS
4 ea. Washer, flat, #10 x 0.625”, .188” hole, $$, P/N 10N62FENS
4 ea. Washer, lock, split ring, #10, stainless
4 ea. Nut, 10-24, stainless
ELEMENTS
1 assy. FRONT ELEMENT, consisting of:
2 ea. PVC insulator
1 ea. Center ins. coupling, Fiberglas, 2.0" dia., 14"long, machined.
DWG. No. 020219-001-0001
2 ea. Bolt, 1/4-20,3.5" long, hex head, stainless
6 ea. Washer, flat, AN-960C-416, stainless
2 ea. Washer, lock, split-ring, 1/4", stainless
2 ea. Nut, 1/4-20, stainless
2 ea. Tube Assy., 2.50" dia. 44.5"overall, all exposed, with 17.5" internal doubler,
DWG. No. 020506-001-0001
2 ea. Tube, 2.25" dia., 0.125 wall, 58.75" overall, 52.0" exposed
2 ea. Tube, 1.875" dia., 0.125 wall, 72.0" overall, 66.0" exposed
2 ea. Tube, 1.50" dia., 0.095 wall, 47" overall, 42" exposed
2 ea. Tube, 1.25" dia., 0.083 wall, 63.5" overall, 59" exposed
2 ea. Tube, 1.00" dia., 0.049 wall, 18.5" overall, 15" exposed
2 ea. Tube, 0.875" dia., 0.049 wall, 18.25" overall, 15" exposed
2 ea. Tube, 0.75" dia., 0.049 wall, 21.0" overall, 18" exposed
2 ea. Tube, 0.625" dia., 0.049 wall, 21.5" overall, 19" exposed
2 ea. Tube, 0.50" dia., 0.049 wall, 29.5" overall, 27" exposed
2 ea. Tube, 0.375" dia., 0.035 wall, 53.0" overall, adjustable
4 ea. Clamp, hose, all-stainless, 7/32 - 5/8, P/N 41915
4 ea. Bolt, 1/4-20, 3.5", stainless
4 ea. Washer, flat, AN960C-416, stainless
4 ea. Nut, elastic stop, 1/4-20, stainless
72 ea. Rivet, closed end, Emhart AD55H, 5/32" dia.
18 ea. Rivet, closed end, Emhart AD53H, 5/32" dia.
72 ea. Rivet, closed end, Emhart AD42H, 1/8" dia.
1 assy. REAR ELEMENT, consisting of:
2 ea. PVC insulator
1 ea. Center ins. coupling, Fiberglas, 2.0" dia., 14"long,
DWG. No. 020219-001-0001
2 ea. Bolt, 1/4-20,3.5" long, hex head, stainless
Revised 14 June 2003
D-3
6 ea. Washer, flat, AN-960C-416, stainless
2 ea. Washer, lock, split-ring, 1/4", stainless
2 ea. Nut, 1/4-20, stainless
2 ea. Tube Assy., 2.50" dia. 71.875" overall, all exposed, with 41" internal
doubler, DWG. No. 020506-002-0001
2 ea. Tube, 2.25" dia., 0.125 wall, 58.75" overall, 52.0" exposed
2 ea. Tube, 1.875" dia., 0.125 wall, 72.0" overall, 66.0" exposed
2 ea. Tube, 1.50" dia., 0.095 wall, 47" overall, 42" exposed
2 ea. Tube, 1.25" dia., 0.083 wall, 63.5" overall, 59" exposed
2 ea. Tube, 1.00" dia., 0.049 wall, 18.5" overall, 15" exposed
2 ea. Tube, 0.875" dia., 0.049 wall, 18.25" overall, 15" exposed
2 ea. Tube, 0.75" dia., 0.049 wall, 21.0" overall, 18" exposed
2 ea. Tube, 0.625" dia., 0.049 wall, 21.5" overall, 19" exposed
2 ea. Tube, 0.50" dia., 0.049 wall, 29.5" overall, 27" exposed
2 ea. Tube, 0.375" dia., 0.035 wall, 53.0" overall, adjustable
4 ea. Clamp, hose, all-stainless, 7/32 - 5/8, P/N 41915
4 ea. Bolt, 1/4-20, 3.5", stainless
4 ea. Washer, flat, AN960C-416, stainless
4 ea. Nut, elastic stop, 1/4-20, stainless
72 ea. Rivet, closed end, Emhart AD55H, 5/32" dia.
18 ea. Rivet, closed end, Emhart AD53H, 5/32" dia.
72 ea. Rivet, closed end, Emhart AD42H, 1/8" dia.
1 assy. PHASING LINE, consisting of:
1 ea. PHASING LINE ASSY., dual coaxial cable, 225" long,
DWG. No. 020301-001-0001
2 ea. Screw, 10-24, 1" long, Phillips pan head, stainless
6 ea. Washer, flat, AN960-10, stainless
2 ea. Washer, lock, split-ring, #10, stainless
2 ea. Nut, hex, 10-24, stainless
Revised 14 June 2003
D-4
Appendix E
OPERATIONAL NOTES
Feed System Description for the N7CL Array
The N7CL version of the two element driven array has been described incorrectly as
being essentially an HB9CV antenna. While the N7CL driven array antenna is definitely in
the same class of antenna as the HB9CV (also confused with the ZL-Special), the N7CL
Array is not technically very similar to either of the above versions of the two element
driven array. The primary differences are in the element lengths, element spacing, and
the method of feeding and controlling the magnitude and phase of the current in the
elements.
The HB9CV and the ZL-Special are typically fed and phased with high impedance open
wire transmission line with a velocity factor in the high ninety percent range. Matching for
the ZL-Special is by means of a shorted stub located some distance towards the
generator from the antenna’s feedpoint. “T” matches at each element are used in the
HB9CV design. Element spacing for the original HB9CV is 0.125 wavelengths.
The Cal-Av LABS 2D series antennas incorporating the N7CL feed system have been
issued U.S. Patent No. 6,411,264. This feed combines element stagger, shorted feedline
stubs, and coax fed inside one arm of shorted open-wire transmission line stub to
produce a feed system with the following characteristics:
1. Physical spacing of the elements significantly less than 0.125 wavelengths for
increased forward gain and, conveniently, a more compact boom. The actual spacing
used in the N7CL arrays produced by Cal-Av Labs, Inc. is 0.11 wavelengths. So the
array is more properly characterized as a “close-spaced” driven array.
2. The feed system uses phasing line with a velocity factor in the 0.66 range. This
permits the use of common coax to form the bulk of the phasing line. This allows the
phasing lines to be placed inside a metallic boom.
3. The feed system permits setting the accuracy of the match to 50 ohm feedline and
the array operating frequency independently using two separate adjustable “hairpin”
shunt inductors.
4. These hairpin inductors are adjusted by sliding shorts. The arrangement of the
hairpins on the boom brings the matching and tuning adjustments inboard towards the
mast. This makes the adjustments reachable from a position on the antenna support
tower. Thus final adjustments to the antenna can be easily made with the antenna in
place on the tower while the antenna is mounted at its intended operating height
above earth.
5. The array dimensions and feed system are configured so that the pattern optimization
is coincident with system resonance and match to 50 ohms. When adjustment is
made to the tuning hairpin to compensate the array for its mounted height, site clutter,
etc., the good pattern characteristics of the array are maintained.
Revised 14 June 2003
E-1
6. The design of the feed system rigidly enforces precise electrostatic balance for the
array. Balance is maintained with regard both to the feedline connection and to the
connection to the tower. This makes the antenna much quieter on receive and
eliminates the need for a separate BALUN or coil of coax in the feedline to the
transmitter. This balancing and matching scheme can handle virtually unlimited
amounts of power (in amateur radio terms) without any non-linear effects or failure
due to heating. It will “loaf” along at 5 kW CCS even on a full-carrier mode such as
radio teletype.
7. The feed system connects the elements to local RF ground (the support boom) for
low frequencies and DC. This feature permits the array to drain off static charges,
survive lightning hits, and provide useful non-radiative top loading of the tower
structure if required.
8. The feed system provides a high quality DC short across the feedpoint at the antenna
end of the feedline.
A schematic representation of the N7CL feed system for the two element driven array is
shown in Figure 1-E.
Rear (longer) Element
Shorted open wire transmission
line used as hairpin inductor
Front (shorter) Element
RF "neutral" points
(all occurrences)
ground to element
support boom
100 ohm balanced phasing
line formed from two equal
lengths of 50 ohm coax
Movable short permits easy
adjustment of stub reactance
Figure 1-E
Revised 14 June 2003
E-2
50 ohm coax inside one arm
of hairpin forces balanced
antenna feedpoint to
unbalanced coax feedline
transformation
Unbalanced
50 ohm
feedline
connection
point
Movable short permits easy
adjustment of stub reactance
for perfect match to 50 ohm
feedline to transmitter
Tune-up Instructions for the Cal-Av Labs, Inc. Model 2D-40A Antenna
This manual contains tabular data on the tuning and matching stub shorting strap
positions and element lengths for an antenna mounted at the minimum recommended
height of 1/2 wavelength above local earth and additional data for antennas mounted at
one wavelength. However, the local environment (ground constants, vegetation, site
clutter, etc.) makes it impossible to predict exactly what you will find when you raise the
antenna at your site. So you may need to make some minor adjustments "in place".
NOTE: The shorting strap on the transmission line stub attached to the front
(shorter) element adjusts the array match to 50 ohms. This is the same
assembly to which the coax feedline from the transceiver is attached.
The operating frequency of the array is adjusted primarily by adjusting the lengths of the
elements. The element length is adjusted by changing the exposed length of the
outermost "tip" sections. When changing the array operating frequency, all four
element tips should be adjusted by exactly the same amount. A reasonable “sanity
check” is to verify that all four tips are exactly equal length before raising the antenna.
Wherever referred to in this appendix, "element" lengths in inches are actually halflengths. That is, the "element length" dimension refers to the distance from the end of
the outside "tip" section of the element to the center of the boom (or half way across the
2-inch gap at the element feedpoint). "Tip" lengths refer to the exposed portion of the
outermost 3/8-inch diameter element tube. “Tip” lengths will be given for settings and
adjustments.
The tuning stub on the rear element sets the array reactance so that the pattern is
optimized at the same frequency where the antenna feedpoint impedance is exactly 50
ohms. It should normally be set at the recommended length and not adjusted further.
However, if the array resonant frequency must be moved slightly, and the element tips
cannot be reached for adjustment, the rear stub may be adjusted to move the array
resonant frequency a small amount (approximately 70 kHz) without significantly
degrading the pattern F/R characteristics.
Operating the antenna at a height above ground that is significantly different than 1/2
wavelength may necessitate an adjustment to the rear tuning stub to restore the
antenna's excellent front to back ratio. Careful modeling of the proposed installation and
consultation with the factory is recommended before proceeding with such an installation.
A very accurate EZNEC (NEC2) model of the antenna is available for download from the
Cal-Av Labs, Inc. web site <www.cal-av.com>.
Revised 14 June 2003
E-3
Antenna Settings for 2D-40A Mounted at 70 feet
(one half wavelength)
Frequency
(MHz)
Delta
(inches)
Tip Length
(inches)
6.962
0
50.5
7.030
-5
45.5
7.099
-10
40.5
7.170
-15
35.5
7.241
-20
30.5
7.313
-25
25.5
Figure 2-E Tip Lengths vs Frequency (70 feet)
If the antenna is to be installed at this recommended minimum height of approximately
1/2 wavelength, the sliding shorts used to adjust tuning and matching for the array should
be preset as follows:
The tuning (rear) shorting bar should be set to a distance of 22 inches back from the
element end of the parallel line on which the shorting bar slides. Note that this distance
is to the center of the shorting bar and does not include the length of the straps that
connect the parallel tuning line to the element.
The matching (front) shorting bar should be set to a distance of 41.5 inches back from
the element end of the parallel line on which the shorting bar slides. Note that this
distance is to the center of the shorting bar and does not include the length of the straps
that connect the parallel tuning line to the element.
All of the above settings apply only to an antenna which has fixed element half-lengths
(center of boom to end of element without the tip section installed) of 358.5 inches for
the front element and 386 inches for the rear element. Some prototype and early
production antennas were produced with element dimensions that differ from those
shown above. If your antenna's element half-lengths not including the adjustable tip
section differ from these values, please consult the factory.
We recommend that you use the element tip length settings shown in figure 2-E and the
hairpin settings shown above as a starting point. Once the antenna is installed, you
should find that when set to the factory recommended settings the array SWR
approaches 1 to 1 at some frequency very near the one for which you set the element
length. Since the performance of the array doesn't change significantly over the entire
2:1 SWR range (and somewhat beyond 2:1 on the high frequency side), the exact
location of the minimum point may not cause you to wish to take the effort move it.
Revised 14 June 2003
E-4
However, if you wish to achieve perfection at some particular frequency, here is the
procedure to completely optimize the antenna for operation on a particular frequency:
1. If the minimum SWR is low enough to make you happy, proceed to step 6 below. If
not, then adjust the matching (front) stub for minimum SWR as indicated in the
subsequent steps.
2. First, find the frequency of minimum SWR (don't worry about the frequency where
this occurs yet).
3. Then, adjust the shorting strap location on the matching (front) stub to minimize the
SWR at that frequency.
4. Find the new frequency where the minimum SWR occurs (this should NOT be far
removed from the original minimum SWR frequency).
5. Repeat steps 2 and 3 above until you have the array minimum SWR set to 1.0 to 1 at
some frequency. Further adjustment of the matching (front) stub will not be
necessary.
6. If you can arrange to reach the element tips for adjustment, then adjust the element
lengths (all four tips by the same amount) to bring the minimum SWR point to the
desired frequency. The 2D-40A antenna will move about 14 kHz per inch of element
tip length change. As you might expect, the resonant frequency of the array will rise
with shortening element lengths.
7. If you absolutely cannot arrange to reach the element tips for adjustment (and the
required frequency excursion is less than one percent), then move the shorting bar on
the rear tuning stub to bring the antenna resonant frequency to the desired point.
However, if the frequency change is larger than one percent, please consider
resetting the element lengths if at all possible. The 2D-40A antenna will move its
resonant frequency by approximately 6 kHz per inch of tuning (rear) stub length
change. Shortening the stub raises the resonant frequency.
NOTE: Pattern degradation due to moving the tuning (rear) stub length away
from the recommended setting is not symmetrical. Lowering the
antenna’s resonant frequency by changing the tuning (rear) stub length
will degrade the front to rear performance much more significantly than
raising the resonant frequency will. If the constraints of the installation
will prohibit adjustment of the element tip lengths for tuning, it is better to
err on the low side when selecting the target frequency during antenna
assembly.
Revised 14 June 2003
E-5
Antenna Settings for 2D-40A Mounted at 140 feet
(one full wavelength)
Frequency
(MHz)
Delta
(inches)
Tip Length
(inches)
6.948
0
50.5
7.015
-5
45.5
7.084
-10
40.5
7.154
-15
35.5
7.224
-20
30.5
7.296
-25
25.5
Fig 3-E Tip Lengths vs Frequency (140 Feet)
If the antenna is to be installed at this height (approximately one wavelength), the sliding
shorts used to adjust tuning and matching for the array should be preset as follows:
The tuning (rear) shorting bar should be set to a distance of 25.3 inches back from the
element end of the parallel line on which the shorting bar slides. Note that this distance
is to the center of the shorting bar and does not include the length of the straps that
connect the parallel tuning line to the element.
The matching (front) shorting bar should be set to a distance of 39.75 inches back from
the element end of the parallel line on which the shorting bar slides. Note that this
distance is to the center of the shorting bar and does not include the length of the straps
that connect the parallel tuning line to the element.
All of the above adjustments apply only to an antenna which has element half-lengths
(center of boom to end of element without the tip installed) of 358.5 inches for the
front element and 386 inches for the rear element. If your antenna's element half-lengths
not including the adjustable tip section differ from these values, please consult the
factory.
The tune-up procedure to use for an antenna mounted at 140 feet is exactly the same as
shown above for 70 feet. But the starting settings for the tuning shorts and the element
lengths for a particular frequency should be taken from Figure 3-E rather than from
Figure 2-E.
Revised 14 June 2003
E-6
Appendix F
PAINTING INSTRUCTIONS
GENERAL:
Should you paint your antenna? We think so, but it's your decision. Here are the facts:
OPERATIONAL EFFECTS:
Nil; a thin dielectric coating (paint) between the metal and the air does cause changes,
but they would be very difficult to measure for antennas of this size. A slight reduction in
precipitation static may be noticed.
ADVANTAGES:
There are two primary advantages to painting an antenna:
First, its visual impact is mitigated, because the recommended paint is flat, eliminating
the "glint" associated with aluminum, even so called low-glare treatments. Further, the
recommended paint is very close to the color and gray-scale of power company polemounted transformers and modern insulators; this results in it not being too dark against
a light sky, nor too light against a dark sky.
Second, the antenna is protected from weathering, particularly if its surrounding area is
subject to contaminants that would attack aluminum (ocean air, acid rain, etc.).
Other advantages include: cleaner handling (bare aluminum can be really dirty stuff),
protection and easy-to-disassemble locking of mounting hardware, protection of cables,
BALUNs, etc. from the effects of sunlight, and as mentioned above, some reduction of
static from raindrops.
DISADVANTAGES:
Labor and cost of painting materials
MATERIALS REQUIRED:
1. "Scotch-Brite" pad, general-purpose hand pad, maroon. Available from auto painting
and abrasives companies and larger hardware stores
2. Clean soft rags or paper towels
3. Acetone or Methyl-Ethyl-Ketone (MEK) (latter recommended)
4. Light Gray Primer, Rust-Oleum No. 2081, available at Home Depot, large hardware
stores, and some paint stores. There are no recommended substitutes at this time.
BACKGROUND:
1. This primer is light gray, a color that is being used more and more for power-pole
insulators, transformers, etc., for looking less obtrusive against an average sky.
2. Read instructions on paint can thoroughly; disregard the part about surface
preparation, which was written for steel automotive bodies. This particular primer
Revised 14 June 2003
F-1
has some very nice attributes. Among them are that it can easily be removed with
acetone, even after it is dry, and that it is very easy to touch up, while wet, after it's
dry, or days later. It will oxidize a bit after years in the sun; even then, it can be
cleaned with an MEK-dampened rag, just enough to remove dirt and some of the
oxidized paint, and then repainted. We recommend two coats, at least 15 minutes
time between coats.
NOTE: If the background for the antenna will be land or foliage, we recommend “Krylon
Olive Drab Camouflage Paint”, number 8143, over the primer.
SURFACE PREPARATION:
1. In this case, the surfaces to be painted are new plated steel hardware, stainless
steel, and aluminum plate and tubing.
2. The hardware can just be wiped down with MEK and allowed to dry before painting.
3. The aluminum plates should be cleaned with Scotch-Brite to a dull, uniform finish, then
washed with MEK until no more aluminum residue shows on the cleaning towel. Then
hang the plate using a piece of wire and paint it.
4. The elements are prepared for painting after assembly. A complete element may be
prepared for painting and then painted before attachment to the boom. Balance it on
a stepladder step so that it is about chest high. Wipe the element down with a rag
dampened with MEK. Be sure to remove any silicone grease residue. Be careful not
to let the MEK drain into the joints. Clean the exposed surfaces of the entire element
using a Scotch-Brite pad. Clean to produce a uniform, matte finish. Then wipe down
with MEK until no more aluminum residue shows on the cleaning towel.
5. The boom and all its parts, including brackets and matching lines, are cleaned in the
same manner as the elements. Mask the feed point connector and the matching lines.
No paint should touch the metal where the sliding short will be used for adjustments.
PAINTING:
1. Follow the instructions (other than for surface preparation) on the can. Be sure to
use several even, light sprays, close enough to produce a wet (shiny) coat, but not so
thick that it runs. Touch-up can be at any time. A second coat is recommended at
least 15 minutes after the first.
2. For elements, a good approach is to spray one side, then the other. When dry
enough to handle, rotate the element 90 degrees and spray each side in the new
position (what were the top and the bottom).
3. Paint the boom in a manner similar to the elements, however, mask off any
connections that will be made after the elements are attached, as well as the feed
point connector and the tuning stub tubes.
Revised 14 June 2003
F-2